Results 41 to 60 of 108
-
08-17-2010 #41

 Registered User
- Join Date
- May 2010
- Location
- Chattanooga, TN
- Posts
- 137
 Due to the "wasp waist's" contour there is no way to mount side exhaust and they look like they belong on car. Next problem is stock side exhaust do not flow well and a big drag on making power.
 Originally Posted by Ripped

Even the best aftermarket ones like that Black Coupe has aren't much better. Another thing with side exhaust is they are in your ear loud. Drive one for 6-8 Hours and you've had your fill of them and wish you had out the back exhaust.
Have to say those 4 big Billy Boat NPP Fusion's 4.0" outside dia cans take getting use too. 3.5" would look better.
Shop hated them at first an I almost backed out on using them too. Like I said, they grown on you, and now there is no way the Shop would let me remove them.
They are part of modern look borrowed from C6/Z06 just as the front fender vent design is. Most everybody does Classic. We're trying to Modernized a Classic design in hopes it looks like it could have been one of GM design departsment's Sting Ray Concept cars.
I'm even trying to tastfully mount a "CUP HOLDER" in it to modernize interior somewhat...LOL
-
08-17-2010 #42
 Registered User
- Join Date
- May 2009
- Posts
- 379
LOL Originally Posted by Poorhousenext
yeah, my engine builder has a BB (427) C2 with sidepipes. He has versed me on the loudness, that he has to deal with. H may even copy the resonator design that I am using.
Yeah probably 3.5's might look better. It does hint at the evil residing under the hood and in the upgrades.
2 thumbs up on the 'glass work.
I just blocked the high build on my f/g hood, (1 1/2 -2 years in primer) last week, and noticed the heat from the engine had 'imaged' the supporting structure on the surface of the hood. It (luckily) blocked out without breaking through the high build.
I cannot imagine doing a whole 'glass car... yikes
-
08-31-2010 #43
Registered User
- Join Date
- May 2010
- Location
- Chattanooga, TN
- Posts
- 137
Little update on progress of the 64. Shop has been sloging through the wiring on car. They were doing ok on rear and front harnesses. Custom engine harness only problem was with cam sensor wiring. Had to get a pigtail harness from GM so we could plug it up.
The transmission controller harness has been a nightmare. The wiring documentation left a lot to be desired. Mfg 'sTech support was ok, that is once you got past their very defensive aditude.
Lack of wire diagrams, are just instructions telling you, that you only use that wire if installing it on non elcetronic car, but you do use the other two wires in bunnel. Are you have two wires in a bunnel and they tell you to hook this wire to that output, but don't give you a clue as to what to do with the other wire in bunnel if anyting. Think we got most of it figured out last Friday, so shop could start hooking everthing up.
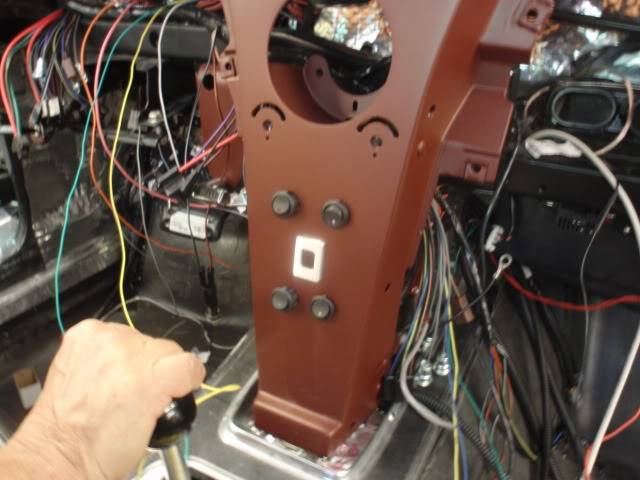
Here are a few pictures of the dash panel that has been modifyed from it's original design to clean up looks by glassing in radio speaker grill and removed stock radio hole so we could use space behind it for 3 control boxes, and face of it for 4 rocker switches, 3 that support transmission functions, and 4th one that opens and closes the NPP exhaust Valve. Also decided to move transmission gear indicator from console to dash panel.
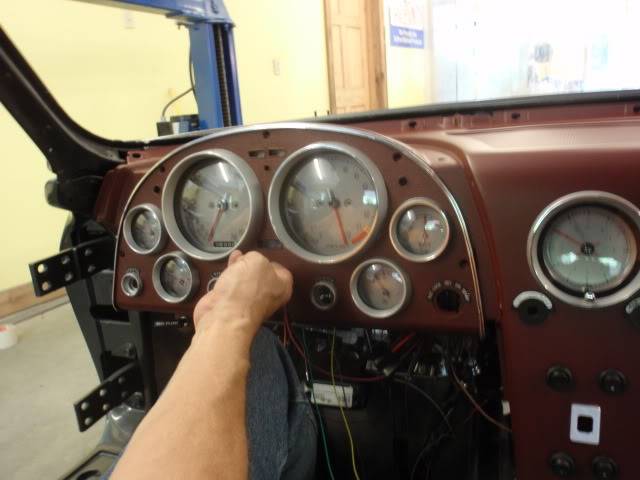
Stock gage cluster and glove box have been painted interior color rather than stock black use on midyear vettes, except for a few concept and corporate exce cars.
Stock gages have been sliver faced and speedo has been re-screened to show top speed of 200 MPH. Tach has been converted to electronic too.
Because of equipment install behind dash, we decided it was best to make it as easy as possible to remove rather than have to drill out fastners to remove it. It will no longer be riveted in as orignal.
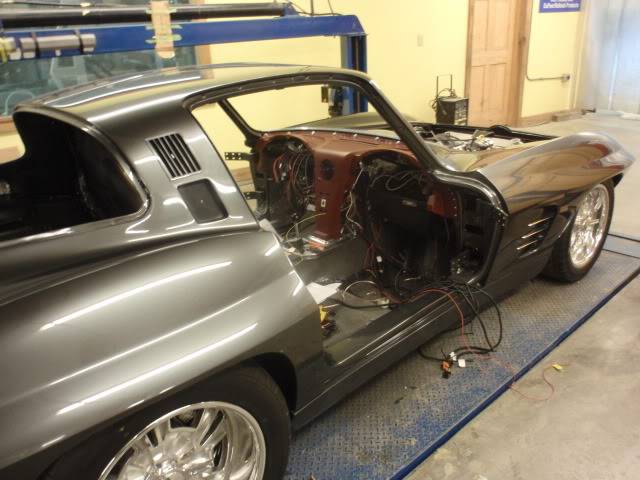
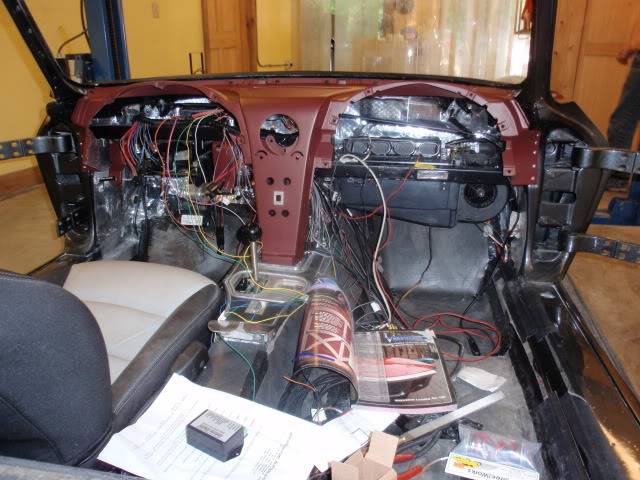
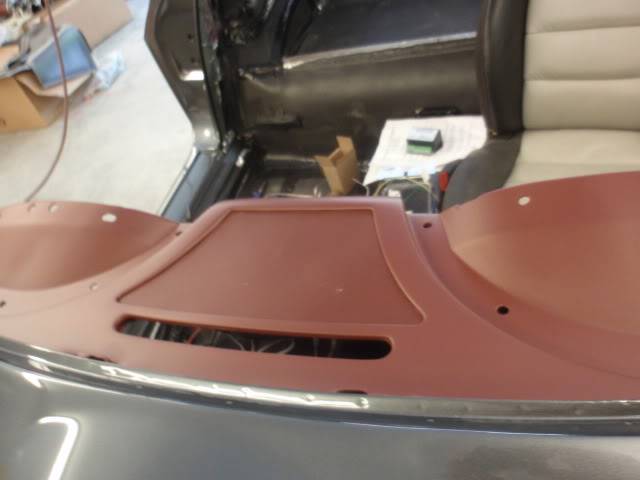
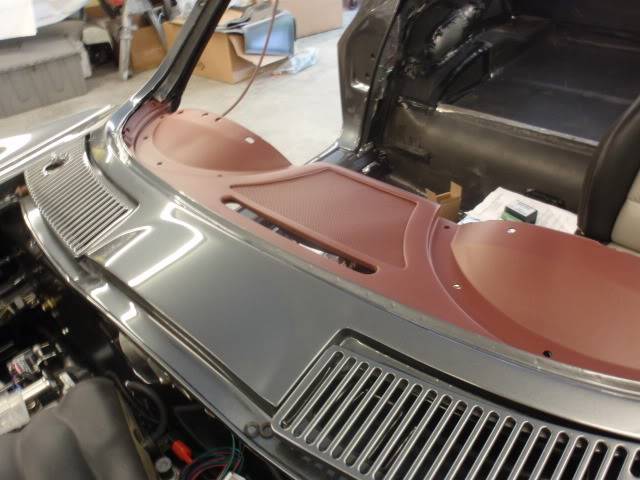
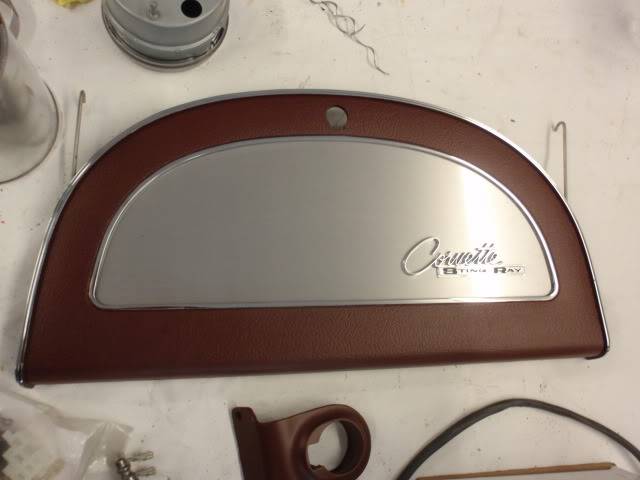
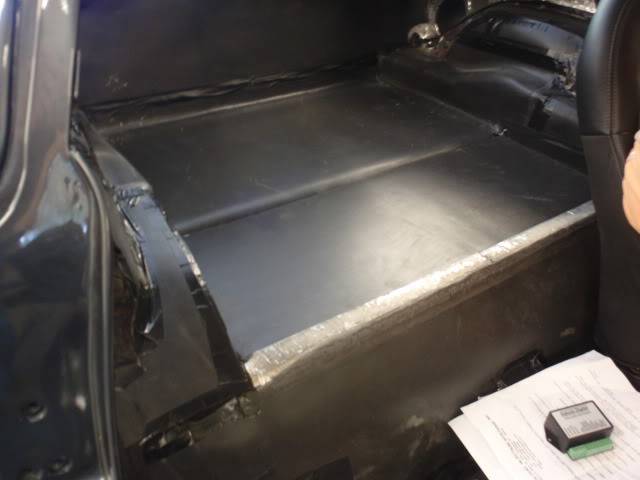
The mod to add more closed storage and flat storage behind seats has been completed.
-
08-31-2010 #44
 Registered User
- Join Date
- Dec 2009
- Location
- Carson City, NV
- Posts
- 861
 wow, that's is a wicked looking Vette. I'm jealous...
-
08-31-2010 #45
 Registered User
- Join Date
- Mar 2009
- Location
- San Antonio, TX
- Posts
- 1,635
Wow, that is going to be absolutely stunning! I'd love to see more pics of that paint, once it makes it out to the sun..

-
10-26-2010 #46
Registered User
- Join Date
- May 2010
- Location
- Chattanooga, TN
- Posts
- 137
Things have been going slowly for the last couple of months.
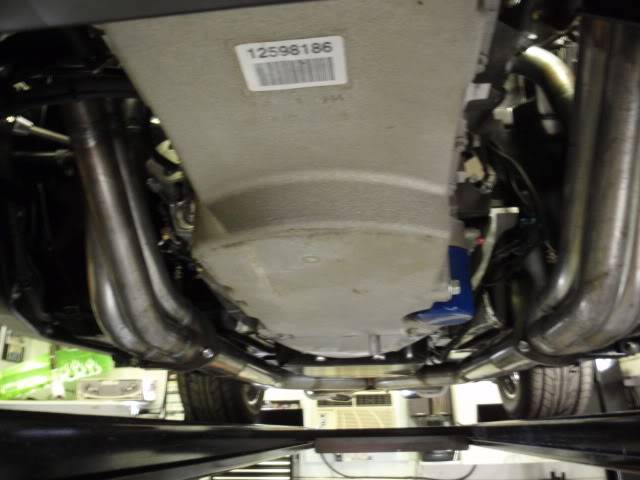
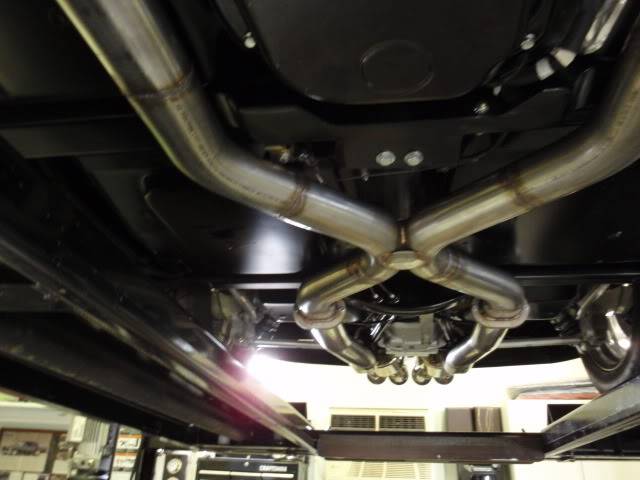
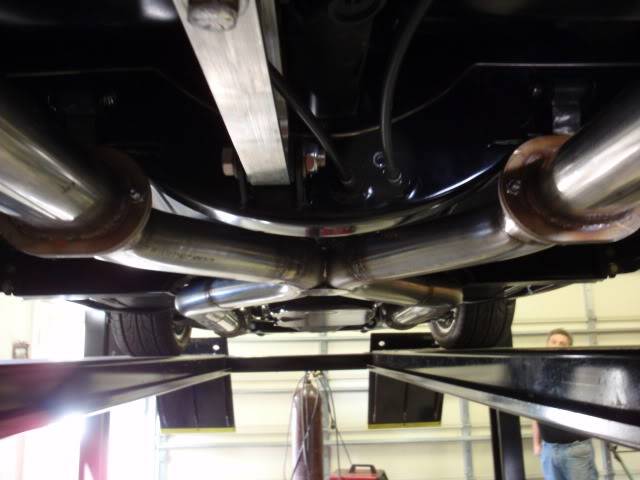
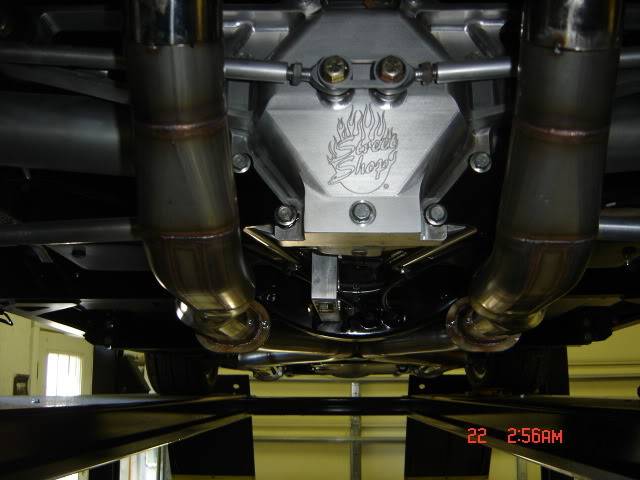
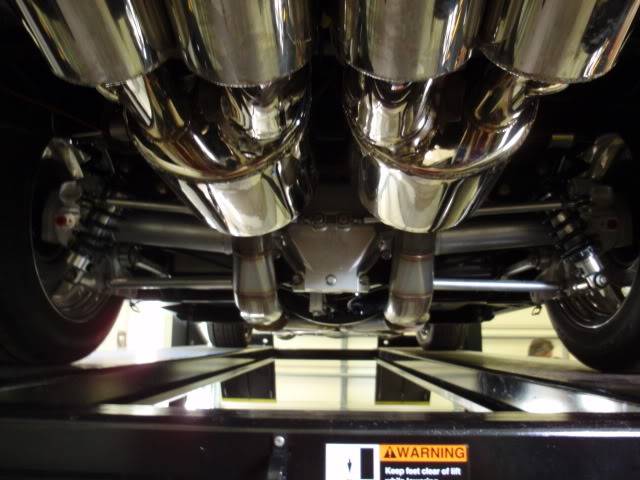
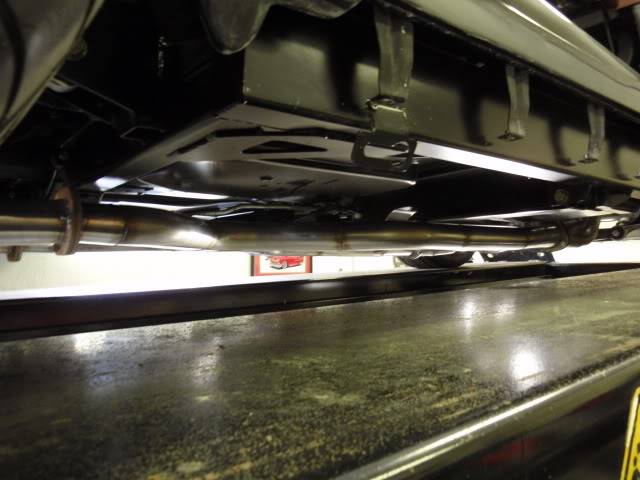
Finally got the car over to Craig's Hotrods in Knoxville to have him do exhaust. We had to move emergency cable bell crank up along with cables where they go thru the frame at rear axle so we could get the 3.0' oval exhaust pipe use to provide 3/4" more ground clearance tucked as tight as possible to floor pan.
To get a more ground clearance where exhaust goes under firewall require reworking header to fit 3.0" round to oval transition so that the 3.0 oval (2 1/4" tall) was tight to floor pan from firewall back.
The mufflers are Billy Boat NNP Fusions that a gentleman on another Forum sold to me at a bargain price that included shipping are they wouldn't be on car.
The NPP feature is controlled by after market electronic unit made by Sunset Orange Creations that allows me to open the open/close valve to bypass the muffler an go straight through, rather than use factory rpm controlled GM vacuum unit. I will be able to control bypass valve from inside the car with one of the 4 rocker switches on the dash are from outside the car with a RF switched key fob at any rpm from idle up.
-
10-27-2010 #47
 Registered User
- Join Date
- Apr 2007
- Location
- Utah
- Posts
- 533
This is turning out to be one gorgeous Vette. Great job.
Sam
Northern UT.
'68 Camaro "Bodacious"
'56 210 2dr "Buckshot"
-
10-27-2010 #48
 Registered User
- Join Date
- May 2005
- Location
- Miami
- Posts
- 2,218
great color combo...
1955 Chevy 150
http://imageshack.com/a/img911/7169/QLWsvk.jpg
1968 Camaro
http://imageshack.com/a/img901/7223/twfpl9.jpg
1956 Chevy 210
http://imageshack.com/a/img834/6076/8azy5.jpg
___________
Jeff
-
10-27-2010 #49
 Registered User
- Join Date
- Nov 2006
- Location
- Ma.
- Posts
- 5,560
I love this car it looks beautiful. Awesome work !
Wayne
Car FINALLY home !!!!!! lol
Project FNQUIK https://www.pro-touring.com/showthre...ghlight=FNQUIK
-
10-27-2010 #50
 Registered User
- Join Date
- Jul 2010
- Location
- OREGON
- Posts
- 364
Looks good cant wait to see some overall pics of the car.
-
10-27-2010 #51
 Registered User
- Join Date
- Feb 2010
- Location
- Central NJ
- Posts
- 791
I love that color combo! very classy! keep up the great work!
My 1973 Chevelle "Bad Buzz" build: https://www.pro-touring.com/showthre...velle-PT-Build
-
10-29-2010 #52
 Registered User
- Join Date
- Feb 2005
- Location
- Sydney, Australia
- Posts
- 1,797

Man...thats one awesome car...love that body style and all you've done just makes it look even better. Love the exhaust!
Regards,
Leigh
Sydney, Australia
1971 Firebird 455
https://www.pro-touring.com/showthre...Project/page27
-
10-29-2010 #53
 Registered User
- Join Date
- Jan 2008
- Location
- Charlotte
- Posts
- 1,295
Nice updates - that exhaust works looks bad ass!
I didn't know you where in TN - you should checkout the Run Thru the Hills event in September if you haven't been to it, its in Pigeon Forge, TN.
Also - you should checkout the Hot Rod Power Tour - they announced the events for next years event, and they will be stopping at LPG Field in Nashville next year!
I love the NPP 3" Z06 exhaust on my C6 - I have the mild2wild kit on it - and its real nice quieting it down on a 2k mile road trip.2005 LeMans Blue Corvette w/ T56 & Z51 & C6Z06 Brakes, Build Thread: https://www.pro-touring.com/showthread.php?64496
2005 GMC Sierra 2500HD LLY / Allison
2014 Chevy SS LS3 / 4 Door
-
12-15-2010 #54
Registered User
- Join Date
- May 2010
- Location
- Chattanooga, TN
- Posts
- 137
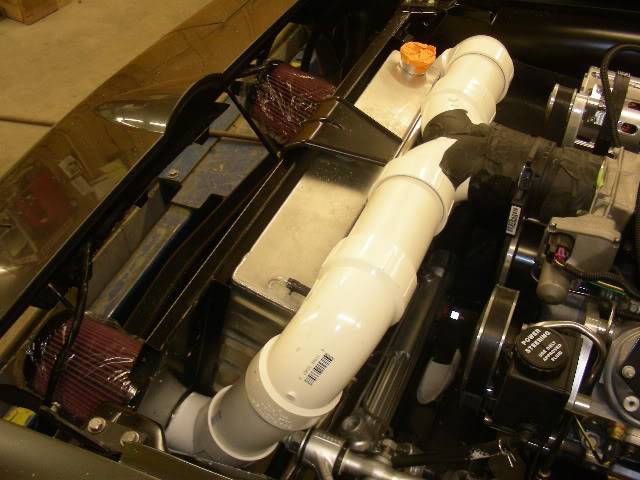
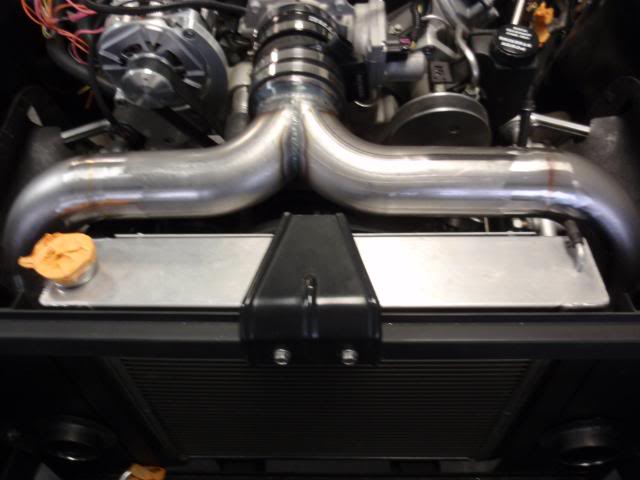
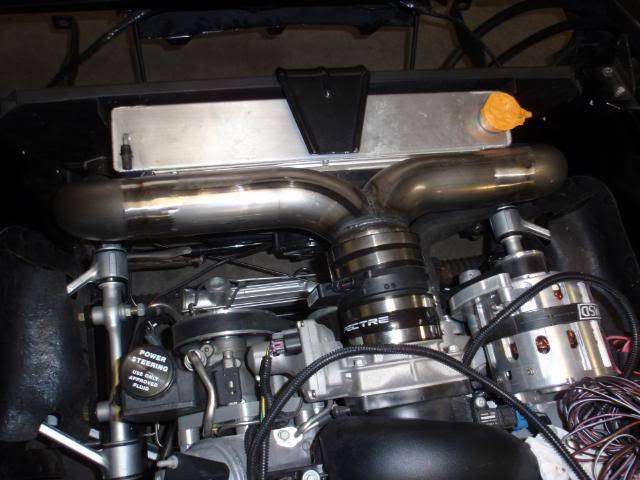
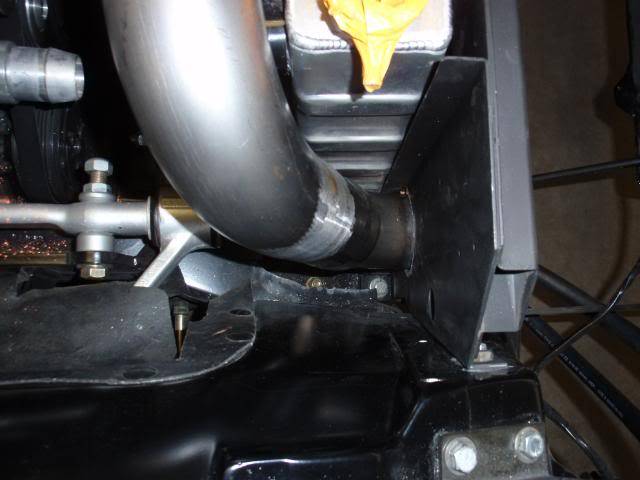
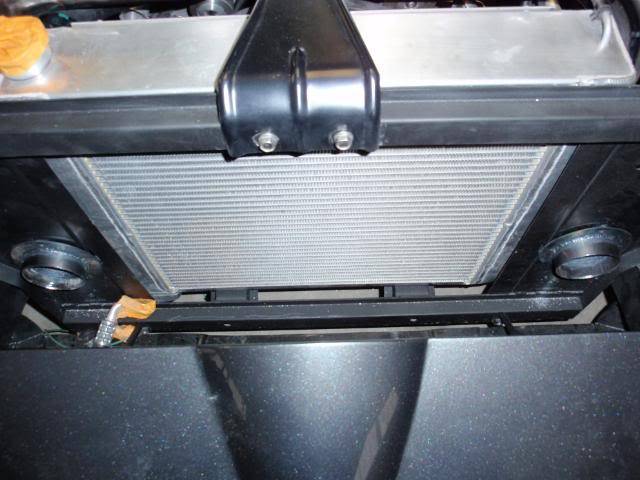
Been killing time again. This time to try and supply Fresh air to engine. This was one thing I really wanted to do.
First thing I had to do was find a filter that would flow at least 600 CFM thru a 3.0" dia pipe. Since Filter Manufactures decided not to list CFM air flow of filters on their website, it was like pulling teeth to get CFM of filter out of them. Not a big fan of K&N, but finally got help trying to idenify ones that could flow min of 600 CFM and then see if any would fit.
To see if the one that flowed the most CFM would fit, we made a simple cardboard mock-up of it to see if there was space to fit it and clear the headlight buckets when they were rotated to open.
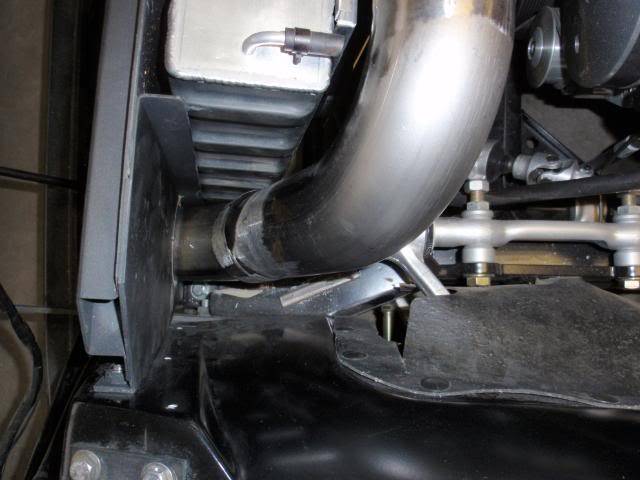
Next we made a trip to Lowes and picked up some elbows and straight 3.0" PVC pieces to see if there was space to fit the piping. There is a problem if using PCV because it's wall is a lot thicker than metal tubing with same 3.0" ID and bends have a larger radius. That caused us to do some unneeded trimming to fit it, Vs what we were able to do with metal tubing with tight U-Bends on end product.
My hope is that I get an added benefit of two 3.0" tubes Vs one 4.0" dia tube, being that neither filter will ever have air being pulled through it at it's max CFM the engine needs. I'm hoping this helps with both air filtration and not pulling a lot of moisture in when driving in rain. To help keep moisture out, I also have K&N Dryfilter covers used on personal water craft air filters to cover them to help keep water out of engine.
If I did not have breakaway hood hinges that allow quick removal and reinstallation of hood, I would not have persued this as Hood has to be removed to service the filters.
-
12-15-2010 #55
Registered User
- Join Date
- Nov 2006
- Location
- Ma.
- Posts
- 5,560
Nice progress.
Wayne
Car FINALLY home !!!!!! lol
Project FNQUIK https://www.pro-touring.com/showthre...ghlight=FNQUIK
-
12-15-2010 #56
Registered User
- Join Date
- Jan 2008
- Location
- Charlotte
- Posts
- 1,295
Cool update!
2005 LeMans Blue Corvette w/ T56 & Z51 & C6Z06 Brakes, Build Thread: https://www.pro-touring.com/showthread.php?64496
2005 GMC Sierra 2500HD LLY / Allison
2014 Chevy SS LS3 / 4 Door
-
05-27-2011 #57
Registered User
- Join Date
- May 2010
- Location
- Chattanooga, TN
- Posts
- 137
Been awhile since I had anything to update on car due to a problem we ran into that require car to be removed form frame to fiX. That's taken longer than expected too.
While waiting, decided it was time to figure out what to do about either going with GM LS Engine covers, to cover the stock valve covers with coils on top, or replacing stock valve covers with taller ones that require coils to be relocated.
GM covers left a lot to be desired, as my alternator is mounted on opposite side, so that left corner of drivers side valve cover and coil exposed. Also that's what most use.
I looked at relocating coils and using aftermarket taller valve covers. But just so tired of trying to hide things, so as usual for me in trying to make car different from the crowd, I decide on a set of valve covers from Katech Performance and use their coil mounting system rather than hide them. Their mounting system just moves coil off valve covers and put them above them.
With anything other than engine covers, I still needed to deal with exposed fuel rails and injector wiring that needed to be hidden from sight. My decision to go with the Katech valve covers made the coils a focus point on engine instead of hiding them. Some may like that, some may not, but it's different from what you most often see with LS engine installs.
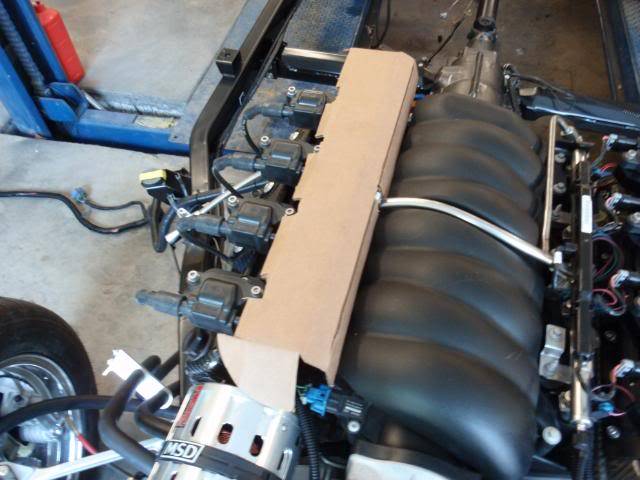
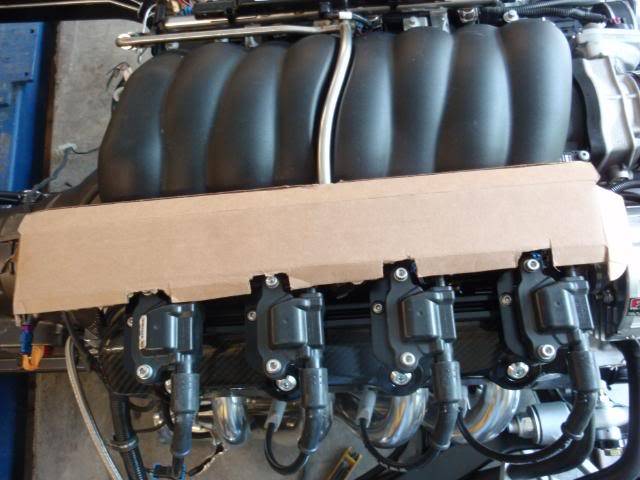
I actually started out trying to cover the coils, but that hid the valve covers, so decided to leave them exposed, and just make a set of fuel rail covers instead of engine covers to hide injector and coil wiring.
To see what I was dealing with, I started out with a big piece of cardboard and whittled it down to come up with base coverage size needed. Next had to convey my idea to shop of what I was looking for. That lead to shop's idea to trim and fit an old valve cover area so we had a hard surface to work with. Using valve covers, cardboard and masking tape we came up with a base mold we could layup a part we could work with using bondo to shape it, and then make a mold to make final parts off of.
Worked out that we only needed one mold to make left and right hand parts, even after shop added in the contours around and in between the coils, so they did not look straight and plain. Parts are same except for tab on right hand one use to cover MAP sensor wiring plug.
To me at least, it looks like something GM might have done on a Concept Car.
Started with this as base.
Next came using the old valve as hard surface to tie things together.
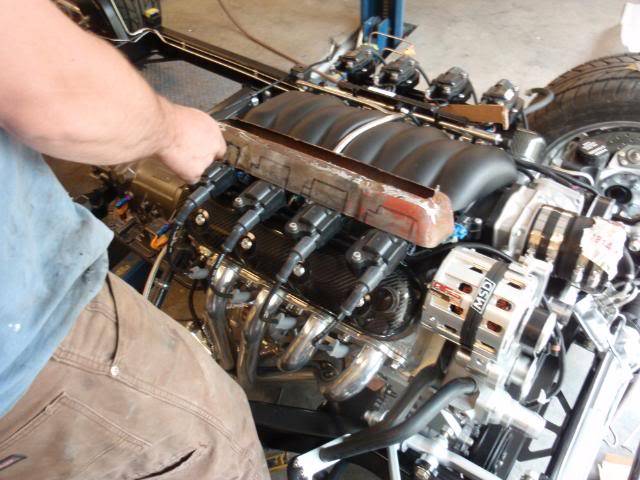
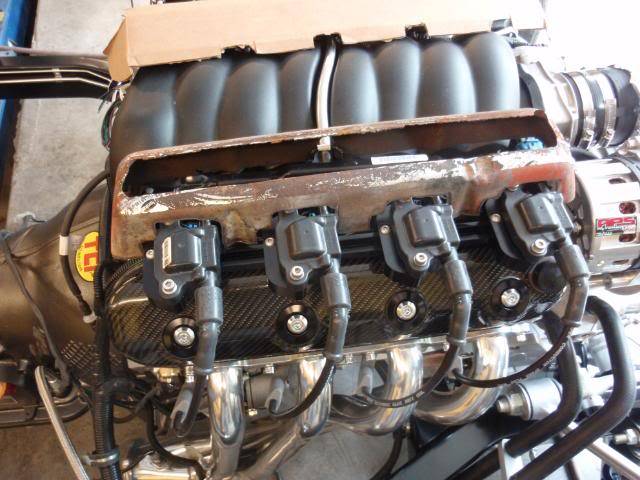
Add the cardboard to valve cover with masking tape. Paint it black to see if it might work, and then produce fiberglass piece of it to work with to come up with final shape, pickup some stainless Corvette lettering to see how that might add a little pop to covers. Then using bondo come up with final fuel rail cover shape to make a part mold off off. You can see we are trying to make the Fuel Rail covers mounting points look like the ones on the Valve Covers to try and tie the two together.
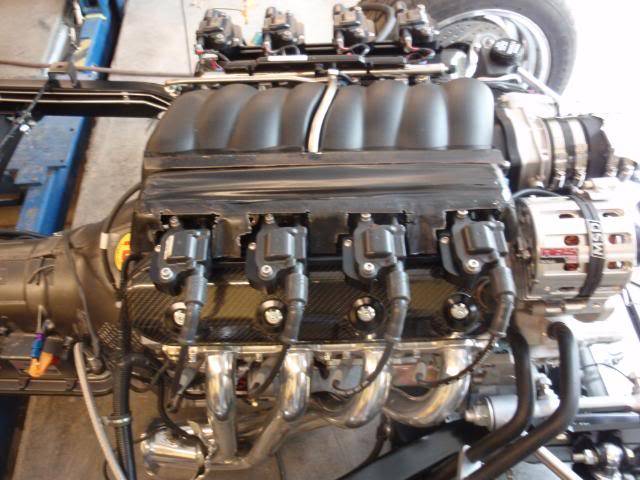
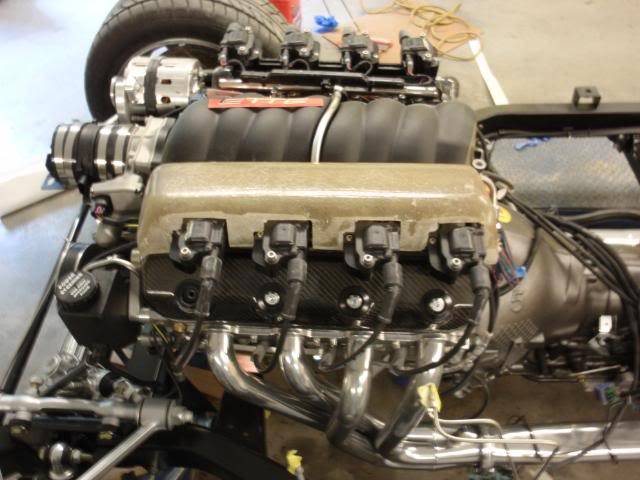
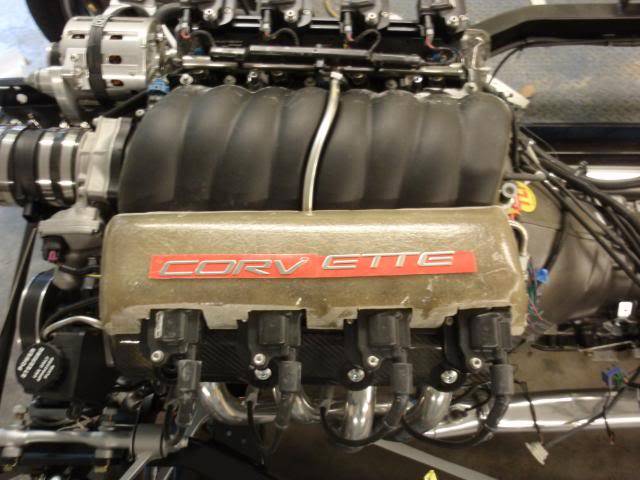
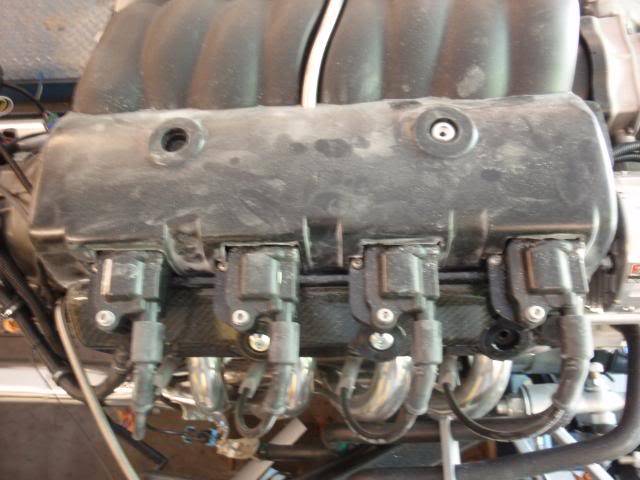
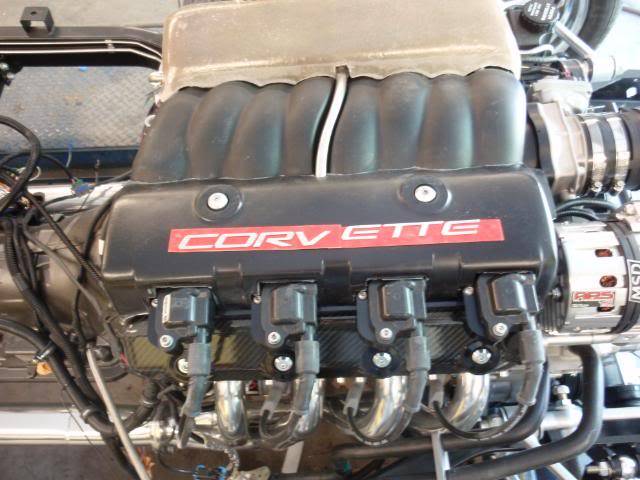
Made a mold, pulled parts off it. Cleaned up the shape on them.
To try and make mounting points look like those on the valve covers, we pulled molds off the valve covers mount points to make 4 pieces to resemble the anodized washers molded in to them.
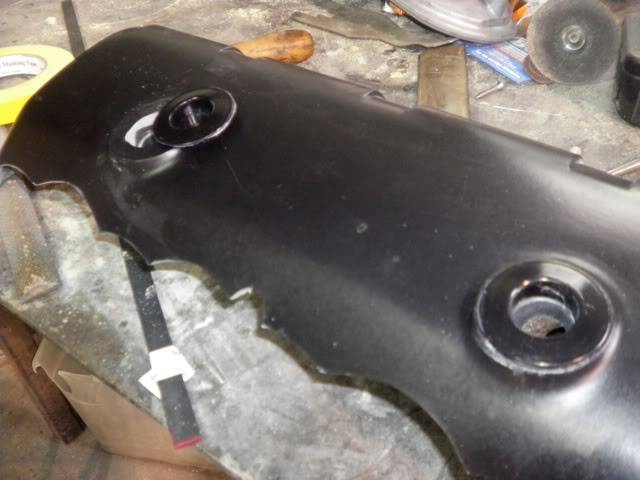
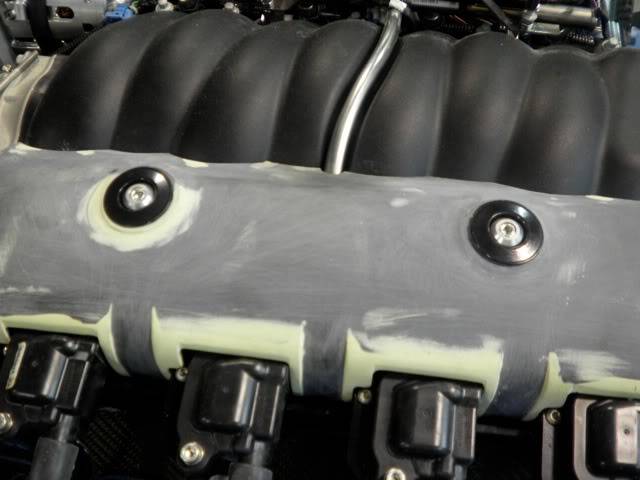
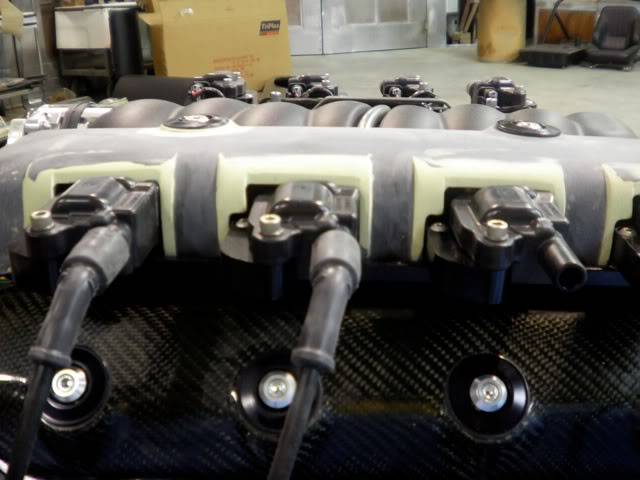
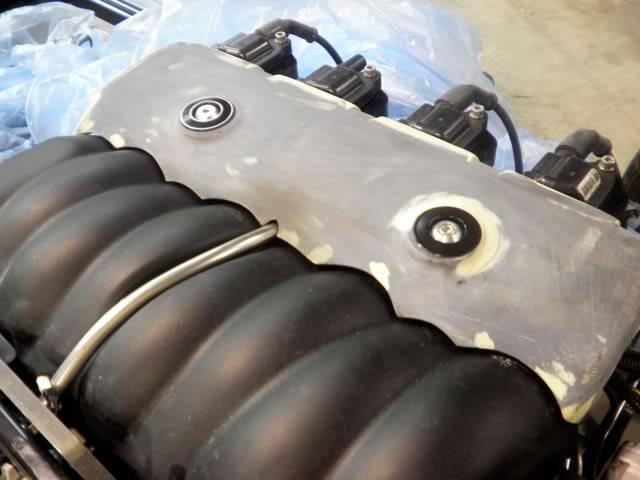
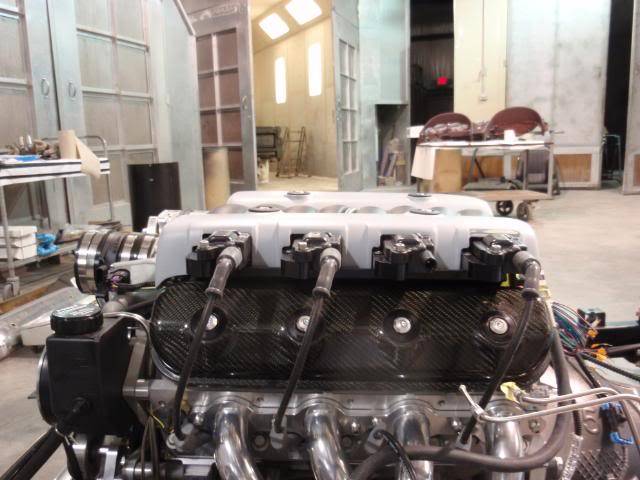
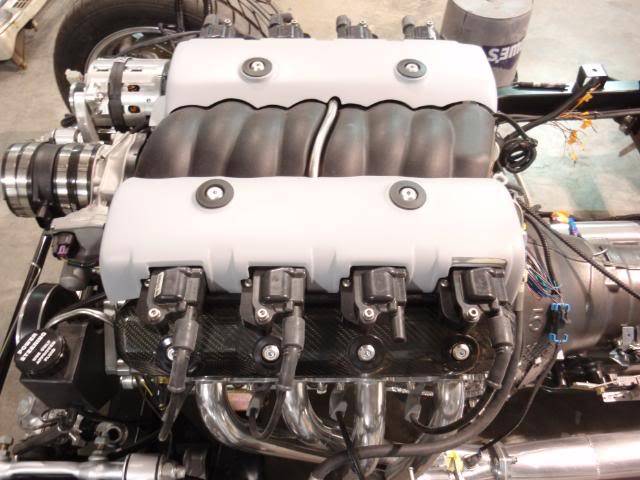
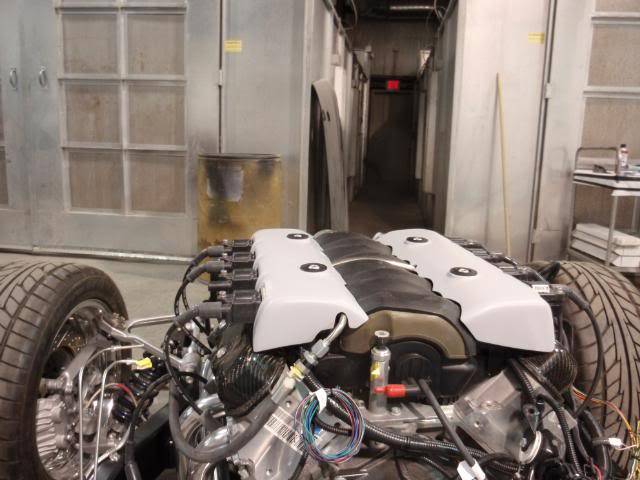
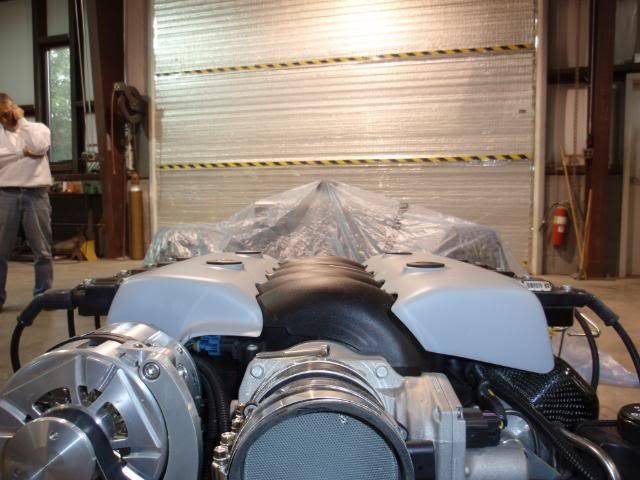
So now I have 8 ugly coils sticking out, but the fuel rails, injector and coil wiring are hid.
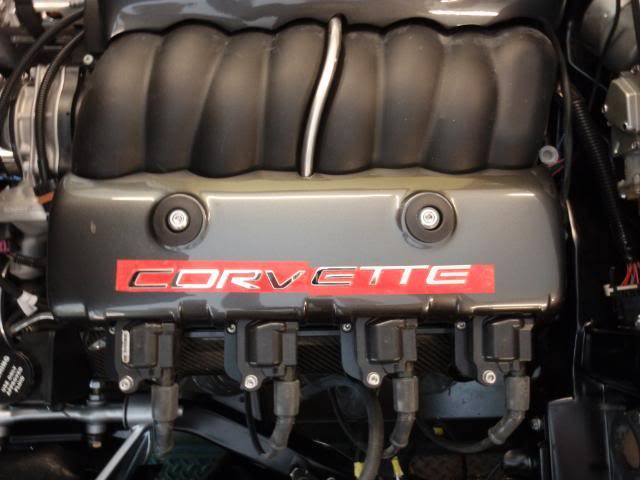
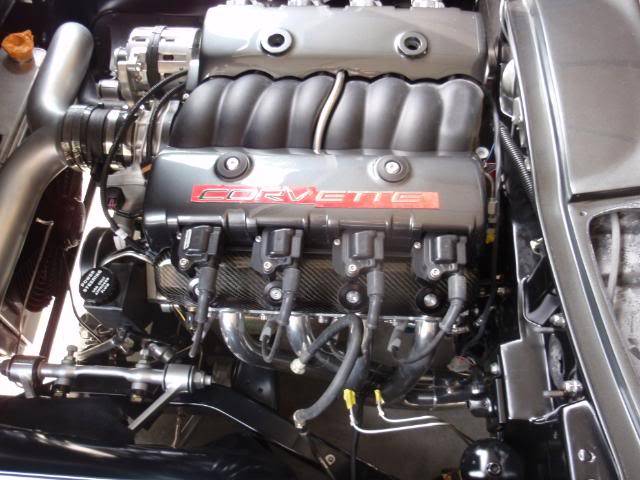
PS: Looks a little better in person than in the pictures. Should help when we get letters stuck on.
-
05-27-2011 #58
Registered User
- Join Date
- Jul 2010
- Location
- OREGON
- Posts
- 364
Nice work.. I know myself id rather look at the coils than the rails and wiring...
-
05-27-2011 #59
Registered User
- Join Date
- May 2009
- Posts
- 379
I like the covers, that you made. They look very professional, and have that "factory" custom look.
I bet it was a lot of work!
Can't wait for more pics, and more progress!
05-27-2011 #60 Registered User
- Join Date
- Mar 2009
- Location
- overseas
- Posts
- 3,434
wow very nice!!! love the covers!
 Kevin S. (overseas in Germany)
1963 Chevrolet Impala 2d ht Coupe
www.CruznArt.com
CRUZN - Automotive Artworks


 Reply With Quote