


Results 1 to 20 of 20
-
12-01-2009 #1

 Registered User
- Join Date
- Aug 2004
- Posts
- 2,413
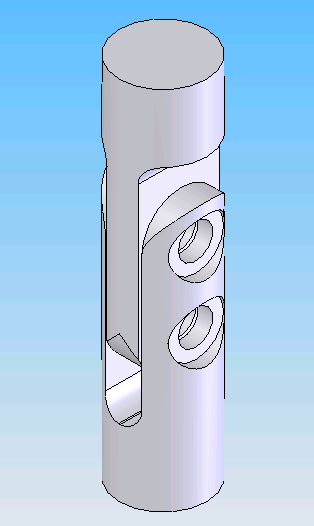
Ballistic fab tube clamps.. Application
On my panhard frame drop Im running a support going from drop to opposite frame rail . Id like to make it removeable. Id like to make tube clamps like the Ballistic fab ones ... Ok Ive already started... But would these be ok in this application..

Nothing says "I built this" better than tool marks and dykem blue..
Follow my 3 link build. https://www.pro-touring.com/forum/sh...ad.php?t=61592
-
12-01-2009 #2 Registered User
- Join Date
- Jan 2009
- Posts
- 197
I think that's a pretty interesting coupler, but I can immediately see some problems with it.
First, it probably isn't meant to be in any kind of bending situation, tension/compression only.
Second, the fasteners are in single shear. Also there are a lot of sharp transitions in the stressed region where you will get some stress risers.
I think you could accomplish the same thing with a kind of interlocking Y/I system. I'll sketch something up to give you an idea. It would be a heck of a lot easier to machine too.
Having said all of this, I have no idea of the loading on a panhard cross brace. I've calculated some estimations but these are for static loads and I can't wrap my head around how the whole panhard assembly gets loaded in a mild impact situation (for instance a rough transition from the street to a bridge, or even a pothole). Maybe the whole setup doesn't see much loading in this situation, or maybe its highly dependent on type of suspension.
12-01-2009 #3
Registered User
- Join Date
- Aug 2004
- Posts
- 2,413
These clamps are sold for rollbar applications where tubes need to be removed for access. Ive seen em used on xtreem 4x4 in some critical rollbar areas. that is where I came up with using them like I want,, Id like to see that scketch before I get too involved in what Im making...
Nothing says "I built this" better than tool marks and dykem blue..
Follow my 3 link build. https://www.pro-touring.com/forum/sh...ad.php?t=61592
12-01-2009 #4
Registered User
- Join Date
- Jan 2009
- Posts
- 197
This is what I was thinking of. You could do this I think in two setups per piece. One thing I have learned the hard way though...rarely is it worthwhile to go to the trouble to fabricate something when a reasonably priced off the shelf item will work.
12-01-2009 #5
Registered User
- Join Date
- Aug 2004
- Posts
- 2,413
 Originally Posted by mrn2obelvedere

LOL you havent been around here/me very long.Nothing says "I built this" better than tool marks and dykem blue..
Follow my 3 link build. https://www.pro-touring.com/forum/sh...ad.php?t=61592
12-01-2009 #6 Registered User
- Join Date
- Apr 2009
- Location
- san diego
- Posts
- 5,101

Hahaha
My build thread: https://www.pro-touring.com/showthre...ing&highlight=
The mustang build thread: https://www.pro-touring.com/showthre...el)&highlight=
12-01-2009 #7 Registered User
- Join Date
- Aug 2004
- Location
- Ontario, Canada
- Posts
- 2,314
 No he hasn't, but the rest of us are on to you. LOL Originally Posted by LowBuckX
Keep up the good work.
KenIf there is a hard way to do something, I'll find it!
My other car is a Vega.
12-01-2009 #8
Registered User
- Join Date
- Apr 2002
- Posts
- 777
Nice sketching skills there. Originally Posted by mrn2obelvedere
I think this pic is better and is double shear.
--JMarsa
12-01-2009 #9 Registered User
- Join Date
- Aug 2004
- Location
- CT
- Posts
- 823
I like your CADD skills but I have to give the nod to these in the torsion and shear strength category.
12-01-2009 #10 -Moderator/Sponsor-
- Join Date
- Jun 2001
- Location
- Orlando, FL
- Posts
- 10,604
Mr. Belvedere said the fasteners are in single shear. And he's right.
I'd like to see some destructive testing of that part (in both tension and bending), before I'd put it on a suspension component.
jpJohn Parsons
UnRivaled Rides -- Modern upgrades for your ride.
UnRivaled Rides recent project -- LS9-powered 69 Camaro
12-01-2009 #11
Registered User
- Join Date
- Aug 2004
- Location
- CT
- Posts
- 823
I can run a ansys simulation in UG if I can get the dims and materials.
Hell, if you want send it to me I'll bring it to school and put it in the tensile machine. I hopefully graduate this summer.
12-01-2009 #12 Registered User
- Join Date
- Nov 2008
- Location
- So. Cal.
- Posts
- 1,240
I like both connectors. The original one, with the bolts in single shear. That joint is actually pretty strong. Yes, each fastener is in single shear. But.... The over all load for the size of the joint and bolts and the great grasp type joint kinda toss the single shear issue out. Mainly its that clasp joint. If the tolerances are withing reason, a dry sliding fit then the shear load on the bolt is greatly reduced, to the point of a non issue. Now thats in compression and tension.
Side loads?? A lil diff. Not if the clearance on the joint is tight. If so then its a SOLID joint. As long as the bolts are torqued to the specified number. Causing it to be a clamped joint.
I think the first joint is a very solid joint. It shows a proper use of fasteners. To provide clamping force to a well fitted joint. The bolts make the joint preform as designed, to clamp the whole unit together.. VS using bolts as a shear unit.
I dont see the bolts being used as a shear unit on that joint. They are there (thats why there are two of them) to firmly clamp the joint solid. It really is a properly designed joint as far as fastener use goes.. JR
12-01-2009 #13
Registered User
- Join Date
- Aug 2004
- Posts
- 2,413
having these in hand I cant see them failing. The tube will fail first.
They fit tight over agressive deburring makes it look like there is a gap..
I want to put them on the support that is drawn in red at the frame drop and at opposit frame high so It can be removed for rear end work or what ever.... This pic is old the frame drop is reinforced and the red line is a real tube...
Nothing says "I built this" better than tool marks and dykem blue..
Follow my 3 link build. https://www.pro-touring.com/forum/sh...ad.php?t=61592
12-02-2009 #14
Registered User
- Join Date
- Jan 2009
- Posts
- 197
spongebob squarepants...what? You have those seat covers too?
12-02-2009 #15
-Moderator/Sponsor-
- Join Date
- Jun 2001
- Location
- Orlando, FL
- Posts
- 10,604
I agree the part looks beefy, and well-designed. I like the material choice too. Looks can be deceiving though, and your choice seems overly complicated.
I don't know your design very well, but I'm wondering why not use a simple double shear clevis on either end of the tube bolted to tabs welded to the body and the support tube.
Here's a pic of what I mean:
jpJohn Parsons
UnRivaled Rides -- Modern upgrades for your ride.
UnRivaled Rides recent project -- LS9-powered 69 Camaro
12-02-2009 #16
Registered User
- Join Date
- Jan 2009
- Posts
- 197
I agree. This is what I plan to do for my PH brace.
12-02-2009 #17 Registered User
- Join Date
- Jul 2005
- Location
- Den Helder, the Netherlands
- Posts
- 1,148
 JP, Originally Posted by parsonsj
I hope Amir brings the magnifying glass since that pic is just too small for my 46 yr old eyes!
12-02-2009 #18
Registered User
- Join Date
- Apr 2009
- Location
- san diego
- Posts
- 5,101
Originally Posted by parsonsj
Good idea. I vote this idea.My build thread: https://www.pro-touring.com/showthre...ing&highlight=
The mustang build thread: https://www.pro-touring.com/showthre...el)&highlight=
12-02-2009 #19
Registered User
- Join Date
- Aug 2004
- Posts
- 2,413
took 1 hour to make so Im not sure why its overly complicated...Guess Im not clear as to why its overly complicated.
a clevis with a single bolt will deflect before my coupler.Nothing says "I built this" better than tool marks and dykem blue..
Follow my 3 link build. https://www.pro-touring.com/forum/sh...ad.php?t=61592
12-02-2009 #20
Registered User
- Join Date
- Jan 2009
- Posts
- 197
I don't think you would have anything to worry about. I did a static analysis of the situation, and assuming that your panhard bar is relatively flat, and the diagonal support strut is at around 30 degrees to the horizontal, then the loading in the diagonal is only about 15% higher than the panhard. If you build your diagonal brace as beefy as the panhard it should be fine, of course assuming your panhard design is built to withstand the cornering forces plus some margin of error.
Ultimately in a failure case (basically one of the two buckling in compression or breaking in tension) something will always be the weak link. I'd have to think about it for awhile before I came to any conclusions about which would be better to have fail first.

 Reply With Quote




