


Results 1 to 20 of 88
Thread: 69 Camaro LS3 transplant
-
11-16-2009 #1
 Registered User
- Join Date
- Aug 2004
- Location
- St. Louis
- Posts
- 191
69 Camaro LS3 transplant
;) Hi Guys
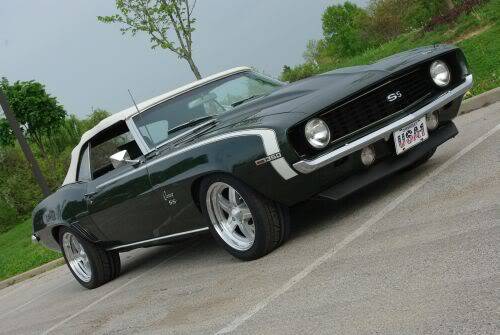
It's been a solid car for the last 7 years, enjoying many miles on various cruises and Power Tours. The 383 stroker and Tremec 5-speed performed well, but I've had the LS bug for years now. Drivability, horsepower, reliability, gas mileage, etc., plus the fact I wanted Air Conditioning for the cruise home. Power Tours are great, but as some point you just want cool air and quiet surroundings. The time has come.
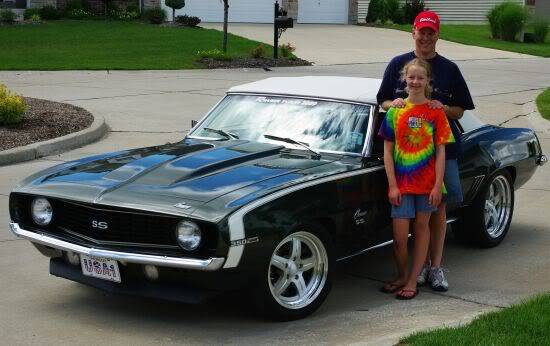
2009 Power Tour with daughter, priceless.
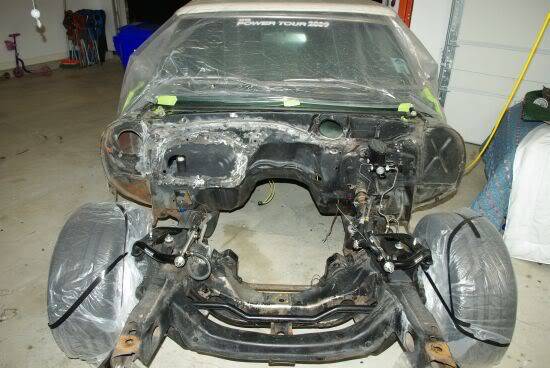
Stroker before the pull.

Thanks to Craigs List, the 383 is going to a new home.

I know, should have pulled front clip first, but I had to remove the motor quickly for the new buyer.


Removed old heater core, and took steel "bolt-in-plate" from Vintage Air package and decided to cut and weld into place for smoothing the firewall. I know many folks hide the lines underneath the fender well, but I decided to go this route. Just going to keep in simpler and use all the hard lines from my Vintage Air kit as they were engineered to by used. First time ever welding so this was a learning experience for me. I can say afterwards I know more now.
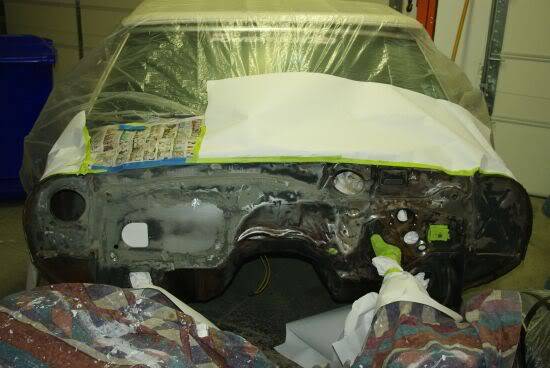
I'm much further along than the photos show, but will have to post more later. I hope you all enloy this as much as I've enjoyed reading all the posts from everyone elses builds. Feel free to ask any questions!
-
11-16-2009 #2
Registered User
- Join Date
- Aug 2004
- Location
- St. Louis
- Posts
- 191
More of the update
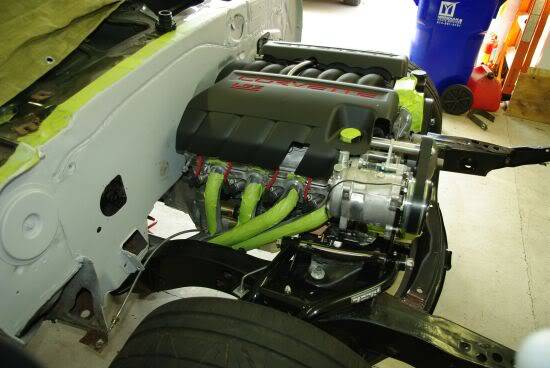
My first time welding on sheet metal was a learning experience for sure. Made the mistake of buying .30 wire, and kept blowing small holes on the metal. Panel going in was a little thicker than factory sheet metal, so the holes ususally ended up on the factory skin. Switched to .24 wire and finished her up, and filled any pin holes inside and out with 3M sheet metal epoxy, the stuff they glue panels on with. My cousin owns a body shop so access to the guys at the shop and supplies sure comes in handy. Firewall is in primer now and the subframe is completed with POR 15 satin black.

Notice the 10 year old Merrills!
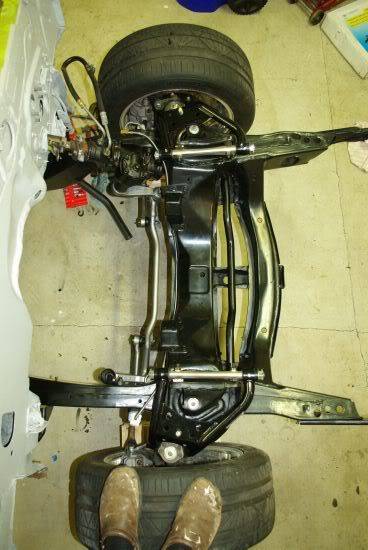
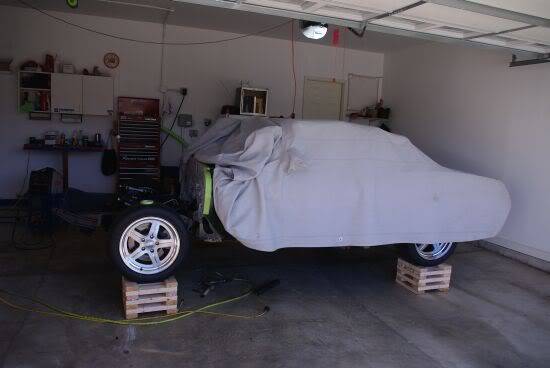
Next step was to throw together some DSE stands and move the car for first mock-up with engine and tranny going in.
For motor plates I went the route of Car Shop Adapter plates with 1" set-back and Energy Suspension Mounts. Hooker Headers and Competition Engineering Cross Member kit from summit for $50. I figured the money I save from making it myself helps pay for the new Hobart Welder.
Besides, welding, cutting, grinding and fabrication is 1/2 the fun.
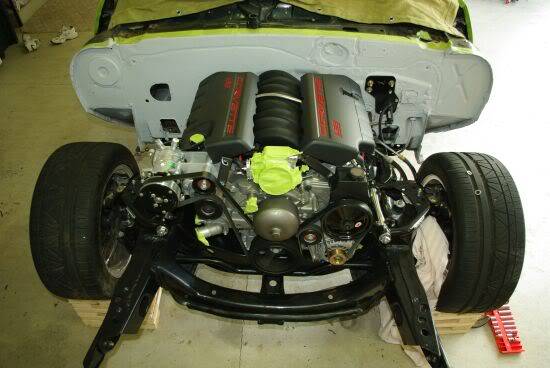
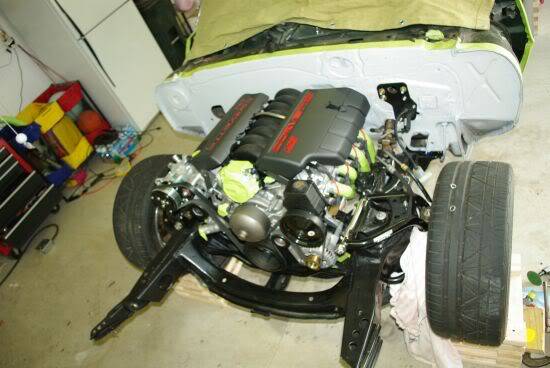
I'm having a blast on this project!!!!
11-16-2009 #3
Registered User
- Join Date
- Aug 2004
- Location
- Dunwoody, GA
- Posts
- 4,984

Looks great and I'm glad you're having fun. I like the green paint. The first two pics made me think it was black. Green looks good on the 1st gens.
Trey
"The early bird may get the worm, but the second mouse gets the cheese."
~ Jon Hammond
1979 WS6 Trans Am stock LT1/T56 drive train out of my Formula. BMW M-parallel rims. C5/C6 brakes
build thread https://www.pro-touring.com/showthre...ghlight=begins
11-16-2009 #4 Starting The Transformation
- Join Date
- Dec 2004
- Location
- Phoenix, AZ
- Posts
- 253
Jon -
Are you running the Kwik pulley setup for the A/C? If so, what are your thoughts about it? I was debating the same setup for my car, but wasn't sure if in person the brackets had more of a function over form look to them.
Thanks,
~ Jason
11-16-2009 #5
Registered User
- Join Date
- Aug 2004
- Location
- St. Louis
- Posts
- 191
Kwik Bracket
Jason
The bracket for the compressor works great. Very solid mounting system.
11-16-2009 #6 Registered User
- Join Date
- May 2008
- Location
- SoCaL-Pico Rivera
- Posts
- 1,138
Dam this is nice. Keep up the good work.
---------Fabian Sanchez-----------
71 velle Project Syckness ATS,Rushforth wheels,PRRC, Autometer,UMI, Hotchkis,QA1,hood-latches.com, comp cams,
https://www.pro-touring.com/forum/sh...ad.php?t=43881
11-16-2009 #7 Registered User
- Join Date
- Mar 2008
- Location
- Ramona, Ca. San Diego area
- Posts
- 1,307
Hey Jon, how close are the headers to the steering gear box?
67 Camaro convertible (Jinx)
11-17-2009 #8
Registered User
- Join Date
- Aug 2004
- Location
- St. Louis
- Posts
- 191
Close
The headers are 3/8 from the steering box. I read this selection of adapter plates and motor mounts would allow this to drop right in, but wish to confess the frame had to be notched for clearance of the alternator. I only had to drop a small pocket in the frame about 1/4 lower since it wasn't hitting by much.
Now maybe I don't have a factory original GM alternator?, don't know for sure. Didn't feel like researching or shopping to solve the problem since my buddy recently purchased a Miller Plasma Cutter and I'm looking to weld anything in sight.
11-17-2009 #9
Registered User
- Join Date
- Jul 2009
- Location
- Graham NC
- Posts
- 34
Great loking project. How did the crossmeber kit work out that you got from Summit? Do you remember the part # for it?
Thanks, Dion
11-17-2009 #10 -Moderator-
- Join Date
- Apr 2005
- Location
- USA
- Posts
- 4,462
That is soooooo nice !!
Thanks for the picks.
I gotta' do this one day..so your info helps..
Where did you get the LS3 ????? Craigslist ? Turnkey ? Ebay ??Jeff Tate
U.S.A.
"The best thing about participating in these events is that you get to hang out with a group of intelligent like minded people who live to achieve things in their lives. You won't find a lazy, mean, or dumb bone in their bodies." Bret Voelkel, RideTech
11-17-2009 #11 Registered User
- Join Date
- Dec 2006
- Location
- summerville,sc
- Posts
- 160
looks killer keep up the work.

11-17-2009 #12 Registered User
- Join Date
- Mar 2009
- Location
- San Antonio, TX
- Posts
- 1,635
Nice attention to detail, it is going to look brand new.

11-20-2009 #13
Registered User
- Join Date
- Aug 2004
- Location
- St. Louis
- Posts
- 191
Crossmember Info and Pics
The crossmember is #3601 Competition Engineering from Summit. Regarding the engine builder, Regal Performance in Texas.
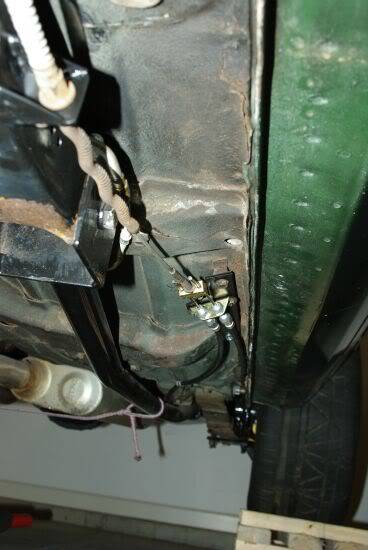
First step to the crossmember installation was to relocate the emergency brake pull cable from inboard side of drivers side subframe to outboard side. Used a Lokar Universal emergency brake cable that originally was purchased for the Kore 3 C5 brakes, but now I rerouted for crossmember clearance. Worked out so nicely I realized it should have been done this way from the beginning.
Area cut from

Outboard relocation

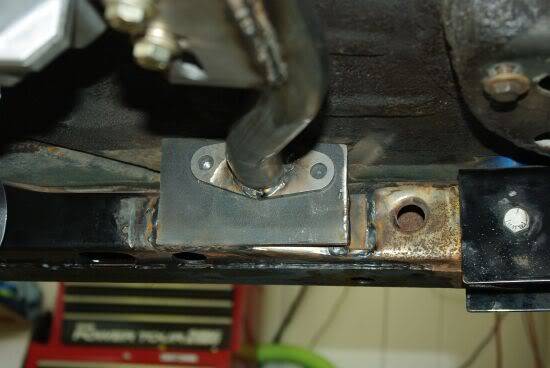
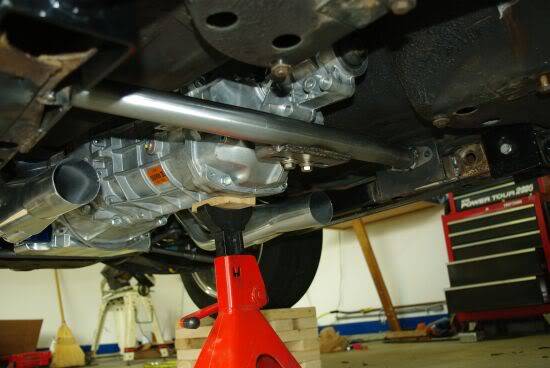
Now for the crossmember. I welded some plates which extend from the frame up to just below the floor. My decision for this was for two reason, 1st being this put the crossmember high enough for a direct exhaust shot rearward from the headers. Should keep the pipes tucked up neatly to the bottom of the car.
2nd, having it up this high gave me access to drilling holes and using 1/2 bolts from the inboard size and while able to access the nuts on the backside of the plates. Should make future installations and removals easier leaving this main part as a bolt in. I'm very happy with how this turned out, especailly for the price.
11-20-2009 #14 Registered User
- Join Date
- Aug 2009
- Location
- Crofton, MD
- Posts
- 161
Great job so far!! Keep us posted!

GM EFI Tuner
1980 Z28 Pro-touring project - sold
2002 Trans Am 9.41 at 143mph on pump gas and drag radials - sold
11-21-2009 #15 Registered User
- Join Date
- Apr 2007
- Location
- Huntsville, Tx
- Posts
- 481
What about..
the angle of the engine and transmission. This isn't going to kick the rear of the tranny to high? Just courious? Build is going great. Your sure work fast.
Sam69 Firebird convertible T/A pro-touring custom, Now LS1/T56 six speed, 3:42 Eaton posi, 18" Iforged wheels, 04 GTO interior.
www.fquick.com/SamHatco
Jack of all trades, master of none.
11-21-2009 #16
Registered User
- Join Date
- Aug 2004
- Location
- St. Louis
- Posts
- 191
Thanks Sam
Actually I started the first of September, and my progress is a ahead of my posting so it looks like I'm kicking _ss. In reality I've spent quite a bit of time on this and my posts are catching up.

The engine sits at 4 degrees now, but I'm thinking once all the front end is on with the extra weight the angle should settle another degree to probably 3, which is perfect by what I've read. The rear end is gonna have to be adjusted though cause it's sitting at 0 degrees right now. That part can wait till the end.
I'll post a little more tomorrow with some pics.
11-22-2009 #17 Registered User
- Join Date
- Jan 2008
- Location
- Charlotte
- Posts
- 1,295
This going to be on the Power Tour '10?
2005 LeMans Blue Corvette w/ T56 & Z51 & C6Z06 Brakes, Build Thread: https://www.pro-touring.com/showthread.php?64496
2005 GMC Sierra 2500HD LLY / Allison
2014 Chevy SS LS3 / 4 Door
11-22-2009 #18 Registered User
- Join Date
- Apr 2007
- Location
- St Joe, Mo
- Posts
- 274
Which Hobart are you getting. I just bought a 140 handler a few weeks ago. I love that little guy. I am just learing to weld and having an awesome time. Your car is looking awesome. Originally Posted by Jon69RagTop
 Ryan
Ryan
1969 X11 Camaro- Peelin paint, rust, the whole works
11-23-2009 #19 Registered User
- Join Date
- Nov 2006
- Location
- Ma.
- Posts
- 5,569
Nice job, it looks great. It should be a fun car to drive when your done.
Wayne
Car FINALLY home !!!!!! lol
Project FNQUIK https://www.pro-touring.com/showthre...ghlight=FNQUIK
12-03-2009 #20
Registered User
- Join Date
- Aug 2004
- Location
- St. Louis
- Posts
- 191
Sorry guys, works been killing me!
Hell YES this is going on Power Tour 2010. One of the reasons I took it off the road so early this Fall was to insure she'd be road-worthy early Spring. Regarding the Hobart, it's a 187.
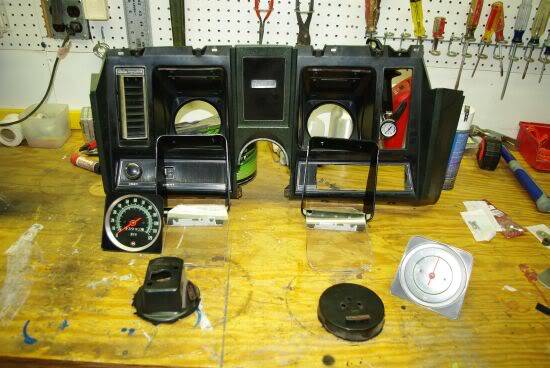
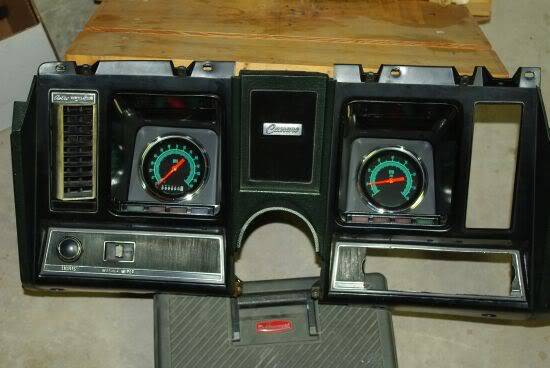
For those of you who might not know, LS motors have an electronic output from the harness to pulse an electronic speedometer and tach. I wanted to keep the original dash though and try to make it look as original as possible. I'm very satisfied with the outcome.
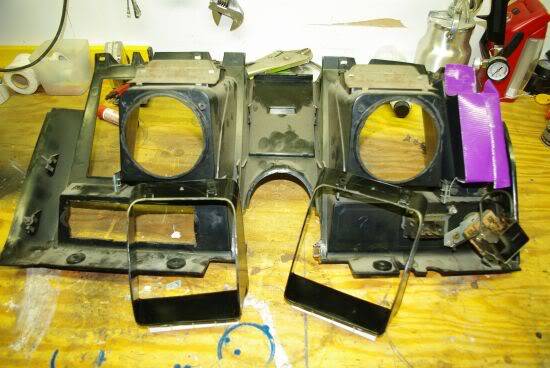
First picture represents the removal of the bezels which hold the gauges in and house the blinkers/idiot lights. Stripped these down and used my dremel to carefully remove just the clear portion of the lens without cutting into the black portion. I also used the dremel to cut out the awkward shapes on the back side of the dash which mirrored the back side of my factory fuel gauge and speedo. I needed to create smooth places for new mounting plates.
Backside
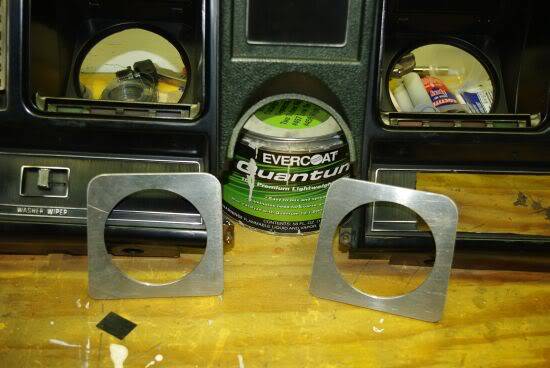
Once this was done, I took my gauges to a buddy with a machine shop and had him trace and duplicate the flat portion of each gauge from aluminum to create new mounting plates.
Once these were painted flat black and I resprayed the bezels, walla!!!! I'm really happy with the stealth look.

 Reply With Quote


