

Results 1 to 20 of 51
Thread: 68 Camaro w/ls2
-
09-30-2009 #1

 Registered User
- Join Date
- Jun 2009
- Location
- Cape Coral, FL
- Posts
- 323

68 Camaro w/ls2
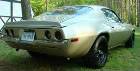
I'm starting a new thread since I messed my first one up. Project started back in May when I found a bone stock 68 base camaro coupe on craigslist just 5 minutes from my house. (I was living at my grandfathers at the time while I was at home from college.) I always wanted to do a project car with my grandpa since seeing his 55 ford re-done. So I checked out the car and it was a prefect project, almost no rust what so ever. It was 12k but worth every penny when we tore it down, we couldn't be believe what little rust we found, even the bolts came out quite easily. I checked out other camaro projects online and instantly knew I wanted to throw in an LS engine. My grandpa was against it being an old school kind of guy, so I've been stuck doing doing this conversion myself. Keep in mind i'm only 19 and never restored a car! My plan is to make this my daily driver.
Here's the car the day we brought her home:

-
09-30-2009 #2
Registered User
- Join Date
- Jun 2009
- Location
- Cape Coral, FL
- Posts
- 323
As of now, we tore down the car, took off the front subframe and coated everything in POR15. Took off 95% of the paint and pulled the entire drive line (throwing away most of it and giving the motor and tranny to the seller of the car). We put the subframe back on, got a ne ford 9" rear end with 3.70 posi, with wilwood dynalites (going to put the same brakes up front next week and replacing the 1 pistons my grandpa bought) got a power steering box, tilt column, new front and rear suspension (original style with multi leafs out back) new gas tank, 18x10 boss 338 in back wrapped in 285/40 nitto 555 and 18x8 in front in 235/40, and a ls2 with a t-56 out of an 06 gto (only 16k miles on it!). Put that in with s&p mount plates, cross member, clutch bracket, headers and intake.
I put on new mounting brackets for the alternator (upgraded to a 180 amp), power steering and a/c compressor. Just installed a new radiator with dual fans on the radiator support we had to replace (only thing that had rust on the car, due to battery leakage).
09-30-2009 #3 Registered User
- Join Date
- Nov 2008
- Location
- iceland
- Posts
- 1,859

 Awesome
Bjarni B
Awesome
Bjarni B
My Chevelle project The Awakening
http://www.1971chevelle.net/

http://www.kvartmila.is/smf/index.php?topic=27028.0
CHEVY POWER RULES!
09-30-2009 #4
Registered User
- Join Date
- Jun 2009
- Location
- Cape Coral, FL
- Posts
- 323
I also put the new brake booster (got a 7inch with excellent clearence for the engine) and master cylinder in. And put the new clutch master cylinder in. I cut the master rod in half, took about 3 or so inches off overall length, threaded both ends and put them together with a coupling nut. I attched the eye to the stock hole on the clutch, do you guys think that angle is alright for the master? The pedal travels well, but the angle of the rod relative to the master assembly is off by a few degress. Also How far back should i adjust the brake? The pedal is way to far up but idk how far back i should adjust it before it starts to affect braking ability. Threw in a pic of the wheels.
09-30-2009 #5
Registered User
- Join Date
- Jun 2009
- Location
- Cape Coral, FL
- Posts
- 323
Sorry for the long-winded first few post, just trying to get the project up to date. last night i put in most of the vintage air (gen iv) components in and dynamated a majority of the interior. a couple questions:
1) would i get away with just putting the dynamat extreme in or should i put something else down to deflect the heat? I tested with a heat gun and it seemed alright but i know its a differnt story when the engine is on for hours.
2) On y previous post i stated the angle of my clutch master cylinder rod and and how far up my brake pedal is, the clutch doesnt need to travel as much as the brake so i can adjust that realtivly easy but the brake padel is really high up.
3) I have a gto dbw gas pedal, how should i go about mounting it?
Thanks for checking out my project, I've learned so much from this forum and hopfully I can now contribute!
09-30-2009 #6 Registered User
- Join Date
- Apr 2008
- Location
- Lakeland, FL
- Posts
- 516
Ah..glad to see you finally on here haha..cant wait for that thing to get going, keep this thread updated- ill be watching!! oh, and you know im gunna have to stop by again when im back down there to see itfor myself
Tim
71' Demon-408, efi, 'viper spec' T56, Dana 60 w/ triangulated 4 link
09-30-2009 #7 Registered User
- Join Date
- Dec 2006
- Posts
- 543
VERY COOL!!
That's a great find. And for only 12k, that's not bad if it has the no body rust like you said.
Good choice on the LS2, especially if you are going for a daily driver car. An "old school" BBC could have you in the garage just as much as you drive it. (Not that there's anything wrong with that!!)lol
GOOD LUCK!
09-30-2009 #8
Registered User
- Join Date
- Jun 2009
- Location
- Cape Coral, FL
- Posts
- 323
hey tim i forgot you were on here! Yeah i plan on posting everyday now, but hurry up and get down here cuz this thing should be done and and the road by thanksgiving! (hopfully) But yeah i'm happy i went with an ls, power reliablity and gas milage!
10-01-2009 #9 Registered User
- Join Date
- Mar 2007
- Posts
- 303
Chris Nice work going on here!

Bill Panouses
 Evade Camaro http://www.facebook.com/pages/Evade-...71454739554636
www.evadecamaro.com
10-01-2009 #10
Registered User
- Join Date
- Sep 2008
- Location
- Colorado
- Posts
- 107
Looks like you got lucky to find such a clean body. I love the looks of your LS motor. Keep us updated.
10-01-2009 #11 Registered User
- Join Date
- Aug 2004
- Location
- Rustburg, Virginia
- Posts
- 3,436
Wow, what a clean car to be able to start with...that is great.
1970 RS/SS350 139K on the clock:
89 TPI motor w/ 1pc rear seal coupled to a Viper T56 via Mcleod's modular bellhousing w/ hydraulic T/O bearing from the Viper, 12 bolt rear w/ 3.73 gearing, SC&C upper control arms, factory lowers with Delalums, C5 brakes at all four corners, Front Wheels 17x8's with Sumi 255/40/17 and Rear Wheels 17x9's with Sumi 275/40/17.
Brief description of the work done so far can be found here: http://www.nastyz28.com/forum/showthread.php?t=112454
10-01-2009 #12 -Moderator-
- Join Date
- Jul 2001
- Location
- Detroit, Michigan
- Posts
- 6,854
Nice. Was the original paint Corvette Bronze? That was what my car was originally.
1968 Pro-Touring Camaro LS1
Project: Next Year
- Start date; June '01
- Completion; Sometime next year or the year after.....
10-01-2009 #13
Registered User
- Join Date
- Feb 2008
- Location
- Cuba, Mo
- Posts
- 92
Clutch master cylinder
Are using the GTO master Cylinder because I thought those were mounted straight on the Firewall or did you switch it to a camaro style? Just wonder because I was getting ready to use the same motor an tranny that you are using
10-01-2009 #14
Registered User
- Join Date
- Jun 2009
- Location
- Cape Coral, FL
- Posts
- 323
Today I put the temp senor in for my autormeter guages. I had to get a metric adapter and shorter sending unit for it to work (both made by autometer) and spent a few hours drilling out a bolt i broke off while putting the street & proformance headers on.

As for the clutch master, its from an 02 camaro. I got an 02 camaro master and slave for the clutch off ebay. But the master didn't come with the line or resivior and i had a hard time finding them online but eventually got a used one off a guy on ls1tech. I bolted the master on a bracket from street & proformance. They have this stupid diaghram showing you how to weld a tab on the clutch to connect the rod of the master. I just cut it, shortened it by about 3", threaded both ends and connected them with a coupling nut. Right now i have it connected thru the stock hole on the clutch pedal and seems to be a good fit.
And i'm not sure about the paint, i know it was repainted about 8 years ago (poorly i might add).Last edited by Chris 68; 10-01-2009 at 06:21 PM. Reason: forgot to add something
10-02-2009 #15 Registered User
- Join Date
- Dec 2008
- Location
- Gold Coast Australia
- Posts
- 22
Great car to start from by the looks.
Good on you being able to do this at such a young age.Lindsey Thompson
Gold Coast
Australia
68 Camaro
10-02-2009 #16 Registered User
- Join Date
- May 2007
- Location
- Tulsa, OK
- Posts
- 189
Whose brackets did you use on the motor? Awesome work, keep it up!
'70 Camaro
'75 Camaro
'66 Chevelle 'vert
Jason
10-02-2009 #17
Registered User
- Join Date
- Jun 2009
- Location
- Cape Coral, FL
- Posts
- 323
S&P but it was a bitch to put in. They say they fit on any small block mounts but that is deff not the case. We had to drill new holes to move the frame mounts out to either side by about a half inch. We also used their tranny cross member, not much fun either. If i were to do it again, i would deff go with ATS
10-05-2009 #18
Registered User
- Join Date
- Apr 2008
- Location
- Lakeland, FL
- Posts
- 516
I think it ll depends on what your gunna be doing with the engine later; are you planning on ever building up the bottom end, or running it hard enough to where having a built bottom end is going to matter? I think that you should get the heads package first. Anything you put on afterwords will show a bigger improvement from the increased flow (whether its a supercharger further down the road, nitrous, or more compression when/if you rebuild the bottom end.)
You should look up the flow numbers for LS heads, but A cheaper route may be getting the stock heads ported, i think porting runs about 1000-1200 for a good job(?) and calling up comp cams or someone and asking for the best cam on what you intend to do. (if your gunna be running boost or nitrous later its going to be a different cam than n/a; same with if you want more low end torque or high rpm hp of course..)
..Oh, and what about like a gunmetal grey with white rally stripes?Tim
71' Demon-408, efi, 'viper spec' T56, Dana 60 w/ triangulated 4 link
10-05-2009 #19
Registered User
- Join Date
- Jun 2009
- Location
- Cape Coral, FL
- Posts
- 323
I'm just going to create a poll for paint and see what happens!
Heres the poll!
https://www.pro-touring.com/forum/sh...ad.php?t=60833
Please check it out and vote! I'm really torn with color choice
10-06-2009 #20
Registered User
- Join Date
- Jun 2009
- Location
- Cape Coral, FL
- Posts
- 323
just got the harness delivered (Wait 4 ME Performance did a great job!) last night. Was up till 2 intalling it, it was nice having everything labeled. Putting in the fuel system next week when my grandpa gets back intown so hopfully we'll start it up within the next 2 weeks!
Last edited by Chris 68; 10-06-2009 at 10:49 AM. Reason: spelling

 Reply With Quote


