

Results 1 to 20 of 48
Thread: The Chevelle Challenge
-
05-15-2009 #1

 -ɹoʇɐɹǝpoW-
- Join Date
- Jul 2002
- Location
- Mesquite, TX
- Posts
- 4,941

The Chevelle Challenge
Hi. I've been here for years, and I have realized that I don't talk much about my projects. I reckon that should change, and it should change about now.
For the longest time, my daily driver was a 98 Z28. I loved that car, driving it was fun. Last October, a gentleman in a pickup truck and I had a disagreement over whose lane it was, and I ended up in a concrete retaining wall and he never even slowed down. Insurance totalled out my Camaro.
Rather than getting another Camaro, I tried something different: I bought a BMW convertible.
I hate it. I hate driving it. I hate everything about it except the ability to fold the roof down.
I'm not in a financial position to buy another car right now, so I'm stuck. I'm years away from finishing my El Camino.
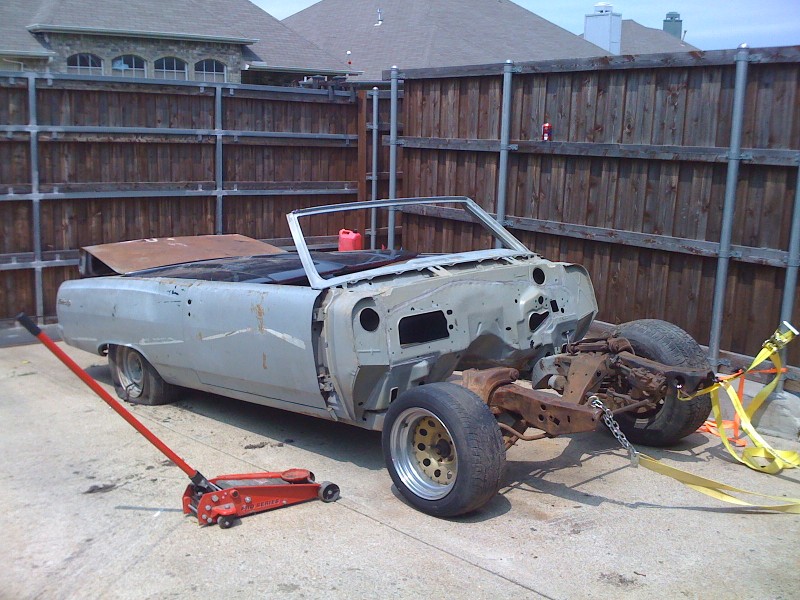
However, I have a 65 Chevelle that's been patiently sitting next to my driveway for years. I bought it in 2001, replaced the floors and quarter panels, and then bought a house and broke the El Camino so the Chevelle got put on hold. It's a convertible, so it's got the whole "top folds down" thing going on.
A few weeks ago, I took a look around my garage at the immense pile of crap I've amassed over the years - sometimes without purpose - and realized that I have almost everything I need to make a complete car.. I've got the Chevelle body, I've got the 396 I pulled out of the El Camino, I've got most of a Muncie M20 I was given back in 1992, I've got the Painless harness I was going to use in my 67 Camaro project back in 98 or so. I could make a car. I'm not looking to make a pro-tourer out of the Chevelle, just something I can drive.
Finals ended Wednesday. I don't have any classes scheduled for the Summer 1 semester, and Summer 2 doesn't start until 17 July.
So: Enter the "Chevelle Challenge". My challenge, to myself, is to make the car run before Summer 2 starts... and to do it cheaply, since I'm not really in a position to drop a bunch of coin on it. It ain't got to be painted, or pretty, or even have much of an interior, just needs to run.
I'd say "make it driveable", but there's a lot of bits I need to get for the Muncie to make it work - a couple of gears, the shifter, clutch, flywheel, and the regular rebuild kit - but I'll try to get that done too. Everything else - brakes, suspension, etc., that would be required to drive it is included in my challenge.
Current status of the Chevelle:
Body exists. Rust that still needs repaired in the wheelwells and in the trunk. Car was painted in epoxy primer before I moved in 03, but I guess it wasn't a thick enough coat as I'm seeing some rust showing through.
The body has been pretty well completely stripped. No brake lines, no cables for the e-brake, no rear drum setup, no interior or top (but I do have the frame and most of the interior, such as it is).
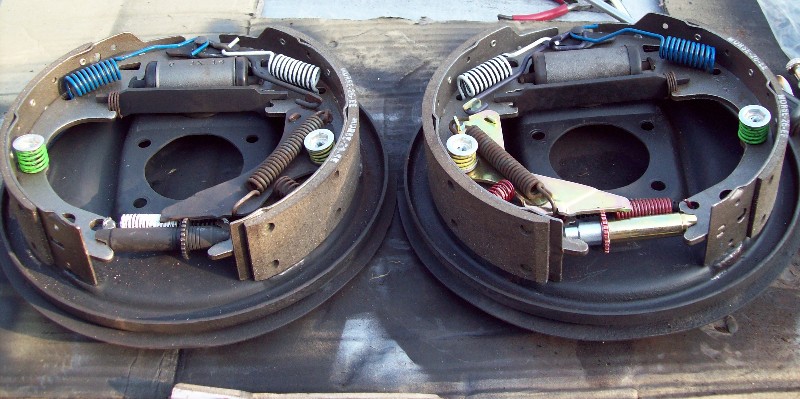
The El Camino, since it's getting the whole PT treatment going on, would be more than happy to donate its almost complete drum brake setup, UCAs and spindles, as well as a bunch of other little stuff.
Last weekend - instead of studying - the wife, my youngest, and I moved the car from the mud next to the driveway to the driveway, and got everything ready for me to have the free time.
Yesterday I cleaned up the rear drums from the Camino, sandblasted them, rebuilt them with new springs/shoes/etc., and installed them on the car with the intention of making the parking brake be one of the first things I get working; I suspect that the intermediate cable from the Elky will be too long and I'll have to buy the proper length, but we'll see.
Tomorrow I pull the front end apart and clean up and paint the frame, replace the bushings and ball joints on the LCAs, and install the Camino's UCAs, spindles, and springs. I'll also be painting the firewall so I can start installing brakes and the like.
I know,
even if it's not a PT car.
Here's where it sat last weekend after we moved it over:
Apparently 14" tires are hard to come by these days, at least used. My local used tire place had someone break in last weekend and only take their stock of 14"s... so I wasn't able to buy any on Monday. Not ready to drop the funds on new.
And, just to show progress, the rear brakes after rebuilding:
I know that I'm missing the tranny crossmember, radiator, and the rear seat bottom. Radiator I should be able to adapt the Camino's old radiator and if I don't complete rebuilding the tranny before the end of the summer I won't need the others.. but we'll see (and if you have a crossmember or the seat bottom, please let me know).
I've got roughly two months.
Last edited by derekf; 06-01-2009 at 04:47 PM. Reason: Weasels ate my pics!
-
05-15-2009 #2 Registered User
- Join Date
- Dec 2006
- Location
- oshawa ontario
- Posts
- 1,607

Man if I lived in the Southern States my daily driver would absolutely be a 60's car.
It's a cool project.....keep diggin'Nascar 69 Chevelle project, 1999 Hutch Pagan Nascar chassis, 69 Chevelle body,700hp, Penske's, slicks, roadrace track day https://www.pro-touring.com/showthre...le-Cup-project
89 Iroc 406 Fitech 5 spd
01 chevy 2500HD 4x4 8.1 Allison
31 Scarab 2 x 454
05-15-2009 #3 Full Blown G-Machiner
- Join Date
- Nov 2004
- Location
- Forney, TX
- Posts
- 738
Sounds like a good plan! I'm cheering for you derek! And actually, I'd be willing to help turn a wrench or two if you'd like the free help. The family and I will be moving from the Denver, CO area to Forney, TX in about 3 weeks. Since my Camaro recently sold and I can't start on my '72 Chevy pickup for awhile, I'm gonna go crazy if I don't have a project to keep me busy. Shoot me an email or pm if you're interested.
__________________________
Boyd
1972 P/T Style Chevy Short-bed - coming soon
Specialty Auto Services
05-16-2009 #4
-ɹoʇɐɹǝpoW-
- Join Date
- Jul 2002
- Location
- Mesquite, TX
- Posts
- 4,941
Okay, today kinda sucked -it was nice and cool outside, but it's hard to work on a car in your driveway when it's raining.
Spent several hours cleaning up the garage, took care of a few little things (stripped the heater box, took the wheel off the column and tightened down the loose screws inside, etc.).
Finally quit raining around 3.
Swapped out the spider gears in the rear end (one of the thrust washers got mangled, and the washers from the Elky were a different shape - the Elky's spiders would fit with them, but not the Chevelle's). Hopefully the rear end is buttoned up for the last time now.
I tried to make the rear brake lines, but I couldn't get the angle for the wheel cylinders right, so I got frustrated and moved on to the next task.
Tried to make the parking brake work, but the Camino's intermediate cable is too long. After all that, I've also found that the front cable is rusted to the sheath, I got the PB pedal to the floor but the cable won't come back up... and with how much effort it took to get the pedal down, I won't be able to match that with a pair of vicegrips.
Started tearing the front end down. It's not a good sign when both sway bar end link bolts shear off, That's about as far as I got before I ran out of daylight.
Tomorrow, if it doesn't rain all day again, I'll try to get the front end tore the rest of the way down. I cut a quarter-coil off the front springs to match the half-coil I cut off the rears 5 years ago, I may need to cut a little further to get the angle right though. Once I've got the front stripped, I'll get started cleaning up the frame and painting it. I'll have to blast and rework the LCAs too, and I'll have to measure to figure out which LCA bushings I need so I'll likely not have it all back together tomorrow.
Since pics are always welcomed, here's the stopping point:

Oh, in my cleaning, I found the reducer for my DuPont single-stage black, and the activator for the epoxy primer... so I'll be able to do it right.
05-16-2009 #5 Registered User
- Join Date
- Sep 2005
- Location
- Utah
- Posts
- 230
Cool updates! I love any budget build. Keep 'em coming!
05-17-2009 #6 Registered User
- Join Date
- Nov 2008
- Location
- Lawrenceville, Ga.
- Posts
- 128
Neat project & kewl challange.
I can dig the tire size issues your having ..... I too am looking at a 15" tire issue for my 46 coupe. Good luck.
I've also looked past my no rust weather beaten body & am going after safety & reliablity on the engine/trans/drive & suspension. My goal - billetproof fla. 2010.
Keep us posted on your progress.
Ratty 46
05-18-2009 #7
-ɹoʇɐɹǝpoW-
- Join Date
- Jul 2002
- Location
- Mesquite, TX
- Posts
- 4,941
Front end teardown is complete. What a bear that was.
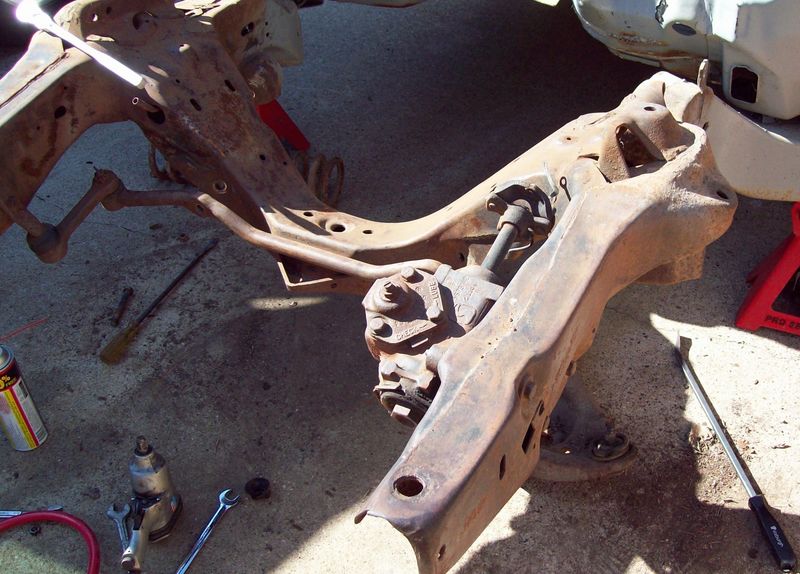
I've got the spindles and UCAs from the Elky with newish bushings and new drum brakes, and I have new ball joints for the LCAs, but tomorrow or so I'll have to get the correct LCA bushings.Last edited by derekf; 05-29-2009 at 08:03 PM. Reason: Bigger pic!
05-20-2009 #8
-ɹoʇɐɹǝpoW-
- Join Date
- Jul 2002
- Location
- Mesquite, TX
- Posts
- 4,941
I'd been working on a deal to get a set of 14" Cragar SS's with decent tires for 75 bucks -they'd have been pretty much perfect for the car - but after all the email swapping, multiple times I've called the guy when I was ready to head out there (they're about 75 miles away) and he doesn't answer or return my calls.
Oh well.
Also disappointed with my local (chain) parts stores. I remember a day not too long ago when I could walk in and ask for LCA bushings, and they'd ask which sizes, and then give me a choice as to manufacturer and warranty. Now, one size they can special order; the other they just can't get. So I've had to mail-order my bushings. I also ordered the parking brake cables, so tack another 80 bucks onto what I've spent.
And then there's the transmission. That's going to break the "budget" aspect of the build. I ordered the flywheel and shifter from Summit last night, as well as poly sway bar bushings and end links (seriously, Autozone has to special order those too?)
I suppose the net result is that I'll have the frame and LCAs cleaned up and painted before the parts get here.
05-21-2009 #9
-ɹoʇɐɹǝpoW-
- Join Date
- Jul 2002
- Location
- Mesquite, TX
- Posts
- 4,941
Things are looking up; wheel-guy wrote back and I'll try one more time, and I won a crossmember on eBay last night.
Summit order should be here today. No idea when the other parts will arrive.
The only thing I accomplished in the garage yesterday was tearing down the LCAs and creating a pile of things I need to sandblast and prime/paint over the weekend. There's a lot of sandblasting coming - LCAs, clutch/brake pedals and carrier, heater box, just off the top of my head.
05-21-2009 #10 Registered User
- Join Date
- Nov 2000
- Location
- O-town
- Posts
- 4,330
Why are you going with such a small wheel 14", I'd run 15"Rallys before a 14" wheel,
Steve68- 1968 Camaro SS LSX T56, 12bolt 3:90's, 18" Fikse Profil 13s, Deep Fathom Green paint, Spearcos, just bunch of old junk because another member said so, LOL
70 Nova SS street/drag 454, T400, 3:55, ugly!
05-21-2009 #11
-ɹoʇɐɹǝpoW-
- Join Date
- Jul 2002
- Location
- Mesquite, TX
- Posts
- 4,941
Going with 14s because it came (both factory and what I bought) with 14s. If I get sick of (or don't end up getting) the Cragars, I'll put stock hubcaps back on it.
05-21-2009 #12
-ɹoʇɐɹǝpoW-
- Join Date
- Jul 2002
- Location
- Mesquite, TX
- Posts
- 4,941
Maybe you're right.
Seller didn't call back before I went home from work, so I suppose that deal is off. 15s would work too, and would make searching easier. Not too many wheels would seem "right" to me on it - stock hubcaps or Cragar SS's are about it. Maybe old-school brushed Centerlines.
Summit order arrived today. Shifter, flywheel, and the poly sway bar bushings and end links.
Not looking forward to the sandblasting, there's a lot of stuff to blast and my cabinet kinda sucks.
05-21-2009 #13 Registered User
- Join Date
- Mar 2009
- Posts
- 157
KEEP IT COMING FOR US CHEVELLE GUYS!!!!!
i wish i could transplant all that knowledge you have to my brain,
i also wish you lived in ca so i could lend you a hand"Project Yeti"
70 Chevelle Coupe
BIGGER is BETTER...
Bigger Engine !!..........
Bigger Wheels !!!.............
Bigger AUDIO !!!!..................
---------------------------------------------------
http://www.youtube.com/watch?v=SjIRkWENUxM
05-22-2009 #14
Registered User
- Join Date
- Nov 2000
- Location
- O-town
- Posts
- 4,330
a set of 15x8 rally or 15x7/8 would also be period correct for that car, and they would look a hell of alot better than hub caps, unless your going for big and little drag racing with "dog dishes" Now thats cool,
I'm doing that for the Nova, "dishes" for a old factory look, till you turn the keySteve68- 1968 Camaro SS LSX T56, 12bolt 3:90's, 18" Fikse Profil 13s, Deep Fathom Green paint, Spearcos, just bunch of old junk because another member said so, LOL
70 Nova SS street/drag 454, T400, 3:55, ugly!
05-24-2009 #15
-ɹoʇɐɹǝpoW-
- Join Date
- Jul 2002
- Location
- Mesquite, TX
- Posts
- 4,941
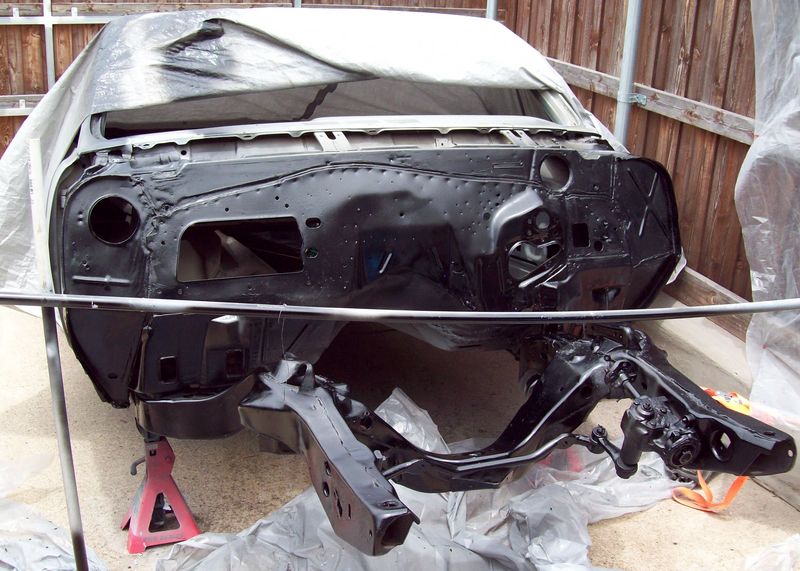
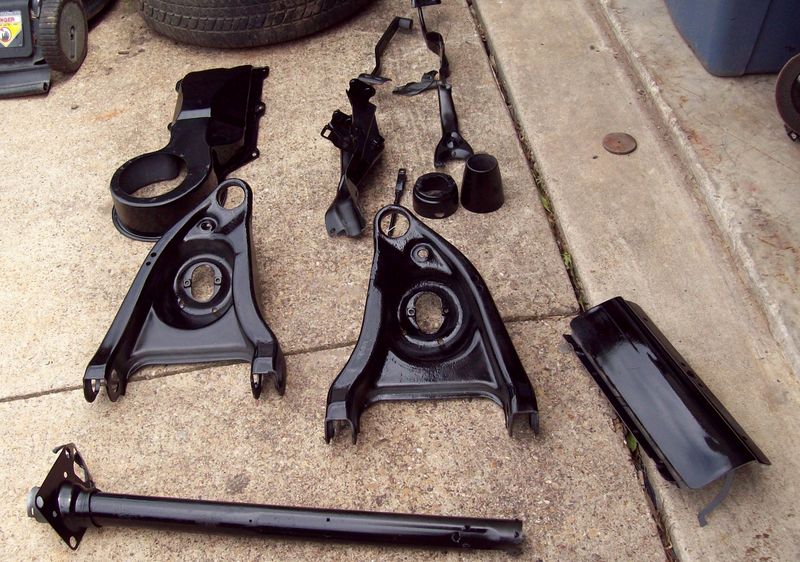
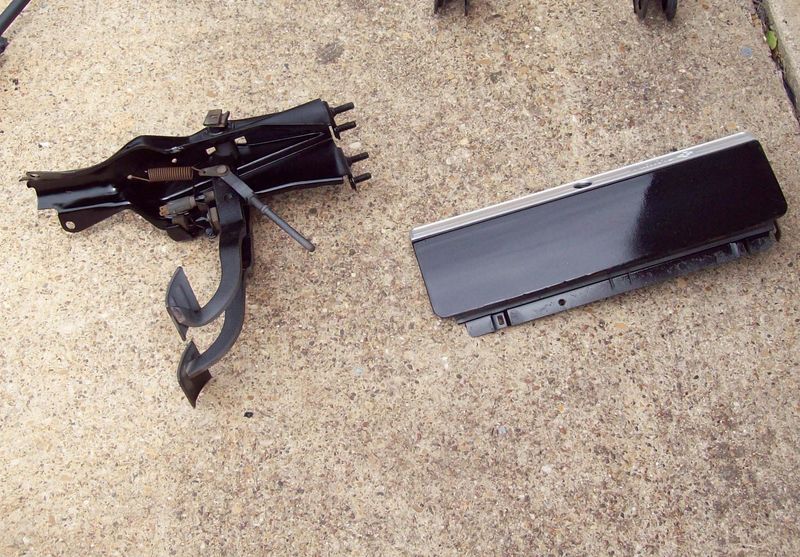
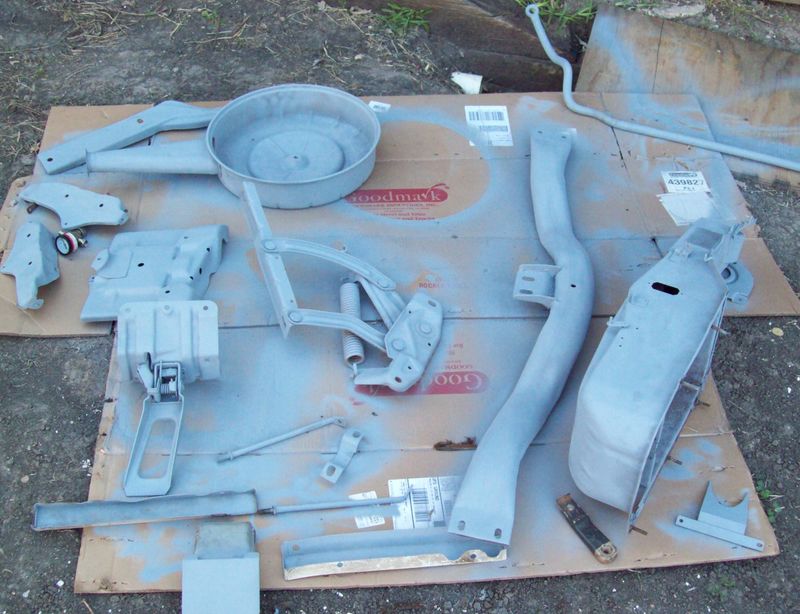
Frame, engine compartment, and various parts blasted, primed, and painted.
From this pile of parts:
and this frame:
to primed like this:

and then painted like this:
and
and
I won't be able to finish putting the suspension together until the LCA bushings arrive... but I can start putting some stuff on now.Last edited by derekf; 05-29-2009 at 08:03 PM. Reason: bigger pics!
05-24-2009 #16
Rat Pack Member

- Join Date
- Aug 2002
- Location
- Waleska Ga.
- Posts
- 2,723
Good stuff Derek!
Glad to see your working on it!!David Sloan
If youre suggesting sending men with weapons of war to take my weapons of war,then Im fairly certain thats whats called an act of war and the definition of tyranny.which coincidentally is the reason for the second amendment to begin with!
https://www.pro-touring.com/showthre...ght=fun+camaro
https://www.pro-touring.com/threads/...lcamino-build!
05-24-2009 #17 Registered User
- Join Date
- Jul 2003
- Location
- Anaheim Hills, CA
- Posts
- 11,967
Cool project.. you don't have to spend a fortune on a car to have fun with it. I will be following this thread
 "A ship in port is safe, but that's not what ships are built for."
1968 Track Rat Camaro:
https://www.youtube.com/watch?v=SGHJ5c1yLIo&t=2s
1971 Chevelle Wagon with a few mods:
https://www.youtube.com/watch?v=WBVPR3sRgyU
05-24-2009 #18
-ɹoʇɐɹǝpoW-
- Join Date
- Jul 2002
- Location
- Mesquite, TX
- Posts
- 4,941
Oh - yeah - I'd meant to be posting what I spent, too.
Pep Boys:
2 Lower ball joints, 27.95 ea.
Fuel tank sender, 54.95
Rear brake hose, 22.95
Pate swap meet:
Ignition switch, lock set, radiator support bushings, trunk floor brace, fuel tank straps, tail light lens, and bellhousing: 188$
More parts:
2 wheel cylinders, 8.99 ea
1 brake spring kit (does both sides), 3.99
Ebay:
Transmission crossmember: 51.00
And then there's Summit, where I spent way too much money:
Tie rod boots, sway bar bushings and end links: 39.24
Flywheel, 30 lb: 249.00
Hurst shifter and installation kit: 351.90
... the transmission is going to be the expensive part here. Sigh.
I've got an order in from Autozone for the missing bushings for the LCAs and the parking brake cables. Total there is 55.95.
Total spent so far: 1091.81
I still need to get the two gears for the Muncie and a rebuild kit, a clutch, hoses and belts and exhaust, and tires. I'm hoping to get it running for less than 2k but I'm thinking that the shifter's going to have put it over the top. Kinda wish I'd found one used, but it's so shiny!
05-26-2009 #19
-ɹoʇɐɹǝpoW-
- Join Date
- Jul 2002
- Location
- Mesquite, TX
- Posts
- 4,941
Okay, so yesterday wasn't as productive.
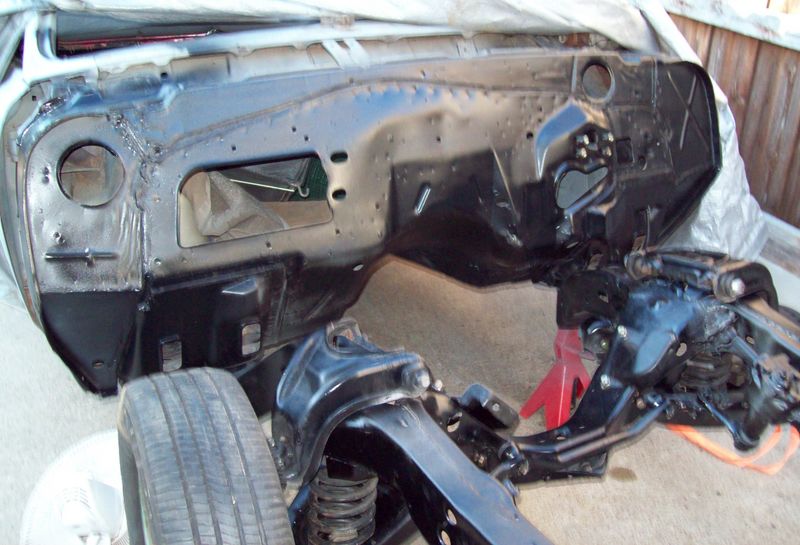
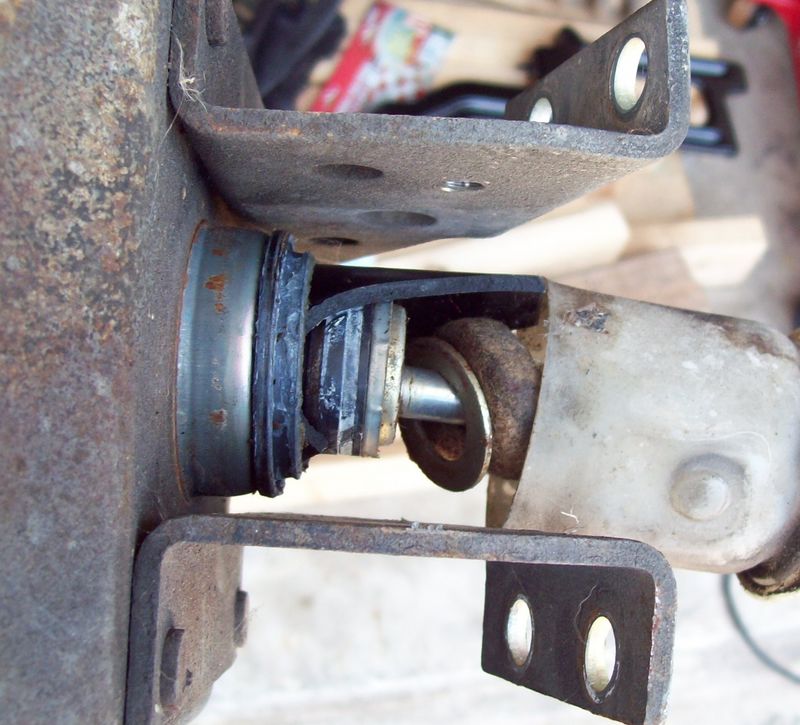
I reassembled the column, but there's obviously something wrong there - the steering wheel isn't centered on the rest of the column. I'll have to see if I can't find some assembly instructions so I can see where I went wrong.
Front suspension is mostly assembled. The UCAs and spindles are directly taken from the parts I took off the El Camino, so the UBJs and bushings have only 6-7k miles on them. They look like crap against the freshly painted frame though; I have to keep reminding myself that I'm not doing a restoration, I'm building this to be a driver and if they look a little dingy, well, the rest of it will soon enough. The remaining bushings for the front end are supposed to arrive today, along with the parking brake cables.
I also attached the engine stands that I painted 6 years ago before I moved, and looking at them attached to the car just hammers home that something bad happened with the paint - the flattening agent that I added (and I added a LOT) really didn't flatten the paint much at all. I know that I'd been told that the hardener glosses it up some (the engine stands didn't get any hardener) but damn, it's all real shiny.
My power brake booster is broken - the plastic surround around where the rod comes in cracked and is in pieces. No idea when that happened. Another thing I'll have to replace.
Rust in the trunk is worse than I remembered. I suppose once I get the car back on the ground in the front, the rear will have to come back up and the rust dealt with. I've got some work to do in the wheelwells back there anyway.
05-29-2009 #20
-ɹoʇɐɹǝpoW-
- Join Date
- Jul 2002
- Location
- Mesquite, TX
- Posts
- 4,941
I have spent more money.
New total is 1381.26 total spent throughout the challenge. I have the clutch now, the front suspension is complete (if not completely installed), and I'm ready to start bolting things up.
Frame and suspension bits painted and installed (sway and one tie rod not attached here, and none of the LCA bolts are tight yet):
I mixed some epoxy primer, and then realized I mixed way too much... so priming the crossmember, the sway bar, and the wiper motor bracket became "prime everything that isn't painted already":
Tomorrow I'll shoot the "Tractor and Implement" enamel on the sway, crossmember, and bracket so I can get them bolted on too. The rest of the stuff will either wait for real paint or needs sanding and the like.
I reshot the firewall with Nason "Chassis Black" as the Centauri came out way too shiny. Also painted about a third of the undercarriage; no need to paint the back half until I finish rust repair.
I had to replace the power brake booster (dammit) as my old one was broken:
That was 77 dollars I would have preferred not to spend - but the new one will look shiny once installed, I suppose, and better to be safe.
Something bad happened when I went to try to reassemble the steering column:
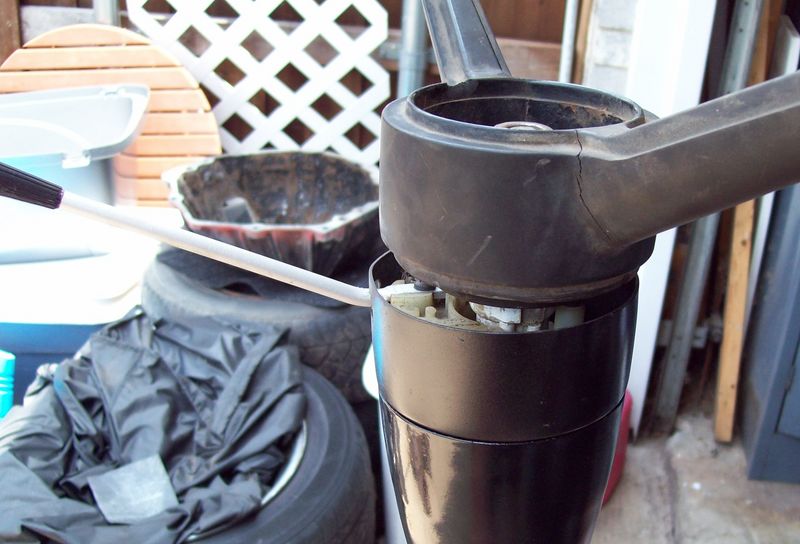
I need to pull it back apart and try again, but I really don't like the look of the turn signal assembly anyway (it looks like the wiring had a backyard repair at one point, and the bearing is missing a couple of balls) - but that's another 75 bucks for a replacement, so I don't know yet. Won't be installing the column until after the dash is painted so no real hurry there - I'm out of the single-stage black and the T&I paint doesn't seem to weather so well according to some web searches.

 Reply With Quote


