


Results 1 to 20 of 31
-
05-12-2009 #1

 Registered User
- Join Date
- Mar 2009
- Location
- Southern California
- Posts
- 38
Budget Wheel Tubs or DSE Deep Tubs?
Okay, I'm finally starting to get set to work on the TA again. Since I'm taking out a lot of sheet metal from the back (tail light panel, lower valace, most of the trunk pan), I've decided since I have decent access to the wheel tubs that I want to make them deep enough to fit fat 335's.
Until I can sell a few more houses, I'm currently on a Poor Man's budget for this build. So my question is, how much, if any, width would I be giving away by splitting and widening the stock wheel tubs v.s. laying down $400+ for a pair of DSE inner tubs?
Is the work more involved splitting the stock tubs and welding in a filler strip worth doing or am I seeing $400 fly away for the DSE tubs?
Will splitting the stock tubs (with frame notch) allow 335's to fit?
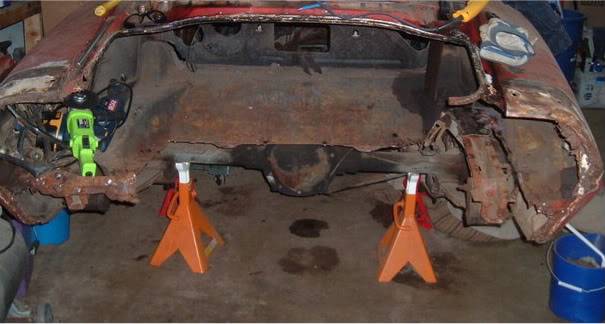
Randy
1970 Pontiac Trans Am Pro-Touring Project
2004 Nissan Titan - The Parts Getter
-
05-12-2009 #2 Registered User
- Join Date
- May 2002
- Location
- Northern California
- Posts
- 10,716

Yes, 335's will fit easily with a strip and slight frame notch.
Just take a close look at the stock set up and cut away. Mock up and then trim as needed.MrQuick ΜΟΛ'ΩΝ ΛΑΒ'Ε
05-12-2009 #3
Registered User
- Join Date
- Mar 2009
- Location
- Southern California
- Posts
- 38
Thanks!
Wow, thanks for the quick response! I see I'm not the only one staying up late at night when I should be sleeping...
I'll give it a go and photo doc it as I go. I've seen threads on the net suggest 18 gauge sheet metal for the strips; does that sound about right?Randy
1970 Pontiac Trans Am Pro-Touring Project
2004 Nissan Titan - The Parts Getter
05-12-2009 #4
Registered User
- Join Date
- Oct 2002
- Location
- Houston,TX
- Posts
- 630
The good news is if you run into trouble we are always here.....
James J.
05-12-2009 #5
Registered User
- Join Date
- May 2002
- Location
- Northern California
- Posts
- 10,716
I like to run 20g cause its easier to work with but 18g is just fine. Originally Posted by 70LS6TransAM

Cut a 4-5" strip, line it up with the outer side of your cut out wheel well then trace and trim the extra. Do the same with the inner section after you line it up. After all is said and done you should end up with a 2 3/4" strip.MrQuick ΜΟΛ'ΩΝ ΛΑΒ'Ε
05-13-2009 #6 Registered User
- Join Date
- Aug 2007
- Posts
- 156
I know of a guy that did it on a Torino but I can't find the pics right now but the nice thing about using the stock tubs is it will look factory if you clean up the welds nice. No one makes tubs for a Torino so I will have to do the same thing for mine. It should cost you less than $20 if you don't count your time LOL.
05-13-2009 #7 Registered User
- Join Date
- May 2005
- Location
- Miami
- Posts
- 2,218
the guys over on the tri five board just cut the factory one's and add in some metal.
 1955 Chevy 150
http://imageshack.com/a/img911/7169/QLWsvk.jpg
1968 Camaro
http://imageshack.com/a/img901/7223/twfpl9.jpg
1956 Chevy 210
http://imageshack.com/a/img834/6076/8azy5.jpg
___________
Jeff
05-13-2009 #8
Registered User
- Join Date
- Mar 2009
- Location
- Southern California
- Posts
- 38
Thanks so much for the advice and for the offerings of help, I'm sure I'll be asking A LOT of questions as I go along. This will be my first attempt at splitting tubs (and for welding, for that matter...) and I sure don't want to screw it up.
That $400 that would've gone toward the DSE tubs will now be going toward a Hobart Handler 125 MIG welder set up I found on NorthernTool.com; I figure that's a better investment for the money.
Since I've never welded before, I'm going to try to craft my welding "skills" on the tubs and hopefully have decent welds by the time I get to the sheet metal replacement. I might go with the 20g strips for the tubs since 2g isn't that much difference. Any preference between butt welding the strips or flanging them?
First up is getting 39 years of undercoating and crud off the insides of the wells - what's the most efficient way to get that stuff off - grinding or some type of chemical stripper?Randy
1970 Pontiac Trans Am Pro-Touring Project
2004 Nissan Titan - The Parts Getter
05-13-2009 #9
Registered User
- Join Date
- May 2005
- Location
- Miami
- Posts
- 2,218
pressure wash, sand blast, heat gun and scraper
1955 Chevy 150
http://imageshack.com/a/img911/7169/QLWsvk.jpg
1968 Camaro
http://imageshack.com/a/img901/7223/twfpl9.jpg
1956 Chevy 210
http://imageshack.com/a/img834/6076/8azy5.jpg
___________
Jeff
05-13-2009 #10
Registered User
- Join Date
- Mar 2009
- Location
- Southern California
- Posts
- 38
Okay, thanks. It's a dirty job, but somebody's gotta do it...
Randy
1970 Pontiac Trans Am Pro-Touring Project
2004 Nissan Titan - The Parts Getter
05-13-2009 #11
Registered User
- Join Date
- Mar 2009
- Location
- Southern California
- Posts
- 38
JY, do you have a link to the thread on the tri five board? Originally Posted by jy211
Randy
1970 Pontiac Trans Am Pro-Touring Project
2004 Nissan Titan - The Parts Getter
05-13-2009 #12
Registered User
- Join Date
- Nov 2006
- Location
- Bourbonnais, IL
- Posts
- 144
http://smg.photobucket.com/albums/v3...aro/mini-tubs/
Here are pictures of my mini-tubs which were split stock ones. I moved in about 3"x3" sections when making these. I used pop can boxes to make each template then used my cheapo throatless shear to cut out all the pieces. I suggest buying one. The less sparks the better, i get tired of having hot sparks hitting me and getting in my ears and eyes and the bad taste they make.
05-14-2009 #13
Registered User
- Join Date
- Mar 2009
- Location
- Southern California
- Posts
- 38
Thanks for the post and for the link to the photos; you did a nice job on the tubs. How many hours do you figure it took you to do from start to finish?
Randy
1970 Pontiac Trans Am Pro-Touring Project
2004 Nissan Titan - The Parts Getter
05-14-2009 #14
Registered User
- Join Date
- Nov 2006
- Location
- Bourbonnais, IL
- Posts
- 144
I spent a full day for making one tub. I rarely work that long so that is the only reason i can say it took me a good 8 hours. I coudlnt tell you how long it took to notch the frame and other misc cutting and welding.
05-15-2009 #15
Registered User
- Join Date
- Mar 2009
- Location
- Southern California
- Posts
- 38
That's cool. I know it will take me as long as it takes me. I've seen some timeframes for doing the DSE tubs, notch etc. of 40-50 hours.
Good news: I've tracked down a new Goodmark full trunk pan from a guy who's local, he's only asking $50 for it. I'm going to go take a look at it tomorrow. That will go a long way to help with splitting the tubs and getting a new trunk pan into the TA since it all ties in together.
A friend of mine (and my wife concurs with him) suggested I swap bodies and TA VIN with a '73 Formula shell that I got for replacing the tail light section, lower valance and assorted patches in order to save me time. He said the frame on the TA might be rusted as well. But I don't know if I can bring myself to do a rebody. From what I've found so far, the rear frame rails are in great shape and it looks like the majority of rust is on the sheet metal...
Here's a picture of the shell. It's in decent shape, although the left 1/4 has been replaced and needs finishing.
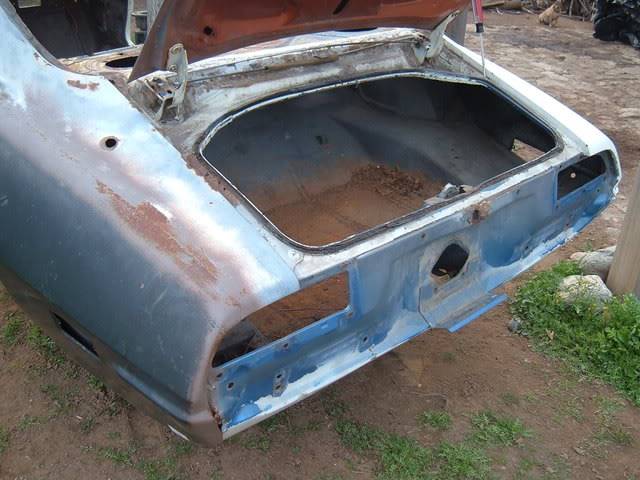
BTW, what's the best way (other than media blasting) to remove the paint from the 1/4's on the TA so I can tell how bad/good they are? I'm thinking I should start working on splitting the tubs on the left side; the 1/4 and wheel well looks like it's in far worse shape than the right. No sense starting on the right tub only to find out I'm SOL on the left.Randy
1970 Pontiac Trans Am Pro-Touring Project
2004 Nissan Titan - The Parts Getter
05-15-2009 #16 Registered User
- Join Date
- Jan 2008
- Location
- Castro Valley, CA
- Posts
- 530
Id say DSE. Just seems way easier to install then the other way plus it would take a lot less time wouldnt it?
John S.
68 "Bloodline" Camaro in assembly...
Speedtech Sub, Alston G-Billet/Fab 9 rear, Ridetech coil overs, Moser axles, Fesler 19's, Lots of Anvil parts,Twin tubo LS3/T56, Carbon fiber manifold, and the list goes on and on..........
05-15-2009 #17 Registered User
- Join Date
- Aug 2006
- Location
- austin
- Posts
- 358
70ls6,
Your car looked like my car! What a piece!
I widened my tubs 2" and did NOT cut the frame rails. You'll have to get creative if you want to keep the rear seat belts. Take your time, if you've got the time, and enjoy the process. I'm proud of my tubs, and love to show them off.Greg
1976 Trans Am SacrilEdge
twin turbo 455
Ttops and 4spd
one of 110 made
https://www.pro-touring.com/showthre...ect&highlight=
https://www.pro-touring.com/showthre...ilEdge-is-free!
05-17-2009 #18 Registered User
- Join Date
- Jul 2007
- Location
- Olathe, KS
- Posts
- 1,158
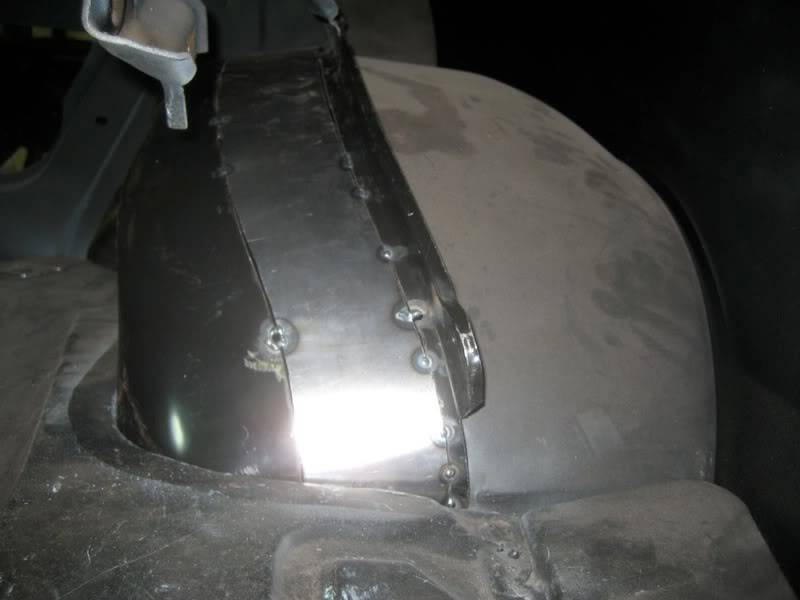
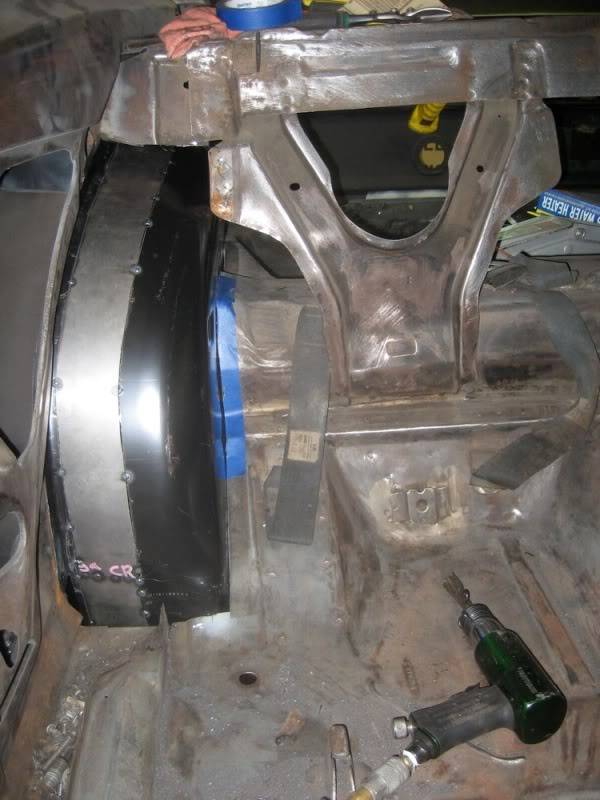
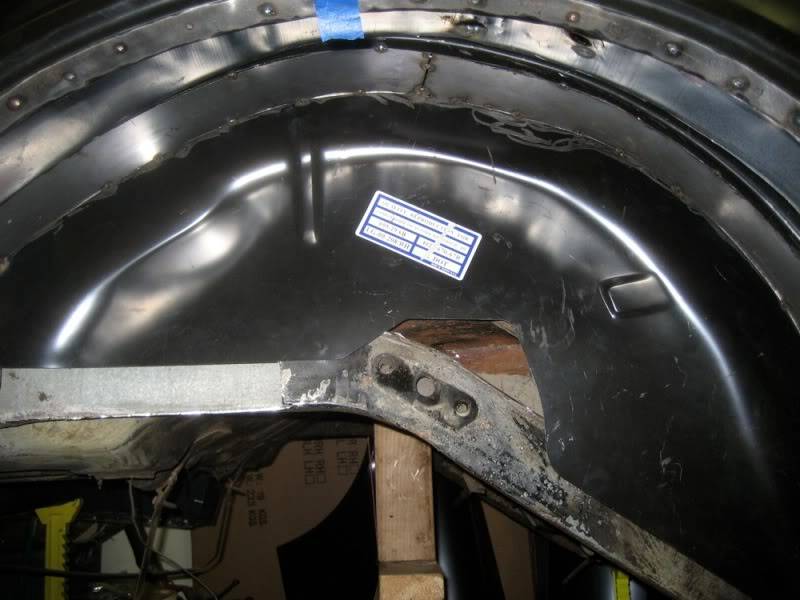
I, as well, did a more budget minded approach to the mini-tub, although I believe I did mine a little differently than most others. I've been meaning to write it up and post it online, although haven't found the time yet. Essentially, I scribed a line 1/2" from the flange surface of a new wheel house, then cut along that line. I then transferred that curve to a piece of thick poster board. Afterward I extended that line out 2 3/4" and cut out a template for my filler strip. Once I knew it would work as expected, I cut the filler strip from steel, bent it to fit the contour, and welded it all up. The nice thing about this is that the majority of the welding and clean up actually happens outside the car, on the comfort of your bench. If you do go this route insure you take very precise measurements.
From that point installation is exactly as described in this thread.
These pics are of my mockup process. unfortunately I can't find my finished pics, although they're now fully welded and installed. Once it's painted/undercoated you'd never be able to tell they were ever cut apart.
It makes for a longer process, but well worth the $300 I saved. I would imagine I have an additional 10 to 12 hours on top of the standard mini tub. That puts me at around 30 hours total. The DSE pieces are great if you're wanting to get it done quickly.
05-17-2009 #19 New to Pro-Touring
- Join Date
- Oct 2005
- Posts
- 60
I too did mine this way, cut and weld in a strip. DSE did not even offer a kit back when I did it.
I think there are still some pictures of it up over at TAC still, but it looks like the guys here have you taken care of. Best of luck with it.
05-18-2009 #20
Registered User
- Join Date
- Mar 2009
- Location
- Southern California
- Posts
- 38
John - While I'm sure the DSE tubs make for a quicker/simpler installation (I have their install dvd), I'm sure a lot of us can think of other uses for $429; especially if we can do this ourselves. But in the end, it all comes down to budget, skills and preference.
Opnwide - Wow! And I thought I was the only one who's car was that bad! You actually put that back together??? There's hope for me and the TA after all...what size tires are you running without the frame notch?
I've certainly got the time and I will enjoy the process. I'm really not concerned about the rear seat belts at this point; I'm thinking about not putting in back seats out anyway - the ones that came with the car were diamond tucked and are now in the landfill.
Did you have to relocate the upper shock mounts?
Rhino - Thanks for the great pics and info, your tubs came out really clean.
10Sec - Thanks for your input, I've seen your thread on TAC and enjoyed reading it. Always good to hear from you!
Okay, this goes out to anyone/everyone. I started taking down the left 1/4 to metal. In addition to rot in both the front and rear of the wheel well (and about 10 lbs. of Bondo), there's also some rot around outer and inner wheel well lips, but only about an inch or so in; the rest of the inner wheel well is in nice shape.
What would be the best way to approach splitting the tub and replacing the damaged areas?
I'll post pics later today after I get home from work.Randy
1970 Pontiac Trans Am Pro-Touring Project
2004 Nissan Titan - The Parts Getter
Tags for this Thread

 Reply With Quote



