


Results 1 to 14 of 14
Thread: Camaro quarter to roof
-
01-09-2010 #1

 Registered User
- Join Date
- Nov 2003
- Location
- St. Louis area
- Posts
- 268
Camaro quarter to roof
After what seems like an eternity, I've finally gotten the passenger side repro quarter on my '69 Camaro nearly ready to weld on. One area I'm uncertain how to fix is the 4mm gap between the roof and the sail panel at the top of the window channel. The only way I can think to fix it is to cut the quarter, bend the window channel in, and weld a filler into the quarter, but I don't like the idea of welding on the edge of the sail panel. Anyone have other suggestions on how to fix this?
1969 Camaro - 355 sbc, TKO 600, 12 bolt, Global West suspension
-
01-09-2010 #2 Registered User
- Join Date
- Nov 2008
- Location
- So. Cal.
- Posts
- 1,240

I have never done a fix on a quarter but I wonder if it is a flex issue. Say the roof section sprung in a lil after the cut and the new quarter section is sprung out..
If it were me before I did any permanent cutting and welding I would make sure the window channel is correct. And that would mean using the window as the gauge. Pain in the but but I would lower the glass down on the channel to make sure the roof section didnt move. If I didnt then the quarter panel is off. Maybe both are off a lil.
You want to make sure the glass is still gonna fit. Use it as a template and shift the metal to fit the glass.
But from the pics it looks like the quarter needs to come over. If you pull the top of the quarter over the 4mm to close the gap does it ruin the lines at the front? JR
01-10-2010 #3 Registered User
- Join Date
- Nov 2007
- Posts
- 464
Looks like the quarter may need to be tweaked up and in a little. There should be a little give to make most of that up. Also suggest fitting window trim before final welding. Clecos clips are my best friend. Good luck-
Ron
69 Camaro Redfire, thanks to
Marquez Design | Ring Brothers
01-10-2010 #4
 Registered User
- Join Date
- Nov 2006
- Location
- Mountain Springs, Texas
- Posts
- 4,827
No matter how you fix it make sure you also check the fit of the window molding before you start welding this up.
How is the fit around the quarter window and where it meets the rocker?1969 Camaro - LSA 6L90E AME sub/IRS
1957 Buick Estate Wagon
1959 El Camino - Ironworks frame
1956 Cameo - full C5 suspension/drivetrain
1959 Apache Fleetside
01-10-2010 #5 Registered User
- Join Date
- Apr 2001
- Location
- Rockford Illinois
- Posts
- 3,949
Get/rent a rotary ceiling laser level and level up the car at the rockers at all 4 corners, then you can use the panel line to level the quarter from front to back. Looks to me like the rear of the quarter needs to come up or at least the middle. With the laser you can measure from the line up or down and know if you are close.
You will be amazed at the difference from one side to the other and you want to match them both or you will have issues with the trunk lid. Having the trunk lid on to make it all match up is a must too. The new quarter will have the right form but not always the right shape, it is up to the installer to get it lined up at all points to make the form correct.Sometimes the piece gets slightly pulled/stuck in the dies upon release and get tweeked a bit.Last edited by Jim Nilsen; 01-10-2010 at 10:00 AM.
May The Horsepower Be With You !!!
01-10-2010 #6
Registered User
- Join Date
- Oct 2009
- Location
- Reno, NV.
- Posts
- 482
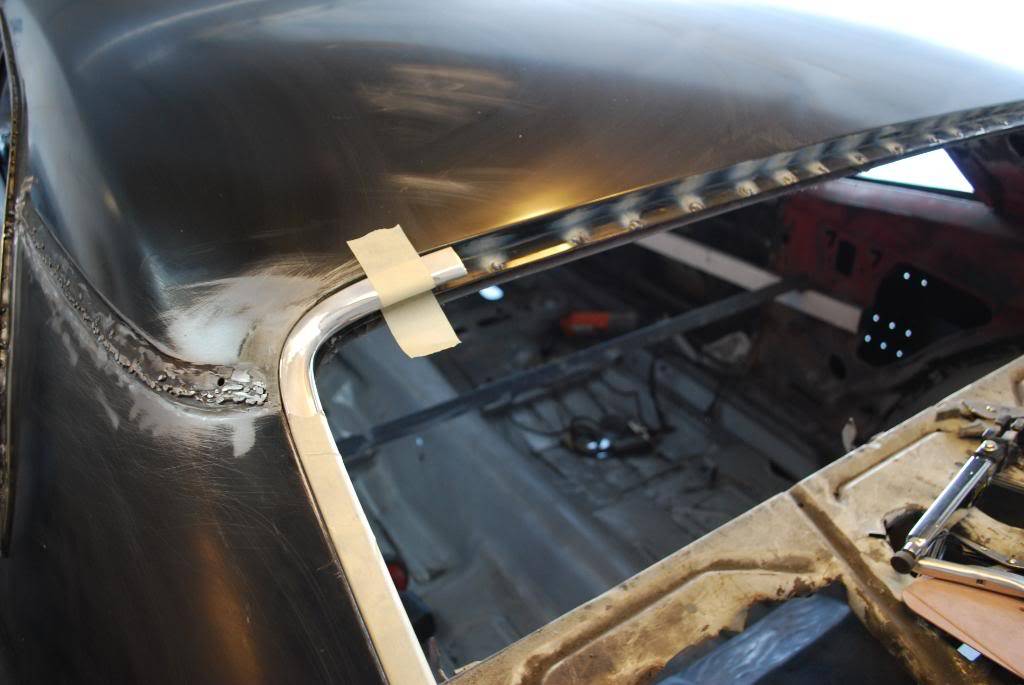
I had a similar problem on mine, but it was on the driver side. I used the window molding to figure out how far off it was. I made a little filler piece out of sheetmetal (mine was opposite, I had to add some material. I then taped the molding with masking tape and affixed it to the edge. I added some all-metal filler, let it harden a little, scored the edge with a blade, and pulled off the molding. A little finish sanding and it's good to go. From other builds, the way I've seen your issue addressed is to cut, push in, weld. Here's a pic of mine:
01-10-2010 #7
Registered User
- Join Date
- Nov 2003
- Location
- St. Louis area
- Posts
- 268
re: Quarter
The quarter fits good almost everywhere else. Jim may be right that it may need to come up a little, but I've made several relief cuts around the top to get it under the roof and it won't go any further. One sign that it may need to go up in the rear is the slight misalignment of the body lines around the tail pan--the quarter looks a little low. However, if I line up the body lines on the tail pan, the quarter sits 1/4" above the trunk weatherstrip rail and won't fit under the rear window filler. From 67rstbkt's pic, my gap from the top of the quarter to the roof (the factory leaded seam) is too big. May need a few more relief cuts to get the quarter under the roof further.
Nathan1969 Camaro - 355 sbc, TKO 600, 12 bolt, Global West suspension
01-10-2010 #8
Registered User
- Join Date
- Nov 2007
- Posts
- 464
You might be running into bits of the original quarter under the roof since they are usually welded to the inner brace before the roof panels were installed.
Ron
69 Camaro Redfire, thanks to
Marquez Design | Ring Brothers
01-12-2010 #9
Registered User
- Join Date
- Apr 2001
- Location
- Rockford Illinois
- Posts
- 3,949
I had the qtr on and off 7 times until it was trimmed enough to fit. When yo finally get it postitioned right you will know. it really wasn't until I got the laser that I actually got it all right. I worked at it for a week full of nights trying to get it perfect and then gave into the extra work I thought the laser would be and found it was well worth it and made it exact. When I finally pulled up the rear and the side to be level and match it all came together like it should. like i said the shape is there but the points have to be pushed and pulled into place. I actually put hooks in the ceiling so I could use ratcheting tie down straps to pull them up. even the curve of the qtr got better and more even when I made it go to the right spot.
Have patience and it will come out right.May The Horsepower Be With You !!!
01-12-2010 #10
Registered User
- Join Date
- Oct 2009
- Location
- Reno, NV.
- Posts
- 482
I had to remove both of my quarters several times and do some trimming to get everything lined up correctly. Just keep tweaking until everything gets lined up. I'm glad now that I went back and kept at it until it was right because I could not have lived with it. I had some issues in the same area of the tail section. I just kept fitting, tweaking, and trimming until it looked right. Keep at it...
01-13-2010 #11
Registered User
- Join Date
- Nov 2003
- Location
- St. Louis area
- Posts
- 268
This is the first quarter I've ever done, so I've kept a tally of how many times it's been on and off. So far, it's up to 49 times! Hope to cut this at least in half when the time comes to do the other side.......
1969 Camaro - 355 sbc, TKO 600, 12 bolt, Global West suspension
01-14-2010 #12
Registered User
- Join Date
- Feb 2008
- Location
- Melbourne, Fl
- Posts
- 237
what brand did you use? Originally Posted by nkopper

01-17-2010 #13
Registered User
- Join Date
- Nov 2003
- Location
- St. Louis area
- Posts
- 268
Taiwan. I bought locally from Gateway Reproduction close to St. Louis. They seem to be very good. The problems I'm encountering are likely due to me being a novice and not knowing exactly what/how to adjust to make it fit.
1969 Camaro - 355 sbc, TKO 600, 12 bolt, Global West suspension
01-18-2010 #14
Registered User
- Join Date
- Apr 2001
- Location
- Rockford Illinois
- Posts
- 3,949
When I was doing mine I did the one side and had it as good as I could get. Since I was putting on a new rear panel I made sure the first new one was secured well and then started on the other and got it as close as possible. Then I removed the old rear panel and trunk area parts and put the new rear panel on. Once it was all mocked up together I then worked on the problems you are facing and that is what forced me to get the laser out. My whole rear was low and had to come up almost 3/4" to get the line on the side to be level with the reast of the body lines. When I got it all in the same plane/line it was almost like a new set of panels took shape and the gaps all came together. Like I said, putting hooks in the ceiling made it so I could pull them to where they belonged.
If you are not replacing the rear panel you are at the mercy of any misalignment from the factory which could have happened.
I wish I had pics but the wife taped over the pics trying to be nice and put a clip of Dream car garage on the tape and didn't know the tape was not at the end.
Keep at it and don't weld anything until you have it all lined up first on both sides.
We'll be here for ya so keep your head up and mind strong.May The Horsepower Be With You !!!

 Reply With Quote


