

Results 1 to 20 of 46
Thread: S10 M/C Bleeding Tips?
-
02-11-2005 #1
 Registered User
- Join Date
- Aug 2004
- Posts
- 957
S10 M/C Bleeding Tips?
I am running into some strange issues trying to bleed out an S10 m/c on my car. This is the unit with the famed quick take up feature, and I'd have to guess that this may be part of the problem. I know lots of folks are running this unit successfully, and really like it, does anyone have any specific experience with bleeding? I have tried vacuum bleeding, the rears seemed fine, but I could not pull much fluid through the fronts, so I asked my shop assistant (otherwise known as my wife, and it cost me dinner too) to do the old pressure bleed deal by exercising the pedal.
Help?
Mark
-
02-11-2005 #2 Registered User
- Join Date
- Feb 2001
- Location
- Portland, OR
- Posts
- 940
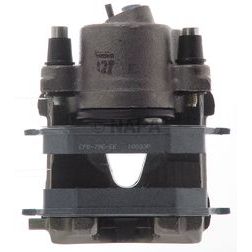
What calipers are You using?
Daniel Kuehn
'71 C-Prepared Chevelle
02-11-2005 #3 Registered User
- Join Date
- Dec 2002
- Location
- MusicCity
- Posts
- 477
Bench bleeding is the key
Hi Mark - how did this thing behave while you were bench bleeding it? (you DID bench bleed it first, right?). My favorite way of bench bleeding any basic type of mc is to clamp one of the mounting ears of the mc firmly in a vise, install port PLUGS into the ports, fill the mc with fluid, then start gently stroking the mc piston in / out about 2-3 inches. Resist the temptation to stroke the piston ALL the way in for a few reasons. Stroke the mc a few times to get the ball rollin', then take a small hammer and tap the mc casting a few times, as this gets the small "champagne" bubbles inside to break free of the casting / internal parts - this seems to help quite a bit on fresh calipers too. Gently stroke the mc as described above, tapping the casting a few times arbitrarily during the process. Watch the ports inside of the reservoirs, as you should be able to see the air pockets / bubbles through the fresh clean fluid. You may find that a few very short strokes done repetitiously will help coax these air bubbles out, usually only requiring a 1/2" to 3/4" of stroke in relatively rapid succession. Keep on working until you no longer see any signs of air bubbles in the small ports at the bottoms of the reservoirs, and the mc piston gets immediately firm when pressed in (as the fluid has no where to go with port PLUGS in place). Once the mc piston cannot be pushed in, you know that you have successfully finished your bench bleed procedure.
NOTE: Don't even bother trying to install the mc onto the car until it behaves properly as mounted in the vise during bench bleeding, as it won't do any better on the vehicle either.
Cool tip: Next time you plan on swapping mc's, cap the lines the minute you disconnect them from the mc with small rubber vacuum caps. Next, swap out your "old" mc with the "new" properly bench bled mc. Grab a large terry cloth towel to catch any and all possible brake fluids and position it properly under the area of the mc. Remove the mc lid, top it off as much as possible, then remove the mc port PLUGS. Fluid will start dripping now, so work quickly. Yank the vac caps off of the lines and connect them to the mc LOOSELY (about 2 turns from being fully seated). Let the lines drip for a little bit, as you will most likely see air bubbles gurgling out of the line connections. When nothing but clear fluid is coming out, tighten down the line connections. Next, hop in the car and pump the brake pedal firmly, but slowly, a few times. If you have a good firm pedal = your done! No need to bleed the entire brake system, as the only air in the system was allowed to escape at the brake line / mc connections. If you feel that it could still use some bleeding, try to bleed at the line connections first before going into bleeding the whole system. Think about it - there is no air way down in the lines or calipers... If you need to "do the whole car", I recommend that you open all 4 bleeders simultaneously, letting it gravity bleed while carefully monitoring the fluid level in the mc (don't let it run dry, or you will have just shot yourself in the foot!!!). Refill the mc a couple / three times during this procedure, then close up all of the bleeders. This usually = success! If you still aren't confident that you have all of the air out, THEN enlist the services of the wife (knowing that it will cost you what it does)...
Last edited by Hydratech®; 02-11-2005 at 09:26 AM.
There IS a difference - Thank you for choosing Hydratech!
Paul M. Clark
Founder / Master Engineer
Hydratech Braking Systems ®
www.hydratechbraking.com
02-11-2005 #4
Registered User
- Join Date
- Aug 2004
- Posts
- 957
Wow, that is terrific input, thanks Paul (as usual). I didn't go the extra mile on the bench bleed, I'll give it another shot today and see how your method fares. Plugs, eh? I have always used the silly little hose thingies that put the fuild back into the reservoir.
Muchos gracias,
Mark
P.S: I am running C4 PBR's with the matching single pot PBR's in the back. And yes, I know that pedal effort is going to be high, this is temporary until I replace the brakes all together.
02-11-2005 #5
Registered User
- Join Date
- Dec 2002
- Location
- MusicCity
- Posts
- 477
Port plugs vs the old hose method
We have seen a change from the usual supplied bleeding hoses to port plugs in most replacement master cylinders commonly available at the parts stores too. It's almost funny (not!) when a customer calls and inquires about the (old school) bleeding hoses, as we supply master cylinders to the customers with clear instructions on how to bench bleed the mc's using the superior SUPPLIED port plugs. This immediately tells me that the customer has not read the instructions, which of course are designed to save them headaches. The largest reason for the change from the hoses to plugs is that you conclusively know you are done bench bleeding the mc when you can no longer stroke the mc piston inward vs the hose method which will only allow a (possibly false) visual confirmation...
Alternately, I will use my fingers as "check valves" on the mc ports while bench bleeding (!?). This allows fluid pressure to build against my finger tips when I push the piston inward, to where I then back off of the ports slightly and allow the fluid to come out, then re-apply pressure to my finger tips to close the ports (when stroking back out) to prevent any air from sucking back in. This allows you to really feel what's going on, especially when a particular mc is being a little troublemaker.There IS a difference - Thank you for choosing Hydratech!
Paul M. Clark
Founder / Master Engineer
Hydratech Braking Systems ®
www.hydratechbraking.com
02-11-2005 #6 -Moderator-
- Join Date
- Apr 2001
- Location
- Central CA USA
- Posts
- 6,114

The trick to the "Quick Take Up" type S-10 master cyl is to make sure you allow time for the rearmost bore to refill thru the special valve in the rear reservoir port. Allow 30 sec minimum to one minute for each time you pump the pedal. The forward port does not have the special valve.
If you can't get fluid out of the bleeder, most likely you need more refill time between pumps.Last edited by David Pozzi; 02-11-2005 at 01:31 PM.
David Pozzi http://www.pozziracing.com67 Camaro RS that will be faster than anything Mary owns.
02-11-2005 #7
Registered User
- Join Date
- Aug 2004
- Posts
- 957
Something just isn't right. I agree that there is "something" going on with the firewall side port. But, the only thing that I see that it can re-fill through is the hole in that particular port? I have bench bled the nuts out of the thing, using Paul's recommendation, with the caps on the outlets instead of the hoses I have used in the past. No question, is is working against the caps, I can only get about 1/2 - 3/4" of piston travel before it stops. However, that translates to significant pedal travel before it stops, when installed on the car (I tried to see the pedal response before I hooked the lines up, caps still on). When it finally compresses, the pedal is solid, just like it should be, but this is after several inches of travel, which is unacceptable.
I'll try the waiting period thing. Heck, I'll try anything, do you think doing this standing on my head would help?
By the way, I have heard people talk about a small bore Mopar M/C that seems to work pretty well, it is the newer modular type with a plastic reservoir, but I have no clue what it is from. Any info?
Man, what a pain. At least it is raining today!
Stay tuned,
Mark
Edit: I just re-read Paul's original response. Looks like I wasn't done with the bench bleed. Perhpas I need lessons in following instructions.
02-11-2005 #8dennis68 GuestThe small Mopar m/c is available through Summit I beleive pretty cheap. Not sure of the application (some Chrysler tech huh)?
02-11-2005 #9
New to Pro-Touring
- Join Date
- Oct 2004
- Posts
- 61
84 Laser, Aries, same master, 21mm
95 Acclaim w/ 14" wheels, 22mm
95 Acclaim w/15" wheels, 24mm
I think all use 2 standard size 3/8x24 ports for 3/16 line and were used on a variety of disc/drum and disc/disc cars... and are available with or without resivoir.
They all look very much like this.
Whether or not one would work for your brakes I couldnt really say. Looks like rear port=front brakes, like the s10.
I've had to resort to pressure bleeding on the QTU masters, but a good bench bleed and gravity bleed usually works, as stated.
02-11-2005 #10
Registered User
- Join Date
- Aug 2004
- Posts
- 957
Uncle. I give. White flag. I cannot get the darned thing to pressure up correctly. I don't know if it is a faulty seal or something, or what, but I have had it. I waited a minute between pumps, and it didn't change one bit from the previous state. I was at it for well over half an hour, nothing that easy should take that long.
I looked back a thread on Team Camaro from years back and referenced a 21 mm bore unit from a 85 Mustang 4 banger. They have one at the local Pep Girl's parts store, I am going to give it a try. If the S10 unit is this much of a pain now, I am not going to deal with it between race sessions if I boil the fluid and need to bleed. My life is too short!
Thanks for the tips guys, I will post results so that folks in the future can learn from the experience.
Mark
02-11-2005 #11
-Moderator-
- Join Date
- Apr 2001
- Location
- Central CA USA
- Posts
- 6,114
Mark,
Are you using a manual or power system?
FYI
On my wife's 73 Camaro with baer Track kit, I tried a manual brake setup and started with 15/16", then tried a 7/8" then 13/16". I'd go one size smaller but cant find one. Early 70's Fords use small bore master cyls. the Monza MC has less stroke than the Ford MC's.Last edited by David Pozzi; 02-11-2005 at 09:45 PM.
David Pozzi http://www.pozziracing.com67 Camaro RS that will be faster than anything Mary owns.
02-12-2005 #12
New to Pro-Touring
- Join Date
- Oct 2004
- Posts
- 61
David, you might have to go metric on the master if you want a 3/4. The 2nd gen has a lower pedal ratio than the 1stgen, so I'm not all that surprised it is a little stiff with a 13/16".
The Ford Festiva had a horizontal flange 3/4" master.
It might have bubble flare fittings, and it might not have the stroke you need. I think it is a QTU though.
The Volvo 240 series also has metric fittings and has a dual bore master (not a quick take up). It was designed for 2piston 38mm fronts and single 38mm rears.
But the secondary piston is only 15mm. I think that's the one for the front brakes. The primary is 22mm.
15mm might make your front brakes kind of touchy. I don't know. I have seen one on a Pantera and the guy likes it. He used an adapter that came with an SVO master for the Pantera, so it should have the same or similar flange spread as the american masters.
I cant seem to find any other 2 port 17-19mm masters which have a horizontal flange and sufficient stroke. There's gotta be one out there though.
The Volvo master can come with left ports or right ports.
02-12-2005 #13
Registered User
- Join Date
- Aug 2004
- Posts
- 957
So here's one for you, guys. I just picked up a Ford unit, which is alledgedly a 21 mm bore. It looks like it might fit the bill pretty well. It has one reservoir larger than the other, and I always thought that the larger section was for the front brake. On this one, the larger fitting is on the larger reservoir, towards the firewall side. Backwards from what I would have thought? Which is front, which is back?
By the way, the part number is Cardone 101907, it is for a 85 Mustang (other years too), 4 cylinder deal. It has a deep pushrod hole for a manual deal too.
Thoughts?
Mark
02-12-2005 #14
New to Pro-Touring
- Join Date
- Oct 2004
- Posts
- 61
The large resivoir is for the front brakes. Fitting sizes dont always determine placement. That is a myth. You will probably have to buy adapters or change line fittings.
Fords and Chrysler almost always run the front brakes out of the rear resivoir, opposite of most old iron GM.
The front circuit will usually have more available stroke. Sometimes you can see this by looking at the port placement.
02-12-2005 #15
Registered User
- Join Date
- Aug 2004
- Posts
- 957
That is clearly the case with this unit, which made me further question the fittings deal. Thanks for the info, hopefully I will be able to fit it all up.The front circuit will usually have more available stroke. Sometimes you can see this by looking at the port placement.
Mark
02-12-2005 #16 Registered User
- Join Date
- Oct 2004
- Location
- dayton ohio
- Posts
- 425
there has to be someone on this site with the ability to make a custom m/c and all of its parts. someone just needs the motivation. i would also like a 3/4 bore m/c for my 79 malibu, it will have stock c5 brakes on all 4 corners, adn i would like to make the brakes manual.
kevin
02-12-2005 #17
New to Pro-Touring
- Join Date
- Feb 2005
- Posts
- 25
Mopar master is same as Strange, or so Bear's Performance in Canada tells me.
02-12-2005 #18
New to Pro-Touring
- Join Date
- Oct 2004
- Posts
- 61
The Malibu might be okay with the C5 and a 13/16....
Mr. Pozzi, that Baer track kit on your wife's '73, that has the 38mm C4 calipers does it not? ...or is the Baer kit the larger C5's? I had been assuming it was the smaller piston ones.
Those Mopar masters are not QTU, if anyone was wondering, despite their appearence.
I'll see if I can come up with a suitable 3/4" master....
02-13-2005 #19
Registered User
- Join Date
- Dec 2002
- Location
- MusicCity
- Posts
- 477
Here it is
Here's the 3/4" bore GM based manual mc that you're looking for:
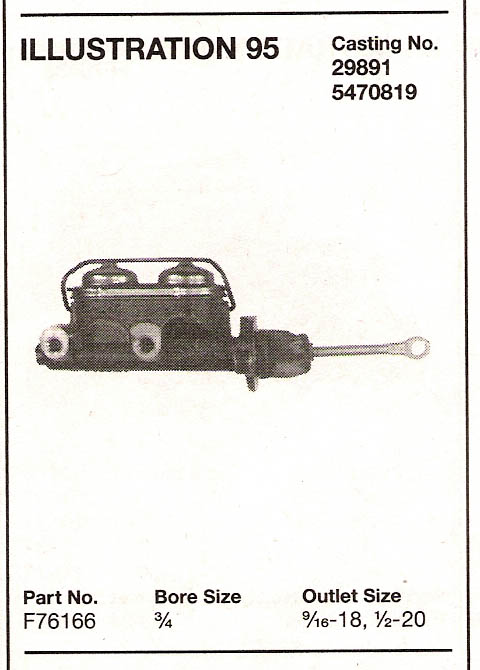
This is a 1975 Monza manual brake spec 3/4" bore mc. It utilizes the GM based stud centers, conventional GM port sizes - NAPA is still showing availability on these from what I'm seeing.
The boot and manual rod should be easily removable, providing the necessary deep hole for the manual brake pushrod for use on the 1st gen F-car.
The Cardone / NAPA reman number is 10-1498 (Wagner illustration / number shown above)There IS a difference - Thank you for choosing Hydratech!
Paul M. Clark
Founder / Master Engineer
Hydratech Braking Systems ®
www.hydratechbraking.com
02-13-2005 #20
New to Pro-Touring
- Join Date
- Oct 2004
- Posts
- 61
That's the Monza master. It might work. It has a pretty short stroke and was made for even smaller brakes than the Mopar ones. It also has a nearly equal volume split. I was trying to find something which operated close to the same volume calipers as the C4 calipers but had no luck.
I guess this goes with any master, but, make sure front pressure doesn't stop rising or rise slower than/before the rear when installed, and make sure neither bottom out before 'panic stop'+ pressures are reached... should be ~1500-2000psi on the high side err with the C4s (on paper).
At least this is near as I can figure. Just want people to be safe.

 Reply With Quote


