

Results 681 to 700 of 862
Thread: The BAD AST Project - Faze II
-
05-31-2015 #681

 Registered User
- Join Date
- Mar 2004
- Location
- Mid-Michigan
- Posts
- 2,764
 The drawers work just fine... I keep the rotary table and all of the big vises in the bottom drawer and it opens and closes easily. No issues. I see HF has the 56" unit on sale so better jump on it.
 Originally Posted by icemanrd19


Mark
Mark:
"Bad Ast" Astro Van. Just because I did it... Doesn't mean it's possible...
This my Bad Ast thread...
https://www.pro-touring.com/showthre...roject-Faze-II
This is my Fotki album...
http://astroracer.fotki.com/
-
07-24-2016 #682
Registered User
- Join Date
- Jun 2014
- Posts
- 160
Any updates?
07-24-2016 #683
Registered User
- Join Date
- Aug 2014
- Posts
- 435
I just found this thread, and saw you were in Mid-Michigan. I live in the Flint area. I'd love to see this when it's done. A guy I worked with back in the early 90's had a V8 swapped Astro or Safari.
Jay
11-04-2016 #684 Registered User
- Join Date
- Jun 2012
- Location
- South Lyon, MI
- Posts
- 1,244
Any updates?
Bill Harvey
Scope Creep - 1974 Nova - https://www.pro-touring.com/showthre...rit-of-America
Family Fun - 1955 Belair - https://www.pro-touring.com/showthre...hter-55-Belair
11-05-2016 #685
Registered User
- Join Date
- Mar 2004
- Location
- Mid-Michigan
- Posts
- 2,764
Wow! It's been three years since I did anything major with this project! Life getting in the way I guess and I did get "kind of" burned out on it. My right hand guy, Mel, is not doing well, that is part of the issue. He has been fighting cancer and is doing okay right now. He has moved to Florida to be closer to family.
Right now I am in the process of cleaning and rearranging the shop. On the list of things to do is get the bottom of the van finished and painted and getting the chassis plumbed, painted and assembled.
With my accrued vacation time, this past week was my last FULL week of work this year. For the rest of the year I will be working two and three day weeks with a week off before turkey day and also the week before Christmas. I plan to use most of that time to get rolling on the van again.
Thank for checking in! Hopefully I'll have some updates in a week or so.
MarkMark:
"Bad Ast" Astro Van. Just because I did it... Doesn't mean it's possible...
This my Bad Ast thread...
https://www.pro-touring.com/showthre...roject-Faze-II
This is my Fotki album...
http://astroracer.fotki.com/
11-29-2016 #686
Registered User
- Join Date
- Jun 2012
- Location
- South Lyon, MI
- Posts
- 1,244
Mark,Sorry to hear that Mel is not doing well.This is a very interesting project. I will be excited to see more updates as you get back in the saddle.
Bill Harvey
Scope Creep - 1974 Nova - https://www.pro-touring.com/showthre...rit-of-America
Family Fun - 1955 Belair - https://www.pro-touring.com/showthre...hter-55-Belair
11-30-2016 #687 Registered User
- Join Date
- Apr 2001
- Location
- The Netherlands
- Posts
- 1,509

I was still keeping an eye out for your build..... Can't wait to see the updates again.
I hope Mel will win his fight! Sad thing to hear :-(
12-01-2016 #688
Registered User
- Join Date
- Mar 2004
- Location
- Mid-Michigan
- Posts
- 2,764
Hi guys,
Mel is doing okay for now. He has been through Chemo again and is getting back on his feet. He is still in Florida though so all we can do is talk over the phone or Facebook.
I have been cleaning the shop, selling off a bunch of BBC's and Pontiac engines, wheels, tires, and lots of misc. STUFF. This weekend I hope to get the working side organized and actually start hanging brake lines on the frame. I'll post up some pics when I get them.
MarkMark:
"Bad Ast" Astro Van. Just because I did it... Doesn't mean it's possible...
This my Bad Ast thread...
https://www.pro-touring.com/showthre...roject-Faze-II
This is my Fotki album...
http://astroracer.fotki.com/
12-27-2016 #689
Registered User
- Join Date
- Mar 2004
- Location
- Mid-Michigan
- Posts
- 2,764
Haven't been doing much out in the shop the last few weeks, been busy with family stuff and being sick for three days. I got out there this morning though and dusted off (yea, really) the hydroboost unit. I pulled off the original Prop valve and designed a bracket for the new Wilwood Adjustable Unit. Made the bracket out of some scrap .090 aluminum and bolted on the APV.
Took the whole thing in to my local Car Quest and they dug out a couple of fittings for me. A 9/16-18 for the front line out of the booster and a 1/2-20 for the rear line. 4 bucks and I was on my way. The HB unit I am using is out of a '95 Astro Van and the front line was 1/4" so I was happy they had the 9/16-18 for a 3/16th's line.
I also did a lot of cleaning on the boost unit. Now that the bracket is built I will mask everything off and spray the booster with silver ceramic brake caliper paint.
I got pictures but didn't get them uploaded yet. Maybe tomorrow.
MarkMark:
"Bad Ast" Astro Van. Just because I did it... Doesn't mean it's possible...
This my Bad Ast thread...
https://www.pro-touring.com/showthre...roject-Faze-II
This is my Fotki album...
http://astroracer.fotki.com/
12-28-2016 #690
Registered User
- Join Date
- Mar 2004
- Location
- Mid-Michigan
- Posts
- 2,764
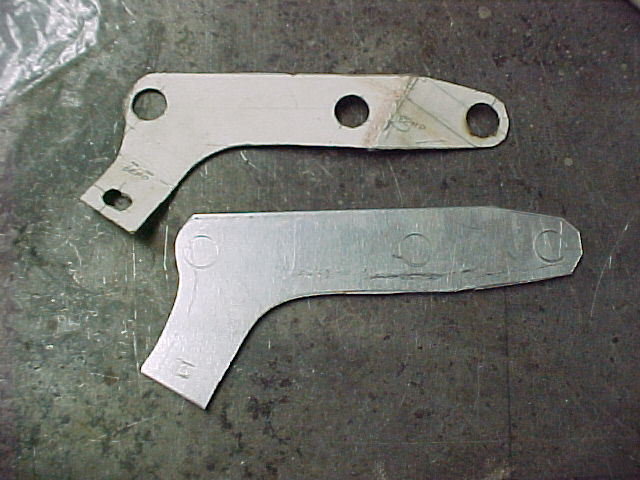
Here are some pics of what I accomplished yesterday. Mostly getting the bracket designed and fabbed.
After removing the original Prop Valve I had this nice bracket to work with.

Getting my bearings by holding the new Prop Valve in place.
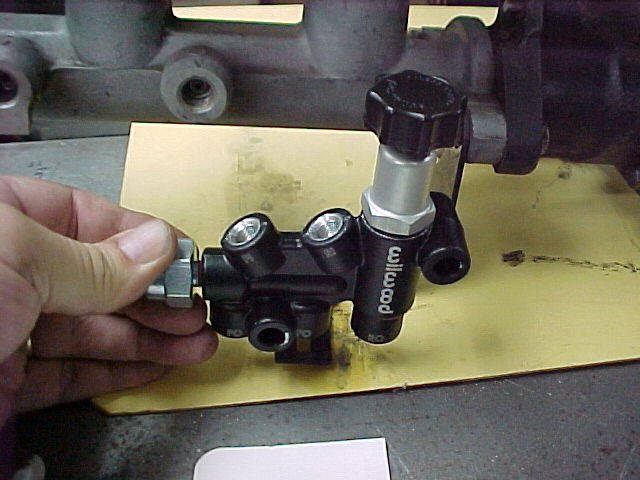
I did a lot thinking on the placement. The bottom has two outlets for the front brakes. I could use either one or both. In order to mount the valve where I wanted it the rear "front" outlet will be covered. I will use the forward outlet and plumb a "T" into the line on the frame. This is what I came up with for a bracket design.
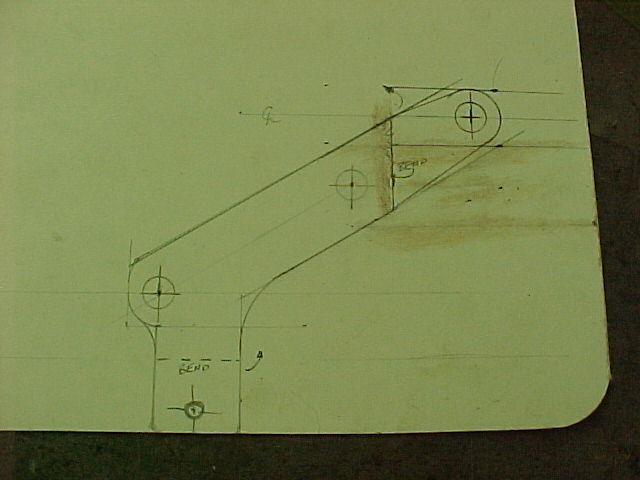
I cut the shape out of a piece of heavy cardstock and "made" the bracket so I could check the fit of the valve.
Bent up and mounted. The top bolt for the master cylinder and the slot in the bottom of the original bracket are plenty to get this attached.
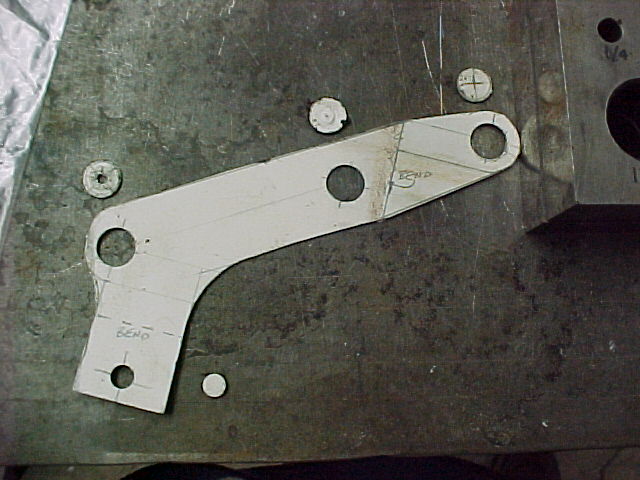
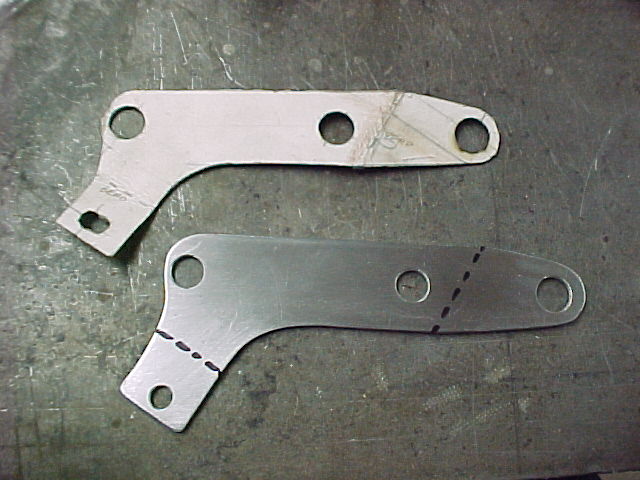
I used the paper template and laid the design onto a piece of .090 scrap aluminum. I cut out the shape with the stomp shear and my scroll saw.
I sweetened up the profile with the angle grinder and drilled the holes. The dashed lines are the bend points.
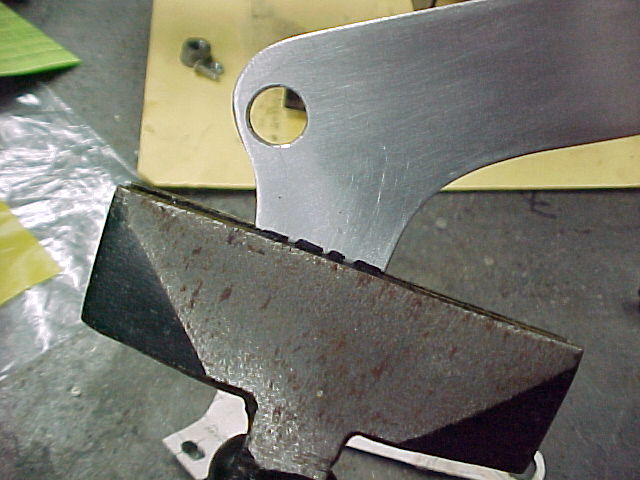
I used a pair of seaming pliers to do the bends. .090 is fairly hard to do by hand so I clamped the bracket in the vise so I could get more leverage.
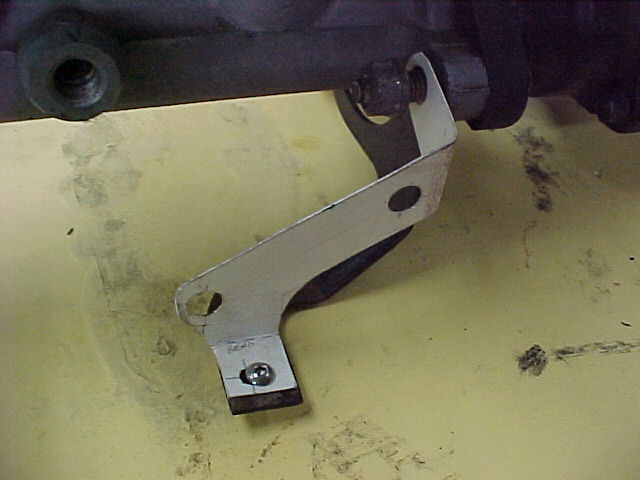
All bent up and bolted in place. I'm happy with it. It will be hidden behind the valve anyway.
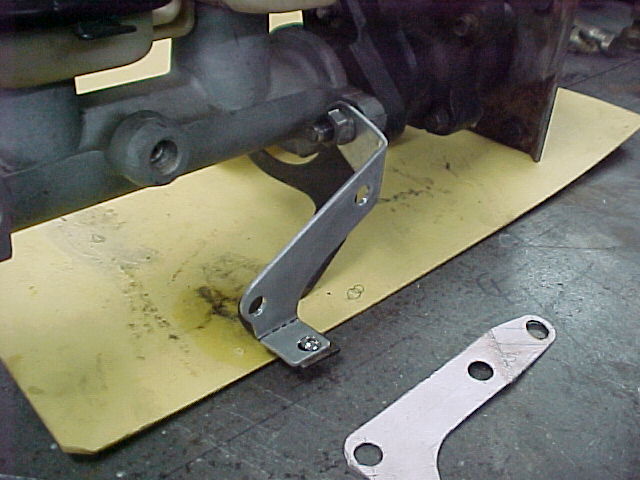
With the valve bolted on. Clear access to both of the outlets on the bottom of the valve and it's not going anywhere. Once the lines are made and bolted in it will be pretty solid.

MarkMark:
"Bad Ast" Astro Van. Just because I did it... Doesn't mean it's possible...
This my Bad Ast thread...
https://www.pro-touring.com/showthre...roject-Faze-II
This is my Fotki album...
http://astroracer.fotki.com/
12-28-2016 #691
Registered User
- Join Date
- Mar 2004
- Location
- Mid-Michigan
- Posts
- 2,764
Got out today and got the lines plumbed. This was a bit of an adventure getting the tight bends that were needed to run the lines.
I ended up making a little bending fixture to get it done. This will be pretty handy for doing the rest of the van.

I made the clamp block on the mill. Both ends have their uses and I used both getting the bends into the lines.
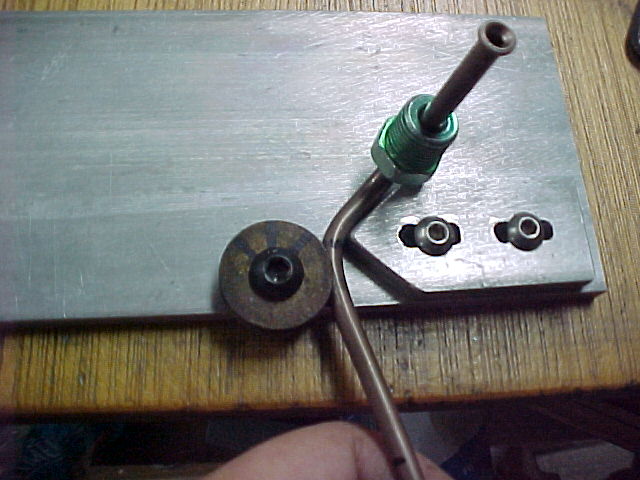
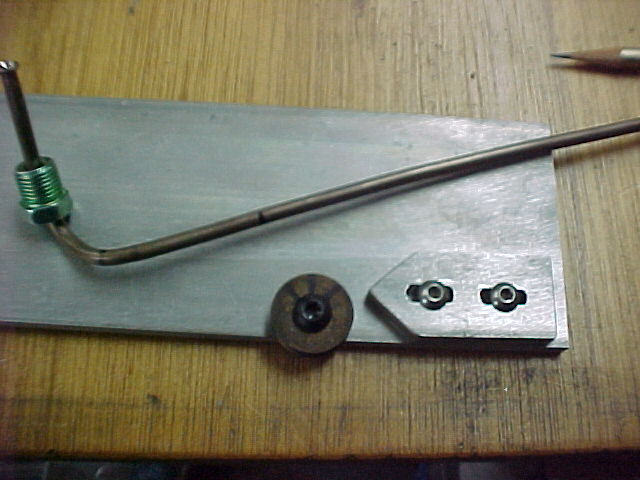
The line for the rear brakes is in.
And here is the line for the front brakes.
This is one of the double flares I do with my CPP Flaring tool.
Got a lot done today and I am pretty pleased with the bending fixture.
MarkMark:
"Bad Ast" Astro Van. Just because I did it... Doesn't mean it's possible...
This my Bad Ast thread...
https://www.pro-touring.com/showthre...roject-Faze-II
This is my Fotki album...
http://astroracer.fotki.com/
01-04-2017 #692
Registered User
- Join Date
- Mar 2004
- Location
- Mid-Michigan
- Posts
- 2,764
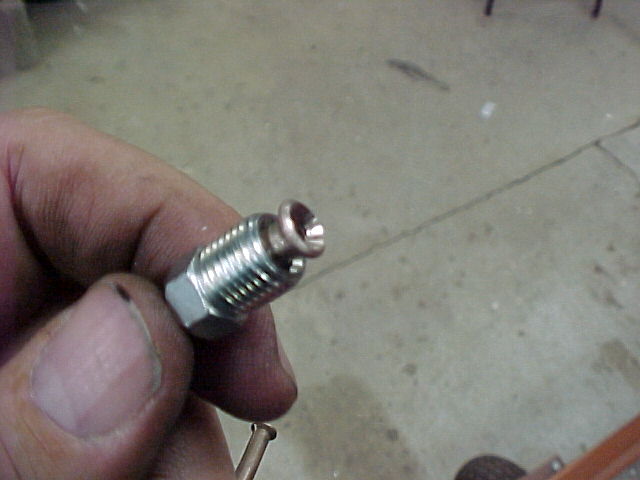
Well, I've ran into a bit of an issue with the prop valve placement. It is too low. The outlet for the front brake line I need to plug is to close to the bracket underneath it. I didn't think it would be a problem finding a low profile inverted flare plug to fill the hole but I have found nothing that will work. The regular plugs are to tall and I do not want to remake the bracket OR the hardlines, so.... I will make a low profile plug.
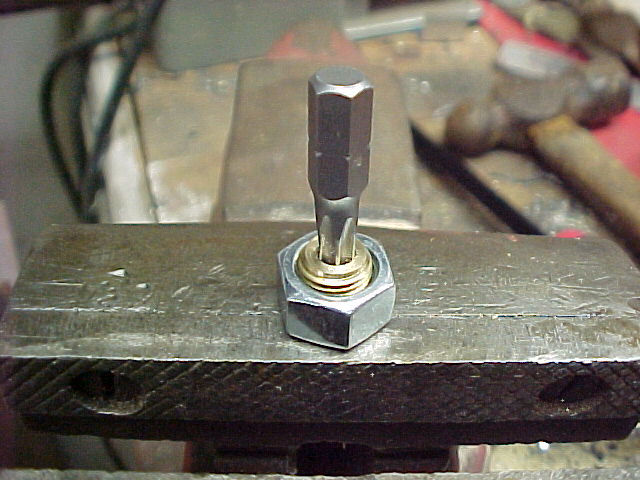
I puttered around in the shop last night trying to figure out how to tighten the plug and came up with this. I bored a .177 diameter hole in a test piece of aluminum.
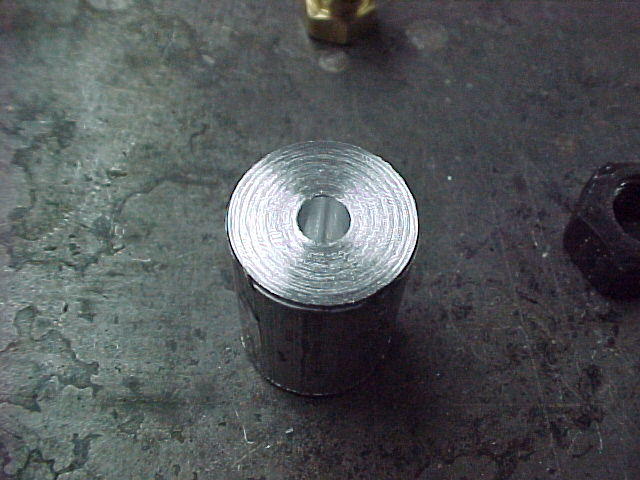
Then I used a short Torx bit to "broach" a hole for the driver. I started it with a few taps from a hammer to make sure it was straight then just pressed it into the test piece with the 4" vise.
This worked great! I have some 3/8-24 threaded brass rod coming from McMaster Carr today. Hopefully the technique will work as well on the brass.

Making the inverted flare side is easy. A 3/16 drill and 90degree c'sink work perfect for that. Getting the "driver" side done will be the challenge.
MarkMark:
"Bad Ast" Astro Van. Just because I did it... Doesn't mean it's possible...
This my Bad Ast thread...
https://www.pro-touring.com/showthre...roject-Faze-II
This is my Fotki album...
http://astroracer.fotki.com/
01-04-2017 #693
Registered User
- Join Date
- Aug 2004
- Location
- Los Angeles
- Posts
- 592
When I was building custom choppers I used to make Aluminium plugs to replace the old cast iron ones, I used the same method to make removing them easier with both Torx and Allen. The Metric motorcycles have little plugs that fit in the hole to dress them up if you are into that sort of thing.
The rule is measure twice and cut once. My problem is I still measure with a mic and cut with an axe!
01-05-2017 #694
Registered User
- Join Date
- Mar 2004
- Location
- Mid-Michigan
- Posts
- 2,764
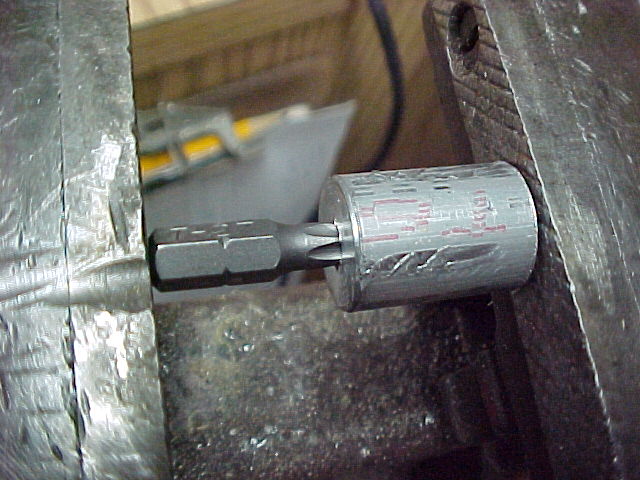
I tried using an Allen key to broach the driver hole but it just wouldn't do a clean job. It kept galling as it was pushed in. The Torx driver works great for some reason. I don't really care what it is as long as it works.
I got the threaded rod and made a couple of plugs tonight. Went as easy as I was hoping. The Torx driver pushed in just as easy as it did with the aluminum test piece. I'm happy.
I got a foot of the 3/8-24 rod and used about half of this piece I cut off...

Dilled a pilot hole and ran a 90 degree chamfering tool into the drilled hole to make the bevel.

The beveled hole.

For the broaching job, I drilled the hole out to .173 dia. That is the one I used in the aluminum piece.

I ran the fitting into a 3/8-24 nut so I could get the "broach" tapped in straight.
Just a couple of light taps with hammer got the broach started.
I then clamped the assembly into the vise and pressed away...
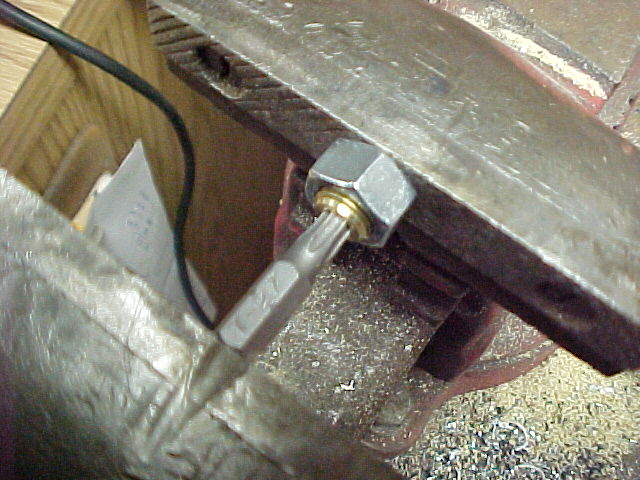
Didn't take much to do the job.

I ran one into the prop valve.
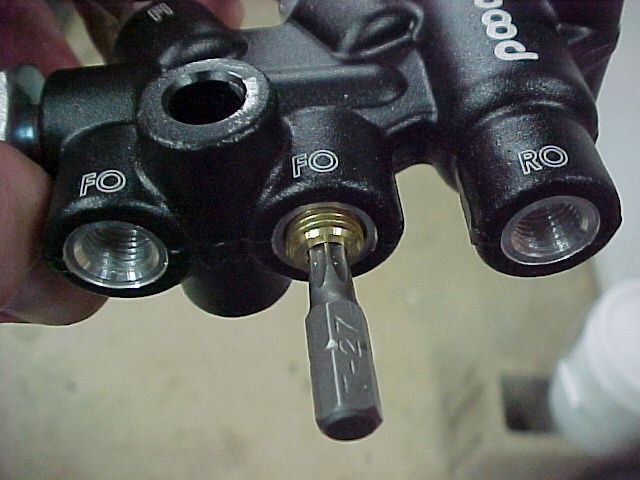
And checked the clearance. We are good to go.

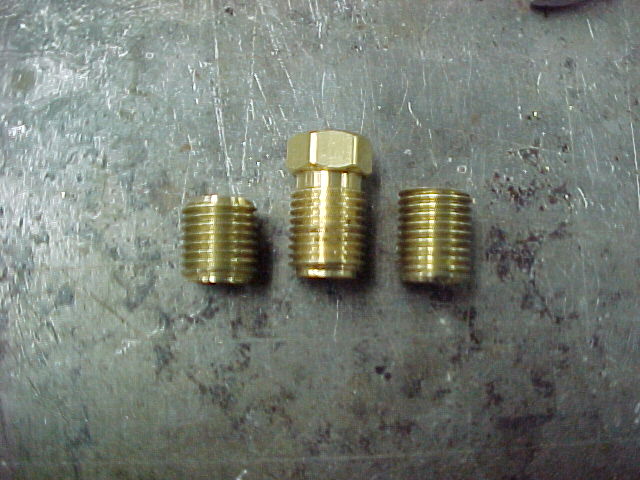
I made a couple of them while I was doing it. Now that I've made one the whole process only takes about 10 minutes.
Now, on to bigger and better things!
MarkMark:
"Bad Ast" Astro Van. Just because I did it... Doesn't mean it's possible...
This my Bad Ast thread...
https://www.pro-touring.com/showthre...roject-Faze-II
This is my Fotki album...
http://astroracer.fotki.com/
01-05-2017 #695 Registered User
- Join Date
- Nov 2006
- Location
- Ma.
- Posts
- 5,569
Nice Job Mark, I've read 15 minutes and learned something that someday might save my butt. Nice fix.
Wayne
Car FINALLY home !!!!!! lol
Project FNQUIK https://www.pro-touring.com/showthre...ghlight=FNQUIK
01-06-2017 #696
Registered User
- Join Date
- Mar 2004
- Location
- Mid-Michigan
- Posts
- 2,764
Thanks Wayne! Very glad your butt is out of harms way...
MarkMark:
"Bad Ast" Astro Van. Just because I did it... Doesn't mean it's possible...
This my Bad Ast thread...
https://www.pro-touring.com/showthre...roject-Faze-II
This is my Fotki album...
http://astroracer.fotki.com/
01-07-2017 #697
Registered User
- Join Date
- Mar 2004
- Location
- Mid-Michigan
- Posts
- 2,764
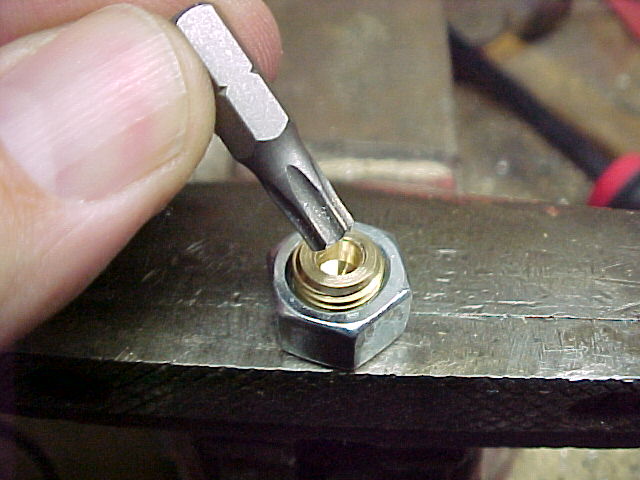
Got out in the shop this morning and made a couple of new, shorter, plugs. These go pretty well flush with the prop valve now so I know there will be no issues with fitment. These fittings are much nicer.

They flush up real nice with the prop valve. The plug on the left is off the shelf.

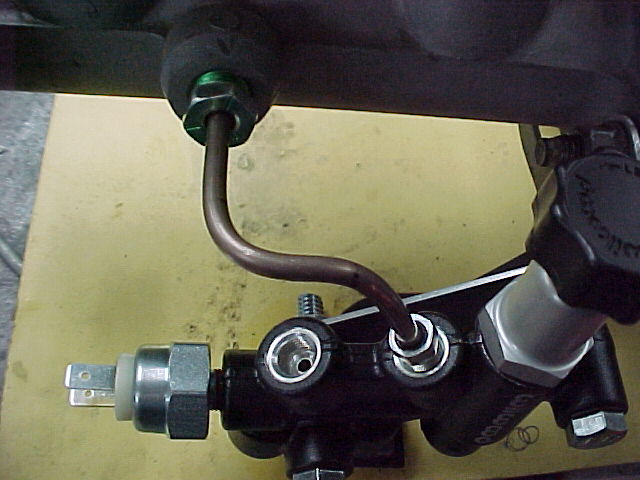
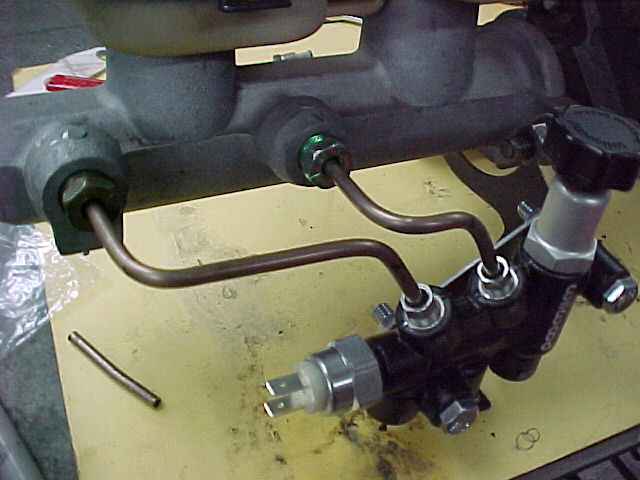
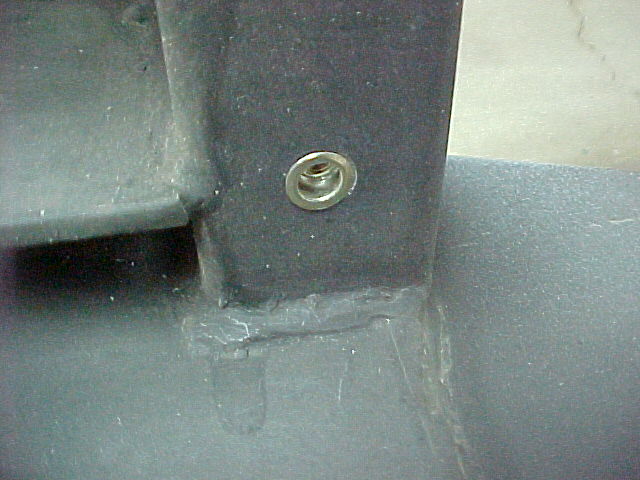
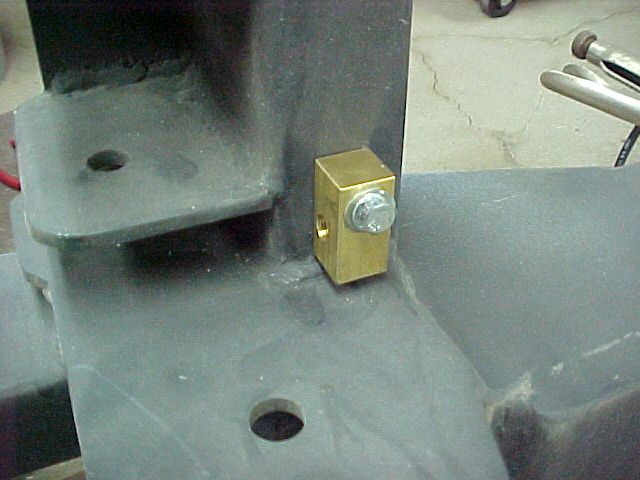
With that finally done I started laying out parts to get the brake lines ran. This junction block will bolt under the cross member. Drilling a hole for a 1/4-20 rivnut is next.
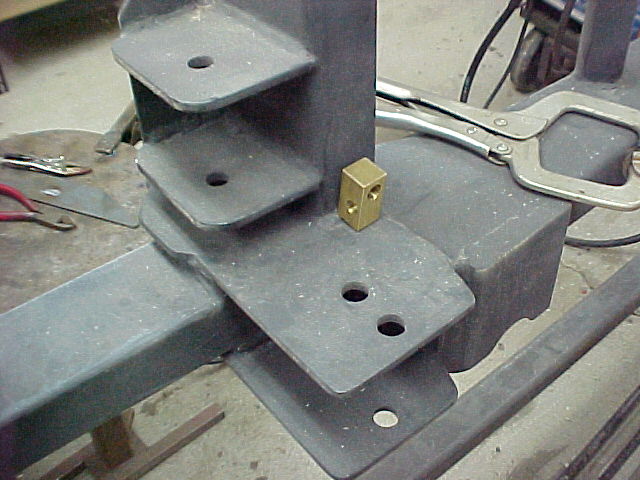

Rivnut installed.
With the block installed I can start routing lines.
 Mark:
Mark:
"Bad Ast" Astro Van. Just because I did it... Doesn't mean it's possible...
This my Bad Ast thread...
https://www.pro-touring.com/showthre...roject-Faze-II
This is my Fotki album...
http://astroracer.fotki.com/
01-07-2017 #698
Registered User
- Join Date
- Mar 2004
- Location
- Mid-Michigan
- Posts
- 2,764
I routed the line up and around the forward 4-bar mounts. This should keep it out of harms way with the wrenches.

The line runs back along the inner rail and follows the kick up back to the rear shock cross member.
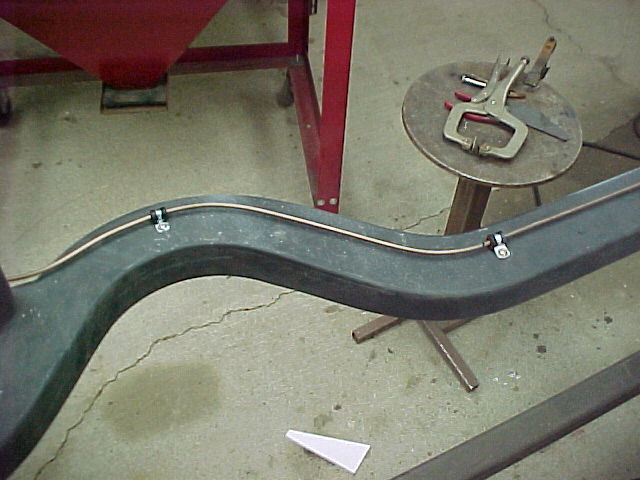
It will run out across the cross member to the junction block for the rear soft line.

I'll get the front line ran tomorrow.
MarkMark:
"Bad Ast" Astro Van. Just because I did it... Doesn't mean it's possible...
This my Bad Ast thread...
https://www.pro-touring.com/showthre...roject-Faze-II
This is my Fotki album...
http://astroracer.fotki.com/
01-07-2017 #699 Registered User
- Join Date
- Mar 2008
- Location
- Brisbane Australia
- Posts
- 410

Nice
Hot rodder's recycle, wheres those prius' going when the tree huggers have a new fad.
01-07-2017 #700
Registered User
- Join Date
- Apr 2001
- Location
- The Netherlands
- Posts
- 1,509
Nice job, love the attention for detail!

 Reply With Quote


