Results 461 to 480 of 862
Thread: The BAD AST Project - Faze II
-
09-13-2012 #461
 Registered User
- Join Date
- Apr 2006
- Location
- MD
- Posts
- 232

Lookin good! I used those molex connectors on my relay box a little while back and had to make due without the crimping tool. It took a long time, but the end result was nice. Do you just get yours from radio shak?
-
09-13-2012 #462 Registered User
- Join Date
- Mar 2004
- Location
- Mid-Michigan
- Posts
- 2,764
Thanks Bernie,
Yes sir, the connectors are from Radio Shack.

I also have a molex style kit I got from Jegs when I bought the crimper. It was thirty bucks which was a good price. Lots of terminals from 1 to 6 way.
If you do any more of those open barrel crimps invest in a crimp tool. It is SO worth it in time saved and end product.
These were the first I had done with the correct tool and I was amazed at how easy it was... and how good they looked.Mark:
"Bad Ast" Astro Van. Just because I did it... Doesn't mean it's possible...
This my Bad Ast thread...
https://www.pro-touring.com/showthre...roject-Faze-II
This is my Fotki album...
http://astroracer.fotki.com/
09-14-2012 #463 Registered User
- Join Date
- Nov 2008
- Posts
- 63
 That's the inspiration I was needing. I purchased a couple of mil-spec connectors and have a harness all around my garage, but was a little afraid of braking something. I know it's not that difficult, but sometimes too much thinking makes you afraid.
 Originally Posted by astroracer

Your project is awesome, I've been following since the beginning and checking all the updates I get daily by email. It will be awesome once completed with all those great mods.
Thanks for the inspiration
09-14-2012 #464
Registered User
- Join Date
- Apr 2006
- Location
- MD
- Posts
- 232
Any reccommendations for higher amperage multi-pin connectors?
I like the mil connectors, but they are so expensive.
09-14-2012 #465
Registered User
- Join Date
- Mar 2004
- Location
- Mid-Michigan
- Posts
- 2,764
No problem Bud, glad to be an inspiration to someone. I do a lot of that "too much thinking" thing. I have been doing that with this wiring job but, like is stated in Tony's book, "break the job down into the individual circuits and it will go easier" He is right. Taking the work one step at a time will get you a little closer everyday. Originally Posted by LSfan70s
MarkMark:
"Bad Ast" Astro Van. Just because I did it... Doesn't mean it's possible...
This my Bad Ast thread...
https://www.pro-touring.com/showthre...roject-Faze-II
This is my Fotki album...
http://astroracer.fotki.com/
09-14-2012 #466
Registered User
- Join Date
- Mar 2004
- Location
- Mid-Michigan
- Posts
- 2,764
Hi Bernie, Originally Posted by SickSpeedMonte
There is a lot of that stuff out there. Anderson makes some good connectors as do the higher end stereo guys. I have picked up a lot of connectors, fuse holders and distribution blocks at car stereo shops. Most of that stuff is very reasonably priced so check them out.
What are you doing that you need a hi-amp connector?
MarkMark:
"Bad Ast" Astro Van. Just because I did it... Doesn't mean it's possible...
This my Bad Ast thread...
https://www.pro-touring.com/showthre...roject-Faze-II
This is my Fotki album...
http://astroracer.fotki.com/
09-16-2012 #467
Registered User
- Join Date
- Mar 2004
- Location
- Mid-Michigan
- Posts
- 2,764
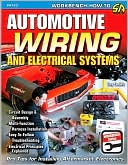
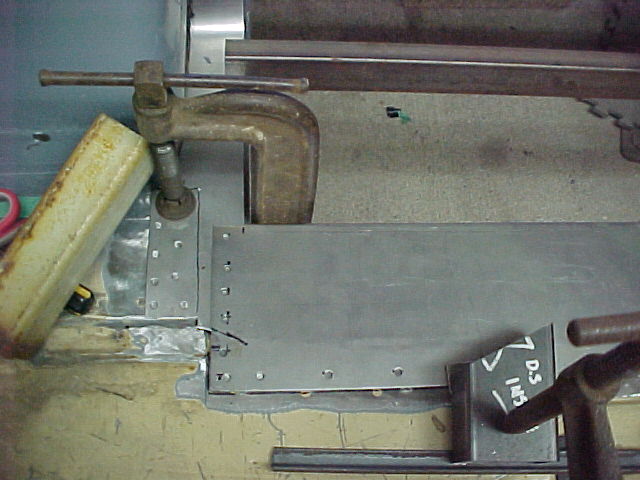
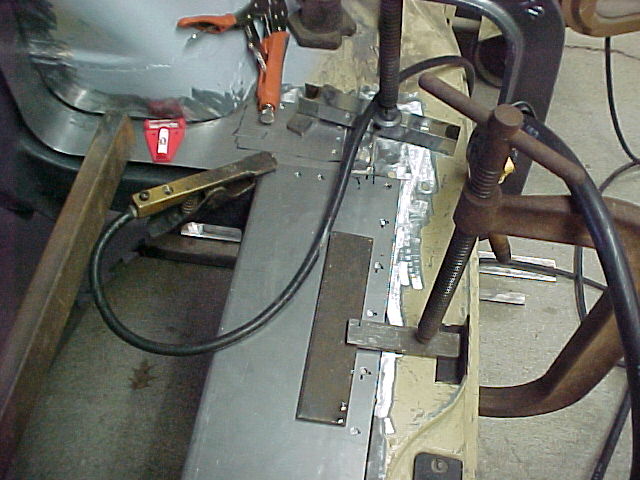
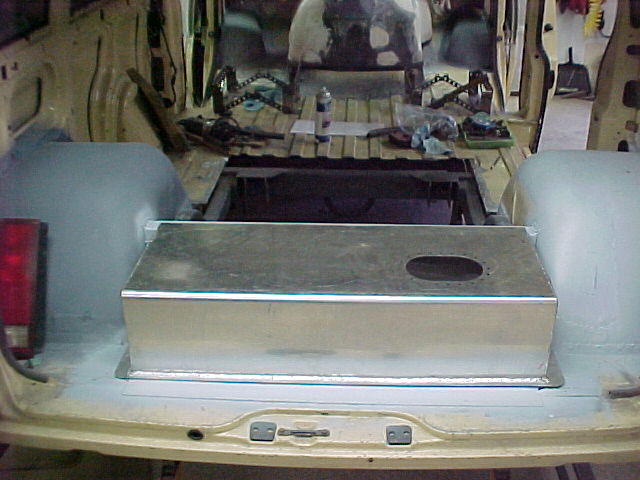
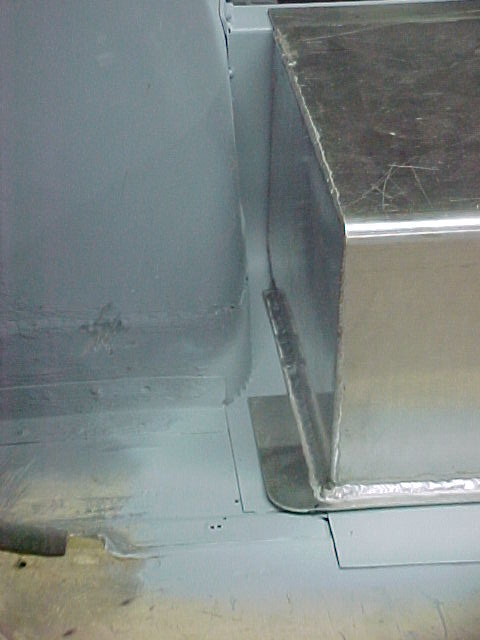
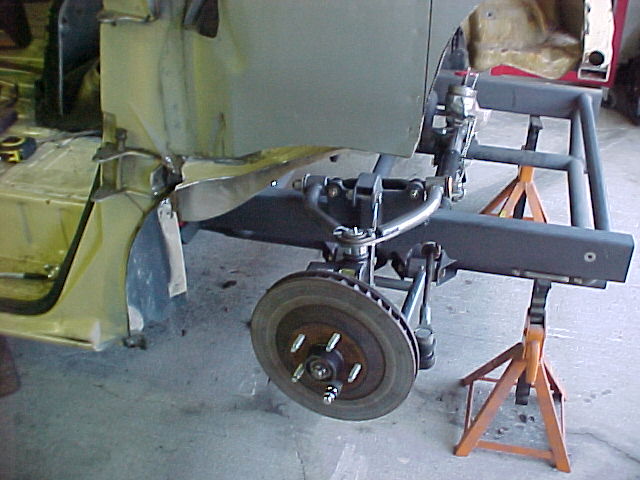
Got a lot done today. We finished closing in the fuel tank. Made the rear filler panel out of a piece of 18ga. Bent a 1/2" lip on the front side, punched a bunch of holes in it and spot welded that and the two end panels into the van.
This is the driver's side before spot welding.
The passenger side.
After welding. This closes out the rear tank opening and, after finish paint, a strip of rubber will go between the tank and body to seal everything up
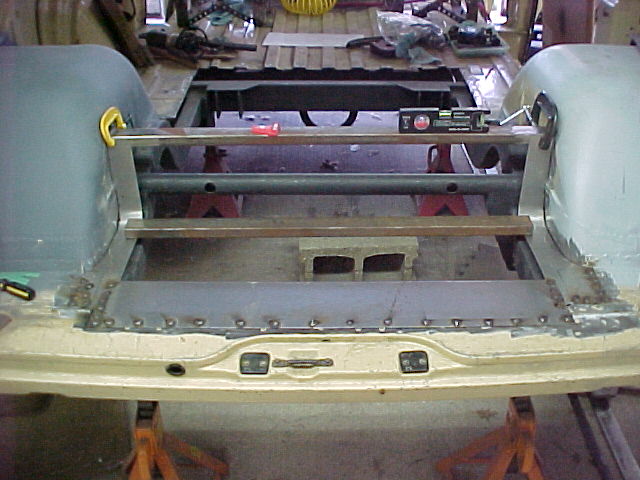
After some cleanup and primer.
Here you can see the verticle spot welds on the end panels.
These will get buried in seam sealer to smooth things out. After the body comes off the frame I will seam seal on the back side also.
Here's a shot with the tank in place. Everything fit up great! I will work on the seam sealer stuff tomorrow night.
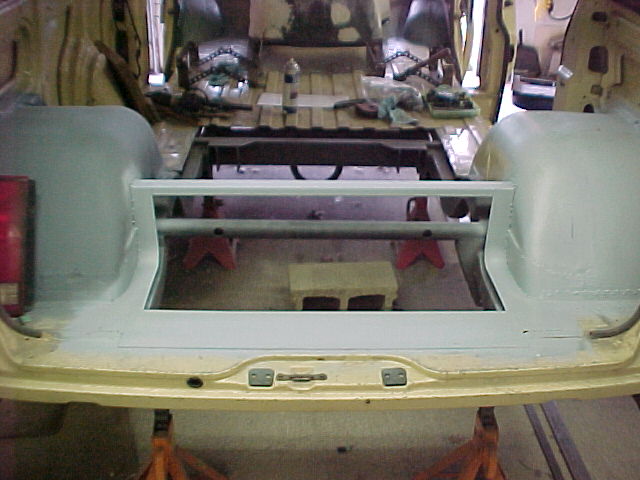
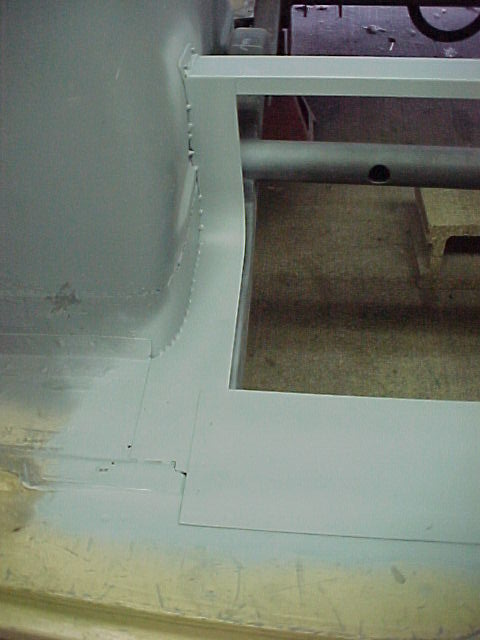
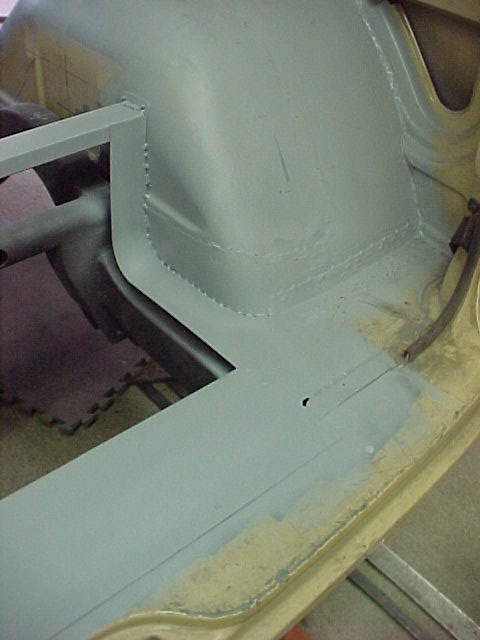
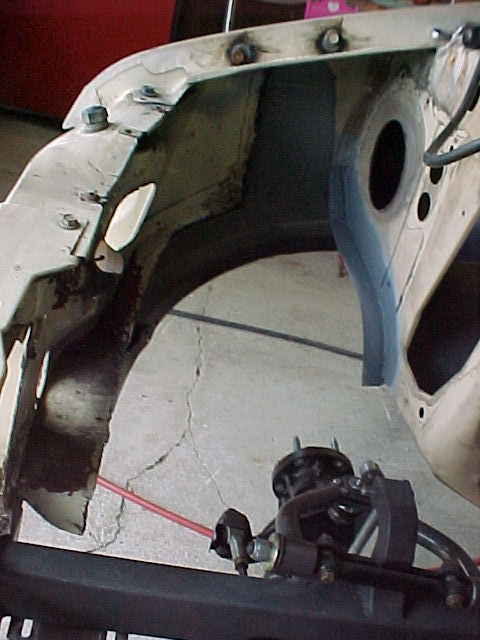
I got the engine compartment inner wheel wells cut out today also. Fired up the plasma cutter and did some trimming.
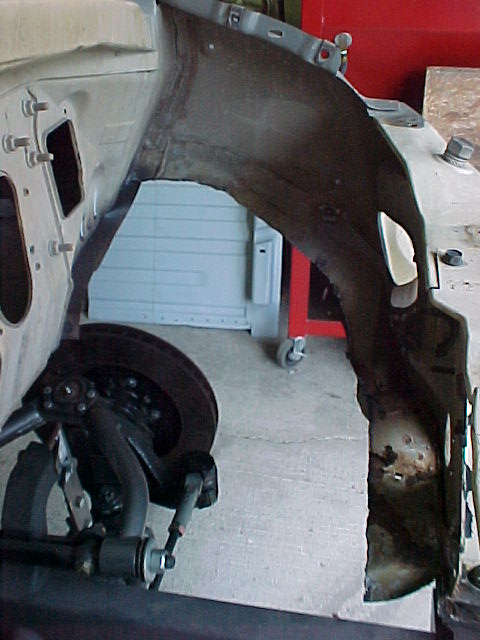
There isn't much left! I will be rolling some 18ga to rebuild these guys. The drivers side will see mounts for the relay box build into it.
This is the pass side. Won't be much of this visible once the HVAC box goes back in.
Got something done today!
Thanks for looking!
MarkMark:
"Bad Ast" Astro Van. Just because I did it... Doesn't mean it's possible...
This my Bad Ast thread...
https://www.pro-touring.com/showthre...roject-Faze-II
This is my Fotki album...
http://astroracer.fotki.com/
09-17-2012 #468
Registered User
- Join Date
- Apr 2006
- Location
- MD
- Posts
- 232
Looking good Mark, your plug welds put mine to shame! I wish I could do mine that well consistently.
I need a high amperage multi-pin connector for my relay box. It houses relays for the fans (2 speeds powered by two different wires for the ramcharger fans) and the high/low beam H4's.
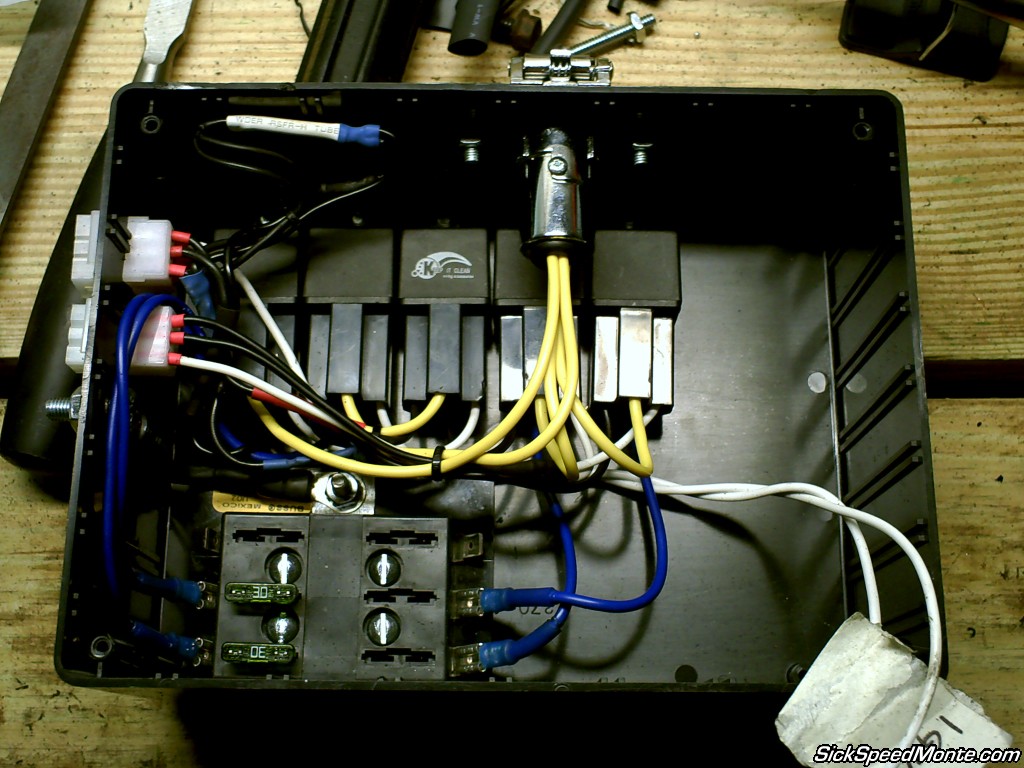
That's a trailer connector in there right now and I don't really like it.
09-17-2012 #469
Registered User
- Join Date
- Mar 2004
- Location
- Mid-Michigan
- Posts
- 2,764
Hey Bernie,
Thanks for the weld kudo's. I can give all of the credit to my machine. Once it's set the spot weld function works very well. I do get a clinker now and then but 99% of them are pretty nice.
Nice job on the relay box! I love the Radio Shack project boxes for this!
What is the amperage draw for your fans? Mine run around 14 amps and I will be running at least a 12ga wire (probably 10ga) out to the fans. I will stay away from any sort of connector between the fans and the relay other then the pigtail at the fan.
If you need a good connector Molex makes a high amperage line. I think they call it Mega-Amp or Mega-fit, something like that. They are bigger then the regular Radio Shack units and I think I read where they will handle up to 20Amps. I've never used one so I can't give a review. I'll do some looking though. Your rig looks pretty good with the connectors as a plug in. May think about that for mine also...
The regular connectors are so exspensive I'll have to find some prices before I commit to the bigger ones.
MarkMark:
"Bad Ast" Astro Van. Just because I did it... Doesn't mean it's possible...
This my Bad Ast thread...
https://www.pro-touring.com/showthre...roject-Faze-II
This is my Fotki album...
http://astroracer.fotki.com/
09-17-2012 #470
Registered User
- Join Date
- Apr 2006
- Location
- MD
- Posts
- 232
Oh so those are true spot welds? A lot of guys (even the ones on some Saturday morning car shows) call plug welds spot welds. That's nice, I'd like to have a spot welder.
My fans draw something close to 30A per leg on startup from what I've been told. I don't think my meters are fast enough to measure the transient though.
I like being able to remove the box from the harness, just in case. The relays are through-bolted to the box, so it would make it easier to R&R them.
Thanks for the tip on the high amperage Molex connectors!
09-18-2012 #471
Registered User
- Join Date
- Mar 2004
- Location
- Mid-Michigan
- Posts
- 2,764
Half and half I guess. The welds on the floor are plug welds (we punched holes for those) and the ones going up the verticle panels are spot welds. They were all done with my welder set on "SPOT".
As far as the start up current for your fans goes, I wouldn't be concerned with that. Initial draw may go as high as 30 Amps but, unless the current stays at that leve,l you shouldn't have any problem with the regular connectors. The nominal draw, with the engine hot and both fans running, is what you need to be concerned with. Check that and build your connectors to suit.
MarkMark:
"Bad Ast" Astro Van. Just because I did it... Doesn't mean it's possible...
This my Bad Ast thread...
https://www.pro-touring.com/showthre...roject-Faze-II
This is my Fotki album...
http://astroracer.fotki.com/
09-19-2012 #472
Registered User
- Join Date
- Mar 2004
- Location
- Mid-Michigan
- Posts
- 2,764
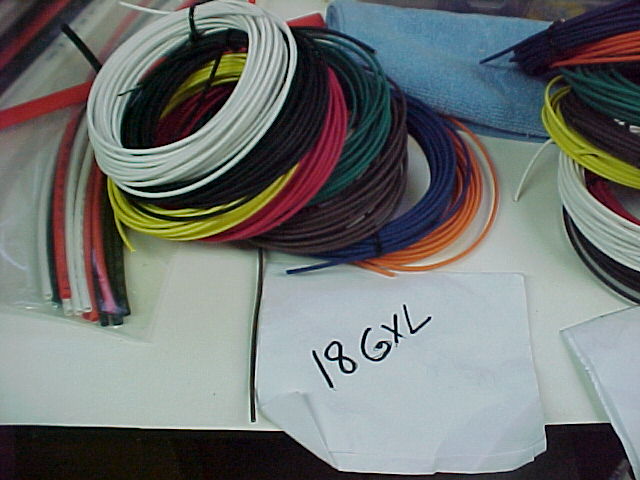
If anyone is in need of automotive wire give Nate Garland at www.wirebarn.com a look. He sells a number of different types with GXL cross-linked polyethelene being one of them.
He also sells it in 25' lengths in multi-packs of six or eight colors. This is perfect for a home builder like myself as I don't need 100' spools of wire laying around. I just bought 1 ea. of 18ga, 16ga and 14ga 8 color packs from him and paid about what I would have for four 100' spools of 16ga. This is more then enough wire to finish up the van and probably a couple more projects down the road. With 8 colors and three ga sizes I am pretty well set for wire for a while. He also has 12 ga and I'll be picking up a selction of that this week.
Here are some pics of the wire he sent me. It is very nice stuff. And it is made in the USA!!!
 Mark:
Mark:
"Bad Ast" Astro Van. Just because I did it... Doesn't mean it's possible...
This my Bad Ast thread...
https://www.pro-touring.com/showthre...roject-Faze-II
This is my Fotki album...
http://astroracer.fotki.com/
09-24-2012 #473
Registered User
- Join Date
- Mar 2004
- Location
- Mid-Michigan
- Posts
- 2,764
Didn't make much headway on the van this past weekend. Spent some time garage saling with the better half Saturday morning. Mel was out in the afternoon and we spent most of the day rebuilding an old hand crank ice cream maker. Bent up new hoops for the bucket and stamped out a couple of sheet metal pieces to replace the rusty handle retainers.
Sunday was spent sharpening mower blades, fixing a shelf and putting away lawn furniture.
I made a spool for all of the new wire I just got. Used a 3 1/2" heavy cardboard tube and cut 25 cardboard rings to separate the wire. Took me most of the afternoon and evening to get that done. I took pics but didn't get them downloaded.
I got the sand blaster cabinet warmed up a little also. I blasted the orange paint off the engine pullies and sprayed those with self etching primer. I took the pullies off a 454 I have sitting in the corner and started blasting those. I will get them finished tonight. I don't know what exactly I am going to need to get the alternator and power steering pumps working so I hope I have enough options for pullies here.
MarkMark:
"Bad Ast" Astro Van. Just because I did it... Doesn't mean it's possible...
This my Bad Ast thread...
https://www.pro-touring.com/showthre...roject-Faze-II
This is my Fotki album...
http://astroracer.fotki.com/
10-02-2012 #474
Registered User
- Join Date
- Mar 2004
- Location
- Mid-Michigan
- Posts
- 2,764
Just to let you guys know where we are at on the van.
Last weekend (Sunday)was spent building seat frame spacers and getting the front (engine compartment side) wheel wells cleaned up and building the new inner wells. Mel worked on the seat spacers while I made cardboard templates and cut and bent 22ga sheet for the new inners. We got a bit done, better than nothing I guess.
I have a bit of a conundrum with battery placement. Even though I am building a van there is no room in the back (behind the axle) for a battery... Unless I mount it high over the back of the Pass side tub. That's not gonna happen, so I am looking at cutting a hole in the floor right in front of the tub and dropping the battery into that. Orrrrr... I could mount the battery up front, centered in the chassis, down low behind and under the radiator. There is plenty of room in front of the rack to drop the battery low into the frame. I don't want to destroy the new weight bias I created by moving the engine back but this is looking to be a real good solution. Keeping the battery low and centered will help. This will also GREATLY simplify the wiring for the start and charge circuits! I will get pics loaded tonight.
What do you guys think?
MarkMark:
"Bad Ast" Astro Van. Just because I did it... Doesn't mean it's possible...
This my Bad Ast thread...
https://www.pro-touring.com/showthre...roject-Faze-II
This is my Fotki album...
http://astroracer.fotki.com/
10-05-2012 #475
Registered User
- Join Date
- Jan 2012
- Location
- Virginia
- Posts
- 237
Mark, as I sit here and watch this O's game (any Orioles fans on here... been a while since a playoff birth) this is the first time I've gone through your entire post, and I must say, you are god amongst men :-) This is hands down the most badass van I have ever seen!
10-11-2012 #476
Registered User
- Join Date
- Mar 2004
- Location
- Mid-Michigan
- Posts
- 2,764
Thank you sir but you've got me all wrong... I am quite proud of what Mel and I are doing here but, in no way, do I consider this build perfect. It is far from that. I have cobbled up some sheet metal parts and built a chassis but what I am doing here is amatuer work compared to what the pro shops do. What we are doing gets the job done and no one will be the wiser after paint and carpet. Originally Posted by Chadman27
Thanks though
MarkMark:
"Bad Ast" Astro Van. Just because I did it... Doesn't mean it's possible...
This my Bad Ast thread...
https://www.pro-touring.com/showthre...roject-Faze-II
This is my Fotki album...
http://astroracer.fotki.com/
10-11-2012 #477
Registered User
- Join Date
- Mar 2004
- Location
- Mid-Michigan
- Posts
- 2,764
Things are moving slowly on the van. I have been working on another "project" and the fall weather is making me take care of some "around the house" projects.
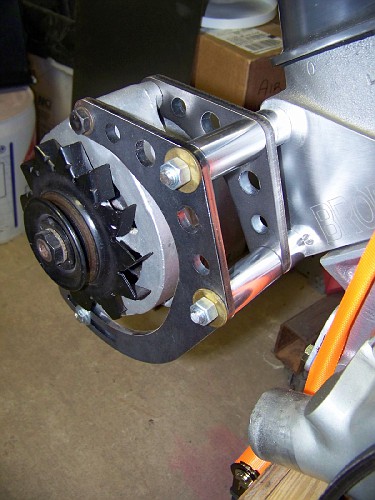
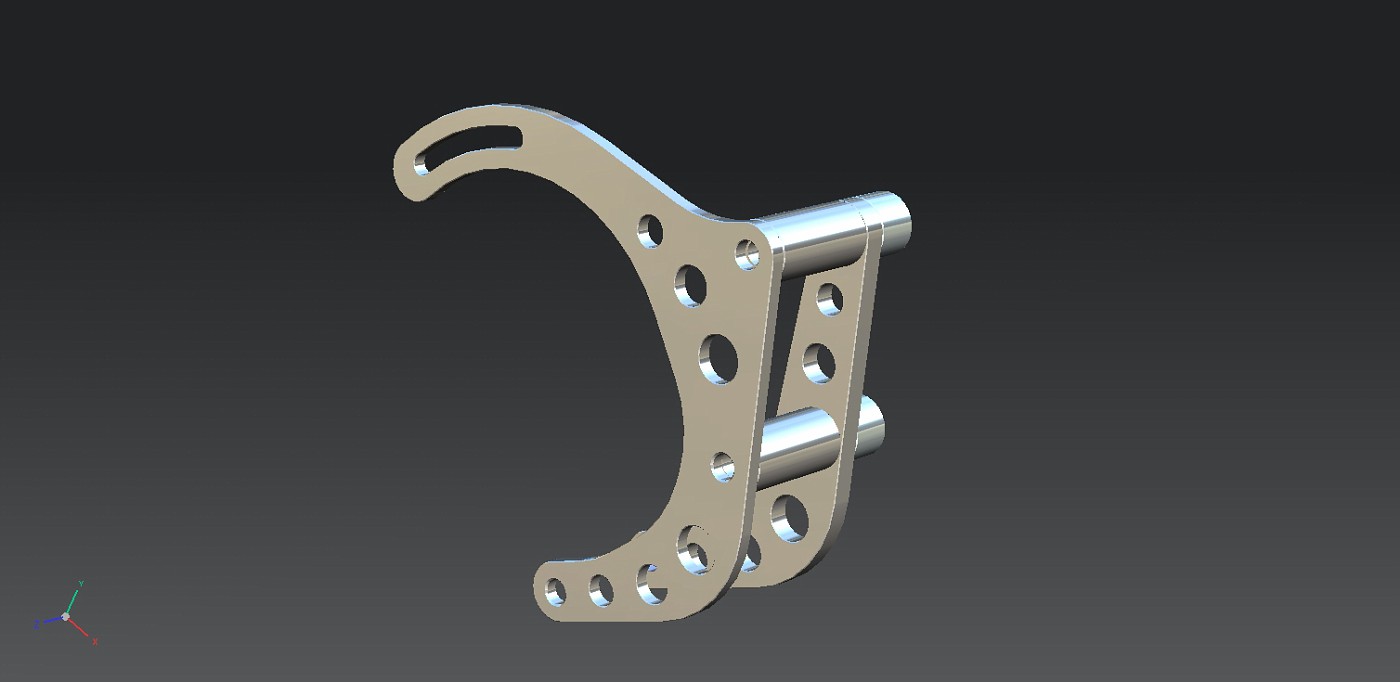
I have gotten a couple things done though. I ended up ordering some chromed pulleys from Jegs. Just to get the front dressed out and let me finish the alternator brackets. The pulleys needed a bit of work to get them yo fit right but I did that last week and got the alt brackets done over the weekend.
I made the mounting studs from 3/8-16 threaded rod. Cut two to length and threaded them into the aluminum head as far as they would go. I will pull them out and put a little anti-sieze on them for final assembly. I will probably put some acorn nuts on them to clean them up.
Here is a creen shot of my UG file for the bracket design... Looks pretty close doesn't it?

I used 1" dia aluminum to make the spacers. Bored them out on the lathe and put a nice polish on them after I faced them to length.
The brackets will get sand blasted and powder coated black after I smooth out the edges.
The pulleys will get the motor running and drivable but I plan to upgrade them to polished aluminum when the van is on it's way to completion.

I have a chromed fan and pulley for the alt and am waiting on the power steering pulley to show up.
MarkMark:
"Bad Ast" Astro Van. Just because I did it... Doesn't mean it's possible...
This my Bad Ast thread...
https://www.pro-touring.com/showthre...roject-Faze-II
This is my Fotki album...
http://astroracer.fotki.com/
10-11-2012 #478
Registered User
- Join Date
- Mar 2004
- Location
- Mid-Michigan
- Posts
- 2,764
Here are few pics of the wire spool I made to hold all of the wire I got.
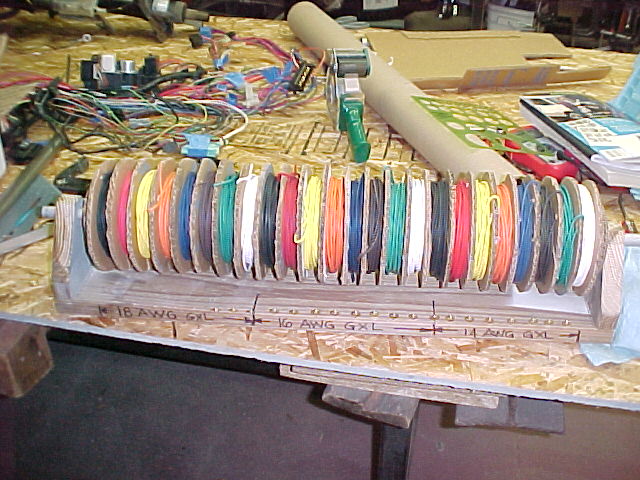
This is pretty simple as it's only a heavy cardboard tube with dividers made from heavy cardbooard and hotglued in place... A scrap of 5/4 deck board made the base.
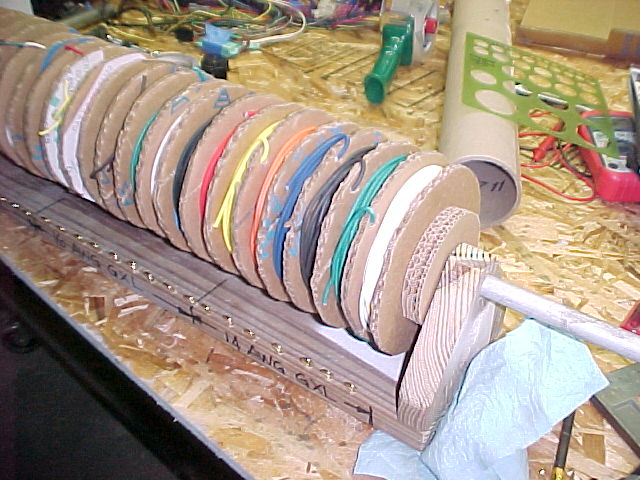
I put hooks in this and it hangs right over my wiring bench so the wire is easy to reach and stays out of the way.
Here are some pics of the battery box. The rear most position just isn't good because it's way to high in the van.
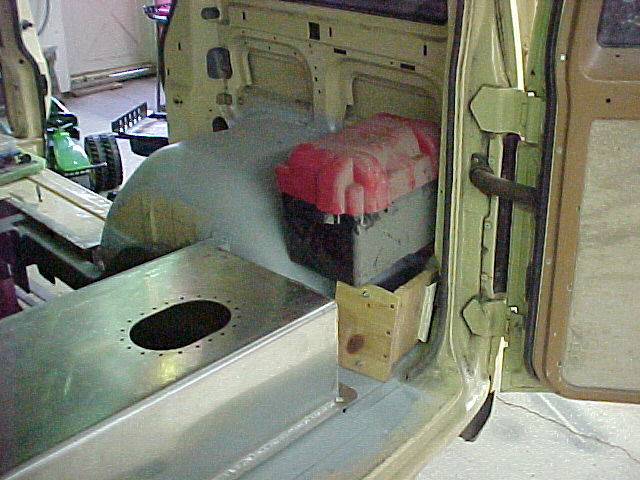
I thought about putting it in the floor in front of the passenger side wheel tub but that is a lot of work for no real gain. Also it would be in the way of my planned exhaust routing.
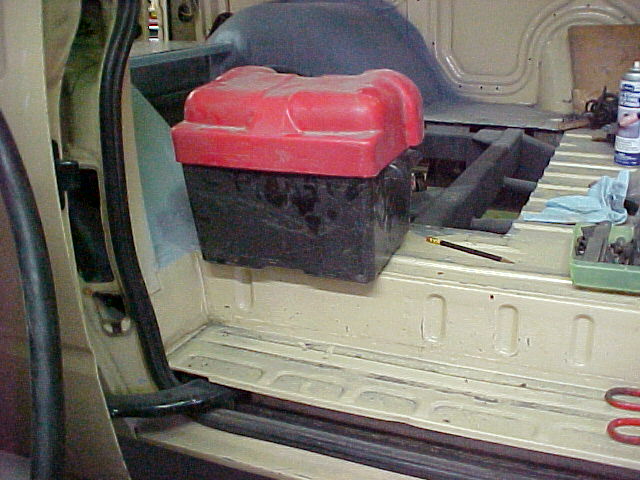
I've made up my mind to put it up front. Centered in the frame as low as I can get it yet keep it above the bottom of the lower frame tube.
It will be sitting fairly low and will not even see the radiator. This is also going to simplfy the wiring by leaps and bounds! No huge mass of cables running front to back now.
MarkMark:
"Bad Ast" Astro Van. Just because I did it... Doesn't mean it's possible...
This my Bad Ast thread...
https://www.pro-touring.com/showthre...roject-Faze-II
This is my Fotki album...
http://astroracer.fotki.com/
10-11-2012 #479 Registered User
- Join Date
- Apr 2005
- Location
- IN/MI border
- Posts
- 1,919
The fab work is amazing! Keep it up!
10-12-2012 #480
Registered User
- Join Date
- Mar 2004
- Location
- Mid-Michigan
- Posts
- 2,764
Thanks Buddy! Ditto on your render's!
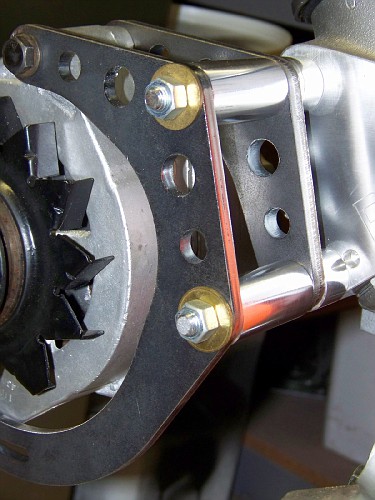
Once I had the alternator brackets installed I got to looking at the placement of the alternator. I would like it it to be a bit lower and tucked in more toward the water pump so I did a little redesign tonight. I took the brackets off and turned them upside down. This pushed the alt out a bit more but I did some measuring and decided to move the bracket down two inches on the line between the cylinder head holes. This will tuck the alternator down and inward toward the lower pump outlet.
here are the new brackets I'll get cut next week.
Compare the new one to the old one and you can see how far down the alternator will go.
This will also put the adjuster bracket up on top of the alternator. Much easier to get to with the engine cover off.
Thanks for looking
MarkMark:
"Bad Ast" Astro Van. Just because I did it... Doesn't mean it's possible...
This my Bad Ast thread...
https://www.pro-touring.com/showthre...roject-Faze-II
This is my Fotki album...
http://astroracer.fotki.com/


 Reply With Quote