Results 181 to 200 of 862
Thread: The BAD AST Project - Faze II
-
06-20-2011 #181

 Registered User
- Join Date
- Jul 2008
- Location
- ohio
- Posts
- 1,135

never seen this thread before but sure am glad you revived it
 ......... several times lol. i like seeing different things being built and mark this sure is different. cant wait to see this thing sitting as a roller.
keep the wheels a spinning and the Beavers a grinning (burt reynolds-smokey and the bandit)
-
06-25-2011 #182 Registered User
- Join Date
- Mar 2004
- Location
- Mid-Michigan
- Posts
- 2,764
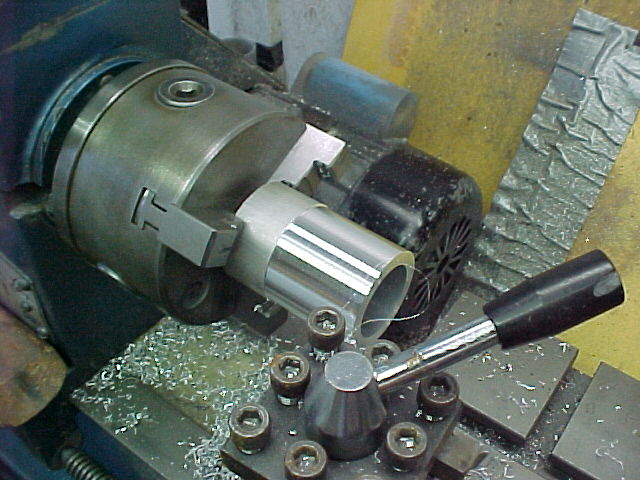
You and me both Craig! I worked at the lathe most of the day today. Got the welding fixture for the LCA inner bushing sleeves made and started making (read that, modifying) the upper arm sleeves.
Here are a few pics of the LCA fixture coming together.
I am just starting to cut the first adapter, here. The inner I.D. of the bushing sleeve is 1.4825 this chink of aluminum is 1.75 O.D. so I had to take right around .128 off the radius to slip it inside the sleeve.
Once I got it turned down on one end I flipped it around in the chuck and turned the other end down.
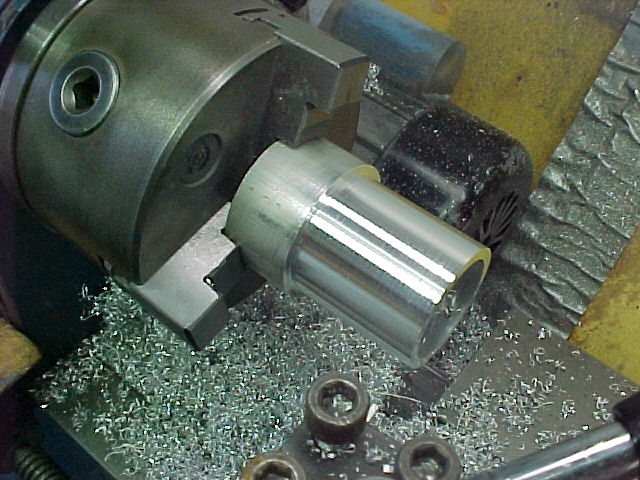
Making the last cut.
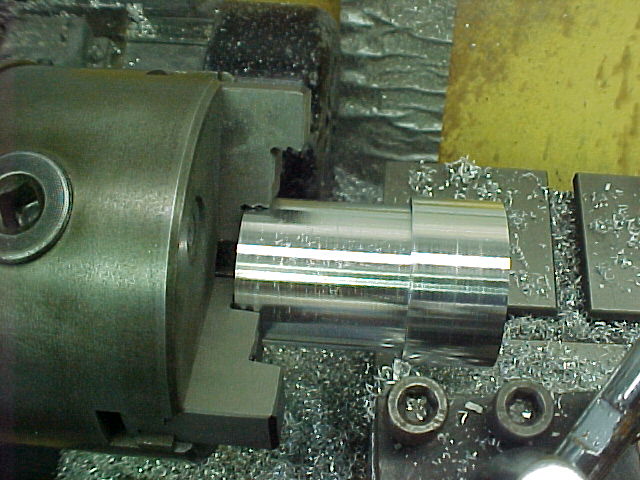
Slip fit inside the sleeve and a slip fit over a 1.25 O.D. tube. The long tube will get bolted to an angle block at set-up height to fab the actual arms.

Thanks for looking
Mark S.Mark:
"Bad Ast" Astro Van. Just because I did it... Doesn't mean it's possible...
This my Bad Ast thread...
https://www.pro-touring.com/showthre...roject-Faze-II
This is my Fotki album...
http://astroracer.fotki.com/
06-25-2011 #183
Registered User
- Join Date
- Mar 2004
- Location
- Mid-Michigan
- Posts
- 2,764
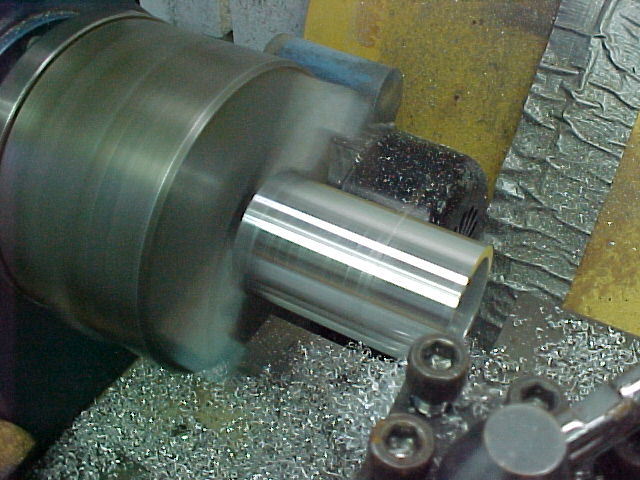
I ordered some bushing sleeves from A & A Manufacturing here in Michigan to make the upper Control Arm sleeves. I will be turning the inside to fit a stock style Monte Carlo upper bushing.
Once I got started I realized my boring bars were not up to the task... I have used these for years on a lot of aluminum but the little guys just can't handle the steel. I broke two while getting one sleeve about 80% done. I will be ordering some bigger boring bars tonight. I could only take about a 5 thou cut at a time so the bigger bars should make the work progress quicker...
These sleeves were 1.434 I.D. on the big end. I have to open them up to 1.530 or so to slip fit the Monte bushings.


After I had made a few passes with this bar I knew we were in trouble.
I got the big end opened up and almost had the other done when the second bar went by by...
I told the wife, damn! I need new tools!Mark:
"Bad Ast" Astro Van. Just because I did it... Doesn't mean it's possible...
This my Bad Ast thread...
https://www.pro-touring.com/showthre...roject-Faze-II
This is my Fotki album...
http://astroracer.fotki.com/
06-25-2011 #184 Registered User
- Join Date
- Aug 2007
- Location
- Albemarle, NC
- Posts
- 1,157
what kind of lathe is that? reason i ask is that im a wooworker, and have a dew lathes for turning. ive read some articles on the forums that stated my delta was origonally able to do both wood and metal with the optional jackshaft, which i have. what kind of rpm and fixtures do you use?
i need to turn some rotors into hubs for my brake swap, and the machine shp wants 200 for the pair.
thanks
michaelMichael Crawford
1970 plymouth Duster back under construction:
https://www.pro-touring.com/showthre...uring-makeover
1987 GMC S15 https://www.pro-touring.com/showthre...ct-drivabeater
06-25-2011 #185
Registered User
- Join Date
- Mar 2004
- Location
- Mid-Michigan
- Posts
- 2,764
HI Michael,
The lathe is an old SMITHY. I bought it in '92 and it ran aluminum for 16 years for a model car parts business I operated. It doesn't see much use since I quit doing that in '08.
Here is a little better pic. It actually is a dual purpose machine with a mill attachment.
I also have a 9 x14" Jet that I used for a while. I seem to migrate to the SMITHY as I am very comfortable running the old dude...
As far as speeds go you have to be careful. Different materials AND different diameters take very different speeds.
I need to turn down the rotors for BAD AST also. I will be cutting the rotor part off with the torch before it goes on the lathe. I hate to think where that rotor would end up if you parted it of at speed! All I will do on the lathe is a bit of clean up work to make the hubs fit inside the Corvette rotors.
I just ordered new "big boy" boring bars from ENCO. Everything, well 99.5%, I turned up to this point was aluminum. Very little steel has run through the chuck. So I didn't need BIG stuff to run small parts. Now I'll hold off making the upper sleeves till the new bars arrive.
Tomorrow will be spent setting up the LCA welding fixture and the tubing bender so I can start bending and fitting bars.Mark:
"Bad Ast" Astro Van. Just because I did it... Doesn't mean it's possible...
This my Bad Ast thread...
https://www.pro-touring.com/showthre...roject-Faze-II
This is my Fotki album...
http://astroracer.fotki.com/
07-03-2011 #186
Registered User
- Join Date
- Mar 2004
- Location
- Mid-Michigan
- Posts
- 2,764
I have to keep pinching myself to make sure all of this progress is real. I sat on this project for so long that I was getting very discouraged. Getting out and actually building this van, getting real work done, is still amazing me...
I have to thank my friend Mel for all of his time and help. He drives out to my place from Flint and works just as hard as I do. He also keeps me focused. I tend to overthink things and he puts "issues" into perspective.
We worked on the LF Lower Control Arm Friday and today. Got it tacked up and have a few pieces to fit tomorrow but the hard part is done and doing the other three arms will go fairly quickly.
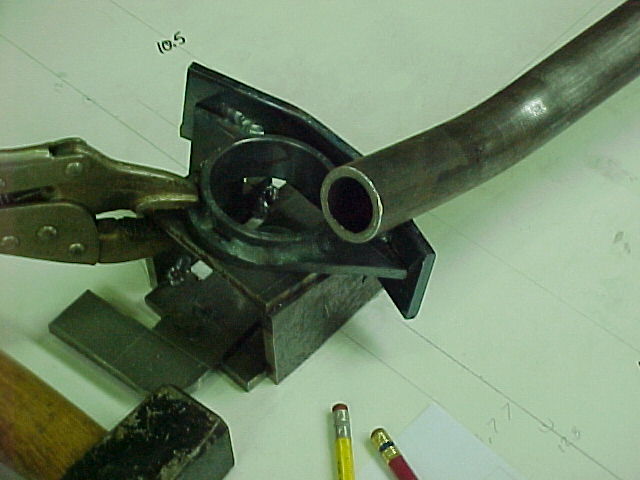
Here is the fixture set up and ready to go. We'll be able to fit both lower arms together and get them tacked with this simple jig.

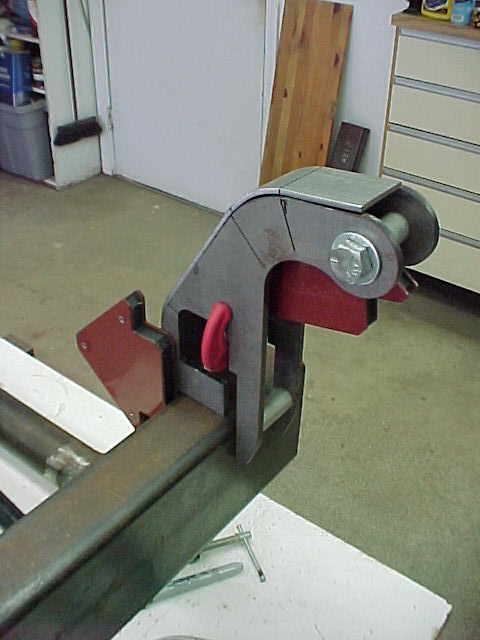
This a pic of the lower ball stud cup with an uncut arm ready to be fit into the fixture.
I did the bends on a pro-tools bender. The tubing is 1.25 O.D. by .156 wall. All of the connecting structure is.25 inch steel.
Did a little thinking on these cuts. Compound angles make for difficult cuts to keep everything tight for tig welding. Cut long, grind to fit...
Didn't do to bad on fitting the arm... Only made one "test coupon" fitting the first one.
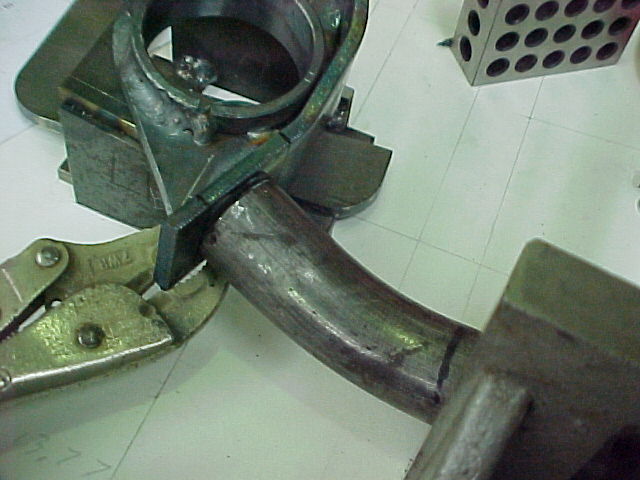
Fitting the forward arm. This is with a nice bevel added for welding.
Every thing tacked up and waiting for the lower shock mount. That'll be tomorrow.
 Mark:
Mark:
"Bad Ast" Astro Van. Just because I did it... Doesn't mean it's possible...
This my Bad Ast thread...
https://www.pro-touring.com/showthre...roject-Faze-II
This is my Fotki album...
http://astroracer.fotki.com/
07-04-2011 #187
Registered User
- Join Date
- Mar 2004
- Location
- Mid-Michigan
- Posts
- 2,764
Got the rest of the LH Arm built and tacked in today. The lower shock mount tube was a pain in the ass. Lots of grinding on this one to get the fit right.
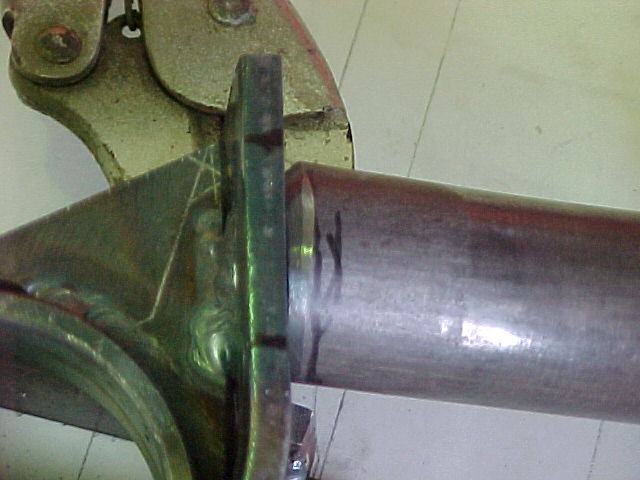
Here is a pic of the fit between the arm and bushing sleeve. We took our time doing this so the welds will not have to be gap fillers.
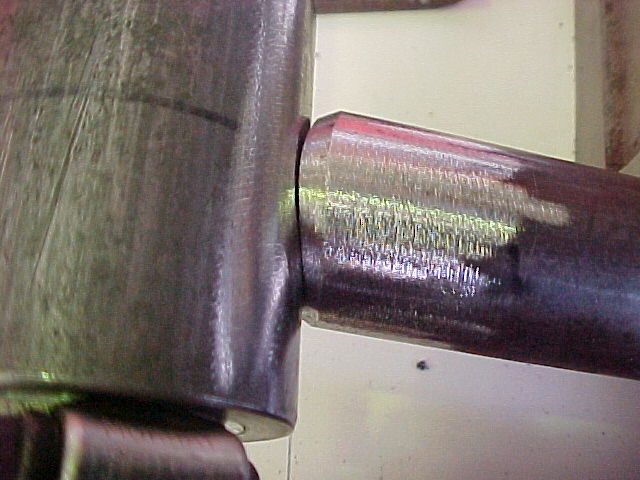
I still have to make the shock mounting tabs but those are cake compared to the rest of this stuff.
Here is the arm tacked together and out of the fixture.
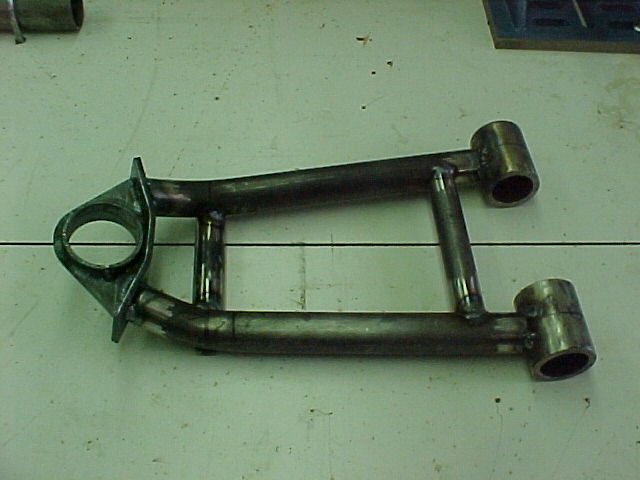
Moved the angle block and started building the RH Arm. We got the forward tube tacked in place and called it a day.

I'll try to get more done this week but I will probably be working long hours and wont be home much before 6:30 in the evening.
Thanks for looking.
MarkMark:
"Bad Ast" Astro Van. Just because I did it... Doesn't mean it's possible...
This my Bad Ast thread...
https://www.pro-touring.com/showthre...roject-Faze-II
This is my Fotki album...
http://astroracer.fotki.com/
07-07-2011 #188
Registered User
- Join Date
- Mar 2004
- Location
- Mid-Michigan
- Posts
- 2,764
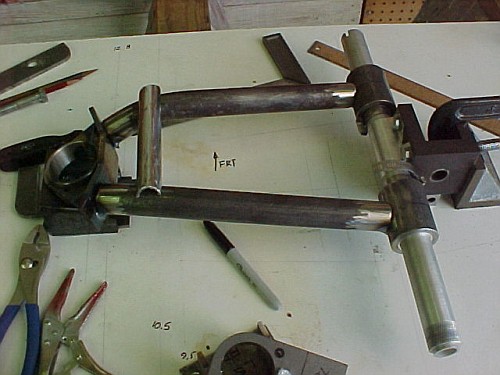
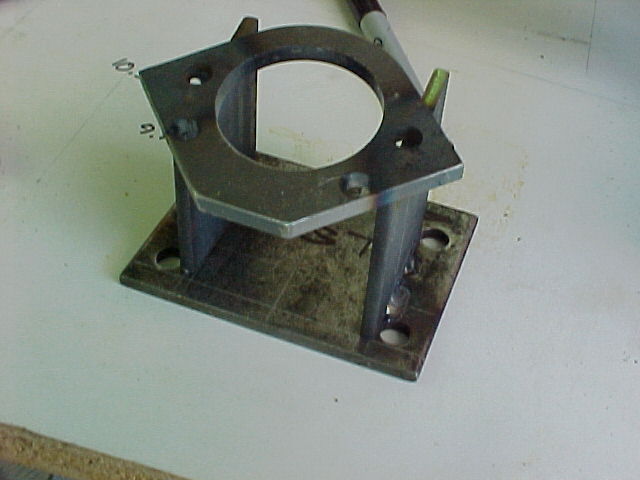
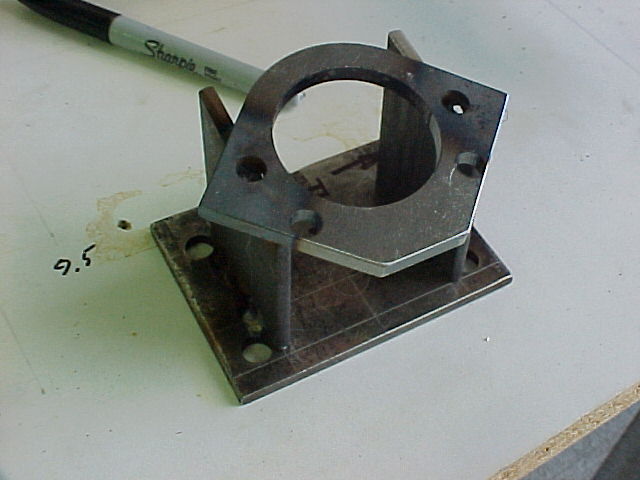
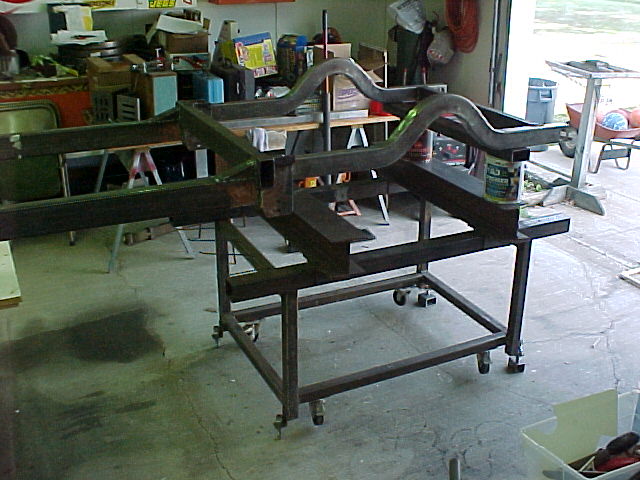
I am only working 8's during the day so I am home by 3:30 or so. Tuesday and Wednseday evenings I spent designing and detailing the welding fixture for the UCA and getting the detail for the UCA done.
Here is the UCA Detail
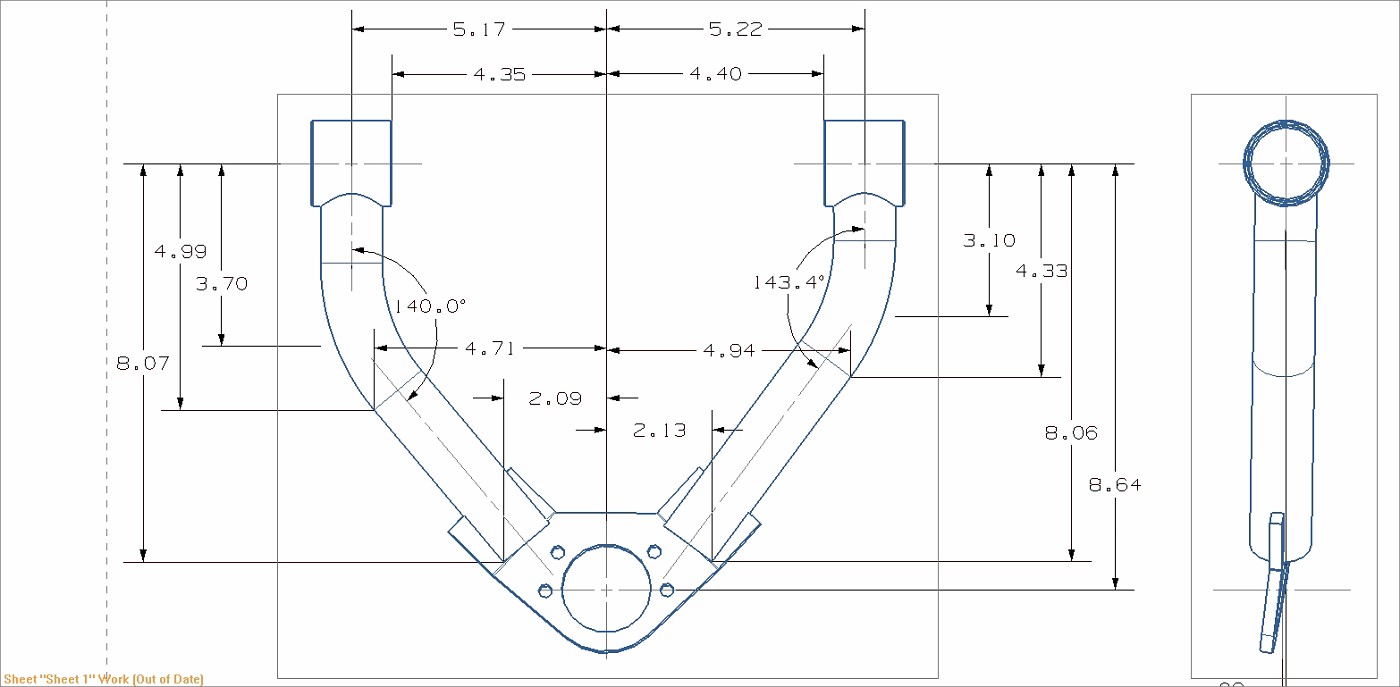
This is the welding fixture detail.
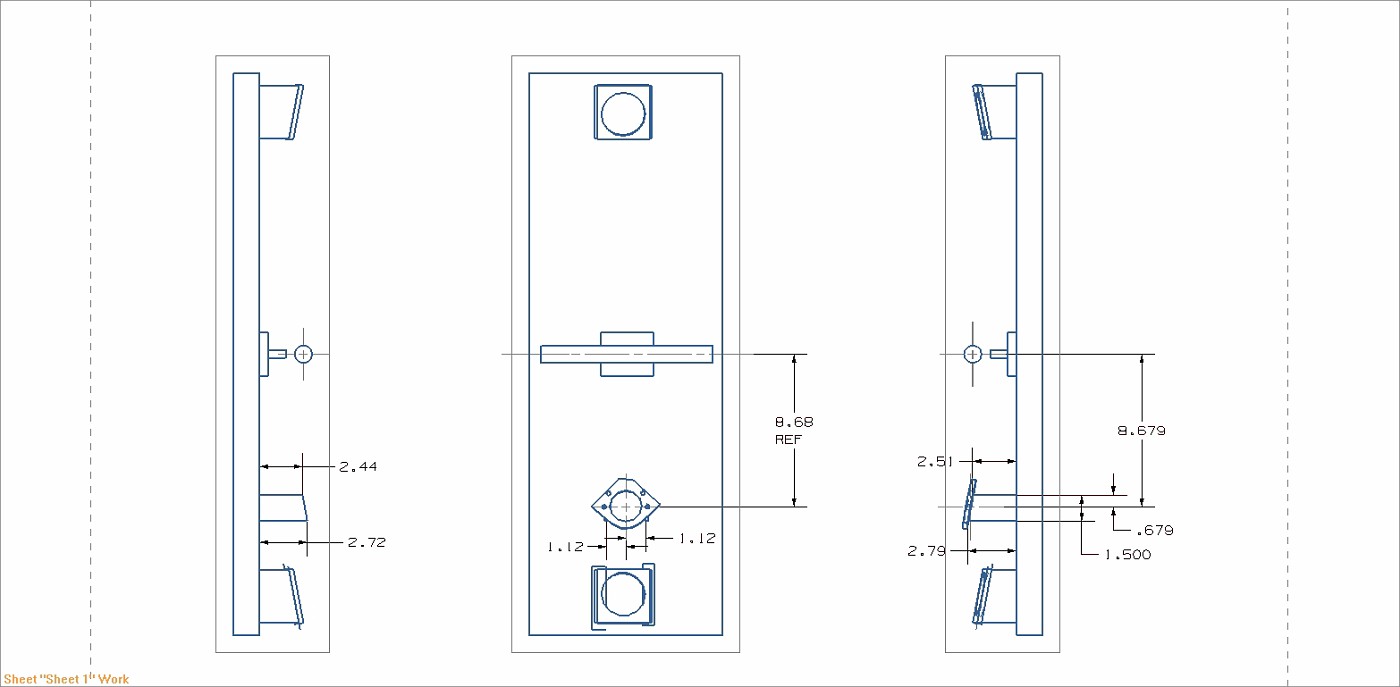
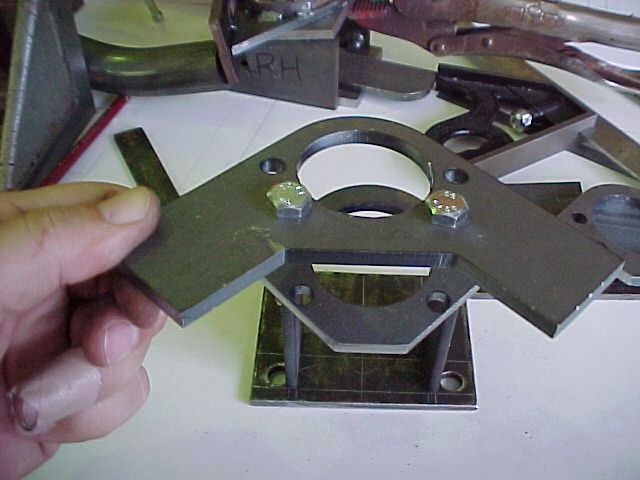
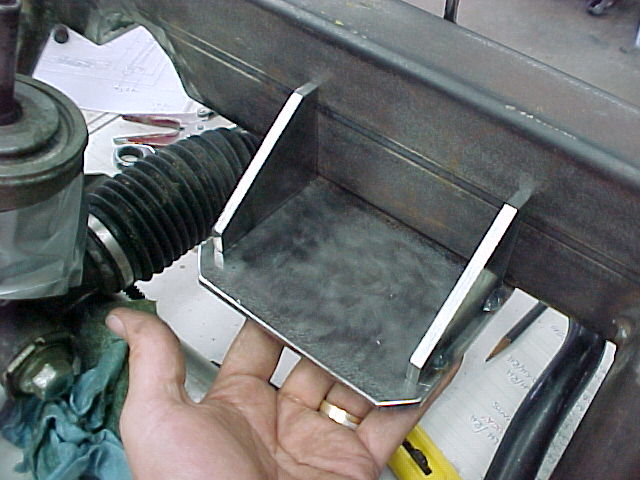
Tonight I worked on the jig for the UCA Ball Stud plate. This will locate the ball stud during fabrication. I got everything cut out and will get the side plates sized on the grinder tomorrow.
Here are the parts laid out for cutting.

Everything cut out and mocked up. I need to run the parts to size on the grinder but this is essentially what we have.
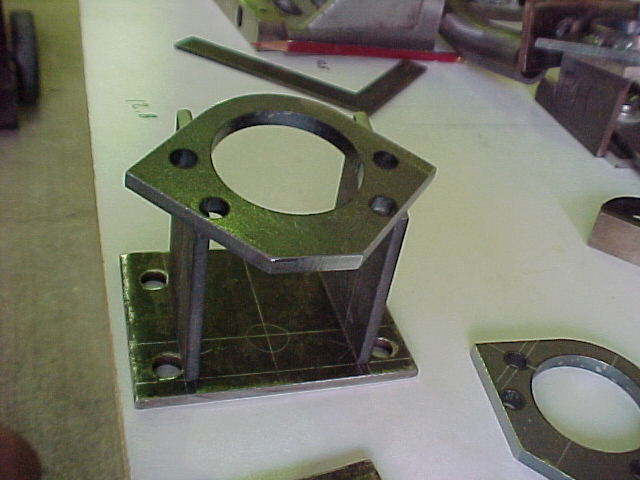
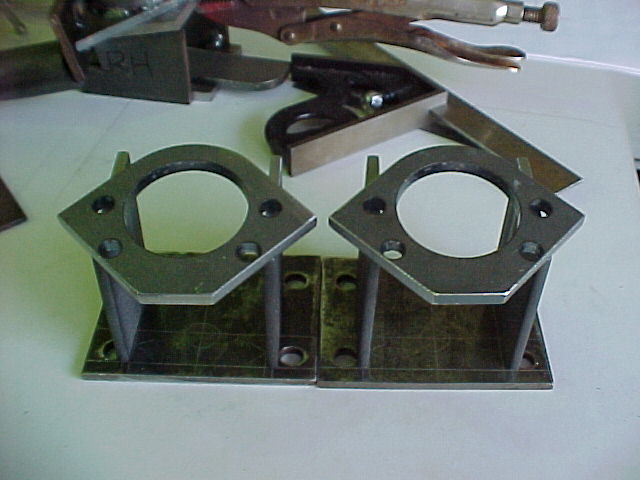
The ball stud plate will be located with a couple of bolts while building the arms.
If all goes well this weekend we'll have a complete set of control arms ready for final welding.
Thanks for looking
MarkMark:
"Bad Ast" Astro Van. Just because I did it... Doesn't mean it's possible...
This my Bad Ast thread...
https://www.pro-touring.com/showthre...roject-Faze-II
This is my Fotki album...
http://astroracer.fotki.com/
07-07-2011 #189 Registered User
- Join Date
- May 2005
- Location
- IL
- Posts
- 586
Looks like alot of time went into just making those control arms, and they look very nice, keep going, i've been working on mine since 2002 bought it just before my wife and I had our twins and now they are 9 and the car is getting much need attention now.
Rick
07-07-2011 #190 Registered User
- Join Date
- Jun 2011
- Location
- St. George, Utah
- Posts
- 1,629
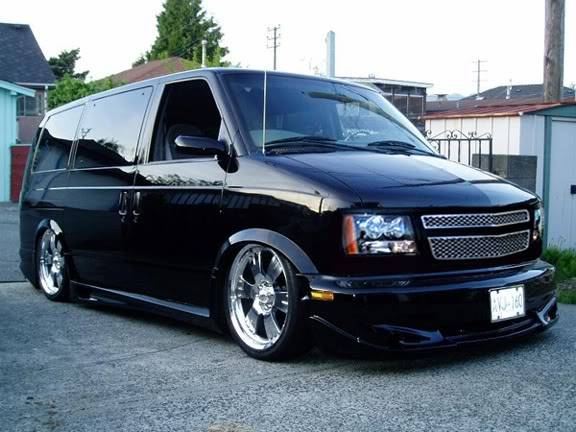
This is a great build thread! Fantastic engineering and fabrication. Before I bought my wagon I thought of doing an Astro to haul my vender booth supplies to car shows. Plans fell through and I got the wagon instead. While I was working out Astro face lift ideas I did this photochop using a late model Tahoe front fascia. I know you've got your ideas but thought I'd share this to help you stay motivated. Keep everything coming, looking forward to seeing more...
Original photo I found on the web-
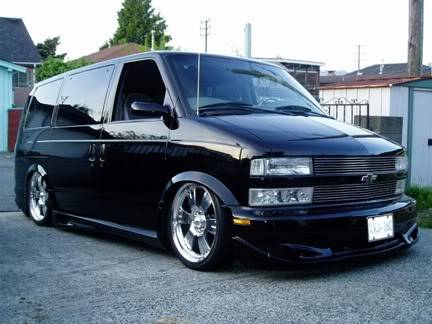
Photochopped-
07-08-2011 #191 Registered User
- Join Date
- Nov 2008
- Location
- NC
- Posts
- 583
I love this build, always been a fan of Astro Vans. You're doing a great job with everything, keep up the good work.
That Photoshop looks good with the Tahoe front end.
07-10-2011 #192
Registered User
- Join Date
- Mar 2004
- Location
- Mid-Michigan
- Posts
- 2,764
Thanks alot guys, I really appreciate the kind words.
I have to say again this build would not be as far along as it is without the help of my friend Mel. He is one of those friends you just can't say enough about. He has invested just as much time as I have into this build. All I can say is thank you.
We got everything accomplished this weekend we had planned. I had all of the UCA fixture pieces cut out Thursday night so, on Saturday, while I was working on fitting the rear tube into the Rh LCA Mel took the fixture pieces out to the belt sander and got everything sized.
Here are a few shots of the RH Lower Arm as we were finishing it up Saturday Morning.
Tacked together in the fixture with the lower shock tube in place.

This is upside down in the fixture. We had to do that because the mandrel support "structure" was in the way of the inner cross tube...
Here are some pics of both lower arms tacked together and out of the fixture.

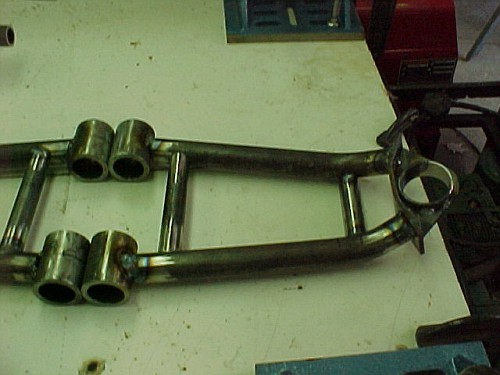
While I had the welder running to tack the arm I also stuck the UCA fixtures together. The fit was so good on these parts I didn't have to use any filler rod.
 Mark:
Mark:
"Bad Ast" Astro Van. Just because I did it... Doesn't mean it's possible...
This my Bad Ast thread...
https://www.pro-touring.com/showthre...roject-Faze-II
This is my Fotki album...
http://astroracer.fotki.com/
07-10-2011 #193
Registered User
- Join Date
- Mar 2004
- Location
- Mid-Michigan
- Posts
- 2,764
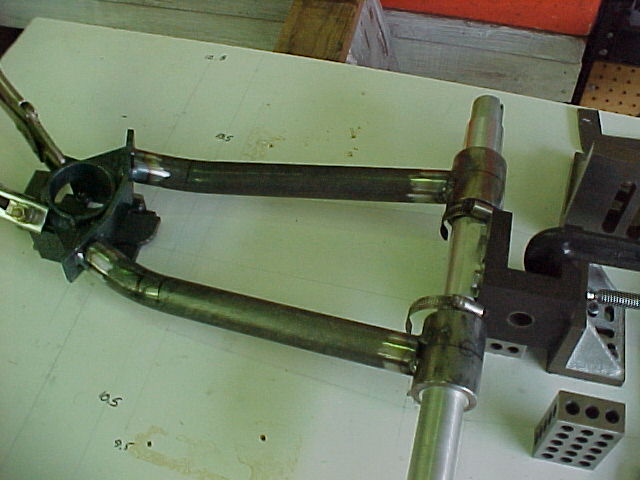
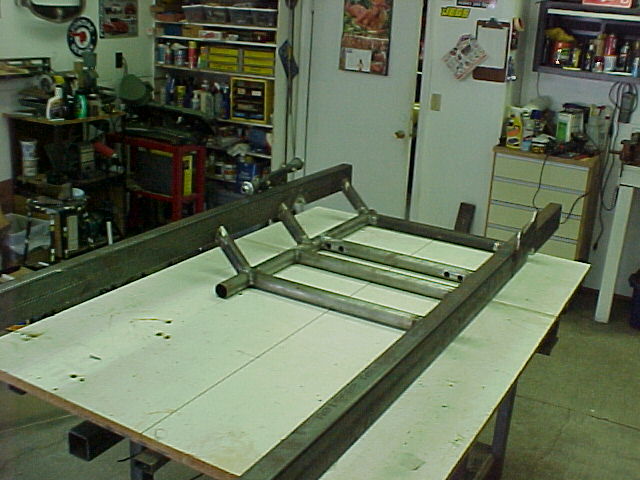
After we had the Lower Arms done we tackled the uppers. I thought these would be a little easier to build but they were just as tuff as the lowers.
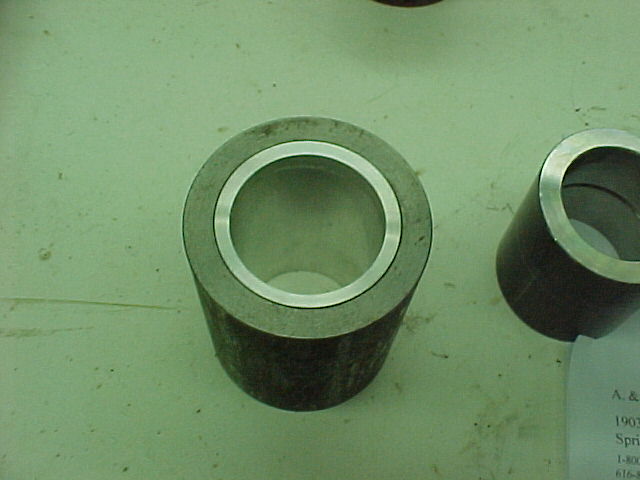
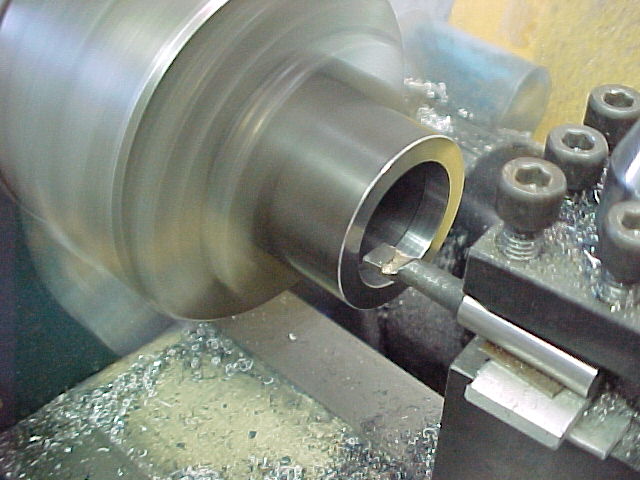
The upper bushing sleeves were turned on my Jet lathe by my Uncle Ed. He is a tool maker who was visiting from Texas. He saved me a lot of time by doing this stuff as I was at work.
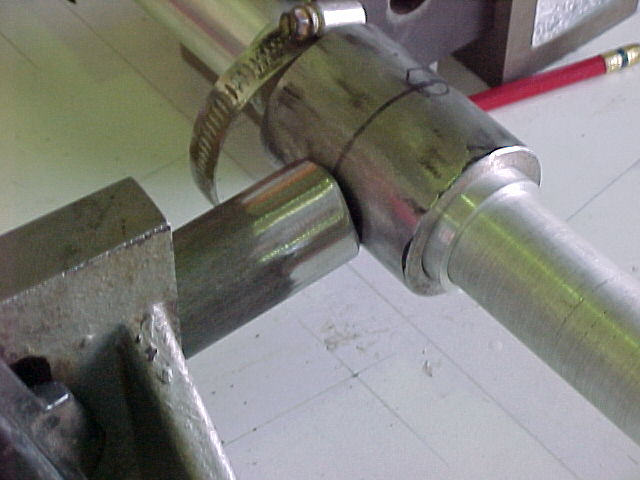
These were modified from A&A parts. We bored them out to fit the Moog #K6176 bushings.
Nice fit...
The step inside the sleeve carries both diameters of the bushing. It has to do this to prevent the bushing from rocking inside the sleeve.
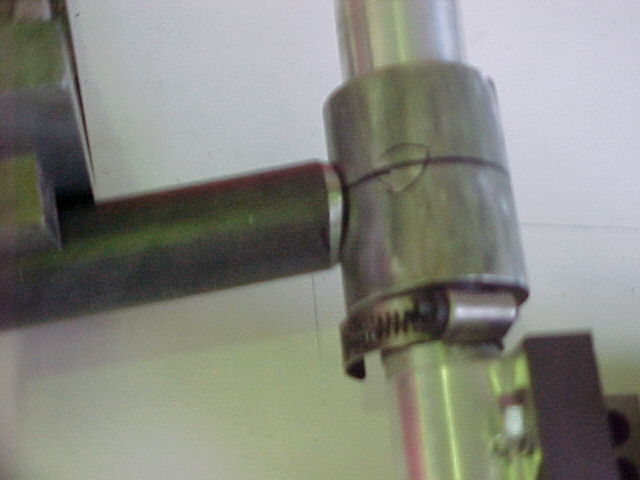
I also made the collars for the mandrel to locate the sleeves in the fixture while fabbing the arms.
I did all of the machining as Mel was making the lower shock mount for the RH Lower Arm.
Once all of this was done we got to work on the arm fabrication.
As I was bending the tubing Mel was laying out the dimensions to locate the fixtures on our table.
It took a bit of time to get all of this stuff ready just to start the build. I think we did good getting as much done as we did. I had hoped we would have both of them built Saturday but that didn't happen.
We got the first tube fabbed and called it a day. Of course it was after 5 o'clock and the wife made us stop to go to dinner....
Thanks for looking.
MarkMark:
"Bad Ast" Astro Van. Just because I did it... Doesn't mean it's possible...
This my Bad Ast thread...
https://www.pro-touring.com/showthre...roject-Faze-II
This is my Fotki album...
http://astroracer.fotki.com/
07-10-2011 #194
Registered User
- Join Date
- Mar 2004
- Location
- Mid-Michigan
- Posts
- 2,764
Today we hit it hard again. Mell was out at 7 o.clock and we started setting up for the last tube on the LH UCA.
Here is Mel cutting the slot in the tube to fit over the Ball Stud Plate.
Here are both tubes fit and ready for tacking.
After tacking I pulled the arm out of the fixture and mocked it up with the LH Lower...
What do you think?
We got a lot done this weekend. This was another huge hurdle for Bad Ast! I can't thank Mel enough for his help and hard work. He knows it is appreciated...
Thanks for looking
MarkMark:
"Bad Ast" Astro Van. Just because I did it... Doesn't mean it's possible...
This my Bad Ast thread...
https://www.pro-touring.com/showthre...roject-Faze-II
This is my Fotki album...
http://astroracer.fotki.com/
07-12-2011 #195 Registered User
- Join Date
- Aug 2004
- Location
- Erwin,TN
- Posts
- 425
Mark, merely out of curiosity, what spindles are you going to be using? Also, what rack-and-pinion are you going to be using?
07-12-2011 #196
Registered User
- Join Date
- Mar 2004
- Location
- Mid-Michigan
- Posts
- 2,764
HEY FGC! How are things going?
The spindles are aftermarket 2" drop Astro units and the rack is a C5 Corvette piece. The suspension was designed around the racks inner and outer points.
I will have to make some modifications to the Astro spindles to change the outer tierod point to match the Corvette racks point. I am actually working on a jig design right now that will locate the steering arm at the correct point after heating and bending. I'll post some pics later.
Thanks for taking the time to reply FGC.
MarkMark:
"Bad Ast" Astro Van. Just because I did it... Doesn't mean it's possible...
This my Bad Ast thread...
https://www.pro-touring.com/showthre...roject-Faze-II
This is my Fotki album...
http://astroracer.fotki.com/
07-16-2011 #197 Registered User
- Join Date
- Jul 2011
- Location
- Tacoma, Wa
- Posts
- 2
Man Mark...The upper and Lower "A" arms look good. What a very Cool Project bud!! The work you and Mel are doing here is Awesome. Thanks for the Heads up on this Forum too Mark...a great place for ref. material for building in scale.
07-16-2011 #198
Registered User
- Join Date
- Mar 2004
- Location
- Mid-Michigan
- Posts
- 2,764
Hi Gary,
It was good talking to you today. Maybe we can keep in touch a bit more through this thread. Thank you very much for the compliment. Mel is very competent doing this kind of work. I am lucky to have him as a friend.
I am very pleased how the arms turned out. It was a lot of work but we got it done and thet are out to a shop for "professional" tig welding. My skills are notg where they need to be for me to be comfortable welding them up myself. I dropped all of the arms and the fab jig off to a shop in Davison Friday morning. They will work on getting them welded and looking pretty.
Thanks
MarkMark:
"Bad Ast" Astro Van. Just because I did it... Doesn't mean it's possible...
This my Bad Ast thread...
https://www.pro-touring.com/showthre...roject-Faze-II
This is my Fotki album...
http://astroracer.fotki.com/
07-16-2011 #199
Registered User
- Join Date
- Mar 2004
- Location
- Mid-Michigan
- Posts
- 2,764
Mel and I were at it again today. The problem is we are working on "detail" stuff now. Getting the chassis finished to a point and all of the control arms built (and getting welded) were huge milestones! Today we worked on stab bar brackets, lower shock brackets and upper shock brackets and had a discussion on the strg rack brackets. Mel designed and built the stab bar and lower shock brackets while I worked on making spacers to set the upper shock bracket width and getting the filler plates bent to fit. Lots of work done, just not as much to show for it.
This is the stab bar bracket. I ordered some universal brackets and bushings from Jegs last night. The bar is a 23mm dia C5 piece. We wont weld the bracket on or drill the bolt holts until we have the whole suspension mocked up and run it in jounce and rebound. There is a lot of room to move the bar around for best clearances.
This is the shock tower filler plate. I made two of these with my Pro-Tools bender. They drop right on and will look great when they are welded in.
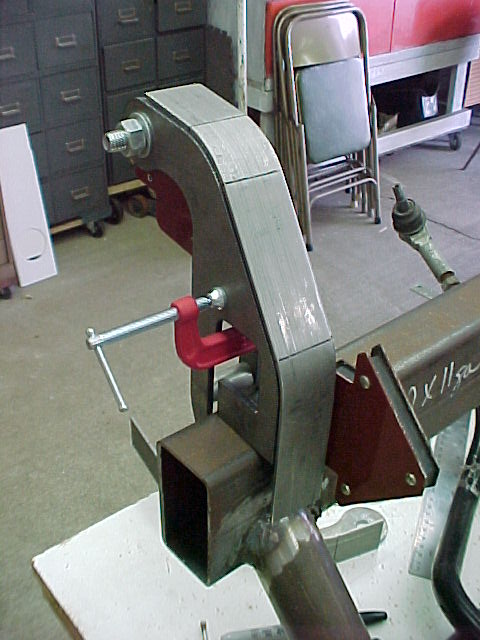
The black lines are tangent points I used to establish the start and stop point for each bend.
Here you can see some naked jig tables. We started cleaning them off so we can move them over to the hoist room. DO YOU KNOW WHAT THAT MEANS???? Bad Ast is going on the hoist TOMORROW to start putting the chassis in place!!!! This is a day I doubted I would ever see!!!
Do you notice anything different here? No? Look again. Do you see there is AIR in the TIRES!!!!! Thanks Mel. Bright and early bud.

Thanks for looking.
MarkMark:
"Bad Ast" Astro Van. Just because I did it... Doesn't mean it's possible...
This my Bad Ast thread...
https://www.pro-touring.com/showthre...roject-Faze-II
This is my Fotki album...
http://astroracer.fotki.com/
07-17-2011 #200
Registered User
- Join Date
- Mar 2004
- Location
- Mid-Michigan
- Posts
- 2,764
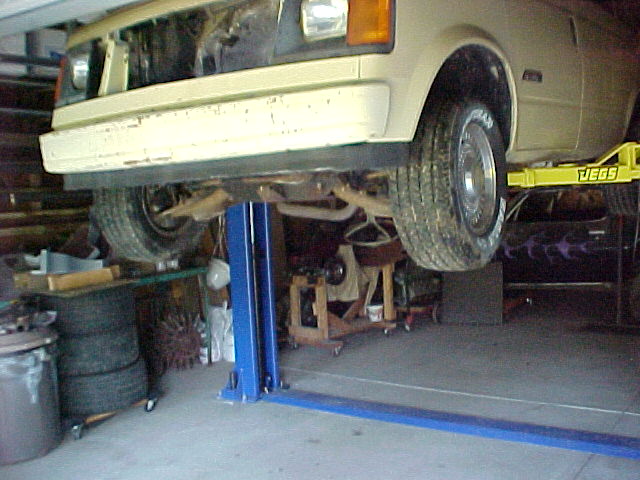
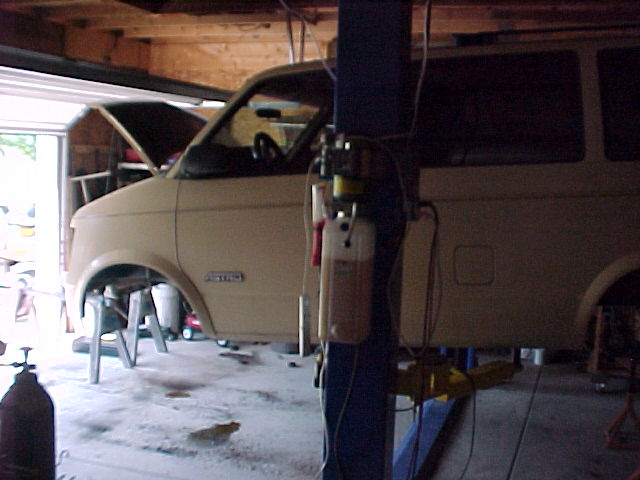
It got plenty warm out there today... Mother nature AND the torches... We moved the Astro into the shop and got busy...
It didn't take long to get it lifted up so we could do some looking and head scratching.
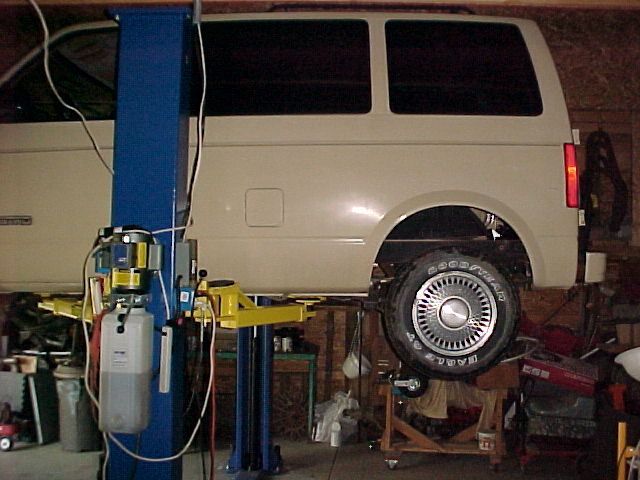
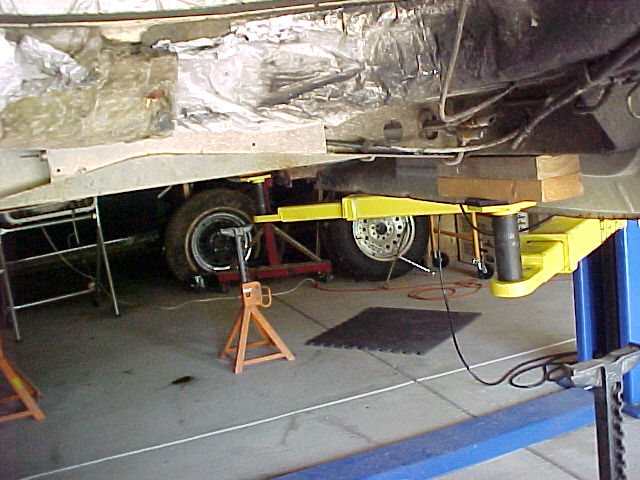
Getting the suspensions stripped out is the goal while still being able to slip the new chassis in place and not be obstructed by the lift arms.

We made a game plan and started the removel process...
Mel ran the hot wrench after we had stripped most of the little things from underneath. Fuel tank straps, brackets, PB Cables, front and rear bumpers, etc. The "pile" was growing.
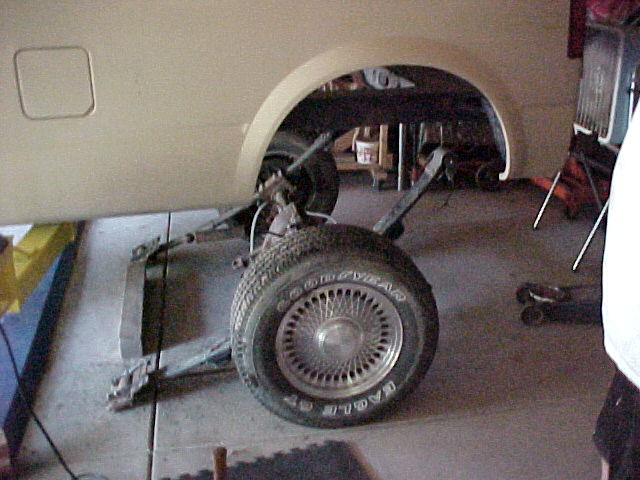
The rear suspension is toast!
Man, what a feeling it is to be getting this far! I told Mel I never dreamed the van would get to this point...

The "pile"...
I'll sit on this stuff for a while just in case I do need anything.... I don't see that happening but, you never know.
Well, here she is in all her nakedness.... Just a hulk now...
The back half...
Looking underneath, through the empty engine compartment, at the lift points. We set the arms right under the old rails. Shouldn't be in the way at all.
Yoiu can see there are two 2x4's under the rail just to get more reach. She sits nice and solid on the lift...
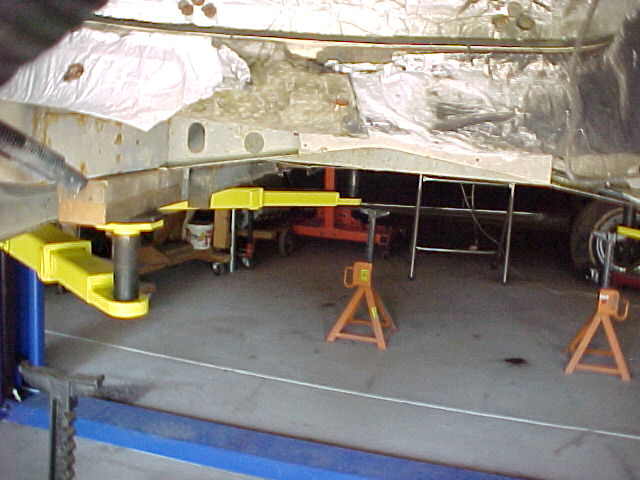
This is where we knocked off for the day at about 1:30. Too hot outside. We had some lunch and discussed the future work. Still tons to do but today was a good "look what we did!" day.
Thanks for looking.
MarkMark:
"Bad Ast" Astro Van. Just because I did it... Doesn't mean it's possible...
This my Bad Ast thread...
https://www.pro-touring.com/showthre...roject-Faze-II
This is my Fotki album...
http://astroracer.fotki.com/

 Reply With Quote