Results 1 to 20 of 27
Thread: 1978 Firebird Build
-
08-20-2019 #1
 Registered User
- Join Date
- Feb 2013
- Location
- Ft Worth, TX
- Posts
- 188

1978 Firebird Build
First off, I went back and forth on whether I should post this here because my current plans for the car probably fit better in the "resto-mod' category. After reading through a discussion about the definition of "pro-touring" in 2020 (or lack thereof), I'm inspired to just go for it.
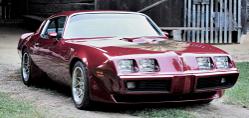
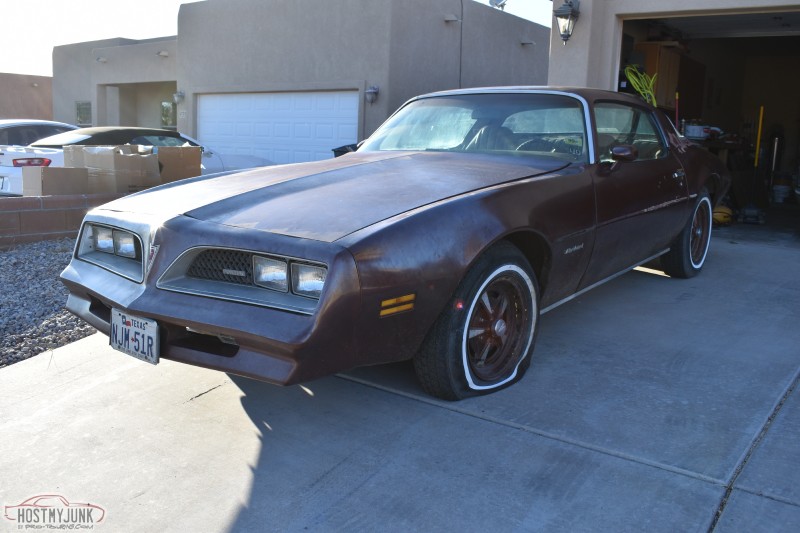
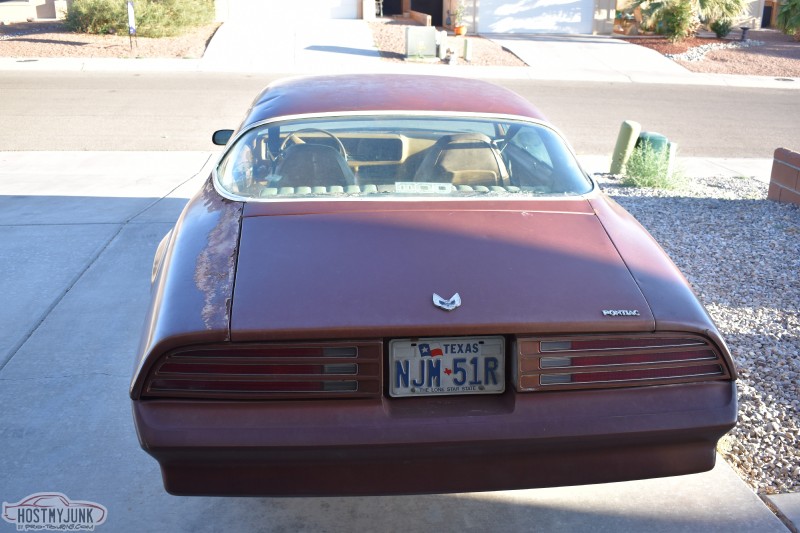
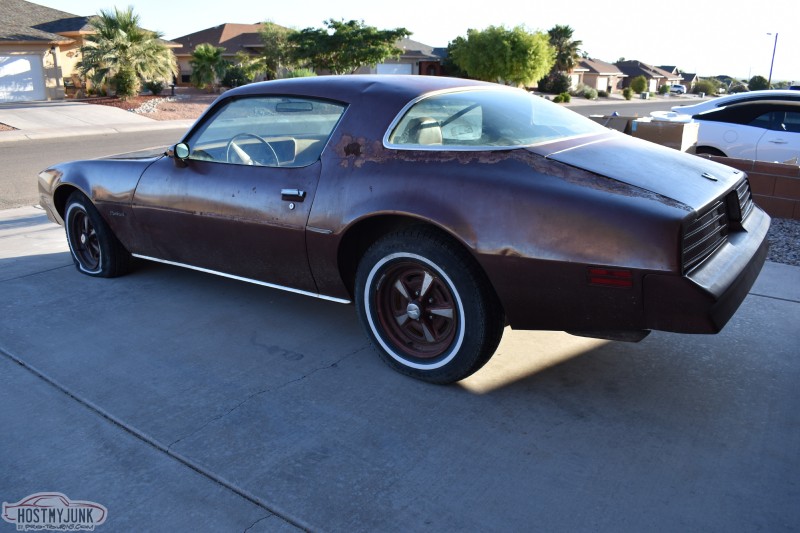
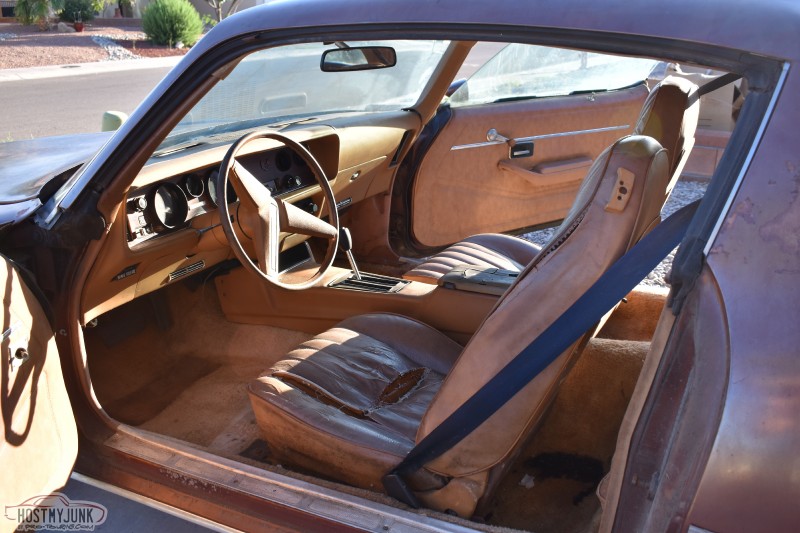
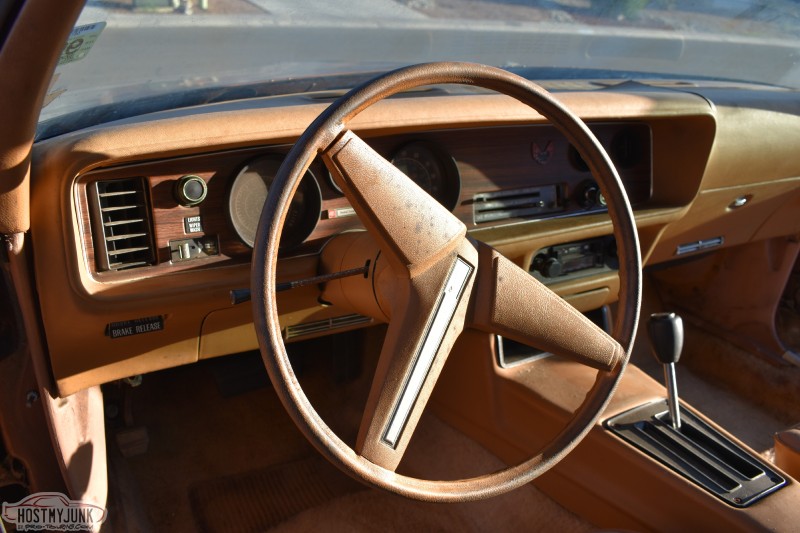
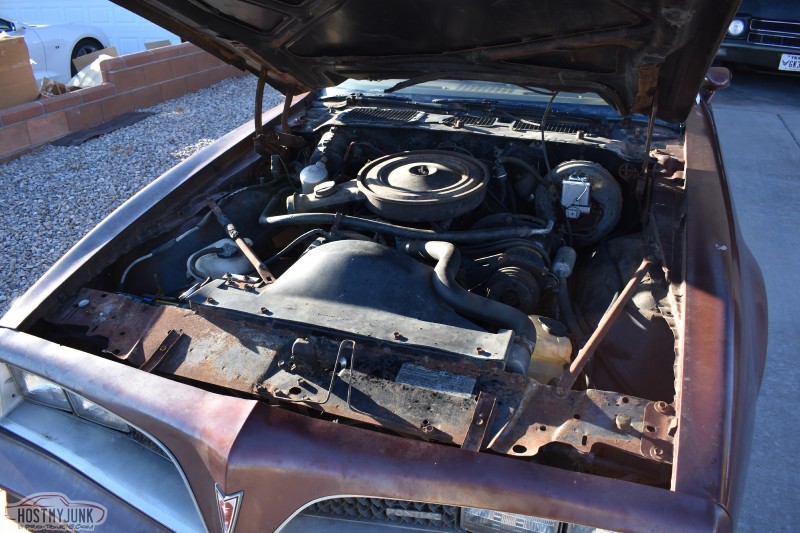
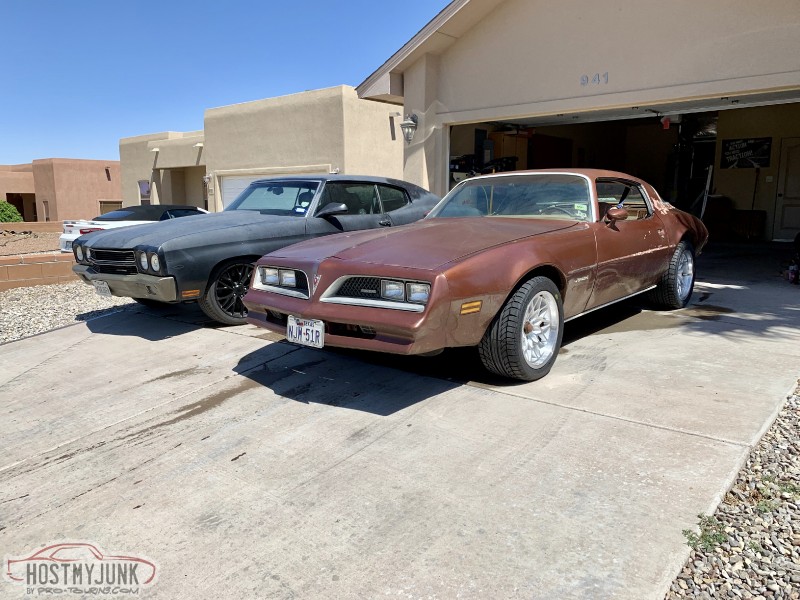
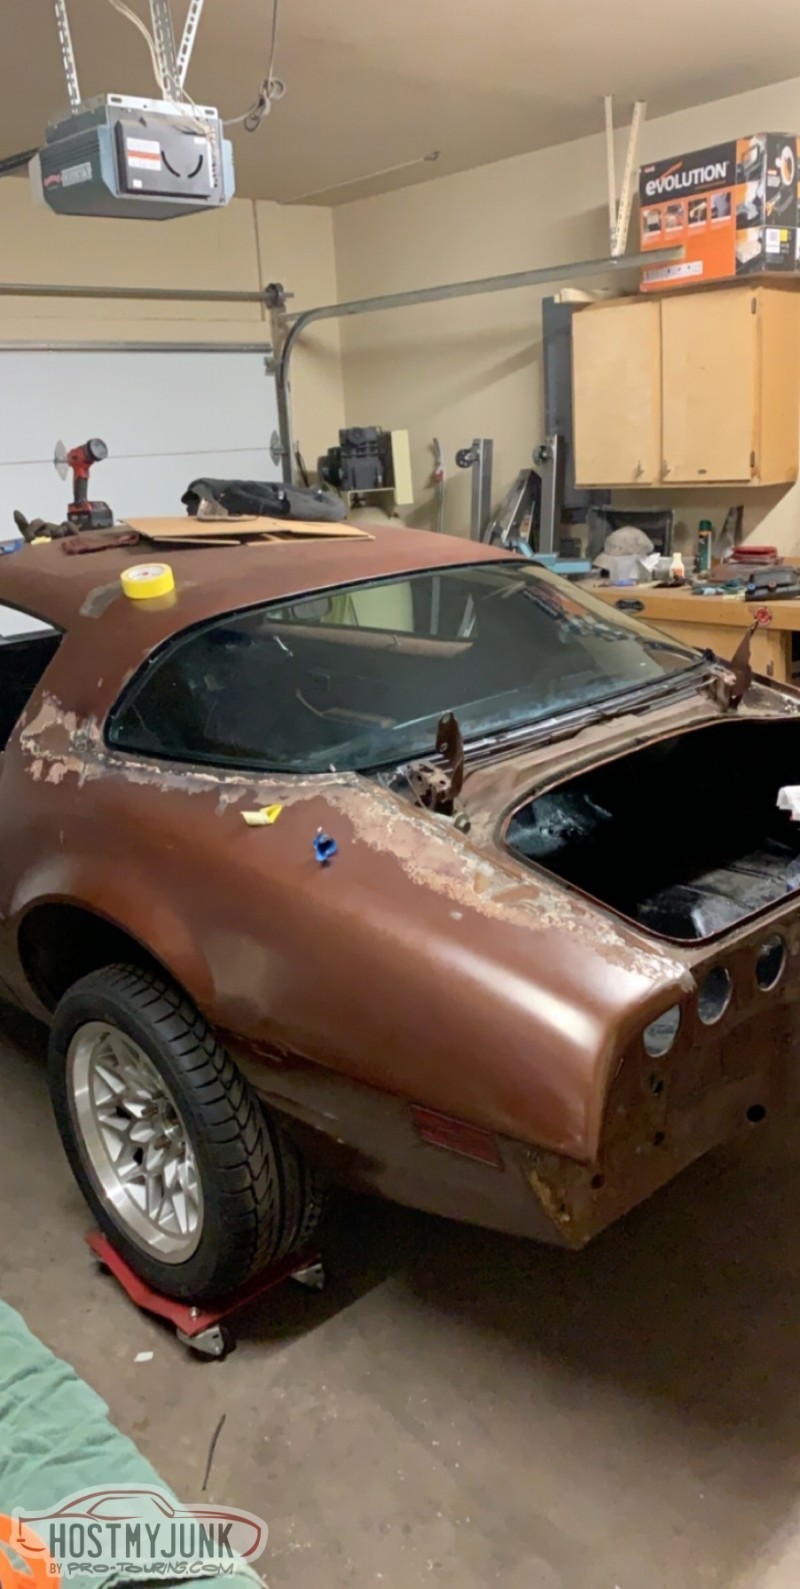
The 77-78 Firebird/Trans Am is one of my favorite GM body styles. They're also surprisingly cheap right now compared to anything from the late 60's to early 70's, so I figured I should go for it. I found this base model 1978 Firebird near Fort Worth and asked my dad to go look at it. He didn't find any big issues, so I made a deal over the phone and effectively bought the car sight-unseen from the original owner who also happened to be a TCU grad. The car had been off the road for 20 years but was essentially complete. I drove my truck and trailer to Texas over Independence Day weekend and spent a couple days getting the original 305 running so I could drive it on the trailer to haul it back to New Mexico. My current plan is to get the Firebird to the point where it's a good daily driver so that I can start some much needed body work on the Chevelle. I've already got a T-56 for it and I'll probably throw in a junkyard 5.3 along with some basic suspension upgrades. Long term, I'll probably either end up going more in depth for a serious pro-touring build or sell the car if I end up trying to buy some land in a few years. For now, this is going to be a very budget minded project. I hope it'll end up being a good resource for other second gen owners.

Both quarter panels have had new skins installed at different points due to various fender benders. I'll have to grind out the body filler to see whether they're worth saving or not.
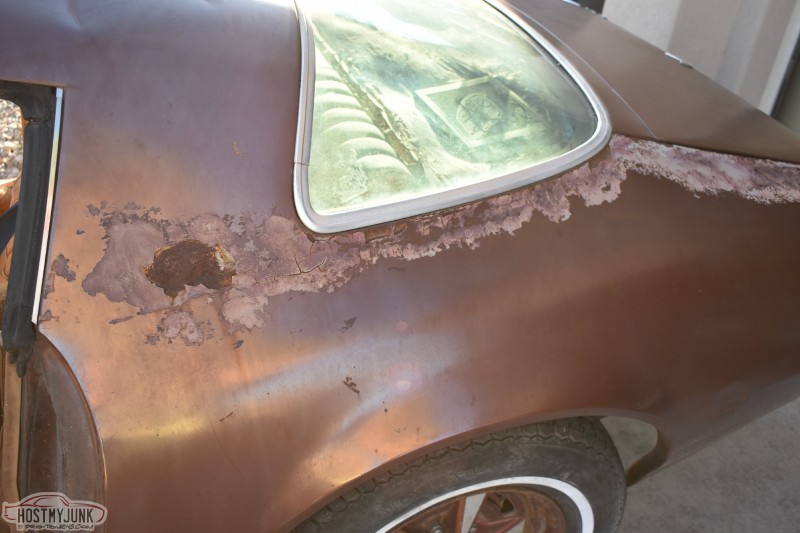
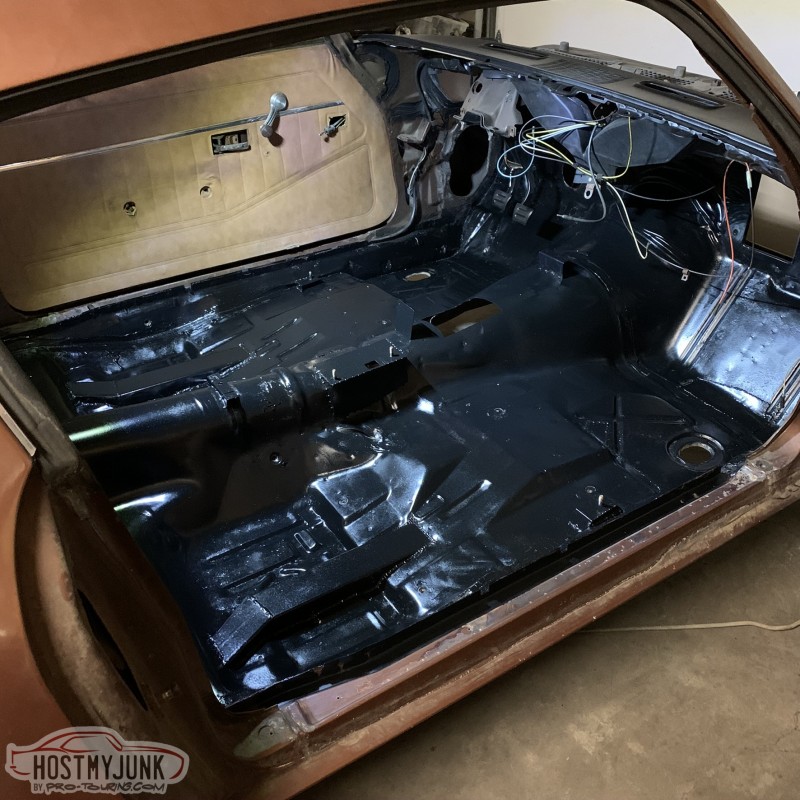
The trunk was really the only rusty area due to a failed weatherstrip and the fact that the original carpet and padding was still there.

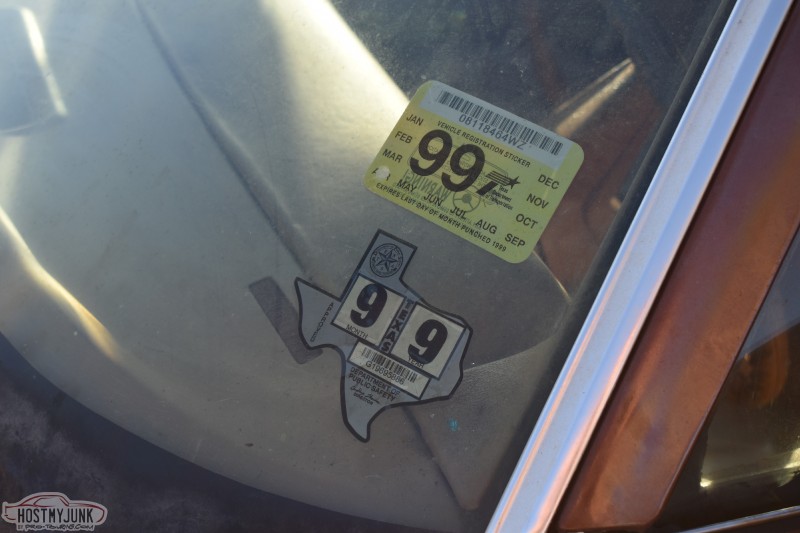
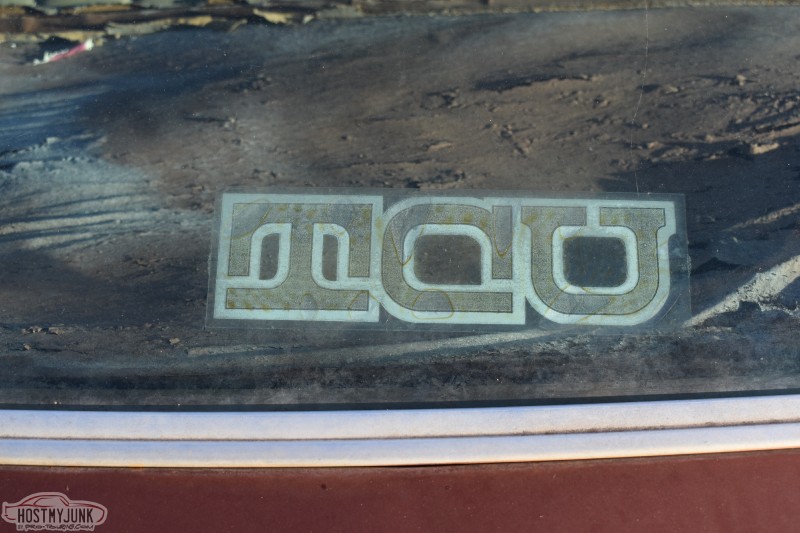
The vintage TCU sticker was really what sealed the deal though.
 1970 Chevelle: 6.0 L96, T56, Strange 9 Inch, Ridetech Coilovers, Wilwood brakes
1978 Firebird: 6.0 LQ4, T56
2007 Sierra 2500HD LBZ
-
08-20-2019 #2
Registered User
- Join Date
- Feb 2013
- Location
- Ft Worth, TX
- Posts
- 188
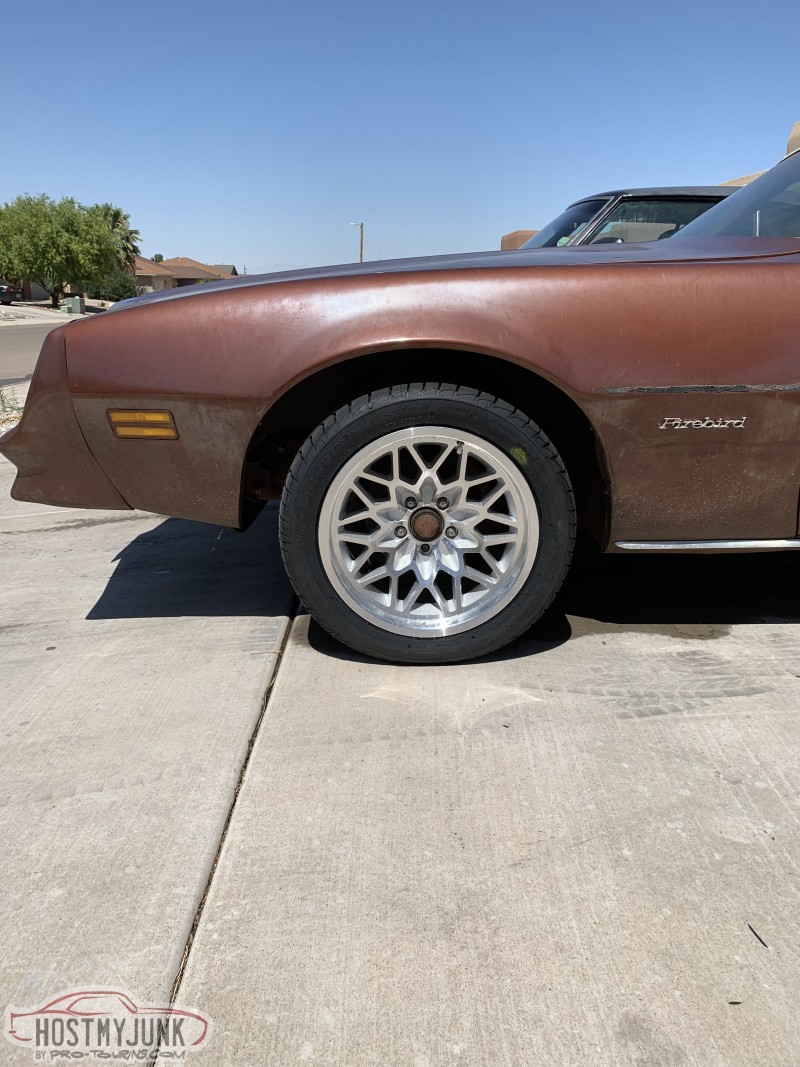
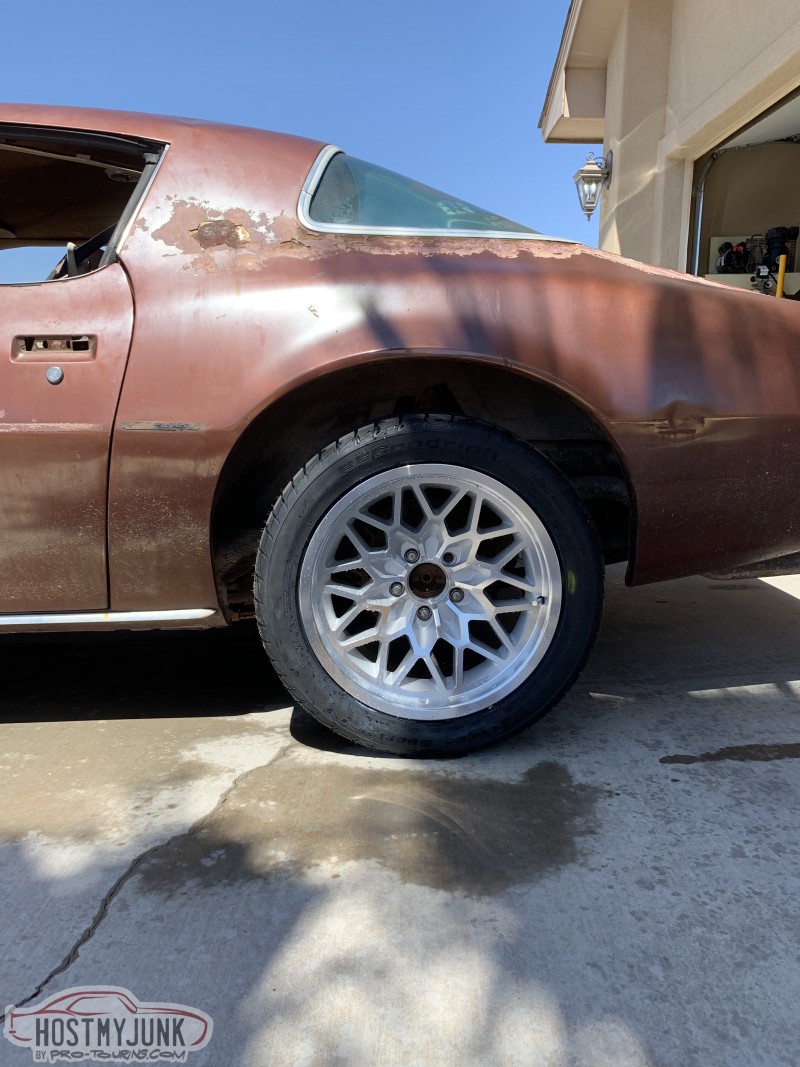
The first step was spending too much money on wheels that are way too nice for the car. These are 17" reproduction snowflake wheels from OER. They were cheaper than the Year One's but it sounds like they're being discontinued for some reason.
I managed to get the 305 running but the carb wasn't happy with the altitude here and oil was leaking pretty substantially with rpm, so out it came. I hadn't considered how long the nose is on the car so my cherry picker wouldn't reach. Luckily, I was able to make it work from the side.
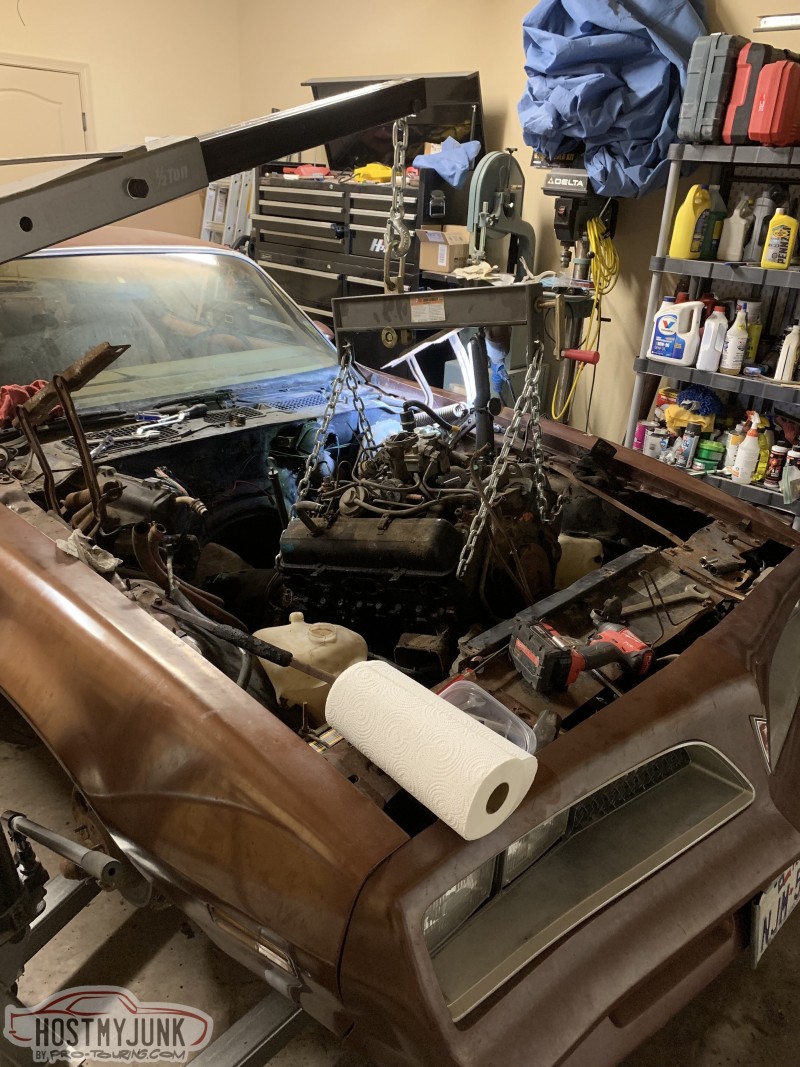
Having the front sheet metal off gave me flashbacks to 10 years ago, working on the Chevelle in a field.

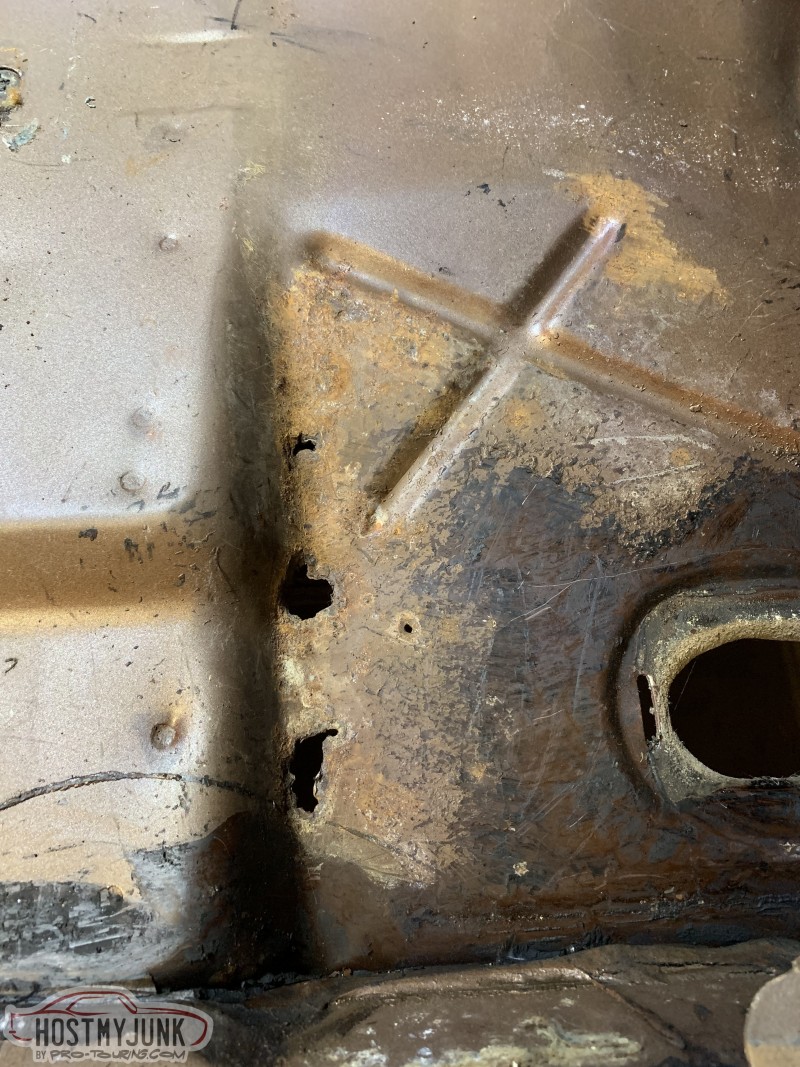
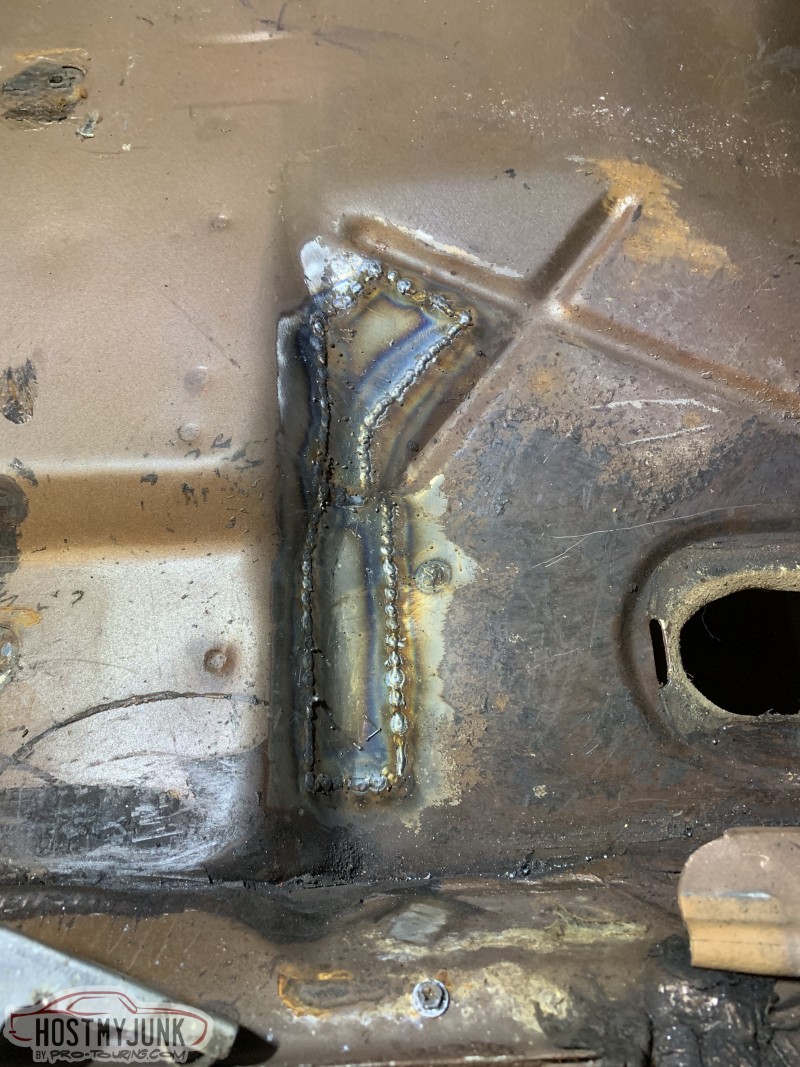
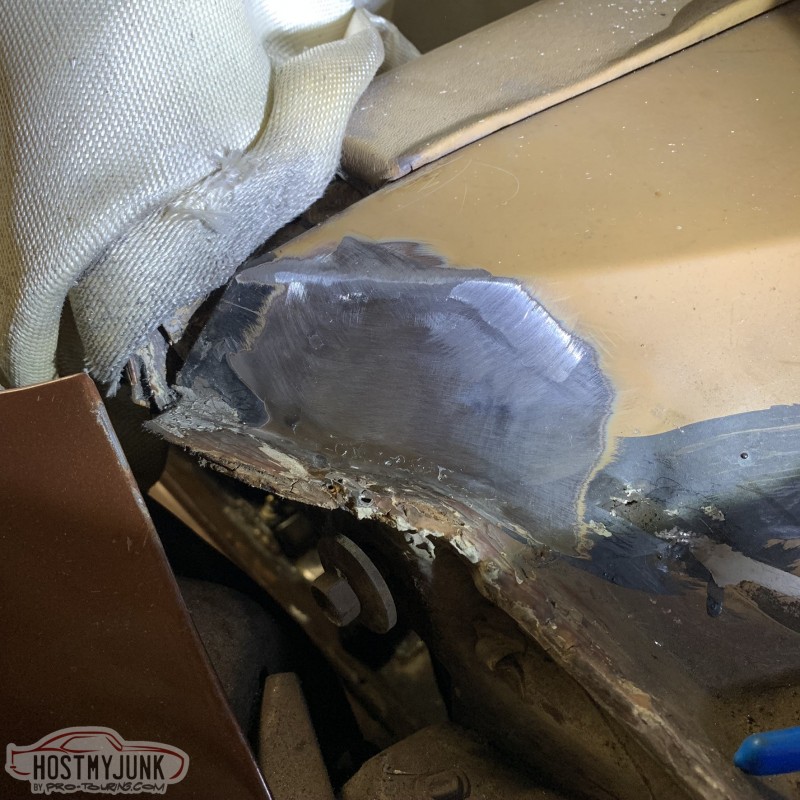
This was about the only other rusty area besides the trunk pan. This was good practice because it's been a while since I worked with sheet metal.
 1970 Chevelle: 6.0 L96, T56, Strange 9 Inch, Ridetech Coilovers, Wilwood brakes
1978 Firebird: 6.0 LQ4, T56
2007 Sierra 2500HD LBZ
08-21-2019 #3 Registered User
- Join Date
- Feb 2013
- Posts
- 1,553
Looking good man! I'm in the same stages with my firebird!
08-21-2019 #4
Registered User
- Join Date
- Oct 2017
- Location
- St. Louis
- Posts
- 117
Looking forward to keeping up on your progress! Nice start
08-21-2019 #5
Registered User
- Join Date
- Aug 2007
- Posts
- 1,239
love the Birds.. keep us up to date
08-23-2019 #6
Registered User
- Join Date
- May 2015
- Location
- Island Lake, IL
- Posts
- 816
Keep up with the progress!
09-03-2019 #7
Registered User
- Join Date
- Feb 2013
- Location
- Ft Worth, TX
- Posts
- 188
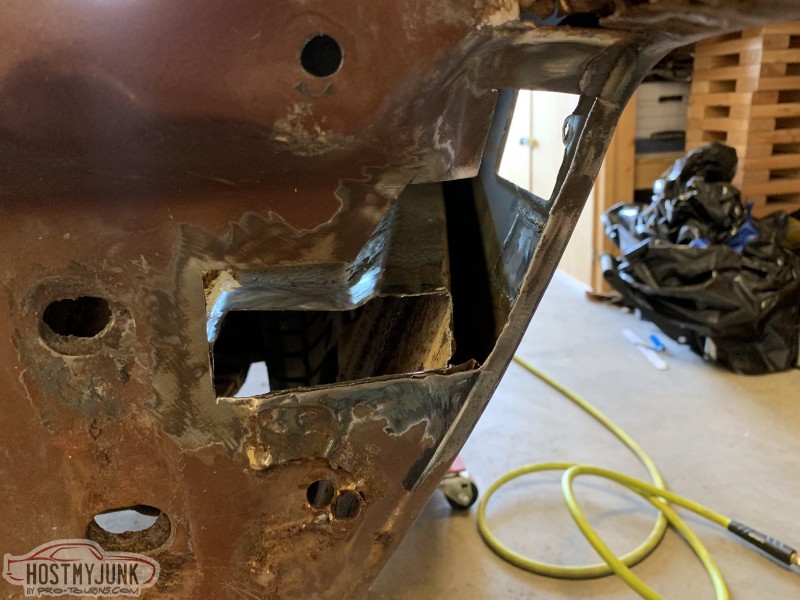
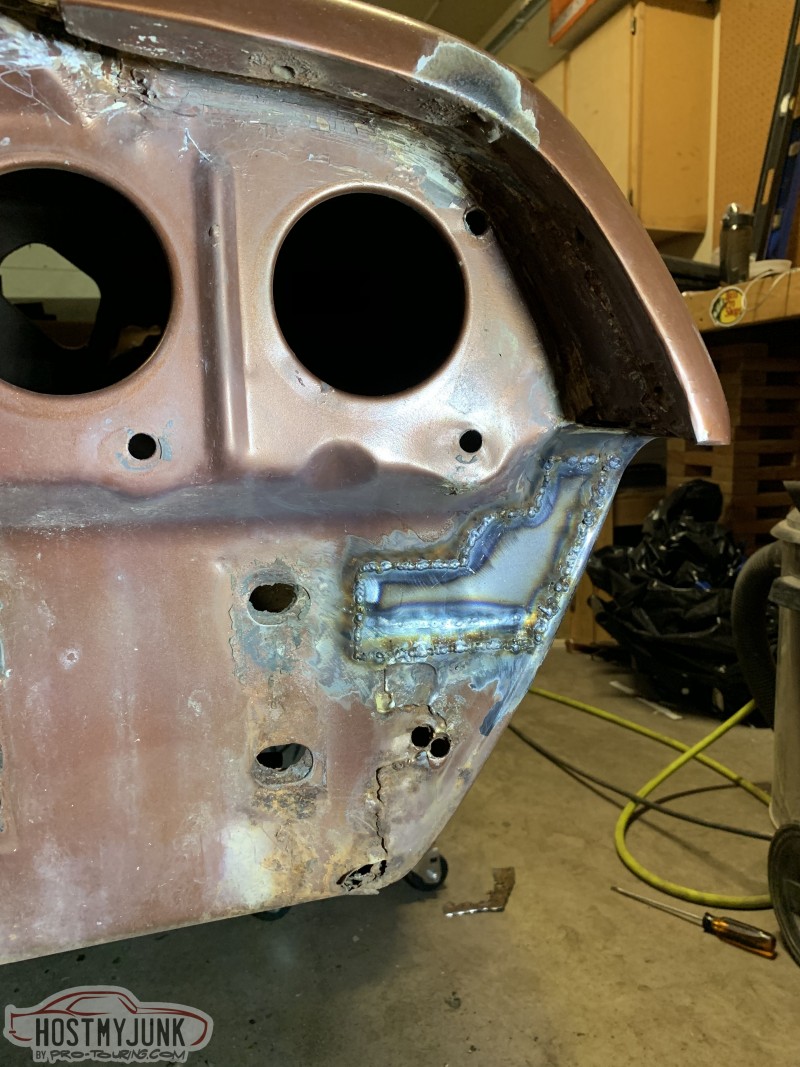
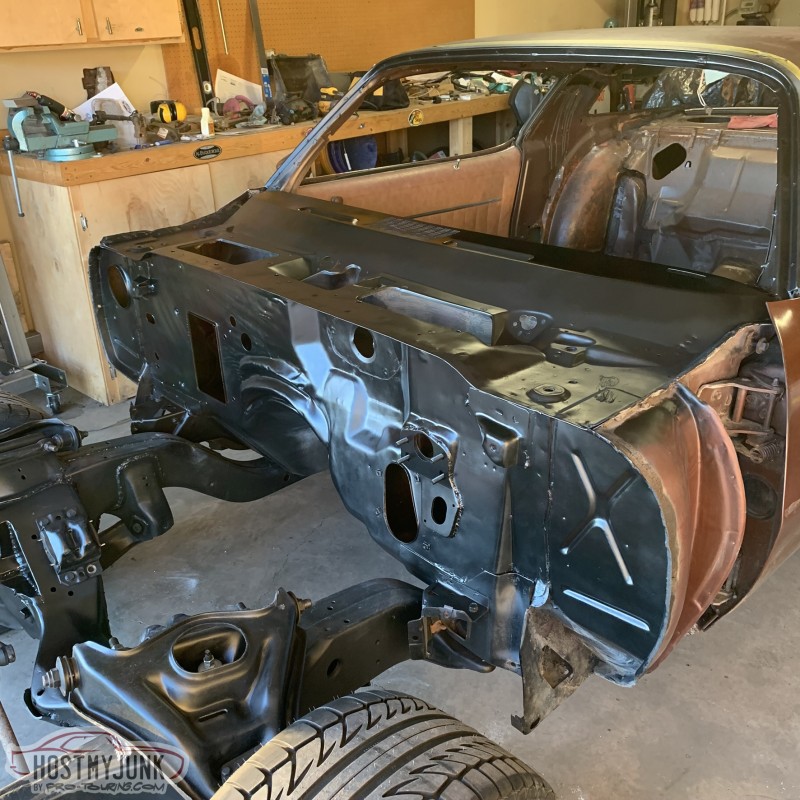
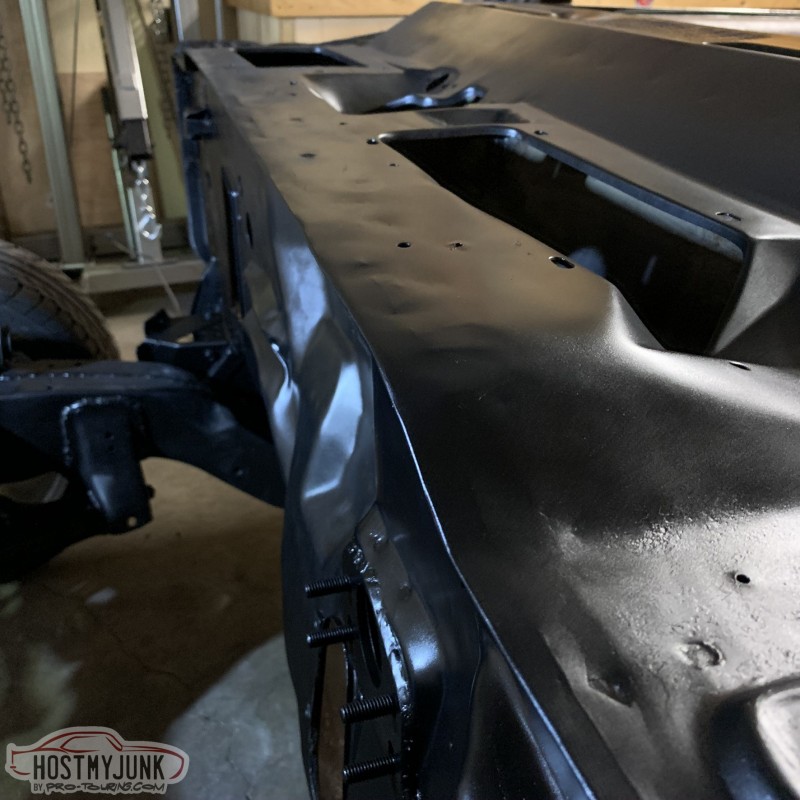
I wrapped up what I hope is the last of the rust repair on the Firebird. It's a welcome change from the Chevelle, which needed just about every panel replaced.
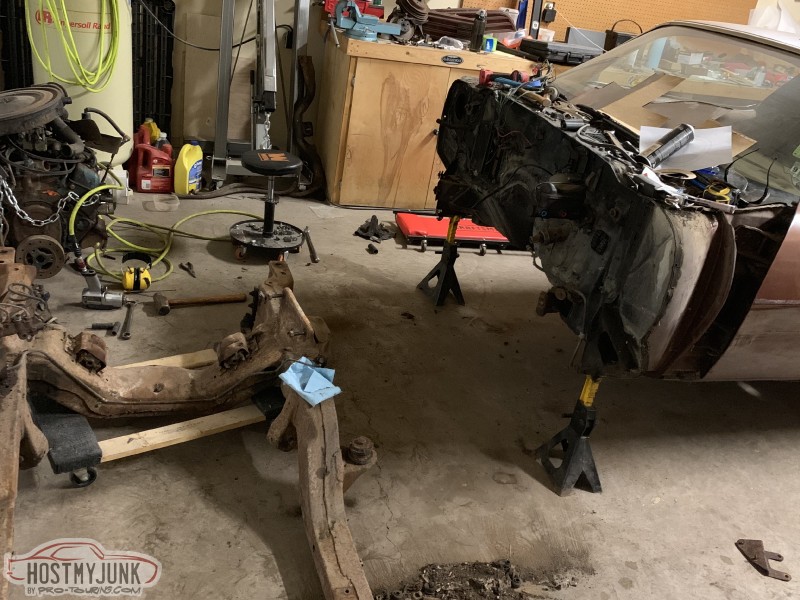
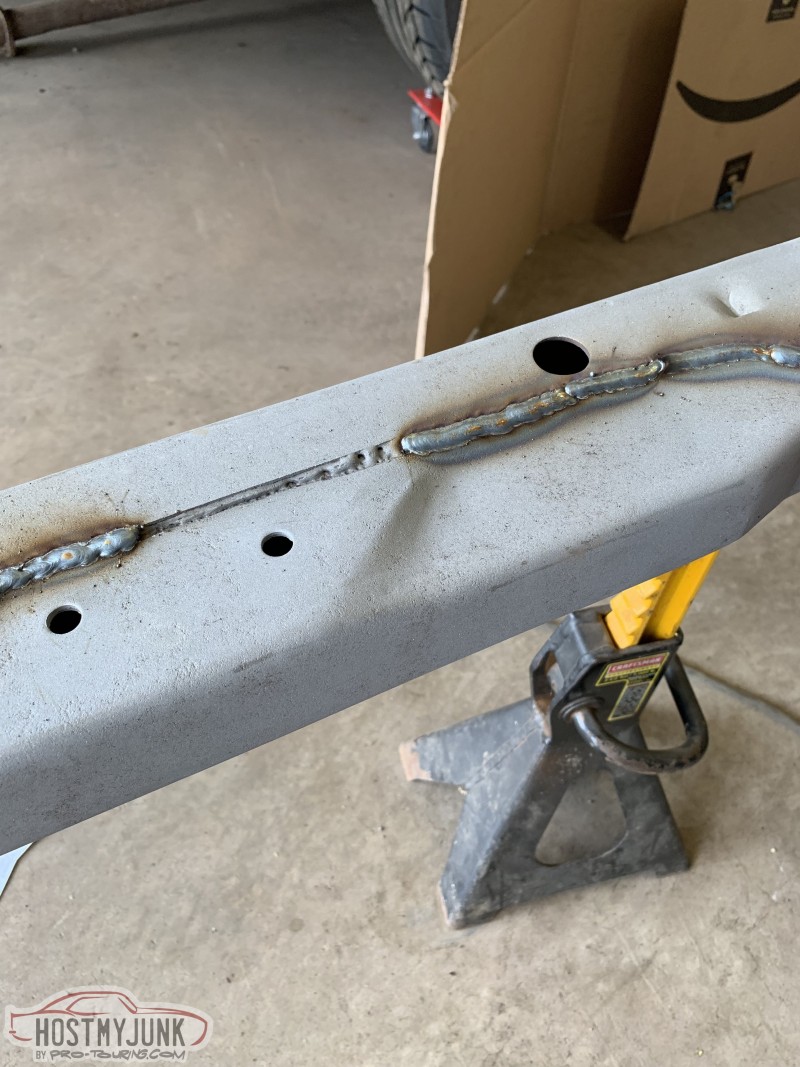
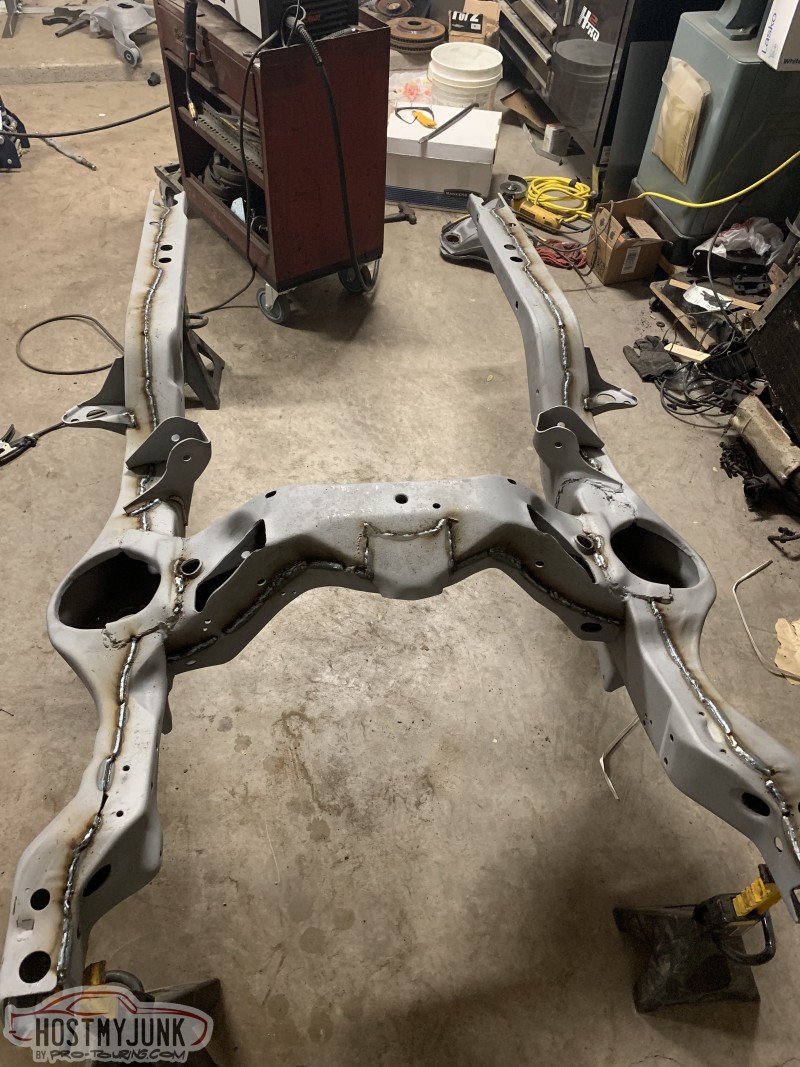
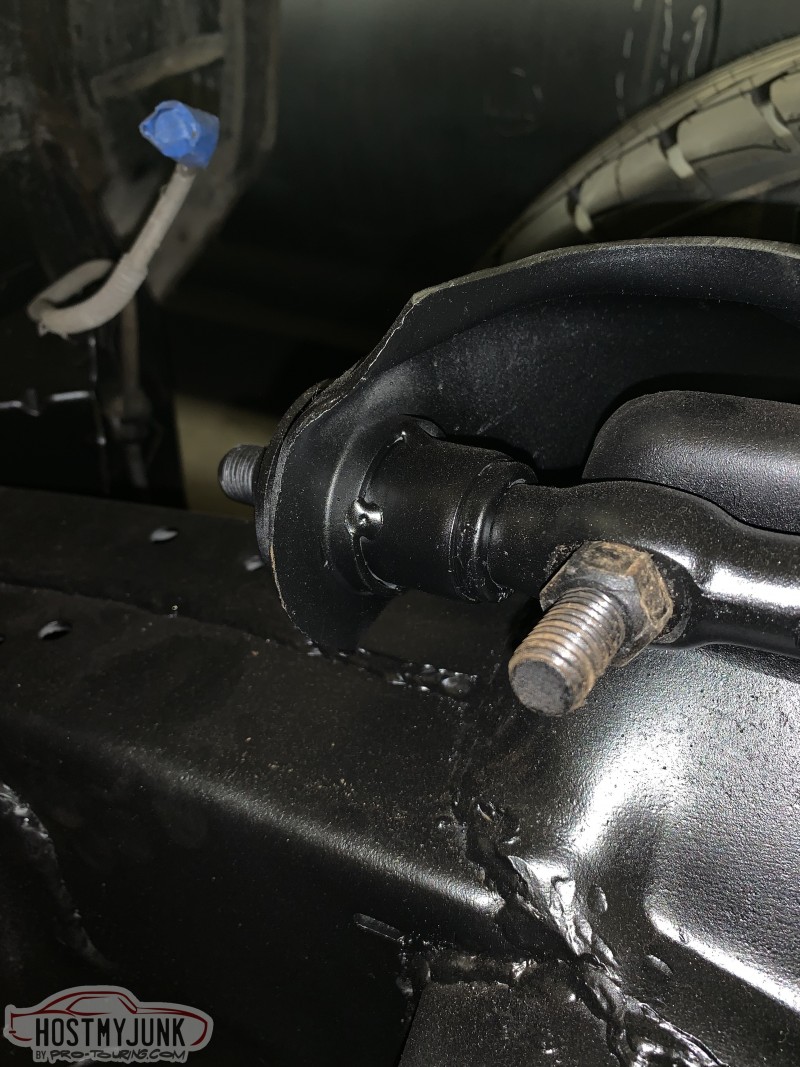
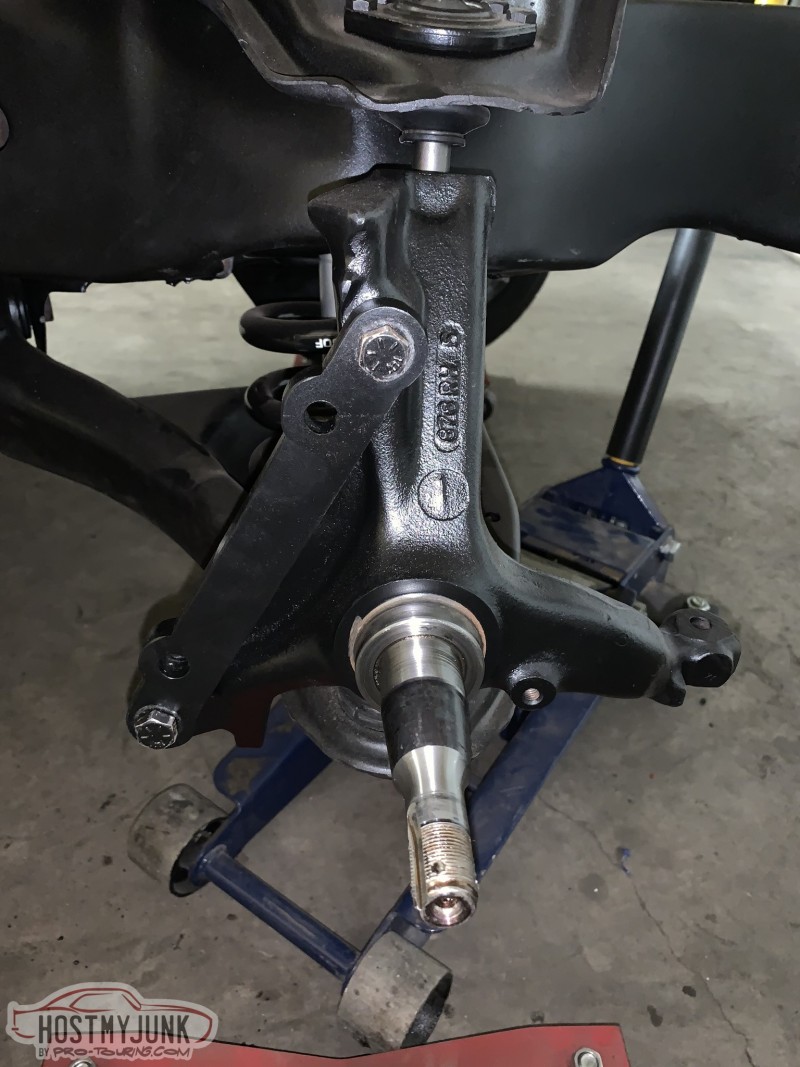
After that, I shifted my focus to the front end. I pulled the subframe and splurged to get it sandblasted. By far the best $100 I've ever spent! The welds on the subframe were as horrible as expected so I ran new beads over every seam. I rebuilt the control arms with Energy Suspension bushings, Moog lower balljoints, and Proforged 0.5" taller upper balljoints.
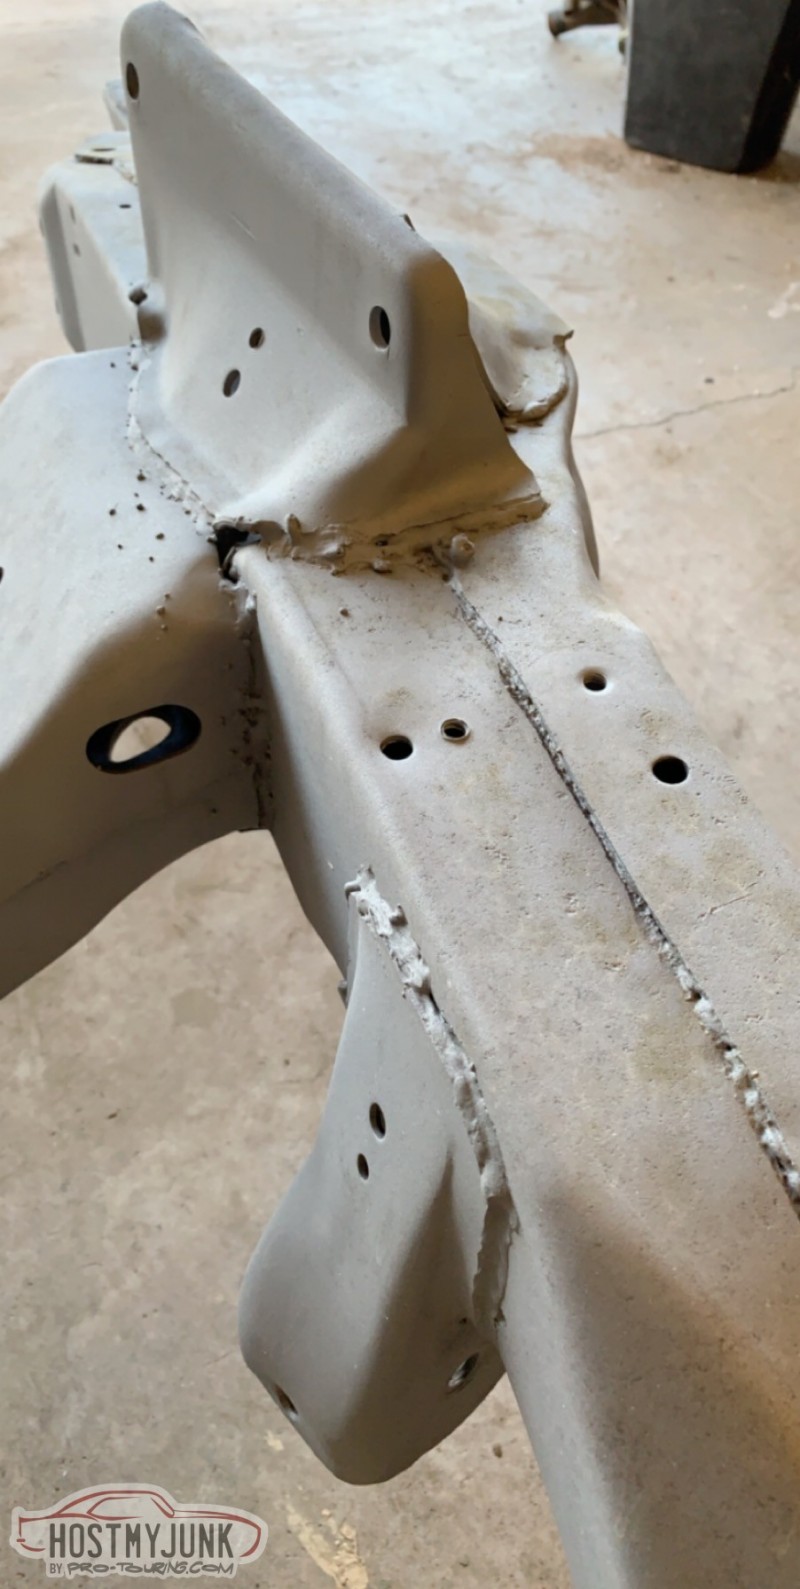
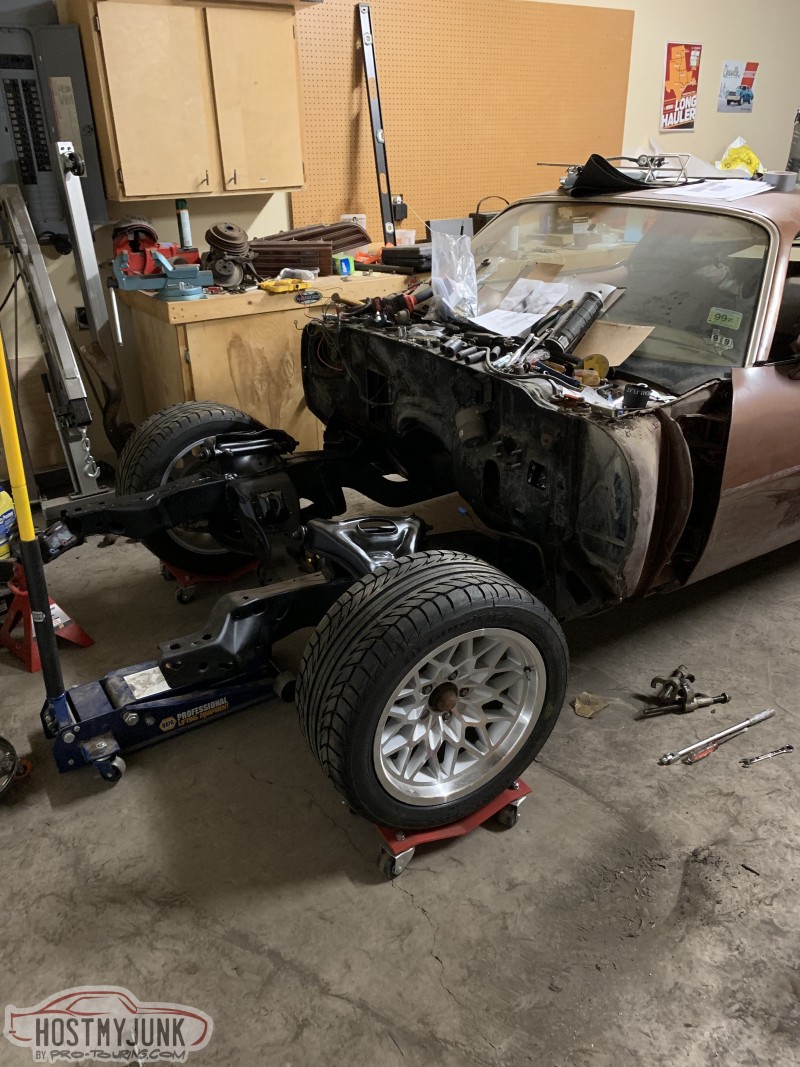
As usual, I'm awful about taking progress pictures so I apologize for the poor quality. I promise I'll get better as the build goes on. The lower control arm mounting holes were quite wallered out so I built some reinforcements out of 1/8" plate. Building these was a quicker alternative to finding appropriately-sized washers in town. The other problem I ran into was mismatched upper control arms. I'm guessing the driver's side arm was replaced after one of the numerous fender benders with an early style version so the Energy Suspension bushing shell was too small for one of the bushing mounts. In either a spark of brilliance or sheer stupidity, I just centered the housing in the arm and welded it in place. I guess I'll see how it holds up.

 1970 Chevelle: 6.0 L96, T56, Strange 9 Inch, Ridetech Coilovers, Wilwood brakes
1978 Firebird: 6.0 LQ4, T56
2007 Sierra 2500HD LBZ
09-03-2019 #8
Registered User
- Join Date
- Feb 2013
- Location
- Ft Worth, TX
- Posts
- 188
My plan for the fuel system was to adapt a 2010 Tahoe fuel pump assembly to a stock replacement tank. I was under the assumption that the Gen IV truck engines used a pwm fuel pump like the 5th gen Camaros and bought a vaporworx fuel pressure regulator adapter, however it doesn't fit. Does anyone know if the pumps in the GMT-900 trucks are conventional or PWM? If I get some clarification elsewhere I'll be sure to post it because the Tahoe bucket is a perfect fit for the tank.
I'd planned on following the conventional T56 swap formula by using a reproduction clutch/brake pedal setup with an adapter to run a 4th gen style master cylinder. The thing is, once I started adding up the cost of the components there isn't much difference in price to step up to a Wilwood tandem brake/clutch pedal setup. Am I missing something to help cut the cost of the "stock" style setup?
1970 Chevelle: 6.0 L96, T56, Strange 9 Inch, Ridetech Coilovers, Wilwood brakes
1978 Firebird: 6.0 LQ4, T56
2007 Sierra 2500HD LBZ
11-06-2019 #9
Registered User
- Join Date
- Feb 2013
- Location
- Ft Worth, TX
- Posts
- 188
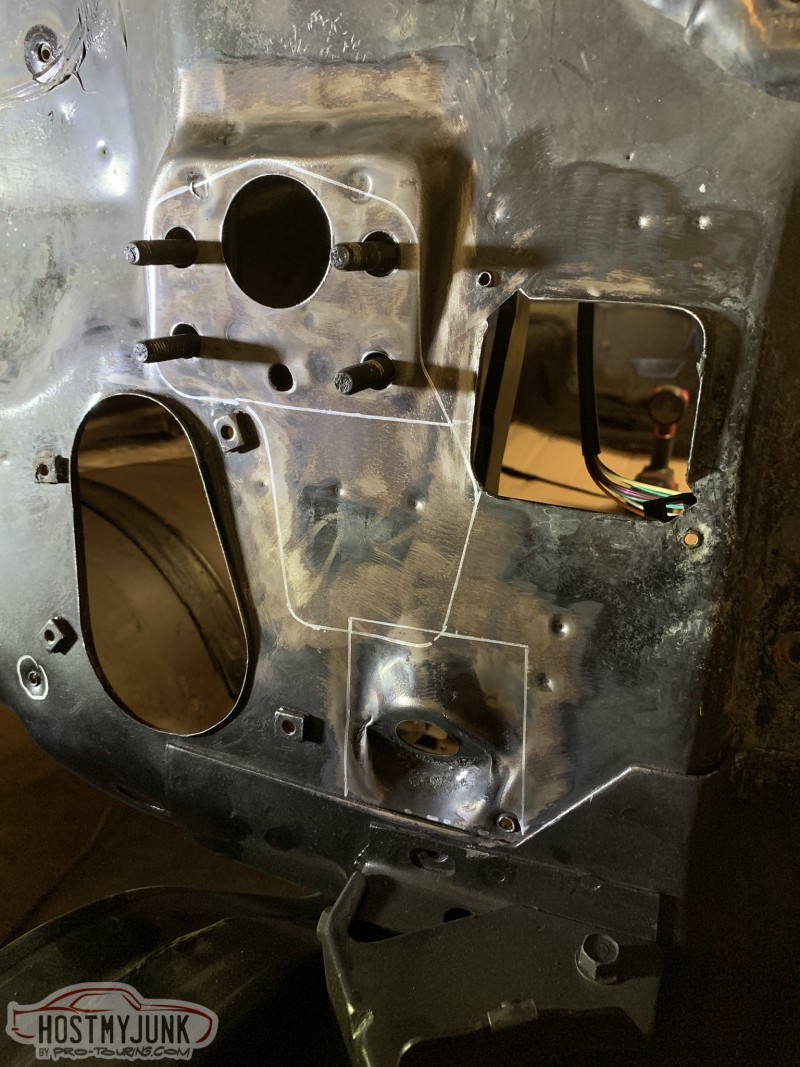
Question for all the second gen folks: does the pocket in the AC box serve a purpose? I'd like to shave it to get more engine setback room but I can't help but think it's there for a reason.
 1970 Chevelle: 6.0 L96, T56, Strange 9 Inch, Ridetech Coilovers, Wilwood brakes
1978 Firebird: 6.0 LQ4, T56
2007 Sierra 2500HD LBZ
11-07-2019 #10
Registered User
- Join Date
- Jun 2010
- Location
- Painted post NY
- Posts
- 115
Most people remove it...use vintage air. Nice progress!
Leon Reed
1978 Trans Am
LS1/4L60E
my build..updated 11-21-13 https://www.pro-touring.com/showthre...8-TA-LS1-build
11-08-2019 #11 Registered User
- Join Date
- Apr 2014
- Location
- DFW, TX
- Posts
- 120
 Originally Posted by David LaBuda

I cut that out of my box and epoxied a plate in it's place, so that's flat all the way across on my 78TA. Looks great I think, however, When the engine was installed there is very little clearance between the heater box and #8 spark plug and the coolant sensor for the Dakota Digital gages. It all works but, getting #8 plug out takes as long as removing the other 7 combined so I am sure it will get changed in the future to be slightly recessed.1978 Pontiac Trans Am Y88-R,
UMI Performace, LS3/T56 Holley EFI
11-12-2019 #12
Registered User
- Join Date
- Feb 2013
- Location
- Ft Worth, TX
- Posts
- 188
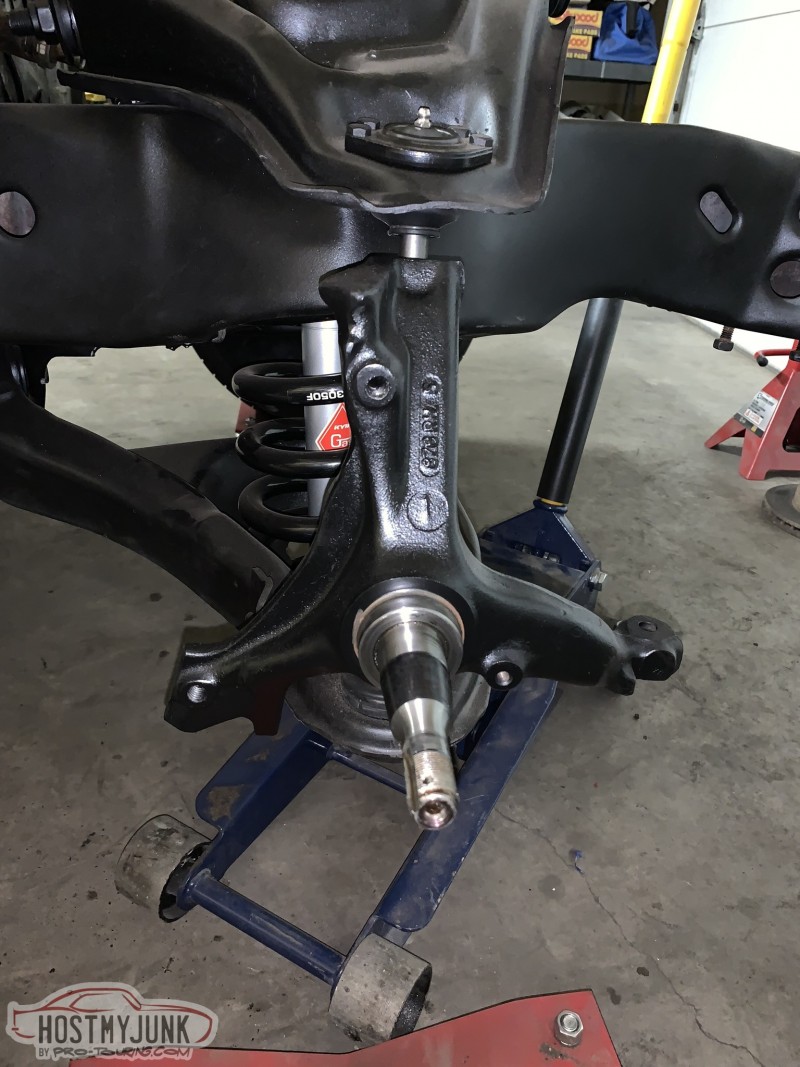
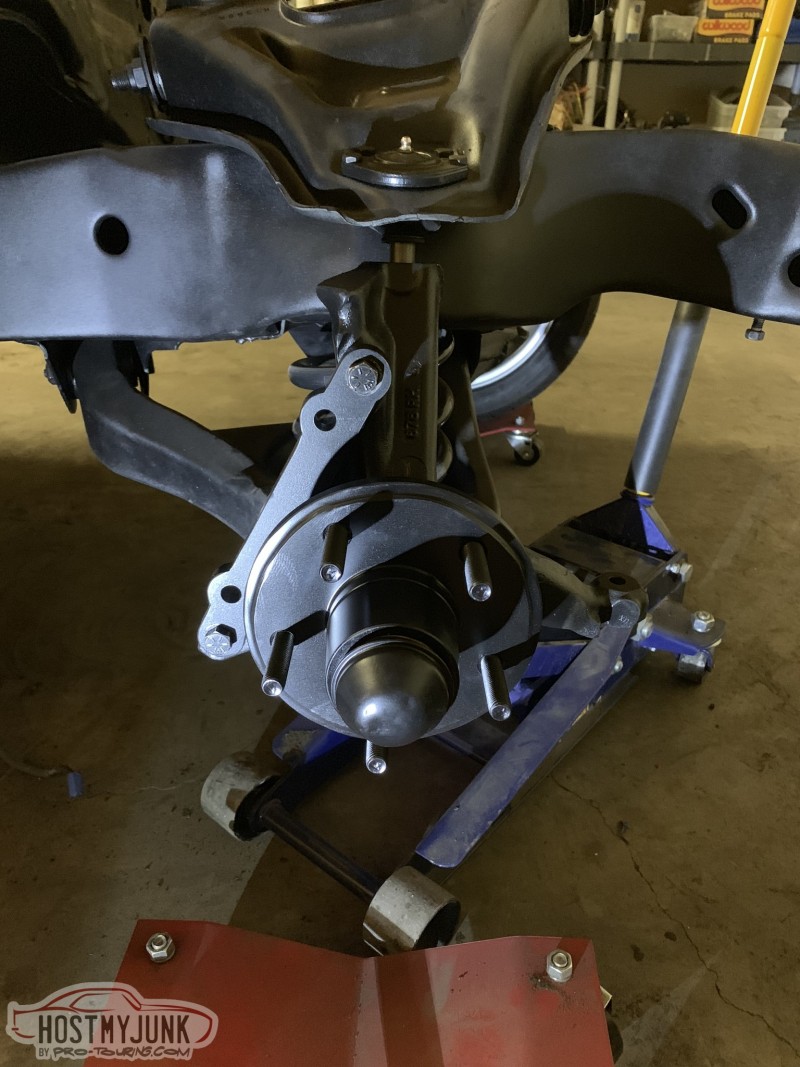
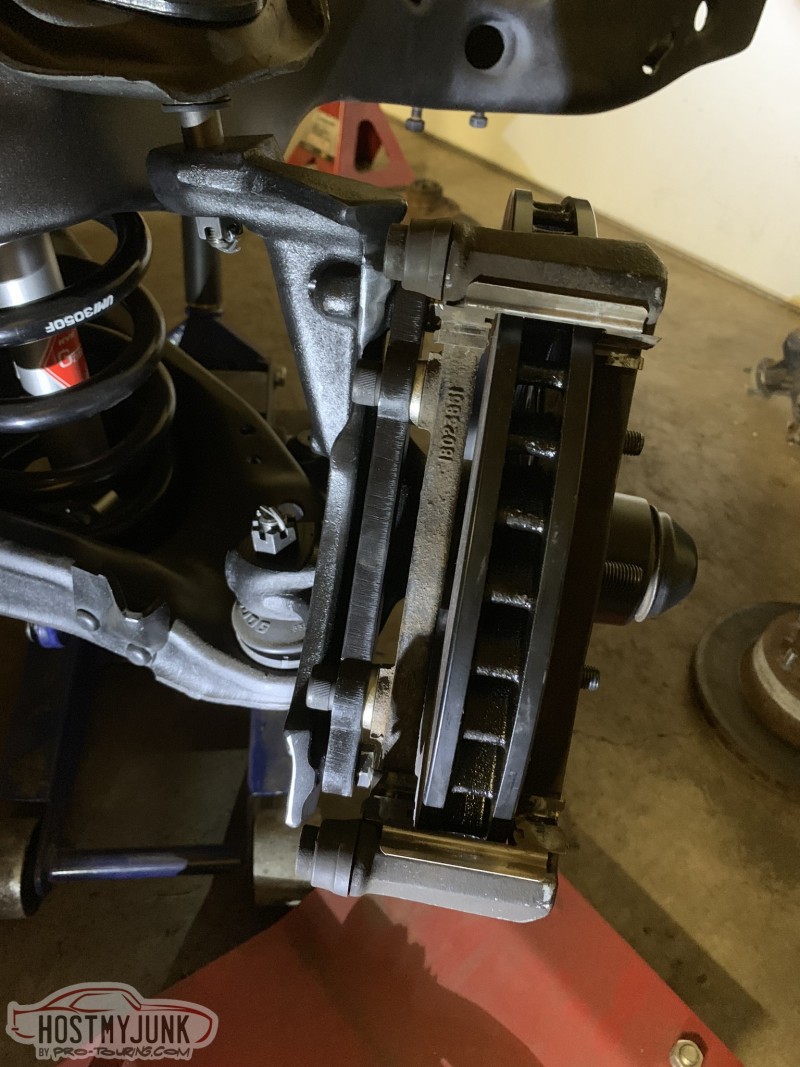
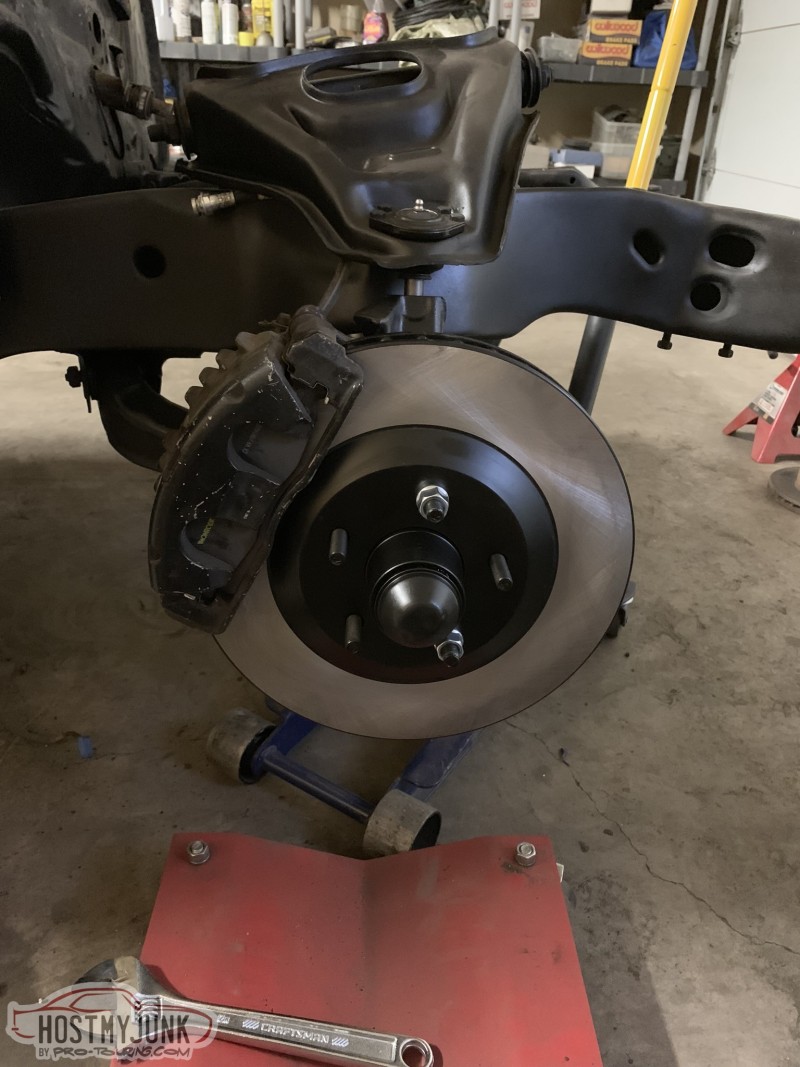
I still had the 4th Gen Camaro calipers from the Chevelle sitting on my shelf. It turns out Custom Works Performance sells a set of adapter brackets that allow the use of 13" C5 rotors with the 4th Gen calipers and abutments. The hubs were built by turning down a set of 3rd gen rotors. The spindle had to be modified, but everything fit really well and the wheels clear easily. Track width is supposed to stay the same but I haven't actually verified this.
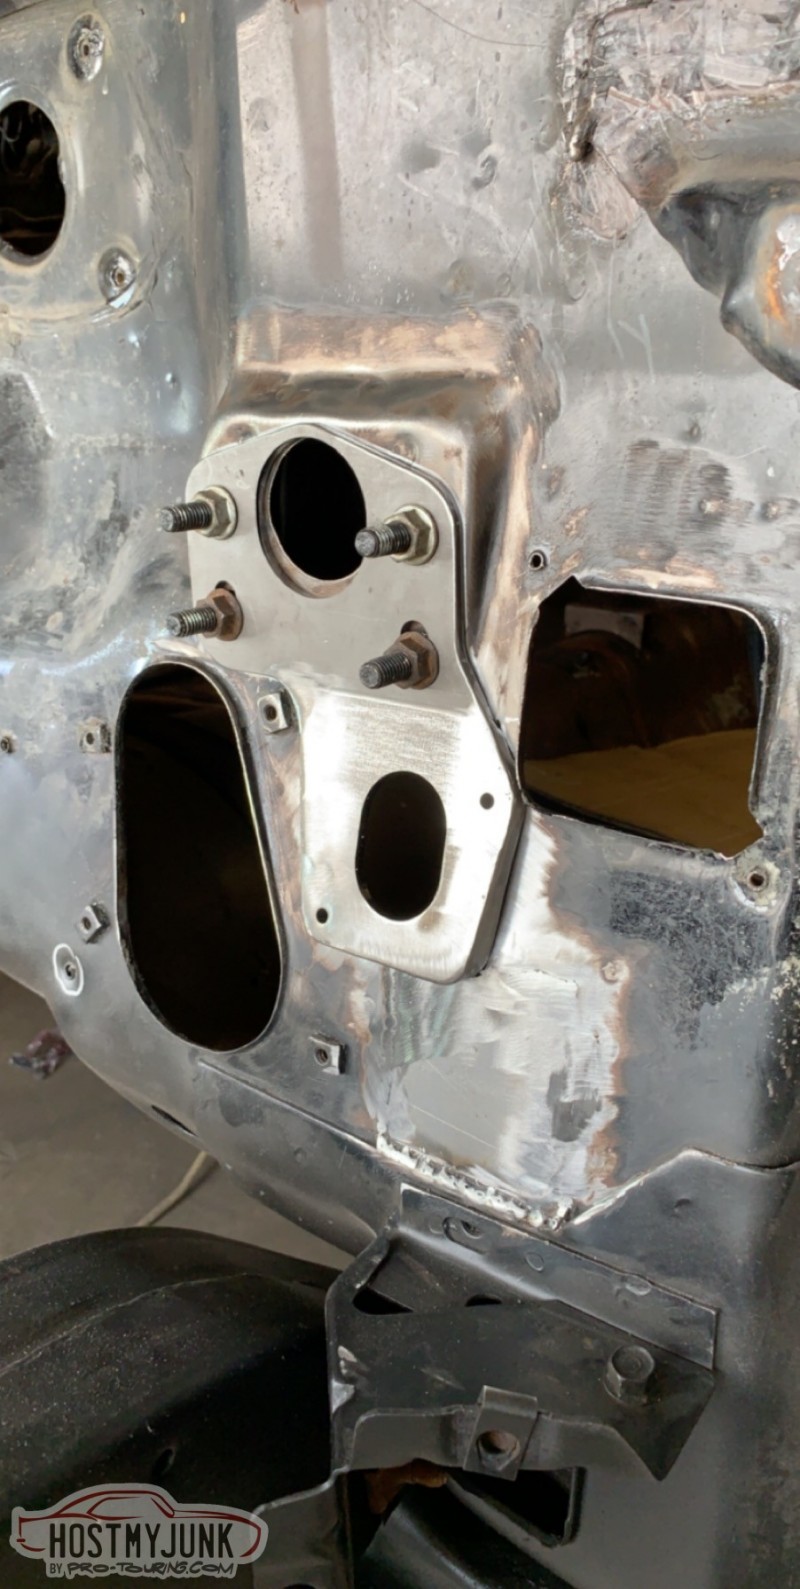
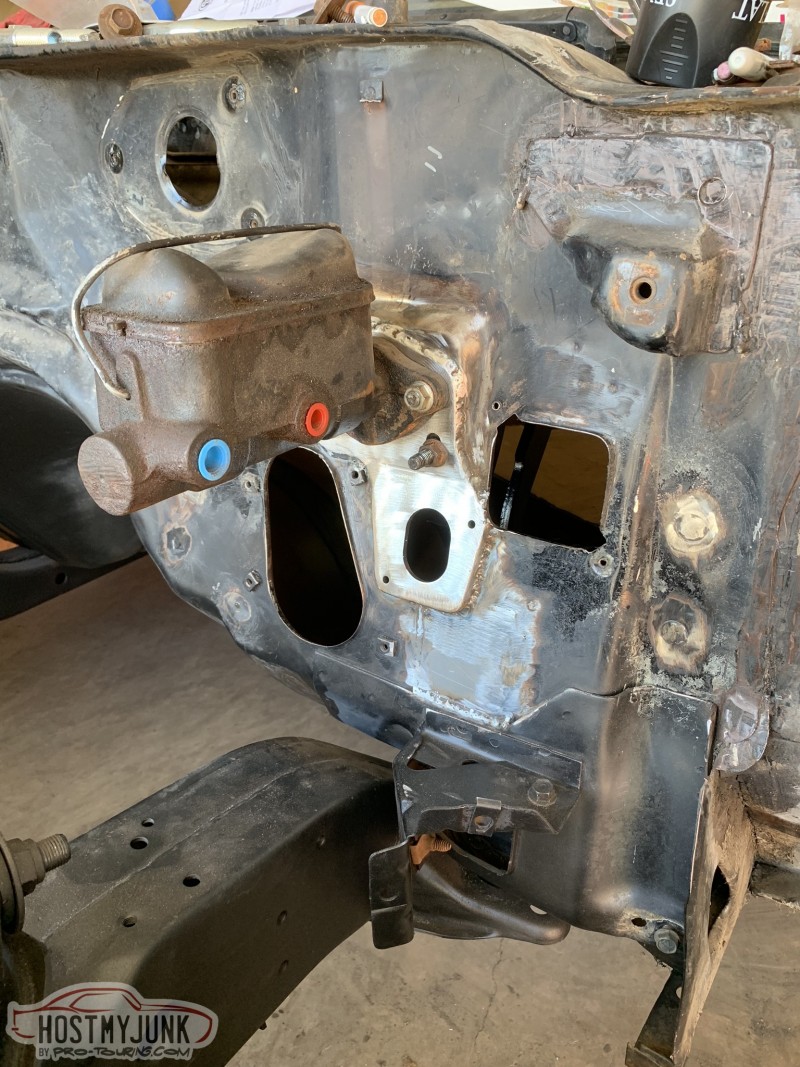
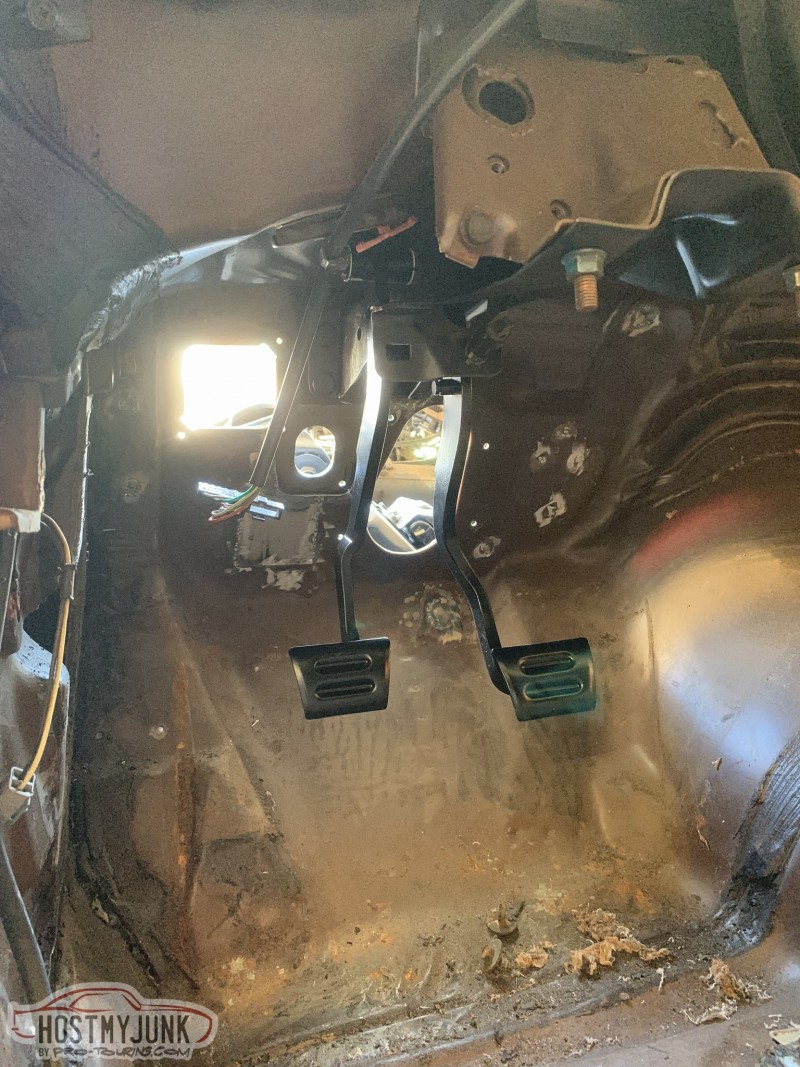
I also cleaned up the firewall a bit and added a DSE clutch master cylinder bracket. It was definitely worth taking the extra time to weld and blend the plate into the firewall. The brake master cylinder is what I originally ran on the Chevelle before switching to the tandem Wilwood setup. I went with a set of reproduction early 2nd gen manual brake/clutch pedals. The early cars had a larger clutch pedal pad, which I like much better.
 1970 Chevelle: 6.0 L96, T56, Strange 9 Inch, Ridetech Coilovers, Wilwood brakes
1978 Firebird: 6.0 LQ4, T56
2007 Sierra 2500HD LBZ
11-12-2019 #13
Registered User
- Join Date
- Feb 2013
- Location
- Ft Worth, TX
- Posts
- 188
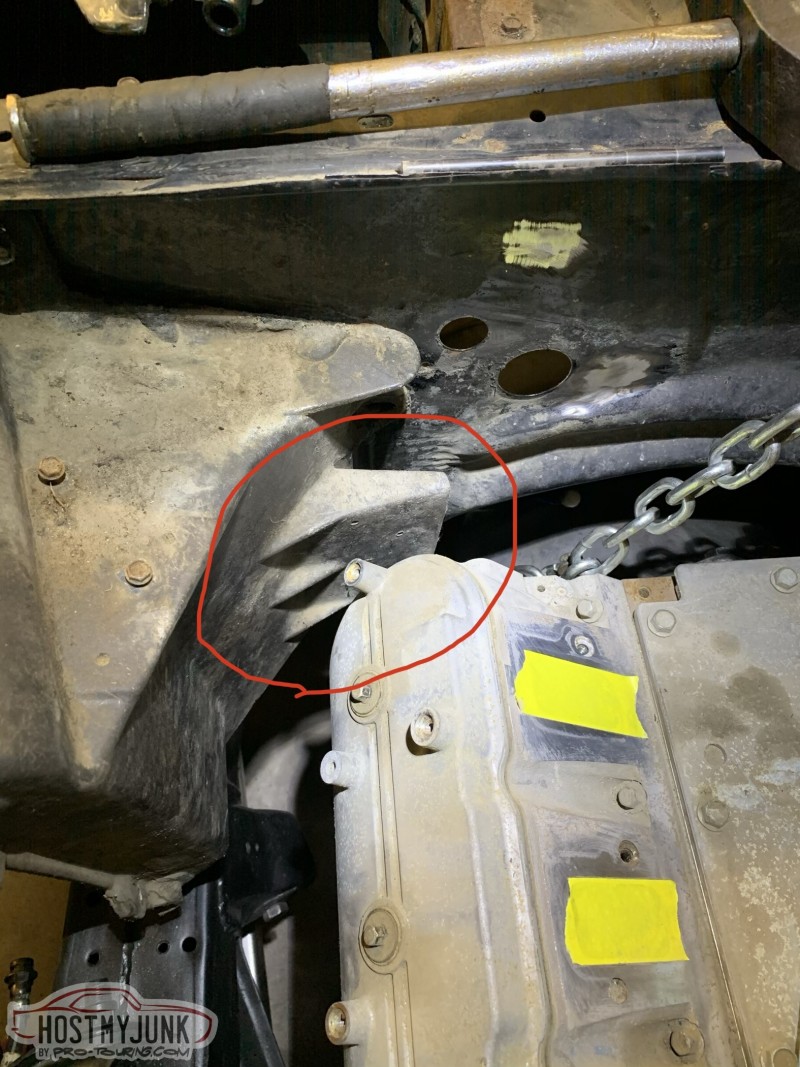
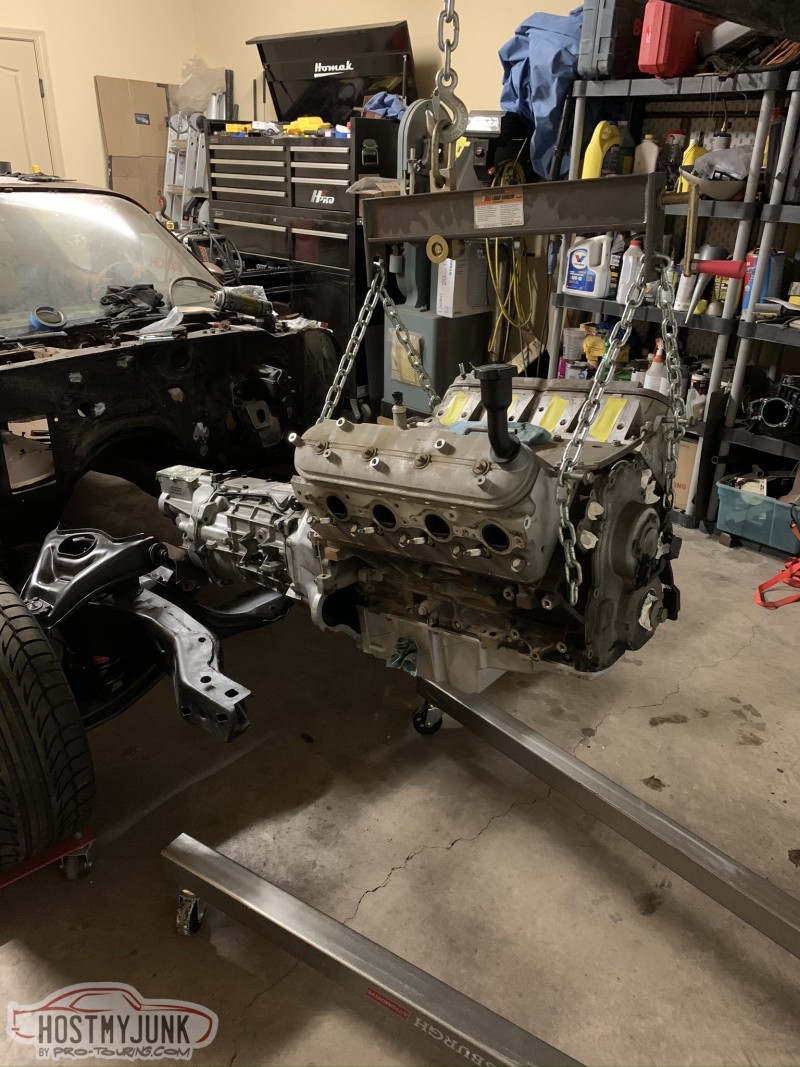
I'll be updating the Chevelle's build thread with more details but my plan of throwing a cheap junkyard 5.3 into the Firebird kind of blew up. Instead, I bought a low mile L96 to put in the Chevelle and the Firebird will be getting the Chevelle's old drive train. Gotta love scope creep...
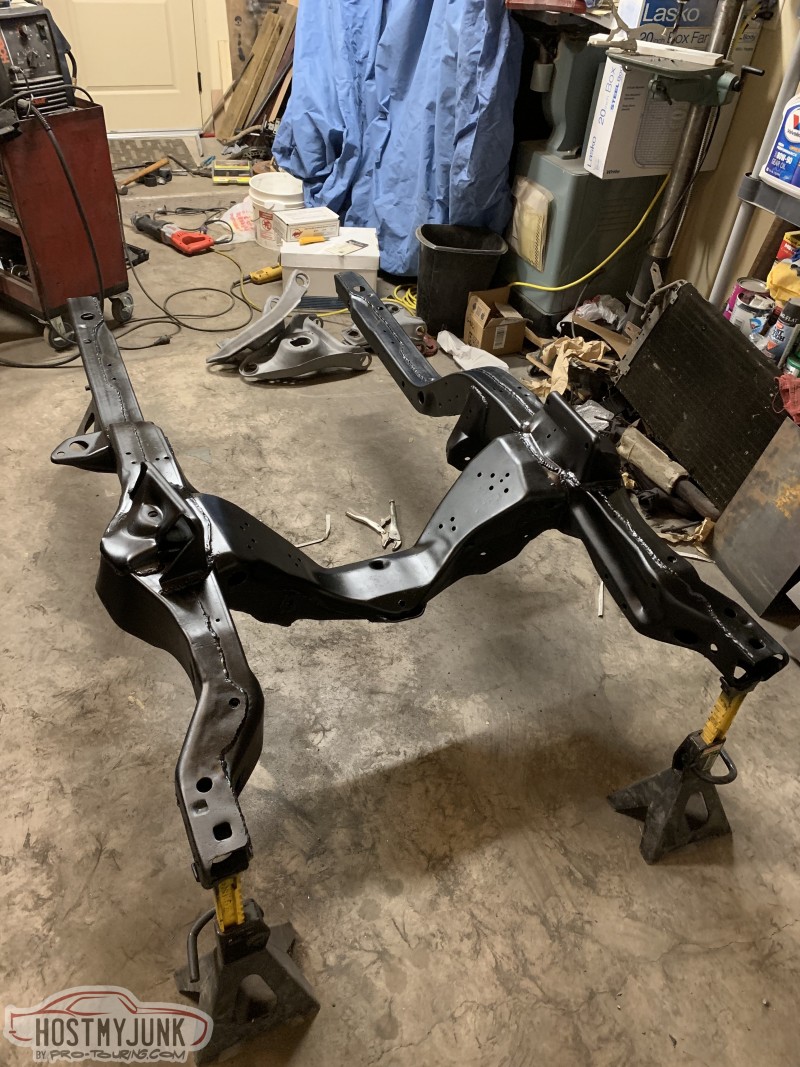
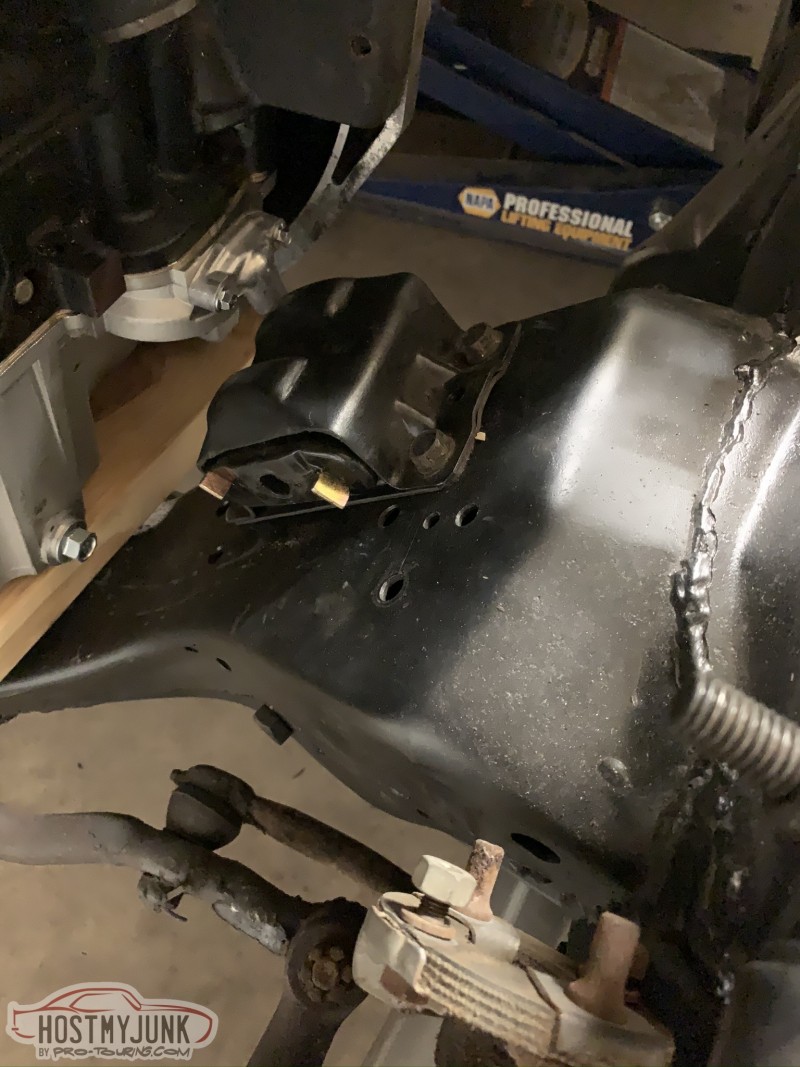
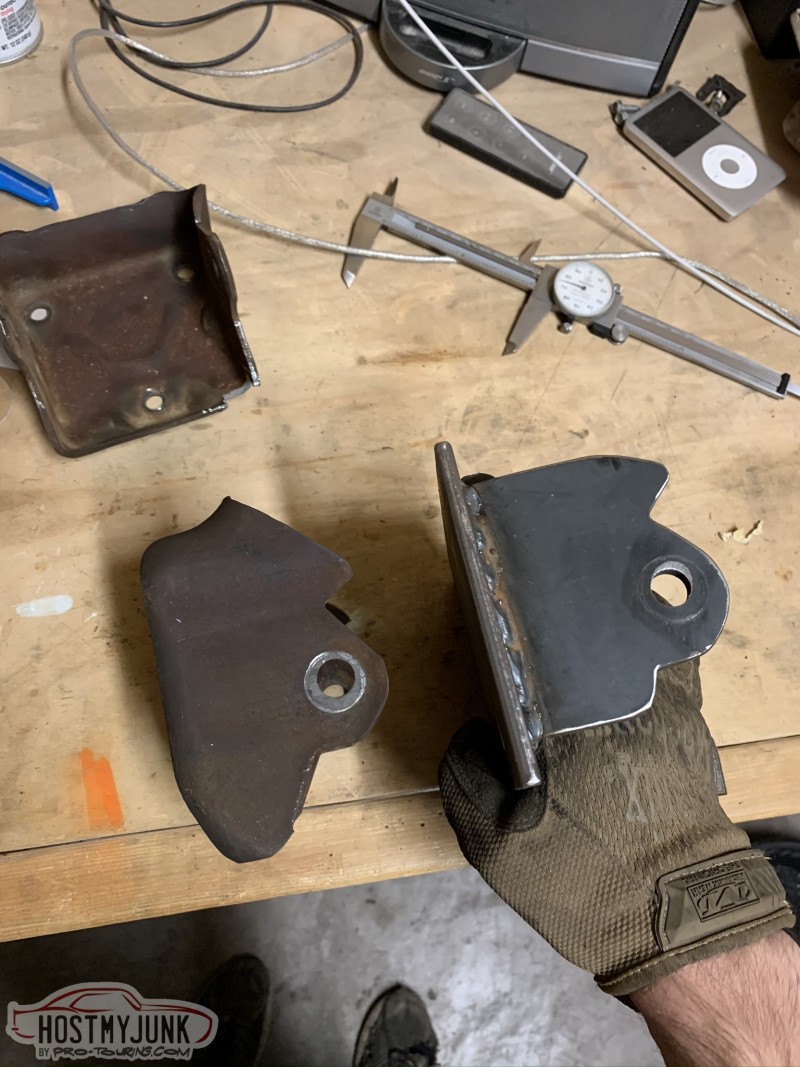
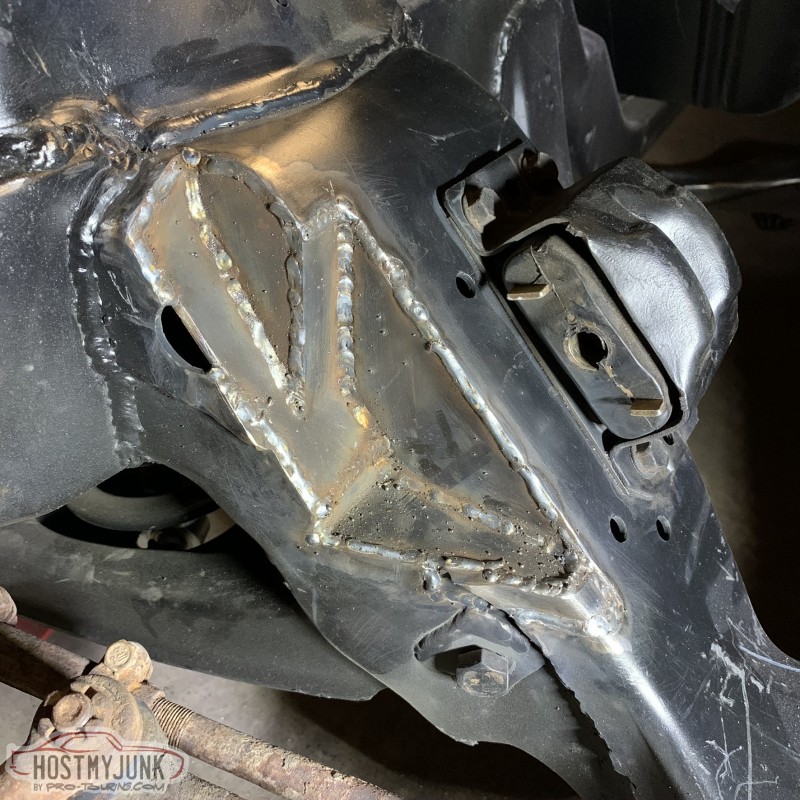
I'll been using the L96 to mock up the motor and transmission mounts for the Firebird until I make the switch. By 77, GM was using the newer clamshell style motor mounts. I don't think these are quite as well suited for swaps as the older style mounts but I figured I could make them work. The biggest issue with the stock frame-side mounts is that they bolt to the very front edge of the subframe crossmember. With the engine set back, this puts them in the way of low mount accessories (alternator and AC compressor, specifically). My solution was to move the mounts back, re-drilling the mounting holes in the process. This will leave plenty of room to notch the frame. I recreated the original clamshells using 1/4" plate that would still use the metal tabs in the polyurethane inserts.
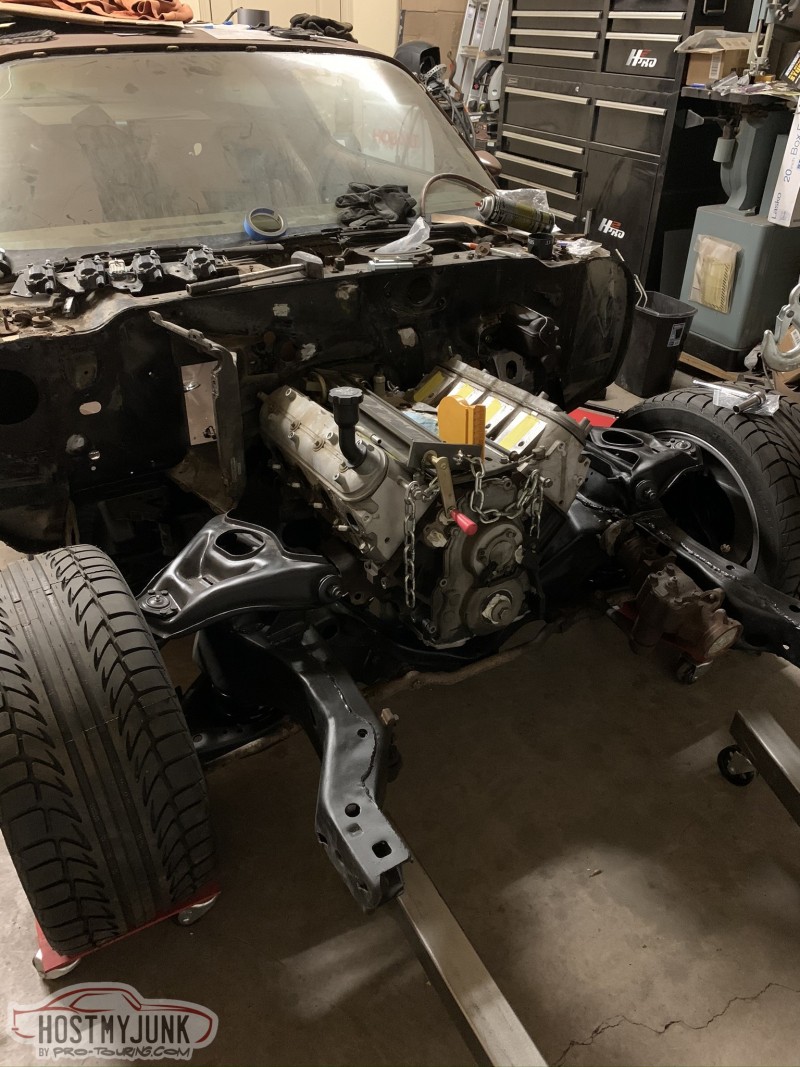

For the transmission crossmember, I know a lot of guys will flip the mounting pad over, slide the crossmember back, and drill new holes in the frame. I flipped the pad but just couldn't see a good way to add new mounting holes in the frame. Instead, I cut the ends off, welded 1/4" plate on the ends, and bolted them to the inside faces of the frame rails. I think it's a pretty good solution.
 1970 Chevelle: 6.0 L96, T56, Strange 9 Inch, Ridetech Coilovers, Wilwood brakes
1978 Firebird: 6.0 LQ4, T56
2007 Sierra 2500HD LBZ
11-19-2019 #14
Registered User
- Join Date
- Jan 2005
- Location
- Burleson Tx
- Posts
- 268
Looking good! Gotta love scope creep. We had some building my sons T/A. Was just going to be a quick engine rebuild and repaint. Found some rust in the firewall had to pull dash, Turned into this: https://www.fuelcurve.com/1978-pontiac-trans-am/
Kenny
01-06-2020 #15
Registered User
- Join Date
- Feb 2013
- Location
- Ft Worth, TX
- Posts
- 188
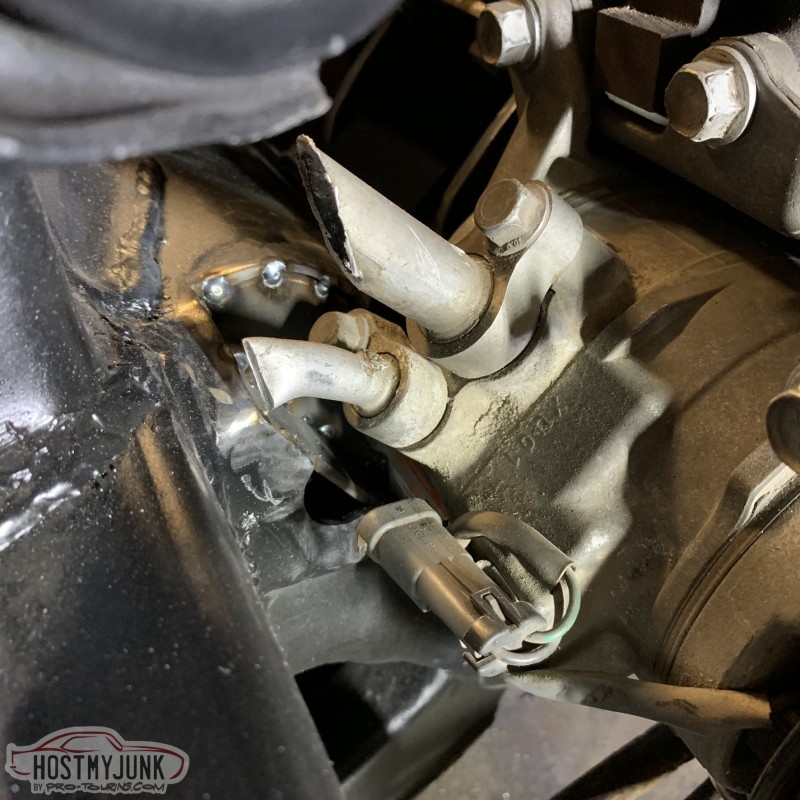
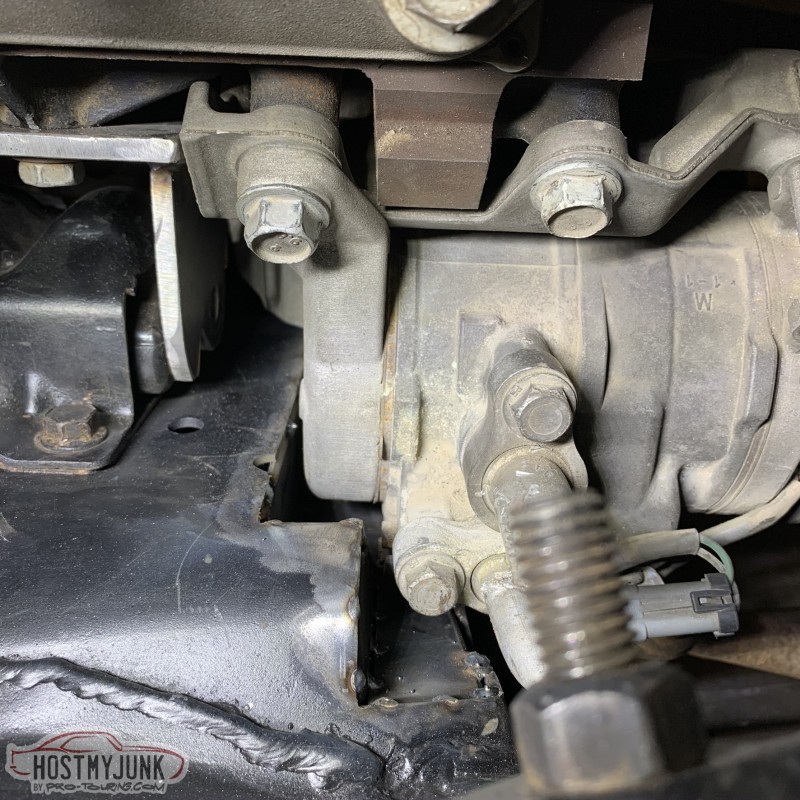
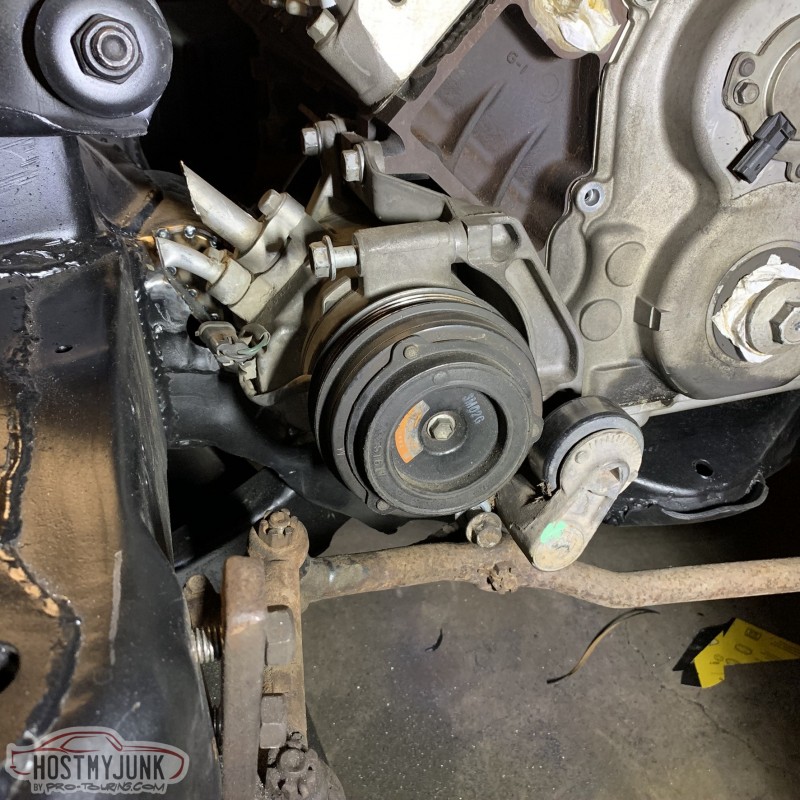
First project of 2020 was notching the frame to fit a stock AC compressor. My hope was to use a 5.3 Trailblazer compressor because the suction and discharge ports are ideally located. Unfortunately, when people recommend these compressors for swaps they seem to leave out the fact that mounting bracket is designed to bolt to the Trailblazer oil pan. It doesn't use tapped bosses on the engine block. A side effect of this mounting is that it locates the compressor extra low. I notched the frame accordingly and the bottom of the compressor ran into the control arm. I switched back to the Denso compressor that came with the engine and the fit was much better. A bit of extra notching means there should be plenty of room for the pressure discharge port. I want to roll the car outside before I clean up the welds so please don't judge my skills too hard.


 1970 Chevelle: 6.0 L96, T56, Strange 9 Inch, Ridetech Coilovers, Wilwood brakes
1978 Firebird: 6.0 LQ4, T56
2007 Sierra 2500HD LBZ
02-09-2020 #16
Registered User
- Join Date
- Feb 2013
- Location
- Ft Worth, TX
- Posts
- 188
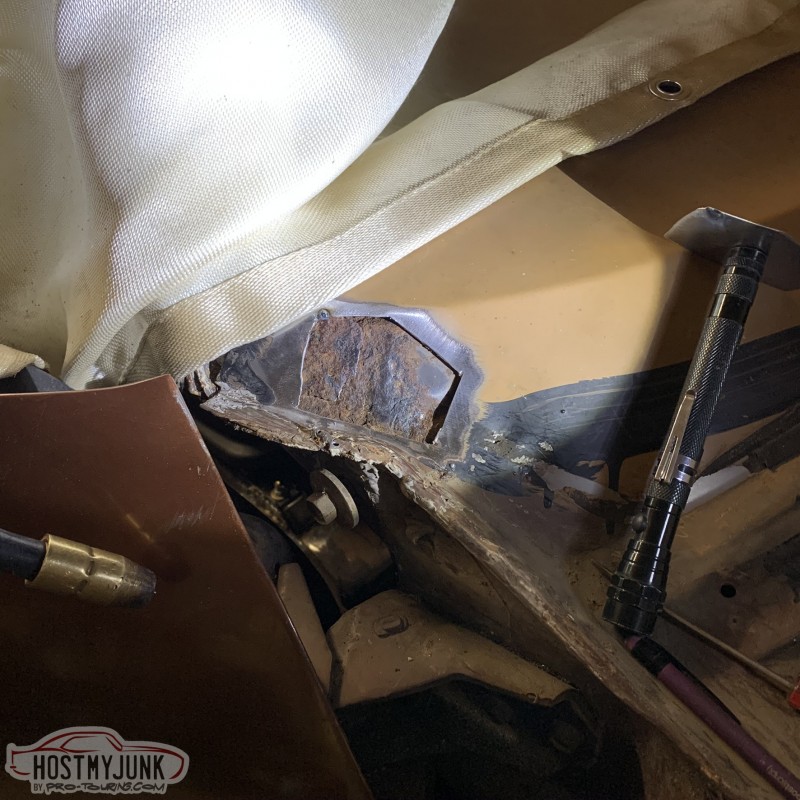
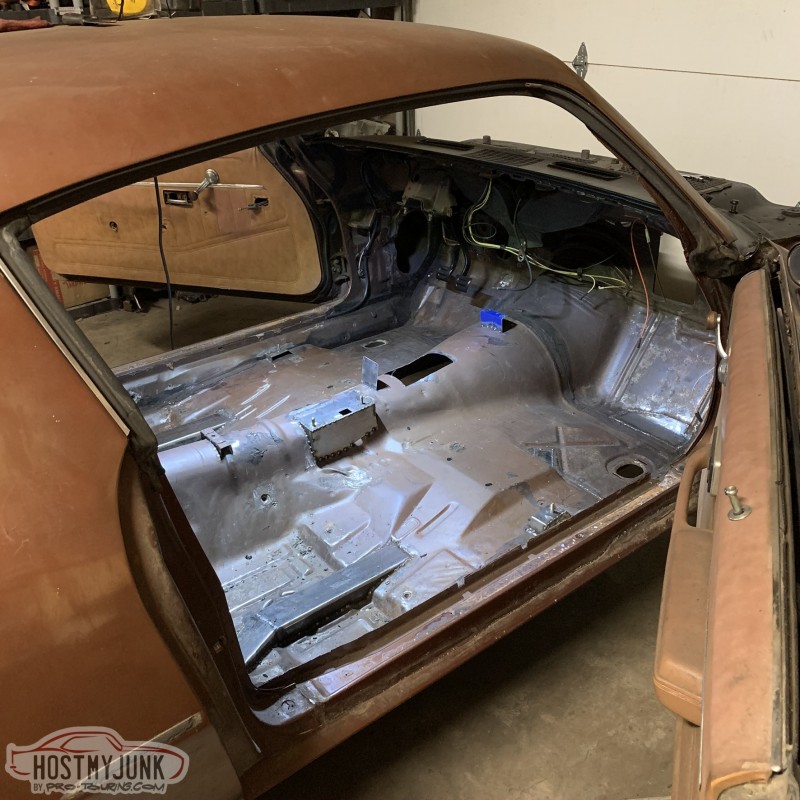
The windshield had been leaking at the passenger side corner and that led to some rot in the toe panel and the dashboard. Compared to my Chevelle, I really can't complain.
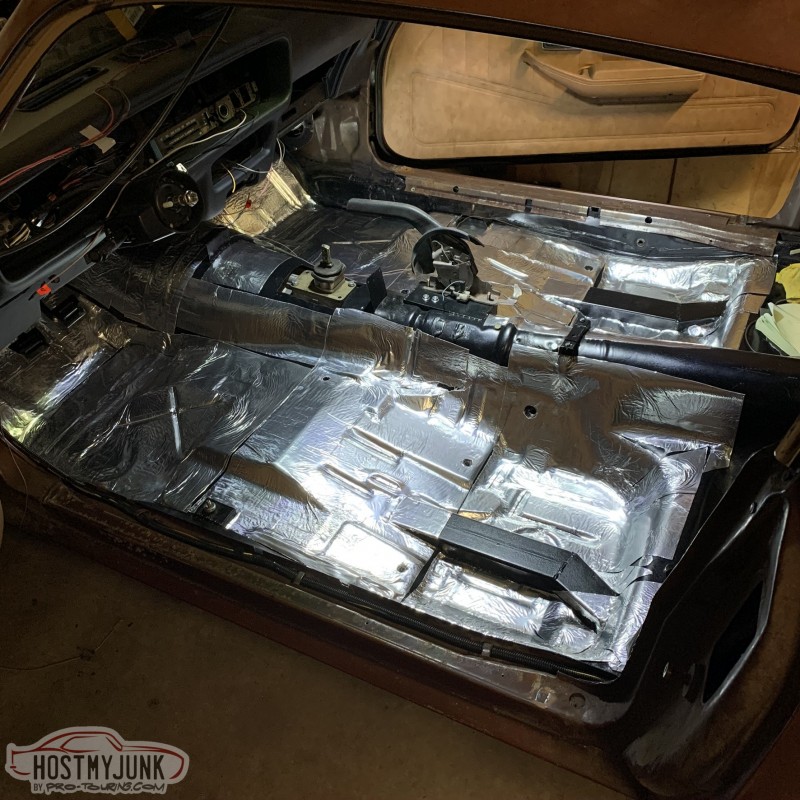
I'm keeping the stock AC system in the Firebird (because I'm trying to keep my budget down and I haven't been all that impressed with the Vintage Air system in my Chevelle) so it didn't make much sense to put a lot of effort into smoothing the firewall. Some quick bodywork plus a can of spray paint has it looking much better.

I did a quick brush and roller job on the floor and trunk pan with some Rustoleum enamel. I'm not sure how it'll hold up long-term but it looks pretty good considering my lazy prep-work. I'm not that concerned with condition of the paint because water shouldn't be entering the passenger compartment with new weatherstrips.
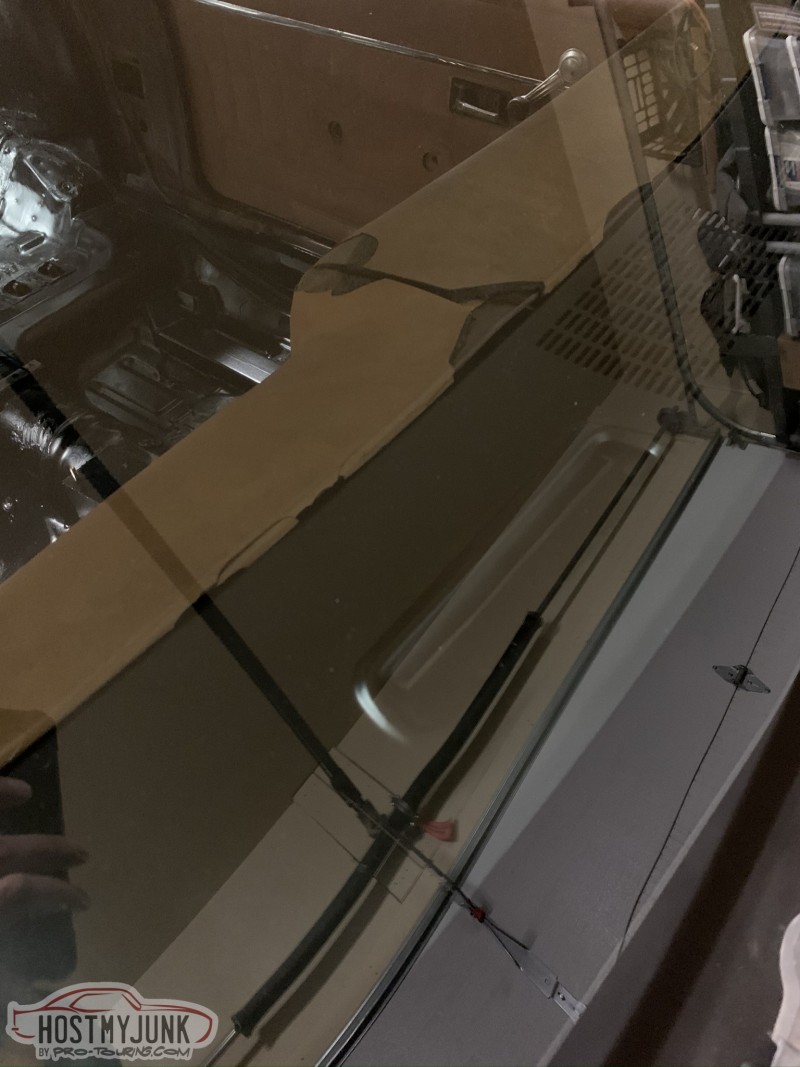
This weekend I got the new windshield and original rear window installed. I used butyl tape because I'll likely be pulling the glass back out when I eventually get around to bodywork. (It'll be a while)

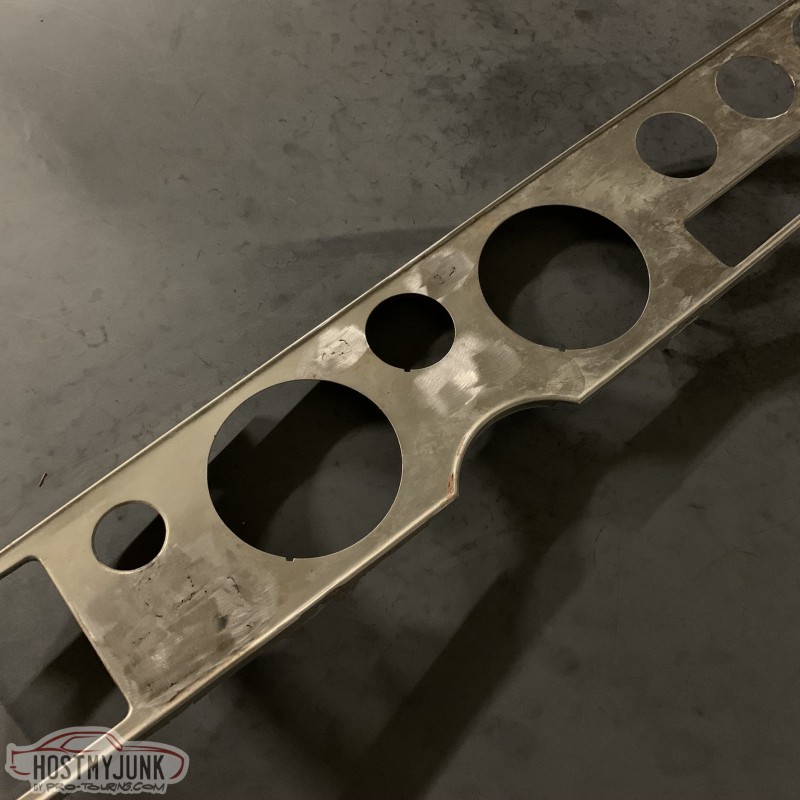
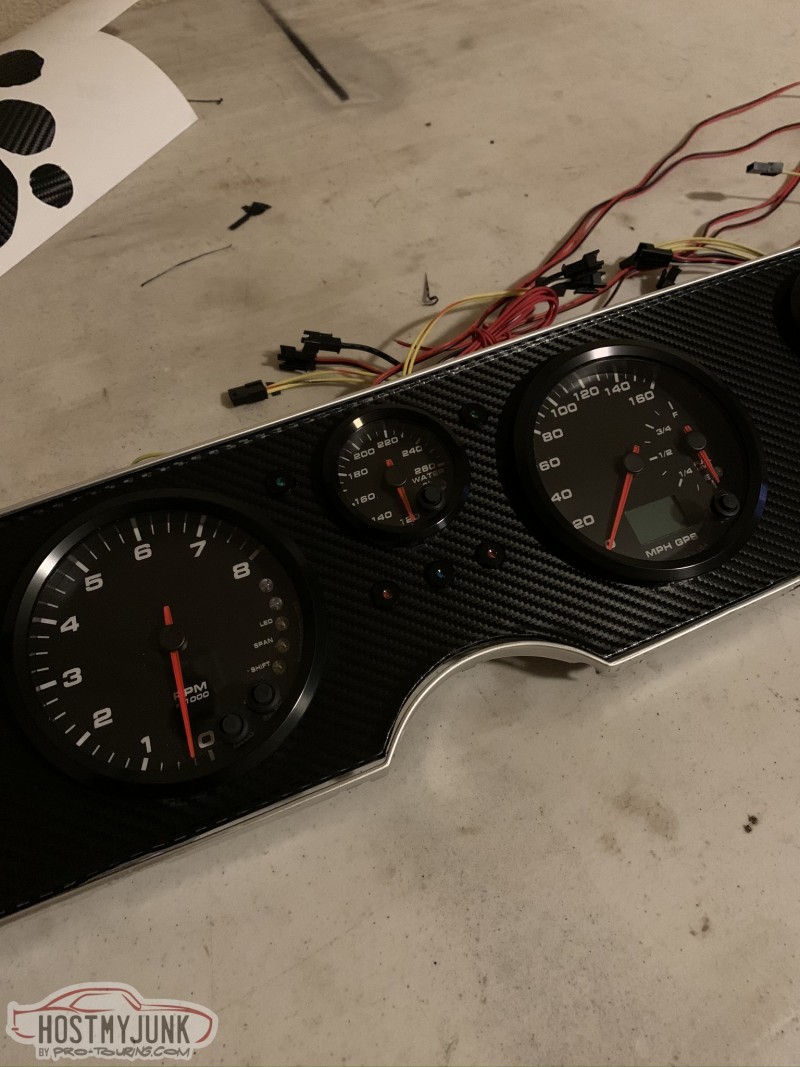
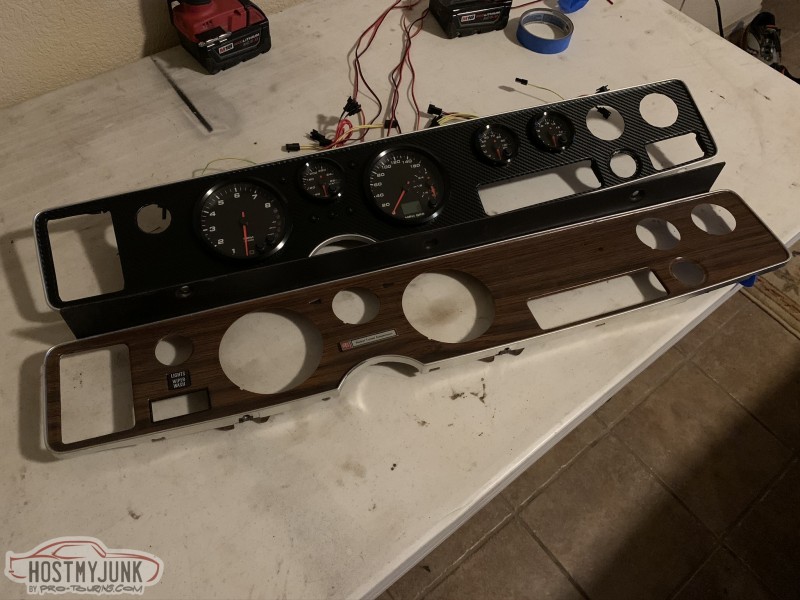
The woodgrain dash bezels are 24 gauge steel with a sticker. A few coats of paint stripper softened up the adhesive enough to peel the woodgrain off. I'm using a 4th gen f-body steering column with wiper controls on the turn signal lever so the dash switch was no longer necessary. I also shaved the holes for the turn signal indicators (lights are built into the cluster so I need a different solution) and the holes for the "Radial Tuned Suspension" badge. I bought this panel because it has the opening for the defroster/lock switches. It came from a non rally-gauge car so I drilled two 2 1/16" holes for the Speedhut gauges.
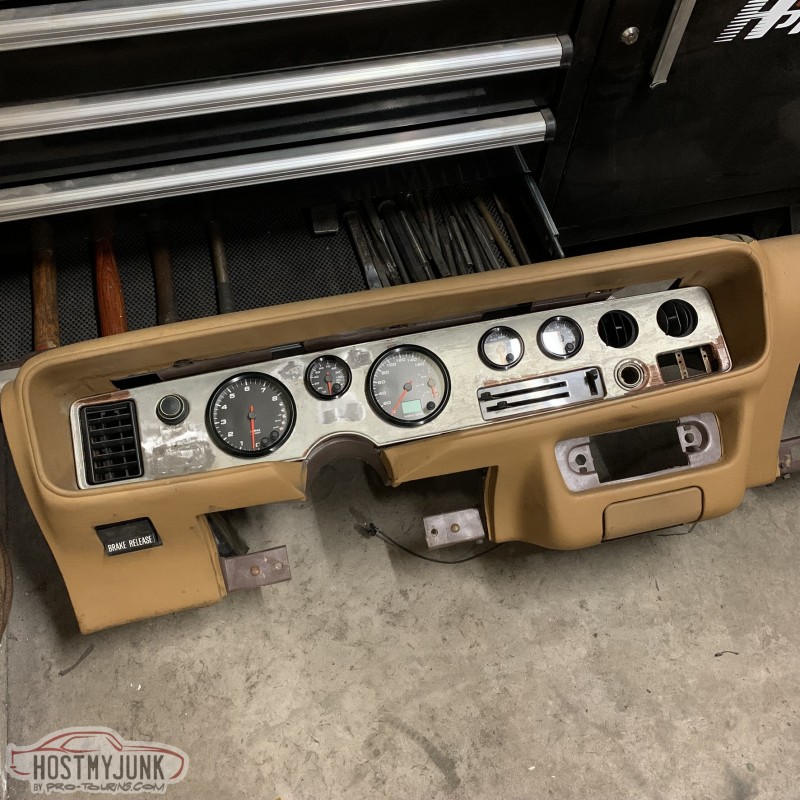
The dashboard is pretty well trashed so I was thinking about installing a cap. My question for anyone who's installed one is whether they extend all the way to the top edge. A lot of the vinyl along the edge is chipped away and I don't know if it'll be exposed with the cap installed.
 1970 Chevelle: 6.0 L96, T56, Strange 9 Inch, Ridetech Coilovers, Wilwood brakes
1978 Firebird: 6.0 LQ4, T56
2007 Sierra 2500HD LBZ
04-30-2020 #17
Registered User
- Join Date
- Feb 2013
- Location
- Ft Worth, TX
- Posts
- 188
I keep telling myself I'm going to be better about updating my build threads and then I go almost three months without a post. Anyway, I've got lots of updates:
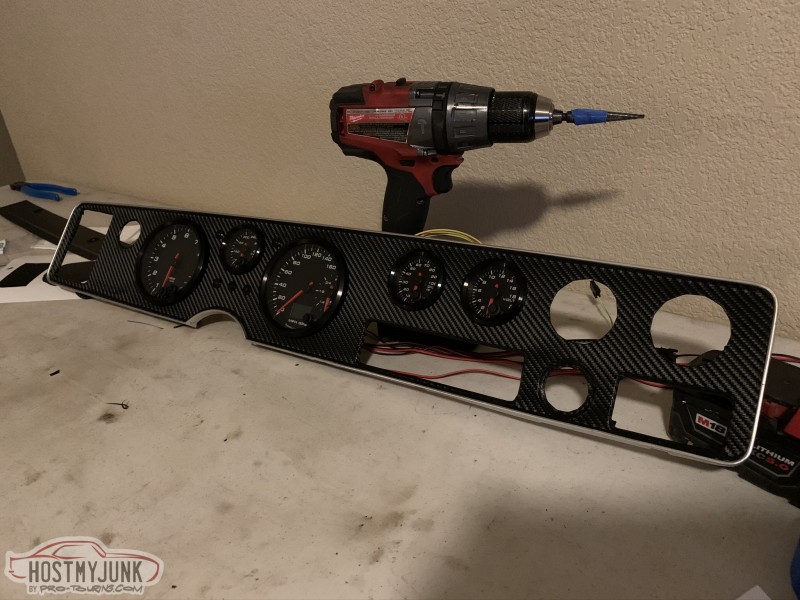
I wrapped the gauge panel with carbon fiber look wrap from 3M after a bit of body filler on the welded areas. I think it looks awesome with the Speedhut gauges. I do wish I would have used some heat to help wrap the vinyl around inside edges though.
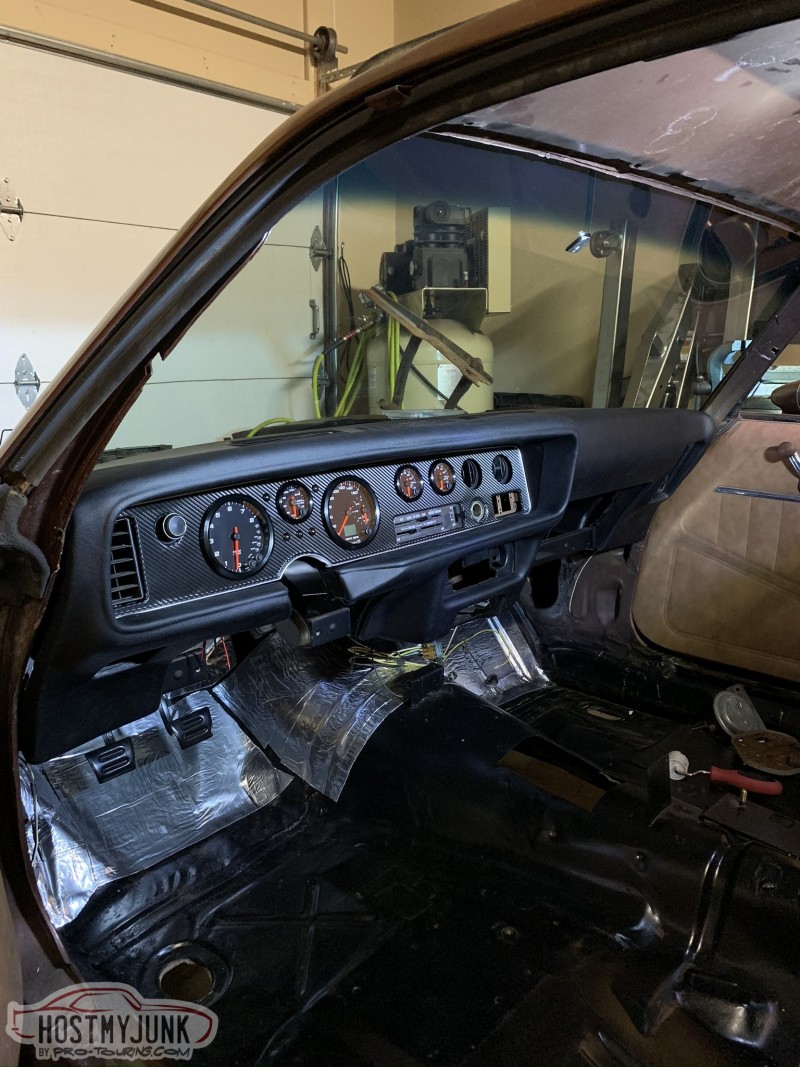
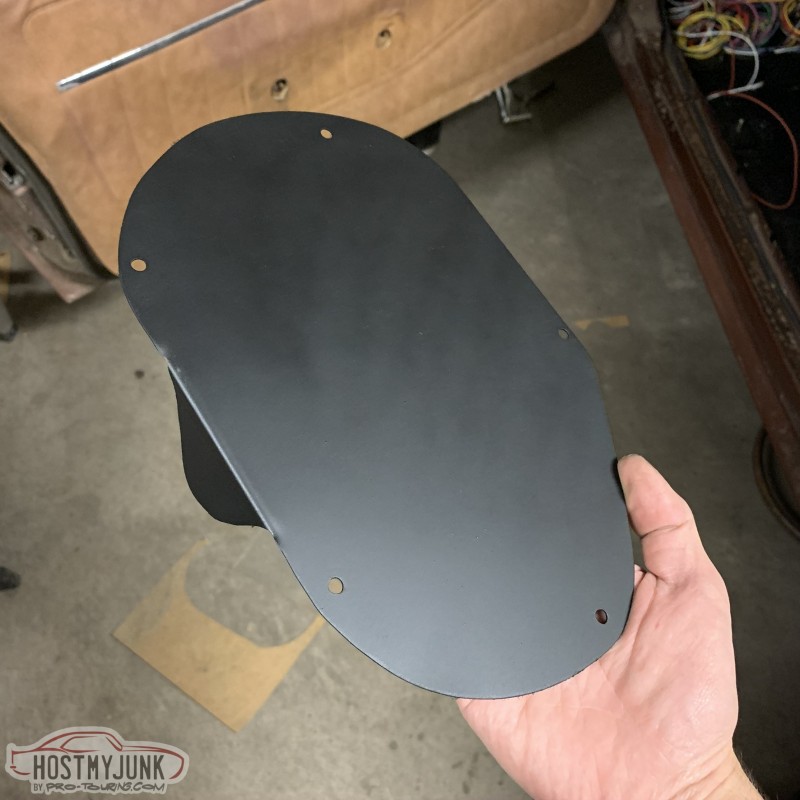
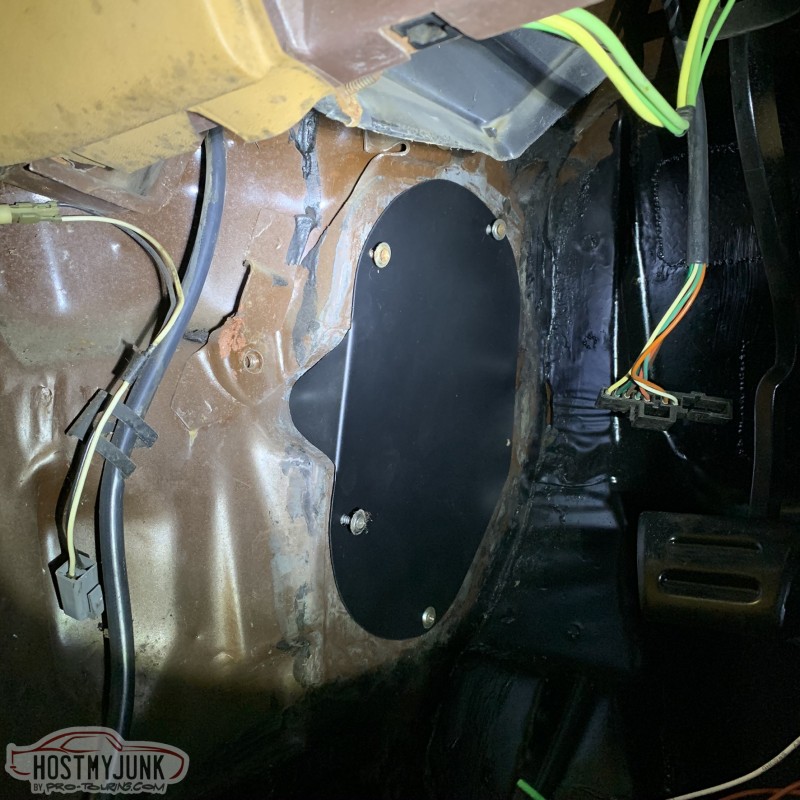
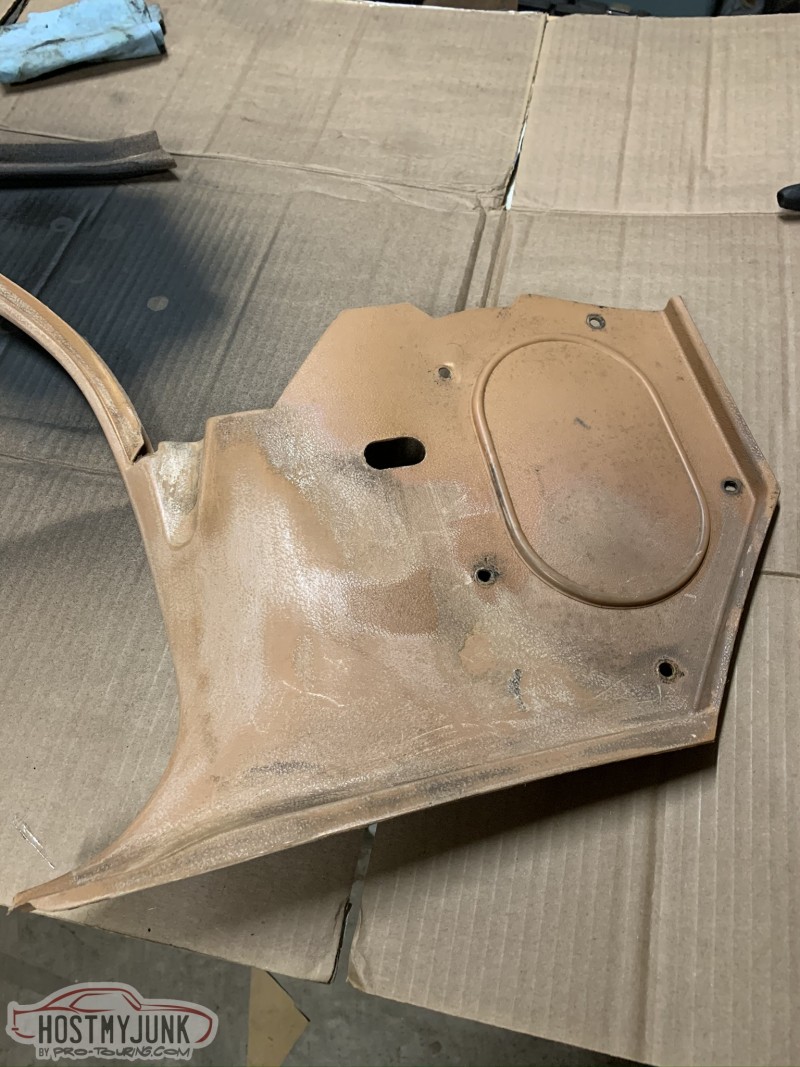
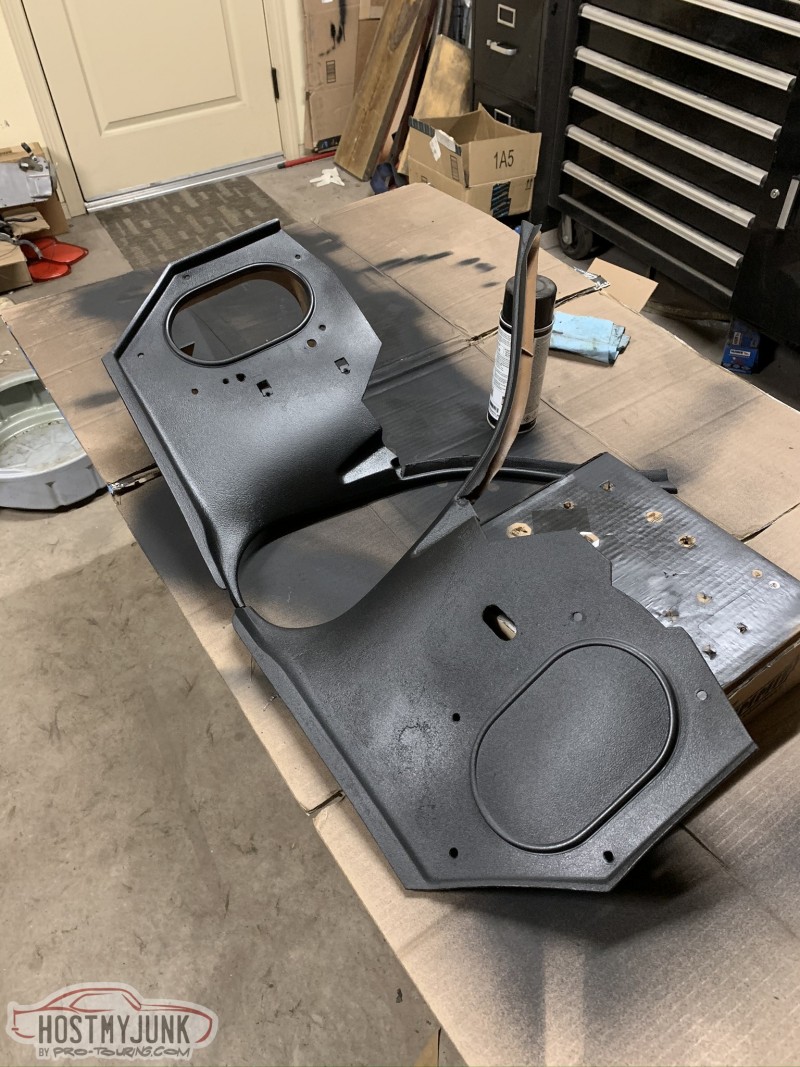
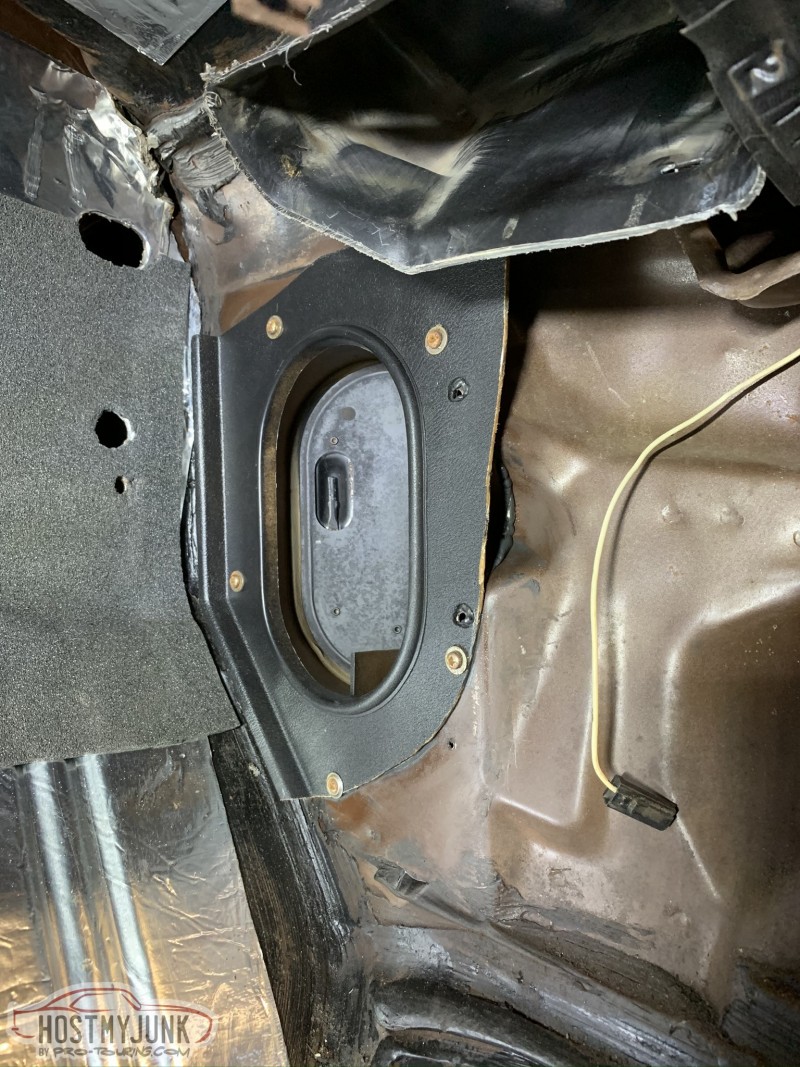
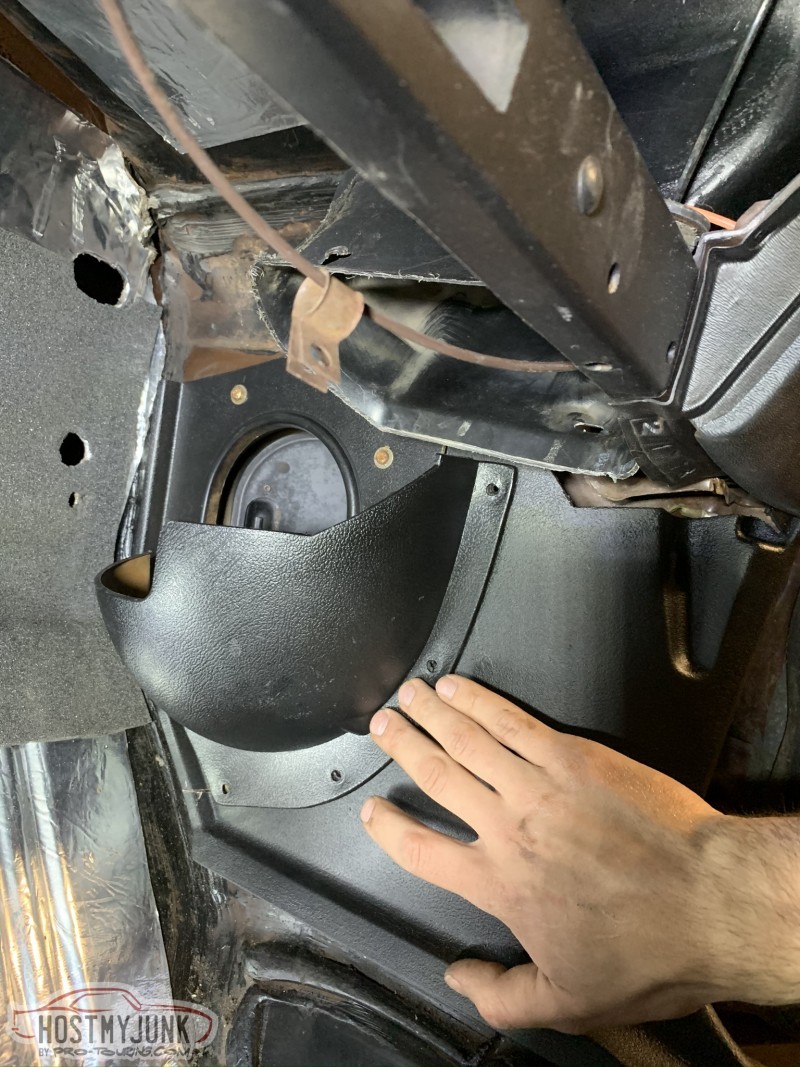
I don't like how the second gen kick panels are used to seal the openings at the base of the cowl. It sounds like they're prone to leaking so I decided to copy how GM did the A-bodies and build a metal cover. I just cut out the plug portion on the back of the panel. Most of the interior plastic was dried out and had the texture layer turning to chalk. I used SEM texture coating the SEM color coat on the kick panels and it actually turned out pretty well. On the passenger side, I cut the cowl vent door loose from the kick panel and glued it in place with RTV. This will allow me to remove the kick panel if I ever want to run wiring to the door. The under dash heater box needs to be removed if the kick panel in one piece. With the cover in place, the seam is barely visible.
 1970 Chevelle: 6.0 L96, T56, Strange 9 Inch, Ridetech Coilovers, Wilwood brakes
1978 Firebird: 6.0 LQ4, T56
2007 Sierra 2500HD LBZ
04-30-2020 #18
Registered User
- Join Date
- Feb 2013
- Location
- Ft Worth, TX
- Posts
- 188
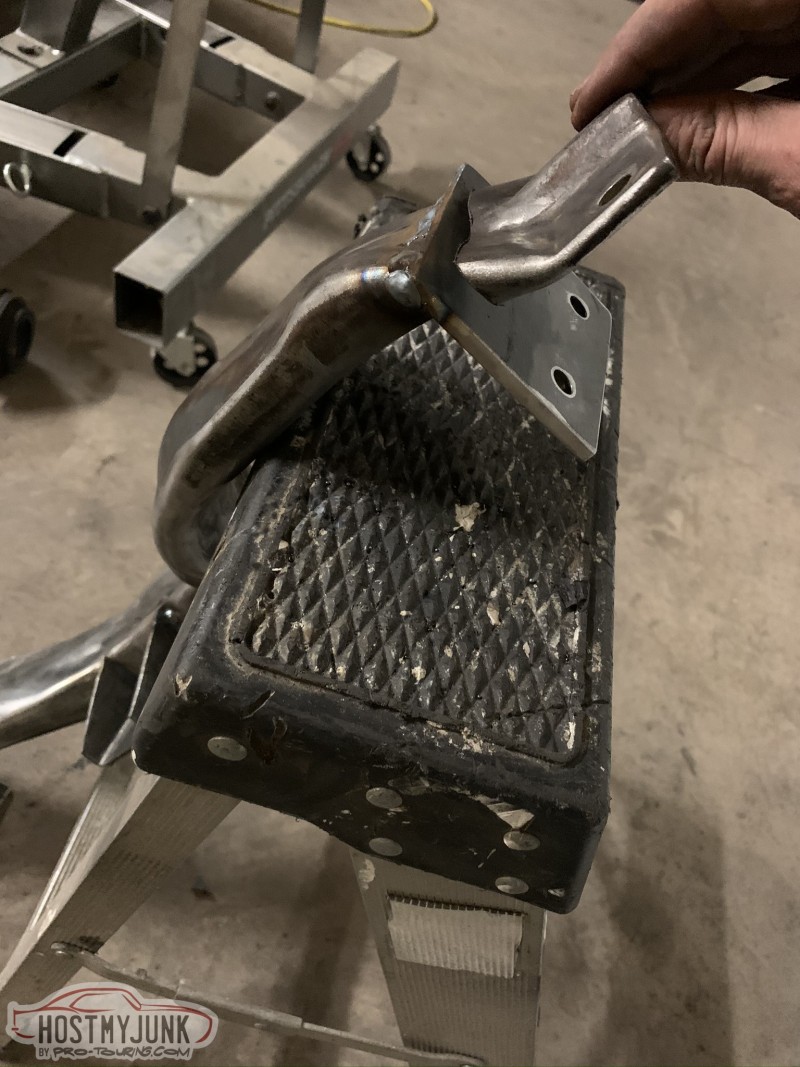
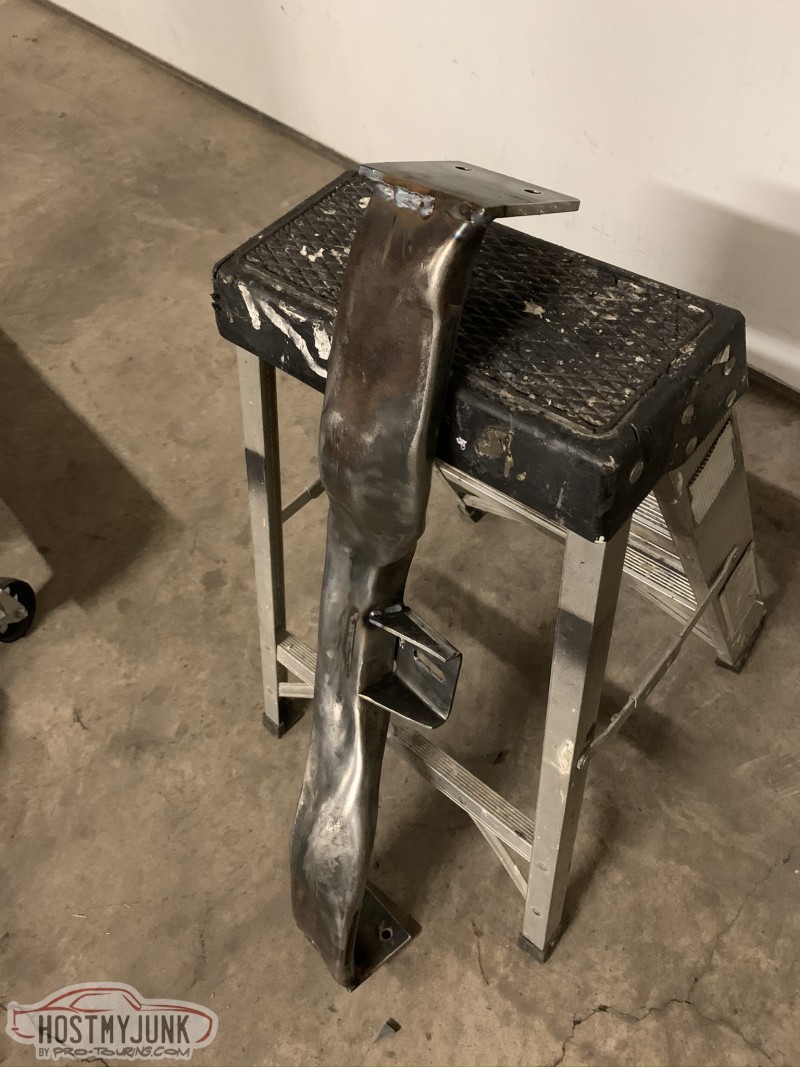
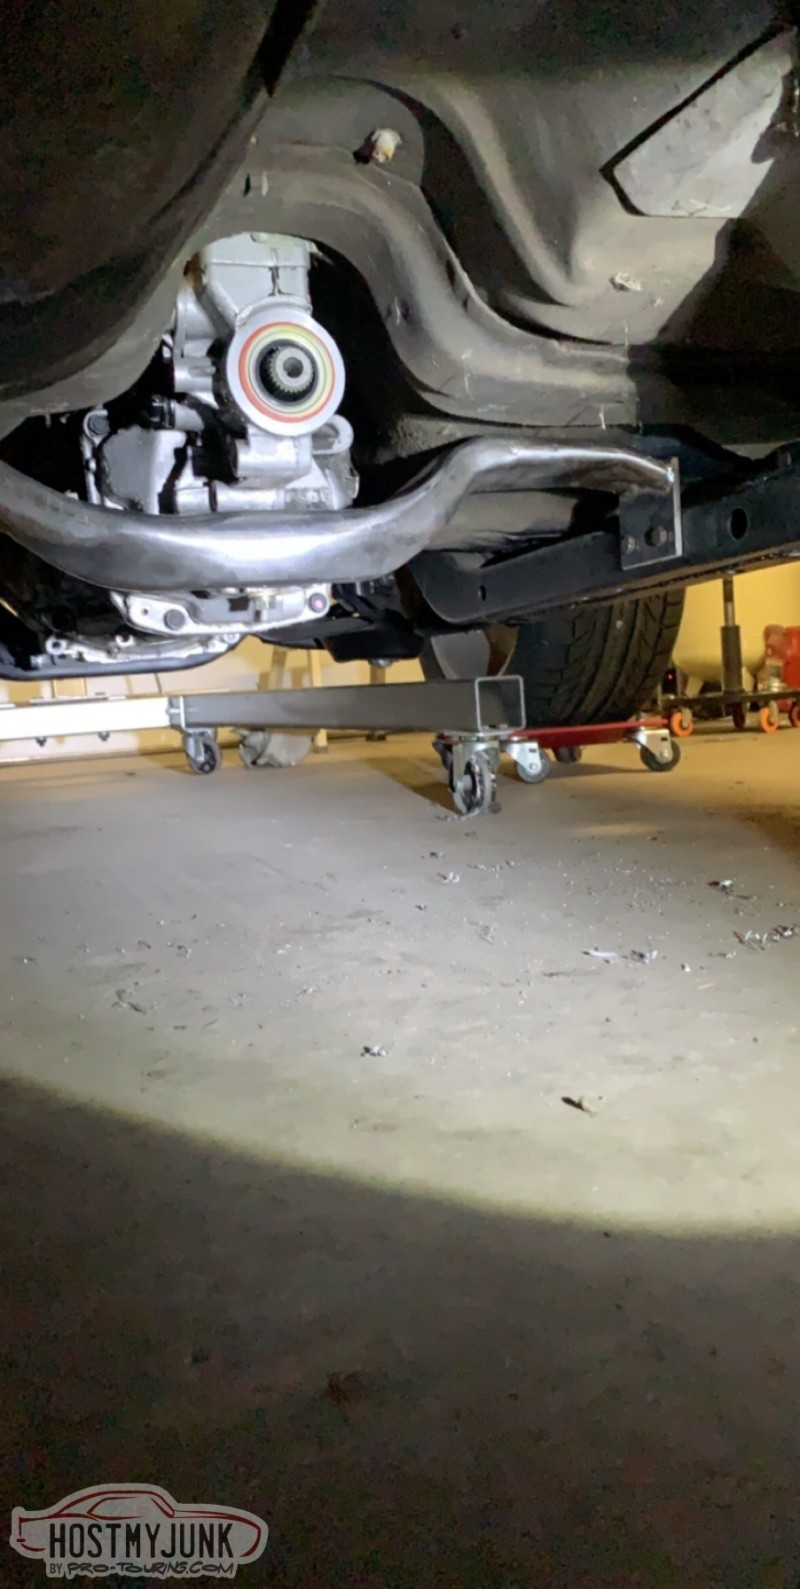
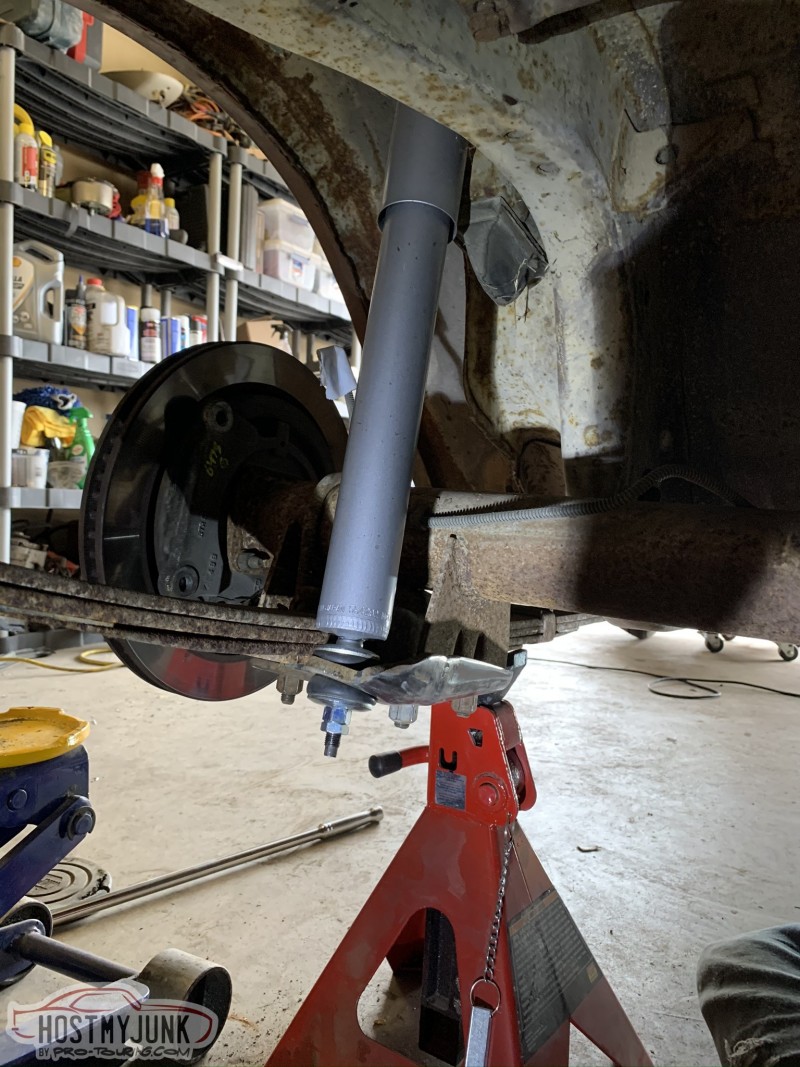
I had to move the mount for the driver's side rear shock inboard to fit the fourth gen brakes. The bracket is flipped upside down with the shock mount tab bent to be in line with the upper mounting point. It's not perfect, but it will work for now.
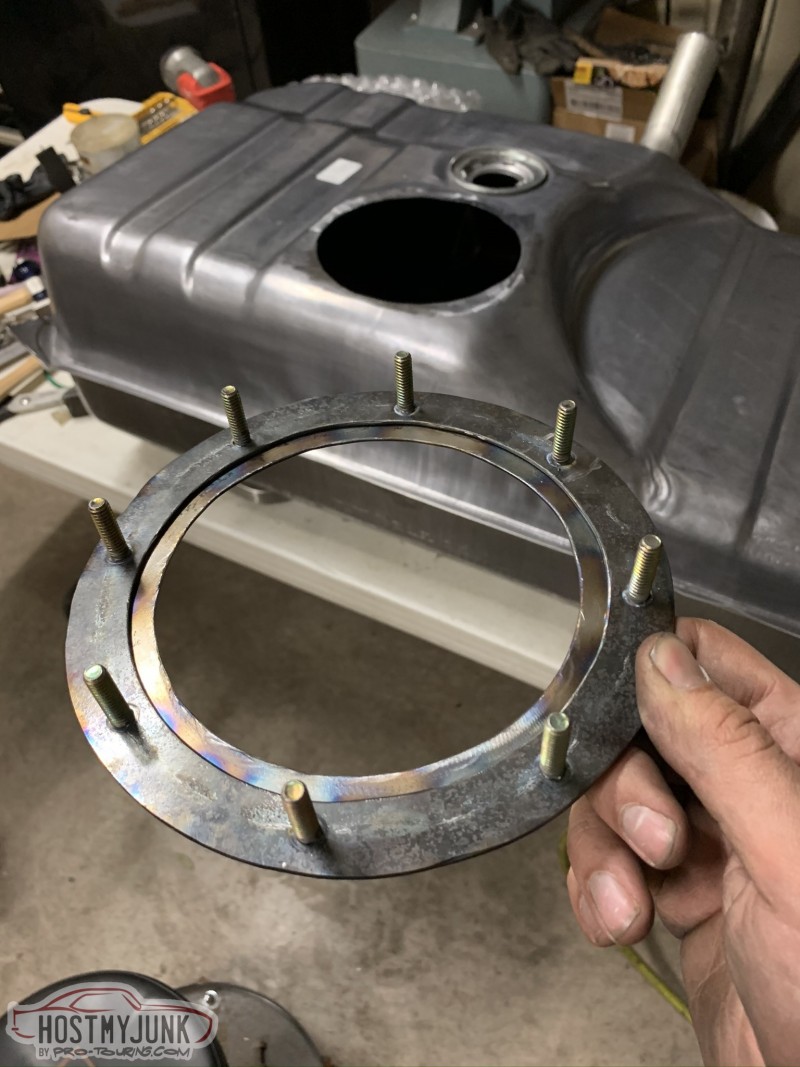
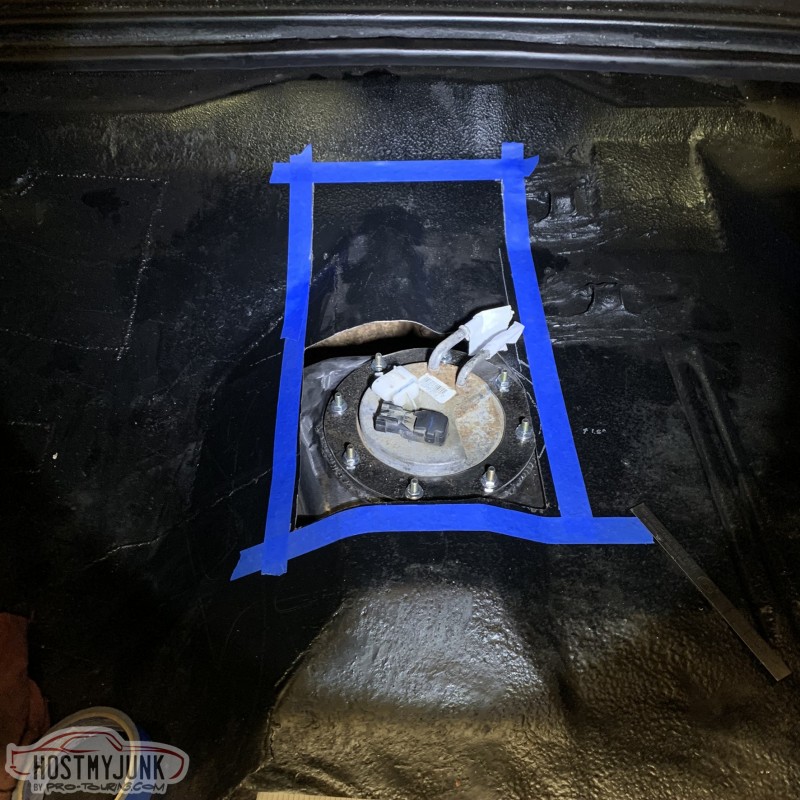
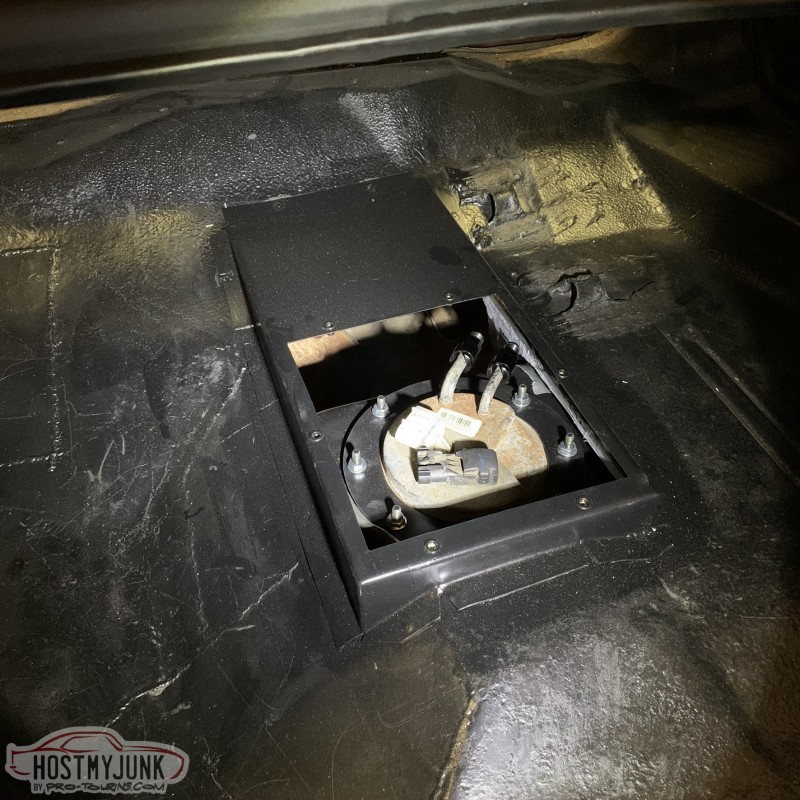
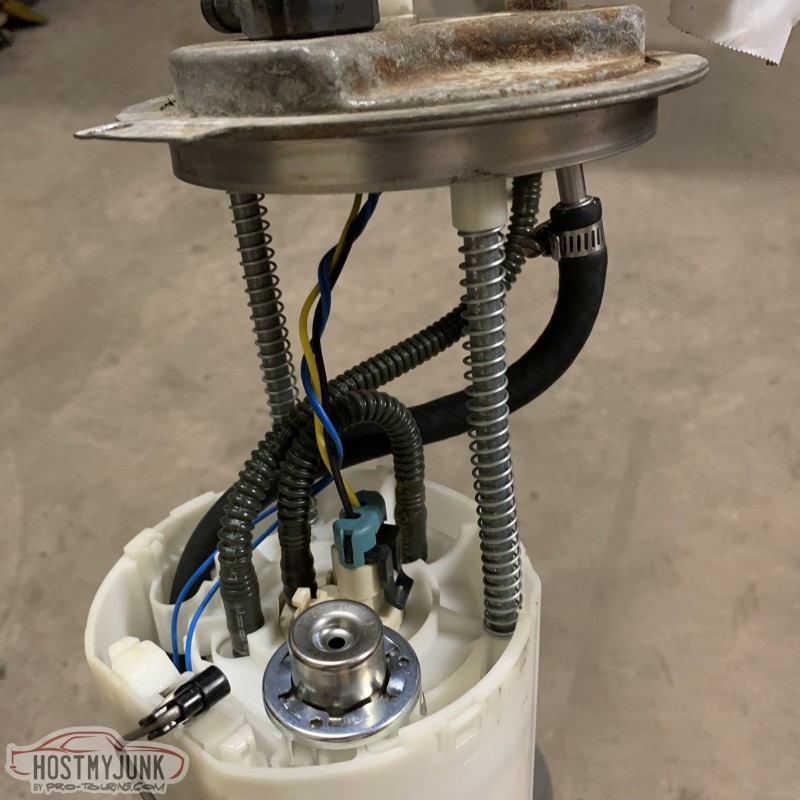
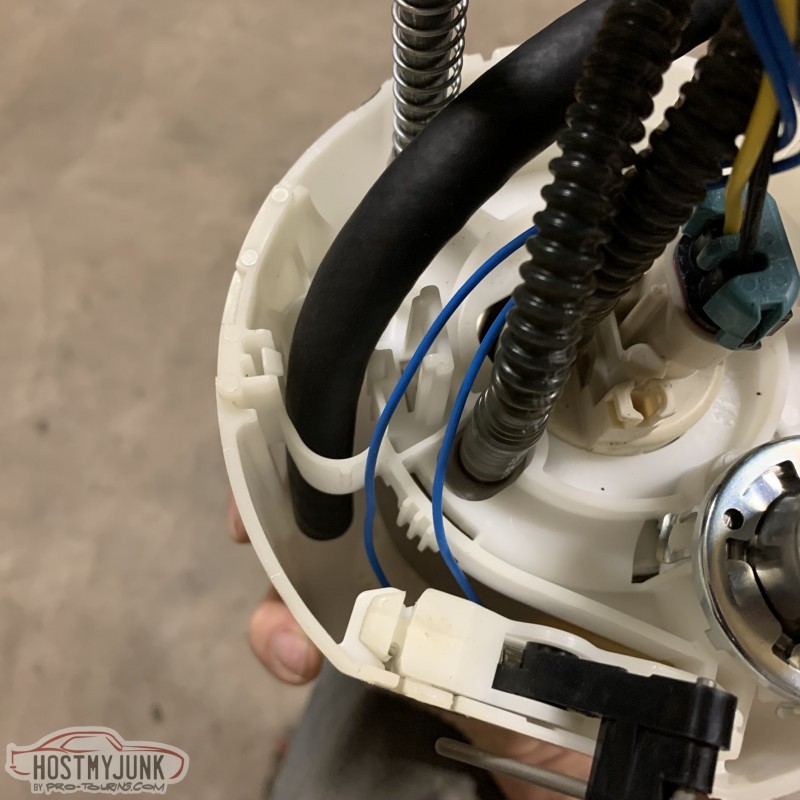
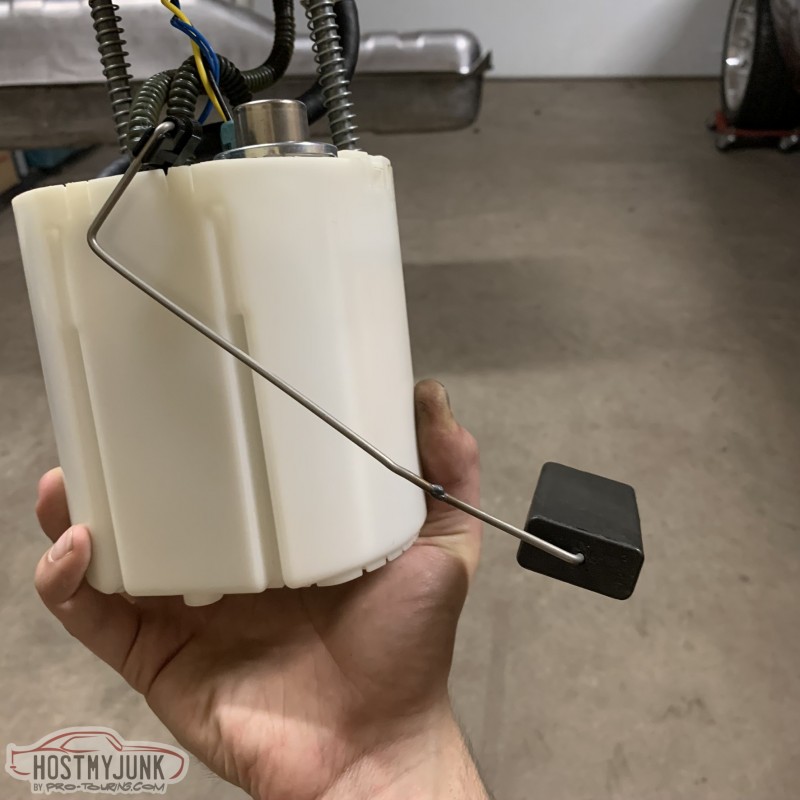
For the fuel tank, I'm using a 2010 Tahoe sending unit. I built these mounting rings using 14 gauge steel and welded studs for the clamp ring. This is originally a pwm fuel pump so it was not designed to have a return. I'm using a C5 Corvette filter/regulator so I've got the filter's return routed back to the vent line port of the sending unit. On the other side of the plate, I've got submersible fuel hose routed back into the fuel bucket. This should keep the bucket full regardless of the fuel level in the tank, eliminating the need for internal baffles. I'll also be using the Tahoe level sensor. The float rod had to be cut and flipped 180 degrees to line up with the flat part of the tank.
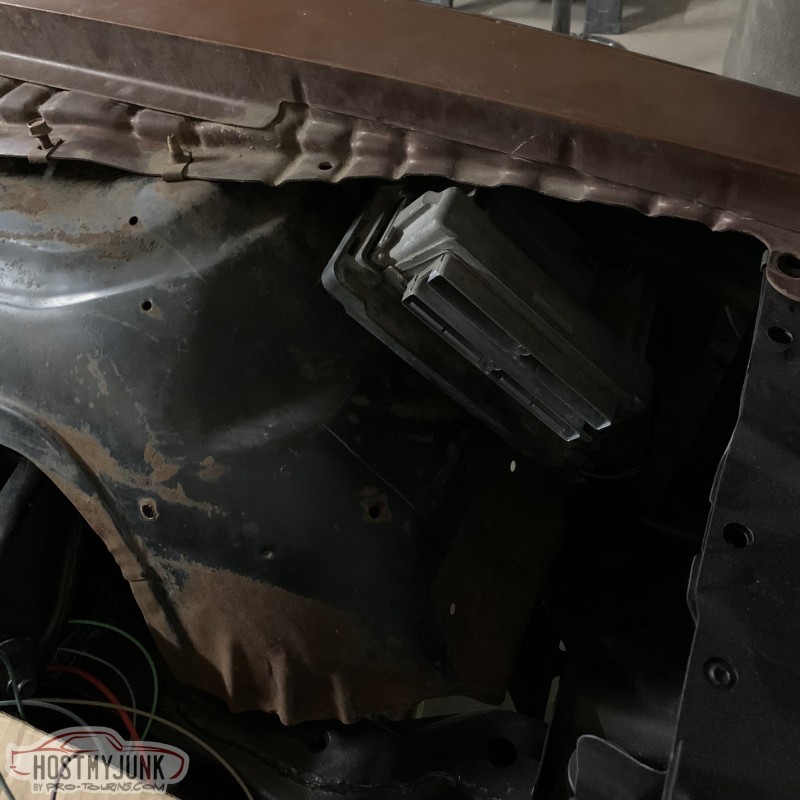
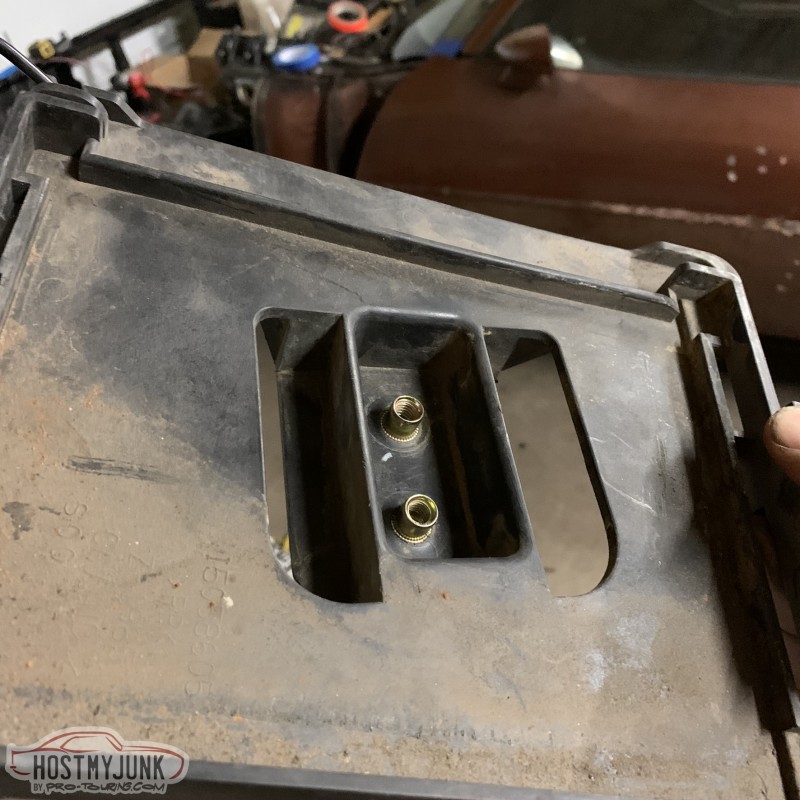
Moving on to the PCM mount, I'll be using the Astro van tray that's currently in the Chevelle. It's got a standoff, unlike the S10 tray which makes mounting a bit easier. The tray will bolt in from the underside of the inner fender. I installed rivet nuts in the tray to make installation much more simple.
 1970 Chevelle: 6.0 L96, T56, Strange 9 Inch, Ridetech Coilovers, Wilwood brakes
1978 Firebird: 6.0 LQ4, T56
2007 Sierra 2500HD LBZ
04-30-2020 #19
Registered User
- Join Date
- Feb 2013
- Location
- Ft Worth, TX
- Posts
- 188
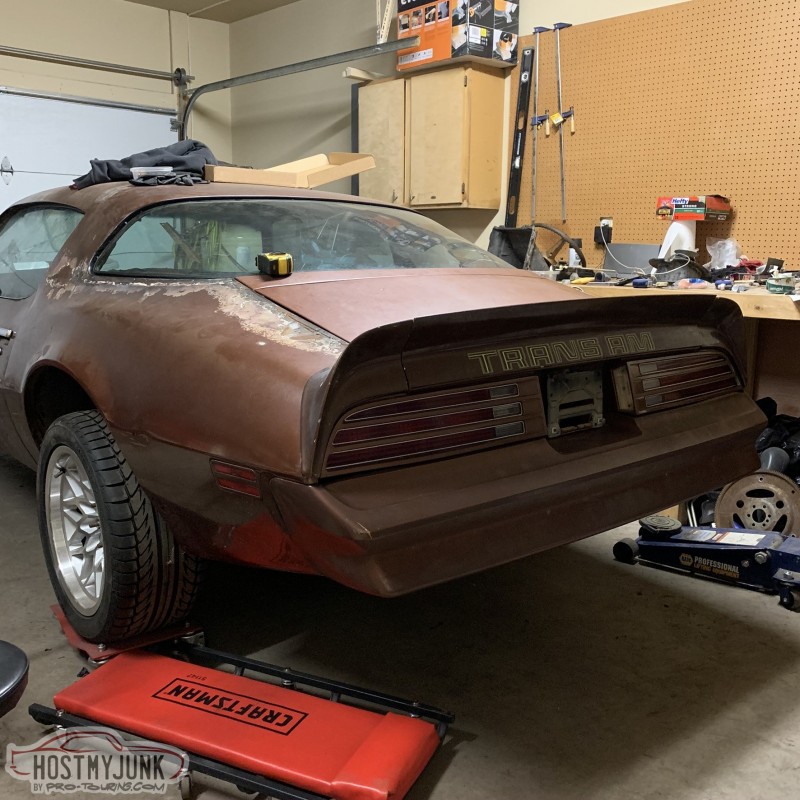
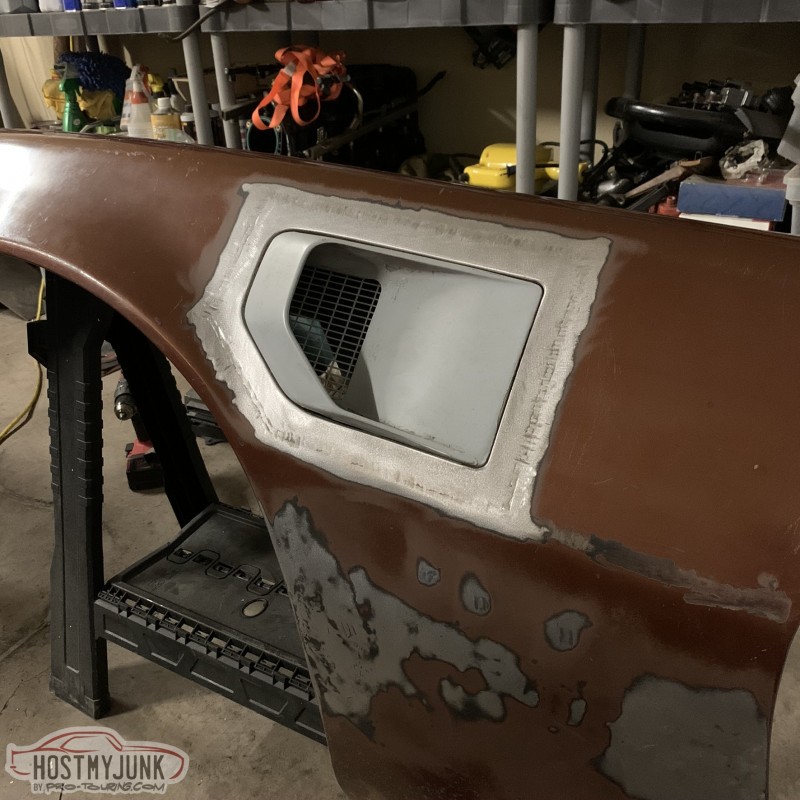
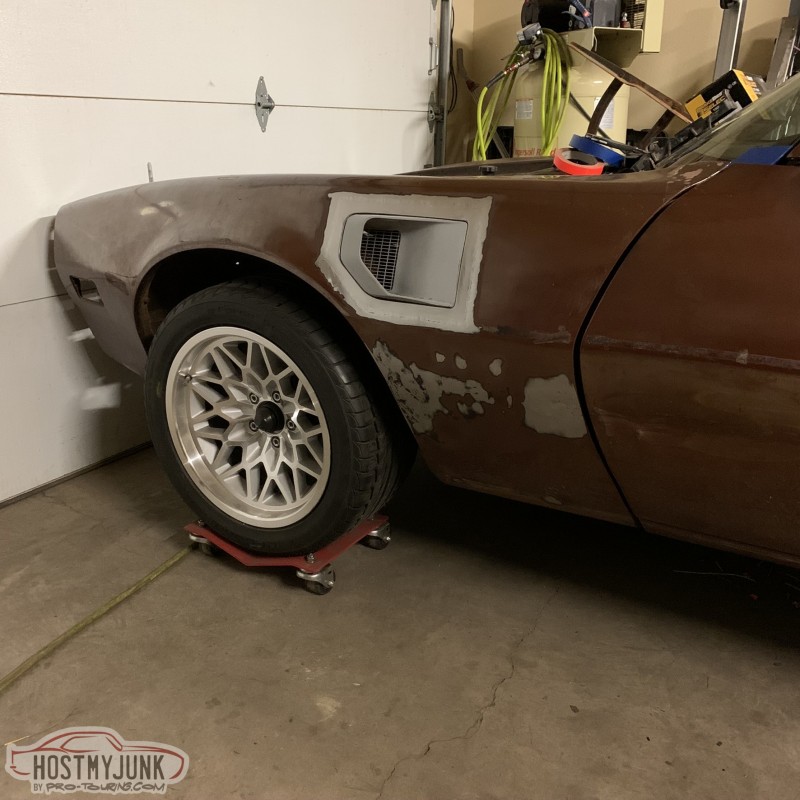
This car isn't meant to be a Trans Am clone but I am taking my favorite pieces of the Trans Am and Formula models. These second gens just don't look right without the spoiler on the back.
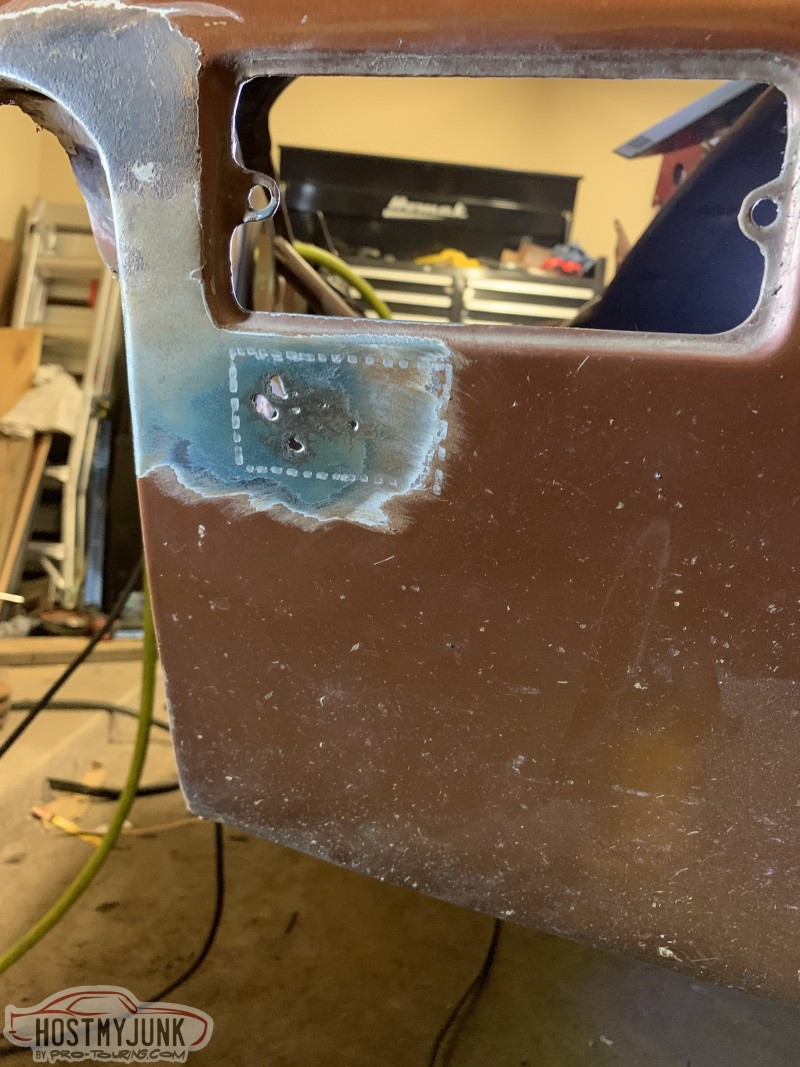
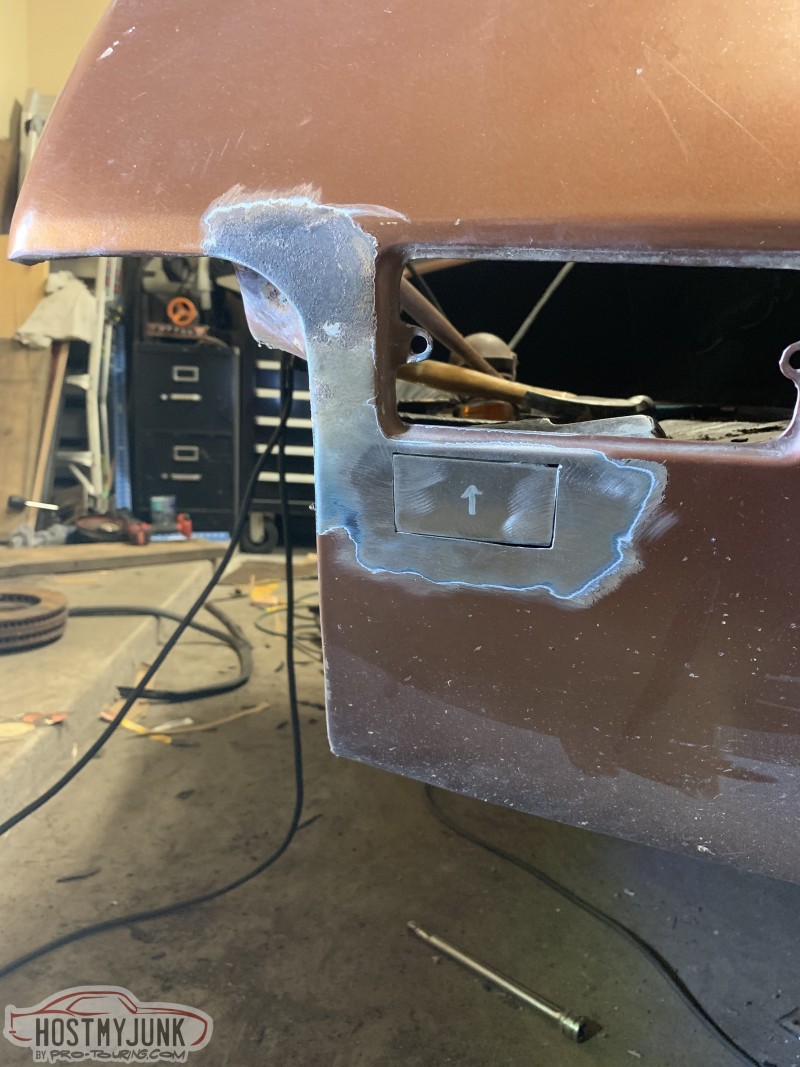
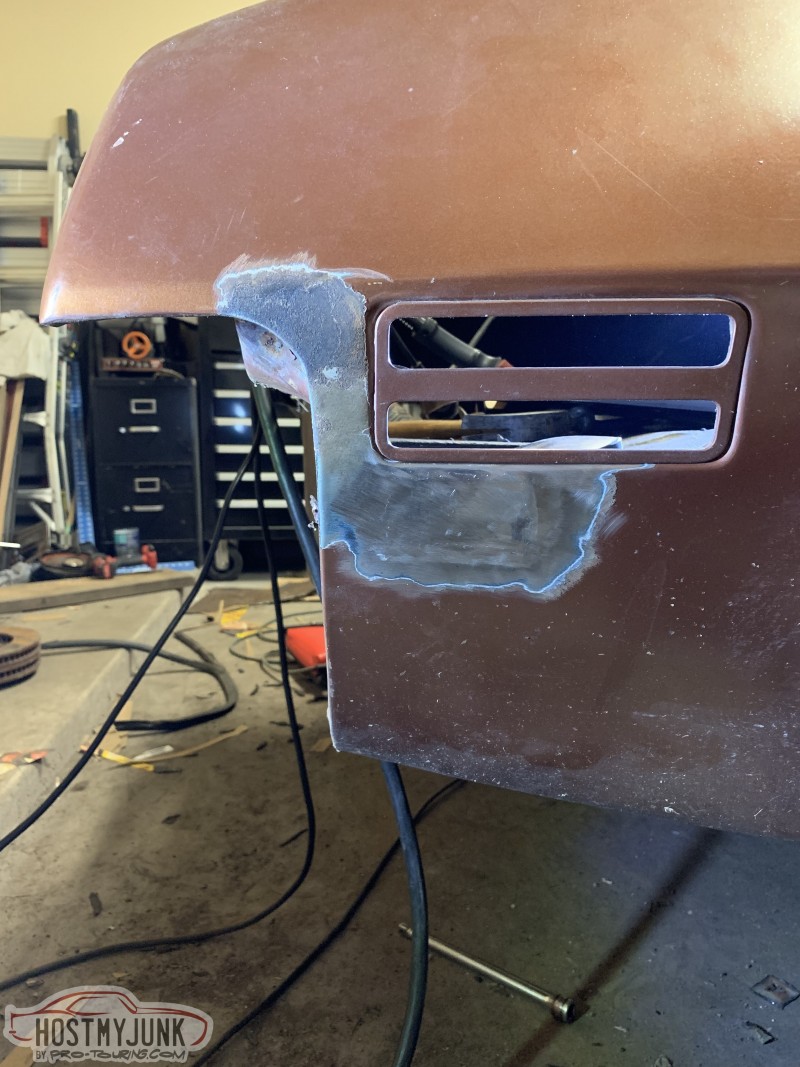
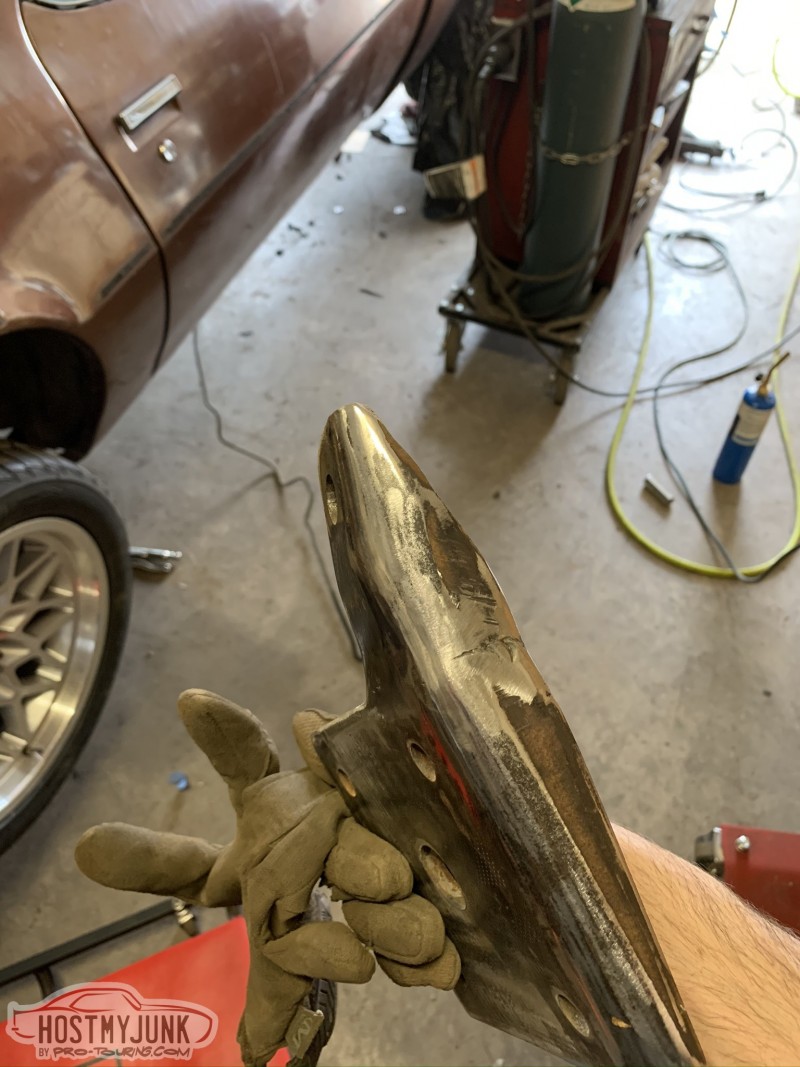
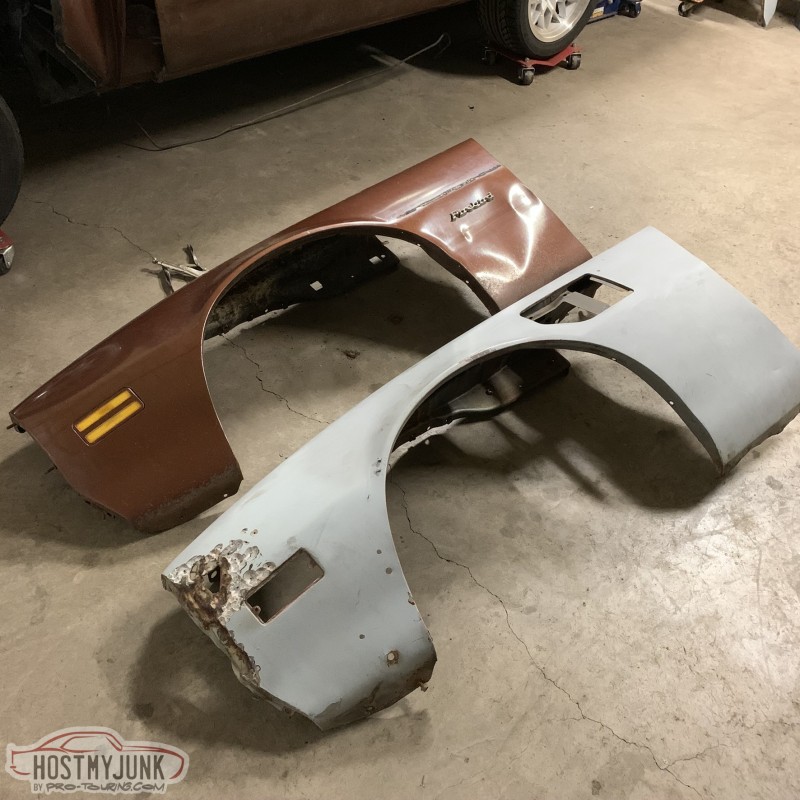
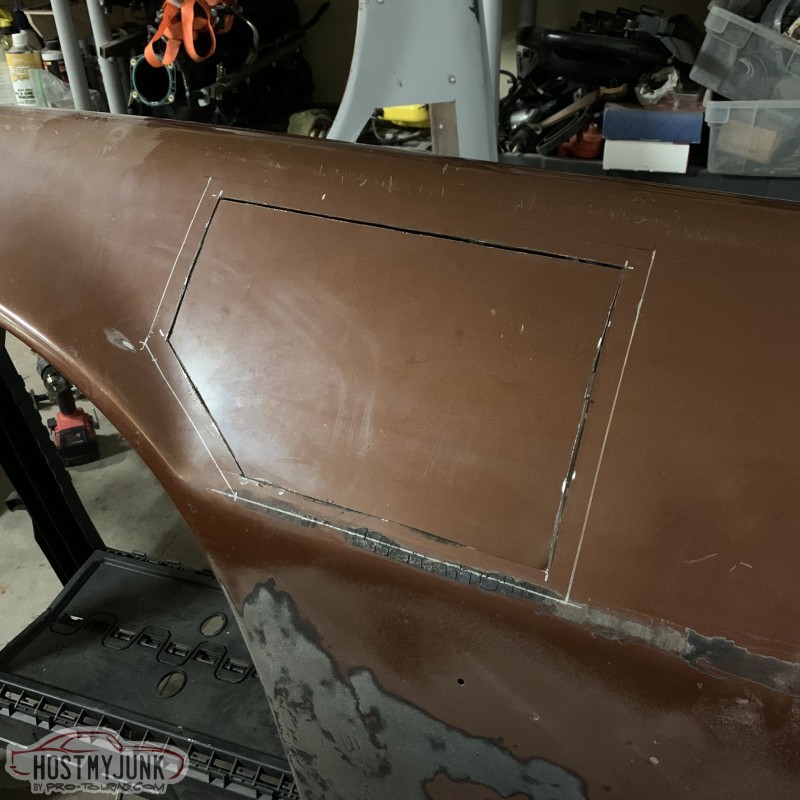
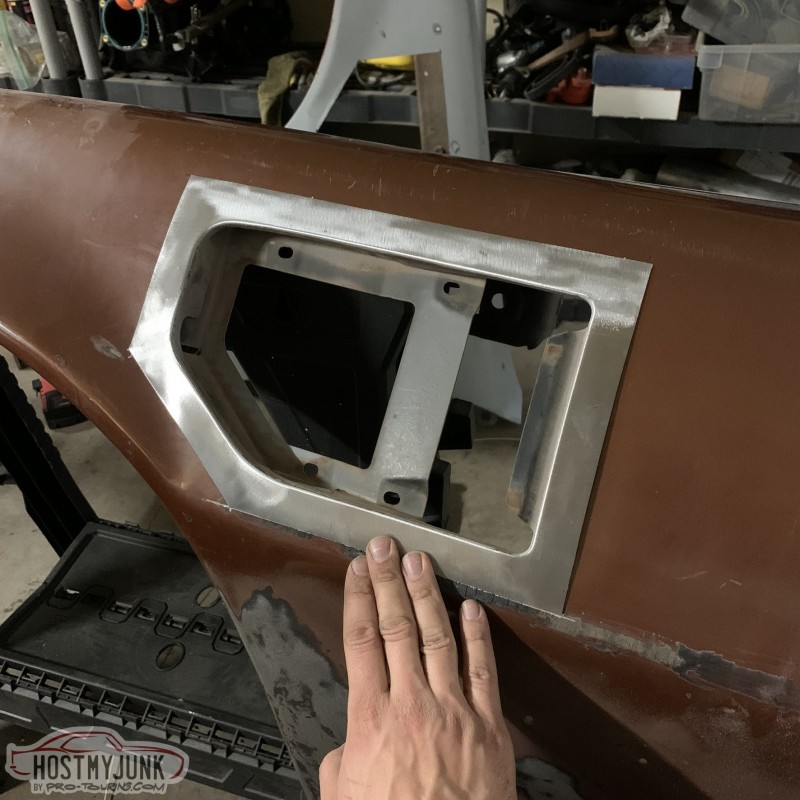
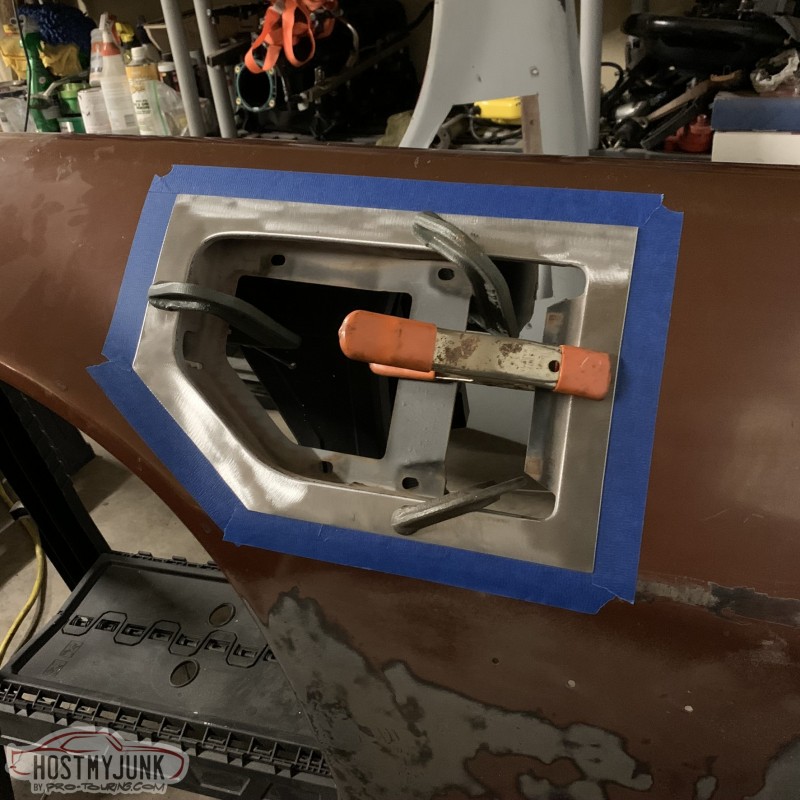
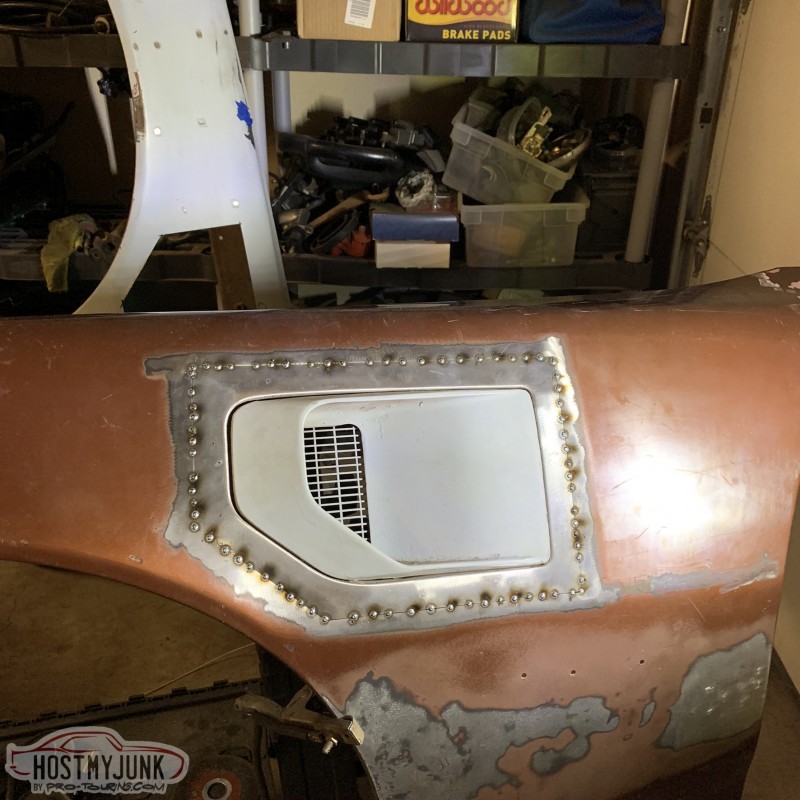
I found a set of cheap Trans Am fenders but was left trying to decide whether to transfer the extractors to the original fenders or repair the accident damage on the new fenders. I ended up straightening the damage on the original fender then transferring the extractors. I'd like to do a more formal write-up of the process in a separate thread so I'll post some summary pictures here.
 1970 Chevelle: 6.0 L96, T56, Strange 9 Inch, Ridetech Coilovers, Wilwood brakes
1978 Firebird: 6.0 LQ4, T56
2007 Sierra 2500HD LBZ
04-30-2020 #20
Registered User
- Join Date
- Feb 2013
- Location
- Ft Worth, TX
- Posts
- 188
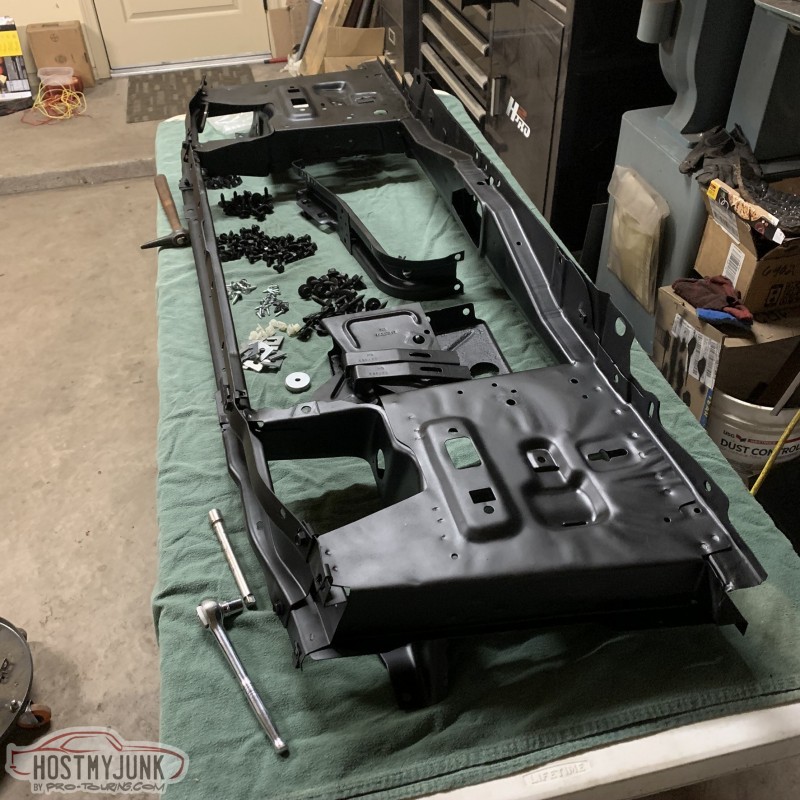
Paying to get the core support sandblasted was definitely worth it. The Krylon semi flat black is still my go-to for under hood paint.
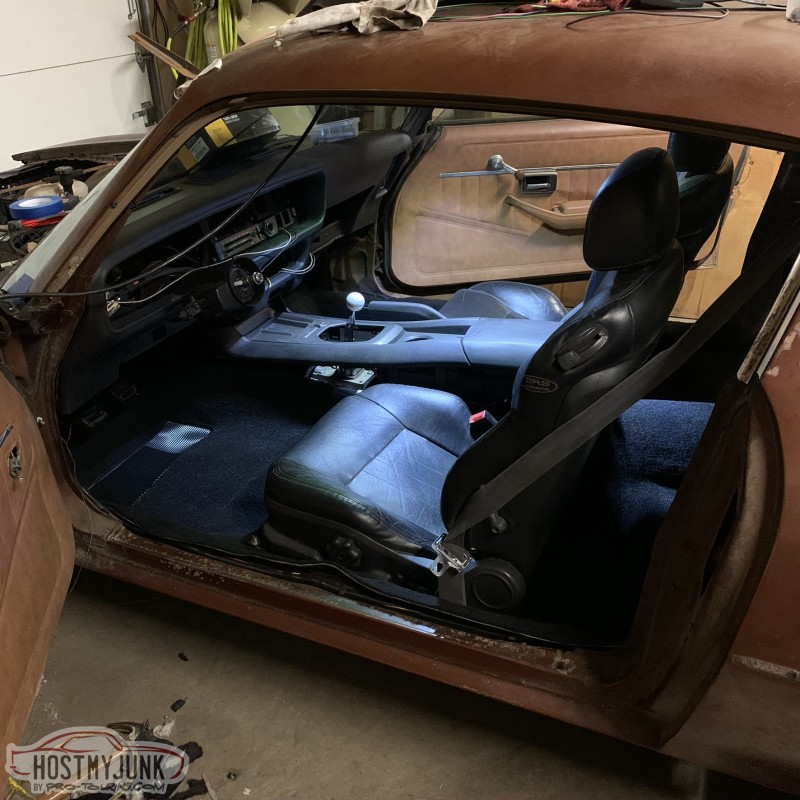
The 5th gen console and Tiburon seats look right at home in the Firebird.
 1970 Chevelle: 6.0 L96, T56, Strange 9 Inch, Ridetech Coilovers, Wilwood brakes
1978 Firebird: 6.0 LQ4, T56
2007 Sierra 2500HD LBZ

 Reply With Quote