


Results 1 to 20 of 28
-
01-18-2017 #1

 Registered User
- Join Date
- Jan 2017
- Location
- Seattle area
- Posts
- 18
1952 Muntz Jet. A build from a beginner.
I bought this Muntz Jet back in 2013 sight unseen. It was found in a warehouse in Biloxi, Mississippi after the previous owner had passed away. Talking to some local contacts, and using lots of cell phone pictures, I knew the car wasn't stock but the extent of the modifications to it remained a bit of a mystery. Adding to the unknown is that this is a Muntz Jet, one of only about 250 cars built, there's simply not all that much information available on what the structure looked like originally.
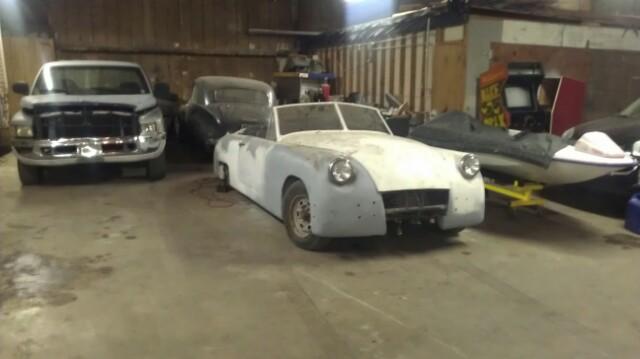
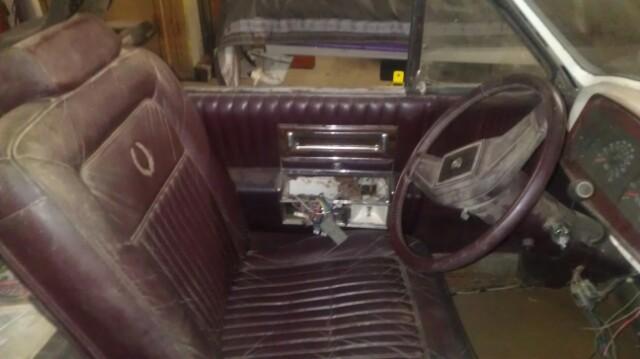
I had the Muntz shipped up to my humble 2 car garage in the Seattle area along with the original engine and transmission. The original engine was no longer in the car but was found in some back corner of the same warehouse. I had hope it could get incorporated back into the Jet. For a couple months I poured over the car, taking it apart and trying to figure out what was original and what wasn't. It soon became clear to me that extensive modifications had been made to the cars structure. The front clip and rear was taken from a G-body car - possibly a mid-80's Buick Regal - and welded in to mate with the Muntz mid section. Nothing mechanical was original - the original engine was now a SBC 350 with a TH350 transmission. The interior had been replaced by something from a late 80's to early 90's Cadillac. After all that my mind changed from a restoration to more of a resto-mod build. On top of that, because I didn't know the pedigree of anything previously done to the car, I decided it was best to tear this car down as much as feasible and build it back up how I wanted.
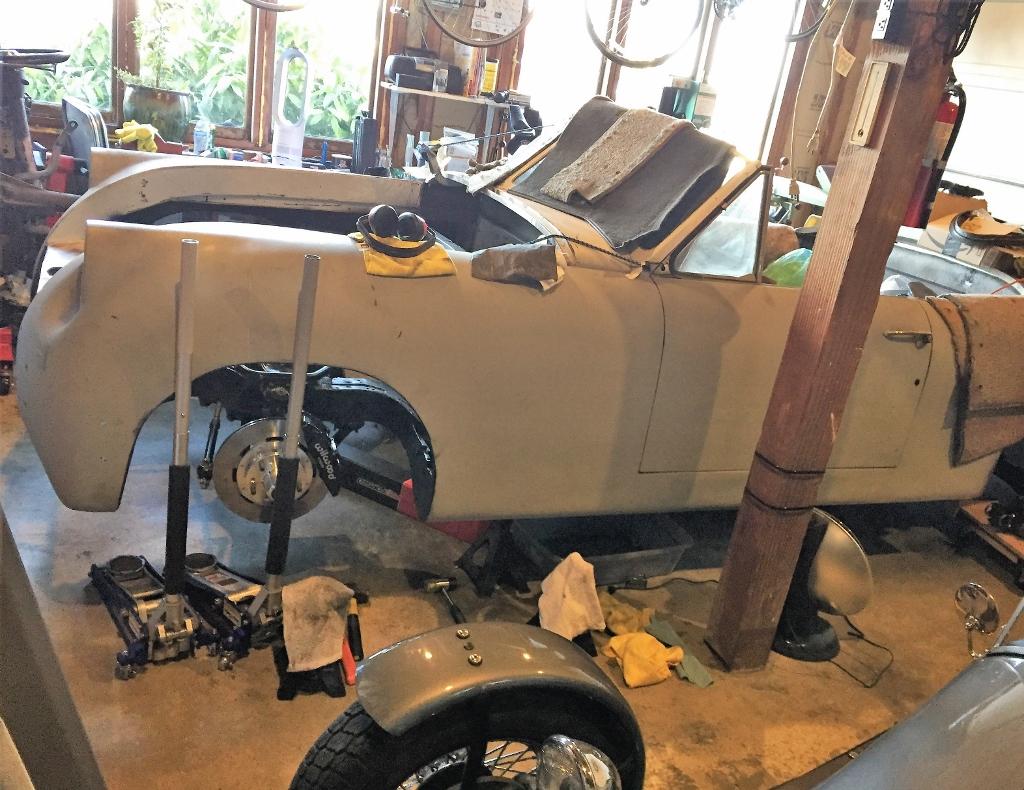
The plan I hatched is to make the car look as original as feasible on the outside, but have modern components under the skin. I want it to be driveable and reliable. Keep in mind I've never built a car before. I am not a professional. I simply have a passion for cars and a desire to learn. I want to do as much of this project myself as possible. The past couple years I've been working on the car when I have some free time (which unfortunately isn't as often as I'd like), bought some of the more expensive parts to spread the costs out, and have been turning some wrenches.
I'm creating this thread to document what I've done, what I'm going to do, what is working and what is not; but more importantly to gain some knowledge from all the great folks on here who know way more about building cars than I do. If you see something that makes no sense or is utterly stupid, let me know. Right now I don't even know what I don't know.
So follow along and let's see where this goes. I'll update this thread as progress is made.
-
01-18-2017 #2
Registered User
- Join Date
- Jan 2017
- Location
- Seattle area
- Posts
- 18
Everything is covered in a thick layer of dust and rat droppings.
01-18-2017 #3 Registered User
- Join Date
- Oct 2016
- Location
- Auckland, New Zealand
- Posts
- 72

This will be an interesting build. I love it when somebody makes an effort with a different vehicle, rather than just the typical Camaro-Mustang-Corvette. Please keep the reports coming.
cheers Russell

My 1957 Pontiac Star Chief powered by a 5.3 LS with a 4L60E transmission, on 18" US Mags Big Slots.
01-18-2017 #4 Registered User
- Join Date
- Mar 2005
- Location
- Portland, OR
- Posts
- 90

In a way it's better to start with something that's already been altered, takes the pain out of modifying a truly rare car!
Ben C. - Sometimes Complete > Perfection - I just want to drive my car...
1969 Nova 408/T56 | 2003 XJ8 Sport LS2/T56
01-18-2017 #5
Registered User
- Join Date
- Sep 2013
- Location
- sw Kansas
- Posts
- 1,661
I'm surprised that someone would have modified a Muntz like that. It would be nice if you could find more history about it. It's your car but I would do a lot of research to see where you might want to go with this. I'm a believer that with old stuff, we are care takers. Not saying to restore it, just be careful what you do. Reading the whole Muntz story is interesting. If you haven't researched him, i suggest you do.

01-27-2017 #6
Registered User
- Join Date
- Feb 2014
- Posts
- 779
Interesting. Eager to watch this unfold.
10-02-2018 #7
Registered User
- Join Date
- Jan 2017
- Location
- Seattle area
- Posts
- 18
Hello all— I’m going to start resurrecting this thread over the next couple weeks and bring it up to speed with where I’m currently at.
When I initially started this thread, this forum seemed like the right group, but the mobile app format was just not working for me. As I do almost everything on my phone, this was a deal breaker. I setup on another forum, and while that didn’t quite fit what I was doing it worked from a mobile-perspective. I was however very limited in what I could post and still be within the bounds of the traditional hot rod rules.
It now appears this forum has embraced mobile devices so I’ll try to post more here as it really fits what I’m doing and where I hope to go with this car.
10-02-2018 #8
Registered User
- Join Date
- Jan 2017
- Location
- Seattle area
- Posts
- 18
1952 Muntz Jet. A build from a beginner.
The suspension
Unfortunately an unlimited budget is something that I don't have. Therefore, to get the major components to make my resto-mod, I had to buy them piece-meal as my budget allowed. The first major purchase was going to be the suspension. Why? Well I figured the old Buick suspension was one of the first items to come off when I disassembled the car, and to get the Jet off the jack stands and back on tires a new suspension was going to be needed sooner rather than later.
With that decided, I needed to figure out what suspension to get. As mentioned in a previous post, the front and rear framework from the Buick allowed me to purchase one of the many available off the shelf g-body designed suspension systems. Ultimately what suspension system is used comes down to the intended use of the car. In my case I had decided that I wanted this car to be a cruiser - something that would be just at home flying down the highway as it would going slow through town. I'm not looking for a 1/4 mile car or track car. I wanted a suspension system that offered comfortable cruising but also versatility. To say I did a lot of research would be an understatement. I looked at air ride, and coil over, and the stock g-body setup and all the iterations contained therein. I looked at several manufacturers and read reviews wherever I could find them on the internet. As I kept looking I couldn't help but notice that the brand RideTech continued to pop up with mostly positive feedback.
So, I started focusing on RideTech suspensions. For the g-body they offer several levels and kits - everything from just coil overs to full computer controlled air ride kits. Honestly, I didn't know what to get. It would be one thing if I knew what the car looked like before - like if I was putting a new suspension on a car I already knew well. But when all you have is a shell of a car sitting on jack stands, a car that came to you with different sized tires on each corner and a suspension not originally built for that particular car, it's hard to know if you'll get the ride height you desire when it's all done. It would be a major bummer if you find you bought the wrong ride height suspension and you hated the look. It was that unknown is what ultimately drove my decision to the more complicated, yet more versatile, air ride suspension. I had heard the positives and negatives of air ride but in the end the decision really came down simple fact of wanting to be able to control the ride height of the car without first knowing exactly what that car was going to look like. It was as simple as that.
Now to decide the type of air ride within RideTech's inventory. That wasn't too difficult a decision either. The g-body suspension on the car was flat out tired. The bushings were old and cracked. The different components were covered in a light surface rust. Could they be brought back to life? Sure, but at what expense of time and overall functionality to the completed Jet. In the end I chose the Level II kit that included the air ride components as well as new control arms, ball joints, rear links, etc. Obviously the car is not yet running but I believe in the end it'll be the right decision and it'll give me the functionality I was searching for.
10-02-2018 #9 Registered User
- Join Date
- May 2018
- Location
- way east on a rock
- Posts
- 155
Enough talk already! Pictures! j/k... kind of.. looks like a fun build!
10-02-2018 #10
Registered User
- Join Date
- Jan 2017
- Location
- Seattle area
- Posts
- 18
10-02-2018 #11
Registered User
- Join Date
- Jan 2017
- Location
- Seattle area
- Posts
- 18
Like any project, even the jobs that are expected to be simple turn out to be a challenge. The Muntz is no different. As I previously mentioned, this particular car is not stock with its front and rear frame work replaced by that of a g-body car. So I knew the rear axle housing, and where it mounts into the car were not original Muntz. Knowing the g-body history, and since the existing axle housing is rusty with unknown pedigree, I took some measurements of the axle housing and ordered a new one to match the g-body configuration. Both are the same measurements - couldn't be more simple.
With a new housing in hand, and a new 3rd member all bolted into it, the time had come to bolt all of that new goodness into the car. What I did not realize at the time was that the previous owner did not change the length of the suspension components, or the axle housing itself, but bent the suspension parts and thereby changed the angle of them between the car and housing. Why? - Because unbeknownst to me until now the g-body frame has been narrowed by about 3" from stock, but the axle housing was not. That's the kind of stuff I imagine you learn to look out for if you've done this a time or two. I have not. Whoops.
So now I have a new housing, and new suspension components, all made for a g-body that aren't fitting together because the frame isn't where it's supposed to be. The lower suspension arms bolt to a bracket welded to the inboard box of the frame, so I don't see an easy way of widening that distance without moving the frame back to stock. It seems the easiest course of action at this time is to tear down the axle housing, and take it to have the top and lower suspension housing brackets removed and welded at new angles. I'm going pro with this welding job because hopefully it can be done without warping the housing. I guess we'll see.
10-02-2018 #12
Registered User
- Join Date
- Jan 2017
- Location
- Seattle area
- Posts
- 18
10-02-2018 #13
Registered User
- Join Date
- Jan 2017
- Location
- Seattle area
- Posts
- 18
The saga of wheels
I once read that when beginning a car project a person should start with selecting the desired wheels and tires, as it will make the majority of later design decisions fall in place. The more I work on the Muntz, the more I understand how this rings true. The wheels and tires impact every component from the pavement to the steering wheel. Going to run larger than stock brakes? Better know if they’ll clear the inner wheel dimensions. Need to make sure the car has an ideal cruising rpm on the highway? Better know what diameter of the tire is going to be so you can select the ideal rear differential gear combined with the right transmission gearing. Want decent ride and handling? Choosing the right suspension is key but dialing in that suspension and making sure it’ll fit ultimately all ties back to the wheels and tires.
For the Muntz, I didn’t have the luxury of starting with wheels and building from there. For this particular project, wheel size in the rear will be determined by how much clearance I have, primarily in the back where the fenders are (partially or fully – depending on configuration) skirted. To say that I am a bit envious of the open wheel roadsters, in this regard, would be an understatement. To get an idea of the constraints of rear wheels I’m working with, there are only 9 inches and some change of distance between the outside of the rear frame rail and the inside of the fender. More modern cars can get away with widening the fenders, but the Muntz is flat sided and to do that would ruin the look of this particular car. There’s a Joe Bailon modified Muntz out there where the rear skirting was cut out to make more room, but I’m not looking to do that either. Another alternative I have seen people do to get a bit more wheel room is to move the frame inward. This, as far as I’m concerned, is not an option at this point. Moving the frame inwards would mean changing suspension geometry and moving attachment points, also likely shortening the axle housing which would therefore lead to replacing the axles – all items that have already been purchased and installed not to mention the months or years of work that would entail at my current rate. No. I’m a bit stuck between a rock and a hard place, or in this case a frame and a fender, but I’m just going to need to make it work with what I have.
For the front, the constraint on wheel size will be the brakes. The brakes for the Muntz are already purchased, built, and installed so instead of getting brakes that fit a wheel I need a wheel that’ll fit the brakes. This turned into the first hurdle. Beginners tip: brake manufacturers clearly specify clearance dimensions for wheels, but most wheel manufacturers do not specify the inner dimensions of their wheels; therefore when the dimensions will be close (say using a 15” wheel with a brake system that says it will fit most 15” wheels) it is easier to buy brakes that fit a specific wheel, but more difficult to find wheels that fit specific brakes.
I got out the tape measure, did a bunch of searching online, and decided that a 15x7 wheel seemed to make sense. I searched the list of Craig and, not finding what I was looking for, I took a blind leap of faith and purchased one rather inexpensive 15x7 wheel with a 4.25” backspace off of Amazon simply as a means to get an idea of where I was at. With that one wheel I was able to attach it to all 4 corners and used my jack to lift the suspension and wheel up to what a ride height would likely be. There was still the unknown of how it would fit after tires were mounted as they will be slightly wider than the wheel. It was very close, but with just the wheel everything seemed to clear. It was about this time that a relatively cheap set of unknown pedigree 15x7 wheels with baby moons, and tires already mounted, became available locally online. I jumped on them.
10-02-2018 #14
Registered User
- Join Date
- Jan 2017
- Location
- Seattle area
- Posts
- 18
While the 15x7 wheels I bought as an initial fit check cleared, the chrome 15x7 baby moon style wheels I bought off craigslist didn’t fit over the front brakes. That must be what they mean when they say the brakes fitting “most” 15” wheels. In addition the tires on the rears, just barely, rubbed on the ID of the fender. Not wanting to risk trying another 15” rim I decided to shift to 16x6 rims in an attempt to both clear the brakes and alleviate any rubbing. I also made myself a lame sketch to visualize how much space I’d be gaining in relation to the 7” wide wheels with a 4.25” backspace.
I always liked the mag racing wheel look and felt that it fit the vintage of the Muntz, so I rolled the dice on fitment and purchased a set of Rocket Igniter wheels in 16x6. It took nearly 9 months since I ordered them for them to arrive (I think they had to mine the aluminum), but now that I got them I think they look pretty good, but more importantly, they clear everything without rubbing.
10-02-2018 #15 Registered User
- Join Date
- Dec 2006
- Location
- Out of the Burbs of Detroit to SoCal, then onto my ancestral homeland, the woods of Cascadia
- Posts
- 1,753
Missed this first time by. First post, is that a Locost in the foreground?
Greg Fast
(yes, the last name is spelled correctly)
1970 Camaro RS Clone
1984 el Camino
1973 MGB vintage E/Prod race car
(Soon to be an SCCA H/Prod limited prep)
10-03-2018 #16 Registered User
- Join Date
- Dec 2017
- Posts
- 61
It's great to see something different in the sea of Camaros, Mustang and Chargers. (Not that anything is wrong with those, I have a 67 Camaro). Looking forward to more updates. Looks good so far!
1951 Ford F1, 1967 RS Camaro, 1979 Firebird Formula, 1979 Trans Am/LS swap.
10-03-2018 #17
Registered User
- Join Date
- Jan 2017
- Location
- Seattle area
- Posts
- 18
It’s a JZR cyclecar. It’s a UK built kit version of a Morgan 3-wheeler. The one I have is powered by a Honda 650 V-twin. It is a ton of fun to drive. Originally Posted by Twentyover

10-04-2018 #18
Registered User
- Join Date
- Jan 2017
- Location
- Seattle area
- Posts
- 18
It’s said that the engine is the heart of the car. The Muntz Jet, being a unique American car, I felt deserves a unique American engine. The flathead 337 Lincoln that came with the car originally, for a number of reasons, just wouldn’t do. Why go through the trouble of using the original engine when the framework of the car has been extensively modified? I’ve read that the Lincoln had problems with overheating. I know it’s too under powered and too heavy. My plan all along was to make this car a reliable and exciting driver – all new underneath but look close to original on the outside. The ubiquitous Chevy 350 that came with the car was an unknown. Overall a great engine but in this case completely unknown pedigree. That engine may have a millions miles on it for all I know. And, frankly, for whatever reason, I just didn’t like it. I wanted something better.
I looked hard at Chevy Performance and the LS motors. Their “connect and cruise” package would more or less bolt right in where in the old Chevy 350 was pulled from the car. It is the engine that would just make sense. Then that all changed when I went to a local car show. Taking particular notice of what engine folks were running I started to notice a trend – I’d guess 9 out of 10 cars there were running some form of the small block Chevy. It attests to how good of an engine it is, but it was just too common for me.
I looked at Ford Coyote engines. Ford’s biggest problem, in my opinion, is that they simply don’t make their crate motors as accessible to hot rodding as Chevy. For example, they don’t offer (at least at this time) any type of connect and cruise package. They also don’t offer anything with the option of running a Coyote with a newer automatic transmission. I wanted to run an auto because that’s what the original Muntz had and I wanted to keep it looking as close to original as possible on the interior.
Then one day while cruising ebay I stumbled onto an engine I knew of but hadn’t thought about – a Dodge Viper V10. Extensive research ensued. Would it fit? Tape measure shows it should, in fact, it’s not much larger than the original Lincoln 337 flathead. Before I knew it I had a Viper engine out of a wrecked SRT truck sitting on a pallet in my garage. A unique American engine to go in a unique American car.
10-04-2018 #19 Registered User
- Join Date
- Jan 2006
- Location
- McKinney, TX
- Posts
- 1,623
This is getting good! You have my attention
66 Mustang "Project: Ballin on a budget"
89 Mustang "Box Wine"
10-05-2018 #20
Registered User
- Join Date
- Dec 2017
- Posts
- 61
Why such a small engine?
 This is going to be amazing!
1951 Ford F1, 1967 RS Camaro, 1979 Firebird Formula, 1979 Trans Am/LS swap.
This is going to be amazing!
1951 Ford F1, 1967 RS Camaro, 1979 Firebird Formula, 1979 Trans Am/LS swap.
Tags for this Thread

 Reply With Quote



