


Results 1 to 20 of 34
Thread: Avanti GT Tribute
-
01-01-2017 #1
 Registered User
- Join Date
- May 2015
- Posts
- 63

Avanti GT Tribute
With the car now receiving some attention in the body shop, we finally have some time to get everyone caught up on our next Studebaker build. As with our last project (https://www.pro-touring.com/threads/...r-to-track-car), my father is entirely responsible for the build. My role is limited to helping to share his progress with everyone here. But before getting directly into the build, a bit of background to set the proper context for this project.
For anyone not familiar with the Avanti nameplate, it makes for an interesting history lesson. The Avanti was originally produced by the Studebaker Corporation in 1962 and 1963 and was designed as “America’s only 4 passenger performance car”. With an inspiring European design with many trend setting mechanical and safety features, it should have been enormously successful. Unfortunately, that was not the case. The Automotive Division of The Studebaker Corporation was in financial trouble and all production in South Bend ceased on December 31, 1963. The rights to the Avanti name, design and tooling was purchased by two Studebaker dealers (Leon Newman and Nathan Altman) and the Avanti II remained in production by Newman and Altman until 1982 and by various other owners until 2007.
in 1982, the Avanti Corporation was sold to Steve Blake, who wanted to change the focus from luxury performance to a true high performance sports car. Blake hired Herb Adams, who was famous for developing the Z28 Camaro for the Trans Am series to develop a prototype and the pair decided that competing in the 24 Hours of Daytona would be the fastest and most impactful way to change Avanti’s brand image. The team did compete in the 24 Hours of Daytona, but in a re-bodied, tube chassis Trans Am car instead of their Avanti prototype. After Daytona, the prototype was completed with a modified Avanti body and many C4 Corvette components. It raced in the Escort, Showroom Stock series successfully in late 1983 and 1984.
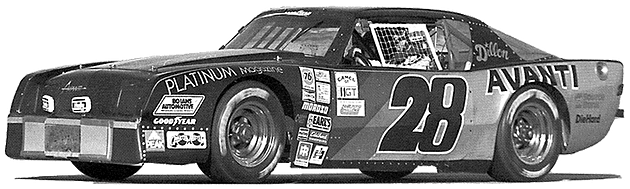
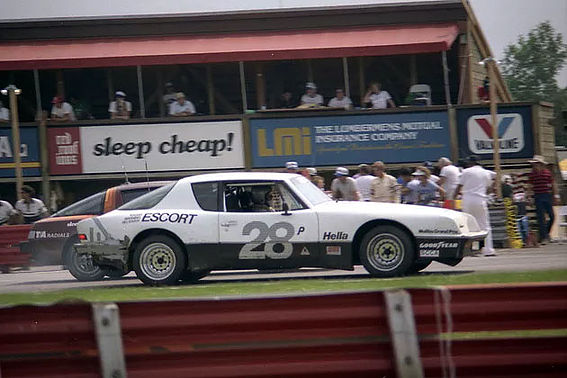
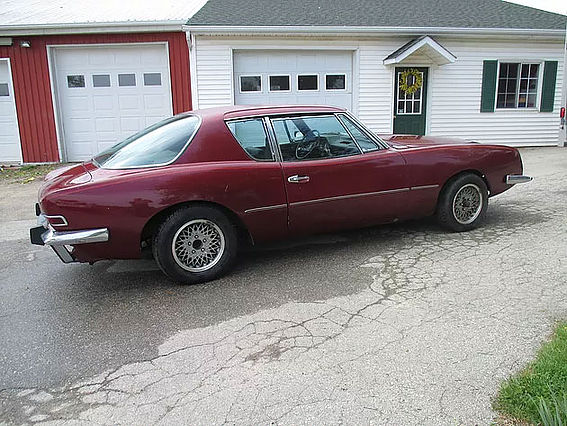
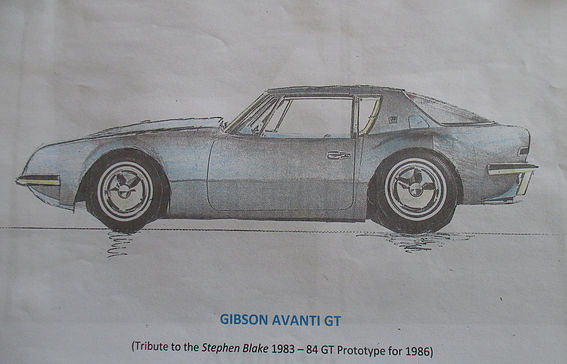
For 1986, Blake hoped to boost sales by introducing a 2 passenger Avanti GT but quality concerns and financial problems began to plague the company. On June 28th, 1985 Blake filed for bankruptcy. Intrigued by Blake’s plans to introduce a 2 passenger, high performance Avanti and after discovering the detailed plans in the book “More than they Promised ----- THE STUDEBAKER STORY”, we decided to build a tribute to the Blake Avanti GT that was designed, but never built. In April 2015, a 1973 Avanti II that was in very poor condition was purchased and became the donor body for what will become the Gibson Avanti GT.
-
01-01-2017 #2
Registered User
- Join Date
- May 2015
- Posts
- 63
While “More than they Promised`` provided a general outline on key components of the GT prototype, it offered few details. The 1983 Escort Avanti GT prototype provided a good insight to many mechanical aspects, but with its lowered stance, the full length body seemed even longer than it really was. The two tone paint and modern bumper treatment added more bulk and exaggerated the impression of length.
In 1963, an Avanti 2 passenger concept car was developed and many detailed photos can be found both in print and online. With eight inches removed from the cabin, its design contributed to the concept of a two passenger concept but keeping close to its original height did not provide the correct stance for a high performance grand touring car.
Combining design elements from both cars while paying careful attention to proportion and stance would ultimately provide the blueprint to the Gibson Avanti GT. A plan to borrow from Blake’s plan for a 48” roof height, use of fender flares and a more modern bumper treatment while retaining the core 1963 styling elements slowly began to take shape.
The body was lowered onto a dolly and moved to the other side of the garage for removal the entire interior and doors. Knowing major surgery was about to begin, a grid of internal structural 1" square tubing was built to maintain door opening dimensions, and alignment of front and rear sections of the body in both a vertical and horizontal plane. By incorporating 1.25” square tubing over the 1”square tubing, dimensions could be maintained while having the ability to move (telescope) the rear section of the body forward once a section was removed.
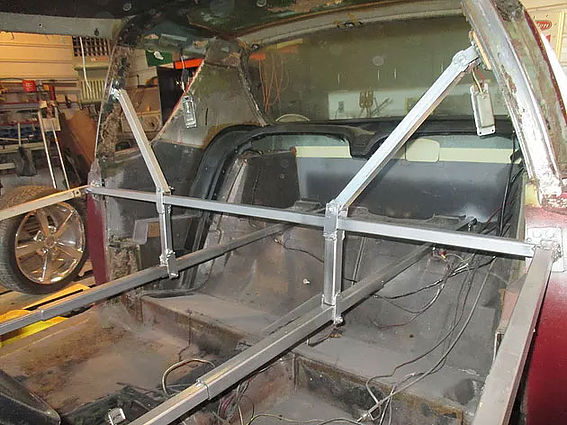
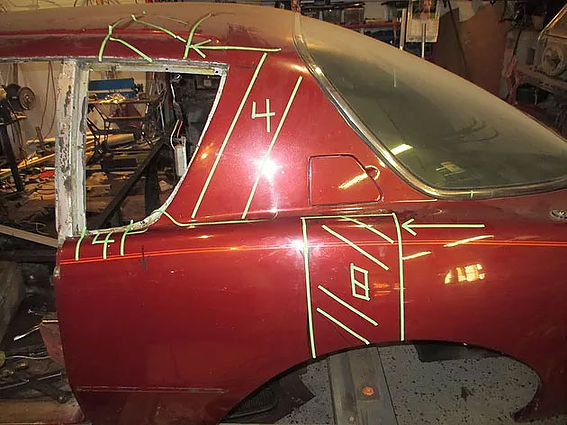
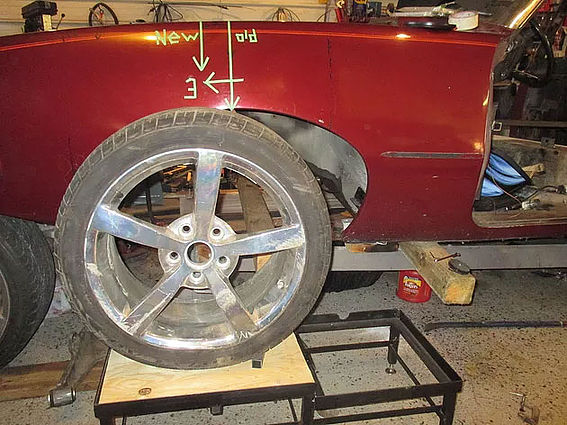
With the internal structure complete, cut lines were marked on the body, 8" out of the roof and middle of the fender above the wheel opening, and 4" out of rear quarter window, as well as 4" behind the rear quarter window. Up front, the front wheel was moved forward 3" to cut down on the front overhang to promote a 50-50 weight distribution and to provide space for the steering rack in front of the engine.
01-01-2017 #3
Registered User
- Join Date
- May 2011
- Location
- Brisbane, Australia
- Posts
- 453

Great idea and write up.
Did you post pictures in the second entry? If so, for some reason I can't see them.1967 Mustang Fastback - widebody https://www.pro-touring.com/threads/...stang-Fastback
1966 Plymouth Fury III
1961 Oldsmobile 88 "bubbletop" = next project
01-02-2017 #4
Registered User
- Join Date
- May 2015
- Posts
- 63
I think we're good now ..... more updates to follow.
01-02-2017 #5
Registered User
- Join Date
- May 2011
- Location
- Brisbane, Australia
- Posts
- 453
Sorted! Thanks. Looking forward to this. Wasn't familiar with the Avanti but it has kind of a Jensen Interceptor quality about it with that rear glass.
1967 Mustang Fastback - widebody https://www.pro-touring.com/threads/...stang-Fastback
1966 Plymouth Fury III
1961 Oldsmobile 88 "bubbletop" = next project
01-04-2017 #6
Registered User
- Join Date
- Nov 2015
- Location
- Oregon
- Posts
- 36

Have always been a fan of Studebakers... Avanti's being high on the list... One of my neighbors has an original 63 model collecting dust in the back of his hanger... He also has two 1952 Presidents, one being a convertible... Have had no luck talking him out of any of them...
Look forward to seeing yours getting the treatment...
Brian
01-04-2017 #7
Registered User
- Join Date
- Dec 2010
- Posts
- 708
The weirdness is partly in the flat/high floor. A former friend of mine had a '63 Studebaker model--I got to drive it about a year ago, and its performance was really (positively) surprising. It's really a lot more Corvette-like than most realize . . .
01-04-2017 #8
Registered User
- Join Date
- May 2015
- Posts
- 63
Interestingly, the early bodies were produced by the same manufacturer that supplied GM with the Corvette body. GM was a much bigger fish. so Studebaker was forced to produce their own bodies. However, production was delayed to address quality issues and showrooms were left empty. Eventually, many of the backorders were cancelled, which contributed to the financial difficulties that the company was facing.
on with the show .....
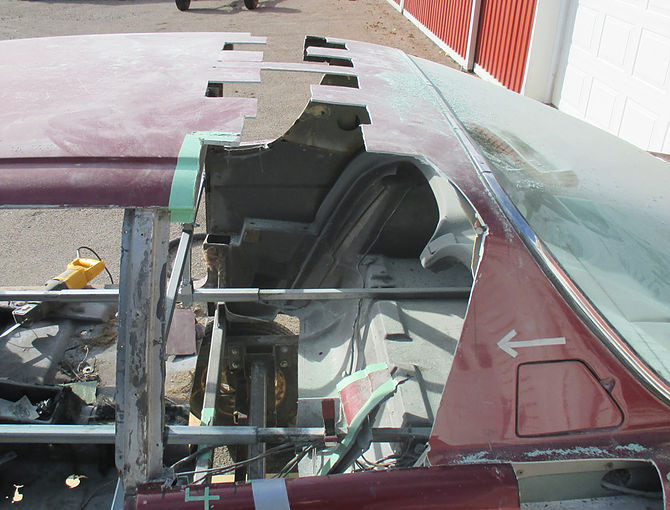
The body and dolly were moved outside for the scary and messy part of the project and after the first cut, there was no turning back! First the rear seat floor section was removed and some extra support was provided under the tire carrier portion of the trunk. The section of the rear fender was cut out, followed by removal of the rear quarter window.
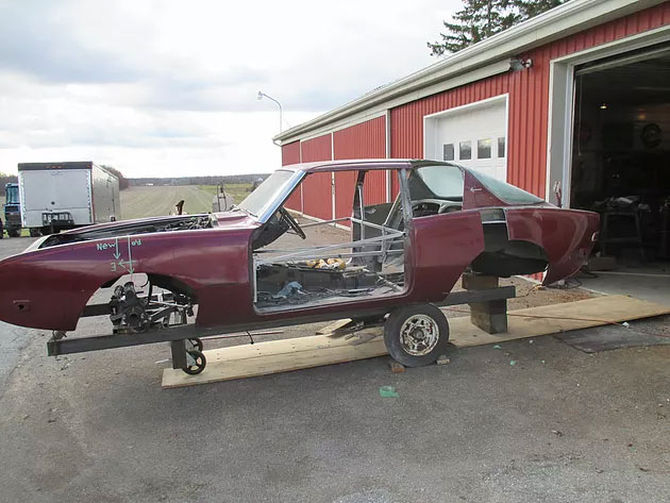
Alternate sections of 4” X 8” of the roof were then removed in a staggered pattern, so as to create a finger joint. The next task was to cut along the top of the fender following the horizontal body line, continuing inside detaching the fender well from the outer body.
01-04-2017 #9
Registered User
- Join Date
- May 2015
- Posts
- 63
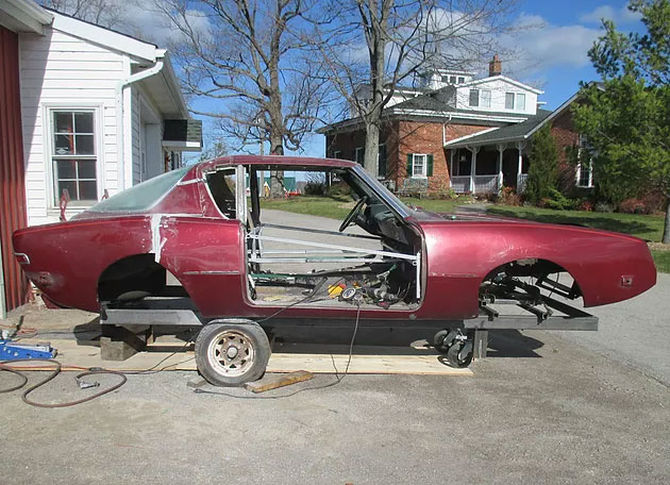
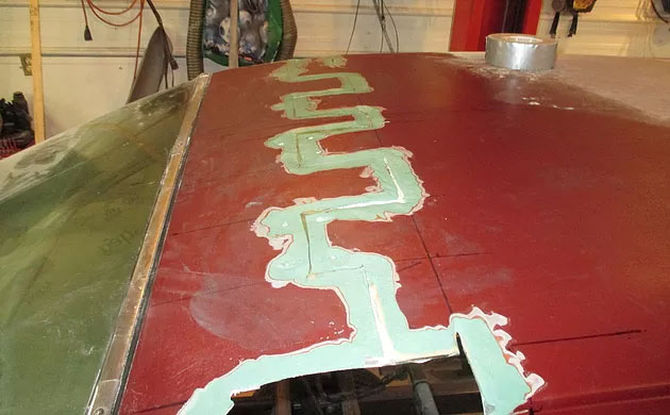
The rear section of the body was then pushed forward, closing the 8” gap. The pieces removed from the fender and roof were then fitted to the inside, treated to fiberglass mat and resin, and pop riveted in place until the fiberglass cured. During this process roof alignment was obtained by cutting almost 1” out of the “B” door post.
01-05-2017 #10
Registered User
- Join Date
- Dec 2015
- Posts
- 6
I have always been a fan of Avanti's, one of my dad's best friends bought one new in 63 while working at Borg warner and calling on Studebaker. He still has it, it was light blue stock but his son redid it in black.
01-06-2017 #11
Registered User
- Join Date
- May 2015
- Posts
- 63
My father has a stock 1964 Avanti as well, which has been a great reference. You may see it hanging out in the background in several of the pictures in this thread. Originally Posted by galaxie460

01-06-2017 #12
Registered User
- Join Date
- May 2015
- Posts
- 63
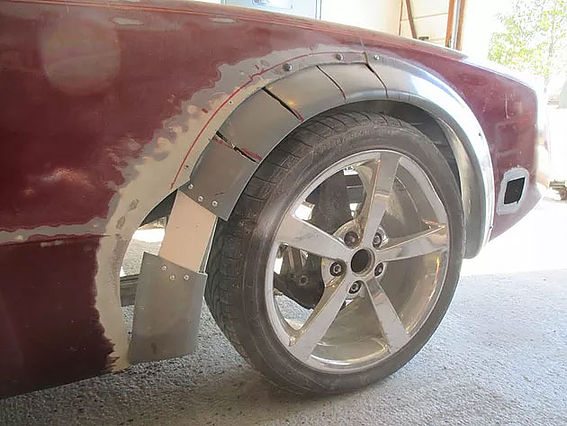
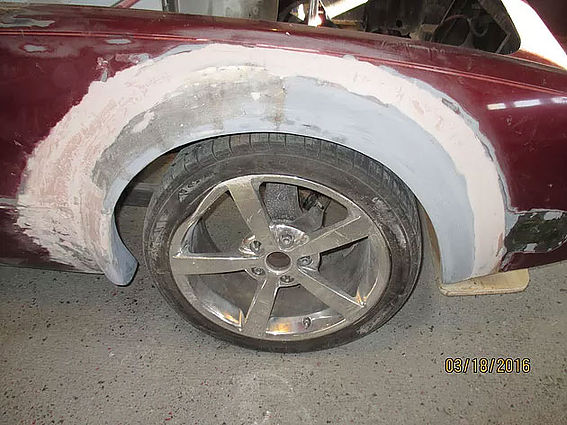
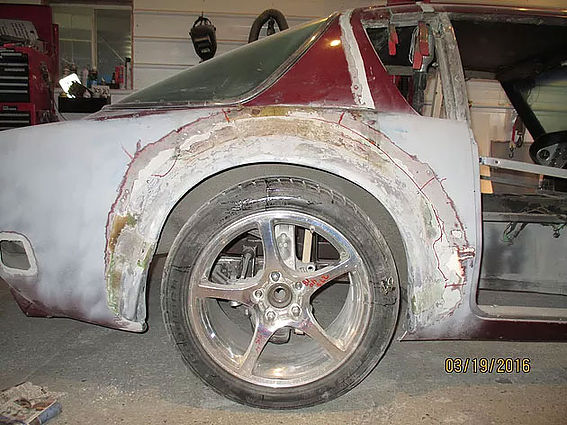
Once the roof and fenders were reinforced and fiber-glassed back together the wheel openings had to be defined and cut out. Small cuts were made to open up the areas and then wheels with tires of the size to be used were positioned in front at anticipated ride height. The front was moved forward an additional 1” to cut down the front overhang to improve proportions.
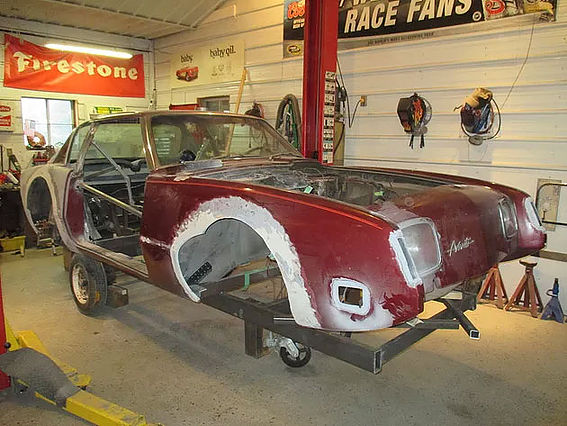
After reviewing many options, a set of 1.5” fiberglass fender flares for a 1967 Mustang were purchased and the area around the wheel wells prepped for installation. However major modifications to the fender flares were required to tighten up the curvature and accommodate the ride height. Initial fitment resulted in an “added on look”, so additional reshaping and fiberglassing was required to get the desired contour.
01-06-2017 #13
Registered User
- Join Date
- May 2015
- Posts
- 63
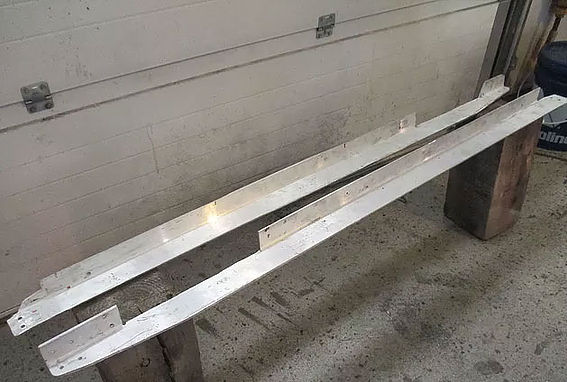
Once body had been shortened, the desired stance established, and the fender flares installed, the wheelbase and track finalized, work on the chassis could begin. Since all the floors and transmission tunnel had been removed, along with the “hog troughs”, it was necessary to reinforce the rocker panel area to accommodate the safe transfer of the body on and off the body dolly, the hoist, and trial fitting of the chassis. This was done by attaching a .25” aluminum 2” X 3” angle iron to the vertical portion of the “hog Trough” that remained in the rocker. This would also provide means to channel and attach the body to the chassis.
While pleased with the overall proportions and lowered stance, it resulted in the rear section looking heavy, as it seemed to be too close to the ground. Eliminating the spring shackle covers and the bumps where the bumpers attached helped to clean up the look. Raising up the license plate up closer to the trunk opening also provided the space for exhaust outlets in the centre of the car.
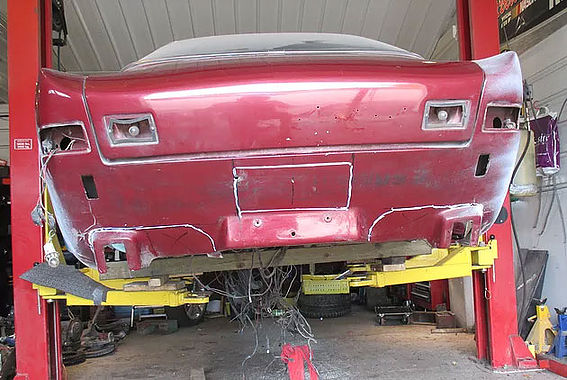
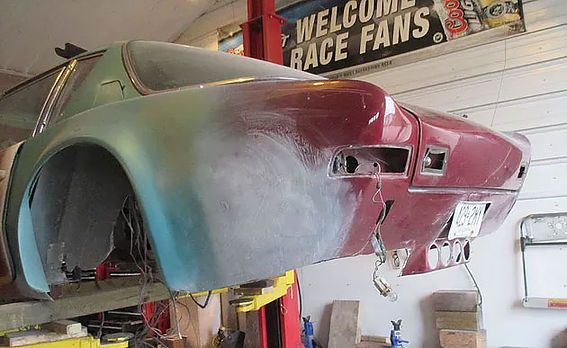
The 3” removed from sides will be reinstalled inside the fender so that the lower curvature is re-established to stiffen this area. This is work in progress, and these pictures do not reflect the final product which will incorporate modified and painted C3 Corvette split bumpers that will frame the exhaust outlets.
01-06-2017 #14
Registered User
- Join Date
- May 2015
- Posts
- 63
To add to the GT theme, heat extraction vents in both the hood and upper fenders were planned. After many hours researching various OEM and aftermarket options and several mock ups were made from cardboard and tape. Many were too large, while others with their chrome finish commanded immediate attention, detracting from the desired smooth and subtle look of modifications beyond the radical lowering and shortening of the body. So, we decided to resort to a low budget, old school approach by cutting slots for vents. This proved very effective thirty years ago on the C2 corvette race car.
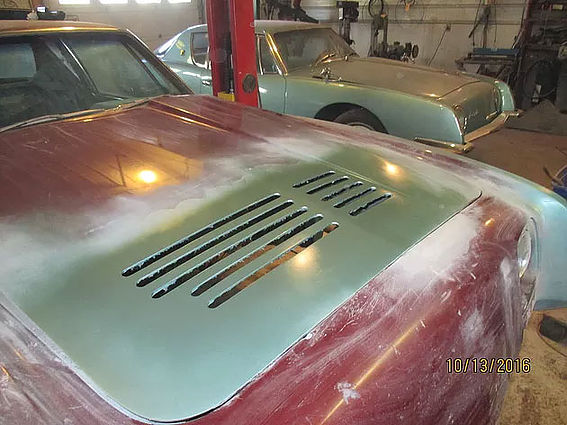
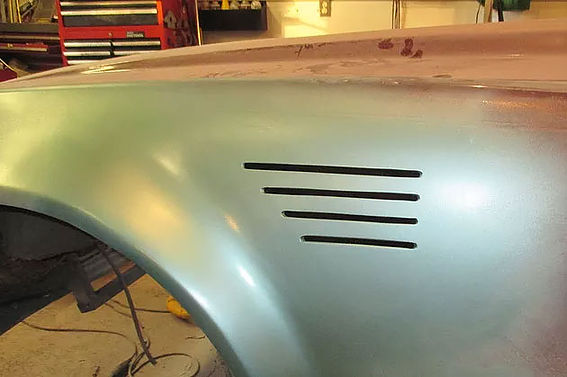
Once the Avanti GT is painted a stainless steel screen will be installed inside the fender and under the Hood. At this point, the body was finally taking shape, sitting on 4” X 4” blocks, shimmed to ride height, with some wheels in position to simulate the proportions and stance of the Avanti GT when finished.
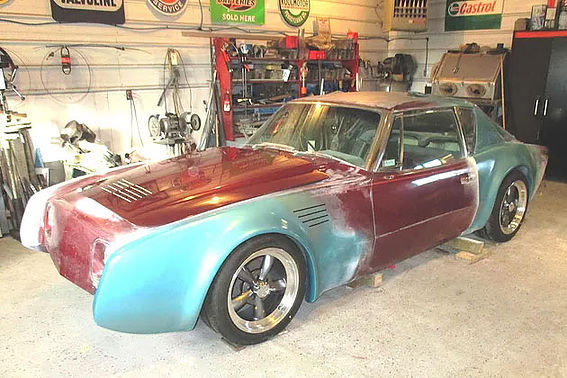
At this point all the remaining red paint was stripped and fiberglass cracks repaired. The backside of all body modifications were also reinforced and many hours were spent addressing gaps and smoothing out the bodywork. The body is currently at the paint shop for final massaging and paint and should be ready for pick-up in another week.
The next series of posts will get everyone up to speed on the chassis, then updates will occur in real time as the chassis and body are reunited.
01-06-2017 #15
Registered User
- Join Date
- Dec 2010
- Posts
- 708
Me smells Corvette awesomeness. I guess both of us foreshadowed that just a bit (C5 or C6?). I like where this is going!
01-14-2017 #16
Registered User
- Join Date
- May 2015
- Posts
- 63
You are on the right path! Originally Posted by rustomatic
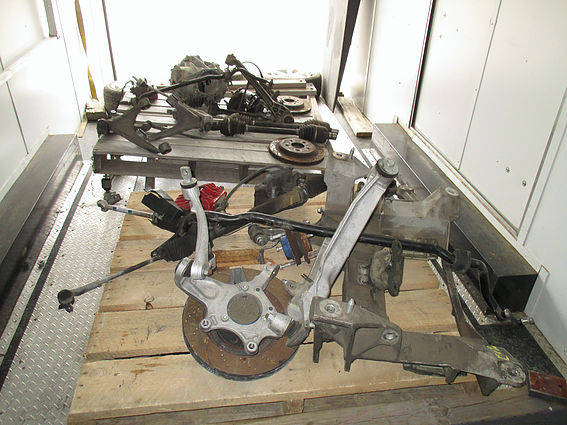
More than they Promised indicated that the 1986 Avanti GT would use a chassis very similar to the one in the 1983 - 84 Escort Avanti GT. It specified a backbone, step down style chassis with both front and rear independent wishbone suspension and four wheel disk brakes, with rack and pinion steering. Given the era and the close connection to GM by both Adams and Blake, one could anticipate that many of these components would be C4 Corvette, including the aluminum differential, although the rear (wishbone) upper and lower A frames would have to be custom built.
The plans would be updated slightly for our Avanti GT tribute, as the majority of the suspension and driveline components were sourced from a 2007 C6 Corvette. Getting rid of the torque tube and converting a C5 rear differential to an open driveshaft would allow the use of a 2010 6L80E six speed automatic transmission in the conventional position, attached to the rear of the engine.
01-15-2017 #17
Registered User
- Join Date
- May 2015
- Posts
- 63
The unique feature of the backbone chassis is that the transmission and driveshaft tunnel become the primary structural componenent supplying a high level of torsional rigidity, linking the front and rear suspension components, The step down feature refers to the floor being located at the bottom of the frame, providing a lower seating position, and thus a lower center of gravity to promote good handling.
The first priority was to identify all the drivetrain dimensions, stock C6 suspension pick up points, then modify them to accommodate a slightly narrower track width.
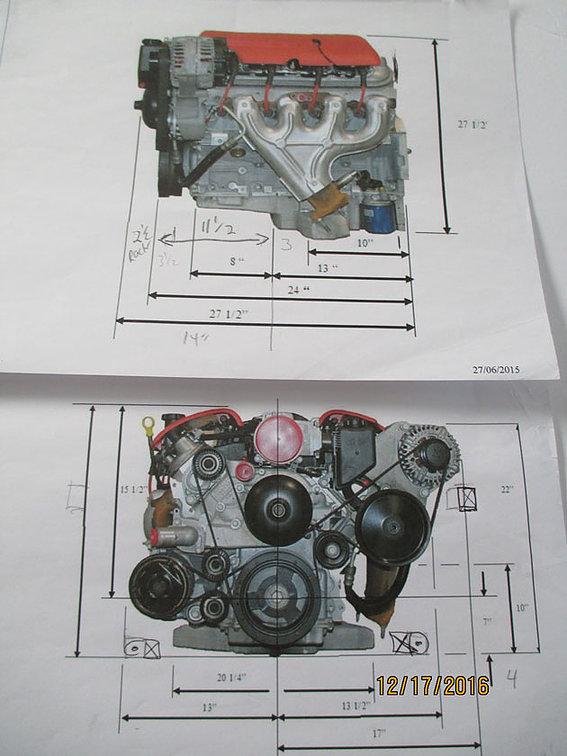
We're hoping to take the Avanti GT on several long road trips, such as participating in Hot Rod's Power Tour. Given the intended use, achieving a comfortable ride will be as important as having great handling. In that spirit, we decided on a slightly softer suspension with greater travel than a Corvette, requiring some of the suspension pick up points to be relocated. We had to ensure negative camber gain was managed with greater suspension travel in a manner that did not result in a excessive bump steer.
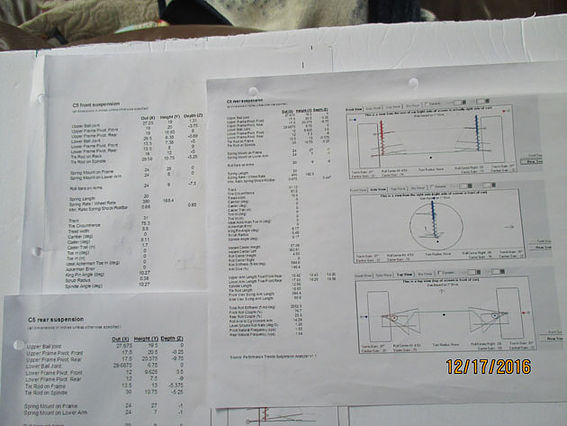
All of the key measurements were collected, including the dimensions of the modified body to establish the wheelbase, front and rear track width. Then, several sketches were made in an attempt to better understand how to connect everything together. With the Chassis layout designed, it was time to test the modified suspension pick up points to be sure they would perform as expected. All the critical data was entered into Performance Trends “Suspension Analyzer“ software that was instrumental in redesigning the geometry of our late model stock car. By using the different heights available for the inner pivot points of the upper A Frames, we were able find the best position, that gave us the desired negative camber gain, with minimal toe change.
01-15-2017 #18
Registered User
- Join Date
- May 2015
- Posts
- 63
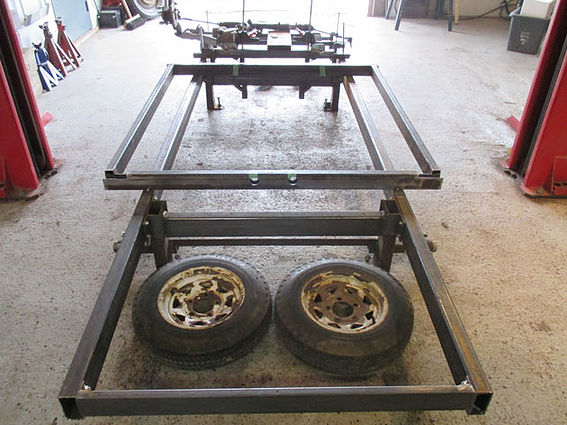
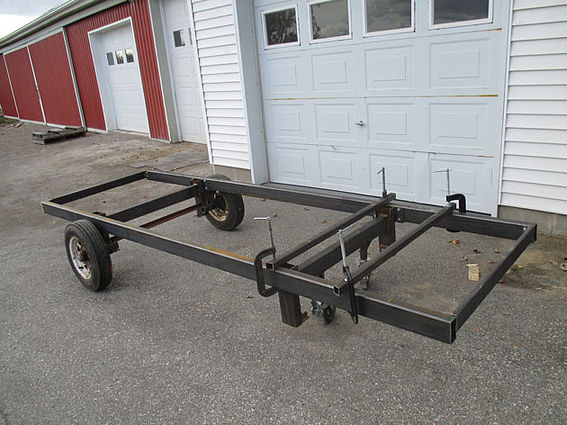
Before actual fabrication could start, a “frame table” had to be built out of 2" X 4"s heavy wall tubing so that all the components could be assembled in a square and level manner. The table was built with 12” legs with leveling adjusters and removable wheels, so that it can be used as a dolly for the chassis or body. The 16” height was chosen to work with our 12” high alignment and scale racks, so that with minor shimming, construction will be at ride height with the wheels sitting on the scale racks.
First, a simple rectangle was made from 1.5” X 3.0” X .125 mild steel tubing, 57” wide to fit up into the rocker panel area, and 60” long, the size of the modified central passenger area of the body. This was squared and tack welded to the frame table. The rear cross member was marked and drilled for the area where the driveshaft will pass through but not cut out. Similarly the front cross member ran the full width, and the area for the transmission will be cut out later.
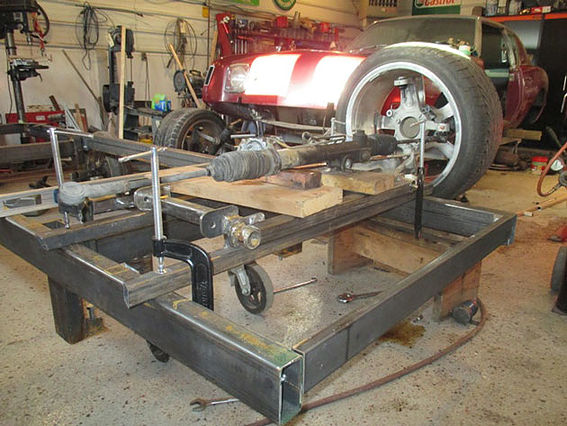
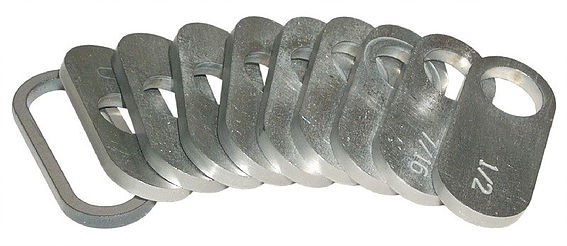
Next, the front module was laid out, positioning the lower C6 A frames as they are on the Corvette, except with a slightly narrower track. The 1/4” thick attachment brackets welded to the 1.5” X 1.5” X.125”square tubing are spaced about 1/2” wider than they are on the Corvette to provide the opportunity to provide an additional means to adjust castor, or fine tune the wheelbase from side to side, by inserting large aluminum spacers to either end.
01-15-2017 #19
Registered User
- Join Date
- May 2015
- Posts
- 63
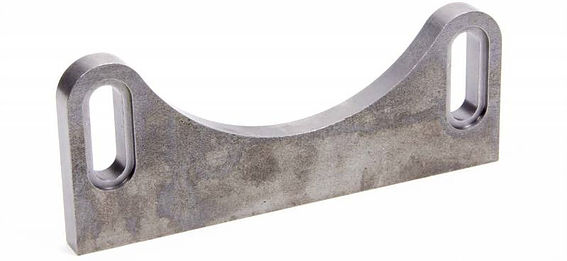
The upper a-arm mounts are stock car products from Howe racing. They feature machined slots, in which various slugs with different offset holes are captured between the a-arm shaft and mounting plate to provide the ability to raise or lower the inner pivot points of the upper A frames to adjust the rate of negative camber gain or to move the roll centre. The use of shims on the A frame attachment bolts, provide adjustability for static caster and camber. The mounting plate was positioned to provide the same degree of anti dive as the Corvette, 10 degrees of positive caster, and 1 degree negative of static camber, and a centered roll center about 3” above ground. C6 Corvette Uprights and spindles connect to the lower and upper A frames.
Initially, C6 – Z06 rotors and calipers will be used, which will readily accept many high performance aftermarket systems later if we decide to upgrade. Coil Over springs and double-adjustable Viking shocks will provide the ability to easily tune ride quality, handling and ride height.
01-17-2017 #20
Registered User
- Join Date
- May 2015
- Posts
- 63
In the rear, the C5 Z06 – 3.42 Differential, has been converted for use with a conventional open driveshaft using an adapter from Chassis Concepts. Laser cut 1/4" plates attach to the front and rear of the differential and are welded to cross members to attach to the rear sub frame with rubber mounts from Howe Racing.
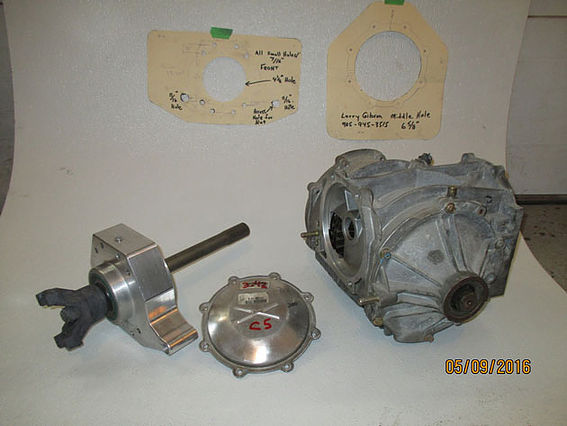
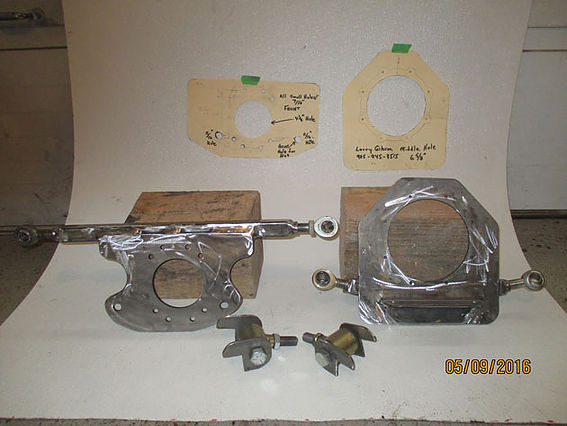
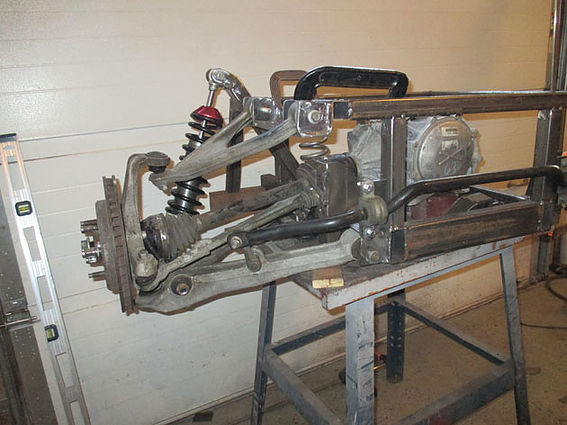
Frame work for the rear C5 differential and suspension was fabricated in a similar manner to the front, duplicating the C6 Corvette suspension pick up points but with a slightly narrower track width. Attachment of the rear upper A frames to the chassis is by way of a removable bracket. No height adjustment is provided, but once the Avanti GT is complete, a different bracket can be substituted to change the roll centre or increase the rate of camber gain if deemed an improvement through testing
Tags for this Thread

 Reply With Quote



