

Results 1 to 20 of 53
Thread: 1986 Nascarlo 2.0
-
10-09-2016 #1
 Registered User
- Join Date
- Jul 2013
- Location
- Grayslake IL
- Posts
- 312

1986 Nascarlo 2.0
Hello! Long time lurker but this is the very first build thread I have ever made. This is my 15th car in the last 3 years and im looking to stop flipping and stick with one for awhile and build it. The project is a 1986 Chevrolet Monte Carlo SS. I bought it running and driving but needing a lot of TLC. It is a 350 SBC with a 200r4 auto and a 7.5 10 bolt. Seems mostly original with some remnants of a very powerful audio setup in its past (its an 80's Monte what would you expect). The keywords for this build are simple: unique, functional, fun. The plan is to build a mild pro touring 1980's throwback nascar Monte Carlo. I am redoing the wheels tires, brakes, suspension, engine, trans, rear end, the works. The interior will be mainly stripped with two buck racing seats, no carpet, no rear seats and no headliner. In place of those items will be black sound deadener. The gauges are being swapped out for a full set of Autometer gauges and the dash board will stay in the car but am unsure if door panels will be staying or not. I will be going with a C5 front brake setup and rear discs but haven't decided on them yet. 17x8 wheels with 255/40/17's all around. Planning on picking up a set of 17x9's for the rear and a large set of drag radials in the future. The suspension will be QA1's stage 2 handling kit minus their coil over setup. The plan is to run a 5.3 in the car with the existing 200r4. I have ported 853 heads, an ms3 cam and will be going with a carb'd setup and msd ignition. Going to send the 200r4 out to get rebuilt to hold roughly 400 wheel horsepower and the 7.5 will be taken out in favor of an 8.5 posi out of a GN or 442. The car will be decaled up just like a nascar and sit low and sound mean. I haven't seen too many people take these g bodies and replicate the nascars of the 80's so i thought id go down that route for the uniqueness factor. Not to mention I love nascar, pro touring g bodies, and things that sit low and make evil sounds. So this project has got me excited to say the least. I'm working with a limited budget but will be piecing together the whole build throughout these upcoming months.
This is how the car looked when i got it
Attachment 132900
Then trailering the car home a few hours away near the Indiana/Ohio border. (Im located north of Chicago)
Attachment 132901
This is the car un-modified as I got it
Possible 5.3 I have on the stand for it
Prep work starting on the monte
Paint work starting...at 7:30 at night
Yes this is a budget build...so I hit up a dozen parts stores to get together all the paint cans, clear, and prep materials needed for this
Clear going on
-
10-09-2016 #2
Registered User
- Join Date
- Jul 2013
- Location
- Grayslake IL
- Posts
- 312
Didnt like the black wheels with 215/65/15's so test fit some 255's i had laying around on the car and liked the look enough to keep them on until my new wheels get here in a few weeks.
10-10-2016 #3
Registered User
- Join Date
- Aug 2004
- Location
- Los Angeles
- Posts
- 592
Welcome and cool build!
Wanna sell the gauges?The rule is measure twice and cut once. My problem is I still measure with a mic and cut with an axe!
10-10-2016 #4 Registered User
- Join Date
- Apr 2015
- Location
- SoCal
- Posts
- 165
This forum is awesome. $100,000 builds, and builds that start with a bombercan painjob as step one. I love it here.
Cool car. Looking forward to hearing all your plans.
10-10-2016 #5
Registered User
- Join Date
- Jul 2013
- Location
- Grayslake IL
- Posts
- 312
You're looking for stock Monte Carlo gauges? Originally Posted by Protour_Pinto

10-10-2016 #6
Registered User
- Join Date
- Jul 2013
- Location
- Grayslake IL
- Posts
- 312
Thank you! For what it is I don't think the car turned out half bad with a rattlecan paint job! But then again I've never been too much into the look of the car..just how it drives mainly. Originally Posted by LERM
10-10-2016 #7
Registered User
- Join Date
- Jul 2013
- Location
- Grayslake IL
- Posts
- 312
Ended up not going with qa1's stage 2 complete kit. I bought there basic qa1 stage one kit without shocks that comes with some simple chassis stiffening pieces, then got some umi shocks, drop spindles I can modify for the c5 brakes, lowering springs and rear sway bar and such. Should handle a little better than now after all that is installed but I am doing an Autocross with the car October 22/23 on stock suspension just to get a baseline first...that should be a riot in itself

10-11-2016 #8
Registered User
- Join Date
- Aug 2004
- Location
- Los Angeles
- Posts
- 592
Im looking for a set of stock type gauges but dont want idiot lights, Since I will be gutting all the wiring from the truck Im going to get a universal wiring solution and the engine is a GM (Cadillac) and the gas sender will be of some sort of GM I figured getting GM gauges would be the way to go. These dont look too big for the dash of the Toyota. Originally Posted by epeterson
The rule is measure twice and cut once. My problem is I still measure with a mic and cut with an axe!
10-11-2016 #9
Registered User
- Join Date
- Jul 2013
- Location
- Grayslake IL
- Posts
- 312
I mean yeah if you want the gauges I'll keep you in mind! I haven't ordered new gauges for the car yet but when I do I'll send you a message and you can let me know if you still want them Originally Posted by Protour_Pinto
10-11-2016 #10
Registered User
- Join Date
- Jul 2013
- Location
- Grayslake IL
- Posts
- 312
Got some new suspension parts for the Monte Carlo! Didn't take too long for me to rip all the boxes open and marvel at the nice new suspension
10-11-2016 #11 Registered User
- Join Date
- Oct 2013
- Location
- H-Town, TX
- Posts
- 356
Love this build
10-17-2016 #12
Registered User
- Join Date
- Jul 2013
- Location
- Grayslake IL
- Posts
- 312
Well started finally tearing apart the suspension! Figured I'd start with the rear thinking it'd be easy...but after a few snapping the heads off some bolts and on blasting my way through everything the only items that are off at the moment are the rear sway bar and rear shocks. I'm working on getting the lower control arms off and then those and the springs will be out and things will start going back together! New QA1 rear lower control arms, qa1 sway bar, umi shocks, umi rear shock tower brace and the 2" lowering springs. Should have time today to finish up disassembly and getting some new parts on!
10-17-2016 #13
Registered User
- Join Date
- Aug 2004
- Location
- Los Angeles
- Posts
- 592
Cool, Thanks!
Originally Posted by epeterson
The rule is measure twice and cut once. My problem is I still measure with a mic and cut with an axe!
10-17-2016 #14
Registered User
- Join Date
- Sep 2016
- Posts
- 44
very nice start.
10-17-2016 #15
Registered User
- Join Date
- Jul 2013
- Location
- Grayslake IL
- Posts
- 312
Definitely one of the times I'm wishing I had a lift. But hey! At least it's 80 degrees around Chicago in mid October! 👍🏼 Will post more pics tonight of hopefully the suspension all disassembled in the back and some new parts on
10-17-2016 #16
Registered User
- Join Date
- Jul 2013
- Location
- Grayslake IL
- Posts
- 312
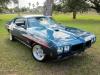
Good news! Came home and my wheels are here! 17x8 cragars...yeah pretty simple, cheap...and heavy...but I didn't have much budget for wheels and needed a 17 to fit the corvette brakes in front. Also if you look at the 80's nascars they had a similar wheel so I went for it! Also my UMI c5 front brake adapter kit came and my ARP wheel studs came as well. After the rear suspension is knocked out I'll be starting right away on the front and getting these big brakes on the car and my front suspension stuff. Here's my question. I initially wanted to paint these wheels the red that's on the car (GM bright red) and have them stand out once all the decals were on. But Ive received the wheels and I am kind of digging the black with red and blue stripe on them...you guys got any opinions? I guess I'll put them on the car tonight and see if I like the black look or not. If not I'll paint them red. I'll attach a picture to show the red wheels on a g body where I got the idea from.
10-19-2016 #17
Registered User
- Join Date
- Jul 2013
- Location
- Grayslake IL
- Posts
- 312
Well my c5 calipers finally came in the mail today! That completes everything I need for the brake swap up front. Got my pads and rotors a few days back and the umi kit had been staring me in the eyes since it arrived haha. As soon as rear suspension is knocked out I'll be starting in that. Which speaking of! Both rear control arms are out, both springs and shocks. Reassembly is starting to happen back there. Finally. I'm tired of the garage being a mess of scattered tools and rust from these worn out pieces!
10-21-2016 #18
Registered User
- Join Date
- Jul 2013
- Location
- Grayslake IL
- Posts
- 312
Progress has finally been made! Rear suspension is completely in and done.
Here's a quick parts list of what I have
-QA1 Lower trailing arms
-UMI street performance shocks
-UMI rear shock tower brace
-QA1 rear sway bar
-UMI 2" lowering springs
That's all for now. Not a crazy budget for this car. But since I had it buttoned up it does ride a lot firmer and you can tell right off the bat it's a tighter feeling and more precise. Front suspension is next and I'm getting tires mounted this weekend. If anyone was interested in part numbers or how the install went on an item I'm more than happy to help! The trailing arms were the bigger pain to get out cause the bushing had made itself one with the rearend house pretty much haha. So after giving it a good amount of leverage with a crowbar it came out, with a nice big patch of rust where the bushing was, so I chipped at the big chunks with a screwdriver and then took a DA sander with 80 grit and made it nice and smooth for the qa1 arms.
Here's the UMI rear shock tower brace
QA1 Rear Sway Bar
The new suspension put in. I didn't do a huge job cleaning up the rearend at some mounting points because the rearend is being swapped for a 8.5 10 bolt soon. (Still in the process of finding a good one)
The rear brace installed
Some natural weight reduction after the install was complete...
Rear suspension that was taken out
The car as it sits now and the garage finally clean again! For now..
The new Hubs with the ARP studs installed for my C5 brake install
10-25-2016 #19
Registered User
- Join Date
- Jul 2013
- Location
- Grayslake IL
- Posts
- 312
Got the tires today! Went with BF Goodrich Sport Comp 2's in a 255/40/17 in a square stance.
10-25-2016 #20
Registered User
- Join Date
- Jul 2013
- Location
- Grayslake IL
- Posts
- 312
Got them mounted! Couldn't wait to take pics but it was already dark so these are what I have right now. I'll get some better pictures tomorrow in the day light. But going from a 65 series side profile to a 40 series got me about another inch and a half lower actually! Going to be starting on front suspension tomorrow after I pick up a more accurate torque wrench. My last one broke on me finishing up the rear.

 Reply With Quote


