Results 1 to 20 of 134
Thread: Pontiac Trans Am
-
11-10-2015 #1
 Registered User
- Join Date
- May 2015
- Location
- Island Lake, IL
- Posts
- 816

Pontiac Trans Am
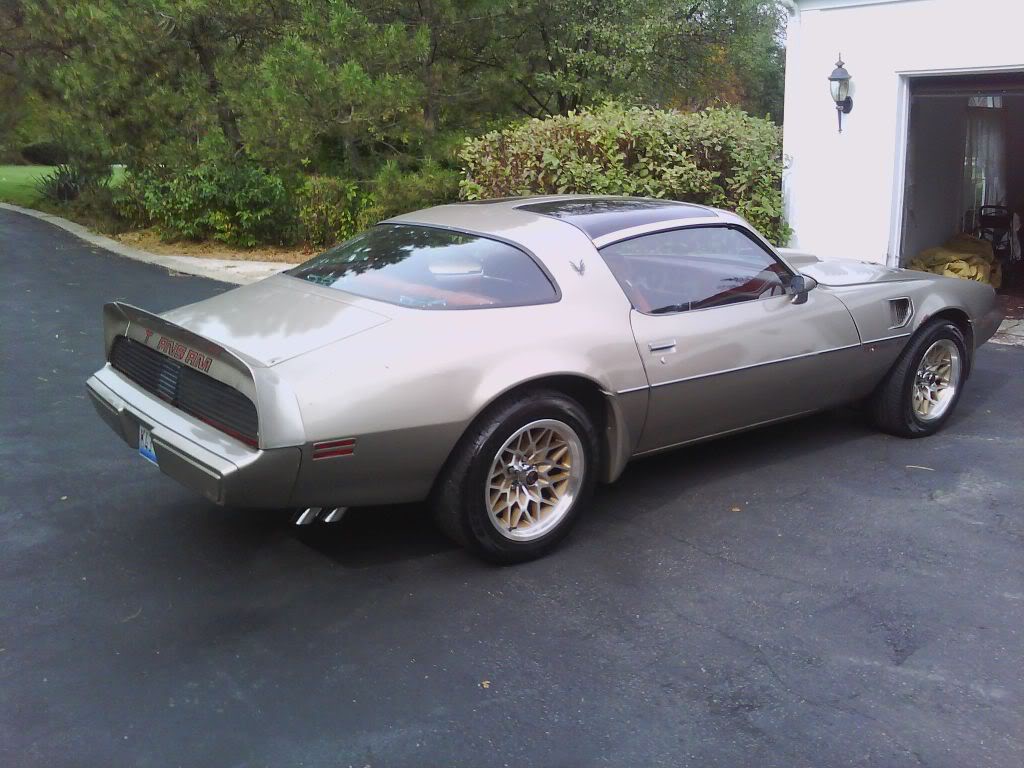
Finally deciding to share my project on the forum. I have made some posts on here but haven't gotten around to sharing my stuff. My car is a 1979 Pontiac Trans Am 400 4spd. It has the correct final year production 400 engine and the rest of the drivetrain in it. Although I'm modifying my far from stock, I do plan on trying make it appear like a factory built car.
Here is how I built it about 5 years ago....

Nothing special but here's a couple videos of it running...
https://www.youtube.com/watch?v=b0BVxF_hnv0
https://www.youtube.com/watch?v=Hih3ybgPqxs
-
11-10-2015 #2
Registered User
- Join Date
- May 2015
- Location
- Island Lake, IL
- Posts
- 816
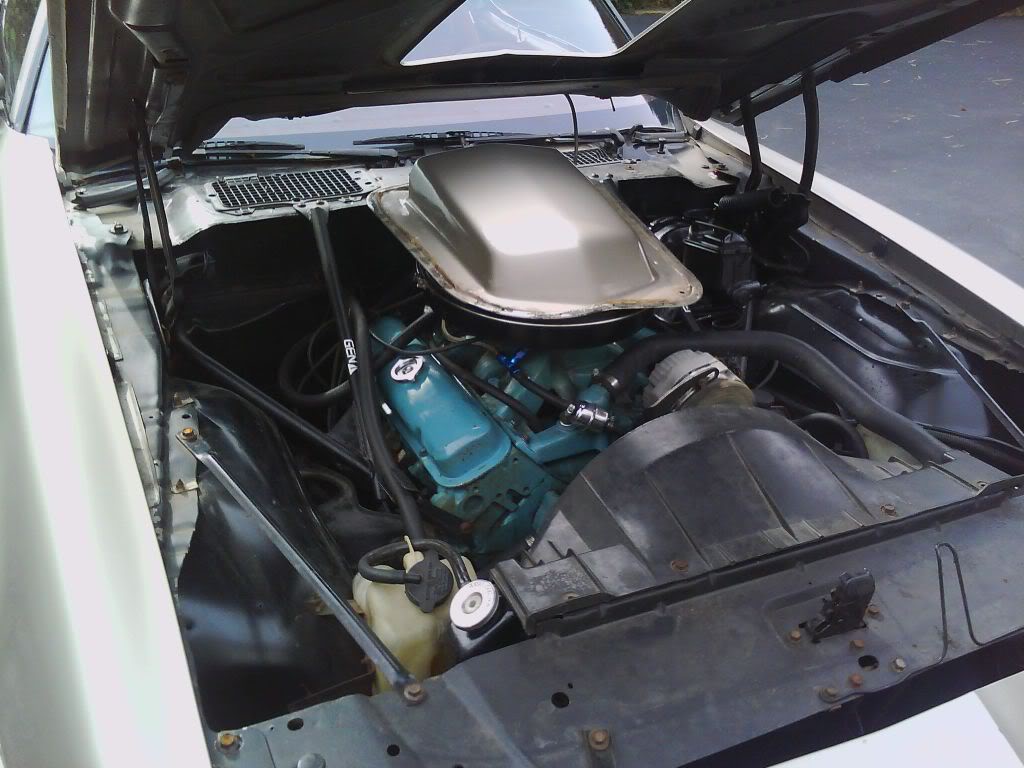
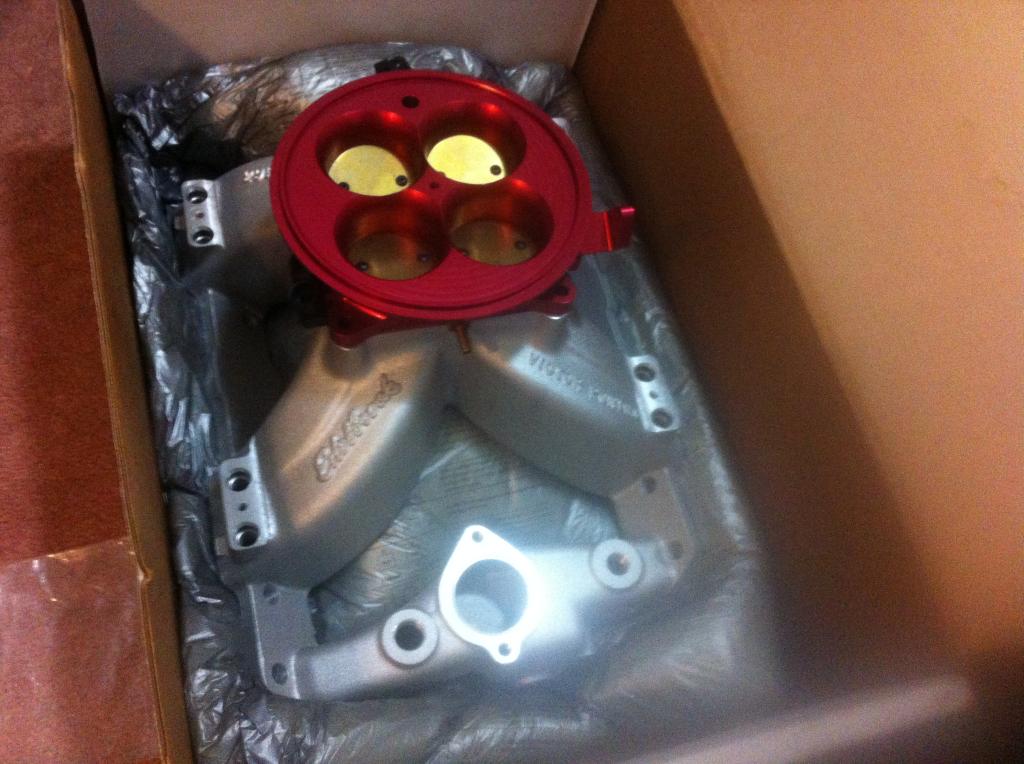
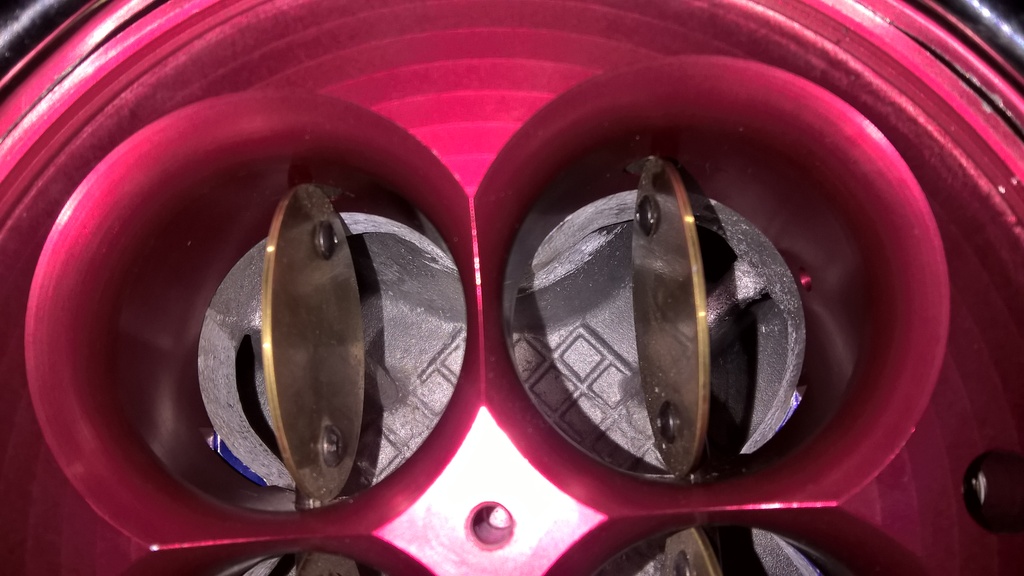
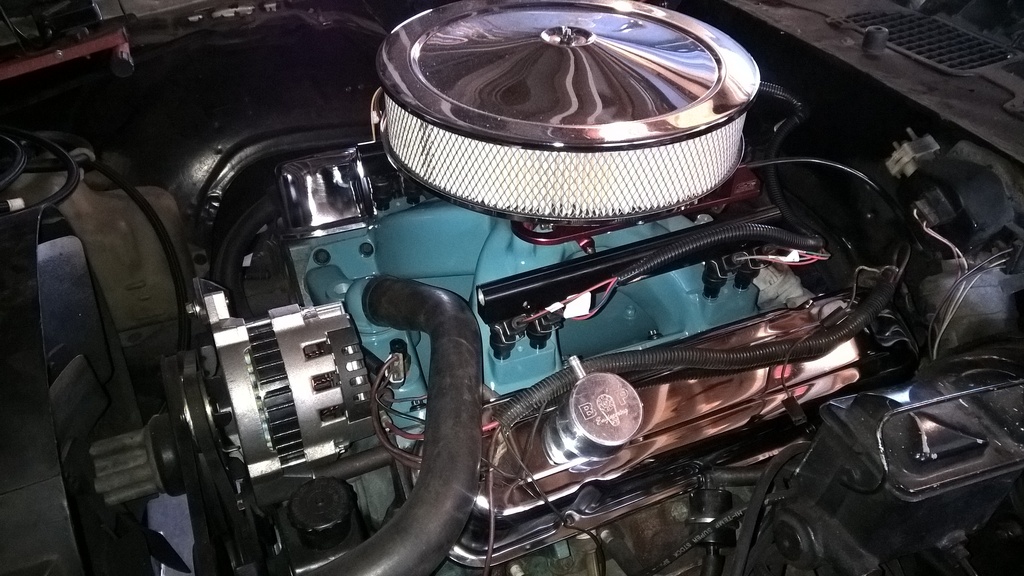
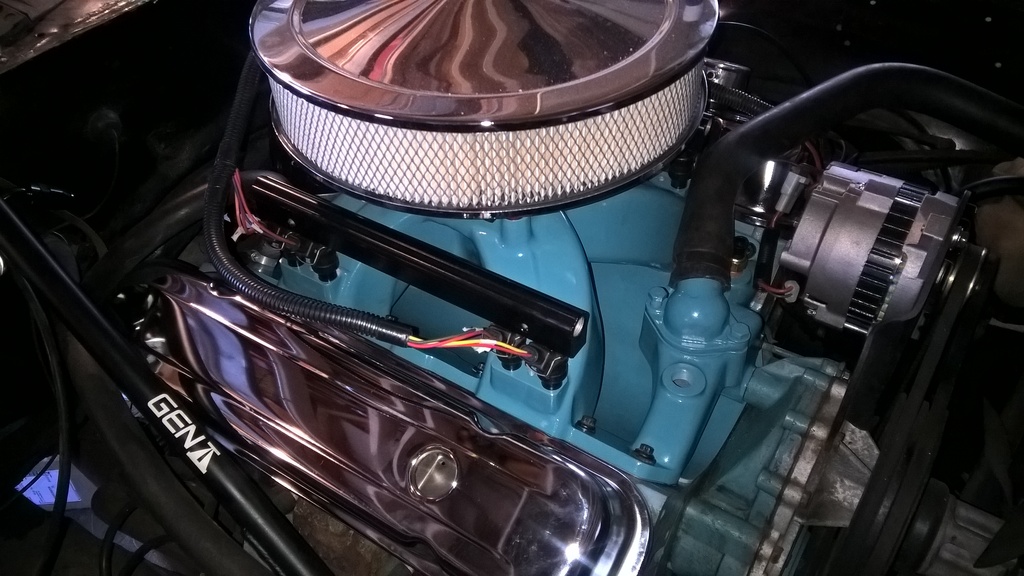
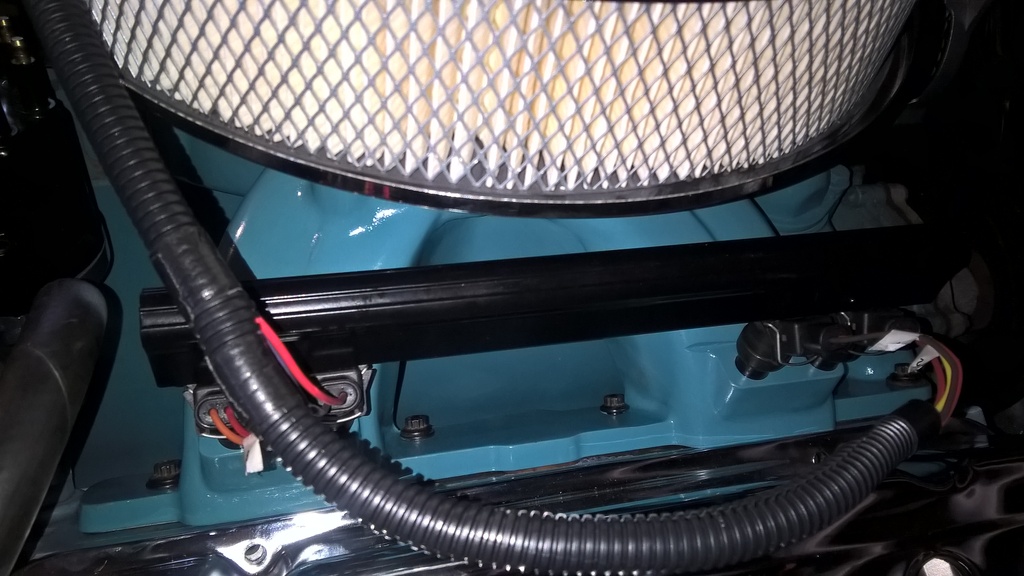
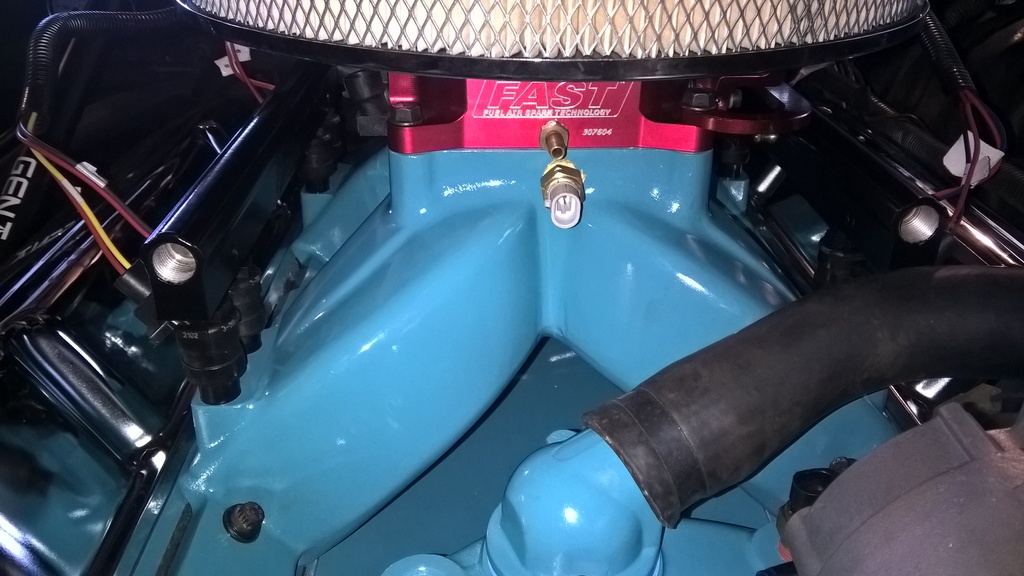
Picked up an Edelbrock Super Victor 4500 EFI intake for Pontiac engines off another forum. This intake has received a lot of work. I had to grind the outside of the plenum just for it to accept the throttle body. After that, I found the throttle blades were contacting the plenum pad so I had to port match the throttle body to the manifold. The throttle body is a 4500 dominator style from FAST. I'm also using their whole FAST XFI 2.0 system, ignition, distributor, etc. Here is a quick overview of the transformation.
Lettering removed...
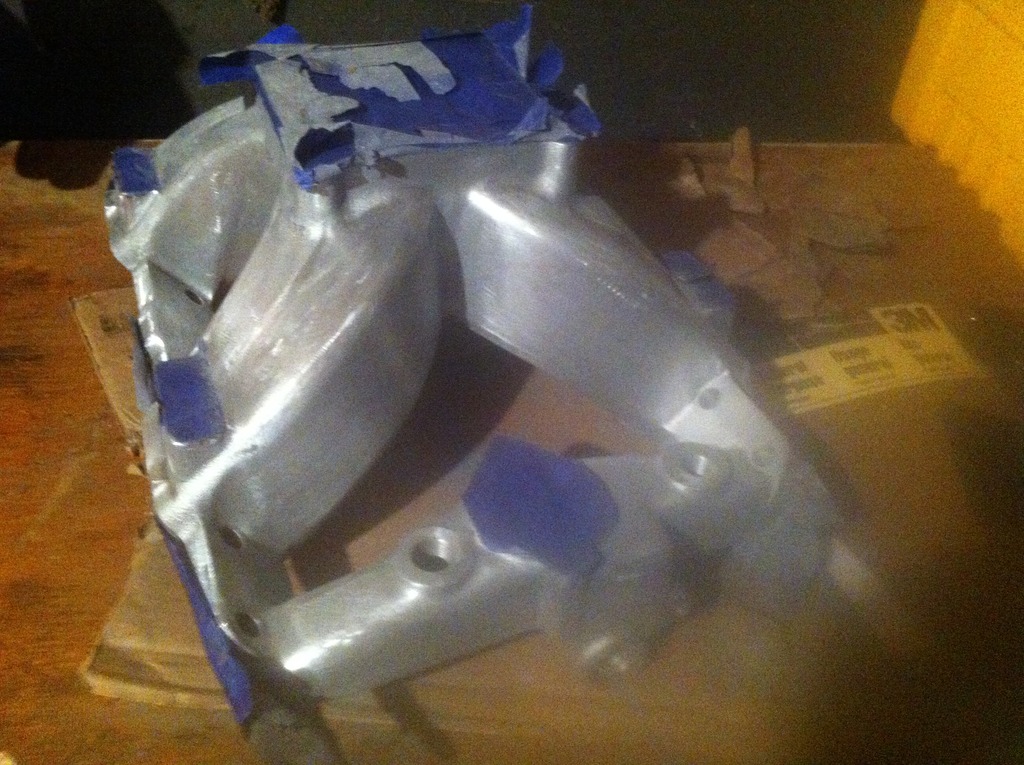
Port matched throttle body to the plenum...
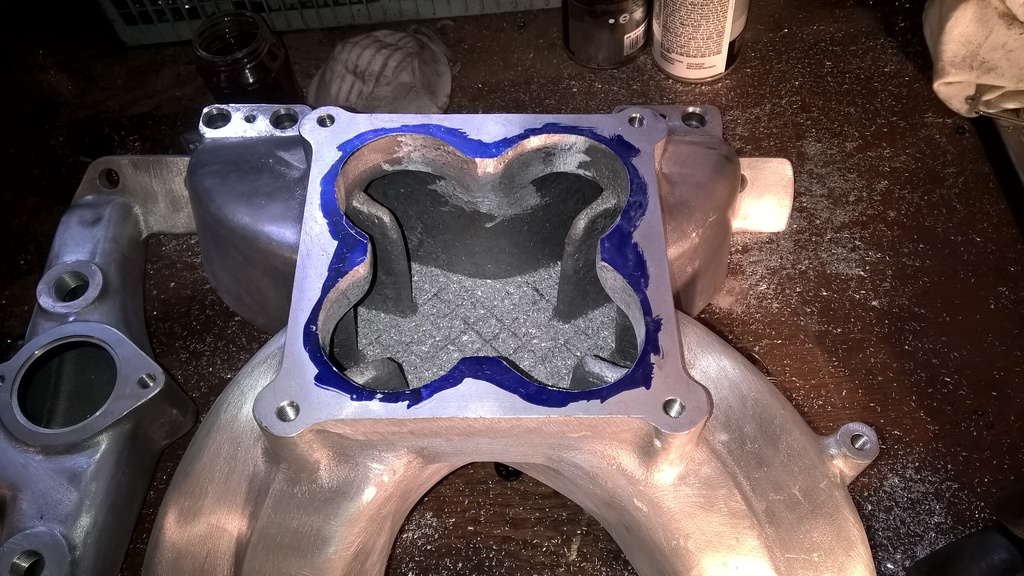
Painted intake manifold 1970's GM Corporate Blue...

11-10-2015 #3
Registered User
- Join Date
- May 2015
- Location
- Island Lake, IL
- Posts
- 816
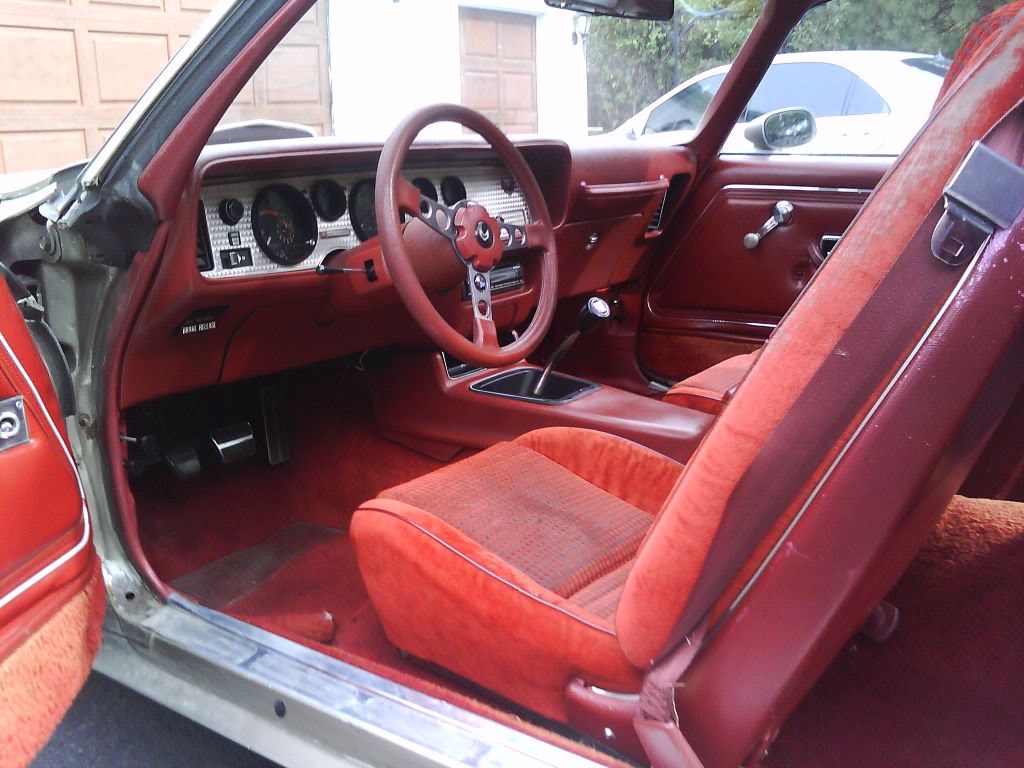
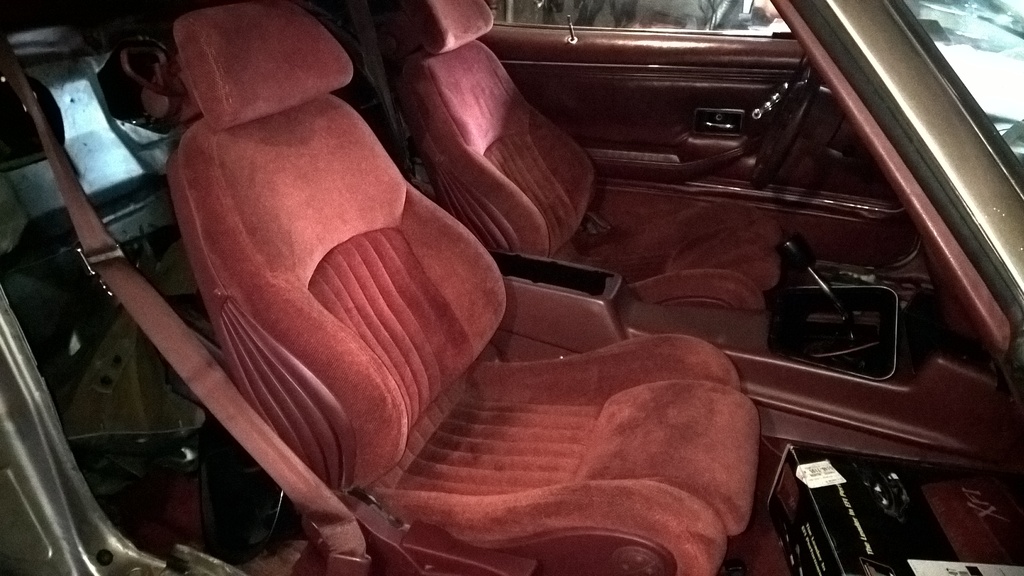
Another setup I'm working on is installing '87 GTA Trans Am seats. These seats offer adjustable headrest, electronically controlled lumbar, recline, lower cushion adjustment and rear cargo net. '79 and '87 both offered carmine red interior so this luckily turns out to be a close match for me. I still need to work out some issue with mounting the seats but I have a general idea of how it will install.
'79 driver seat vs '87 passenger seat...

'87 seats roughly in the car...
11-10-2015 #4
Registered User
- Join Date
- May 2015
- Location
- Island Lake, IL
- Posts
- 816
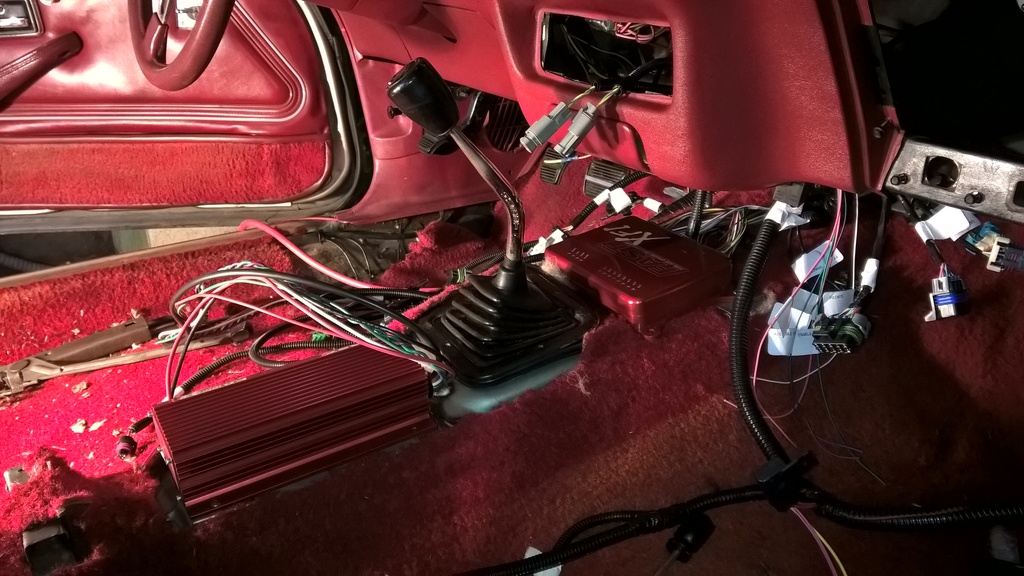
Figuring out where to mount the ignition box and ecu required a lot of thought but I think I found a good spot under the console. I welded in some mounting brackets to space the ecu and box off the tunnel but still keep it under the console.
11-10-2015 #5
Registered User
- Join Date
- May 2015
- Location
- Island Lake, IL
- Posts
- 816
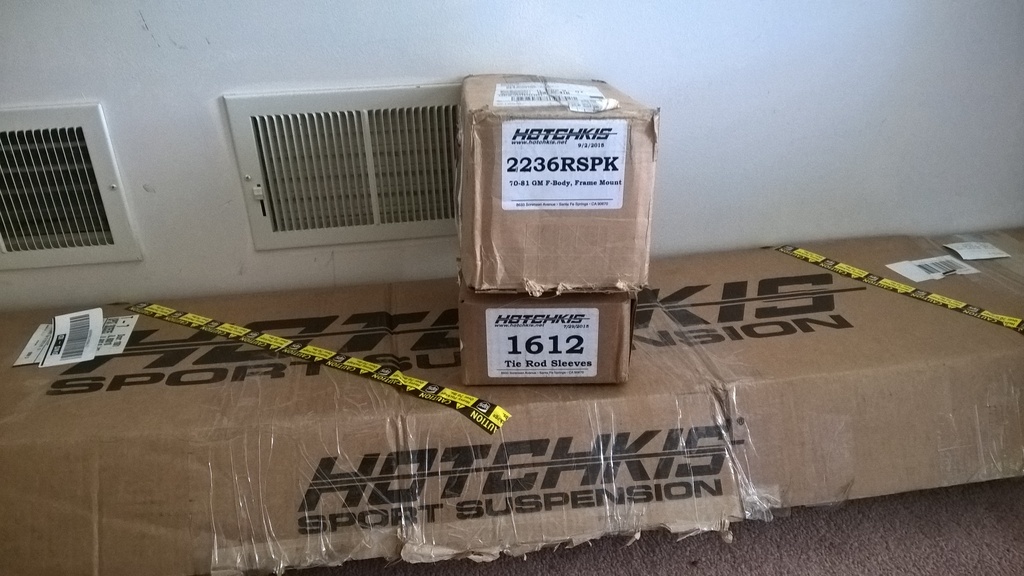
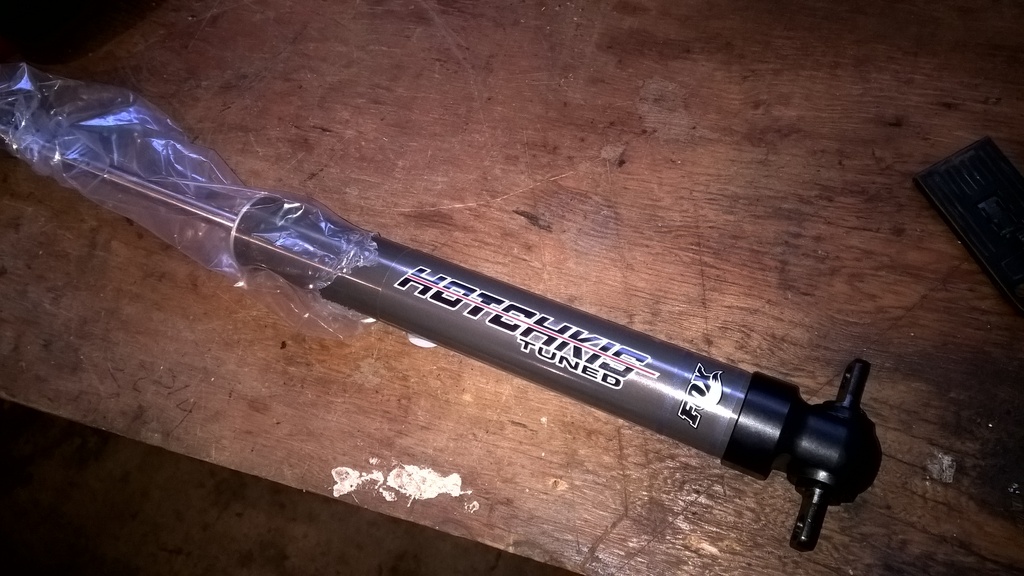
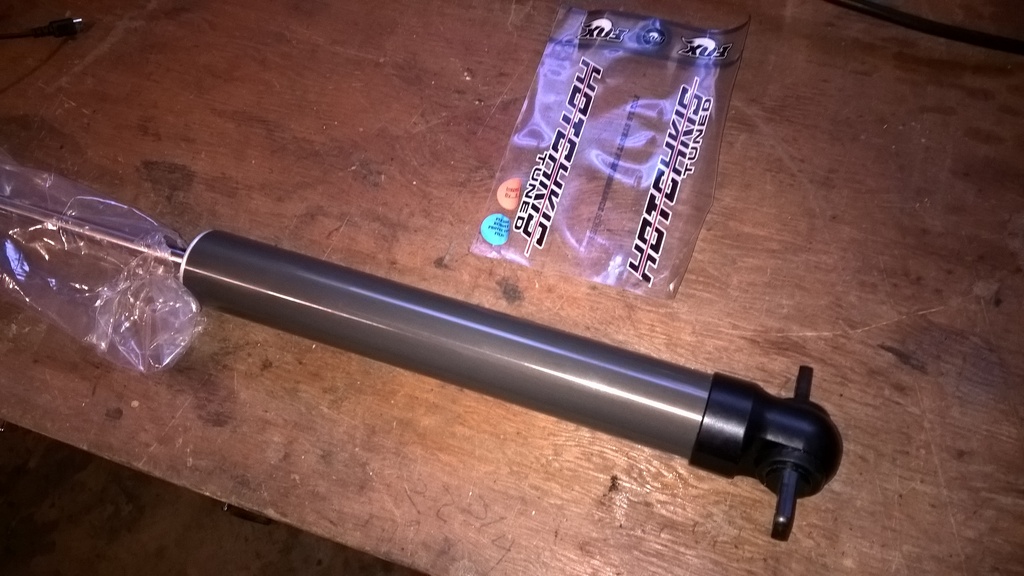
For suspension, this was also another debate on where I should go with the car. I ended up deciding on sticking with a leaf spring set up. I've seen mixed reviews on Hotchkis but I'm going to try them out. I only have their rear sway bar, leafs and Fox shocks.
Hotchkis Fox shock absorbers...
After...
Hotchkis sway bars...
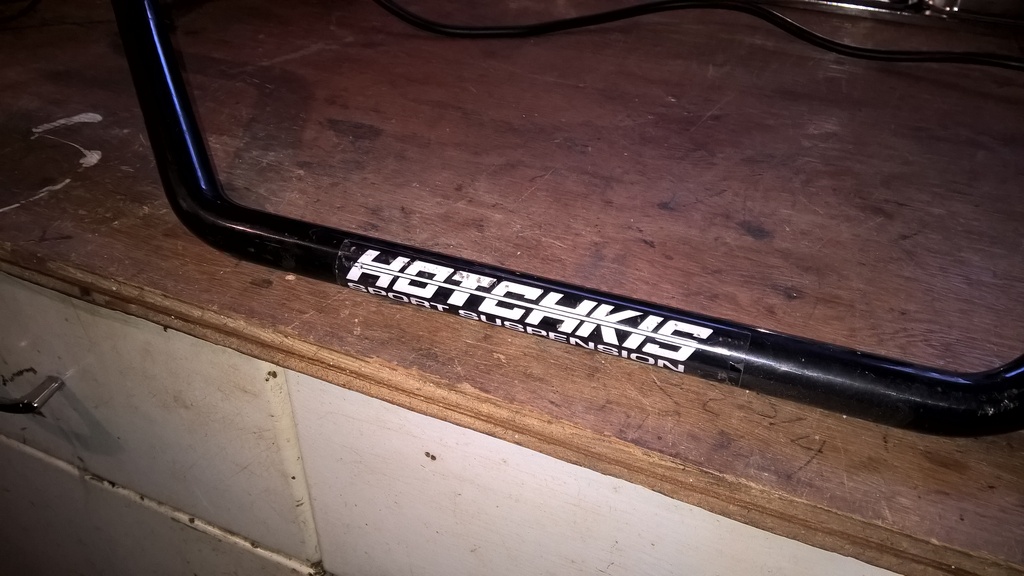
After...

Installation coming soon....
11-10-2015 #6 Registered User
- Join Date
- Aug 2002
- Location
- Sweden
- Posts
- 910

Great project! I love the sleeper look.
11-11-2015 #7
Registered User
- Join Date
- May 2015
- Location
- Island Lake, IL
- Posts
- 816
Thanks Ripper! I have this car on a few other forums under a different username. I've been on the PY, TAC and some other forums for a while but this year I logged into Pro-Touring and Yellowbullet. It's cool seeing the original stuff but these forums offer a lot more fabrication and engineering knowledge. I just stumbled upon your car through your profile link...looks great!
11-12-2015 #8
Registered User
- Join Date
- Sep 2004
- Location
- Fresno, Ca
- Posts
- 379
I dig it! The GTA seats are an awesome touch- really updates the seating while looking vintage-esque.
11-15-2015 #9
Registered User
- Join Date
- May 2015
- Location
- Island Lake, IL
- Posts
- 816
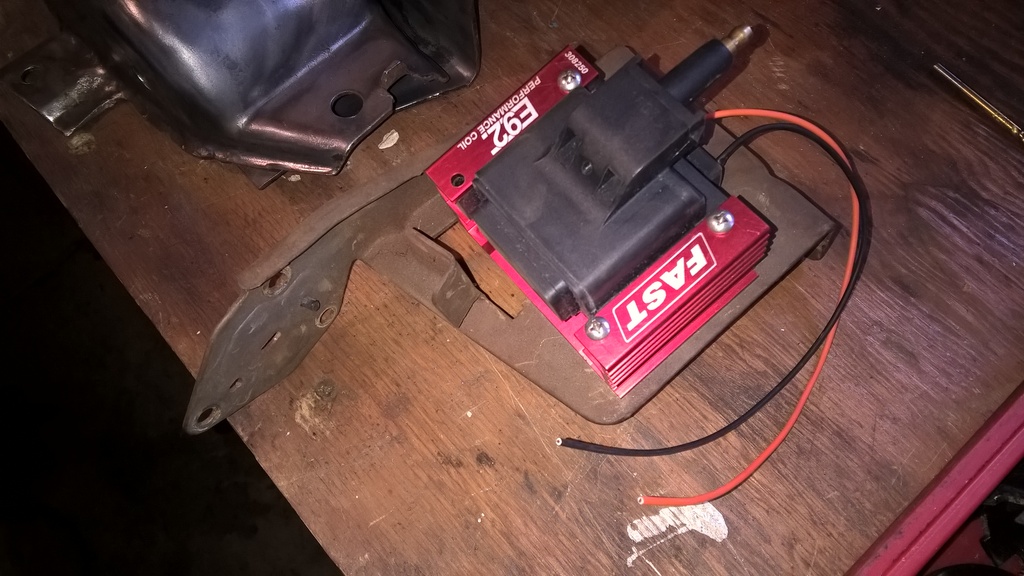
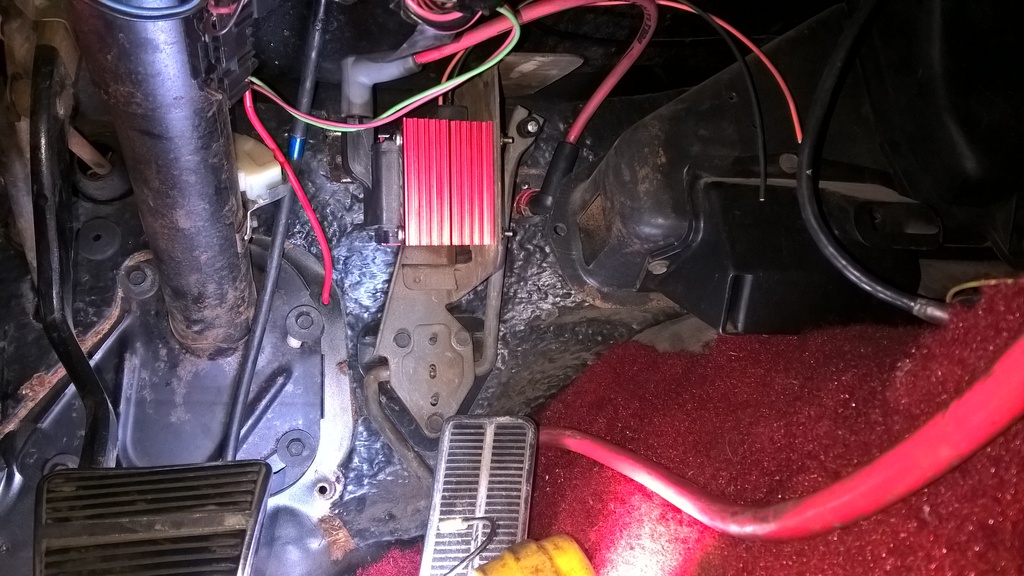
Got the coil hidden inside of the car this week. This ended turning out to be a nice install as well.
Mounted the coil to throttle bracket...
Installed on the inside. Here you can see where the spark plug wire is on the backside of the firewall...
MSD firewall feed (Part# 8211) used to feed the spark from inside of the car. This is a very short route for the ignition to travel...

View from top...
11-15-2015 #10
Registered User
- Join Date
- Aug 2002
- Location
- Sweden
- Posts
- 910
Thanks! Originally Posted by F-Body International

I agree, here are some engineering knowledge. Much more than the keeping-it-stock-forums.
11-16-2015 #11 Registered User
- Join Date
- Apr 2004
- Location
- Cedar Rapids, IA
- Posts
- 999
Subscribing
Some times I'm fast sometimes I'm half-fast
01-09-2016 #12
Registered User
- Join Date
- May 2015
- Location
- Island Lake, IL
- Posts
- 816
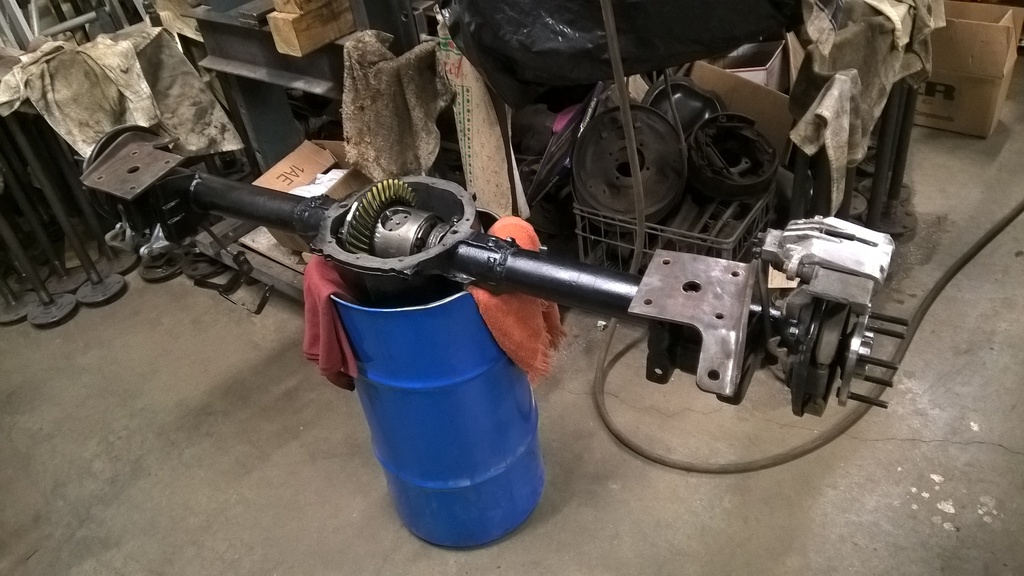
Been following some of the threads on this forum pertaining to swapping on 4th generation '98-'02 F-Body brakes. Some refer to this as the LS1 brake setup. I picked up two sets of brakes and I'm using both driver side "L" assemblies to work with the old style staggered shock orientation.
I also picked up a set of spacers from BRP Hot Rods to work with the old style 8.5" 10 bolt. Here's a link to the spacers if anyone else is interested in this kind of setup...
http://www.brphotrods.com/mm5/mercha...ry_Code=BRK12F
Here's a pic of the initial mockup but I'm still waiting for the BRP spacers to come in the mail. Once the spacers are in, I will be taking the rear to someone local for a rebuild. I tried to set up the rear end myself but I think it's best to have a professional do it at this point.
01-10-2016 #13 Registered User
- Join Date
- Oct 2009
- Location
- Amherst, OH
- Posts
- 524
Great build! I have the same feelings about resto-modding these cars....I'm not into crazy body mods or wild paint jobs. I like an original looking car, that's been updated under the skin!
Where did you source your LS brakes from? Are you doing the same for the fronts as well?
I've been searching for 6+ months for a 8.5 10 bolt for my '68, but haven't had any luck yet. I had plans for C5 brakes up front, and LS brakes in the rear, but I'm going to keep my eye on the for sale thread for your stock discs. Seems like a great, inexpensive way to upgrade from my drums!
01-10-2016 #14
Registered User
- Join Date
- May 2015
- Location
- Island Lake, IL
- Posts
- 816
Originally Posted by Josue
I picked up a set of brakes from a '99 Trans Am off craigslist and my second set was from ebay. The '99 brakes came off a low mile car that got Brembo brakes swapped on. I even received this setup with the original GM pads and Rotors. I will modify my previous post later as I can provide more pictures.
The stock discs from my car are listed for sale on a couple forums and there's some interest but I haven't posted any pics anywhere. This is a great bolt on setup for those who are running 15" wheels or want something they can pick up parts for at a local parts store for cheap. You also don't have to mess around with emergency brake setups because this works with old style factory equipment.
I will also be selling two passenger "R" side '98-'02 F-Body brakes I have right now as well. With two R assemblies on an early 10 bolt rear end, this will position the passenger caliper towards the front of the car and the driver side caliper towards the rear. The reason for this is that on a 4th gen F-Body, both driver "L" and passenger "R" side calipers are clocked towards the front of the vehicle. I've seen on another forum where some have used the standard "L" and "R" assemblies but relocated the passenger shock 1-1.5" on the shock plate to clear the caliper and it works. I chose the two "L" assembly route to run on opposing sides of the shock like my original setup. This is mainly the issue 2nd gen ('70-'81) F-Body owners have to deal with when using this setup.
For '67-'69 F-Body, BRP makes an inward mounted shock kit so that makes it possible for 1st gen owners to clock 4th gen brakes in any orientation. With a setup like this, you can position the brakes in standard 4th gen "L/R" configuration. I would say narrowing down your choice here would be how you want to operate the emergency brake lever. In order to get the emergency brake lever to pull forward on this brake assembly, some may want to consider using the R caliper on the passenger side and L on the driver side. Here's link to the inward shock mount kit for 1st gen owners...
http://www.brphotrods.com/mm5/mercha...gory_Code=CNV1
01-10-2016 #15
Registered User
- Join Date
- Oct 2009
- Location
- Amherst, OH
- Posts
- 524
Ah!
Yea, my passenger shock is in front of the axle, and driver side is behind the axle, so I'll have to do my research before pulling the trigger. I'm trying to hold off and tackle one issue at a time, right now being suspension, or else I'd be too tempted to go nuts buying a bunch of stuff! haha
03-07-2016 #16
Registered User
- Join Date
- May 2015
- Location
- Island Lake, IL
- Posts
- 816
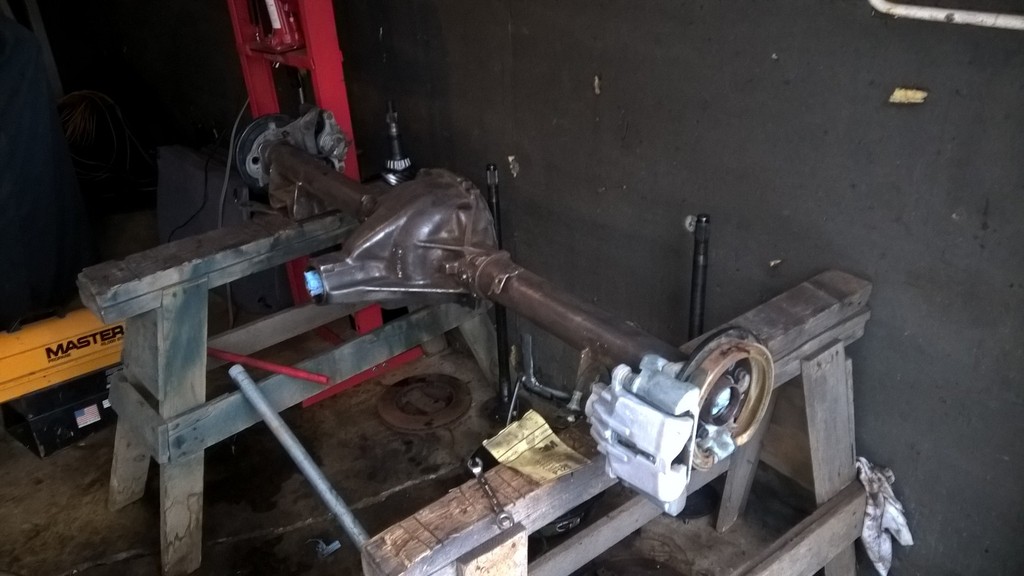
Made some progress with regards to getting the rear end complete. I ended up taking my housing to the person who assembled my engine. I was going to do it myself initially but went this route and it ended up being a great decision for me. Again this is the original 8.5 10 bolt rear end from my car. Here's the list of what's being done to it.
-Moser 30 spline axles
-Eaton Detroit Truetrac carrier
-Strange Engineering 1350 driveshaft yoke
-Crush sleeve eliminator
-'98-'02 F-Body brakes (BRP Hot Rods adapter bracket)
-Axle tubes fully welded to center section
-Custom length wheel studs
03-08-2016 #17
Registered User
- Join Date
- Oct 2009
- Location
- Amherst, OH
- Posts
- 524
Looks good!
Why did you decide on custom length wheel studs? Did no aftermarket company offer a length you need?
03-08-2016 #18
Registered User
- Join Date
- May 2015
- Location
- Island Lake, IL
- Posts
- 816
The ones in stock were a bit long so we cut them to fit. Aftermarket wheel, new style rotors and lug nuts change from setup to setup. I might change lug nuts so we'll see what happens here. Originally Posted by Josue
03-08-2016 #19
Registered User
- Join Date
- Oct 2009
- Location
- Amherst, OH
- Posts
- 524
Again, same boat here. My new US Mag Bandit wheels, and disc brake conversion will definitely require longer studs. Seems there are some standard lengths to go with, like M12X1.5 APR press in, but I'm more worried about finding lug nuts that will secure my wheels properly! Unless I'm over thinking that...haha
03-08-2016 #20
Registered User
- Join Date
- May 2015
- Location
- Island Lake, IL
- Posts
- 816
Measure your wheels then pick the most fitting lug nuts. Choose the stud that matches your lug nut afterwards. Originally Posted by Josue


 Reply With Quote