

Results 1 to 20 of 78
Thread: 80 Camaro Build
-
10-05-2015 #1

 Registered User
- Join Date
- Feb 2015
- Location
- Montana
- Posts
- 183

80 Camaro Build
Finally getting around to starting my build thread. Three years ago, I bought my 1980 Z28 and promised my wife I would enjoy the car as is. Well...things change, thank goodness for an amazing wife. The car had rust in the floor and trunk, so Nov, 2014, I pulled the car in the shop for disassembly.
-
10-05-2015 #2
Registered User
- Join Date
- Feb 2015
- Location
- Montana
- Posts
- 183
I decided to replace my 80 floor with a 70-73 floor. Was surprised to find that they do not make a full floor for the later 2nd gens. I was originally going to do everything myself, but decided for the sake of time, to have a restoration shop replace the floor and trunk. I really regret this, but oh well. Here is the before and after pics. Check out the beautiful fiberglass work from the previous owner. I still need to do some modifications and the roll cage before the seam seal and paint.
10-05-2015 #3
Registered User
- Join Date
- Feb 2015
- Location
- Montana
- Posts
- 183
Next on the list was the suspension.
After hours and hours and hours of internet research and reading this forum, I decided to go with Custom Works 2G suspension kit. Along with their subframe connectors, solid body bushings, and 2G bar. I also upgraded to front viking dual adjustable coilovers, and viking dual adjustable rear shocks. I really appreciated Keith in helping me pick out my suspension. So far, I have my rear leafs mocked up on my rear differential and I'm currently working on the front subframe. Hopefully, I'll finish welding in the upper coil over brackets and 2G bar this week. Then prep and get some primer and paint on the subframe. Here's some pics of my #1 Ace mechanic, rear leafs on the diff (only pic I have is in the background behind my new welder), and how the upper coil over brackets look (I don't claim to be a good welder). I was impressed by how well the coil over brackets fit, and how easy the mod is.
10-05-2015 #4
Registered User
- Join Date
- Feb 2015
- Location
- Montana
- Posts
- 183
For the rear differential, I decided to go with a Quick Performance fabricated ford 9", 3.89 ratio, Detroit trutrac, 31 spline QP axles, 1/2" arp studs, caltrac brackets and Kore3 C5 rear brakes. I'm really happy with how it turned out, can't wait to get it under the car. I'm equally curious/nervous on how the wheels are going to look, bought them new/used. I thought they would be good for mockup, but I ended up with smaller brakes because I got cheap. Oh well, at least I'll get it on the road a little faster.
10-05-2015 #5
Registered User
- Join Date
- Feb 2015
- Location
- Montana
- Posts
- 183
Aeromotive fuel pump installed. This system installed really nice in the stock tank IMO.
10-08-2015 #6
Registered User
- Join Date
- Aug 2006
- Location
- S.W. Florida
- Posts
- 122
Looking good so far
68 Camaro TT LSX 427 "Golem" / click the link
https://www.pro-touring.com/threads/...ighlight=golem
sponsored by
www.FactoryFinishPDR.com
10-08-2015 #7
Registered User
- Join Date
- Feb 2015
- Location
- Montana
- Posts
- 183
Thanks, I really appreciate that I can post my simple build amongst all the amazing projects on this forum.
10-09-2015 #8
Registered User
- Join Date
- Jun 2013
- Location
- San Diego
- Posts
- 275
Looks good.
What's the plan?Brian
1972 C10 - 454/TH400 - Short bed conversion - https://www.pro-touring.com/threads/...1972-C10-SoCal
1970 Nova - LS Swap - https://www.pro-touring.com/threads/...Cal?highlight=
10-09-2015 #9
Registered User
- Join Date
- Sep 2015
- Posts
- 181
Looks good!! Glad to see the QP 9" I also just ordered one for my Mustang, just waiting for it to arrive. Hows the quality look?
1966 Mustang Coupe
5.0 EFI- T5
10-09-2015 #10
Registered User
- Join Date
- Feb 2015
- Location
- Montana
- Posts
- 183
Thanks Originally Posted by bs46488

Short Term(12 months)
Finish suspension, brakes, paint/undercoating on everything except exterior(sleeper), 6 point roll cage, finish fuel system, run old 350/350 combo, old interior
Long Term
Stroked LS2
T56 magnum
Interior
Extended Long Term
Exterior body, never stop making it better
Had to check out your projects, and found one of your quotes that started "yes you can". This is exactly why I regret not doing my own floor and trunk replacement. Wouldn't of been perfect, but much more gratifying. My roll cage is the last thing I will hire out, safety is my first concern. Your 72 is a great project.Last edited by MTZ28; 12-26-2015 at 09:40 AM. Reason: Updated new tranny
10-09-2015 #11
Registered User
- Join Date
- Feb 2015
- Location
- Montana
- Posts
- 183
Appreciate it. Originally Posted by rhurley
I'm very happy with the quality, keeping in mind their price points. I feel like I received a lot of value for the money. I would definitely purchase another. I'll be really curious to hear how you like yours, not a lot of reviews out there.
10-11-2015 #12
Registered User
- Join Date
- Feb 2015
- Location
- Montana
- Posts
- 183
I was able to finish all my mods on the front subframe this weekend. Finished welding in the coil over brackets, I'm running steel bushings on the stock lower control arms. The aluminum coil overs are going to really pop against the satin black paint.
Welded the 2G bar on the front, I didn't get crazy with the welding on this one in case I need to remove it at a later date.
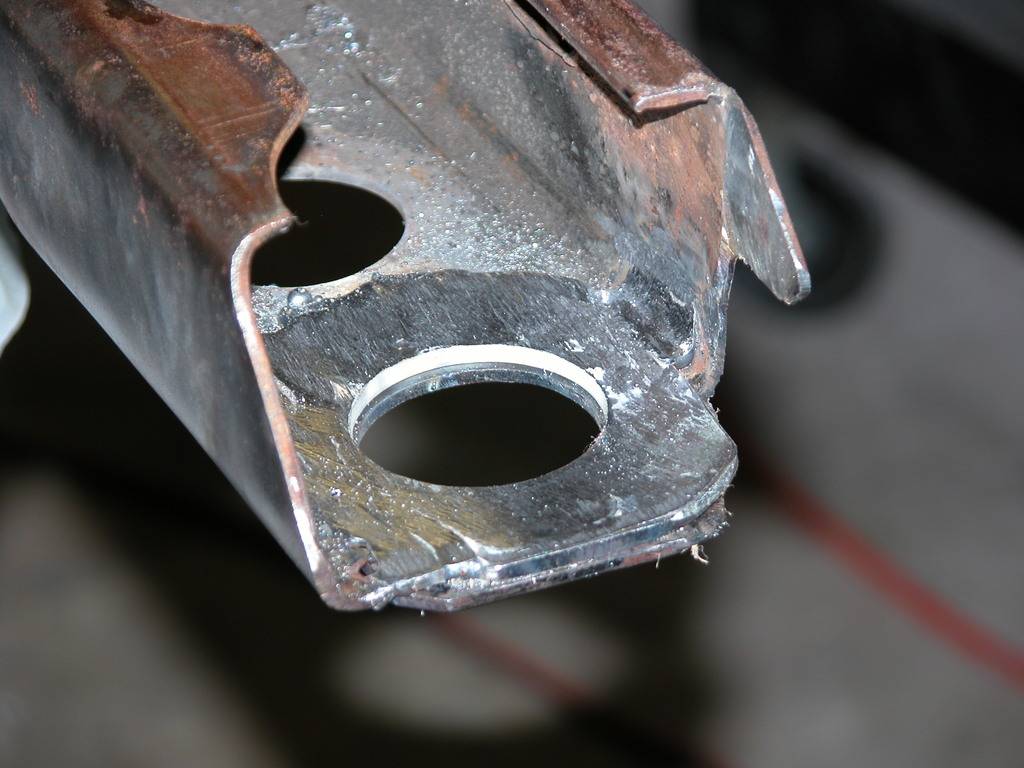
Since I have a 80 subframe with a 70-73 floor I had to move the the rear body mount farther back. I boxed in the frame where the old mount was accessed. Was going to try and add some more structure to the rear of the subframe, but decided that welding the subframe connectors to the frame would be sufficient. Do you guys for see any problems with this?
10-20-2015 #13
Registered User
- Join Date
- Feb 2015
- Location
- Montana
- Posts
- 183
Found some time to modify the front spindles for the Kore3 C6 brakes. I'm so impressed with the quality of Kore3 products, would highly recommend.
Here's a pic comparing the stock hub/rotor with the C5/C6 325mm rotors.
10-20-2015 #14 Registered User
- Join Date
- Nov 2006
- Location
- Ma.
- Posts
- 5,569
Nice progress. I agree about KORE3 products and Tobin is great sorce of information.
Wayne
Car FINALLY home !!!!!! lol
Project FNQUIK https://www.pro-touring.com/showthre...ghlight=FNQUIK
12-22-2015 #15
Registered User
- Join Date
- Feb 2015
- Location
- Montana
- Posts
- 183
Well, hunting season is over, time to get back at it. I decided to have the subframe blasted and powder coated. I think I'm going to do more powder coating wherever I can, which was not the original plan. I also picked up some lizard skin, 2 gal SC, 2 gal CL, and the applicator gun.
I am using spc uca's with tall ball joint and stock lowers, steel on steel lca bushings. Viking double adjustable coil overs, and hellwig sway bar. Now I need to get new grade 8 hardware and tighten everything down.
12-26-2015 #16
Registered User
- Join Date
- Apr 2010
- Posts
- 95
Very cool build. I lover the 80-81 Z-28s. Would you mind PMing me with the cost of powdercoating the subframe? I need to have mine SB and PC'd too.
Thanks,
JIm
12-26-2015 #17
Registered User
- Join Date
- Feb 2015
- Location
- Montana
- Posts
- 183
Thanks Jim, pm sent.
12-30-2015 #18 Registered User
- Join Date
- Apr 2005
- Location
- Chicago
- Posts
- 2,788
Great update and I am really liking the front suspension set up.
marty-mj
GarageScene.net High Speed Welding KDHotrods RecoveryRoomInteriors WegnerAutomotive Autometer Ride-Tech
12-30-2015 #19 Registered User
- Join Date
- Mar 2007
- Location
- Florida
- Posts
- 2,391
Coming along nicely!
I used a 81 subframe in a 70 body so I've been through moving the body mount holes in a late style frame. Using a late frame with the early rear body mount position you'll notice the way the frame metal is overlapped and welded inside the frame where the new mount hole is will cause a solid body mount to be tipped inside the frame. You may want to make a spacer shaped to fit so the body mount bushing sits flat inside the frame. Depending on the frame connectors you have you'll probably also need to trim the indentation at the rear of the frame rail on one side to slide the early style frame connector into the rail. Hopefully you have frame connectors made for the early style body mount.
In the pic below you can see the spacer I put in mine and how the rail's been trimmed to slide in the connector. I fully boxed mine afterward and trimmed the bushing between the body and frame to compensate but that might be overkill. Details of all the frame mods (done so far)are in my build thread.
12-30-2015 #20
Registered User
- Join Date
- Feb 2015
- Location
- Montana
- Posts
- 183
Thank you! Nothing fancy...but I like it. Originally Posted by syborg tt

 Reply With Quote


