


Results 21 to 40 of 208
Thread: My 66 Chevelle P/T build
-
10-06-2014 #21

 Registered User
- Join Date
- Jan 2014
- Location
- Seattle WA
- Posts
- 288

Absolutely beautiful! Cant wait to see how you progress!
1967 El Camino 408ci LSx....and the build begins!
1967 Turbocharged 408ci LSx Chevelle - 1012 rwhp, 959 rwtq 67 Chevelle
2009 Supercharged Silverado - On the Dyno
-
10-07-2014 #22
Registered User
- Join Date
- Sep 2014
- Location
- Rochester, IL
- Posts
- 143
I'm not at this point yet but I'm trying to look ahead and be prepared. My plan is to completely re wire the entire car. With all of the changes I will be making, including LS3, vintage air, VHX Gauges, efi tank etc... Who would you guys recommend to build my new harnesses?
I have looked at the American Auto Wire's Classic update kit. It seems like they send you pretty much everything I would need but it's definitely not a plug and play system. I fully understand I will have to terminate a lot of my own connections. Who else makes a quality, user friendly kit for my application?
Thanks,
Mike
10-08-2014 #23
Registered User
- Join Date
- Dec 2011
- Location
- Bolingbrook, IL
- Posts
- 27
Mike,
The shot of the car with the front end off looks familiar (your previous 66)
dejavu all over again .
.
Anyway, great to see the family helping on the car. The satisfaction your son and fiance will have when the car is back on the road will be priceless.
Wiring, I would check out Ron Francis wiring for the harness. They sponsor here and the Pro-Touring podcast and I'm sure there are a lot of guys here that can attest to their quality.
Keep up the good work!"Smoke'm if you got'm"
10-10-2014 #24
Registered User
- Join Date
- Sep 2014
- Location
- Rochester, IL
- Posts
- 143
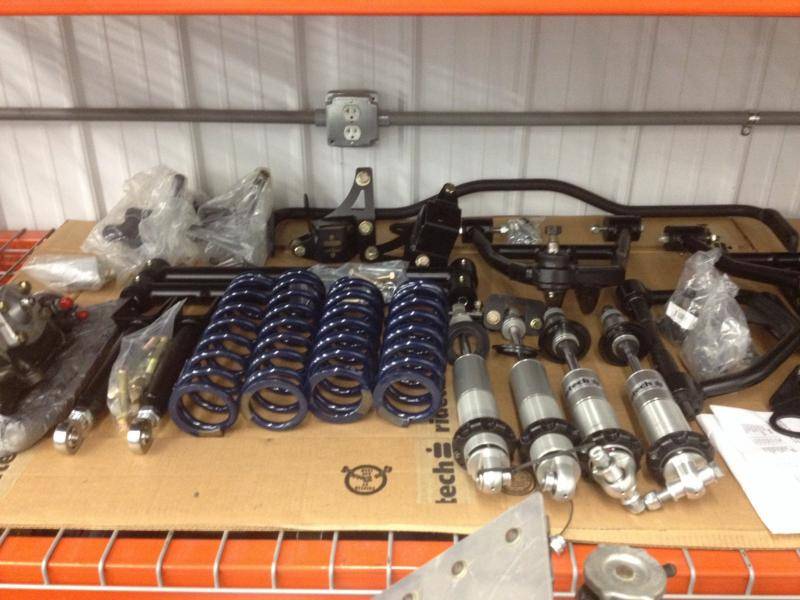
Lots of pretty cool parts are starting to come in. Today, I drove a few hours over to Moorseville, Indiana to the Farrington compound to pick up my new ridetech pieces. I got to meet Sam and the guard dogs and drool over the size of their new shop. It was a good day. I'm hoping to take advantage of this 3 day weekend and log some hours in the shop.
11-04-2014 #25
Registered User
- Join Date
- Sep 2014
- Location
- Rochester, IL
- Posts
- 143
I'm not sure if anyone is following this or cares but I have a few updates.
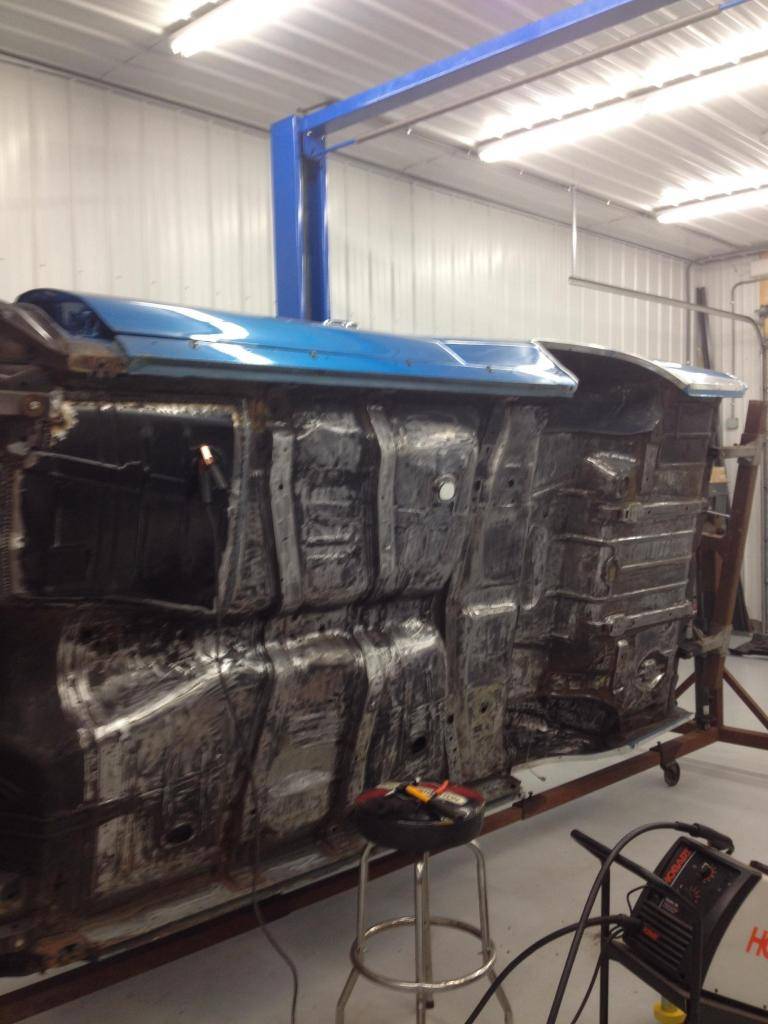
The undercoating took a hell of a lot longer than it should have. Whoever did the undercoating went way overboard. After that I spent the better part of 30 hours with a heat gun, scraper and solvent cleaning the interior floorboards. Somebody thought completely covering the floors in tar paper was a good idea. It was a pain to get off. The residue left behind was harder to remove then the paper itself.
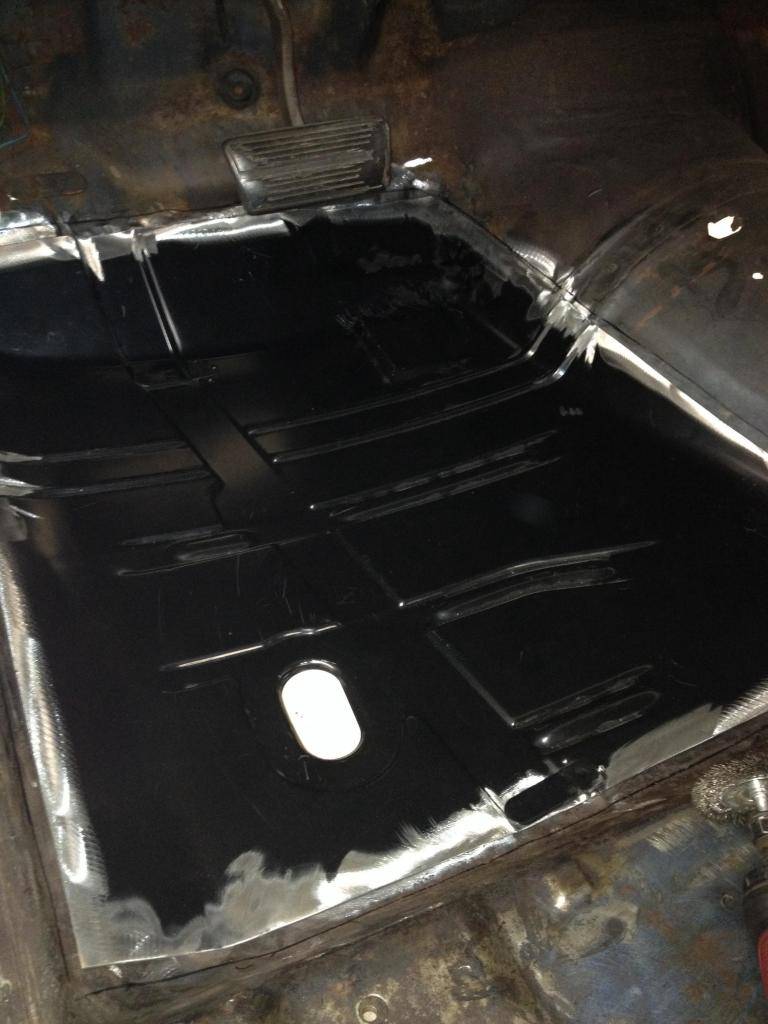
Under all of that tar paper, I found both toe boards had small rust spots and pin holes. I started on the driver's side toe board this weekend and should finish it this week. I also will need to replace the center trunk pan. It could probably be saved but would take as much time as replacing the entire center.
Good news is I have gathered nearly everything I need for the chassis. More pictures coming soon.
Mike
11-04-2014 #26
Registered User
- Join Date
- Sep 2014
- Location
- Rochester, IL
- Posts
- 143
After finding some pitting and pin holes I decided to replace the drivers front pan. I still have some fitting to do but it was a productive night.
11-08-2014 #27
Registered User
- Join Date
- Sep 2014
- Location
- Rochester, IL
- Posts
- 143
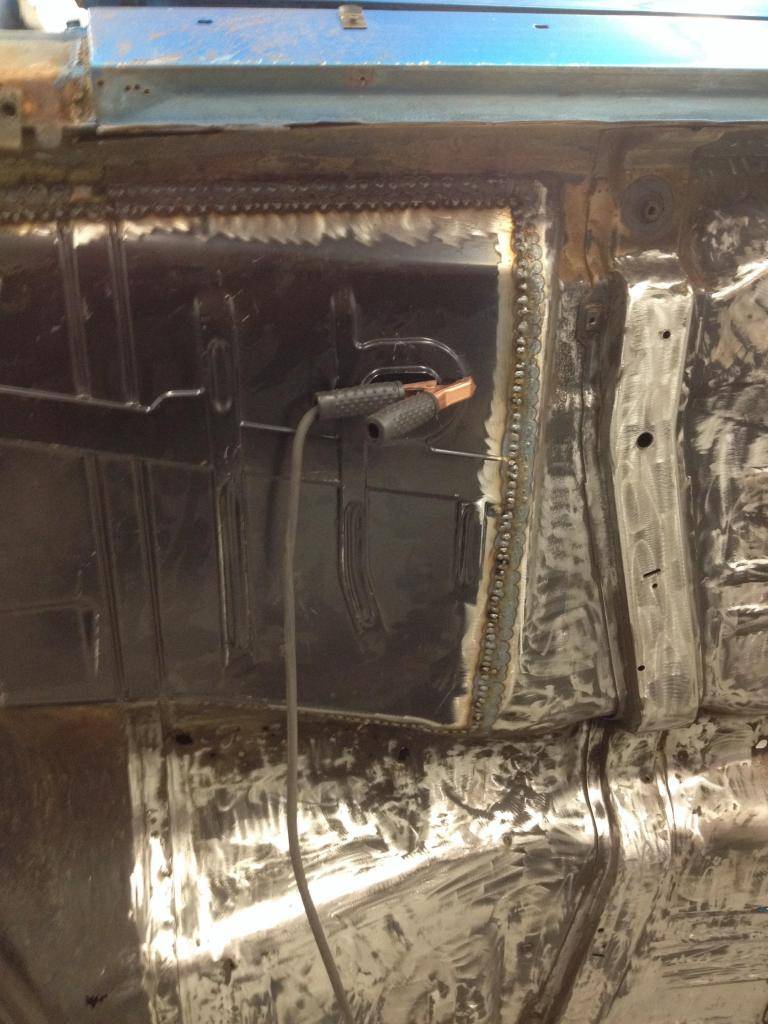
I finished the driver's side floor pan yesterday, I still need to dress up the welds. I'm headed out today to start on the passenger toe board. Keep in mind that I'm not a metal finishing guy, so be nice
11-08-2014 #28 Registered User
- Join Date
- Oct 2014
- Posts
- 16

Nice start to great pt Chevelle , nice place to work on your project ( lots of space ) subscribed ! Thanks for sharing !
11-09-2014 #29
Registered User
- Join Date
- Nov 2012
- Posts
- 346
I gather you didn't have any problems with tearing up your radiant heat?
What were the factors that lead you to choose Ride Tech over the others?_______________
1969 Camaro
1966 Skylark
1964 Lemans
1960 Biscayne
Steve
11-09-2014 #30 Registered User
- Join Date
- May 2013
- Location
- Texas
- Posts
- 297
Interested in this as well... Have a Chevy project in the near future and believe Ride Tech might be my choice as well but interested to hear other's path to that decision. Originally Posted by Zoomin

11-09-2014 #31
Registered User
- Join Date
- Sep 2014
- Location
- Rochester, IL
- Posts
- 143
Originally Posted by Zoomin
Steve,
The lift install went very good, didn't hit any lines. I was pretty confident since I took a lot of measurements and made a diagram prior to pouring the floor but it was still stressful!!
I spent a lot of time on the phone with both Ride Tech and Detroit Speed. Both were extremely helpful and had great customer service. It was a toss up between the two but Ride Tech is fairly local to me and was $1000 cheaper. Don't get me wrong, I don't mind spending $$ on quality parts but I have confidence in Ride Tech's parts quality and I'm kind of a tight ass. I also have several buddies who use Ride Tech and are very happy and I will be able to pick their brains a little on set ups. Both companies participate in all of the USCA events and by all accounts have great customer service. A member here is a dealer and I bought my whole package from him. I hope this helps.
Mike
11-09-2014 #32 Registered User
- Join Date
- Aug 2009
- Location
- Chandler, Az (from west NE)
- Posts
- 240
Welcome to the forum and congrats on you project. Looks like you have a good plan to follow. The floorpan project seems to be coming along nicely. The rotisserie must really help; I had to do mine on my back with the body on a cart about 28" off the floor using a creeper. I was able to get most of the undercoating(OEM ONLY) off with a wire wheel in an angle grinder. Boy was that a mess, especially since I started with a body that had been left outside for over 10 years and inhabited by who knows what, but did it ever stink.
Do you have plans to reinforce the frame, or add a rollbar/cage? What about motor mounts? I have been looking at the Dirty Dingo mounts made here in the Phoenix area. A friend installed a Camaro LS1 into his '70 Chevelle using the stock pan and these mounts adapters. Close yes, but it still worked. I've also seen a lot of noise about the pan baffle kits for autoX and track use, but have never seen any reports on them. I've got an Accusump already that I will put to use. I really appreciate the updates as they help keep me motivated as I transition my '66 from a dragrace only car to a street/track toy. Sorry for all the questions, but as I said, you seem to have all your ducks in a row. Thanks for sharing!Ric
2002 s10, DD and AutoX.
1966 Malibu owned since 1971. Drag car converting to track toy!
11-09-2014 #33
Registered User
- Join Date
- Sep 2014
- Location
- Rochester, IL
- Posts
- 143
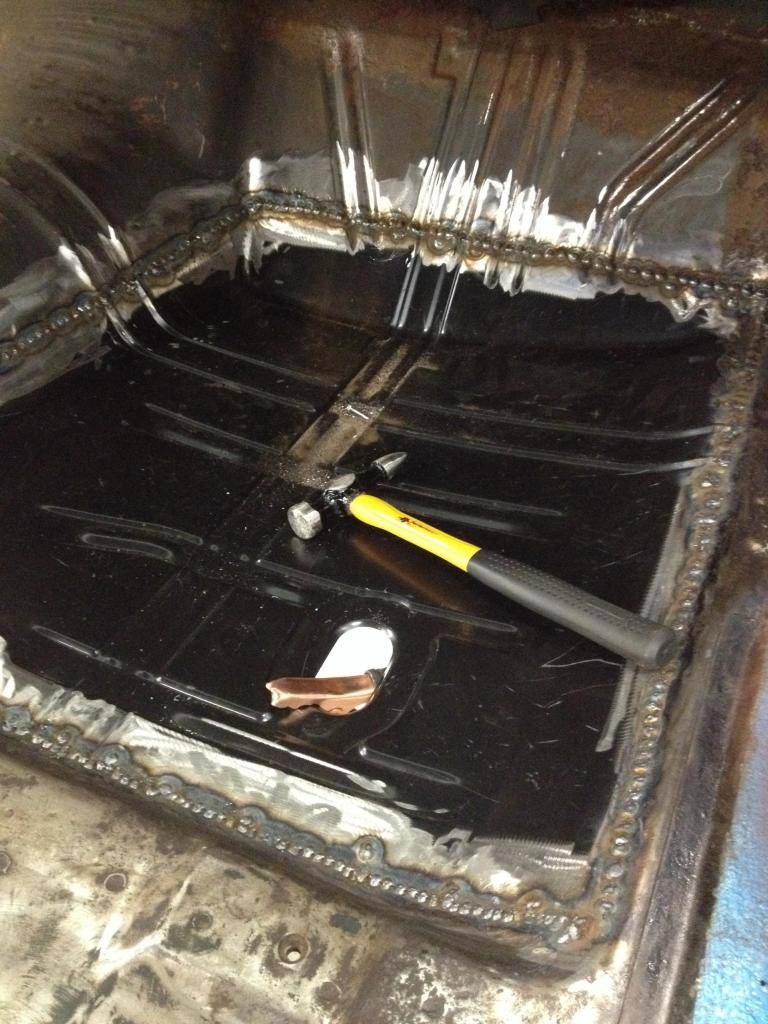
After much debate, I decided to replace the entire front passenger pan instead of just the lower toe board. I was able to finish it today. I have two more areas that need addressed. The center trunk pan has a little rust and the area where the two inner/rear seat belts anchor, are a little weak. I got lucky in the fact that the floors, braces, rockers and wheel houses are perfect.
Maybe I will get a little better at my sheet metal work by the time I'm done.
11-09-2014 #34
Registered User
- Join Date
- Sep 2014
- Location
- Rochester, IL
- Posts
- 143
Ric, Originally Posted by rixtrix1
I plan to box the frame and also notch the frame rails to accommodate a 335/18 rear tire. I'm going to use ABC performance's laser cut plates for this and will do the work myself. I really like the look of the tiger cage (Ride Tech) but it's pretty pricey at around 2 grand. I come from a drag racing background and have a quite a few friends in the chassis business so I'm hoping to call in a few favors to get the cage done when/if that time comes.
As far as motor mounts I'm not sure yet, this will be my first LS build so I'm learning as I go. From what I have gathered the dirty dingo mounts/ energy suspension mounts and a 2 gen Holley pan is a safe combination. Tie rod clearance and header clearance seems to be the main issues. I'm going to bug as many 66 chevelle guys as I can so I only have to buy parts once
Mike
11-10-2014 #35
Registered User
- Join Date
- Sep 2014
- Location
- Rochester, IL
- Posts
- 143
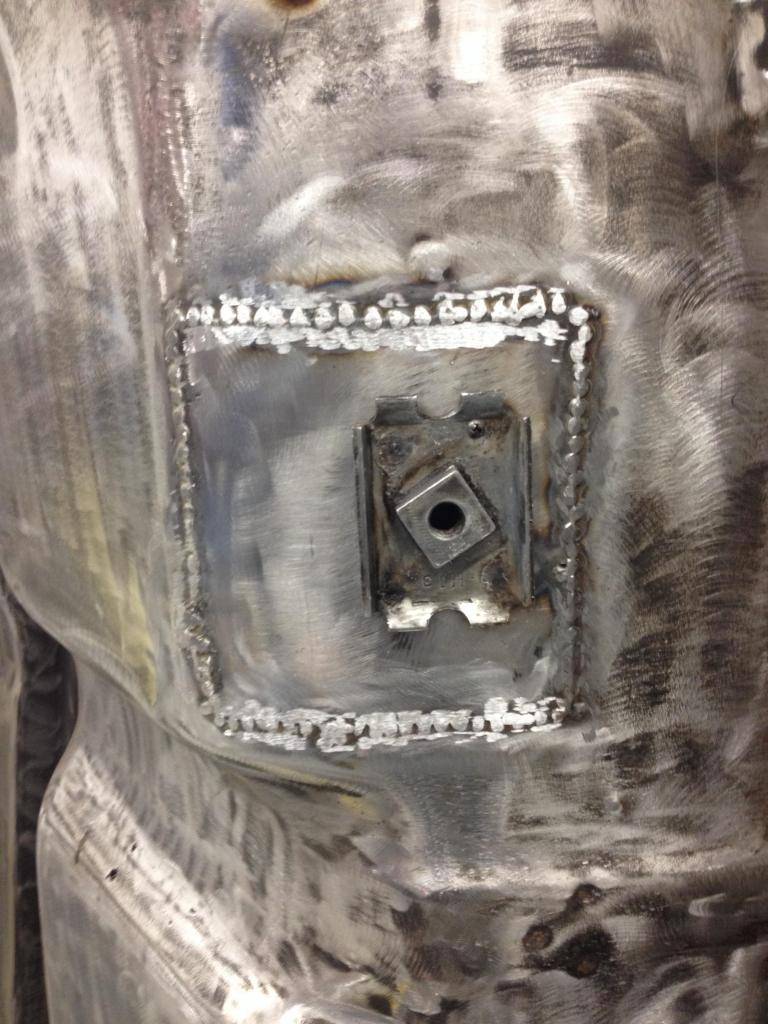
Tonight I tackled the rear seat belt anchor. It had some rust and was pretty thin around the anchor. I made a new piece out of scrap from the new front pan, plug welded the anchor to the new piece and continued my sheet metal learning curve.
11-16-2014 #36
Registered User
- Join Date
- Sep 2014
- Location
- Rochester, IL
- Posts
- 143
Thank you!! Originally Posted by Bonehead
11-16-2014 #37
Registered User
- Join Date
- Aug 2009
- Location
- Chandler, Az (from west NE)
- Posts
- 240
I had rust in the driver's floorpan and passenger rear footwell that I replaced with pieces from my original body as I changed from a 4 to a 2 door body before backhalfing and tubbing the car for drag only. I also used the trunk pan from the 4dr, and the tubs and coilover boxes took care of the rust in that. This was done 20 years ago, so this is really a brand new project again for me. I still have all the parts I have ever had on the car for the last 43 years with the exception of the other 6 engines that have been it. Current 331 has the original shortblock with new pistons. I may go with that originally as I want to finish the body, suspension and drivetrain first before spending more on another engine.
Your sheetmetal skills look fine to me. My car will not be as " nice" as many of the cars here, including yours, but that has never been my intention( or within my budget). I got it to use in my motorsports and driving adventures and I enjoy it immensely anyway.
Top pic is current and bottom is a scan of an old pic from 1995.Ric
2002 s10, DD and AutoX.
1966 Malibu owned since 1971. Drag car converting to track toy!
11-16-2014 #38 Registered User
- Join Date
- Sep 2013
- Posts
- 289
Mike...........Beautiful Job...........You will love it when finished......
Ken
11-16-2014 #39
Registered User
- Join Date
- Jul 2014
- Location
- Brisbane, Australia
- Posts
- 48

Looking good, those welds look like they'll clean up fine, stop being so critical of your own work mate.
Great project btw, looking forward to more updates on this
11-17-2014 #40
Registered User
- Join Date
- Oct 2014
- Posts
- 16
Keep going ! It's all good when u can work on your dream car ! Workmanship is top notch ! Best of luck with all modifications and repairs !

 Reply With Quote





