Enter your username:
Do you want to login or register?
  • Forgot your password?

    Login / Register


    Page 1 of 7 1 2 3 4 5 6 ... LastLast
    Results 1 to 20 of 129
    1. #1
      Join Date
      Nov 2012
      Location
      Birmingham, Alabama
      Posts
      146
      Country Flag: United States

      63 Split Window Corvette with SRIII Chassis

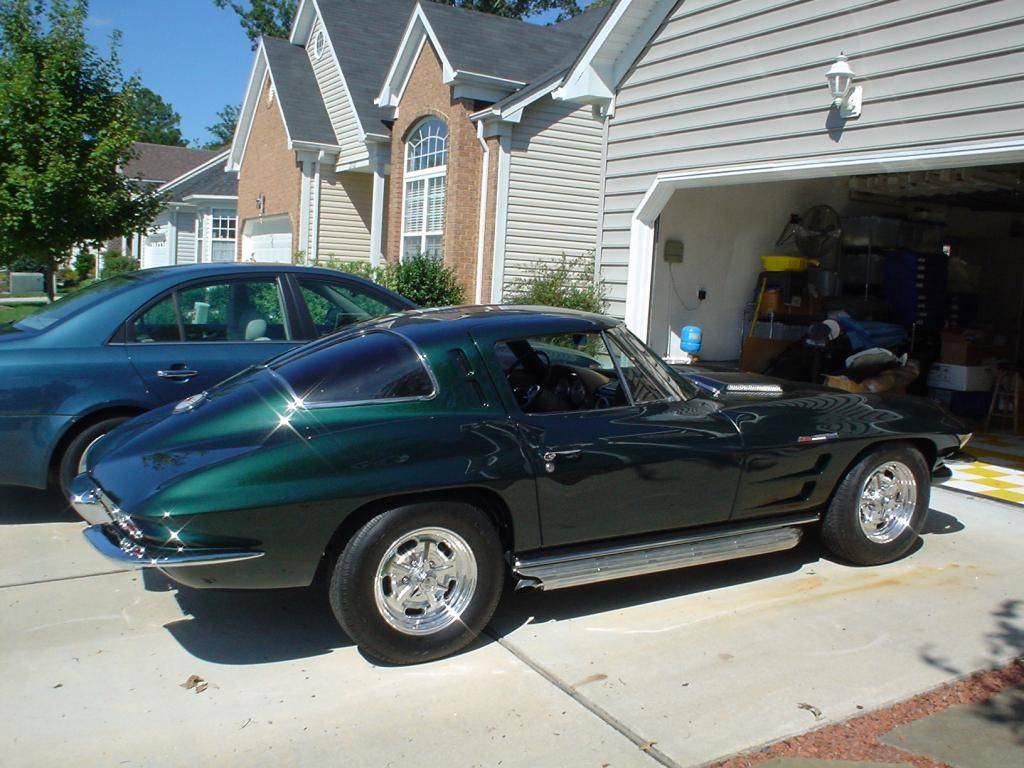
      Here is my current Corvette build. I'm hoping to have it on the road by December, which unfortunately means the Mustang will be put on the back burner again, but it must be done.

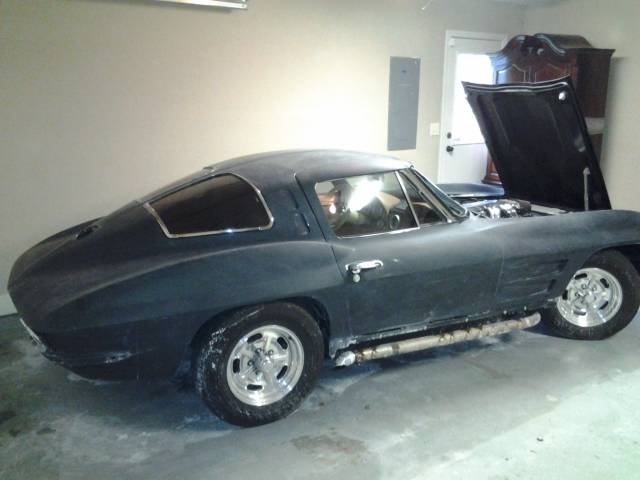
      I purchased this car this past January and started disassembling it on May 29th. The previous owner did a nice job building the car and it handled well for a stock frame with upgraded suspension, but when he was building the car the aftermarket frames and ls motors were not available.


      The body was previously stripped to bare glass and prepped correctly, so the current paint is in great shape, but the doors need to be fit better. The color is going to be changed to a charcoal gray.
      The SRIII chassis is supposed to be finished in mid September and I am still waiting on the 63 hood as well, both of which were supposed to be completed by early August, but what do you do.


      I will have the original upgraded 63 chassis with borgesson power steering unit, hydratech brake booster, 350 roller cam motor with TPI fuel injection, Be Cool BB radiator, th350 Auto trans, autometer gauges, upgraded radio, and all wiring for sale as a package next week.


      When purchased...super nice car to start the project with.


      May 29th: Disassembly/wet sanding with 600


    2. #2
      Join Date
      Nov 2012
      Location
      Birmingham, Alabama
      Posts
      146
      Country Flag: United States
      32 Man hours total

      Body is completely naked of all exterior parts and glass(minus tail lamps), the paint has been wet sanded with 600 grit, all interior molding has been removed, rear carpet is out, and the door alignment has been adjusted as best as possible.


      Door alignment-a few shims moved around and a bit of tweaking on the latch aligned everything perfectly.


      I will be posting the original dated rear glass, vent window glass, and door glass in the for sale section soon. I ordered new smoked tinted glass since the rear glass had a few scratches.

    3. #3
      Join Date
      Nov 2012
      Location
      Birmingham, Alabama
      Posts
      146
      Country Flag: United States
      44 man hours
      Anyway, the car is ready to have the body pulled now. All plumbing is loose, radiator out, computer removed, wiring disconnected, etc. Also managed to remove entire dash and prep for new paint and pads.

      This was back in early June.

      Here was my copilot the other day. We took the risk of getting a ticket and drove 5 miles from my home to my garage where the remainder of the work will be performed. My lab thought riding in the car sans glass was awesome! I don't think I have ever seen her so happy. The looks we got from other drivers were priceless.


    4. #4
      Join Date
      Nov 2012
      Location
      Birmingham, Alabama
      Posts
      146
      Country Flag: United States
      Also in early June

      50 hours deep

      I was watching overhaulin' the other night and saw how they were using tape to create a form for fiberglass, so i tried it on the firewall where the heater box hole will no longer be necessary thanks to the newer vintage air unit. It worked well, but i ended up needing to still put a layer of glass on the backside for support. I've been working on these cars for over 20 years, but i am still learning about body work and paint, so maybe some of this will help others.

      Clean slate


      My opponent


      Template for fiberglass mat made out of tape, which i then transferred to cardboard.


      Glassed in and firewall sanded around area to be filled. Eventually it will all be stripped to bare glass. I will be painting the entire engine compartment to give it a finished look. I wasn't thrilled with the black rattle can finish of the last restomod.


      First skim coat of evercoat filler.


      6/13/13

      54 Hours Total

      New dolley came in yesterday. I assembled it this evening and mounted it under the car. No big updates for now. I've been busy hustling to get another car ready for paint, so i havent had time to work on the 63 this week.


    5. #5
      Join Date
      Nov 2012
      Location
      Birmingham, Alabama
      Posts
      146
      Country Flag: United States
      7/17/13 Took a day to work on the dash since the pads arrived.
      57 hours

      Im starting to work on some of the interior items in anticipation of the SRIII chassis and 63 hood arriving soon.

      I wet sanded the dash, primed it in areas where i had rubbed through eliminating drips, and then repainted it with SEM hot rod black.

      Wet Sanding


      New Black Leather Dash Pads with French stitching option


      Here (on the left, not the other gauges) you can see what the Autometer American Muscle gauges will look like with the original clock. I sold the cluster shown with the stock chassis. The new one will have the autometer gauges recessed behind the original cast in bezels.


    6. #6
      Join Date
      Nov 2012
      Location
      Birmingham, Alabama
      Posts
      146
      Country Flag: United States
      8/21/13 I just started working on the car full time this week. Hopefully I will have some nice updates soon.

      64 hours

      I've removed a large majority of the old paint from the firewall and fender skirts, but still a lot to go before epoxy primer. I am also in the process of fitting the new components on the firewall and in the engine bay to insure everything fits correctly. Hopefully that will help the assembly process after paint go smoothly.


      Making sure everything lines up with the new vintage air system. Still a good bit of body work to do on the firewall where i deleted the heater box cut out.


      New wiper motor from Detroit Speed.


      Seats recovered in new black leather.


    7. #7
      Join Date
      Aug 2004
      Location
      St. Louis
      Posts
      191
      Great looking car, thanks for posting the progress.

    8. #8
      Join Date
      Oct 2012
      Posts
      434
      Country Flag: United States
      Nice to see you on here, I've been watching this car on SPI's forums as well!

    9. #9
      Join Date
      Nov 2006
      Location
      Ma.
      Posts
      5,569
      Country Flag: United States
      Beautiful build!
      Wayne
      Car FINALLY home !!!!!! lol
      Project FNQUIK https://www.pro-touring.com/showthre...ghlight=FNQUIK

    10. #10
      Join Date
      Nov 2012
      Location
      Birmingham, Alabama
      Posts
      146
      Country Flag: United States
      Fresh back from the powder-coaters. I went with the satin finish. From my experience with other chassis', I've found that the gloss finish scratches too easily, even when simply wiping it off with a towel.

      I know some people prefer a more "stock" looking frame, even though the rectangular frames with upgraded suspension look nothing like the original units, but in my opinion, the tubular frame is so much more appealing and down right sexy.


    11. #11
      Join Date
      Jul 2006
      Location
      Merritt Island,FL
      Posts
      1,182
      Country Flag: United States
      Nice project ! Chassis looks bad ass !
      Check out my web site.
      http://screaminperformance.net

    12. #12
      Join Date
      Jun 2008
      Location
      Las Vegas
      Posts
      91
      Country Flag: United States
      A 63 will be my next project.... Sweet ride.

    13. #13
      Join Date
      Aug 2013
      Location
      Riverside Ca.
      Posts
      14
      Country Flag: United States
      Awsome ride cant wait to see more

    14. #14
      Join Date
      Nov 2012
      Location
      Birmingham, Alabama
      Posts
      146
      Country Flag: United States
      70 hours

      I really did not want to get this far into bodywork, but the door gaps on this car were massive at the front and rear and I just couldn't leave them that way.

      Before


      After
      Still a lot of work to do on the jambs, but i should be able to work both doors and the new hood in by the end of the week.


      Firewall only needs one more round of light sanding. I must say, smoothing it out took a lot longer than i initially thought it would, but it will be worth it in the end.


      And after what seems like an eternity, all of 12 weeks, the hood finally was finished and arrived today. Bolting it on made me realize that the hood surround is wavy from previous bodywork, so that is next on the list.


    15. #15
      Join Date
      Feb 2013
      Location
      Santa Rosa Beach, FL
      Posts
      57
      Country Flag: United States
      That chasis is awesome!!

    16. #16
      Join Date
      Nov 2012
      Location
      Birmingham, Alabama
      Posts
      146
      Country Flag: United States
      The SRIII chassis is the only way to go for a restomod, unless you want to keep the rear floor intact to change back to the original chassis at a later point. Mike, the owner is a great engineer, very nice, knowledgeable, and helpful unlike the owner of Street shop chassis Inc.

      Finished narrowing the gap on the driver's side door and fitting the door to the roof, quarter, and fender. That only took 9 hours total. This is the first time i have narrowed the gaps on a Corvette body, so I'm pretty proud. The passenger side is not nearly as bad, so it shouldn't take quite as long.

      The door stuck out past the roof panel just in front of the indentations previously , but that problem is now resolved.


      The door had a dipped down at the rear corner and sat lower than the body. It wasn't terrible, but it needed to be addressed.


      Front of door Before


      Front of door After. I will need to remove the door to finish smoothing things out.


      Still a good bit of filling and smoothing to do on the passenger door, but the gap is already nice and tight after building up the jamb with evercoat vette panel filler.

    17. #17
      Join Date
      Nov 2012
      Location
      Birmingham, Alabama
      Posts
      146
      Country Flag: United States
      Double post

    18. #18
      Join Date
      Jul 2012
      Location
      Iowa
      Posts
      399
      Country Flag: United States
      Do you have any tips, pictures or pointers on how you got your gap so close. I look at the gaps in my car and dont think they are that bad and then I see a car like yours and Im total awe at how much better it looks and the skill it takes to do this, and I havnt any clue how this is done.
      Miles Boyer
      The car hobby is dangerous,if the speed doesn't kill you, the cost of parts will.
      91 V8 S10
      88 Cutlass Pro-Tour
      97 Chevy lifted Z-71
      96 Corvette

    19. #19
      Join Date
      Nov 2012
      Location
      Birmingham, Alabama
      Posts
      146
      Country Flag: United States
      I used Evercoat Vette Panel Adhesive/Filler to build up the jambs. Don't use normal body filler. It isnt strong enough. Basically, take a paddle with the filler on it and scrape it on the lip of the door opening as if you were trying to clean the paddle off. Work your way down the door opening to the bottom.(add filler to door jamb, not the door itself). I tape off the areas where i dont want filler and remove the tape before the filler can have a chance to dry. This stuff is like concrete after it cures, so make sure you sand it right after it sets up. I use 40 grit followed by 80 grit. It takes several applications and lots of hand sanding to get everything just right. I folded a piece of 40 grit in half and let the paper do the work to adjust the gaps at the rear. I had to fold the paper 3 times for the front for clearance. Once i have the gap set, then i move into the rest of the door jamb and fill the rest of internal area in and smooth it out. Make sure you have your weatherstripping in place when you fit the doors. If not, then everything will be completely thrown off once you install it. This is a labor of love, so only do a little bit at a time to prevent getting overwhelmed.

    20. #20
      Join Date
      Nov 2012
      Location
      Birmingham, Alabama
      Posts
      146
      Country Flag: United States
      119 hours Oh yes, i am starting to have a whole new appreciation for people that do body work day in and day out. Miserable!!! I have a vicious case of tennis elbow from fitting the hood! A lot more sanding ahead and then i need to finish fitting the passenger door. After that, the car will sit inside for 3 days to let the fillers completely cure under normal heat conditions. Then it will be time for it to go out in the sun for 3 days before the car is sprayed with Epoxy primer.

      IF you purchase a new hood, order it in two pieces and bond it together yourself with 3m panel bond.

      This was the worst fitting spot on the hood. This was not a low quality hood either, it is from sermersheim.

      Before


      After


      Before-Zero space on passenger side


      After


      Front Before-No space and sat way too low at front edges.


      After


      Driver's side before-too wide


      Driver's side after


      Had an issue with the headlamp bucket...the casing was too narrow and the bezel was to wide. So, i has to shave the edge of the bezel and build up the casing. Once i had it properly aligned, i had to build up the inboard corner and the front of the casing at the lower nose portion of the surround.

      Before


      After


      Both Required attention, but the driver's side was not nearly as bad.


      Front of driver's door is finally finished


      And a few more of the front end and hood fitment.


    Page 1 of 7 1 2 3 4 5 6 ... LastLast


    Advertise on Pro-Touring.com