Results 1 to 20 of 21
-
10-21-2013 #1
 Registered User
- Join Date
- Aug 2010
- Posts
- 451
Ride Tech 4-link install in 69 camaro/firebird
I removed the rear suspension and axle from my 69 firebird project and am getting ready to install the 4-link upper cradle. I was under the impression that there were index holes already in the frame rails that helped get the cradle in located in the right spot prior to welding/bolting it to the car. My frame rails have zero holes. It also seems that the cradle is going to have interference with the trunk pan-floor pan in a few spots...is this normal? With no index holes, how do I know I have the cradle in the right spot to hang the rear suspension? Thanks.
Joe
1969 Firebird Project
1967 Frirebird 400 convertible
2013 Boss 302
-
10-21-2013 #2 Registered User
- Join Date
- Mar 2012
- Location
- Orange County, California
- Posts
- 71
 I just went through this same issue a couple weeks ago. I don't think the 69 has the index holes as mine did not either. It also touched in several spots along the underside. I did note signs of a prior collision so I thought it was because of that. However, the car was built in the 60's so there could be some production issues as well. With all that said I "massaged" the areas and kept going until the cradle fit in with little to no interference. The screw in design I had an issue with and ended up "stripping" the holes the self tapping screws made with very little effort. I am going to weld mine in just for peace of mind. It was also useful for me to use a laser and measure everything out so that you are centered before drilling or welding. Also I found the jig to set the upper tabs on the rear end a little too flexible. I fould this out the hard way but luckily was able to correct it. I would use the upper links with the spacers snugged down to tack the upper brackets. Good luck. I hope this helps.
 Originally Posted by jlwdvm

10-23-2013 #3
Registered User
- Join Date
- Aug 2010
- Posts
- 451
I had to massage a few areas...mainly the floor pan where the front bar was touching and a few ribbed areas of the trunk pan. I set the cradle in place and put a bottle jack on each side near the frame rail and one on the front bar to push it up snug. There is a gap between the bottom of the frame rail and the bottom of the cradle mount on each side where the cradle mount wraps around the frame rail. It looks like if I want one of the frame rail mounts flush with the bottom of the frame rail the other will move further away, and vis versa. Is this due to manufacturing differences between frame rails from car to car, or am I not doing something right? How do I know the cradle is where it needs to be before I start welding? Thanks.
Joe
1969 Firebird Project
1967 Frirebird 400 convertible
2013 Boss 302
10-23-2013 #4
 Registered User
- Join Date
- Nov 2006
- Location
- Hildebran, NC
- Posts
- 998
Most certainly not to be an a$$, but do you have the ridetech instructions?
i know sometimes you end up with parts and no instructions.
I was thinking about running an air bar, and was curious as to how it mounted to the frame.
It said the crade was indexed off of the axle bumpstop mount on the bottom of the frame rail. Does your car use the bumpstop like this?
It also said that if the bumpstop mounts were outside the frame, push the cradle towards the front of the car until it contacts the floorpan.
Here is the link to the instructions.
http://www.ridetech.com/instructions...r/11167199.pdf
Good Luck.
10-23-2013 #5
Registered User
- Join Date
- Aug 2010
- Posts
- 451
Yes, the instructions were read several times before I started. My car still has the pinion snubber in the center and also had bump stops bolted to the outside of the frame rails. The car is mini tubbed, so some metal will need to be trimmed from the cradle since the frame rails are narrower than stock. To me, it looks like the angle of the cradle sides doesn't exactly follow the angle/bend in the frame rails. I don't have any interference with the floor pan after my hammer sessions the past 2 nights! I am working with the stock frame rails that don't have any sings of previous damage. I just feel that there should be an exact place this cradle should be mounted since the upper control arms, coil overs, and sway bar mount to it...something more exact then indexing it off a bump stop.
Joe
1969 Firebird Project
1967 Frirebird 400 convertible
2013 Boss 302
10-23-2013 #6
Registered User
- Join Date
- Nov 2006
- Location
- Hildebran, NC
- Posts
- 998
I see, you dont have any reference holes at all with you factory bumpstop location....
There are several of those units on cars here.
Check this thread, Geoff just got his in and running. It is in a Camaro though.
https://www.pro-touring.com/threads/...-goes-RideTech
You may be able to PM him with dimentional questions. He is a good guy.
Good Luck.
10-23-2013 #7
Registered User
- Join Date
- Nov 2009
- Location
- Austin Texas
- Posts
- 641
I dont thing 69's had the bump stop mounts on the frame. Mine doesnt and my speedtech instructions state the 69 didnt have the bump stop mounts so they gave measurements to mount the cross member.
10-23-2013 #8
Registered User
- Join Date
- Aug 2010
- Posts
- 451
I have a 67 firebird and it's frame bump stops screw into the bottom of the frame rails over the axle tubes. On a 69 the bump stops are bolted to the outside of the frame rails. No measurements given with the Ride Tech 4-link instructions. It would be nice if someone from Ride Tech would chime in...I sent a pm/email to their rep that frequents this board and haven't heard back.
Joe
1969 Firebird Project
1967 Frirebird 400 convertible
2013 Boss 302
10-24-2013 #9
Registered User
- Join Date
- Aug 2010
- Posts
- 451
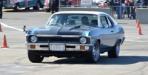
These might give an idea of what I am talking about. Sorry about the wide angle...had to us my Go Pro.
Joe
1969 Firebird Project
1967 Frirebird 400 convertible
2013 Boss 302
10-24-2013 #10
Registered User
- Join Date
- Aug 2003
- Location
- Byhalia, MS
- Posts
- 656
Didn't you say that the center pinion snubber mount is still in place? If so, then that is where your fitment issues are happening. I installed this same setup in my 67 Camaro. I followed the instructions to the 'T' and had no install problems.
10-24-2013 #11
Registered User
- Join Date
- Aug 2010
- Posts
- 451
I will double check, but I don't think I have interference at the pinion snubber. I was under the impression that the snubber had to be removed for maximum drop when using air ride instead of coil overs.
Joe
1969 Firebird Project
1967 Frirebird 400 convertible
2013 Boss 302
10-24-2013 #12
Registered User
- Join Date
- Oct 2005
- Posts
- 21
Jlwdvm,
The pinion snubber mount will have to be removed even when not running Shockwaves to allow full suspension travel. As far as mounting the cradle, the main thing is slide if forward as far as possible. Due to manufacturing tolerances back in the 60's(even newer), no two cars fit the same. Some fall right in, some have to be massaged. If you start bolting it up the gaps should lessen. I would get the upper bars placed before welding. You can weld it when your putting the final welds on the bars tabs. Remember to set your pinion angle before welding the upper bar tabs on. Generally the pinion is set 2 to 3 degrees parallel with the transmission.Rodney Mason
Ridetech/Air Ride Technologies
Product Development
10-24-2013 #13
Registered User
- Join Date
- Aug 2010
- Posts
- 451
On a 69 there aren't any bolt holes in the frame rails to index off of...how do we know the cradle is in the right place to start welding? I will get the pinion snubber off today. What if I don't have a motor-trans in the car yet? Can I still mock up the 4-link and get the correct pinion angle (or close enough so it could be adjusted slightly after the trans is installed)? Thanks!
Joe
1969 Firebird Project
1967 Frirebird 400 convertible
2013 Boss 302
10-24-2013 #14
Registered User
- Join Date
- Aug 2003
- Location
- Byhalia, MS
- Posts
- 656
You are over thinking this, really. It's important to follow the instructions very carefully on the install and not try to think outside of their original design. The reference points that are not on the 69 are not really needed. If you remove the pinion snubber 'mount', then you will have enough room to slide the cradle all the way forward and allow the cradle to fit where it was designed to fit.
You can weld the cradle in before having the driveline fully installed, but you are setting yourself up for error if you do. Also, you will not be able to find the proper pinion angle till the engine and trans are fully installed. You get your pinion angle based off your trans angle.
Once again, follow the instructions. This is all detailed out in the instructions.
10-24-2013 #15
Registered User
- Join Date
- Aug 2010
- Posts
- 451
I don't think you can "over think" installing suspension mounts since they will affect the overall performance of the suspension and the handling performance of the car. This thing is going to be welded in, so I would rather measure 2-300 times and weld once! Maybe that is my OCD coming out...you should have seen me installing the new roof! Not sure which way to go now since I haven't even ordered the drive line yet (thinking 525 horse LS3 from Scroggins and 5/6 speed with a Currie 9"). I'm almost certain I checked for clearance around the pinion snubber mount, but I'll recheck. Thanks for the input.
Joe
1969 Firebird Project
1967 Frirebird 400 convertible
2013 Boss 302
10-28-2013 #16
Registered User
- Join Date
- Aug 2010
- Posts
- 451
Even though the pinion snubber wasn't contacting anything I removed it by drilling out spot welds...the complete thing is gone. I checked all the cross bars for interference and had none. The only place I could see a possible problem was on the inside corner of each mounting bracket on the front cross bar where it bolts/welds to the floor pan. I pounded up these areas after marking the spots. Reinstalled the cradle and now it fits much better! I don't think this car had ever been hit judging from the condition of the original frame rails and floor pan, but I sure had to do a lot of pounding!
Joe
1969 Firebird Project
1967 Frirebird 400 convertible
2013 Boss 302
10-30-2013 #17 Registered User
- Join Date
- Aug 2012
- Location
- Southern Oregon
- Posts
- 183
"Even though the pinion snubber wasn't contacting anything I removed it by drilling out spot welds...the complete thing is gone."
That's the way we've done them here too. I think it is easier and cleaner than doing the cut & weld anyway. We've been happy with the installs on them & so have our customers. I'm sure you'll be happy with it to once you get it back on the road.
10-30-2013 #18
Registered User
- Join Date
- Aug 2003
- Location
- Byhalia, MS
- Posts
- 656
I was just looking at your last pic you posted of the cradle. I see a difference between your Airbar compared to mine. The forward lateral bar on your cradle has two tabs with three holes each. I assume ridetech has revised the product since I bought mine because mine doesn't have those tabs. I guess they were looking for another attachment point to further strengthen the setup. I'll have to call them to see if it would be worth it for me to modify mine to have those tabs.
Now, I'm wondering if those new tabs are creating your problem. Are they sitting against the body now, keeping the cradle from sitting flush against the full length of the frame rails? I'm thinking that may be where your problem lies.
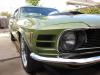
10-31-2013 #19 Starting The Transformation
- Join Date
- Jan 2010
- Location
- Long island NY
- Posts
- 320
I have a 70 mustang and the design on the cradle I have is old and was giving me issues so I contacted ride tech and the informed me that they would stand by it by giveing me the new tabs I needed so I could weld them on, or sell me a new cradle at a discounted price. I bought the new one.
70 Mustang fastback 428 sb
11-01-2013 #20
Registered User
- Join Date
- Aug 2010
- Posts
- 451
Mako...see post #16.
Joe
1969 Firebird Project
1967 Frirebird 400 convertible
2013 Boss 302

 Reply With Quote