

Results 1 to 20 of 121
Thread: 1970 Trans Am Project
-
08-12-2013 #1
 Registered User
- Join Date
- Apr 2012
- Posts
- 385

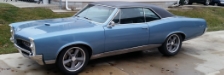
1970 Trans Am Project
Well after 2 years of looking I finally found a nice 1970 4 speed Trans Am. She had 80% of the original parts. The owner purchased the car in 1985 from his brother in law. He then purchased tons of OEM Pontiac Parts from the Pontiac dealer down the street. He purchased an extra set of decals, hoses, clamps, brackets, etc. before the dealer finally quit selling the parts. In 2000 he media blasted the car and painted it. He was able to put back on NOS Decals because he bought an original set back in 1987. Talk about planning ahead. Anyway, everything is numbers matching down to the rear end housing.
I am removing the original engine and trans in order to preserve them. The "pro touring" build has begun. The new TKO 600 arrived last week along with performance suspension parts and the freshly rebuilt 12 bolt rear end. I have spent the last 2 months cleaning the undercoating from the under side of the car and then repainting the original red oxide primer. Rear end went back in this weekend. About 8 months out on the completion but here are the pictures so far.
Feel free to ask questions about the build.
Performance Suspension, braces, bushings, shocks etc. were ordered from Dave over Pro Touring F Body.
American Power Train supplied the TKO 600 Kit.
Designing the Wildwood brake system now, decided on the D154 floating rears with 12.19 rotors, still up in the air on the front brakes. Year One 17x9 Rally II's for the wheels.
Nitto 555 285/40 out back and 255/45 up front.
As for the engine I am saving the original and building a High Revving (for a Pontiac) Road Race setup
from a 1970 400 Block. 550 ft. lbs./550hp.
Original Owner already did the paint and body work. Original Interior is in great shape.
Before Pics
Undercarriage, Rear End, Leaf Spring Restoration Pics
-
08-12-2013 #2
Registered User
- Join Date
- Nov 2012
- Location
- Sacramento, CA
- Posts
- 1,918
Very cool.
08-12-2013 #3 Registered User
- Join Date
- Mar 2007
- Location
- Florida
- Posts
- 2,391
Nice car to start with! You're gonna hear it from the purists, ahahaha. I got so much flak about "wrecking" a 70 TA (and it wasn't even a real one) I got NOT A TA on my license plate and have used it for my screen name on forums since they started.
With your intention to run on big tracks I'll suggest you consider safety items along with the performance mods. While the things I've done to my car might seem "over the top" if you're not actually racing door to door the car doesn't know you're "just" in HPDE or TT if you roll it, stuff it in a wall at 125-150 MPH, or crash & burn. Safety project thread here https://www.pro-touring.com/showthre...ems&highlight=
I'm looking forward to following your build! If I can be of any help send me a PM
08-12-2013 #4
Registered User
- Join Date
- Apr 2012
- Posts
- 385
Hey NOT A TA,
I made sure the build allows all the original parts to be re-installed in the 20 years . To keep the purists happy.
I am currently researching the difference between the 1970 Disc Brake Spindle and the change Pontiac made in the 1979 - 81 cars. I know the later model used a larger bearing so I want to swap my original spindles for the larger bearing spindle. Do you know if that is the only difference? Are the spindles identical other than bearing size?
-JW
08-12-2013 #5
Registered User
- Join Date
- Mar 2010
- Location
- Valencia, CA
- Posts
- 99
Nice work on the underside- gotta love how those leaky valve covers preserved your floor pans.
I see no problem with updating the suspension and drivetrain on a rare T/A, as long the powerplant stays pure Pontiac.
08-12-2013 #6
Registered User
- Join Date
- Mar 2007
- Location
- Florida
- Posts
- 2,391
They'll still be upset, ahahaha. Originally Posted by jtwoods4

I believe they are the same other than the bearing size but someone else may know for sure. The 78+ B body spindle is very similar also and I just learned from Leigh that the B body spindle has different brake mounts that would allow the 1 LE brake mounting.
08-12-2013 #7 Registered User
- Join Date
- Jun 2006
- Location
- Katy,TX
- Posts
- 1,678
Spindles are pretty close to the same other than the outer bearing that changed about '78. Some say 79 but my 78 shop manual says 78 changed over 77. Next time my 78 get's them pulled I'm going to check.
There is a conversion bearing A34 I believe but I don't rmember which way it goes early rotor on late spindle or opposite. Wilwood actually uses those so they used to have only one hub. Now they have a number of different front hubs with different changes in track width for different systems.
Rear end and under carriage look good. My 12 bolt girdle looked real close on the rear sway bar at full extension hitting the adjuster bolts so check that out. Probably never get that extended but on a drag car that lifts I swapped in the PTFB rear bar as hte side legs are longer to kick it out some.1978 Black Trans Am 455 Edelbrock heads [email protected] through mufflers on pump gas
1981 Trans Am 400 stock type motor
79 Camaro getting a 500" 695 hp IA2 Pontiac motor
1965 GTO project car
470ci/Chevy dual quad 409 604 HP 64 Impala SS project
2004 Pulse Red GTO
08-29-2013 #8
Registered User
- Join Date
- Apr 2012
- Posts
- 385
Update:
Here is the latest progress on the brake system. What a pain in the arse to install the D154 Brakes. They were the wrong offset for my car and the vendor would not take a return so I had to do some modifications to make it work.
I have talked to Wilwood several times over the last couple of weeks and they are consistently against a 4 piston non floating caliper on the rear of a c-clip trans am. so I went ahead and installed the D154.
Here is the video. The first part of the video explains the problem. The second half of the video shows the solution. By the way, thank you Not A T/A for your wheel and tire help!
08-29-2013 #9 Registered User
- Join Date
- Feb 2005
- Location
- Waterloo, Ia
- Posts
- 1,408
Nice! Engine specs?
Don't worry about the purists. **** em if they cant take a joke. I did the same to my 67' HO California GTO. Pulled the stock #s matching stuff, stuck it in the shed and now i'm going PT.-Nick
-1967 GTO I drive and race
-Build threads:
-http://forums.maxperformanceinc.com/forums/showthread.php?t=615847&page=23
-https://www.pro-touring.com/showthre...project-thread
08-30-2013 #10
Registered User
- Join Date
- Aug 2012
- Posts
- 68
Looks like you did a ton of work on that underside. I am about to tackle mine. I am not so sure a scrapper and degreaser will do the job, what did you use on yours?
08-30-2013 #11 Registered User
- Join Date
- Dec 2004
- Location
- Tulsa, OK
- Posts
- 112
I don't know about him, but I used oven cleaner. It provides heat when applied and softens everything up and allows you to scrape it off. Originally Posted by Dantigan
1980 Z/28 383, Vortec heads, 2004R 342.1 powertrac
1971 Firebird on rotisserie
2006 Dodge Daytona Charger
"Torred" # 1988 of 2000
2013 Hot Wheels Edition 2 SS Camaro
"I'm Not a Gynecologist, but I'll Take a Look"
08-30-2013 #12
Registered User
- Join Date
- Apr 2012
- Posts
- 385
Get some small flat bladed paint scrapers and "Gunk" brand heavy duty engine degreaser, the Gel spray can. For the red oxide paint use "Zero Rust" brand red oxide spray can. 4 cans should give a couple of nice coats. Originally Posted by Dantigan
Let the degreaser soak in all day or overnight. May require a couple of applications before the undercoating softens up enough to easily scrape off with the paint scrappers.
08-30-2013 #13
Registered User
- Join Date
- Apr 2012
- Posts
- 385
More Updates:
Viking Shock Install and More D154 Details
Viking Shocks - 1970 Trans Am - YouTube
Gas Tank Back from Radiator Shop
Gas Tank - 1970 Trans Am - YouTube
08-31-2013 #14
Registered User
- Join Date
- Apr 2012
- Posts
- 385
More Updates:
Rear End Suspension Complete. Gas Tank Installed.
Test fit some 17x9 Rally II's and 15 inch Rally II's at the end of the video just to see what the different wheels and tires looked like.
08-31-2013 #15 Registered User
- Join Date
- Oct 2004
- Location
- Illinois
- Posts
- 186
Coming together nicely! Sooo sweet to start with a super solid foundation like you did !! Keep it up...
A link to some pictures of my Firebirds and other toys
http://community.webshots.com/user/ponchoman69
09-25-2013 #16
Registered User
- Join Date
- Apr 2012
- Posts
- 385
sorry I haven't posted in a few days. took a little break while waiting on parts to come in. front disc brakes should arrive this Wednesday. install the subframe connectors last week here's a picture.
Subframe connector Video link
09-25-2013 #17
Registered User
- Join Date
- Apr 2012
- Posts
- 385
Well after several weeks of research and brake system design calculations I finally received my custom brake setup from Keith over at Custom Works Products. Great work Keith they look beautiful.
So here is the story. I want to run the Year One 17x9 inch Pontiac Rally II wheels on my 70 Trans Am. They are way less expensive than a custom made 18 inch Rally II ($200 vs. $600) and they just look great. I also wanted to run a Wilwood big brake setup to compliment the rear D154 Floating calipers and 12.19 inch rotors. I looked at the Wilwood Forged Narrow Superlite 6 piston kits and after taking several measurements of the inside of the year one wheel and looking at the diagrams on the wildwood site, it was determined that the FNSL 6 Piston setup would not fit in the 17x9 Year one wheel. I am only talking about a fraction of an inch causing clearance issues but the fact is that they will just not fit inside the wheel. Also, the Wilwood kit comes with a 12.88 inch diameter and .81 inch thick rotor without curved vanes. This is just not enough rotor for the demands of hard driving on road courses like Road Atlanta or Carolina Motorsports Park.
So after talking with several expert brake designers throughout the country, I finally decided on the Wilwood FSL4 Caliper, a Custom 13 inch diameter and 1.25 inch thick slotted, directional curved vain rotor, and modified 1979-81 Firebird Spindle with the larger outer bearing. The FSL4 is a lower profile caliper than the FNSL6 and successfully corrects the clearance issues on a Year One 17x9 Rally II. The clamping force on the 4 piston caliper is also actually more than the 6 piston wildwood calipers. I also selected the aluminum hats in order to dissipate the heat better. EBC Yellow Stuff pads were selected.
Here are the final results.
09-25-2013 #18
Registered User
- Join Date
- Apr 2012
- Posts
- 385
Originally Posted by Nicks67GTO
416 Cubic Inch (1970 400 Block bored with 6.8 Rods ) - Road Race Setup.
6500 RPM Pontiac.
Stock Crank - no need for forged crank when running a Pontiac crank
Edelbrock Aluminum D Port
Keith Black Forged Pistons
Scorpion 1.65 Rockers
246/248 Solid Roller Comp Cam
Canton Road Race Pan
Shooting for 525/550 HP/TQ or so at the crank
You get the idea
09-25-2013 #19
Registered User
- Join Date
- Apr 2012
- Posts
- 385
Thank you BEEBE Originally Posted by BEEBE
09-25-2013 #20
Registered User
- Join Date
- Feb 2005
- Location
- Waterloo, Ia
- Posts
- 1,408
Sweet! Do you have a time frame on that build? Ive thought seriously about staying with a 400 and doing almost the same thing. I had Dave@ SD performance spec me a 400 build a year or so ago. It used his stump puller hydraulic roller and 290cfm KRE D ports and an RPM intake. He was claiming they usually end up in the 500-525hp range and 525-550 ft lbs of tq with a long flat curve. Originally Posted by jtwoods4
-Nick
-1967 GTO I drive and race
-Build threads:
-http://forums.maxperformanceinc.com/forums/showthread.php?t=615847&page=23
-https://www.pro-touring.com/showthre...project-thread

 Reply With Quote


