


Results 1 to 20 of 23
Thread: Autometer guages
-
01-07-2008 #1

 Registered User
- Join Date
- Nov 2005
- Location
- Ontario, Canada
- Posts
- 295

Autometer guages
Could not figure out where else to post this. Please move to the correct section if need be.
I am currently doing a 71 F-bird and I want to install Autometer guages in a stock Trans Am dash bezel.
I want a 5" Tach and Speedo and 2 5/8 fuel, coolant and oil pressure. The holes in the bezel are 4" and 2" respectively.
How much room do I need to install these guages (pushing them through the bezel)?
Thanks
-
01-07-2008 #2 Registered User
- Join Date
- Mar 2006
- Location
- OC CA
- Posts
- 470
I did this in my 70, and am pretty happy with it. Fair bit of work, but worth it IMO
I don't have time to write it all up right now (Wife callin' to do something for her) So, I'll post back up later.
Northern Goat, got your PMMark
LS1- T56
under construction
"Political Correctness is a doctrine, fostered by a delusional, illogical minority and rabidly promoted by an unscrupulous mainstream media, which holds forth the proposition that it is entirely possible to pick up a turd by the clean end."
01-07-2008 #3 Starting The Transformation
- Join Date
- Jun 2005
- Location
- Raleigh, NC
- Posts
- 466
I just took a grinder and ground them down till they fit in the holes. I'd grind a little, then test fit. Repeated till they all fit fine.
01-07-2008 #4
Registered User
- Join Date
- Mar 2006
- Location
- OC CA
- Posts
- 470
Here ya go,
Gauge Install: Autometer 5” & 2- 5/8 to 70-81 Firebird
This can be done using standard or rally gauge cluster. You will need T/A or Formula dash panel with bezels, 5” speedo, tach and 2- 5/8-fuel gauge and voltmeter. You also need to use the factory oil/temp gauge, as Autometer doesn’t have a “dual” gauge that will fit. I used black face gauges, and it matches pretty closely to stock.
Once you disassemble your cluster and remove gauges you will reuse 3 main parts: metal cluster housing, Inner plastic bezel and clear plastic lens, as well as t/sig. indicator lenses and cardboard tubes.
Ok, this was the “nervous” part for me, as I didn’t even know if this was going to work at this point, and these were new gauges.
When you get the new gauge in your hand you will see they are designed to be installed from the “front” of a panel. So, get a small implement of destruction to pry off new bezels and remove glass. You can just throw those away as you won’t be using them. You are now past the “point of no return”.
Next is to fit the gauges in metal gauge housing. You will see the housing mods needed at this point, but just drill holes for the studs on the back of new gauge, and cutouts for wiring and indicator light access. You will need to shim gauges from behind, as they will sit too deeply in housing. I used a combo of metal washers and rubber washers to help dampen vibes. Don’t know if that’s necessary, but it seemed like a good idea at the time. Just trial & error here to get the depth right. Next you will need to mod the cardboard tubes (light tunnels?) to fit around lips on new gauges, just a slice in the tubes will do.
Next is the plastic inner bezel. Just open up to remove “bevel” and it will be about right, go slow and keep testing for fit, and paint it black again when you are done. You can now test fit lens, and drill hole for odo/trip button (carefully) if you are using one.
Repeat for fuel and volts pod.
That’s about it; you will need to hard wire gauges and lights, as printed circuit cannot be used. For indicator lamps you will need sockets (like the ones that come with the new gauges with power and ground wires) I found that 3rd gen. F bodies with auto trans console have a shifter lamp with the perfect socket for this, so just go to the bone yard and get at least four of them (rt. Turn, lft. Turn, hi beam. and brake press. lamp) you will need to find a place to mount the brake press. and hi beam lamps as these used to reside in the old gauges. I used the small rectangular panel at lower right of dash panel.
End result looks almost factory, but allows you to use electric speedo for late model trans swaps and is vibe and rattle free!
Here's some pics:Hope this helps, Mark
 Mark
Mark
LS1- T56
under construction
"Political Correctness is a doctrine, fostered by a delusional, illogical minority and rabidly promoted by an unscrupulous mainstream media, which holds forth the proposition that it is entirely possible to pick up a turd by the clean end."
01-07-2008 #5 Registered User
- Join Date
- Mar 2007
- Location
- Florida
- Posts
- 2,391

Mark, those look great! If I'd seen yours before I did mine I would have done the tach and speedo like yours.
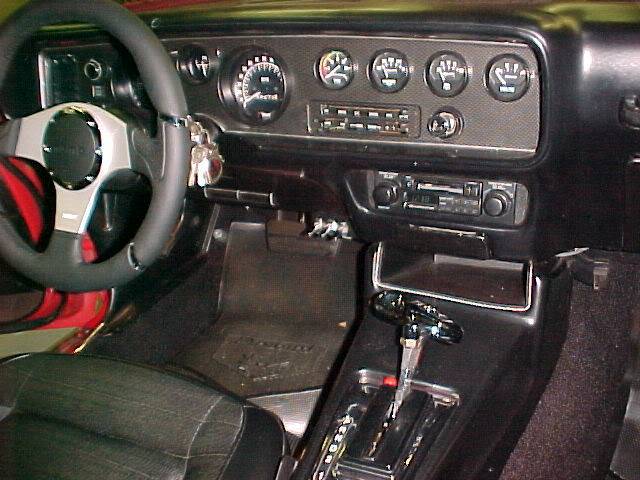
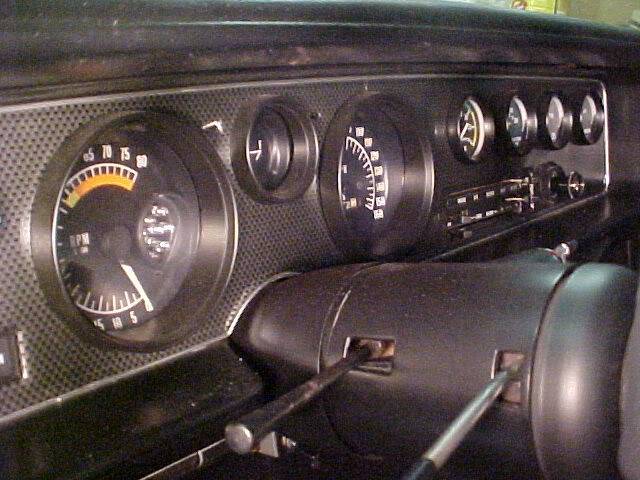
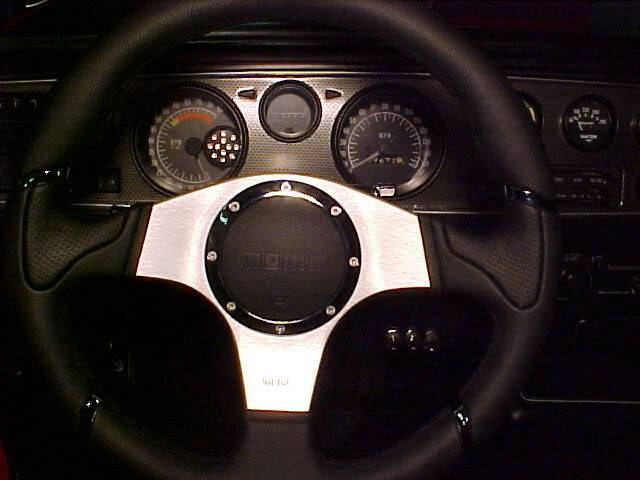
I had a non gauge dash so I got a used woodgrain gauge panel from an air cond car and used the mechanical Autogauge gauges (by Autometer) that fit the 4 holes on the right without modifying the gauge holes. The gauges only come with chrome bezels so I painted them. I got a Tic-Toc Tach and mounted it in my orig gauge pod and installed a shift light where the clock was.
01-07-2008 #6
Registered User
- Join Date
- Mar 2006
- Location
- OC CA
- Posts
- 470
Hey John, That dash looks mighty fine, I like the look of the 4 smaller gauges, but didn't want to lose the a/c vents.
Looks like you found that "carbon fiber look" sticky stuff too. Looks good and is pretty easy to do huh?Mark
LS1- T56
under construction
"Political Correctness is a doctrine, fostered by a delusional, illogical minority and rabidly promoted by an unscrupulous mainstream media, which holds forth the proposition that it is entirely possible to pick up a turd by the clean end."
01-08-2008 #7
Registered User
- Join Date
- Mar 2007
- Location
- Florida
- Posts
- 2,391
70bird, Thanks for the compliment. Ya I was in one of those parts store chains one day and saw the sticky vinyl stuff and thought it'd look good in my car. Great minds think alike! It wasn't hard to do just took quite a bit of time for the whole project.
Since my car wasn't a TA or Formula the wiring and gauge pod is different. I only have the fuel gauge in the center above the column between the tach and speedo. I'd removed my air cond previously and would need at least 3 gauges on the right so I added a vacume gauge (has come in handy) to fill the 4th hole. I took pics during the project if anyone wants to see whats involved. Like I said it's time consuming, but a relatively inexpensive way to get something other than the woodgrain or engine turned look.
01-08-2008 #8
Registered User
- Join Date
- Nov 2005
- Location
- Ontario, Canada
- Posts
- 295
Thanks for the responses.
I guess I have to man up and cut up a new set of guages.
01-08-2008 #9 Registered User
- Join Date
- Nov 2007
- Posts
- 464
If you want to use "slip through" gauges you can pitch the factory plastic insert and housing, then just slip the new gauges through from the front and secure from the back of dash panel. It will require you to rewire the blinkers, etc as described above. I used 2-1/16 mech. slip through in my TA dash and plan on replacing the fuel, tach, and speedo thus eliminating the remaining main cluster (1st pic). This is the same thing Year One did in the Bandit TA (2nd pic).
Good luck - Ron
01-08-2008 #10
Registered User
- Join Date
- Nov 2005
- Location
- Ontario, Canada
- Posts
- 295
That was my original plan. But Autometer Tach and Speedo are 3 1/2' or 5" and the holes in the bezel are 4", I am trying to figure out how to get around this issue. Any advice would be welcomed. Originally Posted by redfire69
01-08-2008 #11
Registered User
- Join Date
- Mar 2006
- Location
- OC CA
- Posts
- 470
Damn Ron, that dash panel is "friggin' awesome". I really like the dash vents. What are they from? Originally Posted by redfire69
Guess there are many ways to skin a cat,or, bird in this case. LOL
The reason I did it "my way" is two-fold. Mounting the gauges to the dash panel seems relative unsupported to me as the panel is just thin aluminum (stock panel). By mounting them to the original housing, thay are supported by the "back" of the gauge, and from the front as well because the black plastic bezel sandwiches gauge between. Secondly, this allows you to remove the dash panel to access things like heater controls, power outlet, etc. without removing all the gauges with it.
Some fine looking 2nd gen. Firebird dashes out there!
MarkMark
LS1- T56
under construction
"Political Correctness is a doctrine, fostered by a delusional, illogical minority and rabidly promoted by an unscrupulous mainstream media, which holds forth the proposition that it is entirely possible to pick up a turd by the clean end."
01-08-2008 #12 Registered User
- Join Date
- Sep 2004
- Location
- Orlando, FL
- Posts
- 1,086
Another version
My current setup is like NOT A TAs as I still have the stock idiot lights on the left, fuel gauge center and 160mph stock speedo. But I used a turned aluminum AC dash from a TA and stuck the AutoGauge threesome plus vac to the right in the four empty holes.
But my new plan is to replace everything (stock and AutoGauge) with Autometer Z-series. I have 3 3/8" 8000rpm tach and 160mph speedo along with a 2 1/16" fuel level gauge for the center. And I'll replace the white needled AutoGauge stuff with the red needled z-series as well to the right.
What I've done is used a Sharpee to trace the inside of the factory black trim ring right onto the clear plastic guage lenses of the idiot light and factory speedo. Then I removed the factory gauges behind it leaving their "buckets" and cut 3 3/8" holes in the clear plastic lense and mounted the Z-series gauges to it. This allowed the bezel to "slip fit" over the tach and speedo and I think it looks pretty slick too. I left the factory black plastic trim rings on as well. You can't see the edges of the clear plastic lense although I painted mine flat black just in case...
For all of the 2 1/16" gauges to include the fuel gauge in the center of the speedo and tach I just mounted them in the factory holes (minus the factory black plastic rings). This allowed me to easily keep my turn signal lights and the hardest part was tracing the connections for my fuel level gauge.
Just another option... you'll notice the BAN III is using the 3 3/8" speedo and tach as well "slip fit" through their bezel without any factory style black plastic trim rings.
Great work on those dash bezels guys! I especially like the integrated shift light in the factory tach!! And IF I could find a functioning tach on the cheap I'd probably go that route and just leave the AutoGauges with their white letters and needles in there!
V/R,
Ty
p.s. NOT A TA... where did you get the shift light?
p.s.s. Any one figured out how to convert our 70-73 tail lights to LED yet???SMSgt Ty Ingle, USAF
"CF71" - Freedom BirdHoodpins.com, Inland Empire Driveline, Billet Accessories Direct, Modo Innovations, AutoRad Radiators, Morris Classic Concepts, Marquez Design, Anvil Auto, Fesler Billet, US Collision (DOOM), AGR Performance, Pro-touringF-body.com, Phoenix Transmission Products, Shiftworks, ACC Carpet, Hedman Hedders, BMR Fabrication, American Autowire, MityMounts, TIN INDIAN Performance, Kauffman Racing Equipment, Pypes, RobbMc Performance, WMC, Holley, NOS, PST
01-08-2008 #13
Registered User
- Join Date
- Mar 2007
- Location
- Florida
- Posts
- 2,391
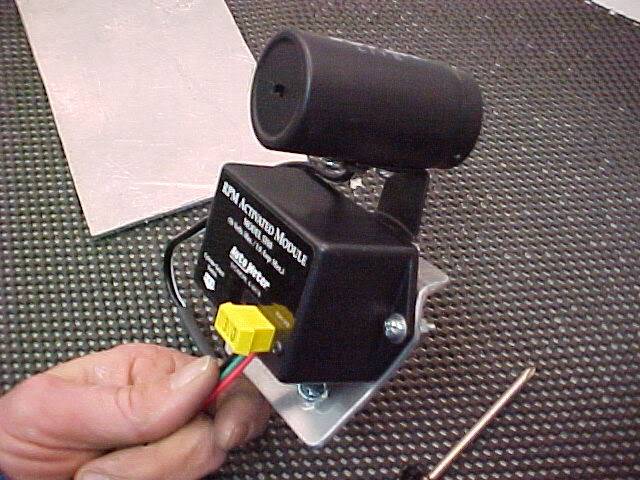
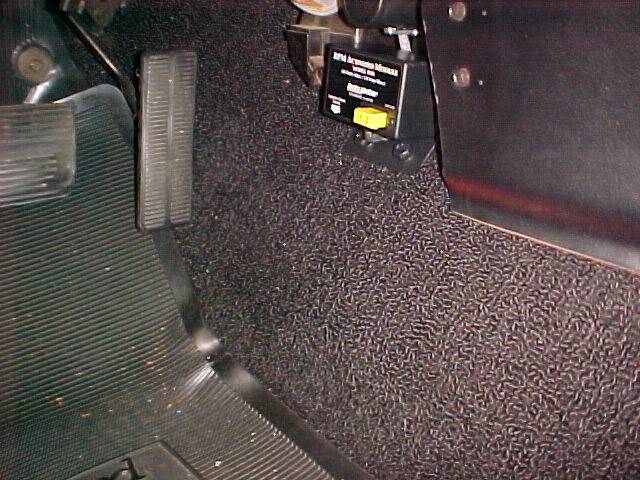
Ty, I got the shift light and the control that runs it from either Jegs or Summit. Can't remember which. I took a stand alone shift light and disassembled it and cut it up. Then with some modifying and some rubber mounting pads installed just the LED panel and part of the housing from the light into the tach.
I installed Halogen bulbs in my tail lights.
Here's a pic of the module and shift light parts so I can change the "shift points" and the brightness of the light for day/night.
01-08-2008 #14
Registered User
- Join Date
- Nov 2005
- Location
- Ontario, Canada
- Posts
- 295
Thanks for the tip Ty, I will definitely look into this option.
Do you have any pics?
01-08-2008 #15
Registered User
- Join Date
- Mar 2007
- Posts
- 8
Here's my version:
01-09-2008 #16
Registered User
- Join Date
- Nov 2007
- Posts
- 464
Hey Mark and Northern Goat, Originally Posted by 70bird
The second pic above is from the Year One Burt Reynolds TA. Not sure about the dash vents. You can get the updated dash panel that has 2 - 3-3/8 and 4 - 2-1/16 holes predrilled. Then run all slip through aftermarket autometers.
Check out the dash @$205 at YO:
http://www.yearone.com/serverfiles/p...11AH82222&trk=
and the BRE TA at:
http://www.yearone.com/yodnn/Default...m/yodnn/bandit
Ron
01-09-2008 #17
Registered User
- Join Date
- Mar 2006
- Location
- OC CA
- Posts
- 470
Man, I need to re-read the article about the Ban2/3. It kinda' hurt to see it the first time. And I thought my Bird was so cool, with all the mods I have done this far! Originally Posted by redfire69
 Seems the 2nd gens. are finaly getting the respect they deserve now that the 1st gens. are sooo expensive, but now with my build nearing completion, (3 long years) and all this new 2nd gen. stuff coming out, I feel "late to dinner" so to speak ie: DSE 2nd gen subframe, Ban3, not to mention the newer versions of the LSX. Seems my car is so "last week". What the heck, I'm just gonna' enjoy it. Mark
Mark
Seems the 2nd gens. are finaly getting the respect they deserve now that the 1st gens. are sooo expensive, but now with my build nearing completion, (3 long years) and all this new 2nd gen. stuff coming out, I feel "late to dinner" so to speak ie: DSE 2nd gen subframe, Ban3, not to mention the newer versions of the LSX. Seems my car is so "last week". What the heck, I'm just gonna' enjoy it. Mark
Mark
LS1- T56
under construction
"Political Correctness is a doctrine, fostered by a delusional, illogical minority and rabidly promoted by an unscrupulous mainstream media, which holds forth the proposition that it is entirely possible to pick up a turd by the clean end."
01-09-2008 #18
Registered User
- Join Date
- Nov 2007
- Posts
- 464
Hey Mark, Originally Posted by 70bird
I feel the same way. I "finished" my TA in 2005, and now I'm having a hard time finding the $$ for the BRE rims, BFG KDWs, and lowering springs that would make my car killer!!! Especially since all my "spare cash" goes toward my 69....
Take care - RonRon
69 Camaro Redfire, thanks to
Marquez Design | Ring Brothers
01-09-2008 #19
Registered User
- Join Date
- Aug 2004
- Location
- SAN FRANCISCO BAY AREA
- Posts
- 13
Classic Instruments
If you look around, there are plenty of gague companies besides Auto Meter. I have always used Auto Meter because I didn't think there was anything else. I know for sure that there is a company that makes 4" gauges I just couldn't find it in the few minuites I searched the web.
I went with gauges from a company called Classic Instrument. Great looking gauges and they can build anything thing you want for the right price. You can get 4 different style bezels with 5 different pointer choices in 5 different colors. Plus, they make all these gauges in like 10 different styles.
Here is a set I saw on their page that would look good in your car. 5" gauges, on has a speedo with a built in tach, the other gauges takes care of everything else. Then you could replace the smaller center gauge with a clock, boost gauge, shift light,...etc.
I used the reverse of these in my Chevelle, white face with black lettering, orange pointer and black bezel
BRIAN
01-15-2008 #20
Registered User
- Join Date
- Nov 2007
- Posts
- 464
BRE Dash and Vent
I got an answer on the dash vents for the BREs. It's a Vintage Air piece #49193. Check it out at: http://www.vintageair.com/cat2007/29.pdf
RonRon
69 Camaro Redfire, thanks to
Marquez Design | Ring Brothers

 Reply With Quote





