

Results 81 to 100 of 127
-
03-10-2014 #81

 Registered User
- Join Date
- Aug 2010
- Location
- Long Island, NY
- Posts
- 118

With this combination of parts the drivetrain fit pretty well in the stock sub-frame:
Kook's 1 7/8" Stainless headers for LS Swap (f-body / x-body)
Dirty Dingo Slider mount adapters with Energy Suspension SBC engine mounts
SBC Frame Stands
Slightly modified trans cross-member (mine came from Keisler with the TKO600 kit)
Energy Suspension trans mount
The steering box (Delphi 670) fitment was good and the mounts allowed me to slide the motor to the exact spot that gave the most clearance.
The engine was about and inch from the firewall. According to the tranny mount this was about a 1/2" forward of the original BBC position.
All I had to do was elongate the tranny mount holes to get it to all bolt together. The drive shaft still had plenty of yoke engagement in the TKO600 and therefore didn't need to be changed.

Frank
Long Island, NY
1969 Chevy Nova - 370 LQ4/LS3, Procharger, TKO 600, 9" w/ 3.89's (always a work-in-progress)
-
03-10-2014 #82
Registered User
- Join Date
- Nov 2012
- Posts
- 346
Glad you posted pix of the clutch assembly. It's too bad people won't be able to see that work of art.
Very nice._______________
1969 Camaro
1966 Skylark
1964 Lemans
1960 Biscayne
Steve
03-12-2014 #83
Registered User
- Join Date
- Aug 2010
- Location
- Long Island, NY
- Posts
- 118
Next, I started putting the front end back on.

I painted the bumper filler piece satin black as opposed to keeping it body color.

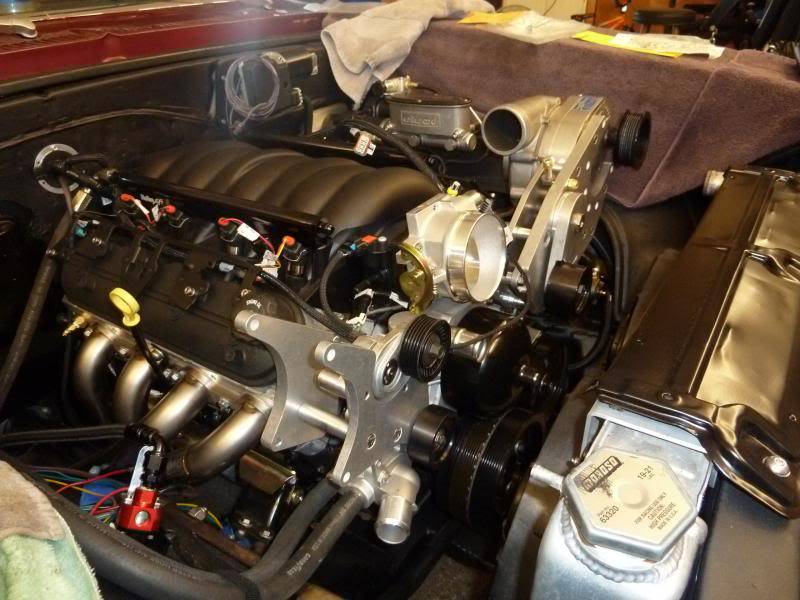
Brackets started going on. These were part of the Procharger LSX kit, I bought them separately as I didn't need the head unit, intercooler or piping.
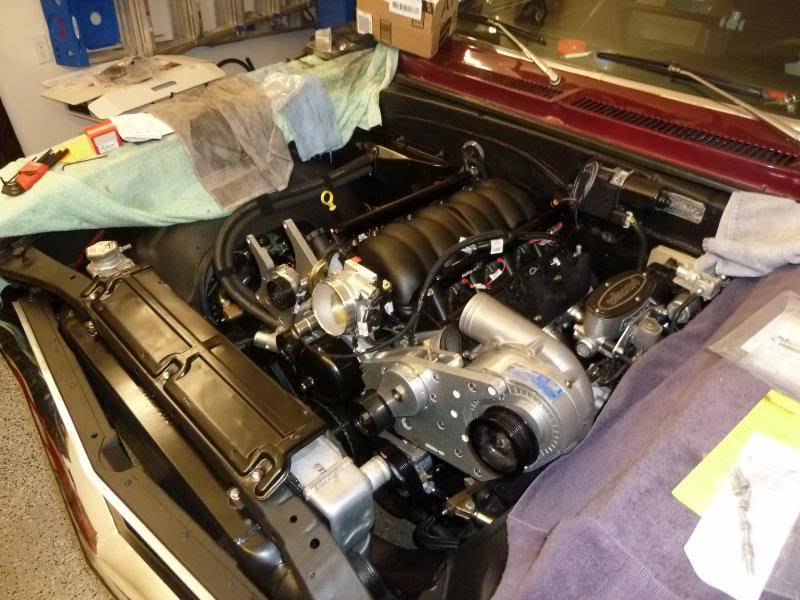
This decision took a little time to figure out. I wasn't sure where I wanted the Holley HP ECU mounted. It can be in the engine bay because it comes with vibration mounts, is heat resistant and fully potted to protect against moisture. But, I wanted the cleanest engine bay possible so I decided on putting it inside the car.
I hole-sawed a 2 1/2" hole in the firewall and used a Seals-It split grommet to dress it up.

The coil brackets were media blasted as were the coil covers (I had to disassemble them first of course). Then both were painted with textured black paint.


Next I used the tab off the passenger side coil bracket to make up a mount for my fuel pressure regulator. I was going to put it on the firewall but I didn't like the way it looked and as per NHRA rules the regulator has to mounted 6" from the firewall (don't want to get booted from a track over a b/s tech rule).


I built off the regulator mount to make a bracket for my oil breather tank. It looks like a bit of overkill, but I had it from the big block setup and re used it. The 10an lines are also carry overs, but I inserted a piece of 3/8" hose at the ends to make the lines neck down to the LS valve covers hose barbs.


I used the space on both the left and right sides of the radiator support to mount the coolant recovery tank and remote power steering reservoir. I made aluminum brackets to bolt to the existing grill support holes as I didn't want to drill any extra ones.


Here's shot of the power steering lines routed to the hydroboost and the p/s box. Tried to keep them as neat as possible.

Since the hood latch assembly and support were ditched to fit the intercooler, I made a bracket with some 1/8" flat stock and 1/4" rod to support the grill to the radiator support.


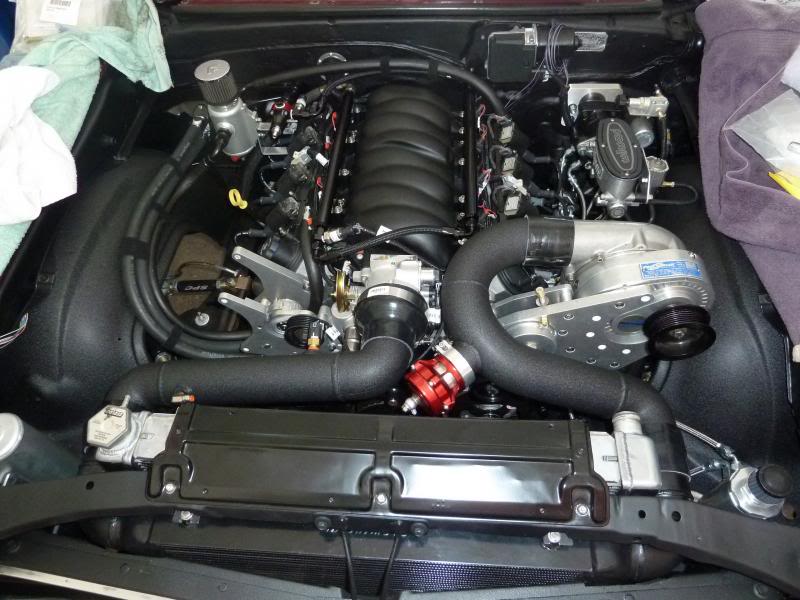
Intercooler piping was fabbed up next. I had it tig welded and then powder coated in textured black. I made it so that there was only silicone couplers at the intercooler, head unit and throttle body connections. I wanted the least amount of flexing parts.


Here's a shot of the engine bay pretty much together at this point. I also had the fender wells powder coated in textured black.
Frank
Long Island, NY
1969 Chevy Nova - 370 LQ4/LS3, Procharger, TKO 600, 9" w/ 3.89's (always a work-in-progress)
03-12-2014 #84
Registered User
- Join Date
- Aug 2010
- Location
- Long Island, NY
- Posts
- 118
Here's where the Holley ECU went. This is the glove box I made previously out of aluminum.


Frank
Long Island, NY
1969 Chevy Nova - 370 LQ4/LS3, Procharger, TKO 600, 9" w/ 3.89's (always a work-in-progress)
03-13-2014 #85
Registered User
- Join Date
- Aug 2010
- Location
- Long Island, NY
- Posts
- 118
Next was a new radiator. There was nothing wrong with the aluminum Griffin that I was using, but I felt that an LS specific one would be better for fitment and application.
I ordered up part# 8-00165-LS. This one was a double pass style which fits the LS better because both inlet and outlet are on the passenger side.

It also had the proper sizing for the inlet (1 1/4"0 and outlet (1 1/2"), it was 1/2" more narrow (more room for intercooler piping) and it had the bung for the LS coolant air bleed connection.


I made some brackets out of 1" x 1/8" aluminum flat stock to hang the dual 12" Spal paddle fans I already had. Previously I was using the "through" the radiator mounting, which I felt stressed the coolant tubes too much. I never had a leak or damage, but I didn't want to do that again as I felt it was a short cut to mounting them properly


You can see from that last picture, I start mocking up a cold air intake for the blower inlet.
Frank
Long Island, NY
1969 Chevy Nova - 370 LQ4/LS3, Procharger, TKO 600, 9" w/ 3.89's (always a work-in-progress)
03-13-2014 #86 Registered User
- Join Date
- Jul 2013
- Location
- St. George, UT
- Posts
- 1,144
Some good stuff going on here. The glove box is cool, and the simple yet effective fan mounts are nice. I also like the texture on the fender wells and intake tubes. Nice!
-Ben, Creative Director at Speedtech Performance
We sell some really cool parts, build cool cars, and do cool concept renderings too!
435-628-4300 www.speedtechperformance.com
My Pumkinator build thread- https://www.pro-touring.com/showthre...ght=pumkinator
03-13-2014 #87
Registered User
- Join Date
- Aug 2010
- Location
- Long Island, NY
- Posts
- 118
Here's the rest of that air intake.
I used 4" aluminum piping, 90 deg elbows from Spectre, one of their conical filters and a heat shield from them also.
I had to slice and extended one of the 90's to get the filter to line up in the middle of the cowl. Everything was tig welded and then powder coated black crinkle to match the rest of the piping.


I know most of the time people just jam a filter on the back of the blower, but I feel like it just sucks up a lot of heat coming off the driver side header. Plus, I had no room with the hydroboost unit in the way (I barely could fit the 90deg elbow)
I think this picks up a lot of cool air off the low pressure area behind the cowl hood.
Frank
Long Island, NY
1969 Chevy Nova - 370 LQ4/LS3, Procharger, TKO 600, 9" w/ 3.89's (always a work-in-progress)
03-13-2014 #88
Registered User
- Join Date
- Aug 2010
- Location
- Long Island, NY
- Posts
- 118
Before I continued with the wiring in the engine bay, I made a bracket for the throttle cable. I used a Lokar cable and pedal which replaced the original lever and rod setup that was there. The LS3 manifold has no provision for a cable actuated throttle body so I had to improvise.


I used 1/4" rod and some 1/8" right angle stock to make the bracket. Then I mounted it with one of the fuel rail bolts. Works, nice and smooth and I made sure I was getting wide open throttle when depressed all the way down.
Frank
Long Island, NY
1969 Chevy Nova - 370 LQ4/LS3, Procharger, TKO 600, 9" w/ 3.89's (always a work-in-progress)
03-13-2014 #89
Registered User
- Join Date
- Aug 2010
- Location
- Long Island, NY
- Posts
- 118
And then the wiring continued. I have to say again, the American Autowire kit was great. Every wire is labeled and all the connectors are included for factory fitment. It looks like big mess of spaghetti when you start, but the directions and wiring maps make it all go together without to much trouble.


I wanted to hide as much wiring as possible so everything went inside the fender wells and tucked up into the radiator support. I had nothing going behind the engine except for the fuel pressure gauge wiring and the efi harness.


Here's my power distribution block. It's just a simple bolt under the cover where the battery power splits for the factory fuse box, relay box and starter.

This is a relay box I got from Hella with four 30amp relays inside. I have them all pre-fused from the Painless fuse holder below. They run each fan, the methanol pump and the ground for the neutral safety from the transmission. Both boxes are mounted to an aluminum plate that bolts to the passenger fender, and all wires are hidden in the fender well.

Headlights and trim bezels are finally back in place.

Frank
Long Island, NY
1969 Chevy Nova - 370 LQ4/LS3, Procharger, TKO 600, 9" w/ 3.89's (always a work-in-progress)
03-13-2014 #90
Registered User
- Join Date
- Aug 2010
- Location
- Long Island, NY
- Posts
- 118
Speaking of the Methanol pump. I mounted it on the lower driver fender well and have it fed from the original washer reservoir (which I painted grey - the original white was faded and yellow)

The feed line wraps around the back of the blower to clear the drive belts and follows the intake piping from the intercooler.


The pump gets trigger by the Holley ECU. I set it for 9psi, but I can also make it based on rpm and throttle position if I want.
Frank
Long Island, NY
1969 Chevy Nova - 370 LQ4/LS3, Procharger, TKO 600, 9" w/ 3.89's (always a work-in-progress)
03-13-2014 #91
Registered User
- Join Date
- Aug 2010
- Location
- Long Island, NY
- Posts
- 118
Last post for tonight...
I wanted to make something to take the place of the 396 fender emblems I had.

So I found these on Ebay:

The 6.0 portion was just the right size to cover over the 396. I trimmed them and attached them with some 3M automotive double sided tape.

I figured 6.0 was the most appropriate because the motor was originally a six liter truck LS even though it has the LS3 heads and intake.
Frank
Long Island, NY
1969 Chevy Nova - 370 LQ4/LS3, Procharger, TKO 600, 9" w/ 3.89's (always a work-in-progress)
03-13-2014 #92
Registered User
- Join Date
- Aug 2010
- Location
- Long Island, NY
- Posts
- 118
Thanks for all the positive comments Ben. I love the Pumkinator. I'm a big g-body fan, I have a few buddies running Monte SS's and a GN. My parents had a sweet '87 Monte LS when I was a teenager, I begged them to keep it for me, but they sold it. My build thread may have been very different today had they hung onto it for me.... Originally Posted by Ben@SpeedTech

Frank
Long Island, NY
1969 Chevy Nova - 370 LQ4/LS3, Procharger, TKO 600, 9" w/ 3.89's (always a work-in-progress)
03-16-2014 #93
Registered User
- Join Date
- Aug 2010
- Location
- Long Island, NY
- Posts
- 118
Firing away here...
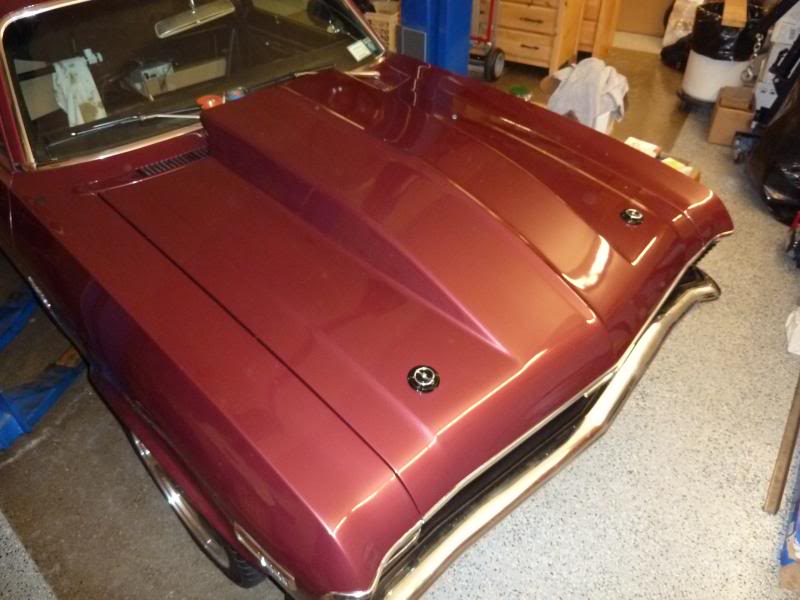
I next had my original hood hinges powder coated satin black. I wanted a nice set of billet ones from Eddie or Fessler but that was happening when $650 could go to something much more worth while, like say... mini-tubs and billet wheel spacers.

So the hood was put back on and aligned again.

Since the hood latch and support made way for the intercooler, hood pins were in order. I wanted something nice with a billet striker and stainless hardware. I found these from AMI:
http://www.summitracing.com/parts/asm-5110k/overview/
http://www.summitracing.com/parts/asm-5114/overview/
And here was the installation:


Frank
Long Island, NY
1969 Chevy Nova - 370 LQ4/LS3, Procharger, TKO 600, 9" w/ 3.89's (always a work-in-progress)
03-22-2014 #94
Registered User
- Join Date
- Aug 2010
- Location
- Long Island, NY
- Posts
- 118
Continuing...
So around Sept of last year, I got to the mini tub portion of this build. I was going to wait and get her running before doing the mini tub, but the wiring portion of the car's rear harness and the efi's main power leads would have to be installed and then removed again. I wasn't going to cut and weld near all these wires.
Here's how everything looked with the original tubs and 17x8 wheels with 255/50R17s:


The rear seat area stripped out:

I masked off and covered the fuel cell, the rear window and rear quarters. Then used the tape marks to record measurements of the original tub to fender distance (as per DSE instructions)


Next the spot welds were drilled out on the truck lid supports and the rear seat to tub braces. Then these brackets were cut out and saved for re-use on the new tubs


Driver side original tub cut and removed:


And then the passenger side:


DSE tub fitted into place after trimming the trunk floor back 2 1/2" from the original location, and then some grinding and smoothing. I must of had both sides in and out about 50 times each in order to get the fitment to what I felt was acceptable.


Frank
Long Island, NY
1969 Chevy Nova - 370 LQ4/LS3, Procharger, TKO 600, 9" w/ 3.89's (always a work-in-progress)
03-22-2014 #95
Registered User
- Join Date
- Aug 2010
- Location
- Long Island, NY
- Posts
- 118
Then I checked the new rim for proper clearance. My wheels are C6 Z06 replicas - 18x10.5 with about an 8" backspace.


And here are the new tires and an old one for comparison. From left to right: 275/35R18 (new fronts), 305/35R18 (new rears), 255/50R17 (old rears) - not pictured the old fronts (245/45R17).


New rear tire in the wheel well to check for suspension clearance:


Passenger mini tub fitted into place:


I then had the tires mounted on the wheels and measured for clearance, and the thickness of the spacers I would need.


The fronts were checked also. They measured in at 18x8.5 with about a 6.5" backspace.


I actually disassembled the front suspension and took out the spring and shock in order to fully cycle the wheel up and down, and at full lock in order to make sure the wheel and tire cleared everything. The only place it rubbed was at full lock, at the rear of the front wheel wells. I knew before fitting the 275 tire on the front that I would be making steering stops to make this work.
Once I had everything measured I ordered my wheel spacers from Motorsport Tech (https://www.motorsport-tech.com/). The rears needed a 3/4" spacer and the fronts, an 1 1/8" spacer. I also had them made both hub centric and lug centric.


Frank
Long Island, NY
1969 Chevy Nova - 370 LQ4/LS3, Procharger, TKO 600, 9" w/ 3.89's (always a work-in-progress)
03-22-2014 #96
Registered User
- Join Date
- Aug 2010
- Location
- Long Island, NY
- Posts
- 118
I continued with the tub install by fabricating the close out plates. DSE gives you an install disk with these templates but they are only guides because not everyone cuts out the wheel tub exactly the same.


The flange toward the rear seat/ foot-well area is important as attachment point for the new tub.
The close-outs for the driver side completed:

Close - outs for the passenger side:


And the complete passenger side:

All the welds were ground smooth and sealed with POR-15 Por Patch. Then they were primed with weld through primer. Also, you will cut a large chunk out of the rear frame rail on both sides. It really isn't a big deal, and I feel as though the new 1/8" close out plate is stronger than the factory stamped sheet metal frame rail.


I drilled the flanges on the new tubs and sprayed them also with weld through primer.

New tubs in place and spot welded:


I don't know if you can see, but I messed up slightly on the passenger tub and had to slice the corner and patch it with a small piece of metal to make it fit the curve I cut.
Rear seat braces trimmed and welded back into place:


Frank
Long Island, NY
1969 Chevy Nova - 370 LQ4/LS3, Procharger, TKO 600, 9" w/ 3.89's (always a work-in-progress)
03-22-2014 #97
Registered User
- Join Date
- Aug 2010
- Location
- Long Island, NY
- Posts
- 118
The welds were again ground smooth and covered with Por Patch.


Trunk supports trimmed and welded back into place. Then ground smooth and some more Por Patch.


Next seam sealer was applied to the tubs both inside and out.


Then the spacers were slipped on and wheels bolted in place for a final check.


Frank
Long Island, NY
1969 Chevy Nova - 370 LQ4/LS3, Procharger, TKO 600, 9" w/ 3.89's (always a work-in-progress)
03-22-2014 #98
Registered User
- Join Date
- Aug 2010
- Location
- Long Island, NY
- Posts
- 118
Now for some painting....
Por-15 was applied to the tubs both in and out.


Then the wheel wells got a coat of textured truck bed paint.


The inner wells got the spatter paint treatment.


Finally the finished results:


Here are the front wheels - steering stops not yet made:


Frank
Long Island, NY
1969 Chevy Nova - 370 LQ4/LS3, Procharger, TKO 600, 9" w/ 3.89's (always a work-in-progress)
03-24-2014 #99
Registered User
- Join Date
- Aug 2010
- Location
- Long Island, NY
- Posts
- 118
Moving back to the trunk, I setup this simple bass tube and amp for the sound system.
I already had a JL Audio 10" subwoofer and 300 watt amp. So I found this empty ported bass tube on Ebay for $35.
I used 1 1/4" x 1/8" flat stock to make a bracket to hold it in place in the trunk and then mounted the amp to the tube also. Stainless clamps and button fasteners to hold in place.


The head unit is an Alpine MP3 player and the front speakers are 6 1/2" Pioneers in the kick panels (http://www.classiccarstereos.com/pro...KNOV-68_2.html). I got one of those dual voice coil speakers for the dash speaker (http://www.classiccarstereos.com/pro...r/4001DVC.html) - it sounds okay but can't handle to much power before it starts distorting. So I just keep the fader dialed back to the kick panel speakers.
This isn't the greatest system ever, but it sounds clear and loud, and the bass tube pounds pretty good. I can hear it over the exhaust and run an mp3 disk or mp3 player, so I'm happy with it for now.
Frank
Long Island, NY
1969 Chevy Nova - 370 LQ4/LS3, Procharger, TKO 600, 9" w/ 3.89's (always a work-in-progress)
03-24-2014 #100
Registered User
- Join Date
- Aug 2010
- Location
- Long Island, NY
- Posts
- 118
While I had the interior out, I did swing out bars next. I was thinking about doing them for a while and thought it would just make life a little easier getting in and out (even though I still just slide over the bar a lot). The big plus in doing these was making interior work and under dash work less of contortionist act.
I got my kit from Applied Racing Technology. It's very similar to the one from Chassisworks and waaaay better than the Comp Engineering kit.


So I measured and marked the side bars and then cut them with a sawz-all.

Frank
Long Island, NY
1969 Chevy Nova - 370 LQ4/LS3, Procharger, TKO 600, 9" w/ 3.89's (always a work-in-progress)

 Reply With Quote


