

Results 81 to 100 of 174
Thread: Madaguy 1955 Nomad Build
-
06-12-2023 #81

 Registered User
- Join Date
- Sep 2009
- Posts
- 2,725

I tried to keep as much of the original metal as I could and yes it's original. It helped me to keep the original shape of the wheel wells. Along with the pieces from the wheel wells I cut out.

1955 Nomad project LC9, 4L80e, C5 brakes, Vision wheels
1968 Camaro 6.2 w/ LSA, TR6060-Magnum hybrid and etc SOLD
1976 T/A LS1 6 Speed, and etc. SOLD
Follow me on Instagram: ryeguy2006a
-
06-20-2023 #82
Registered User
- Join Date
- Sep 2009
- Posts
- 2,725
After a huge push to get that driver's side wheel well in place. I've been slowly just planning my next step to make sure that I'm not missing anything I'll regret after welding up the panels. Before I welded in the outer wheel house panels, I wanted to make sure that I prepped all the inner structure panels while I had access to them. I also wanted to get the metal under the trim treated to hopefully prevent the panels from getting any worse. I used an oil based paint that is similar to POR-15, but I think was made by Rustoleum.


Now that this channel is repaired and prepped, I can work on reinstalling the glass and trim. I left that piece turquoise to remember the original color since the trim tag is missing on this car.


Next was prepping the original outer wheel houses. They required a few patches and adding on the Nomad lower panels. They were ready for me to install new seals which I chose to both glue and rivet. While not original, they worked really well and should seal very nicely to the quarter panels. The rear outer wheel house is shown, but I added a seal for the front outer as well.


One last test fit before I do a final weld up. Very happy with the fitment, and it will sit nice and flush with the front outer as well. Now I can pull them both, paint the top sides and final weld them in.

I'm not sure what this piece is called, but it's got a rubber bumper that stops the rear sliding glass. I re-created this little bracket and will get this installed after I get the window felts back in place. Original was in terrible condition, but I was able to get a good trace of it before it broke in half.


I started preparing the passenger side wheel house for installation. I got it all of the old under coating off of it, but still need to drill all my spot weld holes and grind down the flange where I'll need to weld on the body smooth. Hopefully I'll make a bunch more progress on that this week. Once I get both wheel wells installed, I can test fit my rear folding seat. I can't wait for that because I think that is one of the coolest parts of these old wagons.
Cheers,
Ryan
1955 Nomad project LC9, 4L80e, C5 brakes, Vision wheels
1968 Camaro 6.2 w/ LSA, TR6060-Magnum hybrid and etc SOLD
1976 T/A LS1 6 Speed, and etc. SOLD
Follow me on Instagram: ryeguy2006a
06-20-2023 #83 Registered User
- Join Date
- Sep 2004
- Location
- Orlando, FL
- Posts
- 1,078
Great progress and great update as always!! I find it interesting that the outer wheel housings are square and not rounded...
SMSgt Ty Ingle, USAF
"CF71" - Freedom BirdHoodpins.com, Inland Empire Driveline, Billet Accessories Direct, Modo Innovations, AutoRad Radiators, Morris Classic Concepts, Marquez Design, Anvil Auto, Fesler Billet, US Collision (DOOM), AGR Performance, Pro-touringF-body.com, Phoenix Transmission Products, Shiftworks, ACC Carpet, Hedman Hedders, BMR Fabrication, American Autowire, MityMounts, TIN INDIAN Performance, Kauffman Racing Equipment, Pypes, RobbMc Performance, WMC, Holley, NOS, PST
06-21-2023 #84
Registered User
- Join Date
- Sep 2009
- Posts
- 2,725
They definitely did things differently in the 50s haha.
1955 Nomad project LC9, 4L80e, C5 brakes, Vision wheels
1968 Camaro 6.2 w/ LSA, TR6060-Magnum hybrid and etc SOLD
1976 T/A LS1 6 Speed, and etc. SOLD
Follow me on Instagram: ryeguy2006a
06-21-2023 #85 Registered User
- Join Date
- Nov 2000
- Location
- O-town
- Posts
- 4,286
Ryan, just had to look at page 1 to see what it looked like before, and I saw your comment about the Blue Ridge Mountains, man I miss Virginia! even though I lived on the Eastern Shore the drive west was always a great time,
I like all the little patch panels you have fabbed up and welded in, nice work, keep working on it, I hope I'll get my 88' GT vert done before you do, what was a simple front end repair ended up being a complete front clip R&R......Steve68- 1968 Camaro SS LSX T56, 12bolt 3:90's, 18" Fikse Profil 13s, Deep Fathom Green paint, Spearcos, just bunch of old junk because another member said so, LOL
70 Nova SS street/drag 454, T400, 3:55, ugly!
07-05-2023 #86
Registered User
- Join Date
- Sep 2009
- Posts
- 2,725
Really happy with the progress that I've made over the last few weeks. My big push really paid off. I left off with doing a last final test fit of the inner wheel house. I've had it on and off quite a few times, so I knew it was ready to go, but this time it was all prepped with weld through primer.

Then I started to mock up the other pieces that needed to be trimmed and fit up to complete the patches. The first picture shows the difference between the angles of the Nomad vs all other wagons. The wheel wells are unique and need to be modified since no one makes reproduction pieces.

Once I was happy with the initial trial fitment, I just started trimming the pieces to get them to come together the way I wanted. I kept a close eye on the driver's side to be sure they matched. Since I was splicing pieces the top piece wanted to dip down, so I kept my straight edge and made sure it was straight and level across the top.


The fitment is really good at this point with all of the panels. I have been holding off on welding in the center cargo panel until I got the passenger side all mocked up. It was time now to work my way down and start filling in the spot welds.


Once the cargo panel was done, I moved onto the wheel well.

I skipped a lot of steps here, but over 3-4 days I worked my way around and welded in the upper patch panel. It was a little more tricky than the driver's side, but nothing too crazy. But I forgot to take any pictures during that time, so here's the finished wheel well. The repairs are very visible, but that was done on purpose because they are going to be covered, so I didn't take the time to make it perfectly smooth.


So stoked to be to this point now. Lots more work than I had originally anticipated, but I'm very pleased with the results.


After I finished up that wheel well I decided to pull out my engine and start looking at that. I've been telling myself that I had to wait to do anything other than sheet metal work until I was done. Well I'm pretty much done now with the rear of the car now, so I'm going to get things ready. I got the boys out early and they helped me power wash the 6.0 block after I got it stripped down to the bare block.

It cleaned up really nicely and all the bearings looked great.


Then yesterday I got curious what the spare tire well would look like. It needs a little repair where the spot welds were drilled out, but I sprayed it black and set it in place. I've been going back and forth on what to do with that area. Delete the spare tire and run a larger fuel tank, or run a wagon tank and keep the spare. Now that I see it in place, I'm confident that I want to keep the spare tire and modify the wagon tank for an in-tank pump.


I'm hoping that things will start to move a little quicker now that all of the heavy fabrication work is done. I still need to install the outer wheel houses on both sides, but they will move quickly since they are just spot welded in place. I'm also going to start plugging away at things like brakes and components to mock up the engine/transmission.
Cheers,
Ryan
1955 Nomad project LC9, 4L80e, C5 brakes, Vision wheels
1968 Camaro 6.2 w/ LSA, TR6060-Magnum hybrid and etc SOLD
1976 T/A LS1 6 Speed, and etc. SOLD
Follow me on Instagram: ryeguy2006a
07-05-2023 #87 Registered User
- Join Date
- Nov 2006
- Location
- Ma.
- Posts
- 5,569
It looks really nice, your doing a great job.
Wayne
Car FINALLY home !!!!!! lol
Project FNQUIK https://www.pro-touring.com/showthre...ghlight=FNQUIK
07-10-2023 #88
Registered User
- Join Date
- Sep 2009
- Posts
- 2,725
Thanks man!
Didn't make a whole lot of progress this weekend, but moving forward none the less. I'd been on the fence about building the LS2 block, but at the end of the day I really wanted an aluminum gen4 5.3 engine. So I posted it for a few days on FB marketplace that I wanted to trade the bare block for a LC9 or similar. Some guy messaged me and said that he had a good shortblock that he pulled out of his car to go with a forged 5.7 and kept this as a spare. He sent me a video of it running and he wanted to go with something larger than the 5.7, so we swapped. Very happy with the trade. I am planning to add a turbo at some point so I'll pull the pistons and gap the rings. Probably .024/.026, and then reassemble. I kept the 6.0 rotating assembly, so if I find a good deal on an iron block, I always have the option to put together a forged piston short block. For now I'm just going to push it in the corner and get back to finishing the metal work.


Here's the finished window bracket. I think the only function this serves is a stop for the sliding side window. The original one was completely rusted, so I remade this one.

I installed the new outer seals on the outer wheel houses and now that they are cured, I wanted to get them installed. I wasn't able to finish, but the driver's side is now mocked up and ready to weld. The passenger side rear outer wheel house still needs to have the seal installed, but should be able to get to that this week.


I got a little sidetracked by a treasure I found. I was cruising FB Marketplace and found where a guy was moving and had some stuff out by the curb for free. It was some sort of home brew setup that he had lost interest in and needed to get rid of it. I saw it and immediately thought that would work perfectly for the new welding cart that I have been wanting to build. I went to go check it out and grabbed it. It's made of a heavy square tubing and the dimensions are spot on for what I need. I'm going to modify the bars to shorten it, but I'll have more than enough materials to make exactly what I want. I removed all the brew stuff and I'm hoping to make a buck on it.

I started by adding some casters on the front to get it mobile, since it was never meant to move when brewing.


That's as far as I got, but the plan is to make a holder for two tanks at the rear, middle will have some TIG Filler rod holders, tool box somewhere on the bottom and then a platform on the top for holding the welder. I'll add some hooks and clips for my helmet, hoses and cables. Very excited to get rid of the cheapy Harbor Freight unit that is very top heavy.
Hoping to get all of the welding done soon on the body and then I'll be able to re-install the side windows and trim.
Thanks,
Ryan
1955 Nomad project LC9, 4L80e, C5 brakes, Vision wheels
1968 Camaro 6.2 w/ LSA, TR6060-Magnum hybrid and etc SOLD
1976 T/A LS1 6 Speed, and etc. SOLD
Follow me on Instagram: ryeguy2006a
07-12-2023 #89 Registered User
- Join Date
- May 2008
- Location
- Luling TX In the Hot Rod Shop
- Posts
- 391
Damn! She's cleaning up nicely from all the bondo and squirt foam you found in there the first time.
Here's some inspiration for you. A customer who just sent me these photos of his 55 Nomad project he's currently working on. I can't wait to see one of my frames under another killer wagon! I'm personally a big wagon fan.
07-14-2023 #90
Registered User
- Join Date
- Sep 2009
- Posts
- 2,725
Thanks Russell! I can use all of the motivation that I can. I can't wait to get one of your frames under my car. It's definitely something I want to do within the next year or so. Priority one right now is getting it running and driving. I'd love to be able to drive the car while I'm welding up your frame on the other side.
1955 Nomad project LC9, 4L80e, C5 brakes, Vision wheels
1968 Camaro 6.2 w/ LSA, TR6060-Magnum hybrid and etc SOLD
1976 T/A LS1 6 Speed, and etc. SOLD
Follow me on Instagram: ryeguy2006a
07-14-2023 #91
Registered User
- Join Date
- Sep 2004
- Location
- Orlando, FL
- Posts
- 1,078
For those of us not in the know... what do Russell's frames look like and what are the advantages?
(Sorry, I'm a 2nd gen F-body guy and not a tri-five guy, but always interested in learning more about our hobby!)SMSgt Ty Ingle, USAF
"CF71" - Freedom BirdHoodpins.com, Inland Empire Driveline, Billet Accessories Direct, Modo Innovations, AutoRad Radiators, Morris Classic Concepts, Marquez Design, Anvil Auto, Fesler Billet, US Collision (DOOM), AGR Performance, Pro-touringF-body.com, Phoenix Transmission Products, Shiftworks, ACC Carpet, Hedman Hedders, BMR Fabrication, American Autowire, MityMounts, TIN INDIAN Performance, Kauffman Racing Equipment, Pypes, RobbMc Performance, WMC, Holley, NOS, PST
07-14-2023 #92
Registered User
- Join Date
- Sep 2009
- Posts
- 2,725
Russell is the owner of Nerd Rods, and he makes frames for tri-5's and that era Chevy trucks. His frames allow you to completely bolt on C4 front and rear suspension, as well as fully boxed and stiffened chassis. The biggest advantage for me, is that he offers a DIY option for his frame, where you can weld it yourself. His designs have a locking "puzzle piece" type of design where they lock together and a few disposable pieces that are self-jigging so it can only go together one way. He also offers an option for a 4 link and 9" rear. I love welding and that's probably where I'll hone in my TIG welding skills since there's a lot of welding to do.
1955 Nomad project LC9, 4L80e, C5 brakes, Vision wheels
1968 Camaro 6.2 w/ LSA, TR6060-Magnum hybrid and etc SOLD
1976 T/A LS1 6 Speed, and etc. SOLD
Follow me on Instagram: ryeguy2006a
07-14-2023 #93 Registered User
- Join Date
- Sep 2017
- Posts
- 826
I'm subscribed!
TANKMASTERJ
https://www.pro-touring.com/threads/...touring-Camaro
Jasons Toys
67 Camaro White Lightning LMR LS7 powered, Speed tech Front and Rear.
2023 Rapid Blue ZL1 the Blue Devil
2000 HD Softail
1989 CBR Hurricane anniversary edition
07-17-2023 #94
Registered User
- Join Date
- Sep 2009
- Posts
- 2,725
It doesn't look like it in the pictures, but this weekend I took a huge step forward with progress getting done. Picking up right where I left off with the driver's side outer wheel house panels mocked up, I got right to welding them solid. I took my time to get the panel to fit nice and flush against the inner wheel well. I had to use any combination of my floor jack, self tapping screws and me pressing with the end of a hammer to get the spot welds flush.

Once that was fully welded, I moved my attention to the passenger's side. I scuffed down and painted the inner structure to help prevent any future rust issues.

While I had the paint out, I also scuffed down and painted the rear floor pan section that I grafted in. Really glad to have this section done now.

I got busy, and didn't get any pictures, but I got the passenger side outer wheel houses mocked up and prepped for welding. Once I was happy with the fitment, I got everything fully welded.


Now that these are done, the wheel houses are completely finished! I'm stoked to have gotten to this point. Just need a little paint and then move onto the spare tire well. This should be pretty straightforward, so it should move pretty quickly.
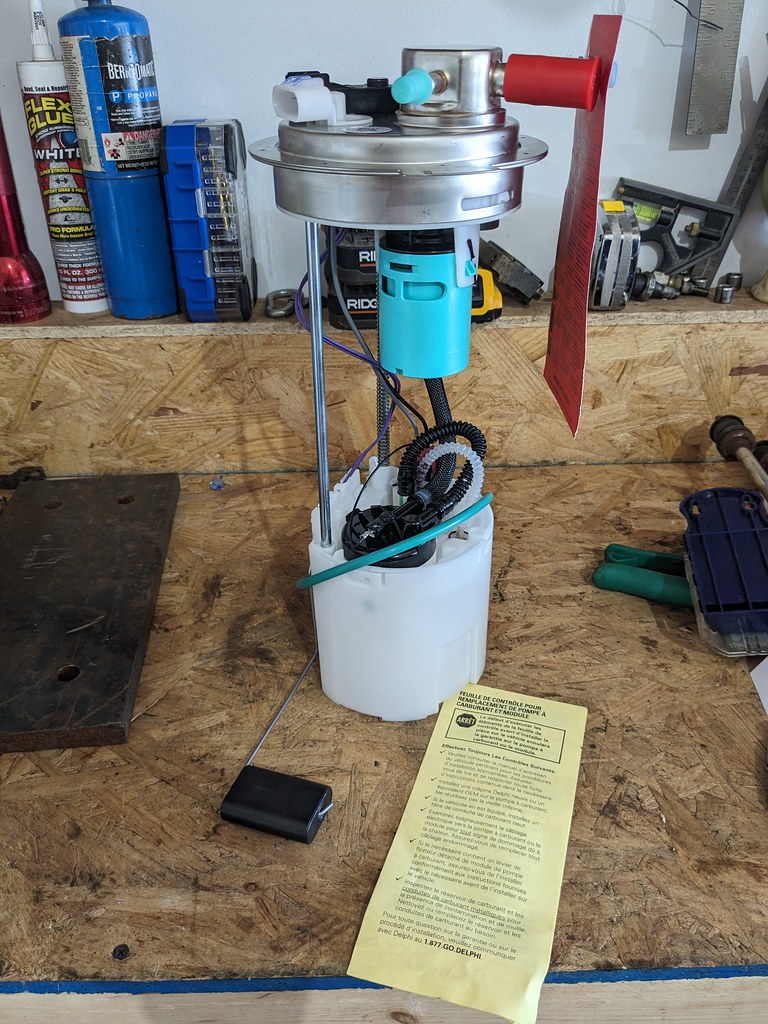
I started to move my attention to the fuel tank that I picked up from the junkyard. I got it really cheap and I'm going to use this for now. It had a few pinholes in it, but they have been repaired and hold water. I'm going to make a fuel pump recess panel and weld in a USCAR fuel pump ring to use some sort of in tank pump. The tank had a lot of varnish that took some time to get cleaned out, but is going to work just fine for me. Not the ideal tank, but given that I'll be deleting the spare tire well and ditching this tank when I run a Nerd Rods frame this will be a perfect temporary solution for me.

My biggest dilemma for this project is what fuel pump to run. The fuel tank, with the 2" recess will land right around 10.5" tall. My plan was to run a 5th gen Camaro SS tank, convert to fixed pressure and extend the height because the max is 7". But I'm not sure that is going to be my best solution. It's a long way to extend the height.
I got sick of looking at the bubbling roofline, and finally took a grinder to it. I was pleasantly surprised with most of the roof. There were a few pinholes, but there must have just been some contamination when the roof was painted as most of it wasn't rusty.

But then I found some bad at the rear corner... Thankfully the other side looks to be just some thing in the paint and I'll recoat it and try to paint match the best I can. I found out that a mid 70s to 92ish Chevy G vans have front fenders that at the top have the exact same curvature as the rear of the wagons. So I'll track one down and use it as a donor. Should be a pretty quick patch and then I can get the roof back in shape.

I'm going to be ordering some parts this week so I can get the rear seat mocked up as well as the engine and transmission. Will also try to work more on the spare tire well and possibly wrap up the rear cargo area.
Cheers,
Ryan
1955 Nomad project LC9, 4L80e, C5 brakes, Vision wheels
1968 Camaro 6.2 w/ LSA, TR6060-Magnum hybrid and etc SOLD
1976 T/A LS1 6 Speed, and etc. SOLD
Follow me on Instagram: ryeguy2006a
07-17-2023 #95
Registered User
- Join Date
- Sep 2004
- Location
- Orlando, FL
- Posts
- 1,078
As always, amazing work and a great update! Those wheel wells will look great with some undercoating or raptor liner!
I'm curious why you're keeping the spare tire well and not putting in a bigger tank since this is going to be a cruiser for the family?SMSgt Ty Ingle, USAF
"CF71" - Freedom BirdHoodpins.com, Inland Empire Driveline, Billet Accessories Direct, Modo Innovations, AutoRad Radiators, Morris Classic Concepts, Marquez Design, Anvil Auto, Fesler Billet, US Collision (DOOM), AGR Performance, Pro-touringF-body.com, Phoenix Transmission Products, Shiftworks, ACC Carpet, Hedman Hedders, BMR Fabrication, American Autowire, MityMounts, TIN INDIAN Performance, Kauffman Racing Equipment, Pypes, RobbMc Performance, WMC, Holley, NOS, PST
07-17-2023 #96
Registered User
- Join Date
- Sep 2009
- Posts
- 2,725
Thanks OLDFLM! Biggest reason is that I don't want to do anything too permanent now that I can't undo at a later date. The spare tire well will be spot riveted to the body to basically use what I already have to fill the hole at this point. In the next year or two when I pull the trigger on the Nerd Rods frame, I'll need to make or buy his custom tank so I don't want to buy the same parts twice. I'll have only my time and a few materials into the wagon tank. Plus the wagon tank is 17 gallon which is larger than the tank I had in my Camaro, and that was plenty of gas to get me back and forth to all the shows that I attended.
1955 Nomad project LC9, 4L80e, C5 brakes, Vision wheels
1968 Camaro 6.2 w/ LSA, TR6060-Magnum hybrid and etc SOLD
1976 T/A LS1 6 Speed, and etc. SOLD
Follow me on Instagram: ryeguy2006a
07-17-2023 #97
Registered User
- Join Date
- Sep 2004
- Location
- Orlando, FL
- Posts
- 1,078
Makes sense! FWIW the Rick's RestoMod tanks are very nice and affordable! I think mine was $400 for my Firebird and very flat on top with the ring for the modern GM fuel canister... just something to consider when the time comes.
SMSgt Ty Ingle, USAF
"CF71" - Freedom BirdHoodpins.com, Inland Empire Driveline, Billet Accessories Direct, Modo Innovations, AutoRad Radiators, Morris Classic Concepts, Marquez Design, Anvil Auto, Fesler Billet, US Collision (DOOM), AGR Performance, Pro-touringF-body.com, Phoenix Transmission Products, Shiftworks, ACC Carpet, Hedman Hedders, BMR Fabrication, American Autowire, MityMounts, TIN INDIAN Performance, Kauffman Racing Equipment, Pypes, RobbMc Performance, WMC, Holley, NOS, PST
07-24-2023 #98
Registered User
- Join Date
- Sep 2009
- Posts
- 2,725
Progress slowed this week. I made a big push to get the wheel wells completely welded up and got a little burned out. I sprayed some rattle can paint on wheel wells to give them a finished look. I'm really happy with the end results. I'm going to spray some bedliner in there at some point, but wanted to look at the wheel wells in one color.


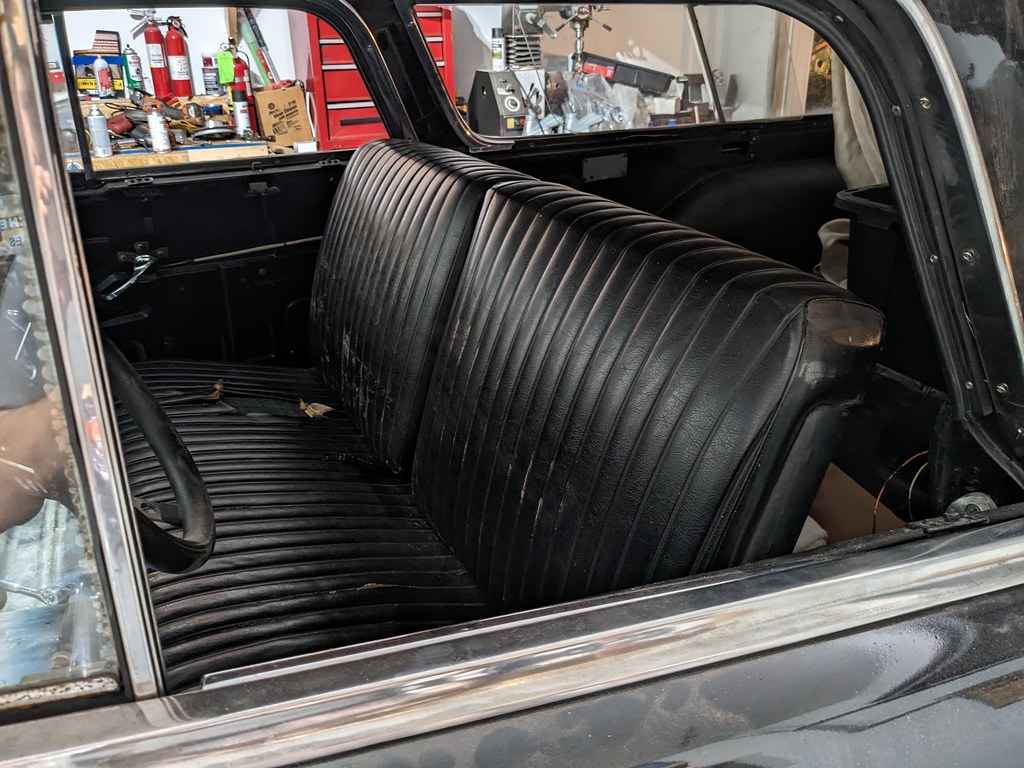
That's all the work I've done on the body. I've been continuing the parts search since hunting for parts is always something that I enjoy. I've been keeping an eye out for a seat in decent shape that wasn't ridiculously priced and was able to finally track one done. I was finding rusty seat frames and people were asking $800 bucks! I ended up driving a little farther than I wanted, but the seat is overall in great shape and not rusty at all. Bonus is it's complete with the tracks and side shells. There are some obvious tears in the seat bottoms, but they sorta match the vibe of the car so they will work as is for now. Looks like someone put the cover right over the original seat covers. Not sure if it's right or wrong, but they appear to have done a decent job.


I couldn't wait to see what it felt like in the car so I installed it first thing when I got back. It fit like a glove in the car just like it should, and felt really good since I haven't really sat in the car since I bought it. I'm a taller guy, so I may need to eventually find some shorter seat tracks to lower the seat down some, but it feels great to finally have a seat.

Like I always do, I asked the guy that I bought the seat from if he had any other parts, and he happened to have a set of new shocks that he installed but never used. He sold them to me cheap, which is great since I don't plan to keep this frame long. He also had a 57 wagon fuel tank, which was in way better shape than the one I was planning to use, and he gave me a great bundle package on everything.

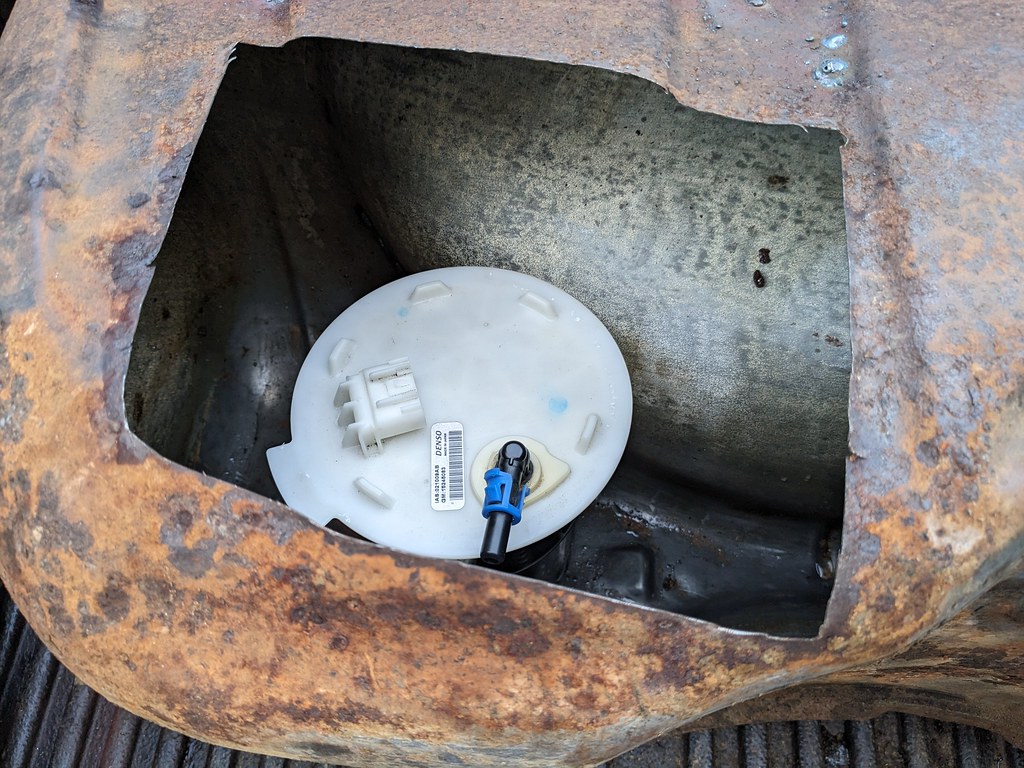
I also placed an order last week for some parts I need to get the motor mocked up, and the rear seat latches to get the rear seat mocked up. I also found a great deal on a new fuel pump that will fit the height of the wagon fuel tank. It's a new Delphi unit made for 09-13 Silverado's.


I couldn't wait to see what the rear seat looked like in the car so I quickly installed the rear seat latches and loosely installed the seats. I have the lower seat brackets just sitting on floor propping up the seat bottom for right now, but for just loosely mocking it up, everything fits great.


It's interesting how bolting a few seats in came make the car feel so much more complete. I'm getting so excited to get this car back on the road. I've got a line on a pair of G20 Chevy Van fenders to make the repairs on the rear roof, and the 55-57 engine mounts from CPP should be delivered today. I can't wait to get the engine mocked up and see what, if any, modifications I'll need to make to get it all to fit properly.
Cheers,
Ryan
1955 Nomad project LC9, 4L80e, C5 brakes, Vision wheels
1968 Camaro 6.2 w/ LSA, TR6060-Magnum hybrid and etc SOLD
1976 T/A LS1 6 Speed, and etc. SOLD
Follow me on Instagram: ryeguy2006a
07-24-2023 #99
Registered User
- Join Date
- Sep 2004
- Location
- Orlando, FL
- Posts
- 1,078
Looks AMAZING!! Any chance the original material under the black vinyl matches the back seat?
Are there any cheap seat cover kits that would work for your front and back seats? Mexican blankets? Scottish tartans?
And Just thinking out loud... I wonder if a Jeep Grand Cherokee or another brand retractable cargo cover would fit behind the back seat?
A newer truck console may fit in front of your front and rear seats too for convenience for the family...
LOVE this thread and look forward to your updates every week!!SMSgt Ty Ingle, USAF
"CF71" - Freedom BirdHoodpins.com, Inland Empire Driveline, Billet Accessories Direct, Modo Innovations, AutoRad Radiators, Morris Classic Concepts, Marquez Design, Anvil Auto, Fesler Billet, US Collision (DOOM), AGR Performance, Pro-touringF-body.com, Phoenix Transmission Products, Shiftworks, ACC Carpet, Hedman Hedders, BMR Fabrication, American Autowire, MityMounts, TIN INDIAN Performance, Kauffman Racing Equipment, Pypes, RobbMc Performance, WMC, Holley, NOS, PST
07-25-2023 #100
Registered User
- Join Date
- Sep 2009
- Posts
- 2,725
Thank you! I'm planning on doing something just like you are describing and using a Mexican blanket to cover up at least the seat bottom. I can do seat covers later on, but right now I just want to get it back together and drive it.
I like that idea for a front console. I've seen where guys build them, but hadn't thought about a truck console.
1955 Nomad project LC9, 4L80e, C5 brakes, Vision wheels
1968 Camaro 6.2 w/ LSA, TR6060-Magnum hybrid and etc SOLD
1976 T/A LS1 6 Speed, and etc. SOLD
Follow me on Instagram: ryeguy2006a

 Reply With Quote


