

Results 41 to 60 of 165
-
08-08-2013 #41
 Registered User
- Join Date
- Oct 2012
- Posts
- 164

lol.
That's sick.
I want a 3d printer now.
-
08-11-2013 #42 Registered User
- Join Date
- Apr 2011
- Location
- North NJ/SW Virginia
- Posts
- 197

Defiantly going to look into getting a R32 in the next few years being they will meet the 25 year age requirement to get them in the states.
Do you think the turbo timer actually helps? I keep hearing they aren't necessary provided you stay outta boost for a few minutes before shut-down. (Being a non-turbo guy)
Keep the updates coming.
08-11-2013 #43
Registered User
- Join Date
- May 2013
- Posts
- 98
 I still cant get over how pricy they are/ will be in the states when compared to here. Honestly, I dont think the turbo timer does much but it was already wired into the car when I got it so I thought I would make it a nice home rather than keep it double sided taped to the dash. If you just stay out of boost the last few minutes of driving as you said, you will be completely fine.
 Originally Posted by john31s

08-19-2013 #44
Registered User
- Join Date
- May 2013
- Posts
- 98
Got a bunch of little things done on the car this weekend including New poly bushings in the new (to me) S13 Non Hicas rear subframe. I am re-finishing the stock arms for now and using all poly bushings, Adjustable arms will be in the cards in the future but for now my money needs to go towards more important things. I have also replaced all the endlinks, steering rack and tension rods with Poly Bushings as well. It is painstakingly time consuming slow work so I hope the end result is worth it.
In continuing with my design ways, I have started mocking up a "ram air" to bring cooler air into the engine bay. I dont know if stock GTS-T rad supports are the same as GTR's or not but I never noticed the opening below the passenger side headlight.

644301_10151540154341540_48097080_n by R32Jordie, on Flickr
I quickly mocked up the intake to bring air from the vent in the bumper to the rad support using pink insulation foam. Great stuff to work with although it needs to be sealed before fiberglassing can happen. Ill update more on this later.
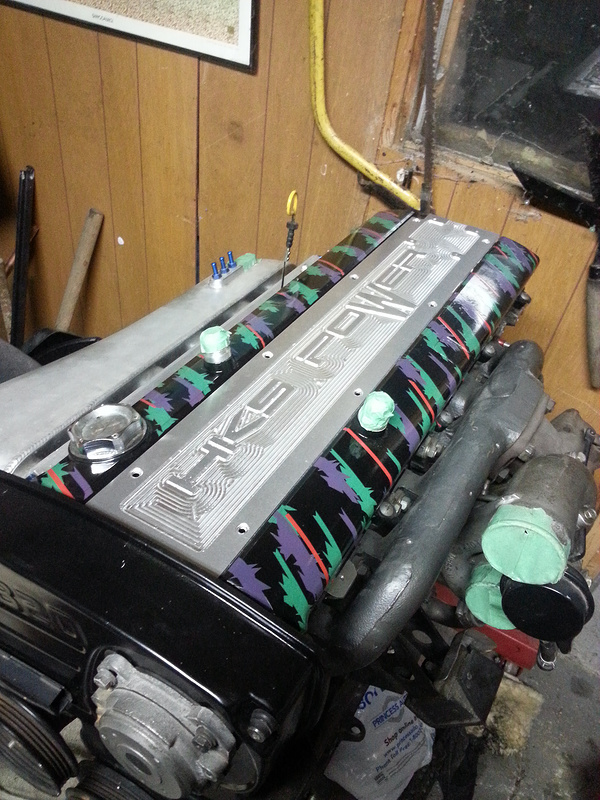
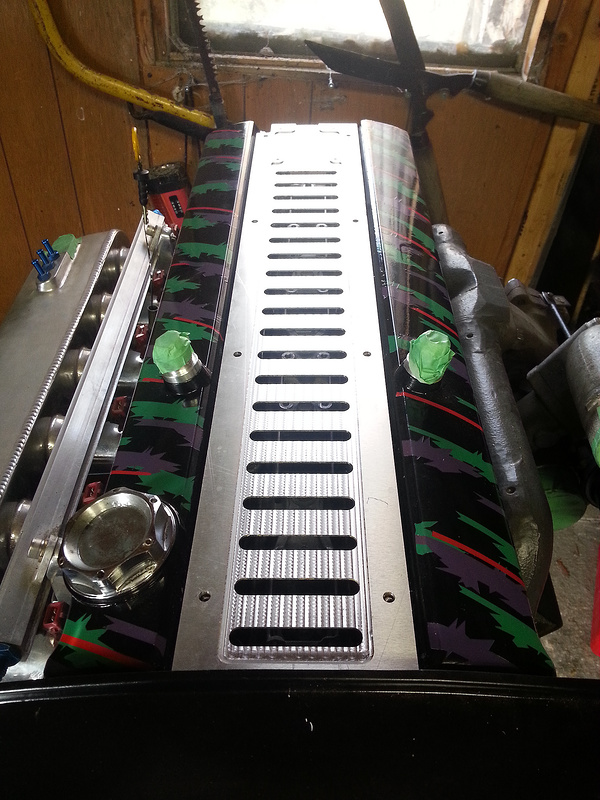
I have also recently been working with out CNC Router table at work to create aluminum parts and toying with making a coilpack cover to go along with my recently painted cam covers.
When I had my S13 I searched high and low to find this coilpack cover:
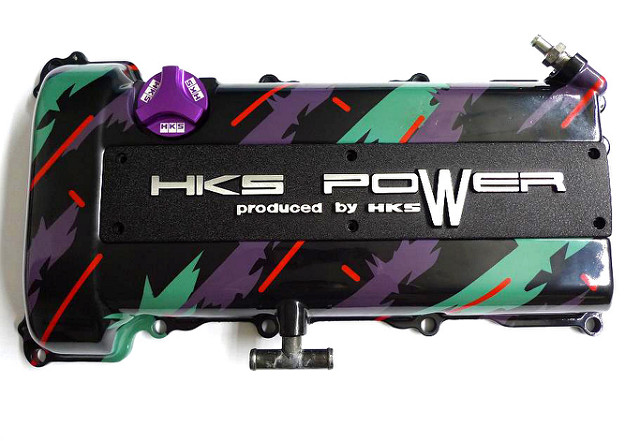
hks-spark-plug-cover-oil-cap-and-custom-painted-sr20det-valve-cover by R32Jordie, on Flickr
Now I have the machinery to make my own I may design one for my RB. I will upload a pic of the design when it is completed :D
I have found the Oil Cap on Ebay but I cant bring myself to pay 100 for it just yet.
Cheers,
-Jordie
08-20-2013 #45 -Moderator/Sponsor-
- Join Date
- Apr 2001
- Location
- The City of Fountains
- Posts
- 15,975
Jordie,
I am totally digging this build. Why not make the oil cap on the 3D printer?
Andrew1970 GTO Version 3.0
1967 Cougar build
GM High-Tech Performance feature
My YouTube Channel Please Subscribe!
Instagram @projectgattago
Dr. EFI
I deliver what EFI promises.
Remote Holley EFI tuning.
Please get in touch if I can be of service.
"You were the gun, your voice was the trigger, your bravery was the barrel, your eyes were the bullets." ~ Her
08-20-2013 #46
Registered User
- Join Date
- May 2013
- Posts
- 98
Hey Andrew, Originally Posted by andrewb70
Thanks for the kind words. I think I would be afraid of the material breakdown when exposed to oil and heat. I will eventually buy one and add it to my collection of rare and discontinued parts but in the meantime my money could be better used elsewhere.
-Jordie
08-20-2013 #47
-Moderator/Sponsor-
- Join Date
- Apr 2001
- Location
- The City of Fountains
- Posts
- 15,975
Most OEM caps are "plastic" but I don't know how they compare to the material that is used in the 3D printers... Originally Posted by R32Jordie
Also, can you post more details on the 3D printing machine that you are using?
Andrew1970 GTO Version 3.0
1967 Cougar build
GM High-Tech Performance feature
My YouTube Channel Please Subscribe!
Instagram @projectgattago
Dr. EFI
I deliver what EFI promises.
Remote Holley EFI tuning.
Please get in touch if I can be of service.
"You were the gun, your voice was the trigger, your bravery was the barrel, your eyes were the bullets." ~ Her
08-20-2013 #48
Registered User
- Join Date
- Aug 2013
- Posts
- 34
This build is awesome. Love the 3D printer pieces - very nice. I'm not sure if I dig the 90's valve covers - but it's your car.
Question - Why didn't you spray the aero kit when you sprayed the dents? It has that beater rice burner look to me if you neglect to paint the body kit.
08-20-2013 #49
Registered User
- Join Date
- May 2013
- Posts
- 98
Sadly we only have an Objet 30 Pro at the moment. It is accurate up to .005" and prints but prints in a UV sensitive material (which isnt the greatest for "end use" parts without reinforcement). the material comes in cartridges and is deposited via a print head and cured with a UV light. It is great for mocking things up and has saved our company a ton of money in ensuring fit and ease of manufacturing of parts. Originally Posted by andrewb70
However we were at the suppliers head office here in Toronto (Proto3000) last week and were looking at a new machine (Fortus 400MC) with a larger build tray. The new machine prints in the "FDM" style of printing and works like a mig welder or glue gun. It deposits the material from a spool in customizable layers. The advantage to this system is the selection of materials available ranging from ABS and different grades of Polycarbonate (some of which are FST compliant). This would give our company the ability to print end use pieces for low volume orders where tooling would be expensive.
I do want a real Oil Cap though ( haha you cant just print everything) They are discontinued and pretty rare and wont go down in value at all.
The 3d Pieces will only get better if we get this new machine haha. Originally Posted by novaboy009
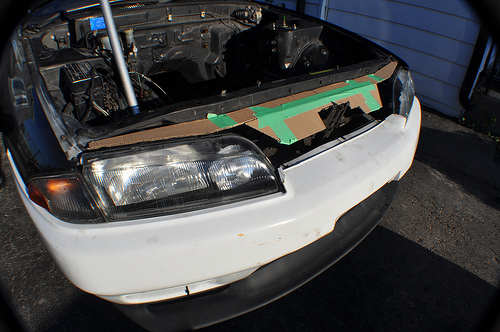
In regards to the aero, when I ordered it from Japan it was cut in half to save on shipping. the side skirts and rear valance still need some sanding and fiberglass work to fit 100%. The front bumper needs the "N1" ducts added to channel the air over the intercooler and into the rad.
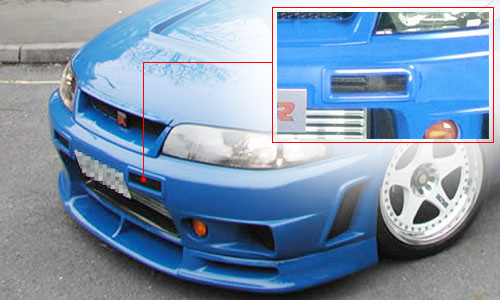
R33-GTR-N1-duct by R32Jordie, on Flickr
I promise that everything will be painted professionally prior to it hitting the road. It was just hard to get everything lined up and to my friends body shop when, at the time, the car was at my parents house 350 kms away.
09-30-2013 #50
Registered User
- Join Date
- May 2013
- Posts
- 98
Finally managed to get the S13 Non Hicas and all the bushings together and painted. Now that project is done and car is back on the ground it was time to work on the interior. And by that I mean take everything apart label all the wiring and start taking out what I dont need.
It started with deleting the rear wiper and escalated from there. "oh im not using the rear wiper any more, ill just remove the wiring and simplify it"
Pretty soon my interior looked like this
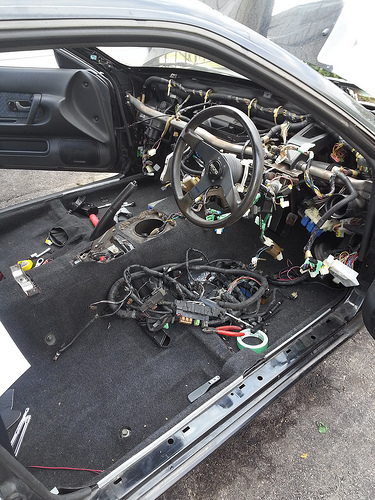
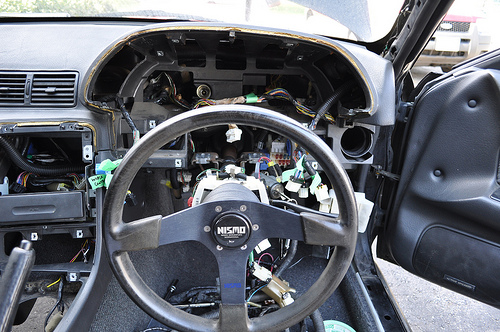
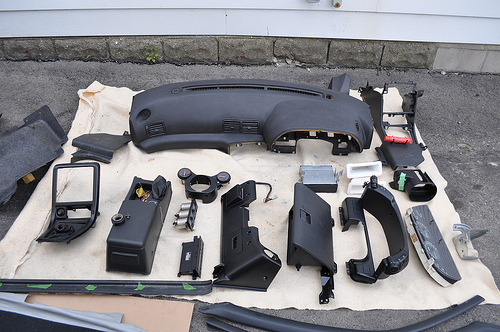
I am planning on putting the fusebox in the rear seat delete along with the battery and other electronics. Its going to be alot of work but gives me something productive to do
during the winter while I'm stockpiling parts.
Now onto the fun bit! this weekend I also decided to do some CAD (carboard aided design).
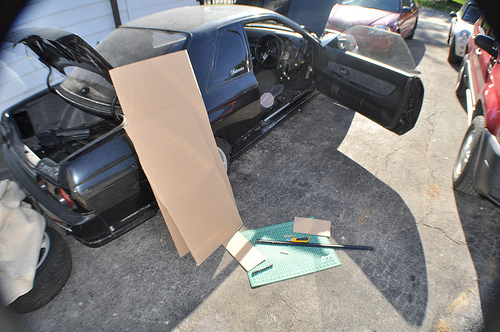
The plan was to do a cooling panel and to mock up the rear seat delete.
With this template ill measure and do it in solidworks and have it cut on the router table at work. Its been busy lately so I have a few programs I have yet to run.
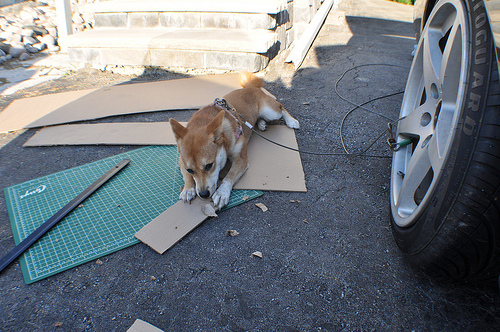
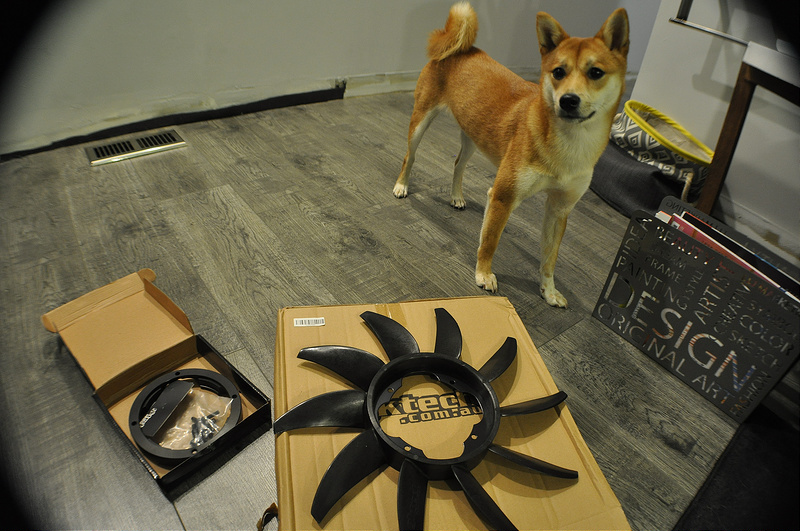
Akira Tried her best to help but made a mess and ruined the cardboard.
Here is a quick rendering of my "HKS" coilpack i am waiting to do on the router. Hopefully i can find some time this week.
Cheers
-Jordie
10-01-2013 #51 Registered User
- Join Date
- Nov 2010
- Posts
- 1,387
Dude I love your car and build!! Big fan here of skylines even though I own a 93 SUPRA!!!! NEMESIS (keep up the build)
68 Camaro RS twin turbo
https://www.pro-touring.com/threads/...d-Intent-V-2-0
1993 Toyota Supra 6768 Built Single Turbo
Slow Lifted Jeep No TURBO :(
Randal F
10-01-2013 #52
Registered User
- Join Date
- Oct 2012
- Posts
- 164
The R32 GTR and GTST Bodies were identical bar the front and rear guards, and the hood latch.
Structurally they are identical.
I've owned 4 R32's.
1 of which was a late '89 GTR.
10-01-2013 #53
Registered User
- Join Date
- Sep 2013
- Posts
- 448
3 things shocked me so far...
1) that you posted a Japanese car in these forums
2) that you didn't get flamed for it
3) that people on here actually genuinely are interested in this build.
This site rocks! there are so many closed minded people on the net that it's refreshing to see open minded people that just love cars... no matter what heritage they are.
i'm looking forward to this build too.
i do agree that the skyline/supra/rx-7's aren't muscle cars though. I read that way back in the day in scc magazine and thought it was an odd way to label these cars (my second car was a twin turbo 1993 rx-7 R1 (mild street port, ported turbo, sways, springs, shocks, etc..) and never thought of it as a 'muscle' car.
10-02-2013 #54
Registered User
- Join Date
- May 2013
- Posts
- 98
Thanks Scott Originally Posted by scott_fx
I believe it comes down to maturity and is the main reason I joined this forum. I loved the builds I saw on buildthreads.com and that directed me here. I havent been one to follow the latest trends (I think lots of the "stance" cars are silly) and cannot stand the flaming and name calling on Zilvia.net (nissan forum). I also enjoy all the custom fabrication that gets done on this forum. Whilst I dont have a big shop, welder or a massive amount of tools, I do spend most of my day designing and doing 3d CAD work (I am a product designer) so I am constantly coming up with ideas and designs. Having a 3d printer is nice too :D
I am neck deep in wiring at the moment (which is new to me), removing all the things I will not be using such as rear wiper, defrost and all the electronic 4 wheel steering components. Ill post up progress when it is all loomed back together but so far the only wires going to the rear of the car are for the lights and fuel pump.
thanks for reading.
-jordie
11-24-2013 #55
Registered User
- Join Date
- May 2013
- Posts
- 98
So Winter is officially upon us here in Toronto. I had to ditch the shelterlogic garage sadly because it was too wide to fit in the driveway without blocking my front step. I grabbed a all weather car cover on sale
and the car is sitting on jack stands in my driveway.
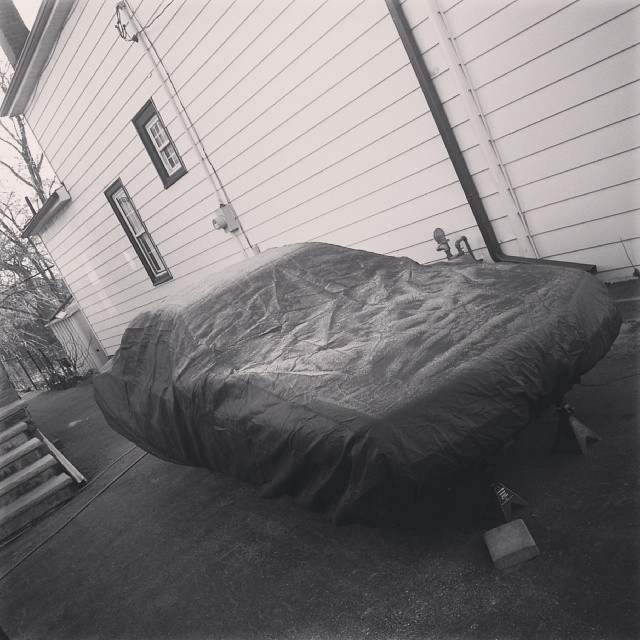
In Canada we are blessed to be able to legally import Skylines yet our climate only allows us to enjoy them for a fraction of the year. It is what it is.
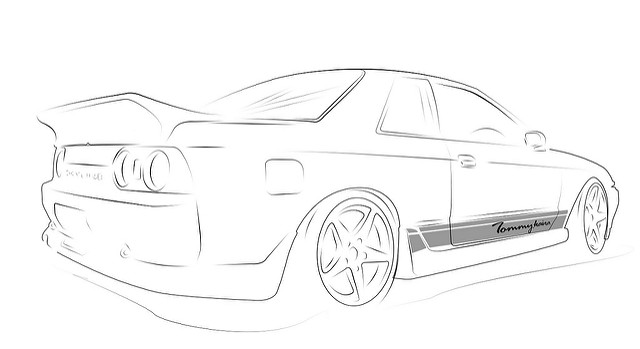
Since its unbearable outside, I've been doing lots of work in photoshop.
to get back into the swing of things, I did a quick line drawing of my R32 with all the aero on to show the stripe I want down the side of my car. Once my sideskirts are painted and installed I'll have the decals cut in either matte black or dark grey.
My Girlfriends dad used to have a gold Trans Am way back when so for Christmas I thought I would do a Rendering of his car for him.
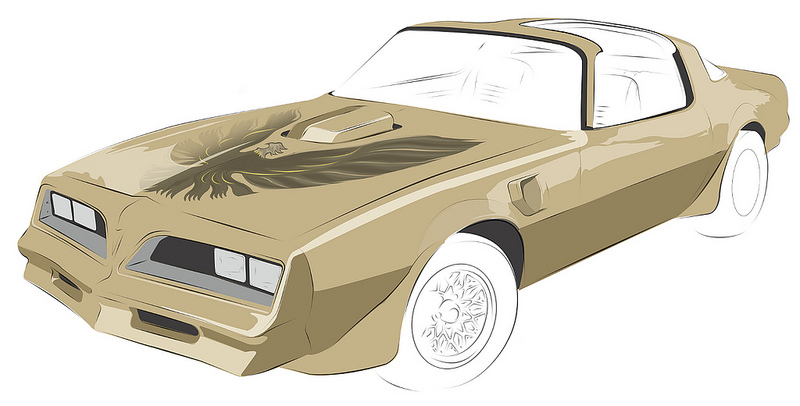
I prefer making things rather than buying stuff for people around Christmas. Ill be sure post up a finished shot once its done later this week.
-Jordie
11-28-2013 #56
Registered User
- Join Date
- May 2013
- Posts
- 98
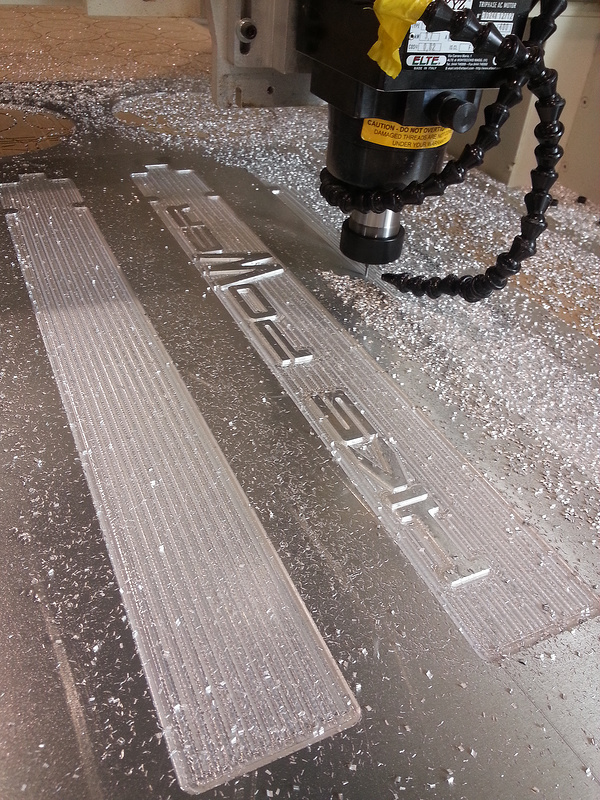
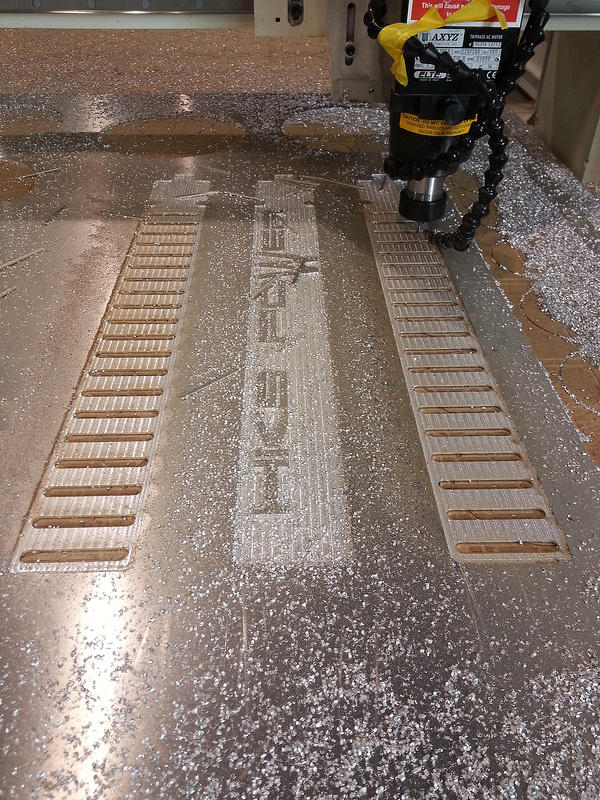
I managed to program the .nc file to run the cover on our router machine. I usually use this to cut lenses out of polycarbonate and other simple stuff, this was my first time programming a little more complex. I am by no means a master of this craft but it was fun turning my design into something made out of aluminum rather than 3d printed plastic.
I only had my cell phone to take pics with at work so bear with me
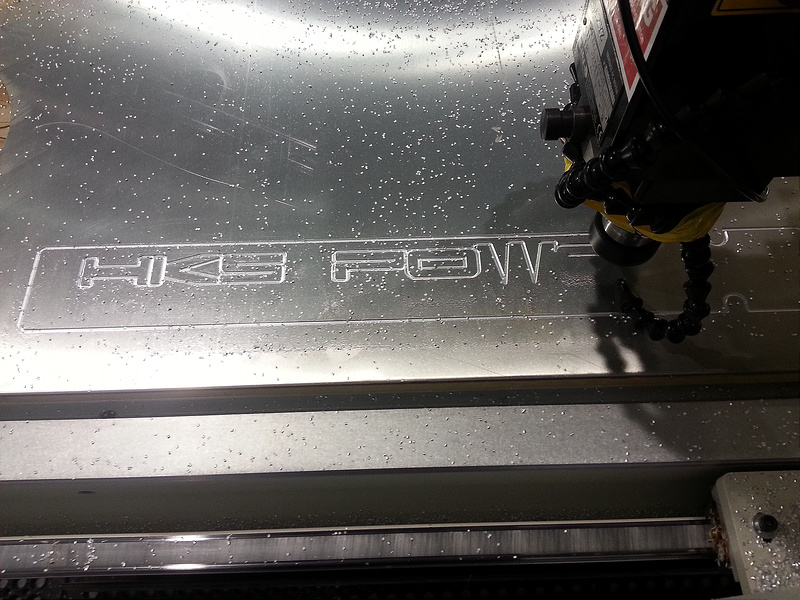
The program ran the part using a .125" tool to do the "finer" details and a .250" tool to clear the majority of the material away. We do have a .0625" tool I would have liked to have used to make tighter radii but didnt want to break it.
The tooling marks are easily sanded down and buffed but it was an interesting process to watch
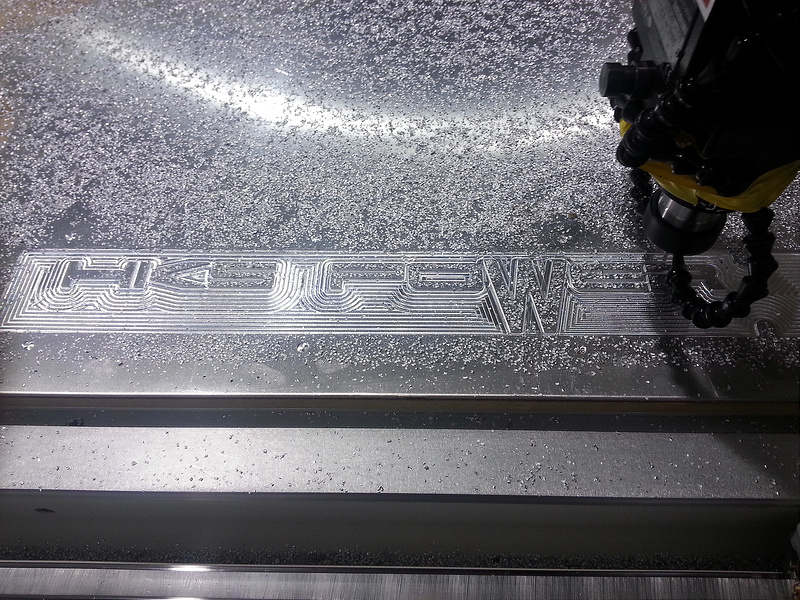
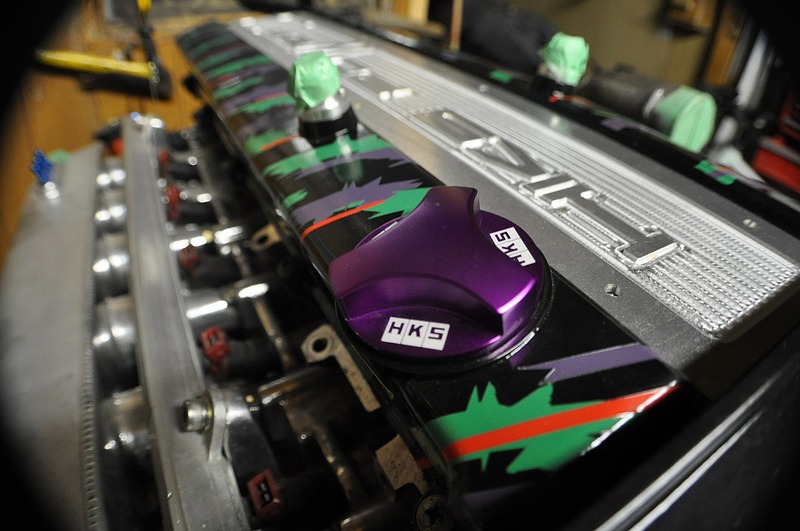
The whole process took about 40 min from start to finish and I'm pretty stoked on how it turned out. It will even look better with the Purple Oil cap thats in the mail.
It still needs to be finished, sanded and painted. I might try and make one with countersunk hardware as I think it will suit the thinner material thickness and give it a cleaner look.
the owner of my company gave me the go ahead to use the machine whenever I like (provided there is someone else in the building) so I will keep refining the design until It is to my standards.
Once I perfect the program, I might start making vented coil pack covers as there seems to be some interest for them amongst skyline owners.
I am also waiting on some parts in the mail,
- Like I mentioned, I caved and bought the HKS Oil cap
- I am waiting on a GKTECH clutch Fan (60% claimed better airflow over stock and its not 20 years old) and the Adaptor to mount it to my engine (currently out of stock and on back order)
- as well boring stuff like tierod ends and steering boots (AMS had a sale for black friday and I got everything for 70% off)
Its supposed to warm up a bit this weekend (only to +6 C) , I might take final measurements for the cooling panel and cut it as well. we shall see.
-Jordie
11-28-2013 #57
Registered User
- Join Date
- May 2010
- Location
- kitchener,Ontario,Canada
- Posts
- 2,336
I must agree...a foreign Japanese. Car on this Site...a Canadian yet too, 2 mins for roughing, even though I've got Chevelle I have always said that out of all the japanese cars the only ones I respect are the supra,gtr and skylines congrats for being different and cool keep up the good work and if your ever in kitchener the beers are on me
Ryan
12-01-2013 #58
Registered User
- Join Date
- May 2013
- Posts
- 98
Haha thanks for the kind words. I've always been into nissans and have wanted a skyline since playing gran turismo on the original playstation haha. If im ever headed up kitchener way with the car ill swing by, id love to see your project. Originally Posted by raustinss
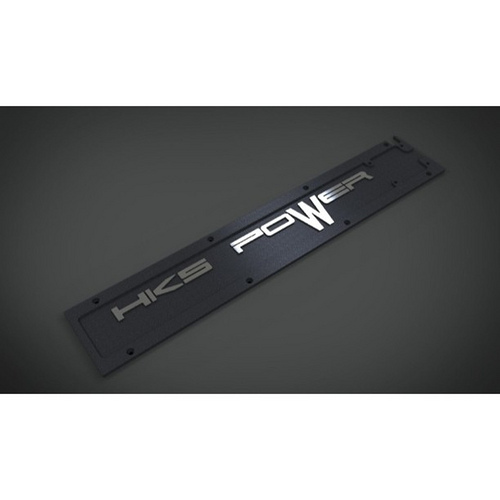
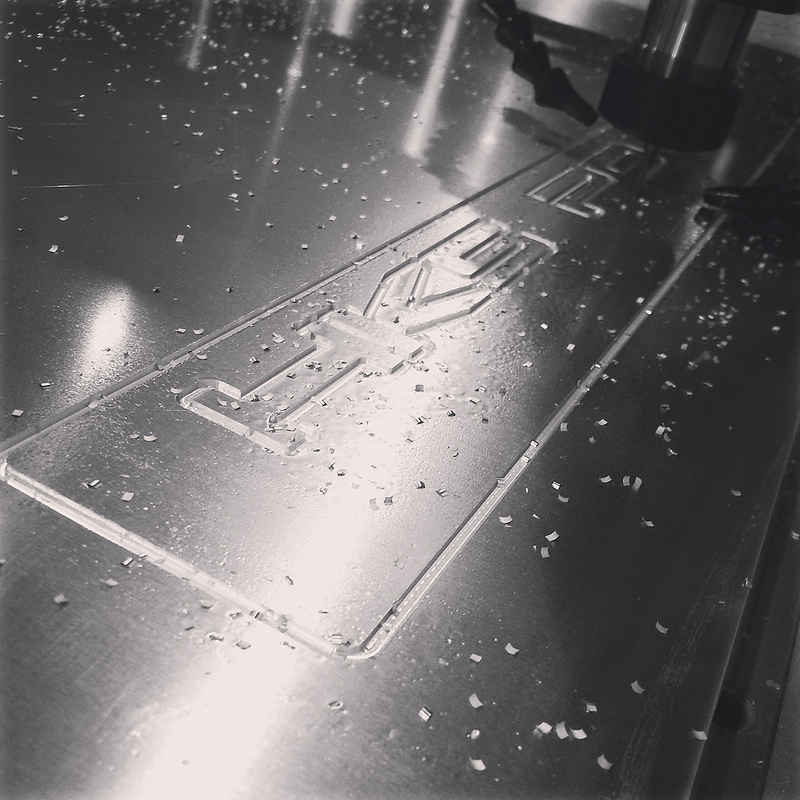
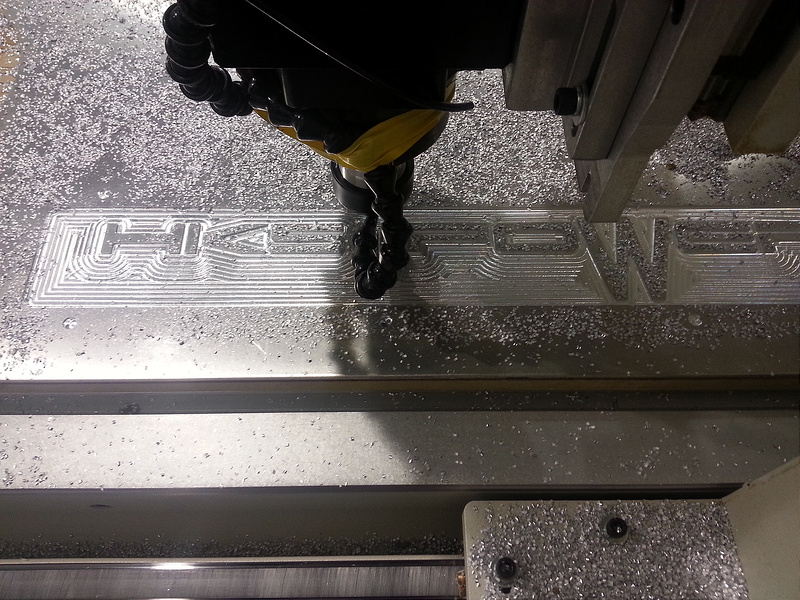
It was pouring all day today so I took another crack at perfecting the HKS Coilpack cover. The first one I made needed some minor tweaks to the program.
I corrected the tool path to it makes nice clean linear cuts rather than going around the parameter of the letters and got rid of the counterbore holes for the hardware.
I also had some requests to make vented covers as well so I made a couple prototypes in that style.
The Fitment is spot on and should provide the much needed cooling to prevent misfires while at the track.
-Jordie
12-15-2013 #59
Registered User
- Join Date
- May 2013
- Posts
- 98
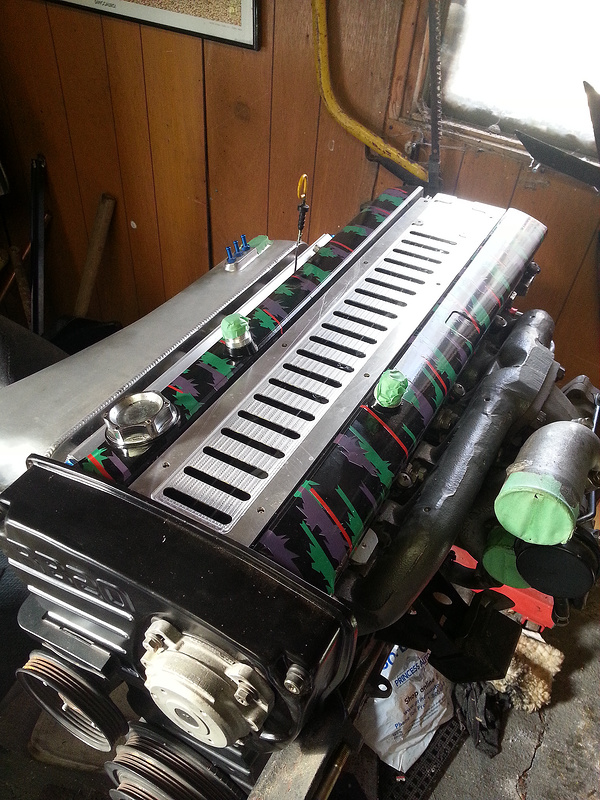
Christmas came early today and everything showed up today (So I have to Show it off)
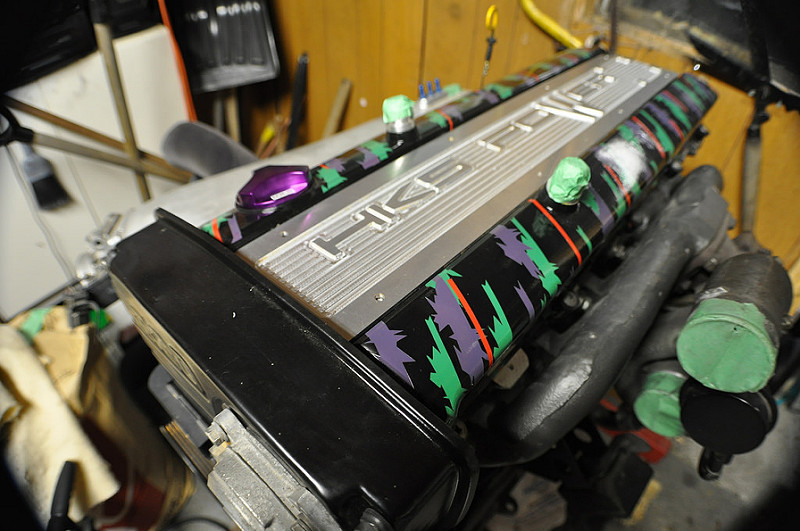
I know i've posted enough pics of my motor but i'm just so happy how it all came together with the HKS oil Cap.
Finally got my package for GKTECH and the quality looks great. Cant wait to see how it preforms.
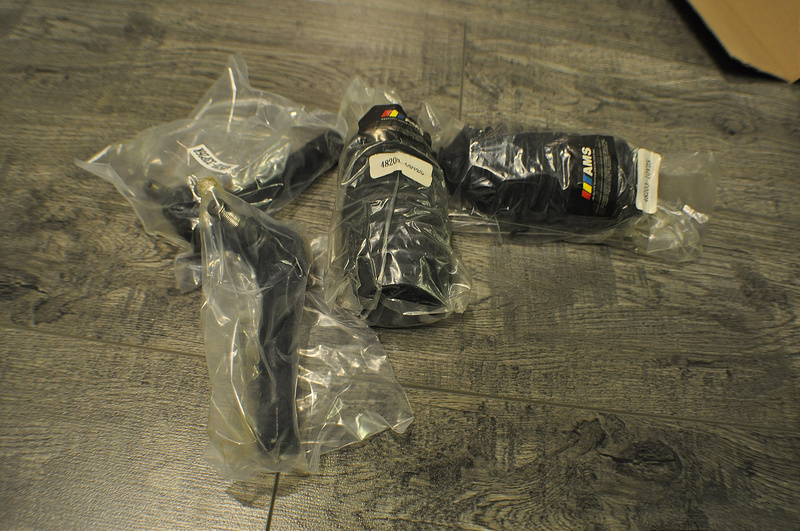
Maintenance stuff in from AMS's Black Friday Sale. Got 2 steering rack boots and 2 outer tierod ends for just over $20
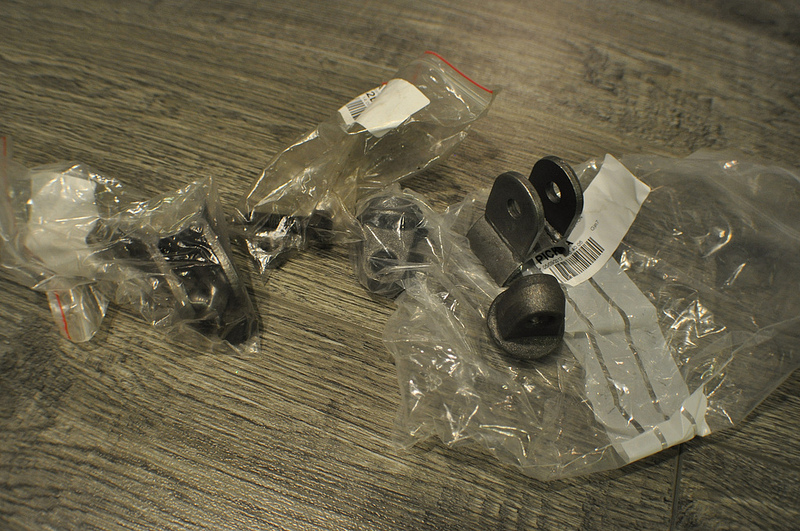
Also picked up some bar ends and brackets from OMP to turn my 4 point cage to a 5 point.
Finished the rendering of the Firebird I did for my Girlfriends Dad. should be a good christmas present.

I've started selling the coilpack covers to fellow skyline owners to fund the project a bit. So hopefully that gets the ball rolling again
-Jordie
05-08-2014 #60
Registered User
- Join Date
- May 2013
- Posts
- 98
Back From the Dead.
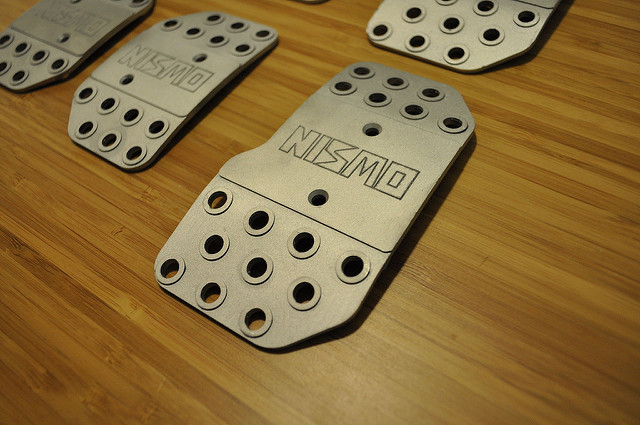
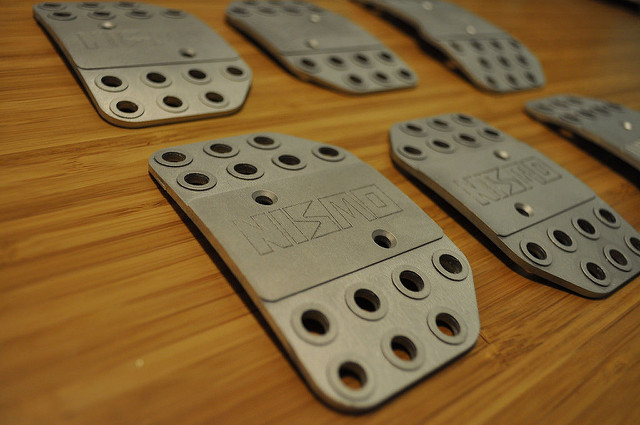
when I got my car it was missing the rubber pads that cover the clutch and brake pedals. I have been looking on and off for "old nismo" pedals, but quickly relized that they are +$200 and that is way to much to spend on something that gets trod on every time you're driving the car.
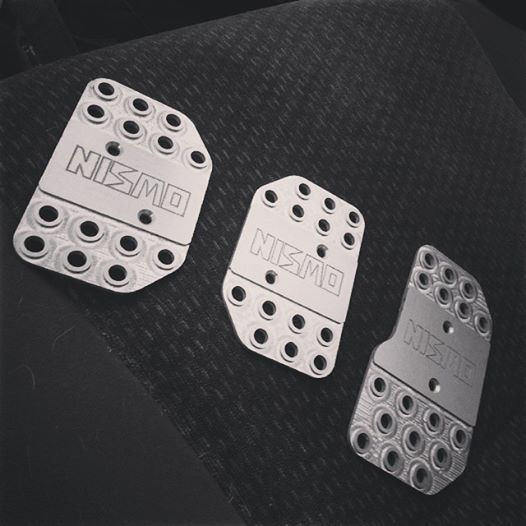
So a couple hours in Solidworks and CNC programming I had this:
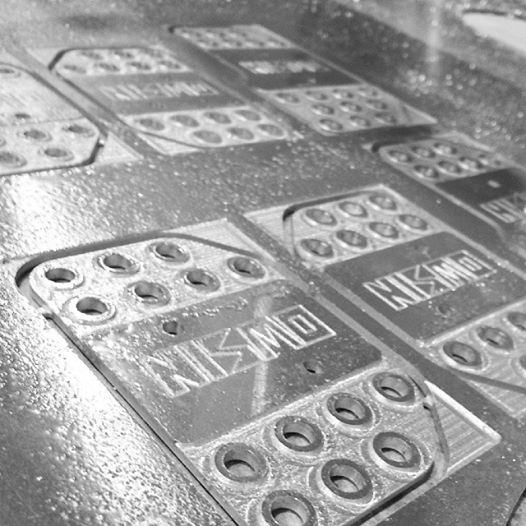
They mount using #8 countersunk machine screws and the mounting holes are based off MOMO/ Sparco universal mounting patterns.
(Sorry for the Cellphone/ Instagram Pics)
They are cut from a flat sheet and will be bent using my old MOMO pedals as a template.
I then sent my pedals to Centerline Motorsports and had Rene clean up the tooling marks with the sandblaster. I am so stoked on how they look.
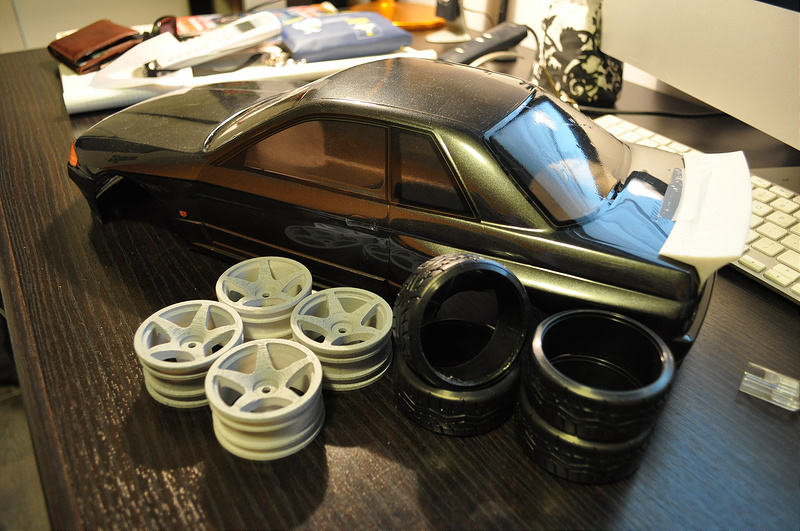
also because it was is winter and I lack a garage, I decided to bring life back into my old Tamiya RC car. I found it stashed in my closet at my parents house over the holidays.
Here it is in all its glory. It started out as a Ferrari Enzo Kit (TT-01 i believe). I had this when I was 15 and before I got into real cars. This is also waaay before the drifting boom happened and before any RC manufactures jumped on the bandwagon so It has ghetto PVC pipe "tires" for drifting.
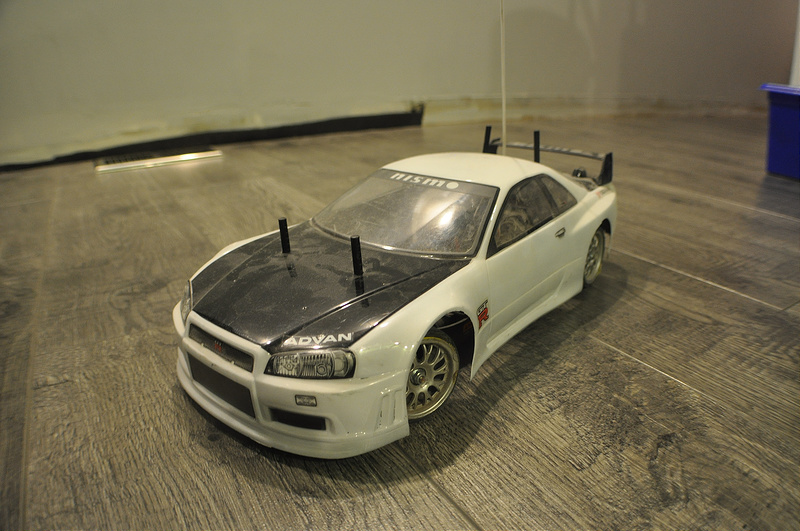
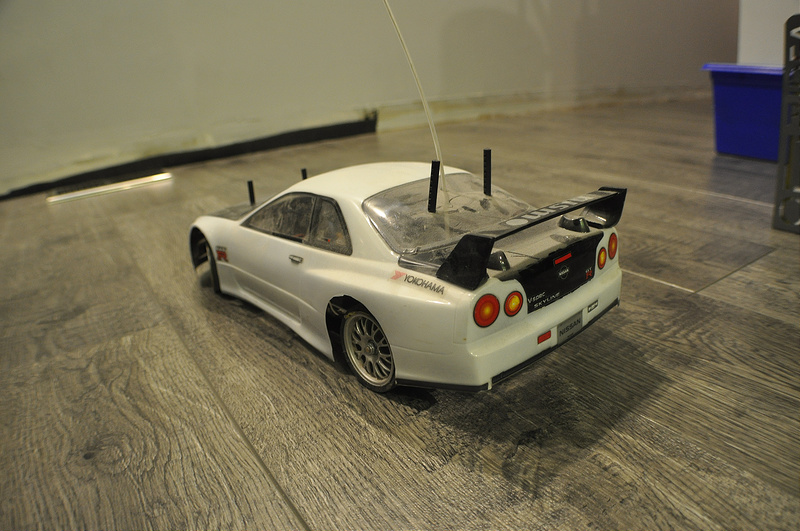
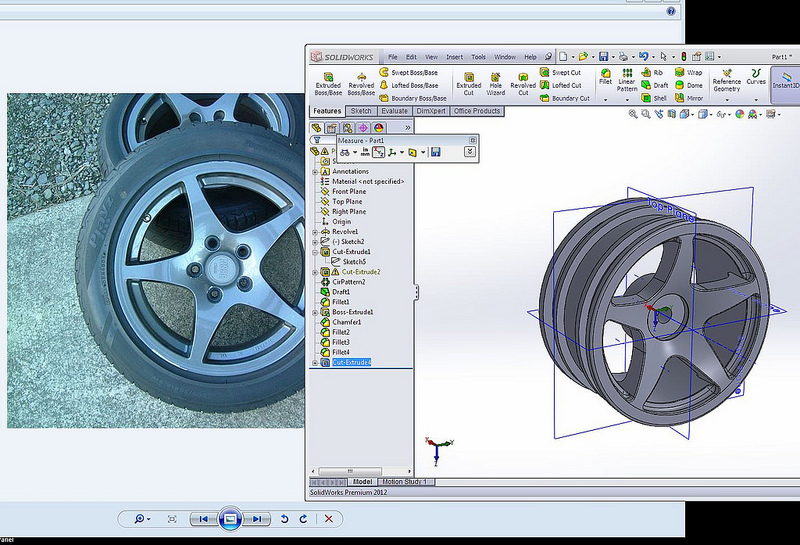
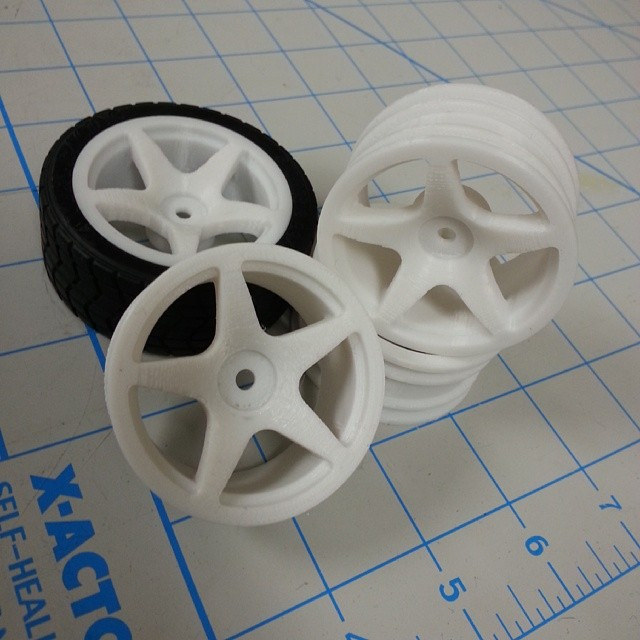
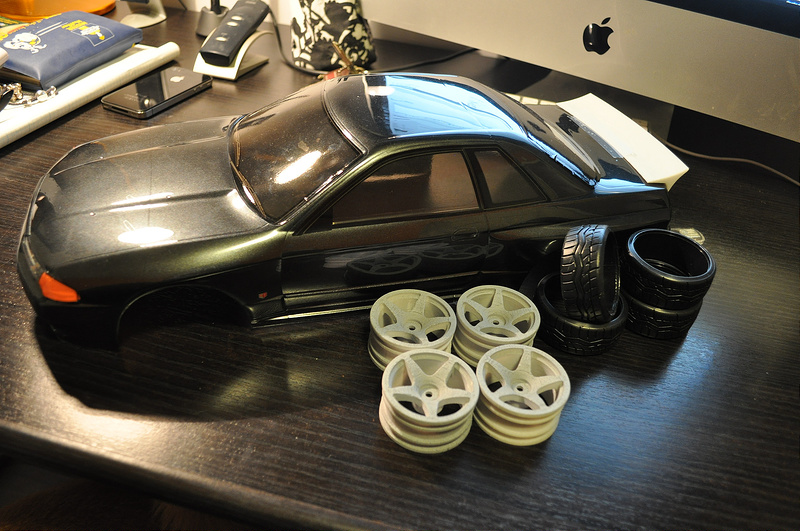
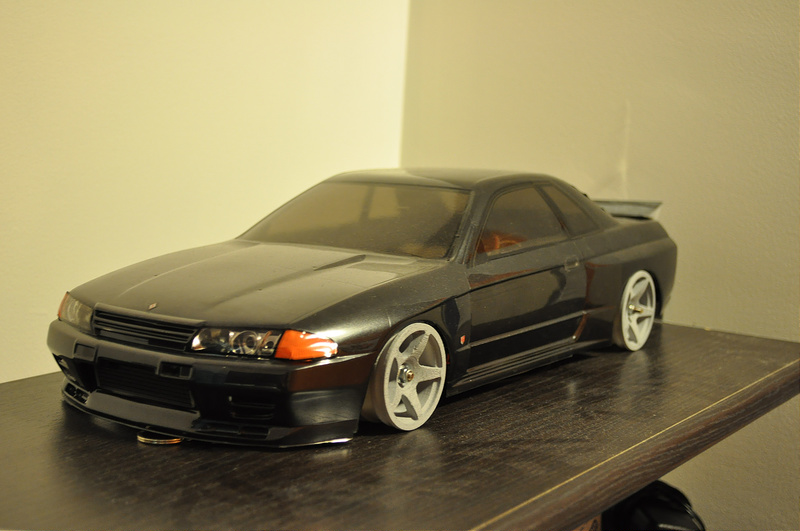
The plan is to practice solidworks and by using the new polycarbonate printer at work create a replica of my car. I tried doing this with a 1/24 model but the scale was too small. The 1/10 scale will be a lot more manageable.
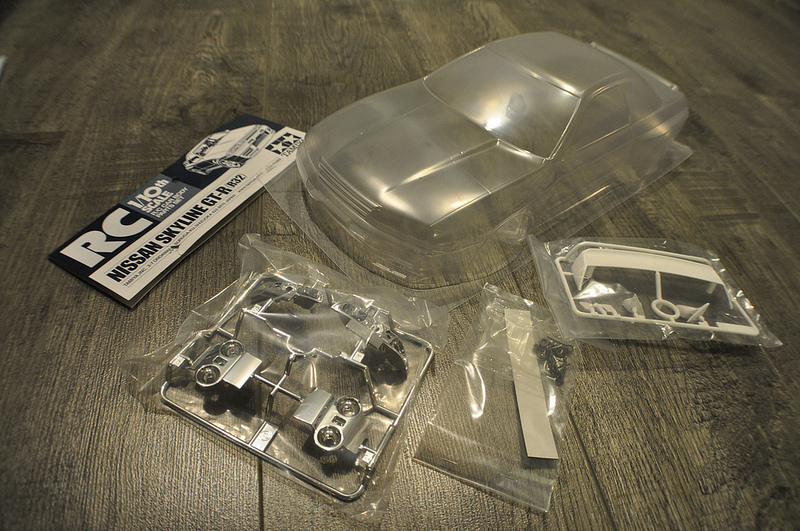
I picked up the Tamiya R32 Kit as a base to start from (it actually just showed up today). I really like the detail of their products when compared to HPI and other brands.
Ive started on designing the CAD for the wheels. No one really knows Nismo NS5R wheels let alone makes replicas for RC cars. I grabbed all the dimensions from the wheels that came with the ENZO Kit.
My birthday was at the beginning of April, But due to the ****ty cold weather I postponed my party/ bbq until this past weekend (which turned out better because everyone had their cars out)
It was a pretty good turnout for my small street. It also got my motivation back to where it needed to be, I brought the car out of hibernation.
I ordered a sealed Moroso battery box to relocate my battery (legally) to behind the passenger seat. The box is sealed with an O-ring with the exception of a vent tube which exits the bottom of the car.
A while ago I mentioned that I was going to make a rear seat delete cover. I really don't like the stripped out look of not having back seats but didn't want to keep the seats with the rear half cage either. I have been planning it out for some time now and it will look OEM ish when complete. The Idea is to have 2 lock boxes (doors) on either side of the driveshaft hump. One will give access to the battery and the other will provide storage for a small tool kit or whatever.
I started my making some bracketry which mounts into existing mounting holes on the rear bulkhead. (excuse all the sound deadening. I will be properly cleaning this out)
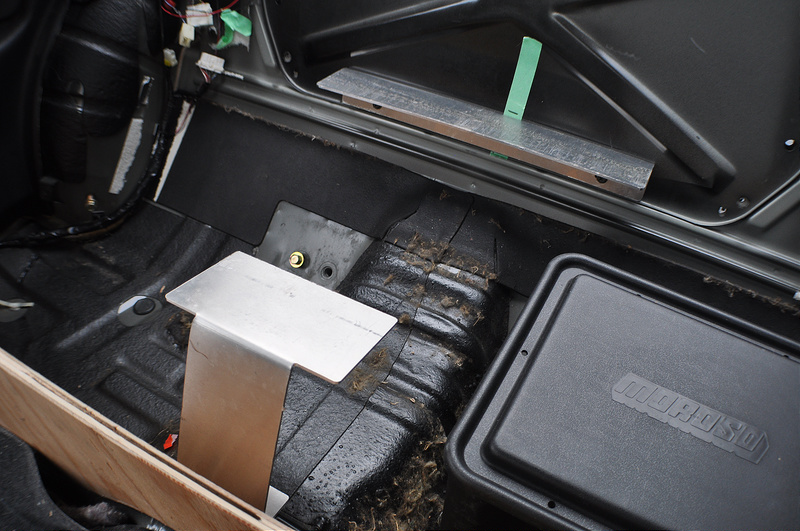
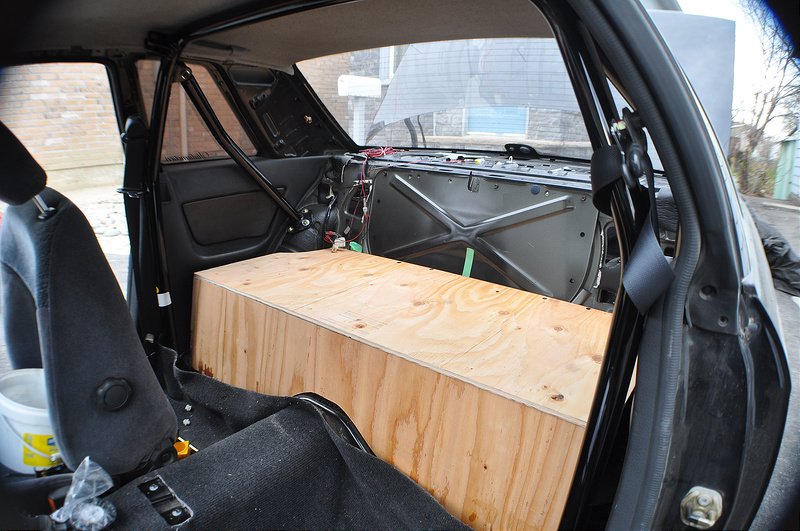
Then I made cardboard templates and cut everything out of 1/2" plywood. I am not too sure if this is the best material for the job, but Its cheap good for making ridged templates. I still need to cut the openings for the storage lockers in the top panel but the overall shapes fit nicely. The front piece is angled slightly so the whole structure doesn't look like a box and mimics the seat back.
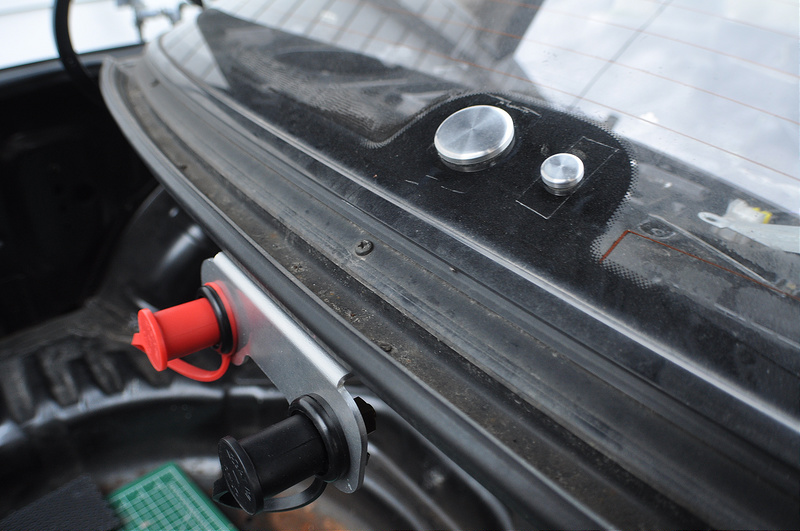
Since the battery is tucked away in the cabin, I machined a bracket to fit where the rear wiper was mounted and bought some remote battery terminals. This will allow the car to be boosted / trickle charged without going into the interior. I got this idea from 95riosnake's build on here (so hats off to you)
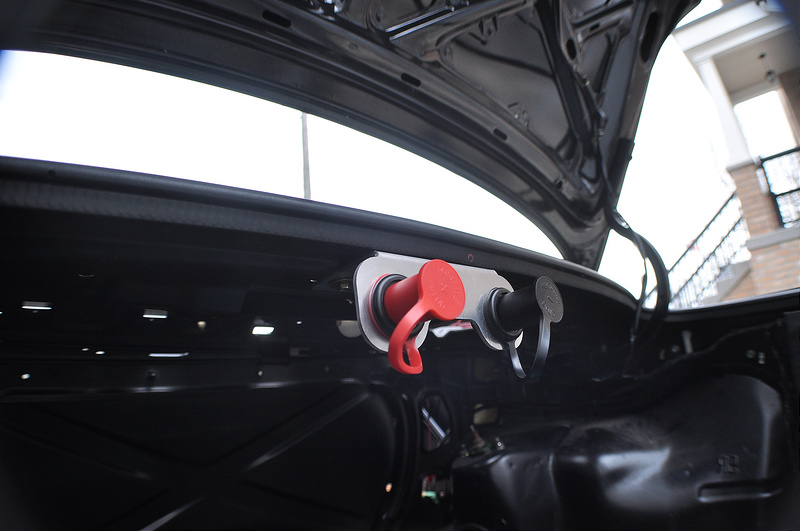
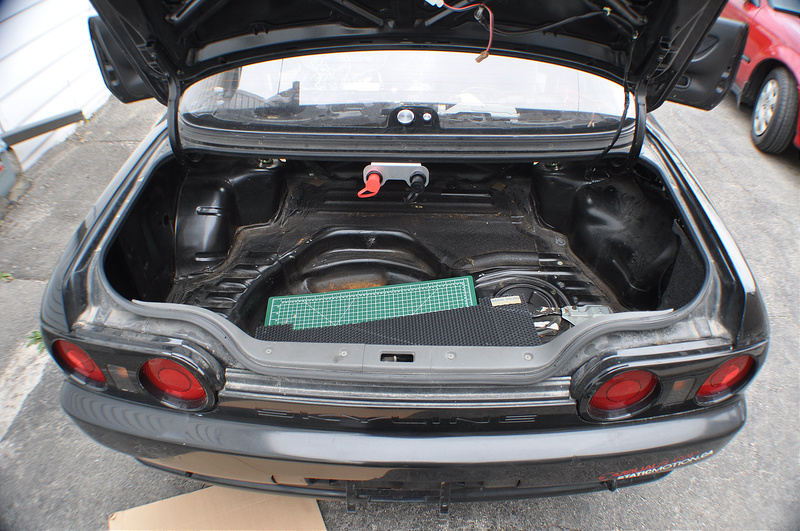
I also picked up some machined wiper and spray nozzle plugs from the Alloy & Carbon store on ebay. They are quality pieces and I would recommend them to anyone.
thanks for reading
-Jordie

 Reply With Quote


