

Results 321 to 340 of 388
-
07-02-2014 #321
 Registered User
- Join Date
- Jun 2014
- Location
- Auburn, Mi.
- Posts
- 44

SSLance & Mr. Ron Sutton,
I'm sorry for the highjack of this thread! I'll finish with a thank you for answering my questions. My post in "Suspension" (1980 El Camino frame and suspension help) will be used for my questions in the future. Thanks again!
Doug
-
08-25-2014 #322 Registered User
- Join Date
- Aug 2012
- Location
- Peoria, AZ
- Posts
- 1,758
I have secured the use of a set of scales and plan on 4 corner weighing my car once again (this time properly, at my own shop not in a hurry) in a couple of days. I had to go find this post to print out the instructions again so I thought I'd bump it up just in case anyone else might need it once again.
 Originally Posted by Ron Sutton

There have been some other goings on with my new setup while getting it ready for the SCCA Nationals this coming weekend. I'll update the class more a bit later on when I get some time. It's been interesting for sure...Lance
1985 Monte Carlo SS Street Car
08-25-2014 #323 Registered User
- Join Date
- Nov 2002
- Location
- state of confusion
- Posts
- 1,499
Why not build a set of four ramps, each with a flat length at a height equal to the height of the scales? A come-along ought to be sufficient to pull the car up the ramps and leave you with less (maybe none) of the jacking and relocating of scales and other problems associated with large amounts of lateral tire scrub.
Norm'08 GT coupe, 5M, suspension unstockish (the occasional track toy)
'19 WRX, Turbo-H4/6M (the family sedan . . . seriously)
Gone but not forgotten dep't:
'01 Maxima 20AE 5M, '10 LGT 6M, '95 626, V6/5M; '79 Malibu, V8/4M-5M; '87 Maxima, V6/5M; '72 Pinto, I4/4M; '64 Dodge V8/3A
08-25-2014 #324
Registered User
- Join Date
- Aug 2012
- Location
- Peoria, AZ
- Posts
- 1,758
I'm really liking having these set up flat, level and square...with lots of room for me to still get under the car and my lift to raise and lower the car right there.
I've made slip plates that I'll put under the front tires on top of the scales. Should work like a champ...Lance
1985 Monte Carlo SS Street Car
08-28-2014 #325
Registered User
- Join Date
- Aug 2012
- Location
- Peoria, AZ
- Posts
- 1,758
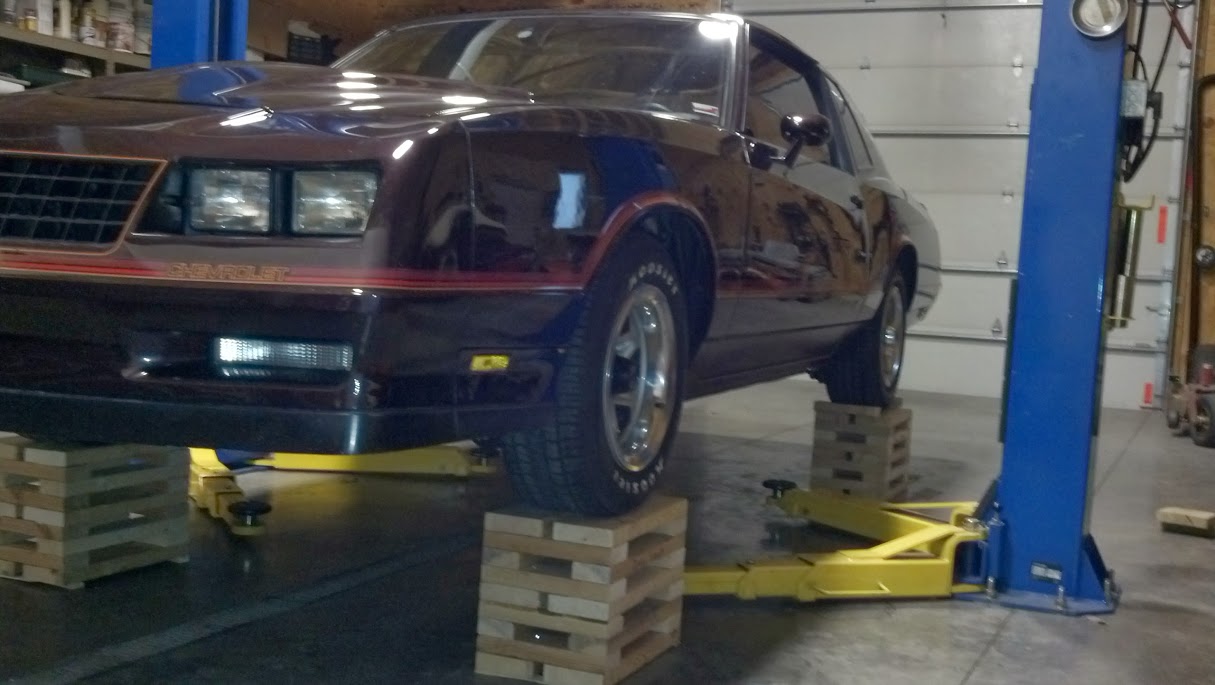
4 corner weighed the car last night and ended up here:
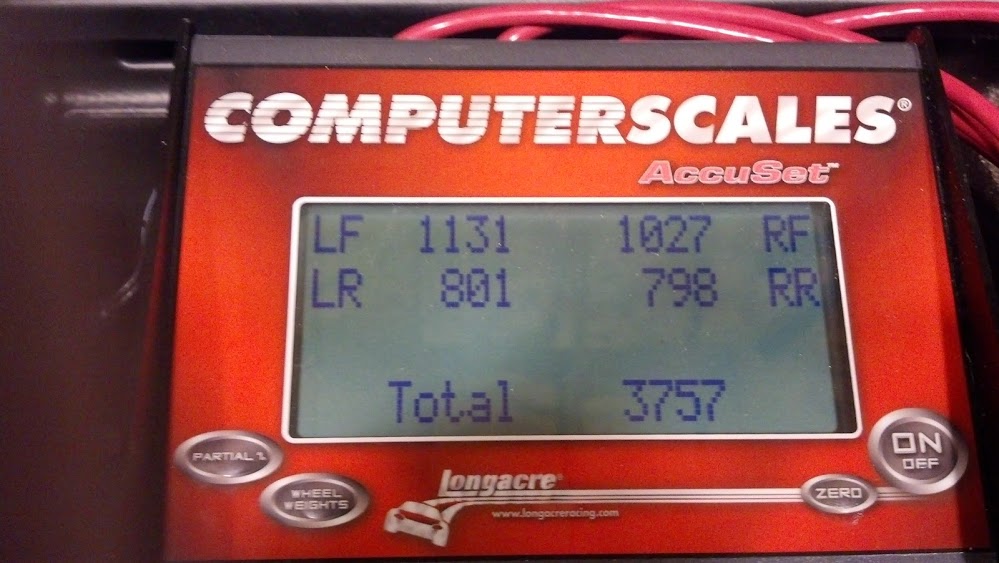
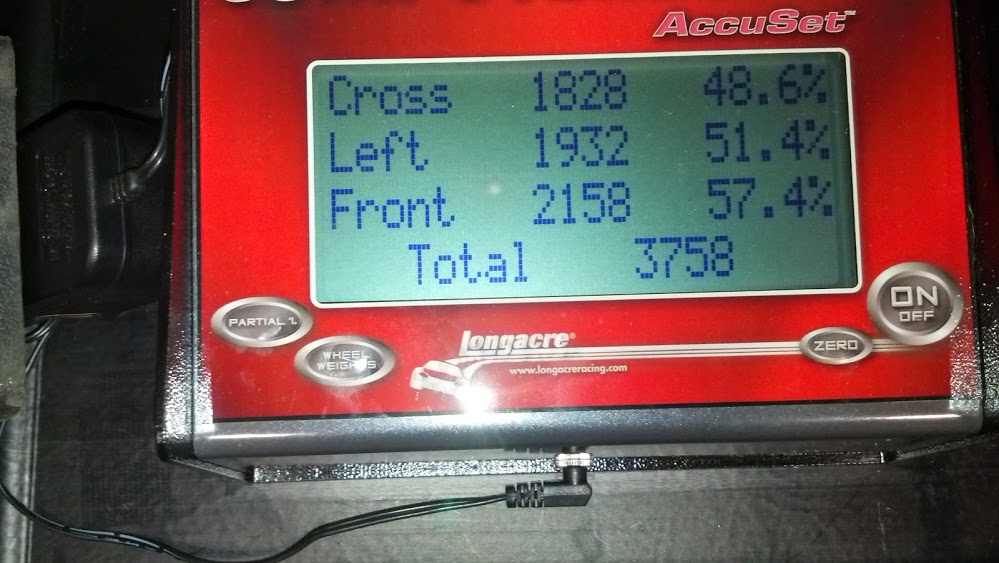
That was with me sitting in the driver seat and a full tank of gas which is usually how I start out an event. The ride height was adjusted right where we needed it as well, 25 7/8" at each front fender and 26 7/8" at each rear fender.
I'm pretty happy with how it turned out, especially since it's a fully trimmed street car with AC, battery up front...the whole nine yards.
Between those adjustments, the new 9.6* of caster and -1.2* camber settings, the new stiffer front sway bar and rear springs to match...plus a brand new shiney set of Falken rubber...it should run pretty well at the SCCA Nationals next week. I'll post up the results when I get them.Lance
1985 Monte Carlo SS Street Car
08-28-2014 #326
Registered User
- Join Date
- Nov 2012
- Location
- Sacramento, CA
- Posts
- 1,918
Looking Sweet Lance!
For those that are following along with us on Lance's thread ...
The concept of making the diagonal weights ... aka cross weights ... 50/50 ... is only correct if the car also has 50/50 left & right side weights. In race cars, we offset the powertrain more & shift placement of weight to achieve a 50/50 left-to-right side weight balance. And then we also corner balance the car to achieve 50/50 cross weights. Since most production cars do not weigh 50/50 left & right with the driver in the seat ... if you make the cross weights 50/50 ... the heavier left side weight will add rear grip on left hand turns and reduce rear grip on right hand turns. That's not the goal. The goal is to corner balance a car so it has similar grip on left & right hand corners.
To better balance the car on left & right hand corners ... of a left side heavy car ... we need to reduce the cross weight percentage of the LR & RF wheels & increase the cross weight percentage of the RR & LF wheels. Over the years I have found a good rule of thumb is the cross weight percentage of the LR & RF wheels need to equal the car's ride side weight percentage & the cross weight percentage of the RR & LF wheels need to equal the car's ride side weight percentage. Or said another way, the cross weight percentage of the LR & RF wheels & the car's left side weight percentage need to add up to 100% & the cross weight percentage of the RR & LF wheels & the car's right side weight percentage need to add up to 100%. It isn't perfect in all situations, because there are other factors that affect left & right hand cornering grip. But I have found it to be a good baseline to start from.
P.S. The left & right side ride heights need to be the same with the driver in the car.
That is what Lance has achieved here.

02-06-2015 #327
Registered User
- Join Date
- Feb 2015
- Posts
- 17
This thread had been very interesting and helpful as I am looking at setting up a G body for road racing.
The series I would be running in is very restrictive on what parts I can use (Chump), meaning no ridetech shocks and such. I can however do a lot of moving around of suspension pick up points,modding control arms, springs, swaybars etc.
Basically what I am curious about is if the setup Lance had before the ridetech's would be good for long course road racing as well. Specifically Road America. Setup was shown in this post; https://www.pro-touring.com/threads/...99#post1022599 Here is the pertinent info from that post;
Let's recap what you did for anyone following along:
Mapped the roll center & corrected a RC migration problem
Raised car 1" to increase front travel with spring adjusters
Installed larger front sway bar ... kept same 575# springs
Installed stiffer rear springs from 125# to 225# ... kept same rear sway bar
Installed DSE LCA's to add caster
Modified LCA holes to get a little more caster
Increased caster from 5.5° to 7.5° (Better but still about 1.0° -1.5° less than optimum)
Front sway was a 36MM Camaro bar and rear was 7/8's stock as I recall.
Just curious if this is a good starting point for my setup and what might be different for a strictly road course setup.
btw-The car weight would likely be about 700 pounds lighter than Lance's ride as it would be gutted with a full cage, which has the side benefit if stiffening the flexi flyer frame.
Once again, great thread and Lance's car looks great. It's nice to see a Super Sport carving corners
02-06-2015 #328
Registered User
- Join Date
- Aug 2012
- Location
- Peoria, AZ
- Posts
- 1,758
I've got a friend that runs a Miata in Chump and WRL races across the Midwest and he on occasion sends me pictures of dilapidated G-Bodies he's found with the caption "Chump candidate?". He also is constantly hounding me to come racing with him in his car which I'm certainly considering as it looks like a blast.
I only ran the setup you are referencing at 2 autocross events I believe before upgrading to the ridetech triple adjustable shock setup. Geometry wise the setups were pretty similar and drove similar...the major difference was the adjustable race specific shocks which changed the way we traveled the suspension considerably. There was a spring rate change in the rear mainly because of the motion ratio change moving the spring from on top of the axle to the lower shock mount...and the front spring was pretty close to the same. Truthfully, the setups drove similar except for being able to tune the shocks to let the suspension work better. One correction is I run a 1" solid LCA mounted rear sway bar. When I ran this setup at Gateway on the road course, it worked great...the only changes I made as I went along were tire pressure changes and tightening down the rebound on the shocks both front and rear. The balance was great...the balance has always been great ever since stage 1...which makes this car so much fun to drive.
I don't see any reason this setup wouldn't be a good starting point for your car as well. The wildcard is the reduced weight and where exactly that weight loss comes from. Ron I'm certain will step in here and point out where I misspoke and offer up additional guidance. I highly suggest utilizing his services to help get a setup under your car that maximizes how you are going to use it. He'll help you get it right the first time which is worth every penny.
What area of the Country are you from? Do you plan on running more than a few Chump races with this car or just Road America?Lance
1985 Monte Carlo SS Street Car
02-07-2015 #329
Registered User
- Join Date
- Nov 2012
- Location
- Sacramento, CA
- Posts
- 1,918
Originally Posted by BanditDarble
Hey ... Bandit,
The specs you gave on Lance's car are back at Stage 1. Since then we upgraded the UCAs & LCAs to Ridetech, allowing Lance to achieve 9° + caster & longer shocks for the increased travel. It has Ridetech Coil Overs on all 4 corners with my Street-Star Digressive valving & a special thick wall Ridetech sway bar that I call the Monster Bar. I came from a wide background of racing, but a majority of my most experience in from road racing. When the rules restrict what you can do ... that is what makes having all the geometry, spring & bars rates optimized the key to the best handling car.
IMHO, you should:
1. Decide on a suspension strategy: Low Travel/High Roll, High Travel/Low Roll or Moderate Travel/Roll.
2. Optimize the geometry of your car for the suspension strategy you chose.
3. Work up the best spring & sway bar combination you can that will give you the optimum TRS, FLLD & RLLD.
4. Run the best shocks you can under the rules & revalve them (if allowed) towards a digressive, high rebound, high zero number profile if possible.
As Lance mentioned, I offer a wide range of technical services to car guys in Autocross, Road Racing, Pro Touring, etc. The most popular is my #40 Tech Service, which is what I did for Lance. It goes like this:
A. We discuss suspension options & you pick the path you want
B. You measure your car's suspension points ... just as Lance did
C. I evaluate your current geometry & can tell specifically how the car has been handling
D. I map out a plan of change to optimize your geometry (Details Below)
E. I work up the optimum sway bar & spring rate package for your goals (Details Below)
F. You make the suspension changes
G. I'm available to help with any fine tuning when you take it to the track
You can see or purchase RSRT Tech Service #40 HERE. It includes:
Full Front & Rear Suspension Geometry, Steering, Total Roll Stiffness, Front & Rear Roll Angles, Spring & Bar Rates Optimum Work Up:
Full Front Suspension Geometry - Optimum Work Up:
Optimum Roll center @ ride height + dive & roll
Optimum Static Camber
Optimum Camber change in dive + dive & roll
Optimum Caster change @ dive & roll
Optimum Dynamic Camber for application
Dynamic Camber at 15-20-25° steering @ dive & roll
Optimum Spindle KPI (Standard or Custom)
Static & Dynamic Scrub Radius
Optimum Anti-Dive / Pro-Dive Percentage
Steering Geometry - Optimum Work Up:
Optimum Ackerman from Spindle & Tie Rod angle
Optimum Bump Steer Settings
Inner & Outer tie rod pivots
Optimum Toe setting
Optimum Dynamic Ackerman @ cruise height + dive & roll
Full Rear Suspension Geometry - Optimum Work Up:
Optimum Anti-squat percentage
Optimum General ratio of lift vs push
Optimum Instant center, swing arm length & pick up point
Roll center (can only optimize with TRS work up)
Optimum engine/trans, driveshaft & pinion angle work up
TRS & Front & Rear Roll Angle Optimum Work Up:
Optimum Total Roll Stiffness work up
Roll angles provided for different corner loads
Front & Rear Lateral Load Distribution Work Up
Optimum Front & Rear roll angles & difference work up
Optimum Front & Rear Spring rates & wheel rates
Optimum Front & Rear Sway Bar rate & wheel rate
Optimum Front & Rear roll center & CG work up
Spring motion ratios as-is or optimum relocation
Sway bar motion ratios as-is or optimum relocation
Car measurements provided by client
Cost for Tech Service #40, outlined above, is $379 as of 2015. Tech Service #41 is the same as #40 ... plus brake optimization for $50 more. See #41 HERE.
For those that care to, you can see the full menu of Tech Services I offer Car Guys & Racers HERE.
02-07-2015 #330 Registered User
- Join Date
- Nov 2008
- Location
- Lawrenceburg, TN
- Posts
- 4,083
here is my advice about having Ron Sutton help you...do it...after you look at the price (which is VERY reasonable) you will think you can save some money and copy a setup or do it yourself...and your wrong...the weight balance, ride height, roll centers, pitch and yaw axis, tire Dia. track width and wheel offsets are all areas that impact the chassis setup..so after you buy 2 or 3 sway bars at $200 plus each, a few sets of springs at 75 bucks each and a few dollars for wheel spacers...it will still be wrong and you could have saved money just by getting Ron to help
just my humble opinion
02-07-2015 #331 Pro-Touring.com Sponsor
- Join Date
- Oct 2011
- Location
- Philipsburg, Pa
- Posts
- 528
Need a little help figuring something out
I'd agree 100% with Rod. The value Ron provides is immeasurable.
One of the most frightening things to see is a Ron Sutton Race Technology sticker on a competitors car.
02-08-2015 #332
Registered User
- Join Date
- Nov 2008
- Location
- Lawrenceburg, TN
- Posts
- 4,083
I better order my sticker!!!!!!!! Originally Posted by umi tech

02-08-2015 #333
Registered User
- Join Date
- Nov 2012
- Location
- Sacramento, CA
- Posts
- 1,918
Wow! Thanks for the kind words guys. With friends like you ... who needs a PR department.

Seriously, I appreciate the love. It's been fun helping guys make their car go, stop & turn better to the point they're winning events.
Rod, since you're at Showtime Motorsports ... will you be at Thunderhill at the end of this month?
02-08-2015 #334
Registered User
- Join Date
- Aug 2012
- Location
- Peoria, AZ
- Posts
- 1,758
I'll admit, it was a daunting task to measure all of the suspension points at first as Ron asked me to do. I had a friend helping me who said more than once that I was "sucking all of the fun out of this" by doing this leg work. Once I felt the results of the stage 1 install, it was all worth it plus more. To barrel into a corner and know exactly how the car is going to react and where the grip limits on both ends of the car will be time in and time out makes the car a blast to drive and pretty fast as well.
It doesn't have to be expensive either, the parts list for stage 1 for my car was right at $1,000...and they made my car a different car immediately. Buying the right parts once vs throwing parts after parts after parts at a setup trying to get it right is a no brainer.
I took all of my Ron Sutton Race Technology stickers (along with the others as well) off my car after last season, I need to get to work on some new ones for the new year soon I guess. ;)Lance
1985 Monte Carlo SS Street Car
02-08-2015 #335
Registered User
- Join Date
- Nov 2008
- Location
- Lawrenceburg, TN
- Posts
- 4,083
I will be there Ron!....the PR isn't free! I will bill you later Originally Posted by Ron Sutton

sorry for the thread hi-jack Lance
02-08-2015 #336
Registered User
- Join Date
- Feb 2015
- Posts
- 17
Hey guys,
Considering that Ron's fee is way less than I would be spending for a set of tires for a weekend, less than a pair of 275/40/17 615k's let alone 8, I agree that not tapping his expertise would be foolish. I had actually already visited his site and checked out his prices before posting here.
I asked if Lance's setup Stage 1 setup would be a good baseline for a long course, fairly high speed, setup as it would be easier to replicate with the factory parts that I would have to work with. DSE and ridetech parts are not going to fly in the series I am looking at running, while I am free to change pivot points, springs and such. I can fab up a swaybar out of 1.5" 4130 tube but can't buy a Monster bar for instance. Think along the lines of what Donohue had to work with on his First Gen Trans Am cars. He couldn't open a catalog and get parts. He had to modify the factory parts, make offset bushings, change suspension pivots, cut and weld control arms, etc. That's what I have to do while running on 180tw (615k's are 200tw but the only brand with the size I want.) tires against lightweight E30/E36 BMW's and V6 swapped MR2's with a 3000 pound G body with maybe 250whp.
I should have worded my initial post a bit better, but I'm really curious if one could make this chassis competitive with the parts restrictions. I believe one can but am curious what area one would change on Lance's setup if one was to set it up with no concerns about street drivability and focused only on road course versus autocross. (I have zero interest in autox) And if that change is feasible for a guy with a welder. I'm not looking for specifics.
Can I cut, relocate, weld and drill factory parts and tubing to out corner a 2100 pound BMW E30 in the Carrousel at Road America? The last race there the fast lap was 2:49.
If not I'll build something else. a 2nd Gen would probably be smarter, bigger gas tank and lower CG, but i don't care for the look...
One other thing that hopefully Ron can answer; Are BBSS setups generally easy on tires? These are endurance races, so being easy on tires is important so the tire bill doesn't end up being 3 or 4 grand for a weekend just racing for a trophy.
Lance-Have you ever had a G meter in your car? Obviously it corners hard. I'm just curious if you have measured it.
I've really enoyed this thread, and have picked up from my reading that Ron doesn't like hypotheticals. One has to start somewhere however and figuring out if a car can be made competitive is the logical starting place. I know the chassis can be with loads of parts.
I don't have access to those parts however due to the class rules.
edit-Lance-Road America would be the focus of the car, however I would likely run it at a few other tracks. Brainerd and possibly Autobahn Auto Club would be likely as would Daytona if I can get a 5.3 in the car while staying under the point limit. A guy HAS to race at Daytona if he gets the chance. btw-While a number of Chump cars look like rolling wrecks, more and more do not and this one definitely would not. Whatever I build will definitely look like a racecar and will perform like one. Just lacking the big horsepower and name brand aftermarket parts.
Even at that, at the last Chump race at Road America a 79 Camaro had the top speed in the speed trap at 127mph, so a good Chump is not terribly slow. I've seen claims of 140+ at Daytona with GPS verifying.
Thanks,
Joe
02-09-2015 #337
Registered User
- Join Date
- Aug 2012
- Location
- Peoria, AZ
- Posts
- 1,758
Joe, how does the Chump series react to bracing done to the factory style stamped steel control arms? Especially the fronts? They are FLIMSY and need stiffening up to hold up to road course action in my opinion. Be careful stiffening up the rear control arms though as they are meant to flex when the axle articulates.
Ron knows the metric chassis very well and can answer the questions if it can be built to handle with stock parts better than I. My first blush though is if you can replicate something close to my Stage 1 setup you will be good to go.Lance
1985 Monte Carlo SS Street Car
02-09-2015 #338
Registered User
- Join Date
- Aug 2012
- Location
- Peoria, AZ
- Posts
- 1,758
Joe, I sent you a PM here with some links to some different road course videos to watch to see how the changes we made helped the car to corner better.
Lance
1985 Monte Carlo SS Street Car
02-09-2015 #339
Registered User
- Join Date
- Feb 2015
- Posts
- 17
Boxing the front control arms is ok as it's just a material points hit which would be minimal. If a guy can fab something up that doesn't require a machinist he's good to go. Originally Posted by SSLance
I mentioned Donohue and the Sunoco Trans Am Camaros as that is basically what he had to do back then. Boxing the control arms was specifically mentioned.
It looks like there is enough metal in in the LCA pivots to move them to get the LBJ far enough forward for a lot of caster and I can move the upper bracket or just weld in a cheap aftermarket UCA mount, or fab one, to get the required caster. Tall ball joints are not something I think tech is looking for and would be minimal points anyway.
The more I look at it the more I think it will work well. Just more work than bolting on the pretty parts.
02-09-2015 #340
Registered User
- Join Date
- Aug 2012
- Location
- Peoria, AZ
- Posts
- 1,758
I've got WAY more work in mine than just bolting on the pretty parts, that's what makes it so satisfying... Your biggest challenge might be coming up with an appropriate sized front sway bar and making it stock looking. Where you'll run into a challenge I suspect is tire clearance.
Lance
1985 Monte Carlo SS Street Car

 Reply With Quote


