

Results 41 to 60 of 258
-
01-15-2014 #41
 Registered User
- Join Date
- Feb 2007
- Location
- Hawaii
- Posts
- 225
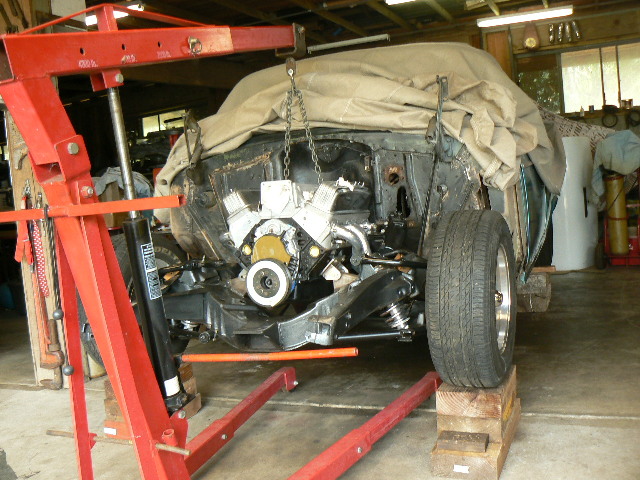
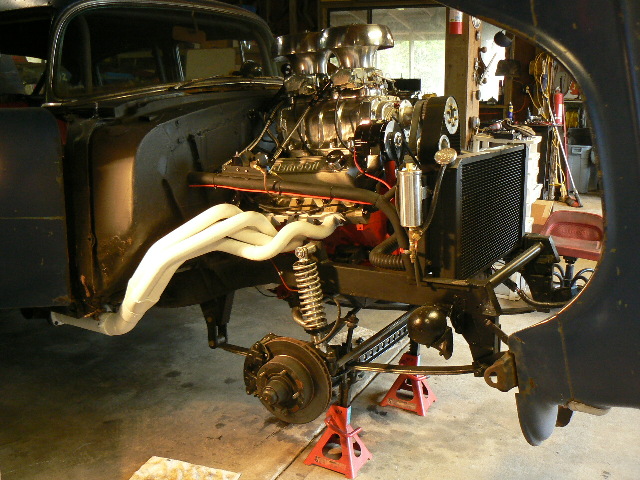
Been slow processing my pix and getting my web pages updated. Here's the motor "dummied up" in the car, Earl Williams side mounts in place, Super Comps fit nicely, today installing the cross-member for the tranny support....
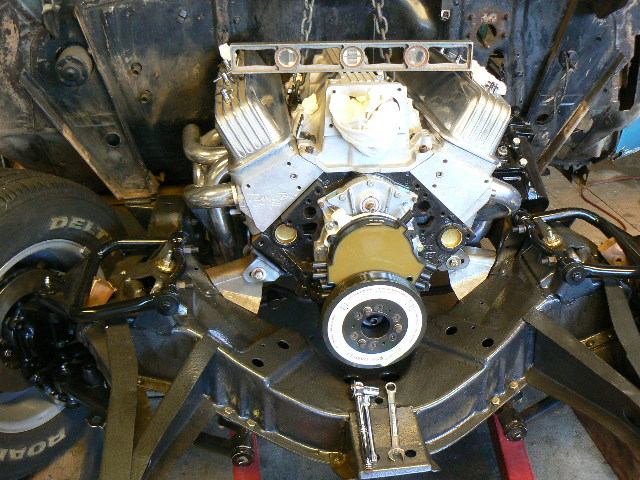
Got a bunch more pix on my web page HERE....
With the LT1 distributor in front, I tucked it up pretty snug against the firewall. I'll be modifying the firewall to give me plenty of room to get the valve covers off, and will be checking clearance with the brake master cylinder.
Aloha,
Willy
-
01-20-2014 #42
Registered User
- Join Date
- Feb 2007
- Location
- Hawaii
- Posts
- 225
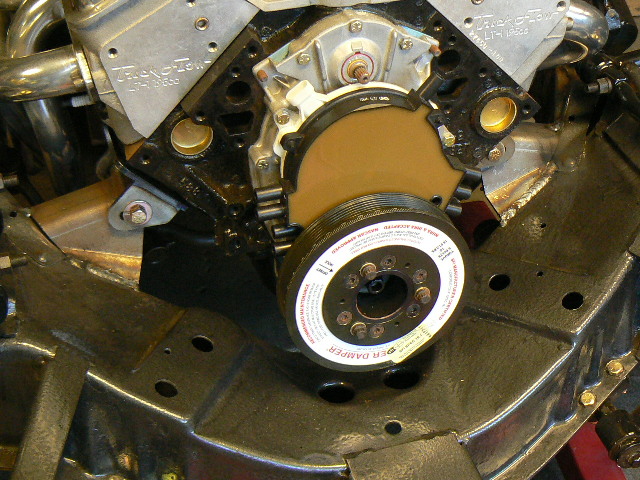
Not much to add, the motor mounts are partially welded in place, will weld some more on them after pulling the motor/tranny back out:
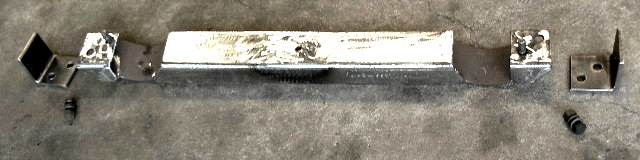
Meanwhile I cleaned up the old tranny mount that was in this car and located it for the T56, and welded it in place. This car had a "wheeezy" 350/350 combo leakin' all over the place when I got it, sold that for $350 to a guy who is now rebuilding it! The exhaust openings in this one just happen to match up with the Hooker collectors quite nicely!
I have a good Strange Engineering 3-1/2" driveshaft that had been in my '55 gasser, but I broke the front U-joint at the track and messed up the front of that one. With the T56 I can shorten it a little and weld on a new front yoke and be good to go!!!
Aloha,
Willy
My Webpage
01-21-2014 #43
Registered User
- Join Date
- Feb 2007
- Location
- Hawaii
- Posts
- 225
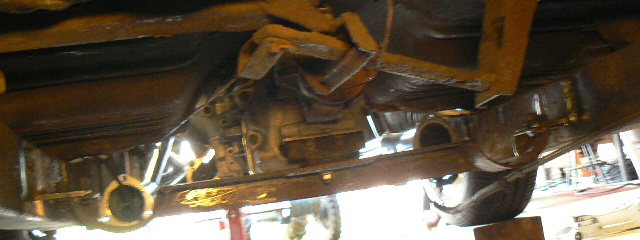
Just a couple of pix, crawled under the car and took one of the tranny mount. A cobbled up pos the previous owner put in, but it's actually pretty solid, so I cleaned it up a bit and put it back in service under the tail of the T56 in my '55....
Now I gotta patch up a Strange Engineering driveshaft I broke in my '55 "gasser", and shorten it to fit in this rig...
After the brackets for the exhaust system are welded in place on the frame rails, the motor is coming out, and the body is coming off....
And, YUP, I'm still havin' fun....
Aloha,
Willy
07-07-2014 #44
Registered User
- Join Date
- Feb 2007
- Location
- Hawaii
- Posts
- 225
My other rigs keep demanding my attention, breaking something or needing adjustment....
But I got both trucks, the 55 4x, and the 58 pro street; and the 55 gasser, all running again...
YaHoo....
Now to work on the 55 Sport Coupe and the panheads for awhile...
Put a 1350 pinion yoke on the rear end, and measured the old driveshaft from the gasser to be shortened. Sent it to Strange, they will put on a front 1350 trans yoke for the GM T56, and cut and weld on a new 1350 rear yoke to fit the pinion yoke.
Then pulled the motor/tranny out so I could finish welding the motor mounts in, do some mods on the firewall to provide more clearance for the valve covers, cleaning smoothing and painting.
Yesterday pulled the T56 apart and swapped out the main shifter shaft for a modified shifter shaft from Keisler Engineering that I've had around for awhile. The new forward position of the shifter will clear the bench seat in my '55.
Wrote it up and it is here (Link) if you want a look...
Some highlights:
Pulled the rear tailshaft housing off, it also houses the reverse gear set and the 5th and 6th gear sets...
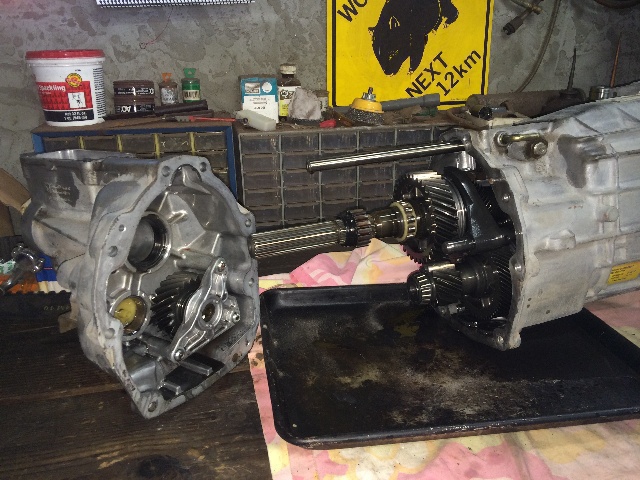
Removed all the gears in this portion of the case, reverse, 6th and 5th, then pulled the main gear case off the front trans plate:
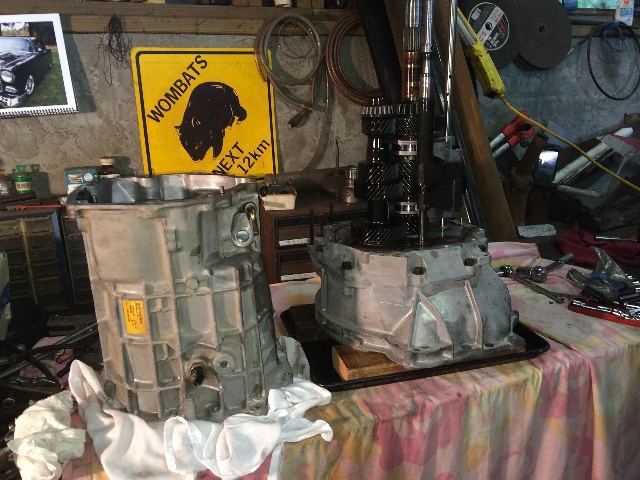
One of the guys in our crew hauled home that "Wombat" sign from a recent trip "down under", no we don't have wombats on Maui....
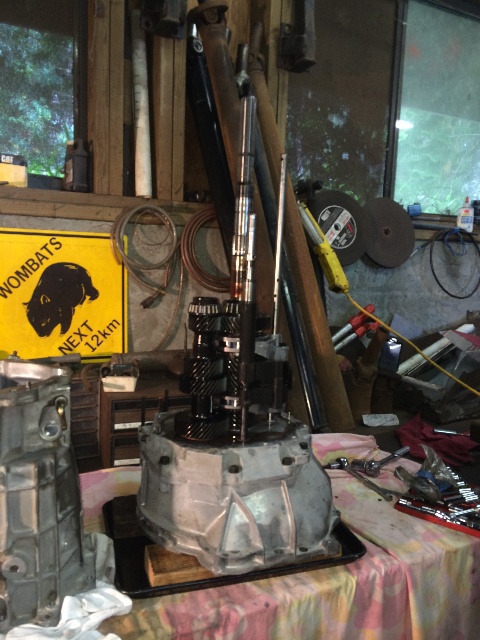
You can see the long shifter shaft, it runs the full length of the gearbox. I pulled it out and installed the modified shaft I got from Keisler Engineering, which splits the shaft in half at the appropriate spot under the forward case inspection hole, and puts a piece of hardware in that will accept a new shifter and operate all six gears and reverse properly...
Unfortunately I forgot to take a pix of that modification Keisler did to the replacement shaft, will look for something I can find to show it.
The truth is, I misplaced the new shaft, and we were going nuts trying to find it so we could finish the job, I finally did find it, and it was getting late, so we buttoned everything back up and then realized we forgot to photo it !!
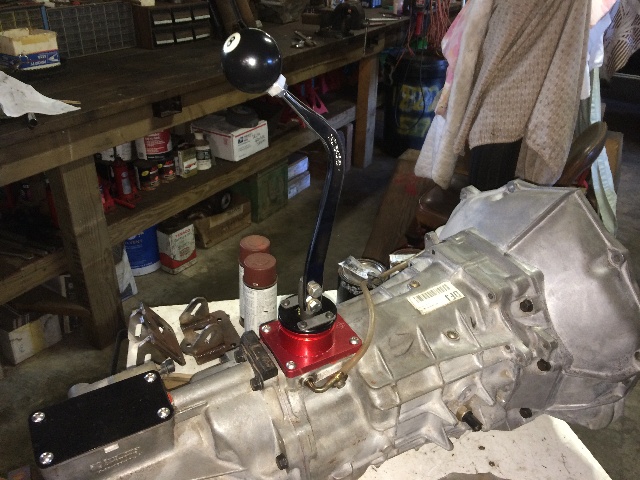
Stuck this short shift lever on it to check it out, it shifts good, hits all the gears it is supposed to. I'll find a nice curved shift lever to use in the '55....

Actually, that original main shifter shaft could be modified to the forward position if you had that piece that goes in that location to match up the two halves of the shaft after it is cut and a piece removed.
Now to figure out where to cut the hole in the floor for this shifter....
Aloha,
Willy
07-07-2014 #45 Registered User
- Join Date
- Jan 2008
- Posts
- 193
Looks like your coming along pretty well. Is that tansmission going to fit without cutting up the hump in the floor board?
Tony H.
07-15-2014 #46
Registered User
- Join Date
- Feb 2007
- Location
- Hawaii
- Posts
- 225
So far, yes, when I was working up the motor/tranny mount points, I pushed the motor/tranny combo back about as far as I could, and the motor mounts I had bought from a California source dropped right onto the sides of the front cross member very nicely, as the photos above show. By then I had the tranny up pretty tight against the floor, but with about a 1/4" clearance between the floor and the closest point on the tranny. Right behind this new shifter location is a rubber bumper bolted on the tranny, and that's just under the floor. Mounted the cross member there with new holes in the frame, reinforced the frame to make it nice and solid.
This photo from above is not too clear, I was under the car with poor lighting, but you can see my home brew cross member with clearances for the headers, and the tranny location.
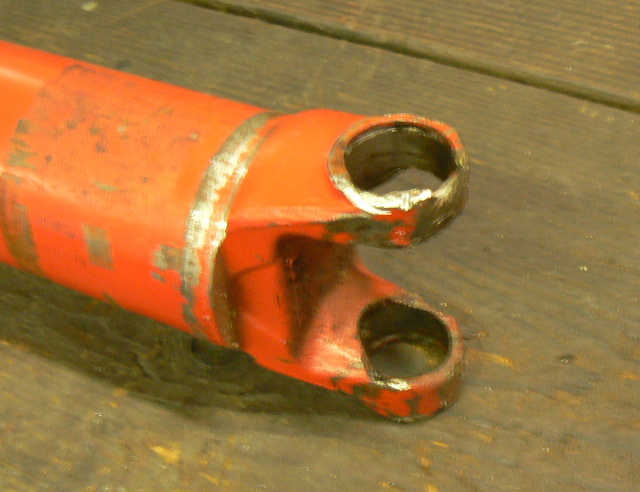
The old driveshaft from Strange Engineering that I busted up one end at the drags in my other '55, the blown Olds powered "gasser", was sent off to Strange to be redone to fit this setup.
When I get it back I can put it all together and measure the u-joint angles and get it all in sync, hoping the angles will not be too large, but just eyeballin' it, it all looks pretty dang good !!
The motor is out now also, doing final welding that's needed, like the motor mounts, then cleaning and painting the frame, some reworking the firewall to give me a little more clearance for my "oversize" (read, tall) valve covers so they will be easily removed when needed. Also took some measurements and will cut a hole for the new shifter location.
Then install the flywheel, clutch, hyd release cylinder; fit on the tranny, and reinstall the motor/tranny. Then I can install the "new" driveshaft and check the driveline angles.
The car presently has relocated leaf springs, aftermarket springs, stiffer, to allow my "mini-tub" job and run 12" wide rims in the rear. Presently have slappers on the leafs, but have a CalTraks setup that I will install. Have used those before with good results.
I have a whole bunch of other projects going on, so I get to this one as often as I can, which is not as often as I would like, but it's coming along nicely.
Want to get it running well, handling well, then will attack the paint and upholstery side of the project.
I really have been amazed so far at how well the new power steering box, the headers, the side style motor mounts, the tranny under the floor, have all fit together so well. I keep waiting for something to come along and bite my butt, maybe I'm just livin' right for a change....
Aloha to all from Maui....
Willy
07-15-2014 #47
Registered User
- Join Date
- Feb 2007
- Location
- Hawaii
- Posts
- 225
Ordered this Hurst stick:
and this boot:
have used this stick before in a '55 and it cleared the bench seat quite nicely...
from Amazon, prices were quite reasonable...
07-15-2014 #48 Registered User
- Join Date
- Apr 2010
- Location
- Jersey Shore
- Posts
- 695

I just did a 55 with the front shift t56 and that stick... youll love it!
Whos hydraulic clutch master cylinder are you going to use? The firewall mounted ones are often very close to the headers. Nice work!-Chris
'69 Corvette
'55 Chevy Hardtop
AutoWorks Middletown, NJ
@autoworksnj for corvette and shop car pics
https://www.pro-touring.com/showthre...e-Build-Thread
07-16-2014 #49
Registered User
- Join Date
- Feb 2007
- Location
- Hawaii
- Posts
- 225
Haven't decided on the clutch mc yet, like the idea of hiding it under the dash, but don't like the idea of having to refill or check it under there....
Any suggestions?
Finished welding up the motor mounts yesterday, and started banging on the firewall to round out more room for the valve covers. Lucky with the LT motor no distributor in back to be concerned with.
Alopha,
Willy
07-16-2014 #50
Registered User
- Join Date
- Feb 2007
- Location
- Hawaii
- Posts
- 225
In '67 I bought a '63 split window coupe, the hipo 327, Muncie M22, 4.11 posi, mag wheels, headers, fresh air intake, all numbers matching, it was a very fast car for it's day! Got married and sold the car in '70, like I didn't need the 'vette now that we're married, got a more 'sensible' car for life here on Maui (a Buick V6 powered '70 CJ5, the wife and I drove that for the next 20 years....), but I sure do miss that 'vette, wish I had kept it and just kept upgrading the suspension and motor. Yeah it's a collector car these days, but if I'd kept it, it probably would have an LS motor in it right now....
with the original stuff all very carefully packed away!
This was my Christmas Card I sent out in 1969:
And yes, my surfboard would fit inside that car....
08-17-2014 #51
Registered User
- Join Date
- Feb 2007
- Location
- Hawaii
- Posts
- 225
Am laid up with some medical issues, so have not got much done on the '55 hardtop.
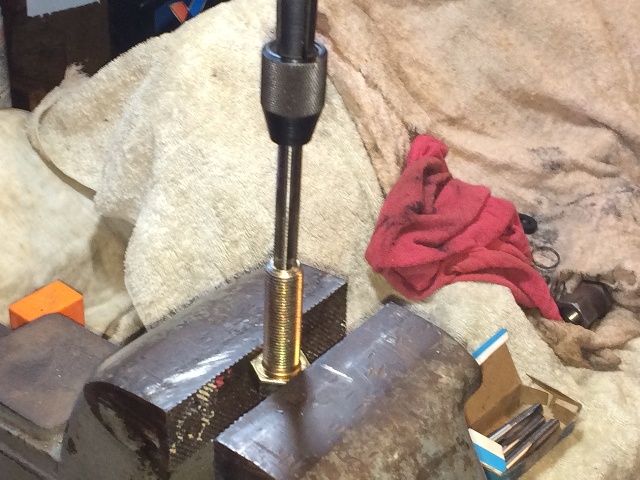
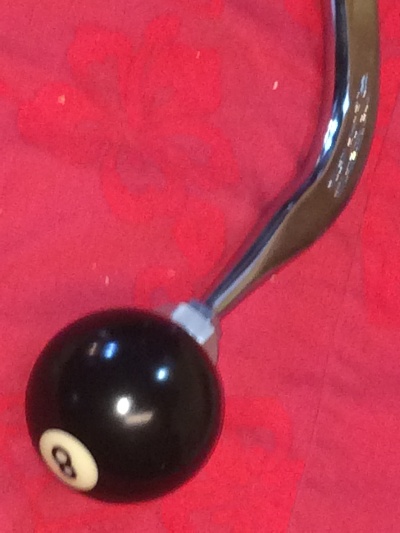
Got a Hurst stick that I've used before w bench seats, but the stick's thread was different from the 8-ball knob I want to use:
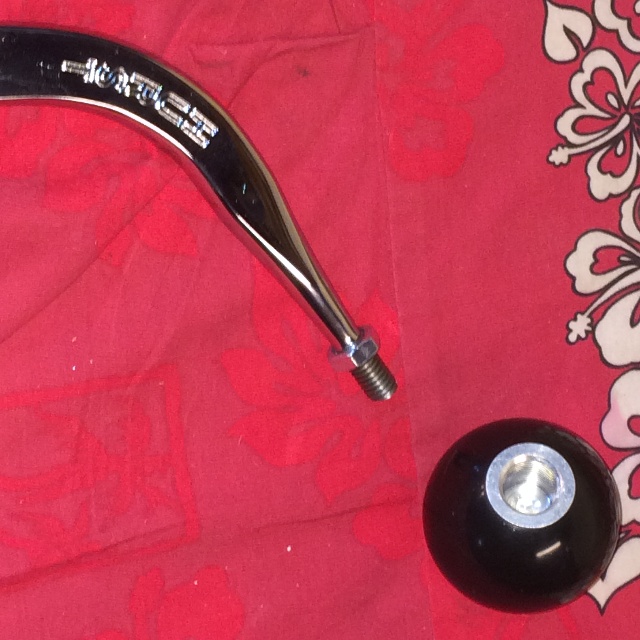
So I got a bolt that fits the knob, drilled and tapped it to fit the stick, put it together and put it on the tranny.
I've been playing around with some new software for web pages, this is my first attempt:
LINK to shifter page
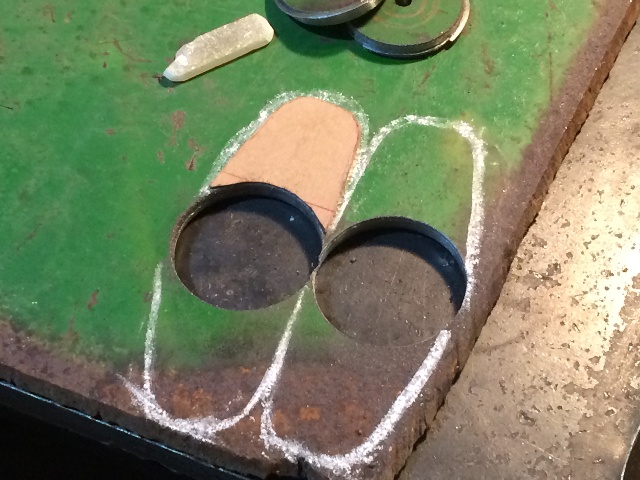
I did go beat on the firewall of the hardtop a bit before I got laid up,

Chalk marked it the last time the motor was in,
the driver's side went where I wanted it pretty easily....
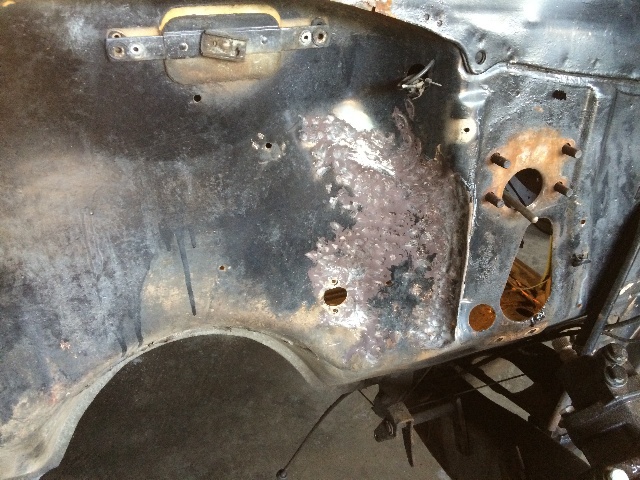
But the passenger's side was being more stubborn,
might have to get the torch out....
Link to a new page
There will be some welding, filling in holes, smoothing, fresh paint....
More later....
Willy
01-18-2015 #52
Registered User
- Join Date
- Feb 2007
- Location
- Hawaii
- Posts
- 225
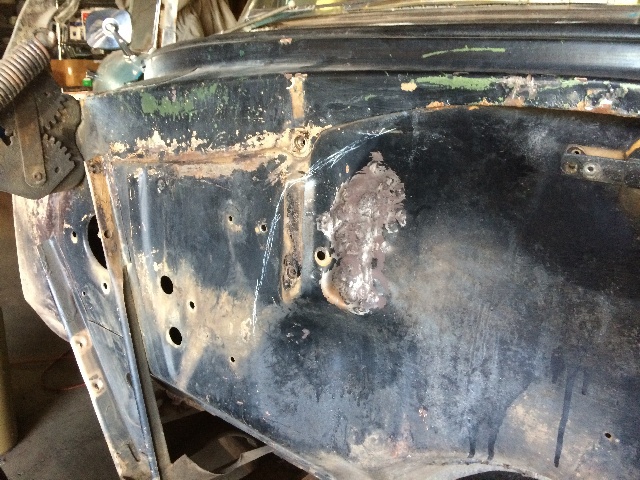
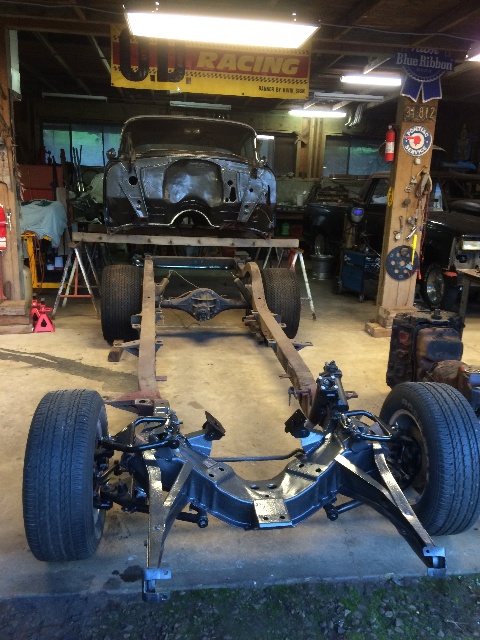
Finished off the firewall mods, then cut all the body mount bolts (they were a rusted solid mess....), and got the body up off the frame....
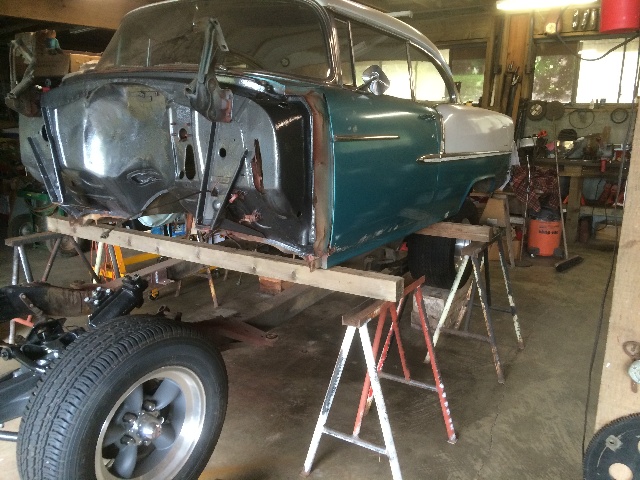
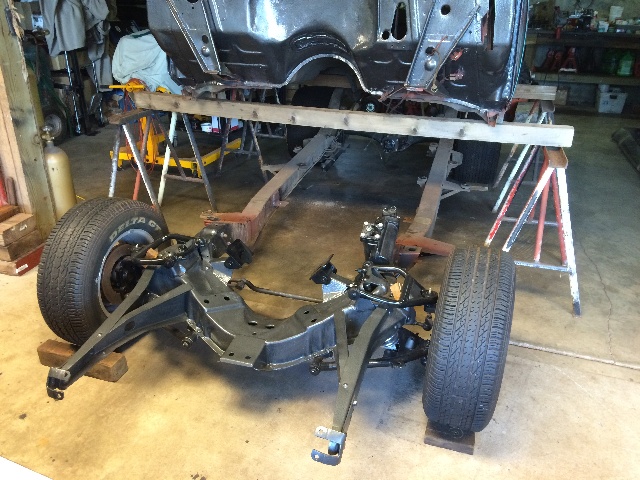
Rolled the chassis out for a good look....
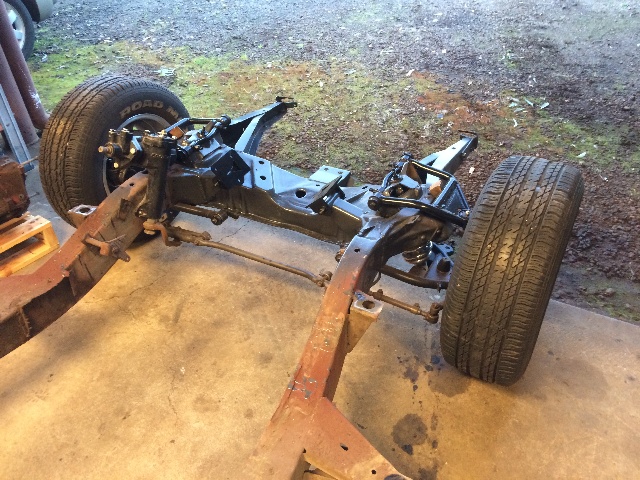
It will get ground down where necessary to remove the remaining fragments of the old original mounts I removed or the PO removed....
The frame is in really great shape, and will get a new paint job. I really like the Rustoleum black hammer tone, will probably use that, as I have already done the front frame/cross member with that paint....
Have a set of CalTracs I'm thinking of putting on, but I also really like the old style slapper bars, have had good luck with those over the years...
And a sway bar for the front....
It's coming along, but slowly....
Aloha,
Willy
More pix on my web page, please scroll down....
05-05-2015 #53
Registered User
- Join Date
- Feb 2007
- Location
- Hawaii
- Posts
- 225
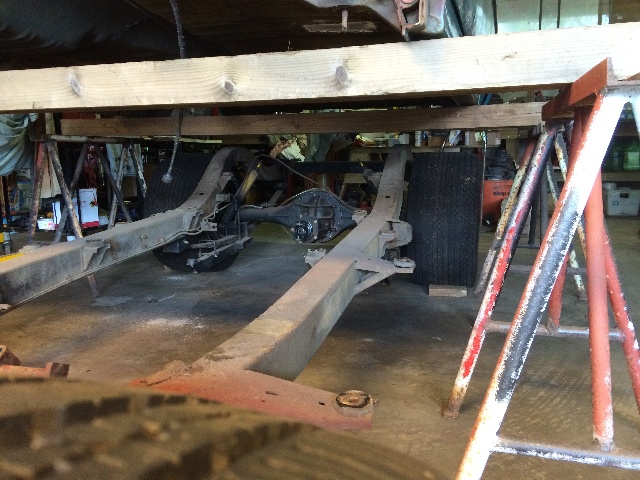
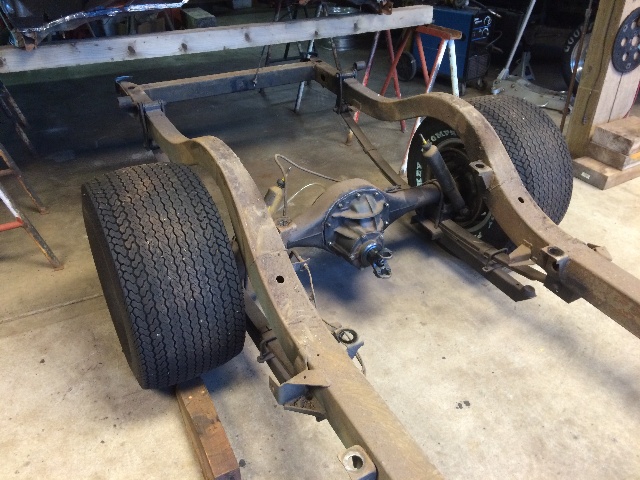
Have been slacking off a bit on posting, been working on the frame and suspension....
Lots of updates on my personal web pages, looking at ways to mount the CalTracs, and messing around with a mix of leaf springs and QA1 coilovers....
Did some work on it today....
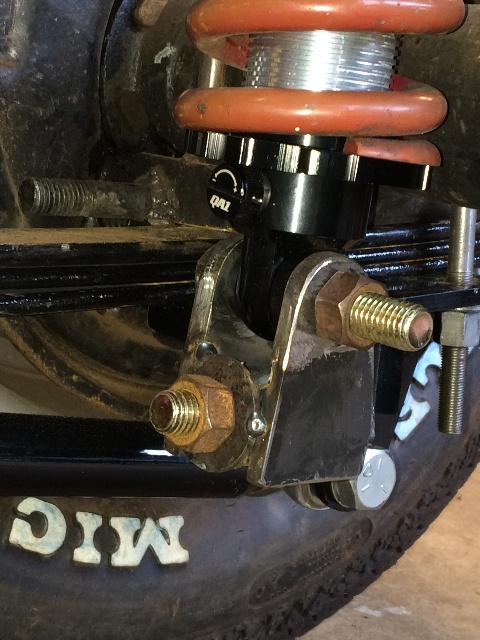
Took the lowering blocks out,
moved the CalTracs U-bolt plates around, and welded in bolts for the lower shock mounts,
and a few other things....

more pics HERE....
Willy
05-09-2015 #54
Registered User
- Join Date
- Feb 2007
- Location
- Hawaii
- Posts
- 225
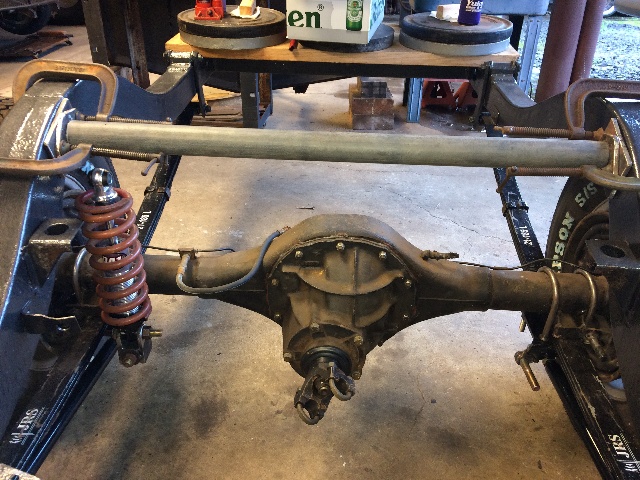
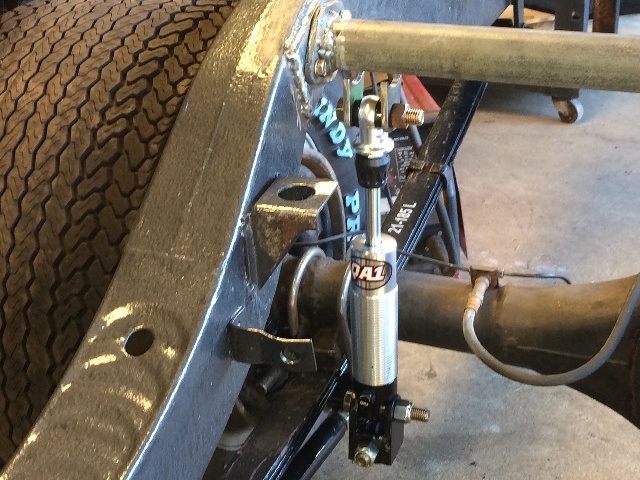
Did some more work on mounting the rear QA1 coil over shocks:
More Pix Here....
Willy
05-10-2015 #55
Registered User
- Join Date
- Feb 2007
- Location
- Hawaii
- Posts
- 225
Before and After on those rear lower shock mounts:

More pix HERE....
UPDATE....
I've been asked why I want both the coil-overs and the leaf springs on the rear....
The QA's give me easy access for adjustability on rear ride height and ride firmness, as I can crank up the preload when necessary to add more capacity when carrying extra load (maybe a coupla wide bodies in the back seat?) or pulling a trailer with the added tongue weight. The shock valve adjustment works well to provide the right quality of ride from soft to firm.Will start with 100 lb/inch coils and have a pair of 150's on hand if needed. Just thought I'd try the concept and see just how well it works. I did that on the front end of my solid axle '55 gasser, worked out great!
05-15-2015 #56
Registered User
- Join Date
- Feb 2007
- Location
- Hawaii
- Posts
- 225
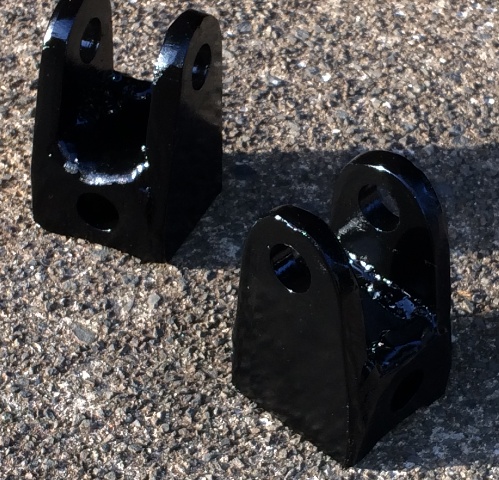
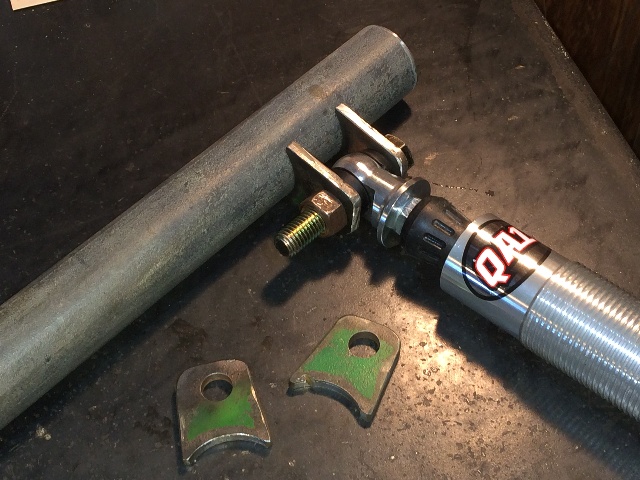
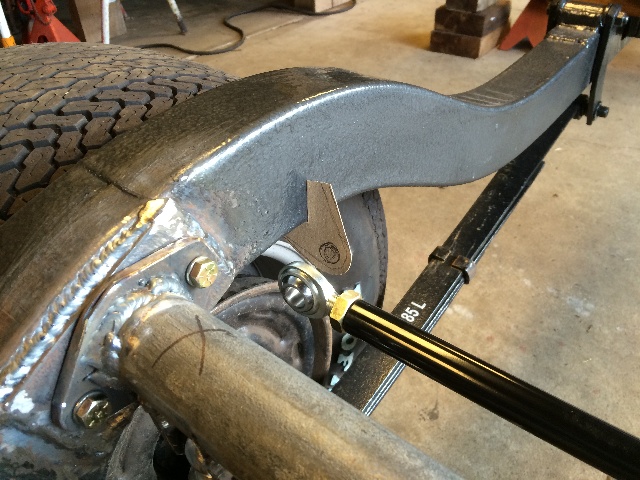
Cut some 1/4" steel tabs for the top of the shocks....
MORE pix here (pg 9), scroll down....
Have the shock mounts done now, and starting work on a panhard bar for the rear end....
and MORE pix here (pg 10), scroll down....
Then everything comes apart again for paint...
Aloha,
Willy
05-15-2015 #57 Registered User
- Join Date
- Dec 2007
- Location
- Lombard, IL
- Posts
- 545
[QUOTE=2Loose;1134817]
Willy Are you installing a panhard bar also?Dan
1971 Chevelle Maliboo Convertible 496/4L80E
1956 210 2 door Sedan 8-71 blown 468/T400
05-15-2015 #58
Registered User
- Join Date
- Feb 2007
- Location
- Hawaii
- Posts
- 225
Yes, there is enough side to side flex in those leaf springs, plus the tilting action on uneven terrain, that my 1" clearance between the inside of the tires and the frame does cause a bit of tire rub from time to time. By mounting a panhard bar up high like this, the tires can be kept away from the frame, at least it works pretty well on my '55 Chevy gasser, where I'm running a pair of pretty fat tires on 12" wide rims, and was getting tire rub on hard cornering and rough terrain until I put the panhard bar, located up high, on that rig. Of course at that time I also switched to ladder bars and coil-overs on that rig, so I needed the panhard bar anyway, just decided to mount it high to keep the rotation axis up high, which keeps the tires pretty well centered with relation to the frame rails.
05-17-2015 #59
Registered User
- Join Date
- Feb 2007
- Location
- Hawaii
- Posts
- 225
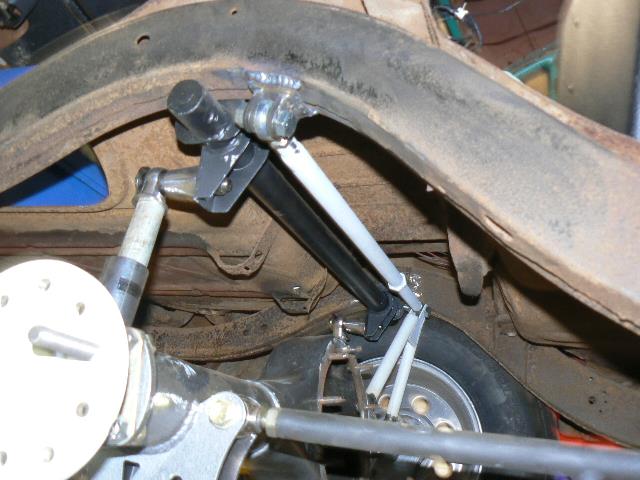
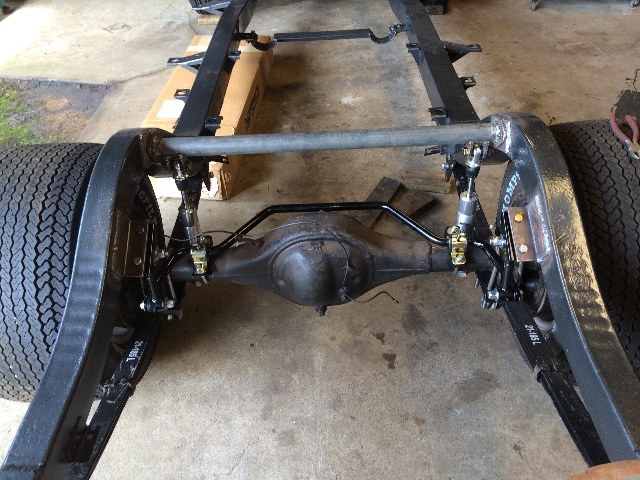
Me and my buddies sat there for quite awhile last Fri. nite, beer in hand, discussing the panhard bar idea, and ideally where it should be located to get the best results.
One comment about mounting it fairly high like I am proposing, is that between that high mount point on the axle itself, but above the axle on the left side (the frame mount is going to be on the right side), and the two leaf springs down under the axle, the axle is pretty much constrained to only move up and down. As far as rocking the body to one side or the other relative to the axle, not going to happen, the panhard bar, triangulated with the leaf spring mounting points at the axle, will pretty much keep the axle parallel to the frame rails and, much like a sway bar, keep axle movement pretty much just up and down. At least that's what it looks like to us.
The panhard bars I have on the front of my '55 4x4 truck, and the '55 gasser does cause it to corner pretty flat, plus the parallel ladder bars on the rear of the gasser have that effect also, there's not very much body roll at all on hard cornering with the gasser.
05-31-2015 #60
Registered User
- Join Date
- Feb 2007
- Location
- Hawaii
- Posts
- 225
Finally convinced myself to try a sway bar first on the rear axle. But will install the mounts for the panhard bar, and will leave the bar out for now. Then I can always try it out later if I want to, or if I still see tire sidewall rub on the frame with the sway bar. Two bolts and it's in.
Ordered a Hotchkis rear swaybar setup for my '55 and installed it. It's not the standard position for a swaybar, as my coil-over shock position prevents that, but I think this setup will work just fine.

There's a bunch more pix on my website....
Aloha,
Willy
A bunch of pix HERE (scroll down)...


 Reply With Quote


