

Results 61 to 80 of 721
Thread: My 1985 Monte Carlo SS Barney...
-
12-26-2013 #61

 Registered User
- Join Date
- Aug 2012
- Location
- Peoria, AZ
- Posts
- 1,758

I think I have my choices narrowed down... Just need to wait and see what else becomes available (if anything) before making the leap.
Lance
1985 Monte Carlo SS Street Car
-
12-27-2013 #62 Registered User
- Join Date
- Mar 2009
- Location
- overseas
- Posts
- 3,434
nice!! wide front wheels - 17x9.5 all around now?
Kevin S. (overseas in Germany)
1963 Chevrolet Impala 2d ht Coupe
www.CruznArt.com
CRUZN - Automotive Artworks
12-27-2013 #63
Registered User
- Join Date
- Aug 2012
- Location
- Peoria, AZ
- Posts
- 1,758
Yep... I'll keep my 8" wheels as well in case I want to run the staggered look for street driving.
Lance
1985 Monte Carlo SS Street Car
12-27-2013 #64 Registered User
- Join Date
- Mar 2006
- Location
- California City Ca.
- Posts
- 398
ni e work Lance, wanna go to cali and work on my regal, i'll swing thru on my way back from south georgia nad pick you up.
Dale Hayes
87 turbo t
turbonetics t60, pet stock location intercooler, ride tech coilovers, rjc exhaust, 60lb injectors with tt chip, ported heads and intake, ported tb, baer brakes, roh 17 inch wheels....now need to finish paint and get it put back together.
12-27-2013 #65
Registered User
- Join Date
- Nov 2012
- Location
- Sacramento, CA
- Posts
- 1,918
 Originally Posted by instro84

 I'm thinking Lance is ready to enjoy the fruits of his labor before he takes on anymore projects.
01-02-2014 #66
Registered User
- Join Date
- Aug 2012
- Location
- Peoria, AZ
- Posts
- 1,758
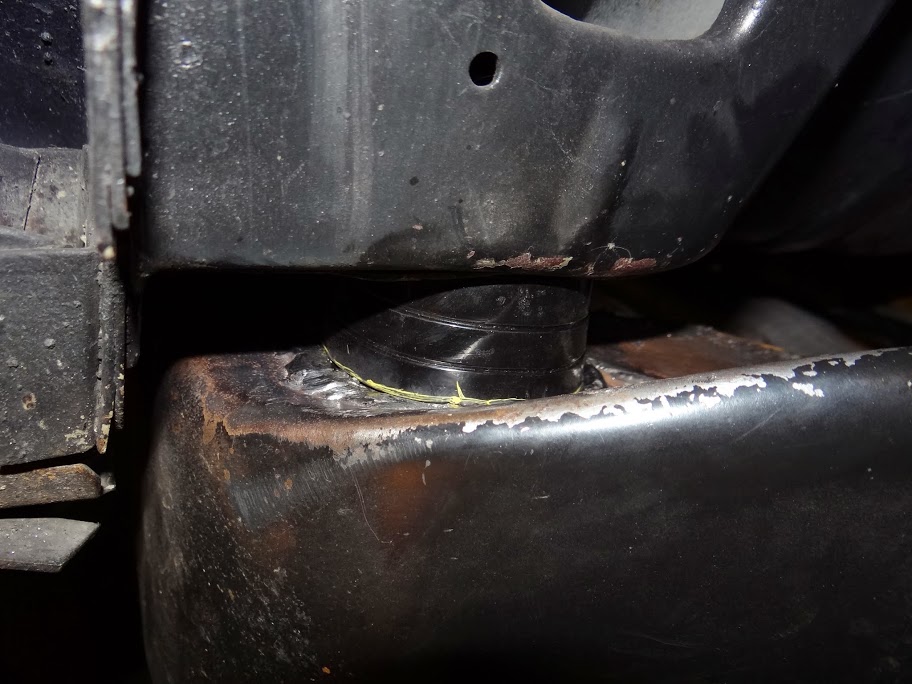
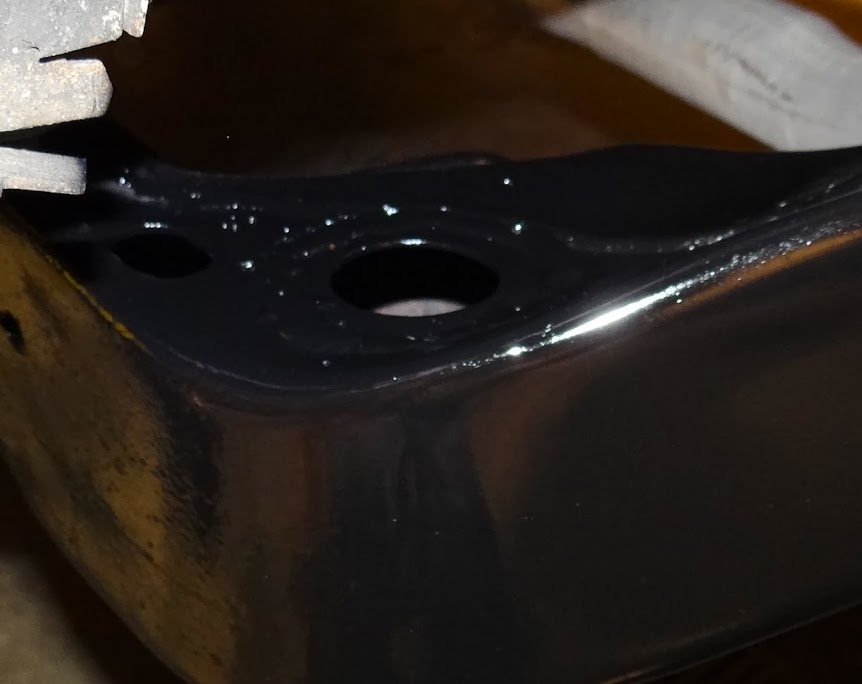
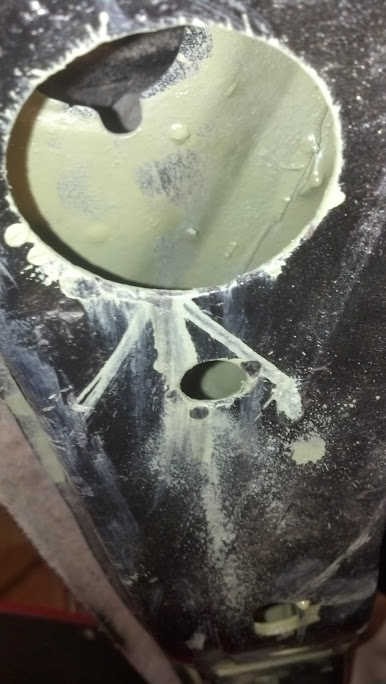
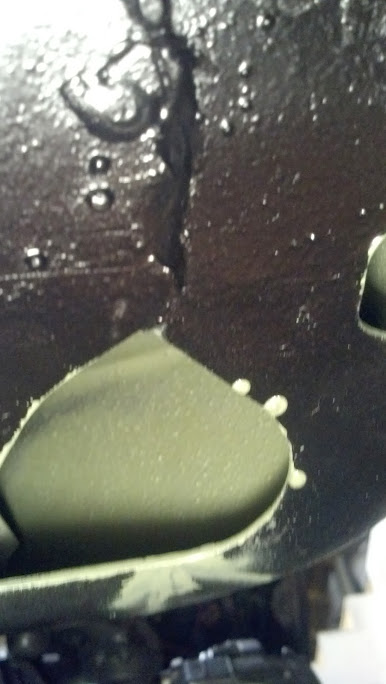
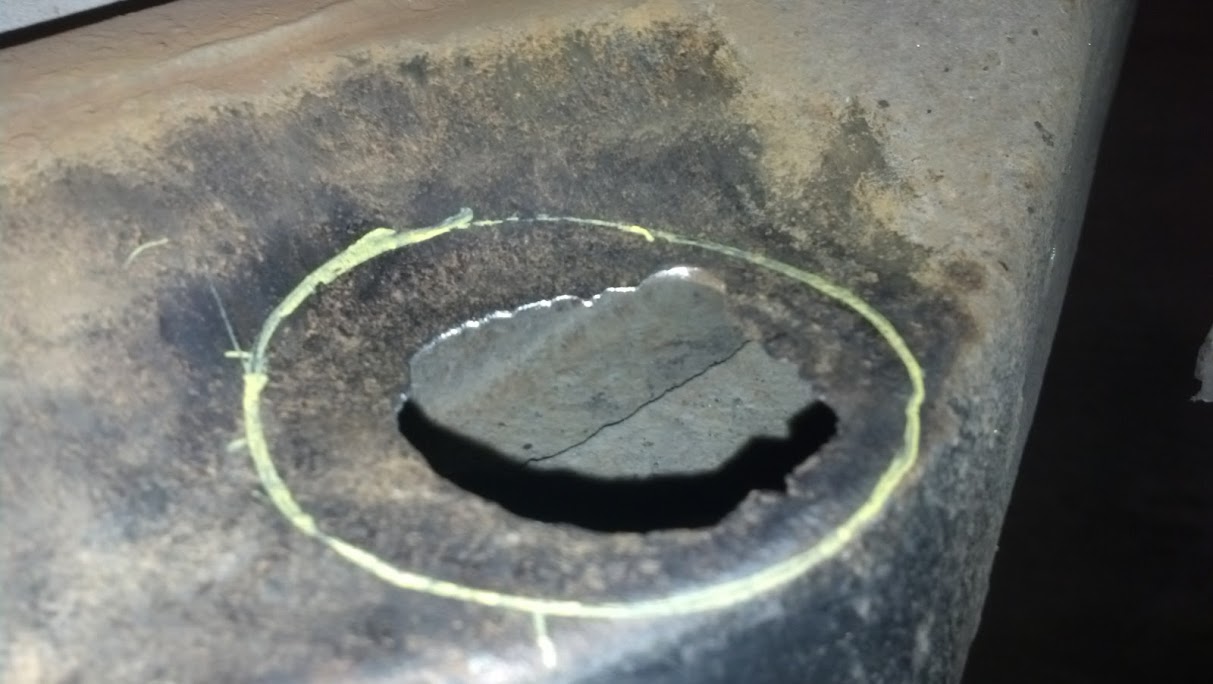
So even though I was feeling less than 100% yesterday, I headed out to the shop about 1 pm and settled in to repair my #2R body bushing frame hole. I was lucky that there was still enough of the existing hole left to let me use the bushing to mark where the repair washer was going to go.
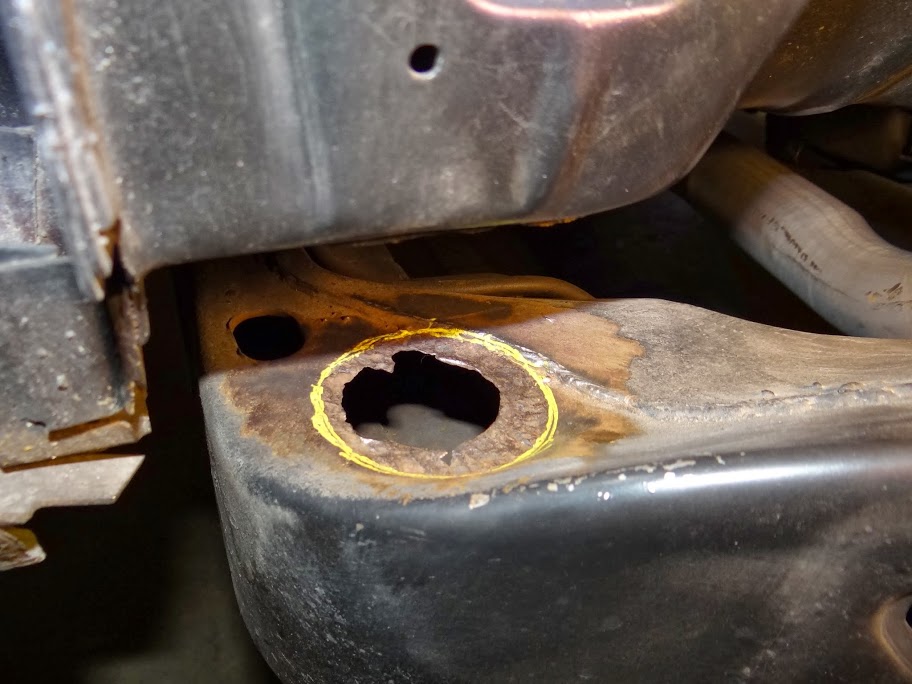
Cutting the frame parts out was a challenge. There just isn't enough room to get the proper tools in there. I used a carbide bit on a right angle die grinder first then a light duty plasma cutter that I borrowed. Both were a bit under sized to do a good job once I got into the good steel of the frame. I then decided to start whittling down on the washer to fine tune the fit. Plus this way I could bevel the edge of the washer with the grinder to get it to fit down inside the frame without falling through the hole. Here's as good as I could get it.
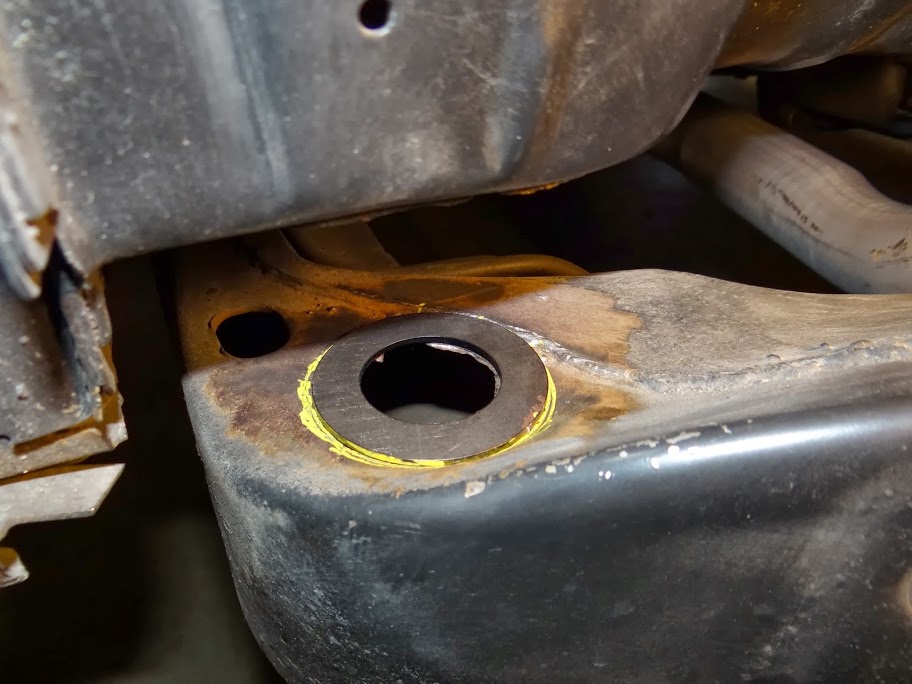
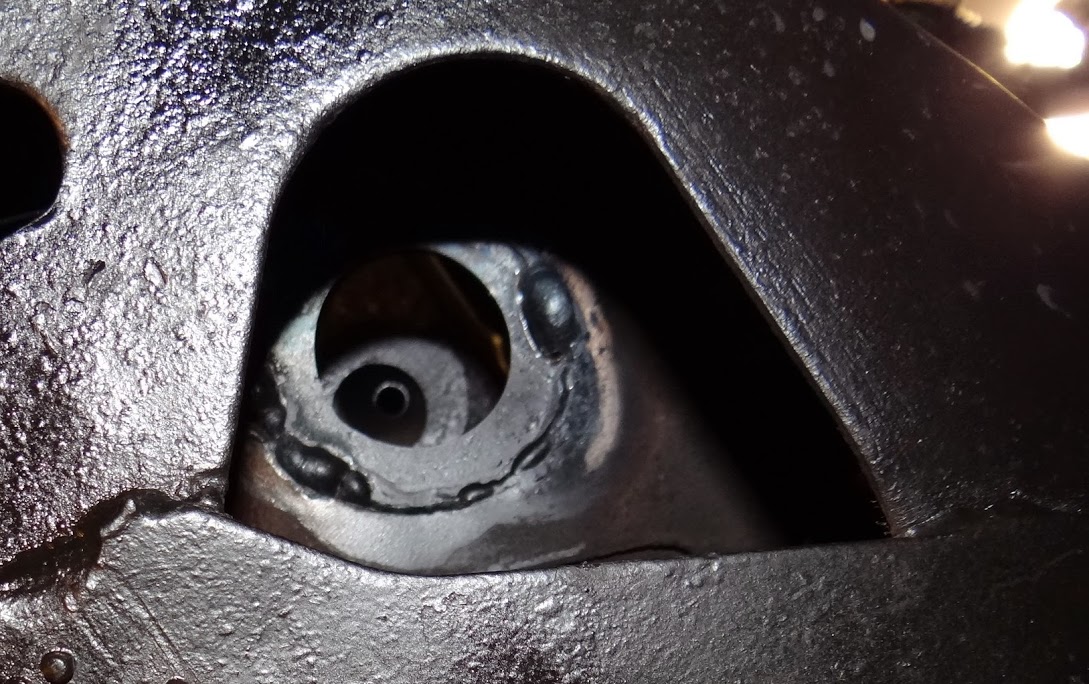
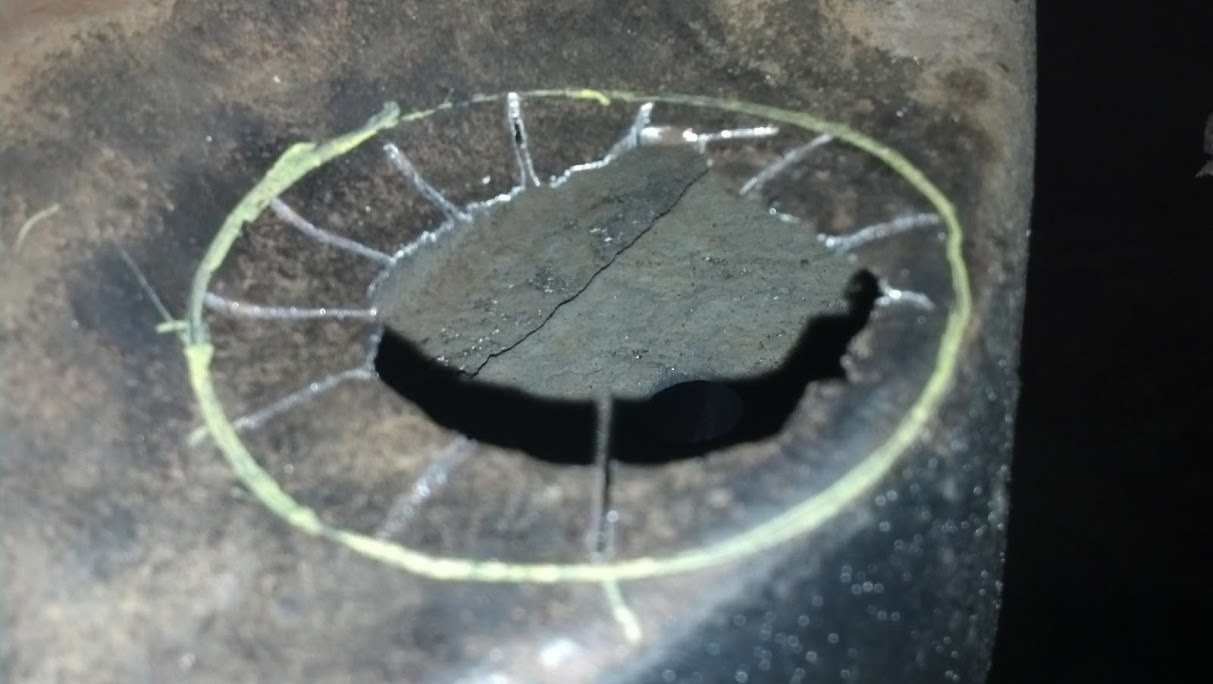
Time to break out the new MillerMatic 211 and get to welding. I used the gauge to determine that the washer thickness was in between 14 gauge and 1/8" thick so I set the wire speed and voltage settings halfway between those two based on the chart, clamped the ground on the frame ans tried to tack the washer in...no spark. Spent about 5 minutes chasing it down, even hit a quick bead on a piece of scrap steel which worked...finally figured out it wasn't getting a good ground. I ended up putting a C clamp on the frame close to the repair site, clamping it down tight and then clamping the welder ground on it. The tack welds went pretty good, so I started laying down a bead around the back side of the washer. That went pretty well, then as I got to the engine side...I started burning through the frame. I tried again on the fender side and after a bit started burning through as well. The welds were plenty hot and laying down nicely but I was blowing away the frame as I went along. I ended up turning the volts down just a bit and moved slower which filled the void but also built up the welds higher than I would have liked.
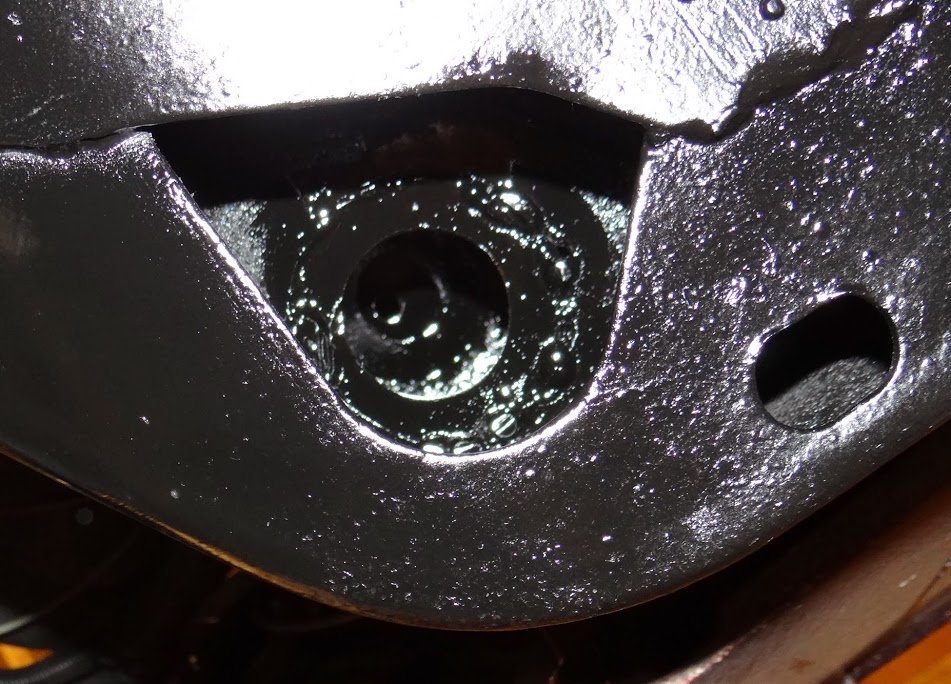
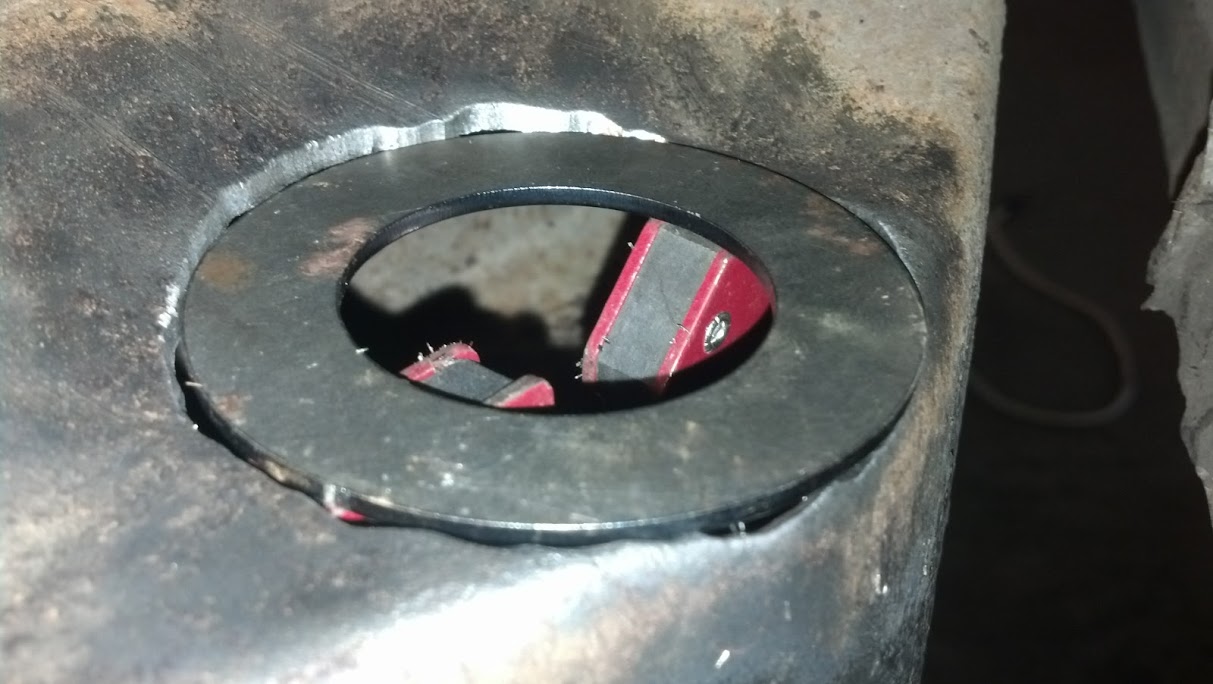
This was after a wire wheel and a little bit of dressing.
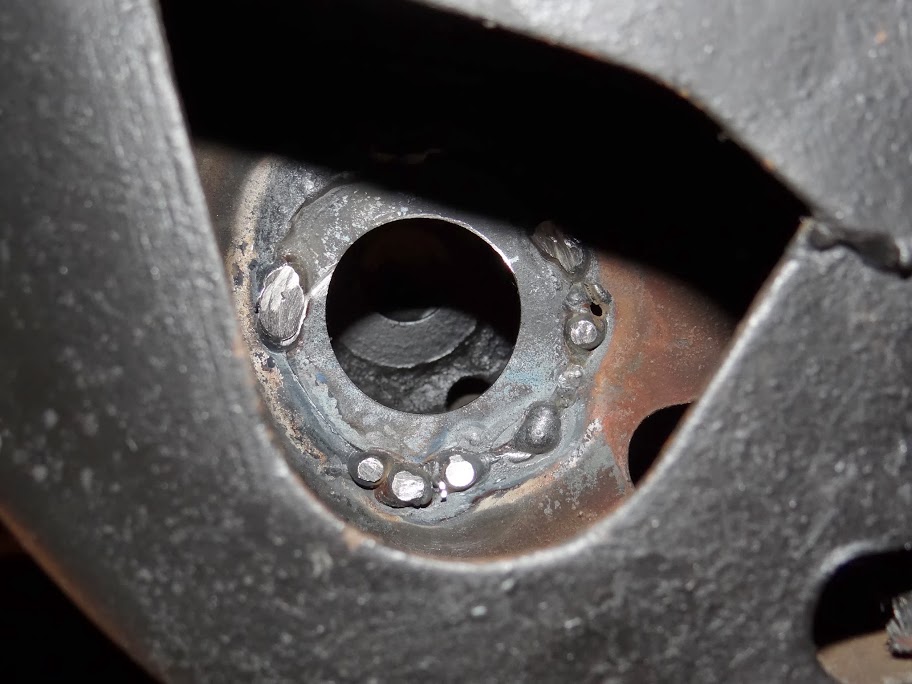
Had it been out in the open it wouldn't have been a big deal, hit them with a flap wheel to dress them up and call it good. Bit of a different story here though, I cleaned them up the best I could while test fitting the bushing. I finally got it where it sat pretty well and called it good. Most of the high welds are just outside the bushing and I'm sure the Poly Graphite bushing will pull down around the humps and bumps left. If I decide to go with a solid aluminum or delrin bushing I'll have to clean them up a bit better though.
I also had to clean up the underside where the welds blew through so the bottom bushing would sit flat. Thankfully I could get a die grinder up in there with a cut off wheel on it to dress them up.
I then hit all of the areas of the frame and body I could get to with a coat of Eastwoods Rust Encapsulator and after it setup two coats of Extreme Chassis Black.
This is #6R which is still in real good shape thankfully.

I left the body suspended on the lift to let the paint set up. Next time out in the shop I'll set the passenger side back down on the bushings and lift the driver side to start the repair on #6L. Hopefully it'll go a bit smoother (and I won't be nearly as hungover).Lance
1985 Monte Carlo SS Street Car
01-02-2014 #67
Registered User
- Join Date
- Nov 2012
- Location
- Sacramento, CA
- Posts
- 1,918
Nice!` What a simple & great repair.
01-04-2014 #68
Registered User
- Join Date
- Aug 2012
- Location
- Peoria, AZ
- Posts
- 1,758
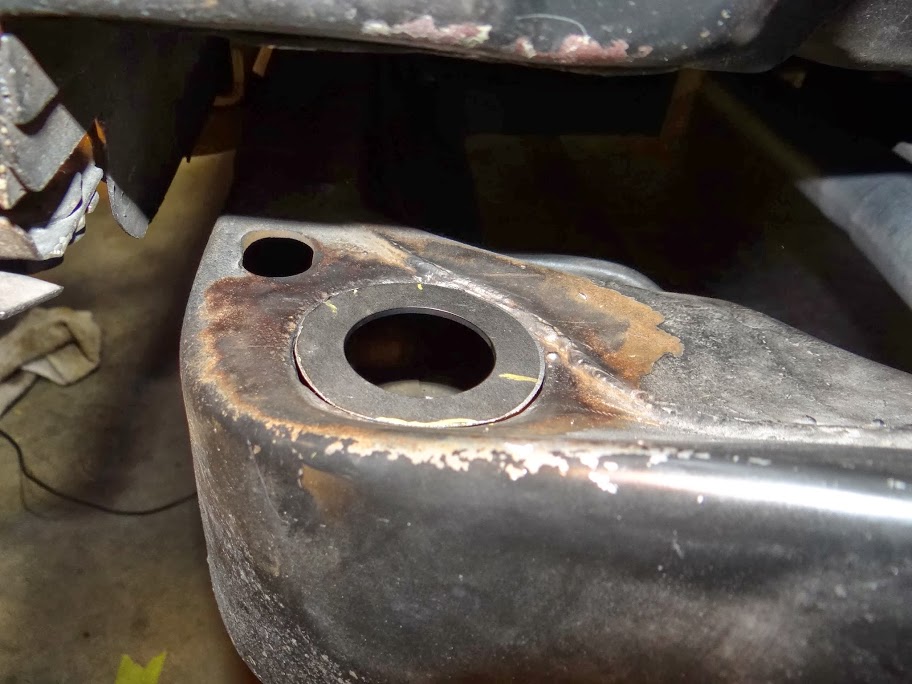
The 4" grinder with a new wheel did the trick...It would just fit in between the body and frame and make quick work of my ugly welds.
I even welded back up the little blow through hole that was left over from before then test fit the bushings once again.
Much better...
I then put a couple of coats of Extreme Chassis Black on the repaired area to coat it up.
While that was setting up I grabbed a can of Eastwood Internal Frame coating and got busy coating the whole inside of the passenger side of the frame.

http://www.eastwood.com/internal-fra...ay-nozzle.html
I used air to blow anything loose out of the frame first paying special attention to the areas behind the tires. A BUNCH of crap come out of the rear frame rails. Once nothing else was coming out, I starting sticking the spray nozzle inside holes and spraying. It took a bit to get used to how it sprayed out, but I figured it out pretty quick. It can be a bit messy, but I was more concerned about getting it all completely coated than being tidy. I used one whole can on the passenger side and got to all of the enclosed areas of the frame. I even stuck the nozzle up inside the cage body nut areas to coat up inside them.
One more quick coat of Extreme Chassis Black to cover the frame coating mess back up and it all looks good again.
I used a die to chase the threads on all of my body bolts, even the new zinc coated ones...as I don't want ANY issues when it comes time to re-install the bolts. I then tried to run a tap into the cage nuts and didn't like the way it felt going into the first one. Not being able to securely hold the tap straight as I was starting it because of the frame being in the way was hampering my effort and I did NOT want to screw a nut up at this point. I ended up just grabbing one of the cleaned up bolts, coating it with rust penetrant and using a socket and a long extension to run it up into each body nut and back out again to make sure the threads were good and clean.
Then it was time to let all of the passenger side frame paint cure...and come inside to watch the Chiefs game!
Tomorrow I'll start on #6L.Lance
1985 Monte Carlo SS Street Car
01-05-2014 #69
Registered User
- Join Date
- Aug 2012
- Location
- Peoria, AZ
- Posts
- 1,758
What is it about frame repair days and hangovers...
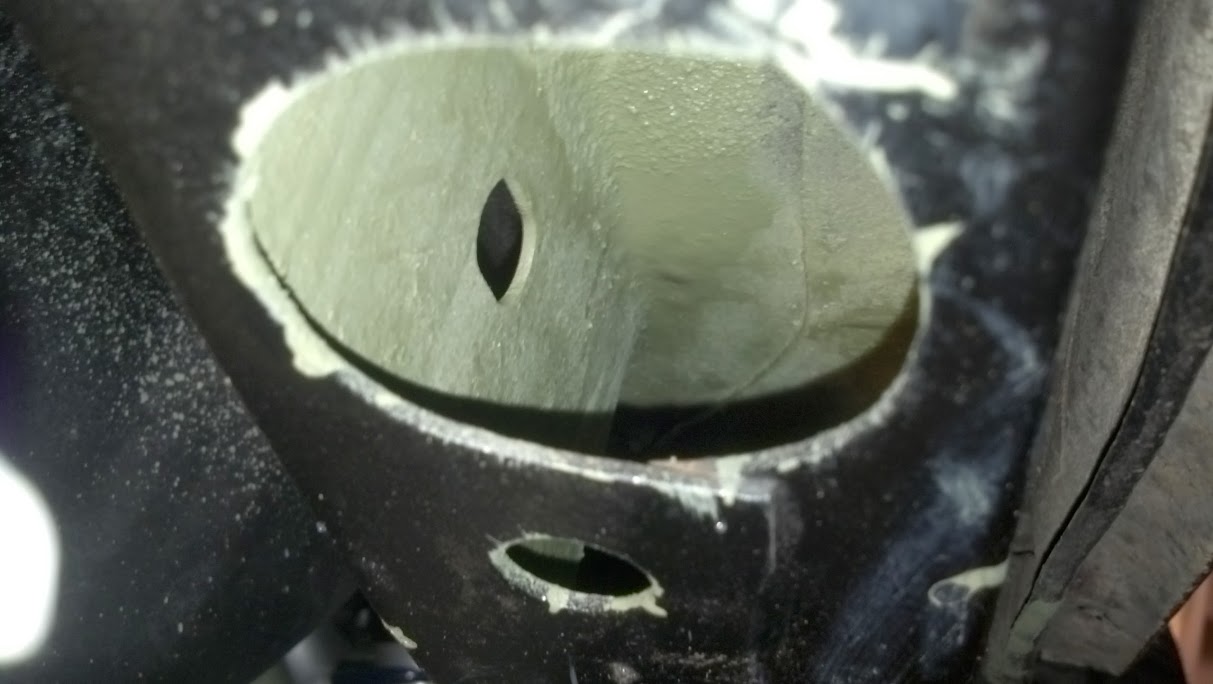
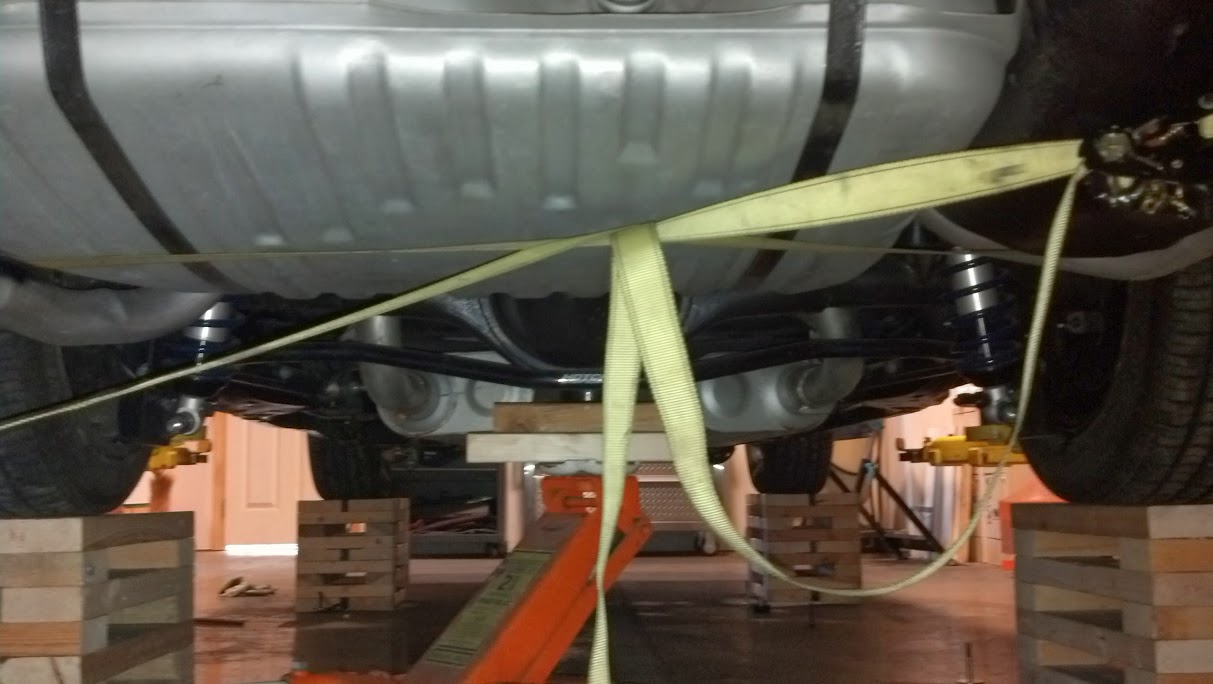
Headed out to the shop this morning after plowing the 3' snow drift off the driveway in -15 degree wind chills... Set the passenger side down on the newly painted frame rails and set about raising the driver side as high as I could get it. No matter what I did, I could only get about 3.5" of room above the frame rail to work with. First sign that it was gonna fight me.
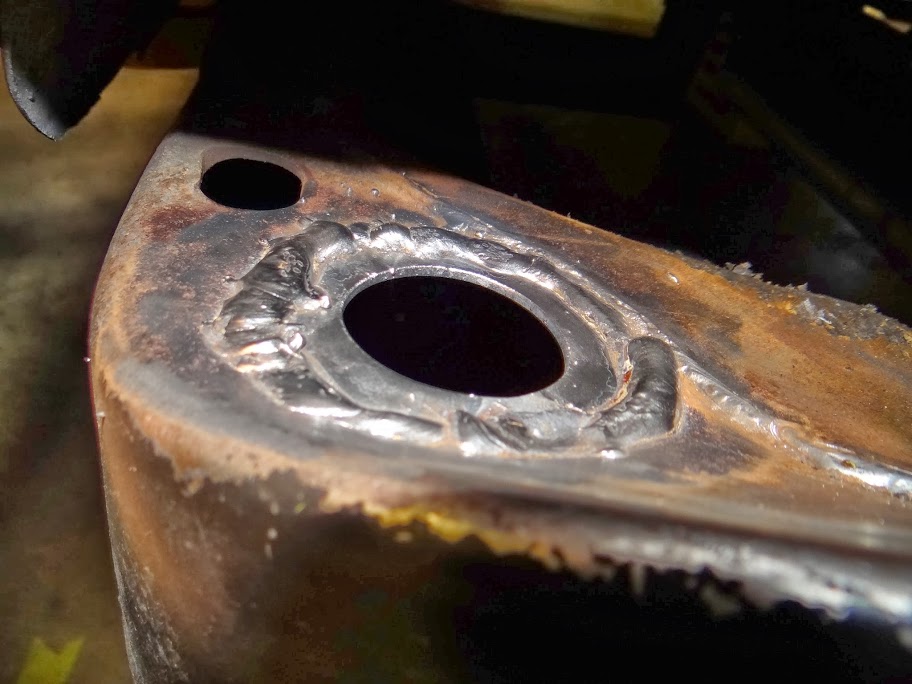
Borrowed a body saw and with 5 new blades, set about cutting out the bad stuff and making room for the repair washer.

Got a much better fit with this one
Turned the welder up just a touch and practiced a stitch or pulse weld method to burn the weld in good without blowing through the frame. It worked pretty well really...until my hand got trapped against the body with my finger on the trigger and blew through an area about the size of a dime!!
I then had to turn the welder down and plug that area back up again. I was going to get away without having to do a lot of grinding until that happened.

Still turned out better than the last one, just takes practice I guess. Cleaning up was a bear, just no way to get any sort of grinder in that tight area. Tool of choice ended up being a die grinder with a cut off wheel on it stuck in from the side.

Then on to the same process, coat the inside of the frame with the Internal Frame Coat then rust encasulator and extreme chassis black on the whole driver side of the frame.
Be nice to button this part of the job up next time I'm out in the shop. Need to shim up the #3 bushings, get all of the bolts started, then try to figure out how to move the back of the body to the passenger side to line if back up square with the frame.Lance
1985 Monte Carlo SS Street Car
01-11-2014 #70
Registered User
- Join Date
- Aug 2012
- Location
- Peoria, AZ
- Posts
- 1,758
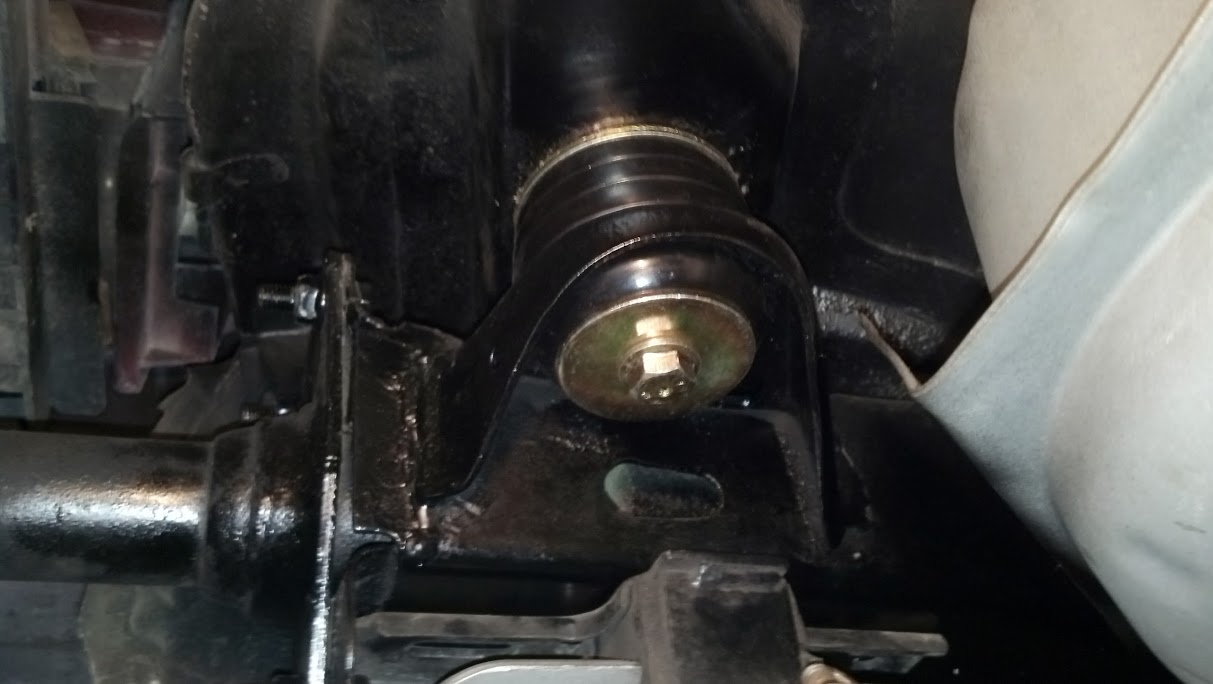
Since the repairs were complete and the frame was coated and painted inside and out, I set about putting the PST PolyGraphite bushings in place and buttoning up the project.
The body sat down on all of the bushing washers at just about the same time except #3. I had a couple of washers on hand with a big enough hole in them to put between the top bushing washer and the body which filled the gap perfectly. A quick coat of paint on them and in they went. While the paint on those and the #1 shims was drying, I set about squaring the rear of the body up with the chassis.
It was 5/8s of an inch to the driver side at the axle centerline...so the body needed to move to the passenger side 5/16s of an inch. Ratchet straps did the trick.
I then tried to get the #6 and #7 bolts started...which proved to be a challenge. The factory bolts are 79mm long and pointed on the thread end, the new bolts I bought from Fastenal are 75mm long and square ended. I didn't think that 4mm would make a difference, but in many cases...it did. The trick I finally learned was to use a longer old factory bolt (cleaned up and threads chased) to line the bushing, sleeve, washers, and cage nut up...then back it out and then put the shorter new bolt in its place. In some cases the body had to be sitting on the bushings to get these bolts started. I finally got all of the new bolts in every place but one, which I had to use a painted old bolt that was still in good shape but had I to do this job again, I'd buy 79mm or even a bit longer bolts for sure.
I got the 4 back ones started and had to squeeze the body back square a bit more with the straps and then started getting the rest of the bolts in. Even with the lift it's a bear to get the #3 stub from the body down into the washers and bushing...especially by myself. I finally got my Dad out there to help me...he'd raise and lower the lift that was lifting the body while I'd line things up and get the bolts started. Once a bolt was started I'd move on to the next one. It went pretty quick after that.
Once all bushings, washers and bolts were in place and started, I checked the squareness of the body again and both the front and the back needed a bit more of a tweak. Again a ratchet strap hooked to the body on one side and the frame on the other proved to be the easiest way to nudge it over. Once square I set the body down on the bushings one last time and tightened all of the bolts up starting at the back working my way forward in a crisscross pattern.
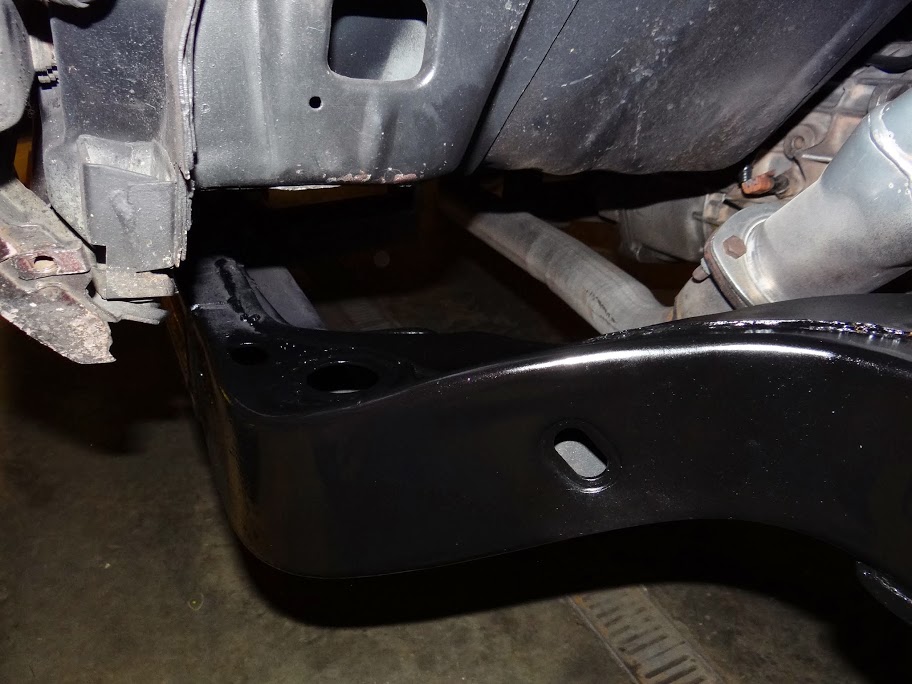
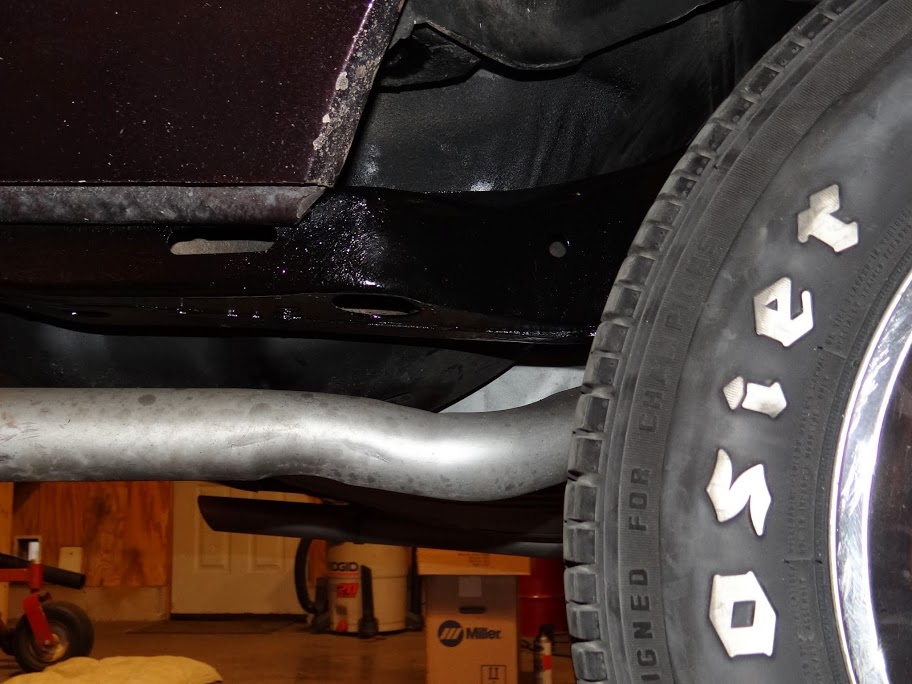
I then reattached all of the cleaned up and painted bumper hardware and tailpipe hangers and called it a day. Still haven't put the front inner fenders back in but I have a couple other jobs planned that will be easier with them out.
I checked the fender ride heights with the car snugged down and back on the tires and all 4 corners are within an 1/8" of where they were before I started. If I bounce the front up and down and measure, the fronts are an 1/8" down and the rears an 1/8" up. If I bounce the rear of the car and measure, the rear is down an 1/8" and the front is up an 1/8". I'd say it's right on where it was before, just a bunch more secure in place and square.
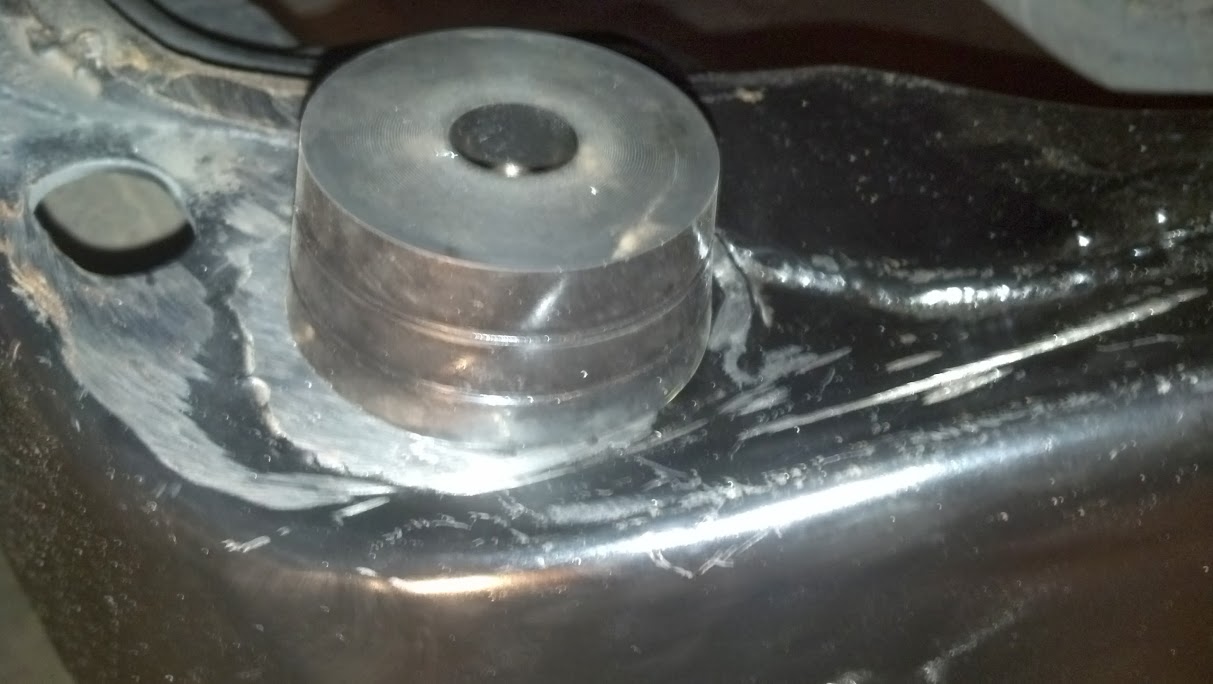
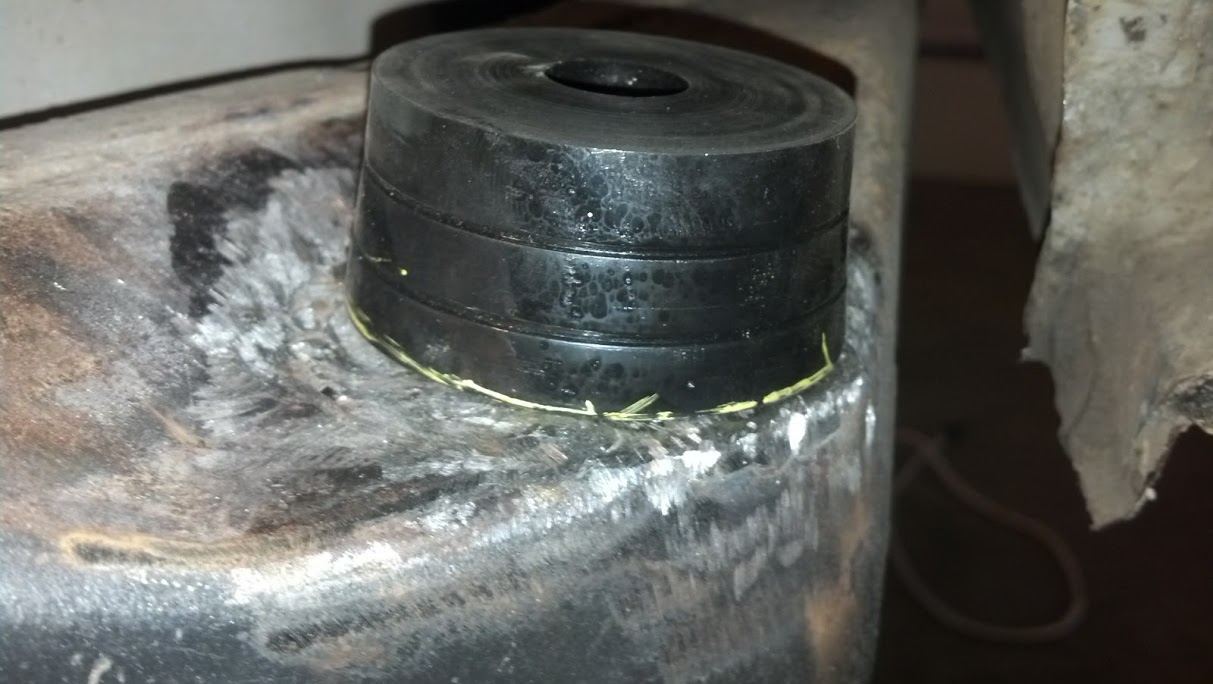
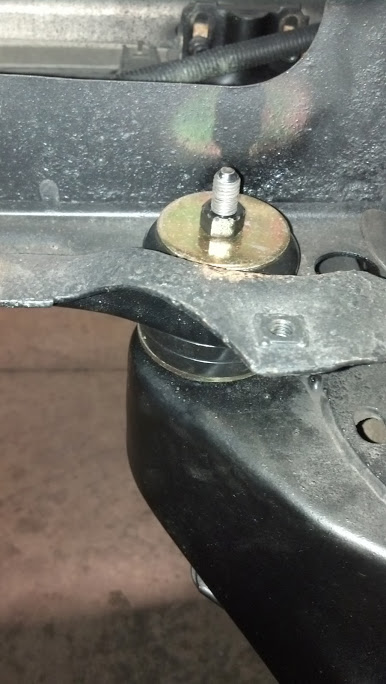
Here's some pics of the snugged down bushings...
#7 Left
Think this is #4 Right
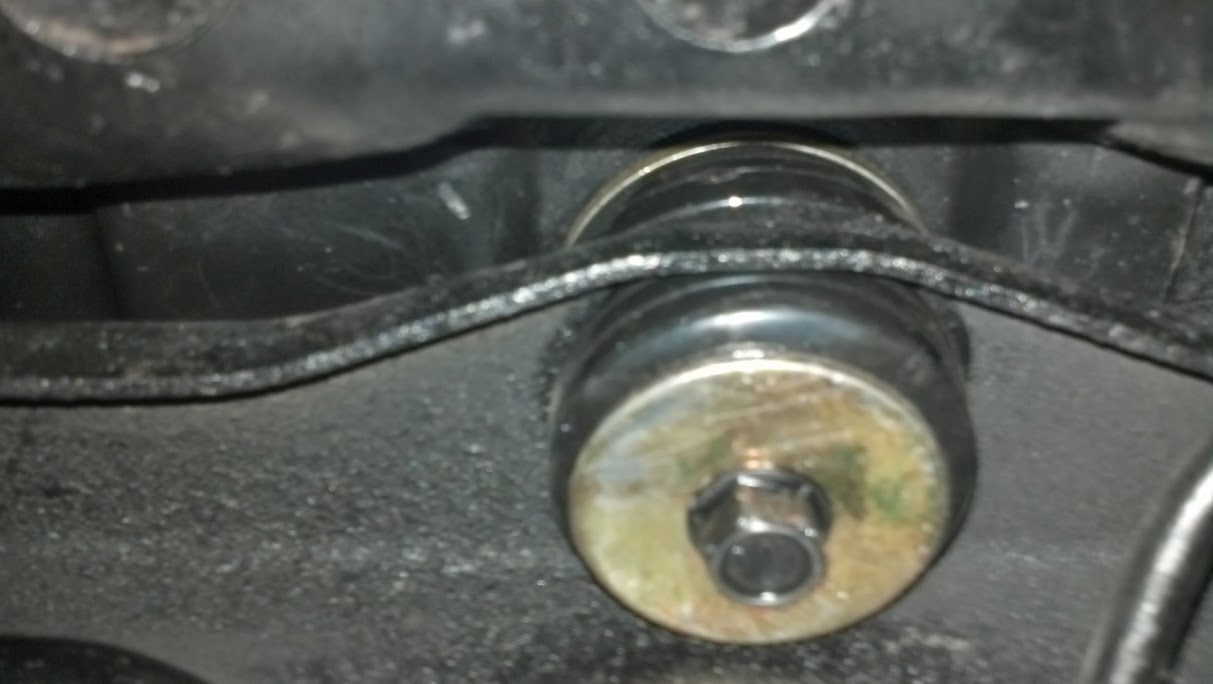
#3 Right
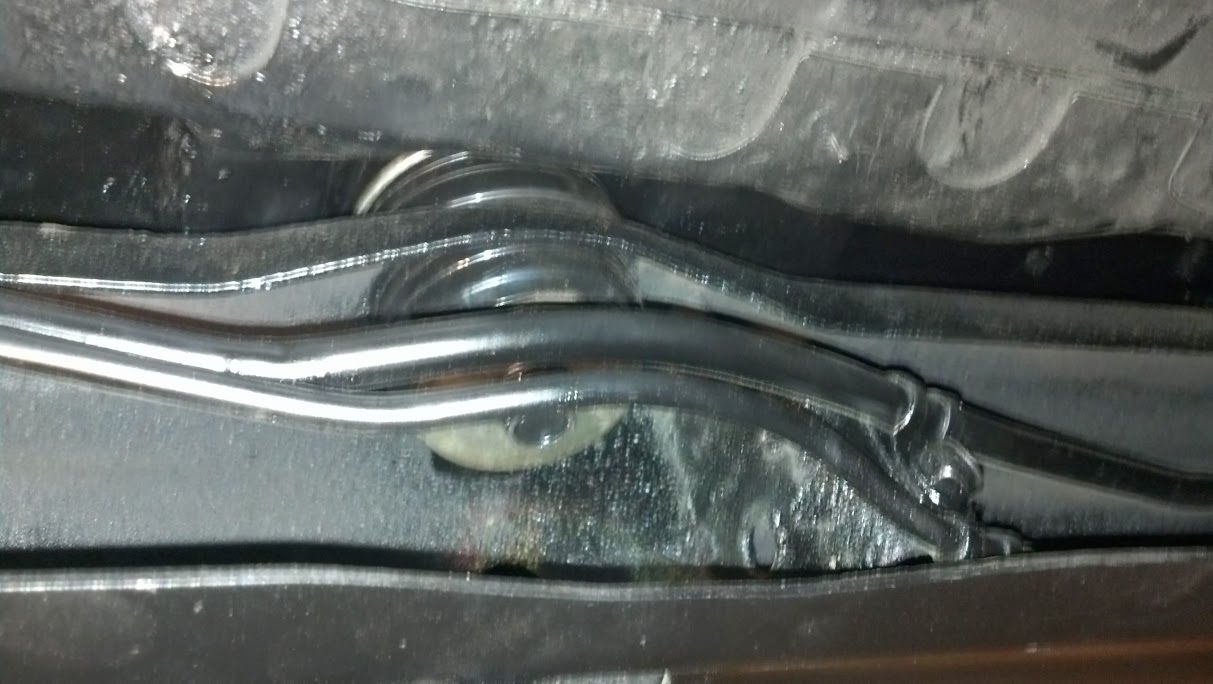
#2 Right
#1 Right
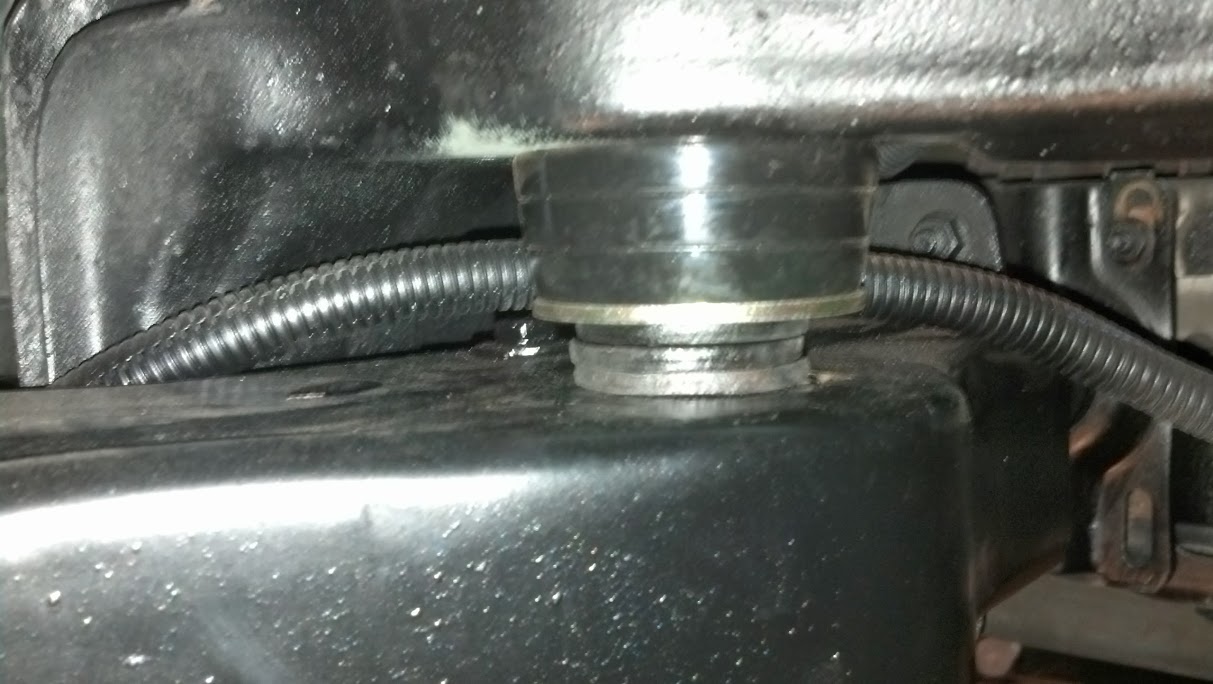
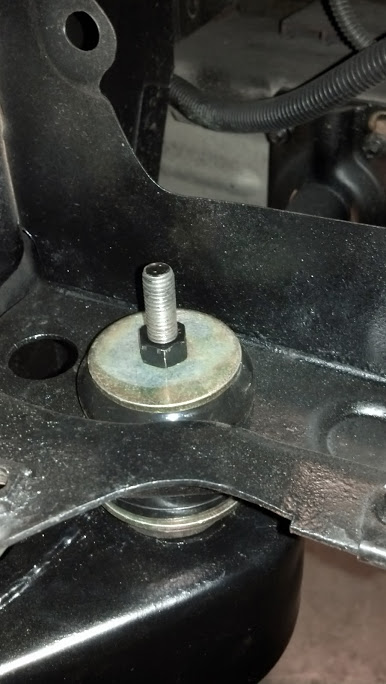
#1 Left
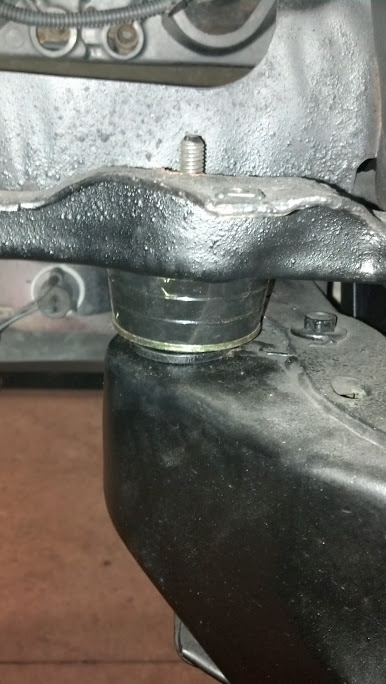
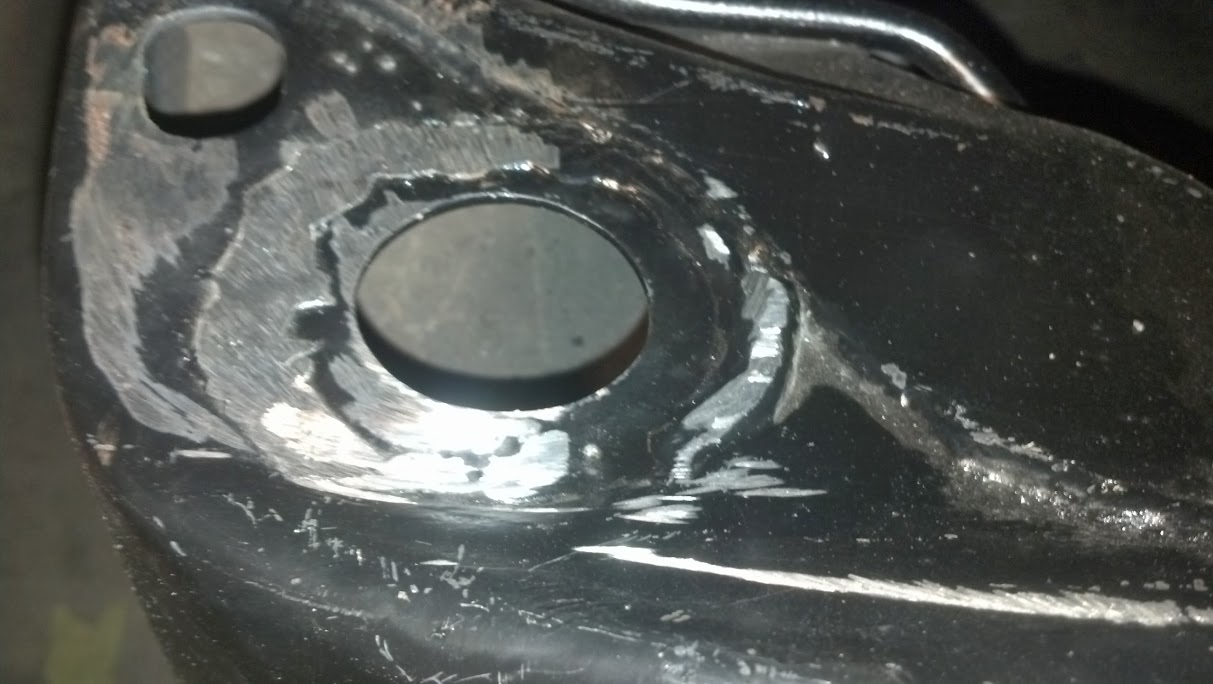
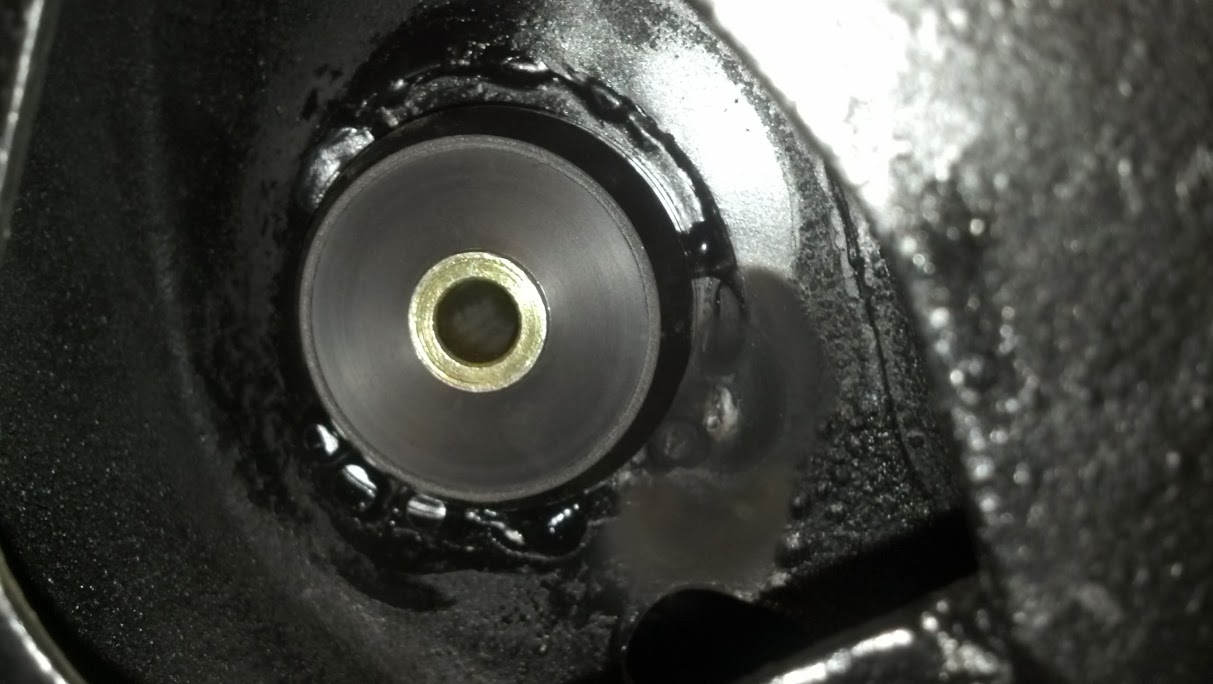
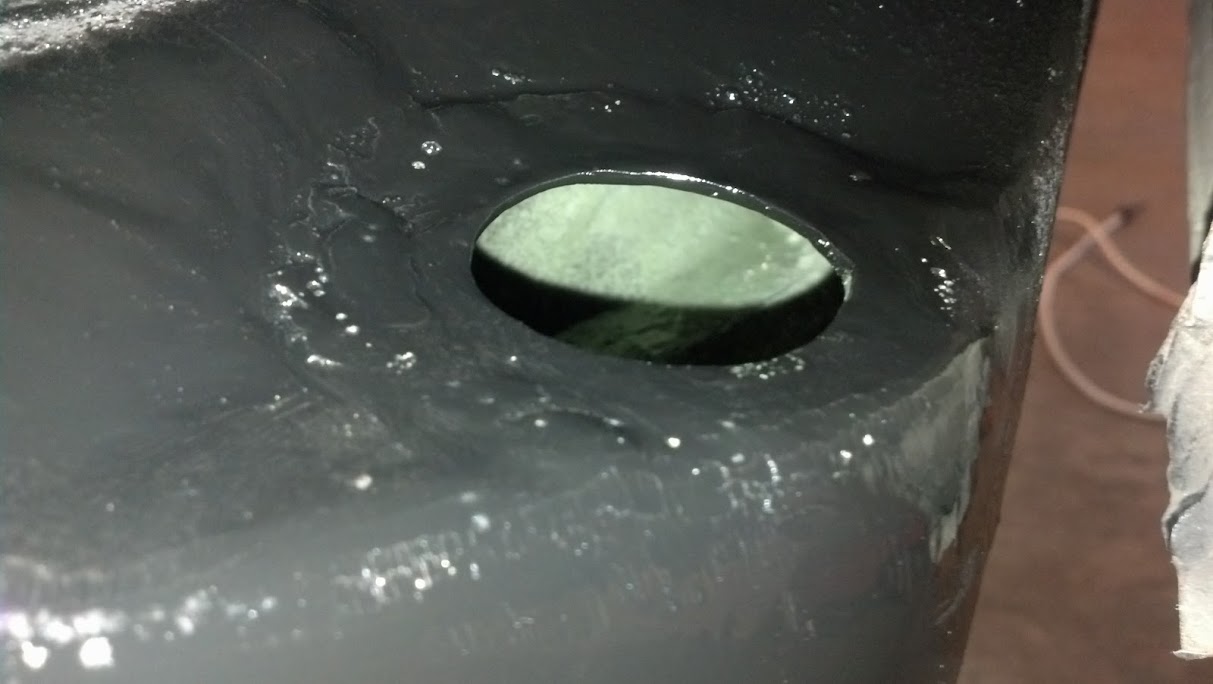
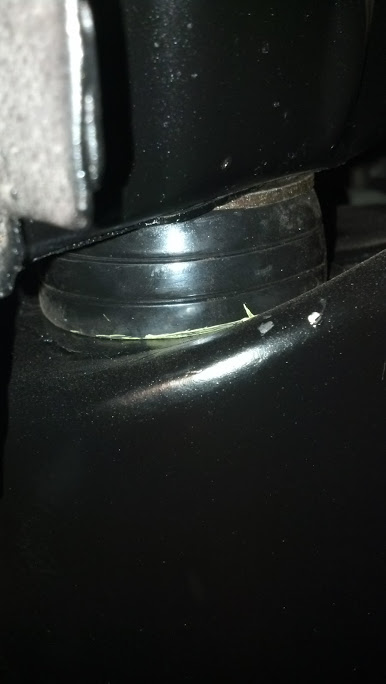
BTW, remember this picture of #1 left when the car is lifted on the lift and the front end of the frame sags under the weight of the engine?
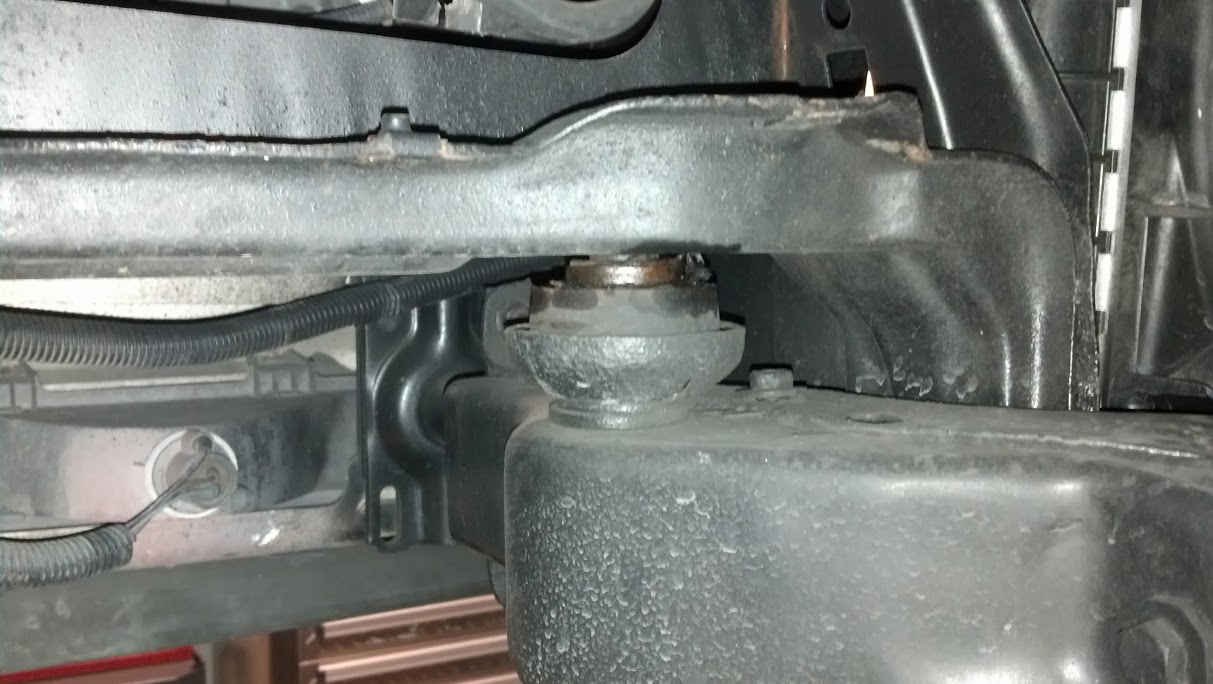
This picture was taken of the same spot with the car lifted on the lift but new tighter bushings holding the frame up and in place.
Problem solved...Lance
1985 Monte Carlo SS Street Car
01-12-2014 #71 Registered User
- Join Date
- Mar 2010
- Location
- Okinawa, Japan
- Posts
- 305
Nice work! That was the worst part of my build, dropping the body back down and lining up those body mounts by myself was a PAIN.
81 Regal, impersonating a Grand National with a 488 Olds
Build thread: https://www.pro-touring.com/showthre...ith-a-488-Olds
01-26-2014 #72
Registered User
- Join Date
- Aug 2012
- Location
- Peoria, AZ
- Posts
- 1,758
This weekend I was able to finish up the performance minded wheel alignment, reset my pinion angle and bolt the street tires back up and run down to the car wash to rinse the layer of shop dust off the car. During the test drive I noticed a bit of interference coming from directly under the console and pretty much knew what it was right away. Between lowering the pinion angle 2 degrees and a slight raise of the body from the frame, my drive shaft loop was now just a bit too close to the drive shaft. With the car back up on the crib stands (Man, I've used the heck out of those things since building them) a closer inspection revealed that the loop was just a bit off center and just a bit too close to the yoke.
A couple of large washers were used to space the loop down a bit and that did the trick.
Another longer more intensive test drive proved the fix worked, no more interference.
It was in the 50s outside and sunny, which is warm but not really summer weather. The ride started out a bit springy I'll call it. As with most ride characteristic changes, they were more evident from the rear of the car than the front. There seemed to a be a bit more of a bounce after a bump from the rear than before. The more I drove it though, the better or closer to normal it got. Could have been just getting more heat into the tires or possibly even a little bit of a break in period on the body bushings.
The front felt a little bit different also, but I also made a pretty drastic change to the wheel alignment (-0.6 to -1.6 camber) which I'm sure had an effect too.
My GoPro battery was dead so I couldn't do any data acquisition but it's on the charger and I still might get another test trip in the books this afternoon yet. Plan on checking the front frame horn flex under hard cornering as well as pinion action under hard acceleration, braking and turning.
Overall though, I can not complain about any extra NVH from the Polygraphite Body Bushings. There may be just a touch more feeling from the smallest of bumps transferred through to the driver's seat, but nothing that a pound or two of pressure out of the tires wouldn't alleviate if it really concerned someone. Overall, I'd call the project a success.Lance
1985 Monte Carlo SS Street Car
01-27-2014 #73
Registered User
- Join Date
- Aug 2012
- Location
- Peoria, AZ
- Posts
- 1,758
Was able to grab a bit of video today...check this out.
http://youtu.be/YvWLoyNaWMc
Kind of a big improvement don't you think?
The seat of the pants feel is different as well. I am struggling to put into words exactly how it is different though. It's not a HUGE difference from before, just certain things feel a bit different. Most of the feel difference comes from the rear suspension over larger bumps. It's almost as if it's springier in the back if that makes any sense? Maybe I'm just being a bit over sensitive too looking for something to be different too...
The car just keeps getting tighter and tighter. Everything I upgrade on it improves on it's Loosey Goosey feeling and it's really starting to have more of a European ride feel to it. Nothing has made it harsh feeling though, it still rides pretty dern good all things considered.
I'm really happy that the frame isn't flopping around under the core support under hard cornering now, that should help considerably on the track one would think.Lance
1985 Monte Carlo SS Street Car
01-27-2014 #74
Registered User
- Join Date
- Jul 2005
- Location
- Grain Valley, MO
- Posts
- 92
Nothing short of 'amazing' on the visual difference alone!
01-27-2014 #75
Registered User
- Join Date
- Mar 2006
- Location
- California City Ca.
- Posts
- 398
thanks for the video comparision Lance really showed the upgrade worked.
Dale Hayes
87 turbo t
turbonetics t60, pet stock location intercooler, ride tech coilovers, rjc exhaust, 60lb injectors with tt chip, ported heads and intake, ported tb, baer brakes, roh 17 inch wheels....now need to finish paint and get it put back together.
01-27-2014 #76
Registered User
- Join Date
- Oct 2006
- Location
- Chicago
- Posts
- 289
Holy cow Lance, awesome video! I've told people how much a "feel" difference the new poly bushings made but that certain explains it.
Luke
'63 Chevy II wagon - project
02-04-2014 #77
Registered User
- Join Date
- Aug 2012
- Location
- Peoria, AZ
- Posts
- 1,758
Snow day = Shop day
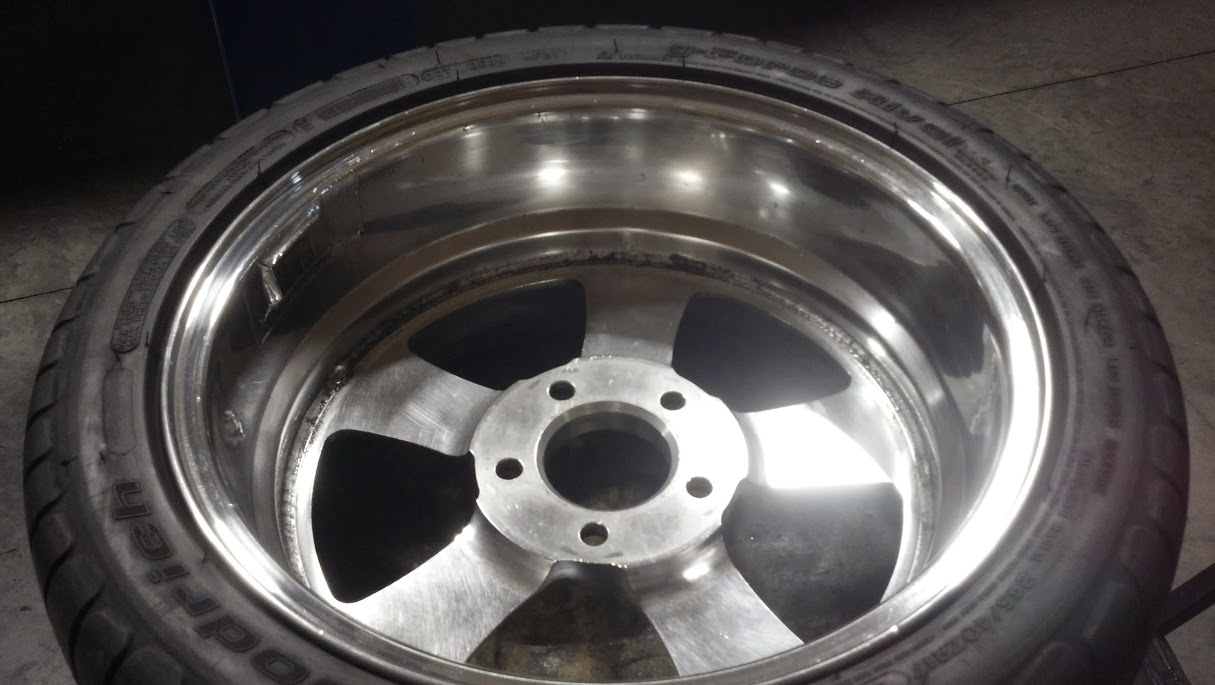
Since I'm going to run street tires full time this summer, I had to find a way to get my billet wheels looking nice again and more importantly keep them looking that way.
First up, cleaning them up and polishing them. Brake N Parts cleaner on a rag was used to clean the back sides of them up of grease, gear oil and brake fluid then Mother's billet polish was used on the fronts. I've found the best way to do this job is to get a nitrile glove, dip a finger in the polish and work the polish onto the rim with the glove. This lets you control the amount of polish (little goes a LONG way) and also makes it easier to work the polish into all of the nooks and crannies.
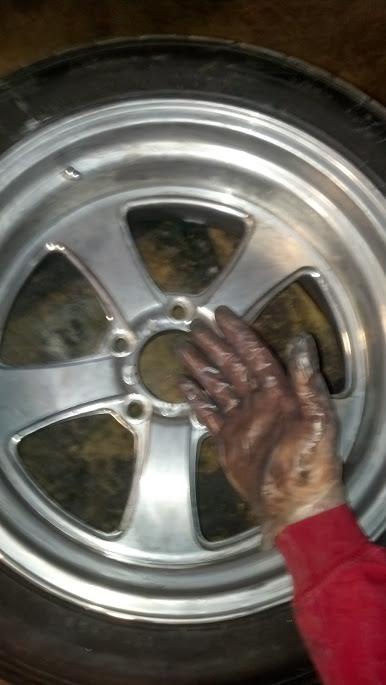
I then take a Mother's Polish cone on an electric drill and work the polish back off the rim. This works pretty good to get the majority of the spots and blemishes off on the first go around. Usually still have some spots left though and I take my glove and work polish back into the areas missed. This makes it a bit easier to watch the spots work out as you work the polish in. I finish it off with a microfiber towel polishing all of the nooks and crannies.
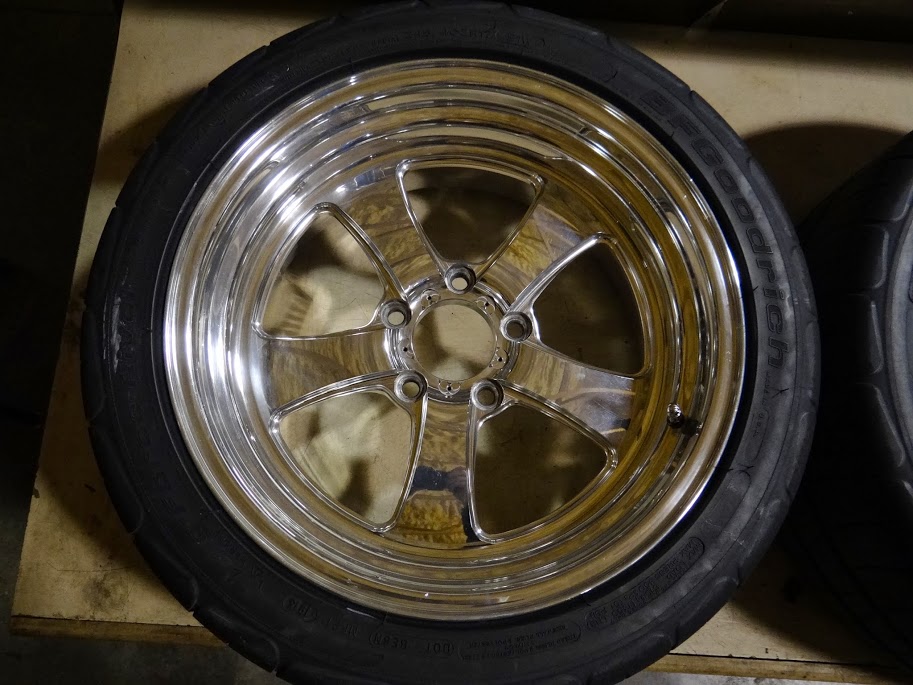
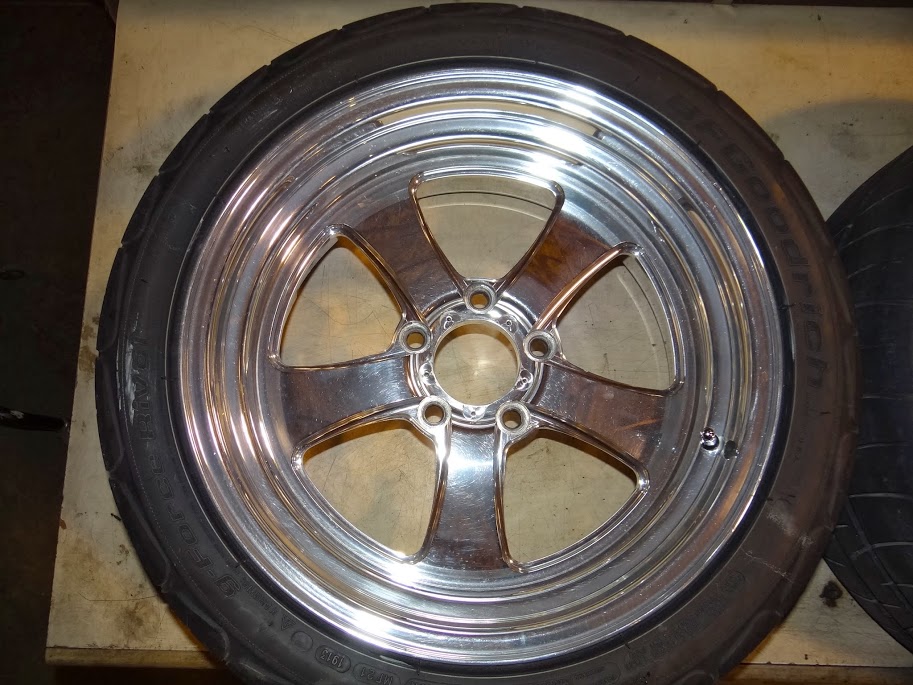
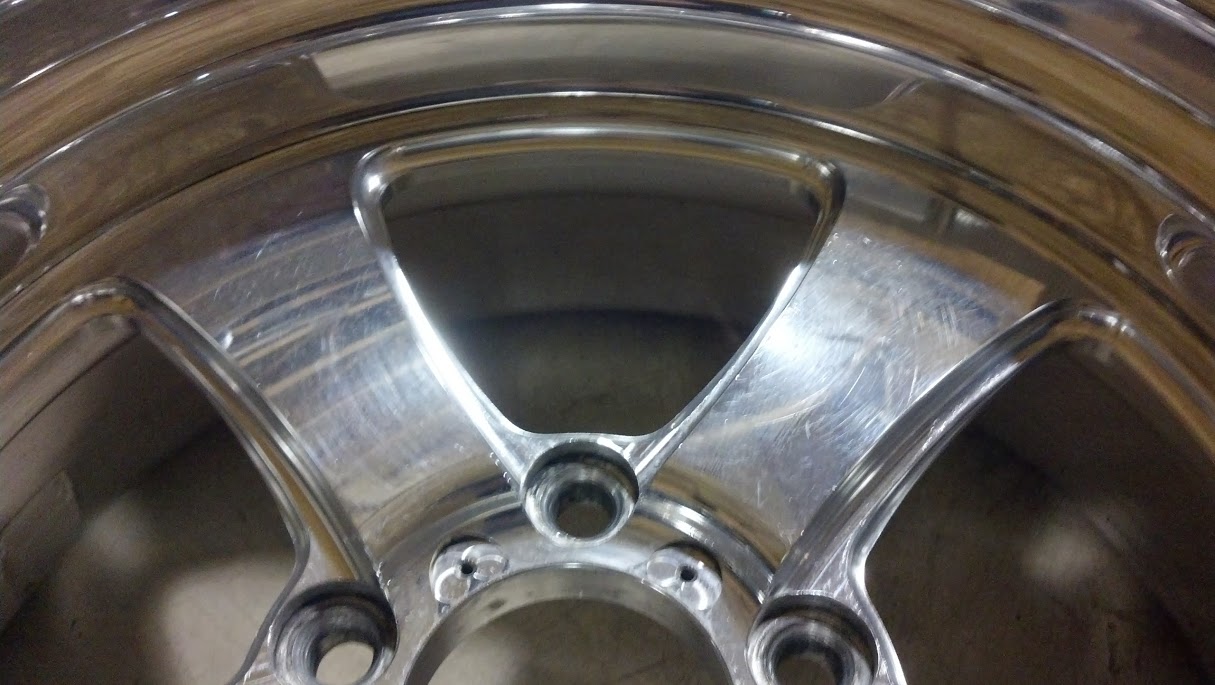
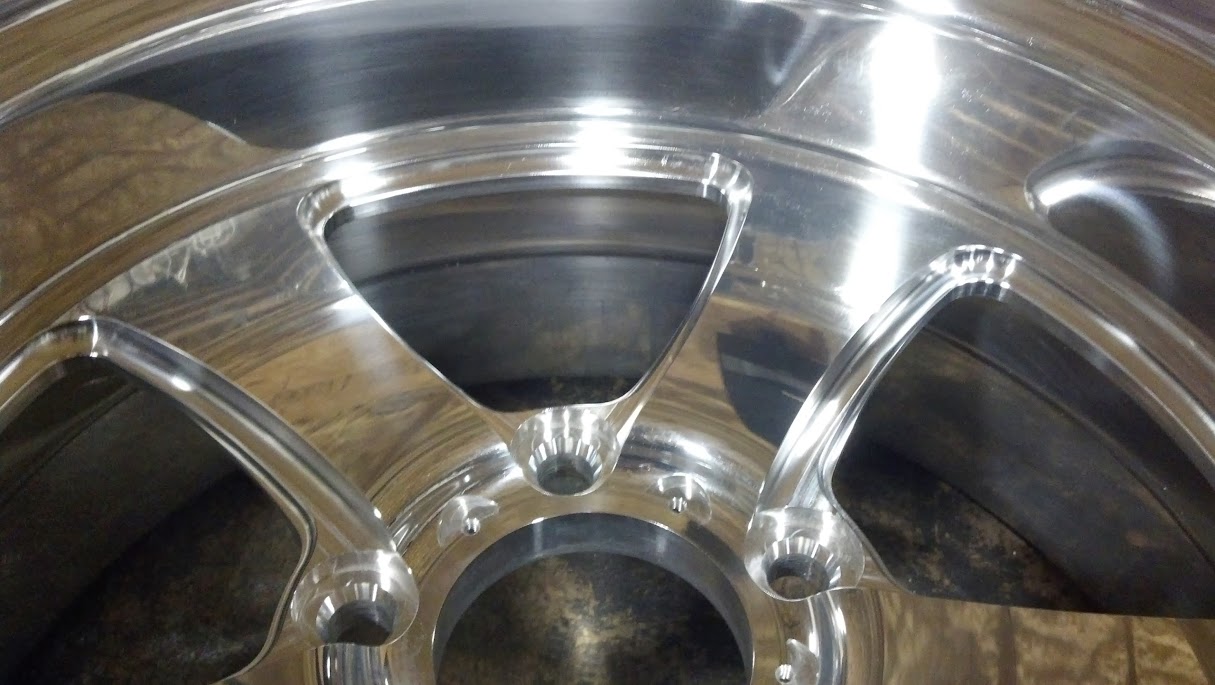
Here's one of the rear rims polished out...
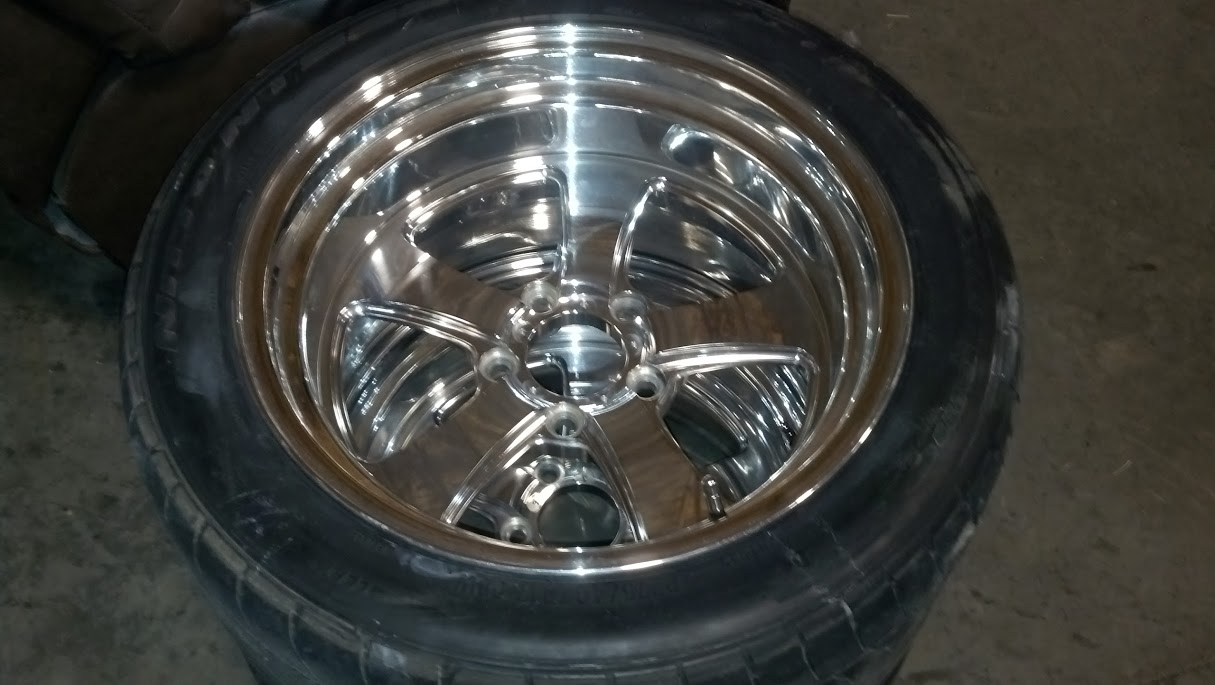
And here is one of the new rims to compare it too...
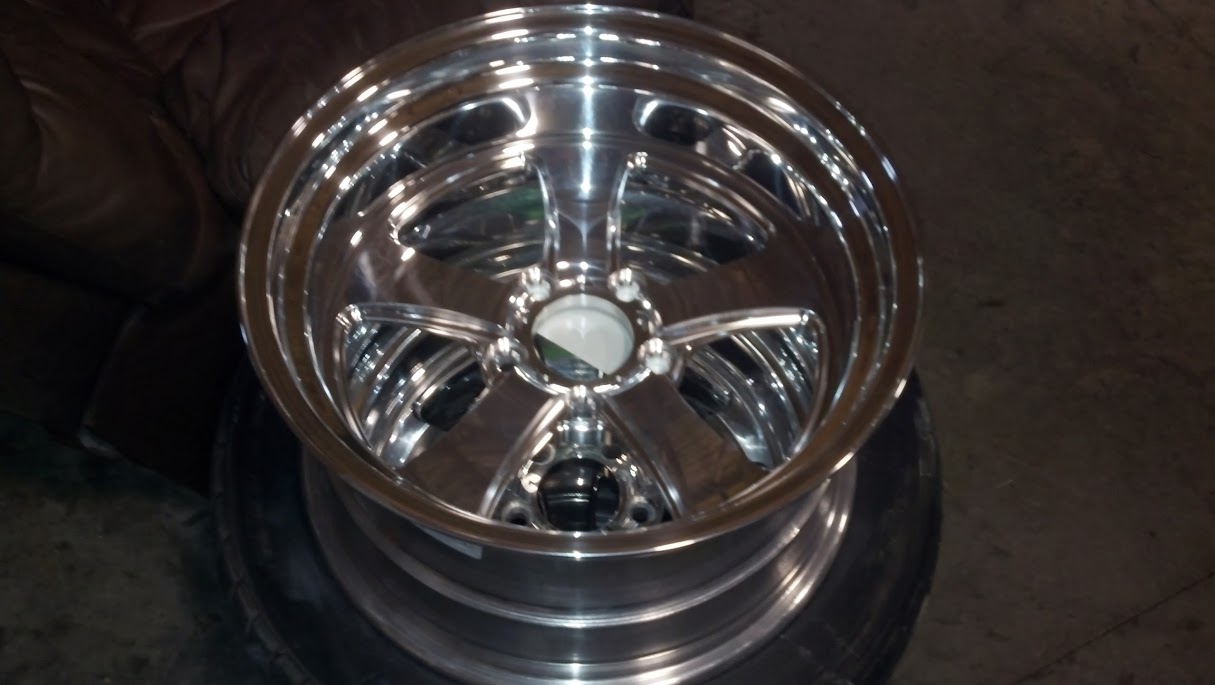
I realized that my cell phone takes terrible pictures of shiny billet aluminum...but it was snowing too damn hard to go back into the house to get the good camera so this is all we have for now.
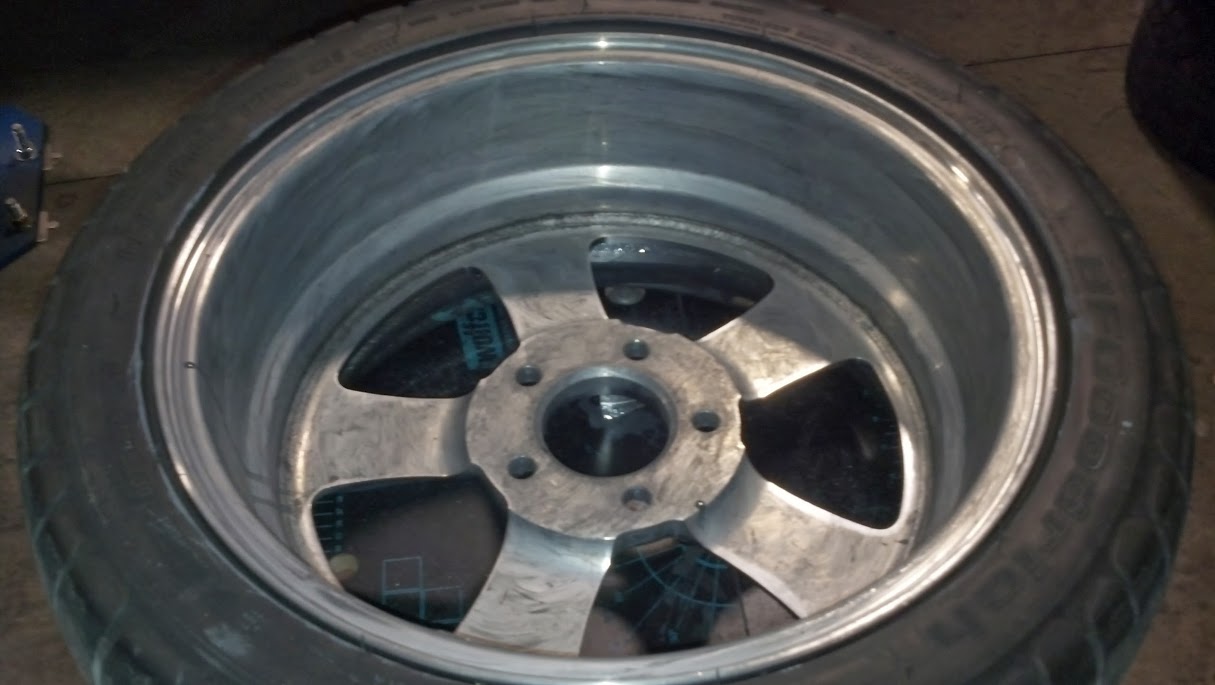
I even did the back sides of all of the rims too...
Mother's billet polish applied
and taken back off...
The next step is a sealant to help keep them nice looking under daily driving duties and after races. I've ordered some of this stuff up and will be applying it to all 6 rims later this week.
http://www.shineseal.com/products.htm
It used to be called Zoop Seal but they have reformulated it and now call it Shine seal. It works a bit like Sharkhide, another aluminum sealant that I have used to seal the pontoons on my boat. It seals the porous aluminum surfaces and puts a protective coating on it to keep the aluminum from oxidizing, makes brake dust just blow off and resists water spots making clean up super easy.
There is a cleaner, sealer, slick finish and bright shine metal polish in the kit. They say the sealer goes on kind of like rain-X. Bit like a solvent applied best with a new cloth diaper, let it haze up...then buff it off with a microfiber towel. Once the metal polish is used, the aluminum is supposed to shine as good as if not better than freshly polished billet with no sealant on it. We'll see...
I can't drive it regularly with them the way they were though...this I know. Hopefully this relieves some of the hassle involved with daily driving billet rims. If this doesn't work...they are getting plasti-dipped...Lance
1985 Monte Carlo SS Street Car
02-04-2014 #78
Registered User
- Join Date
- Jul 2012
- Location
- Iowa
- Posts
- 399
I was just getting ready to order the Zoop stuff to put on my new rims. I guess Ill wait and see how yours comes out. Im hoping it works like it says so I can daily drive with the billet rims.
Miles Boyer
The car hobby is dangerous,if the speed doesn't kill you, the cost of parts will.
91 V8 S10
88 Cutlass Pro-Tour
97 Chevy lifted Z-71
96 Corvette
02-09-2014 #79
Registered User
- Join Date
- Aug 2012
- Location
- Peoria, AZ
- Posts
- 1,758
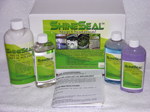
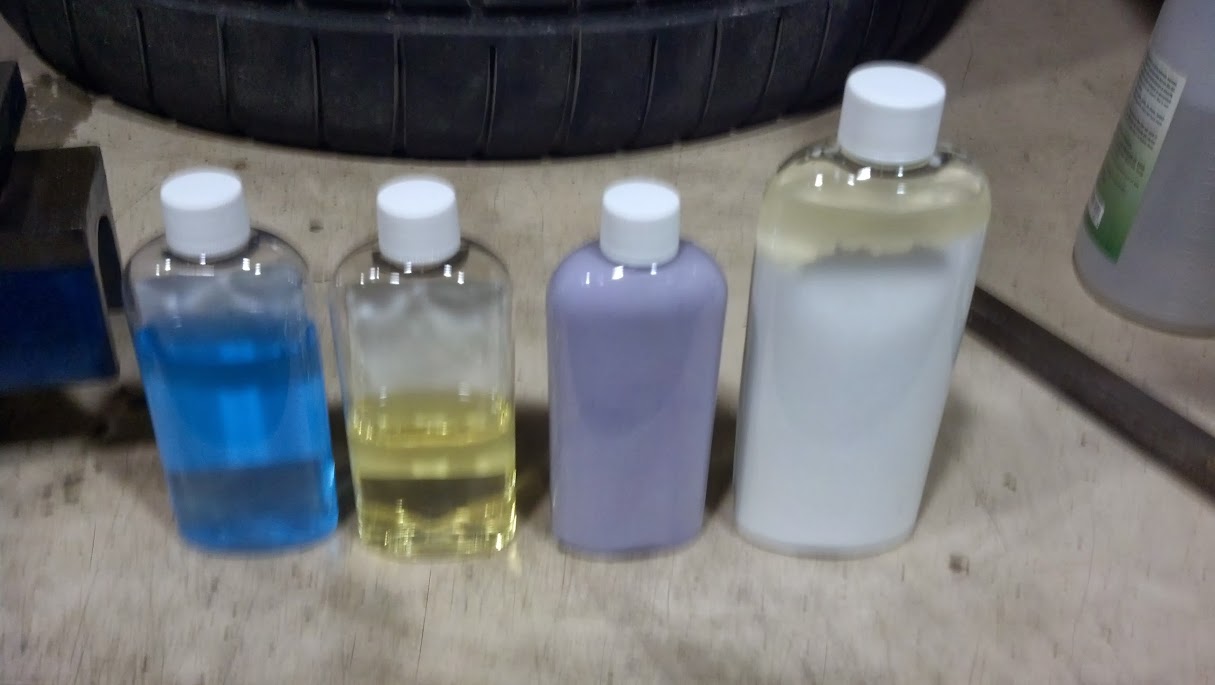
I got the ShineSeal kit in, I ordered the Master Kit which is says is good for 80 sq ft. Here it is along with the diapers I'll use for applying the sealer and the microfiber towels for polishing.
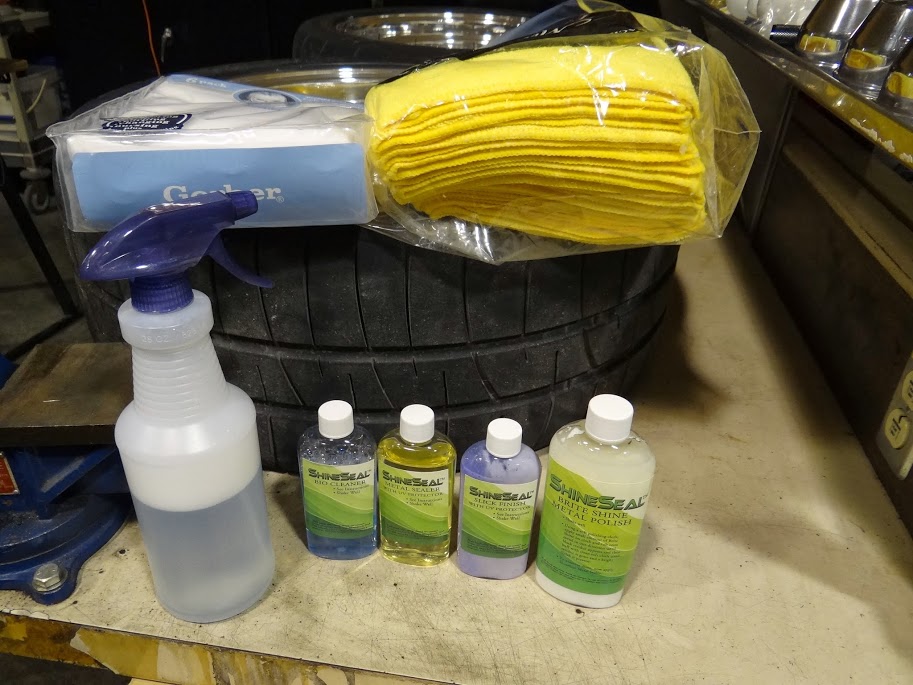
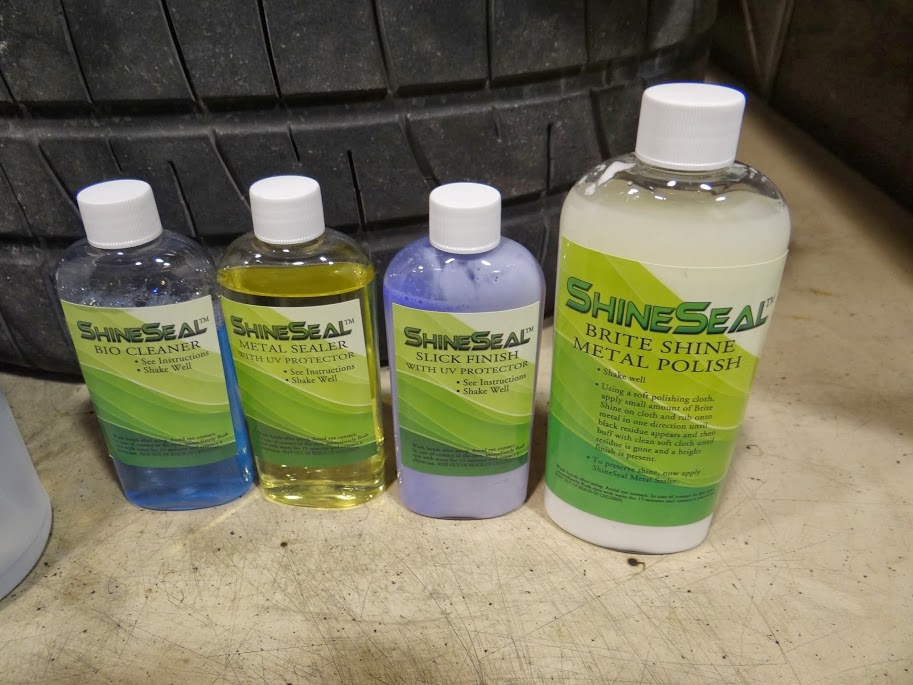
The bottle on the left is their Bio Cleaner which I mixed 1 oz with 16 oz of water in the spray bottle. This is used to clean the metal surface of any contaminants before the sealer is applied.
The Metal Sealer is the bottle second from the left, this acts and works very much like Sharkhide. It's the sealer that gets rock hard and protects the aluminum from anything penetrating it. The third bottle from the left is the Slick Finish, this may be what separates this kit from the other aluminum finishes on the market. It goes on like a wax but you don't let it dry on the surface you just keep polishing on it until it is all taken back off of the metal. It's the cat's meow... The 4th bottle from the left is a Brite Shine Metal polish that you use should you ever need to clean the Metal Sealer back off of the aluminum. I guess if you ever wanted to polish a shine back onto the surface you'd clean the sealer off with this, then polish, then reapply.
I cleaned the outsides and the insides of all 6 wheels with the Bio Cleaner and a microfiber towel. This wasn't a big deal in my case because I had just polished all of these wheels with Mother's Billet polish so they were already what I'd call very clean but the directions said to so I did.
I then used a diaper to apply the sealer to the outsides of all 6 wheels. It goes on kind of like Rain-X, is very solvent smelling, and is tacky and kind of hard to tell if you are getting an even coat on, especially in all of the nooks and crannies most wheels have. I'd much recommend anyone that is doing this project to have the wheels off of the car laying flat and everything that can be taken out of the way (center caps etc) off the wheels as well. Once I was fairly sure that all of the outside surfaces had a good coat on them, I flipped the wheels over and coated the hoops on the inside. I didn't spend the time or materials to do the back sides of the spokes as they'll never be seen. Then it had to dry and set up. I ended up letting them set for about 24 hours. You can tell if it's not set up by running your finger on the surface, if it smears...it still needs more time.
After BioClean, before Sealer
Same wheel after Sealer applied but not dry yet.
Brand new wheel before Sealer
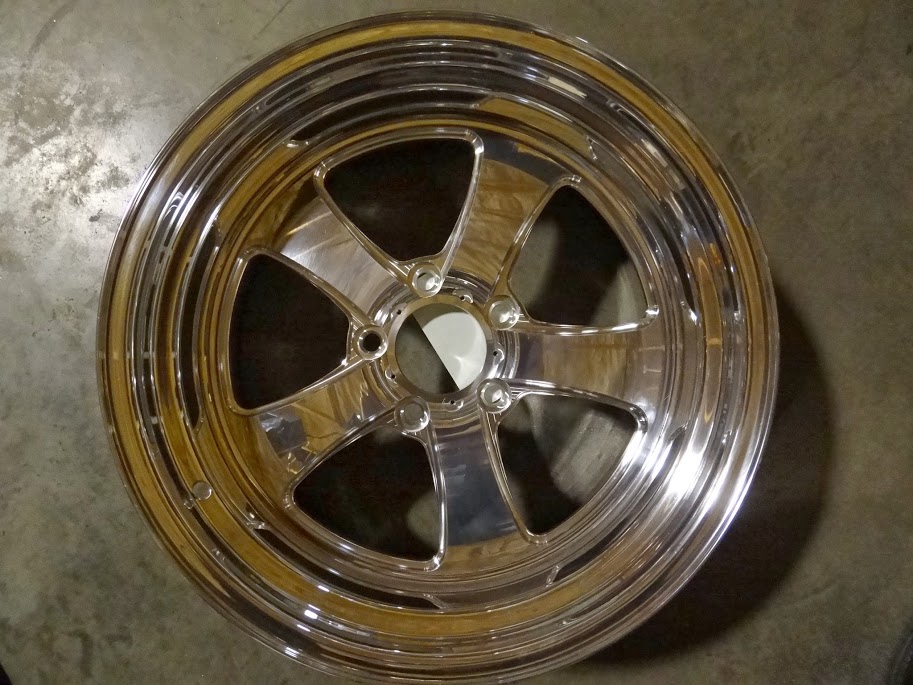
Same wheel after sealer
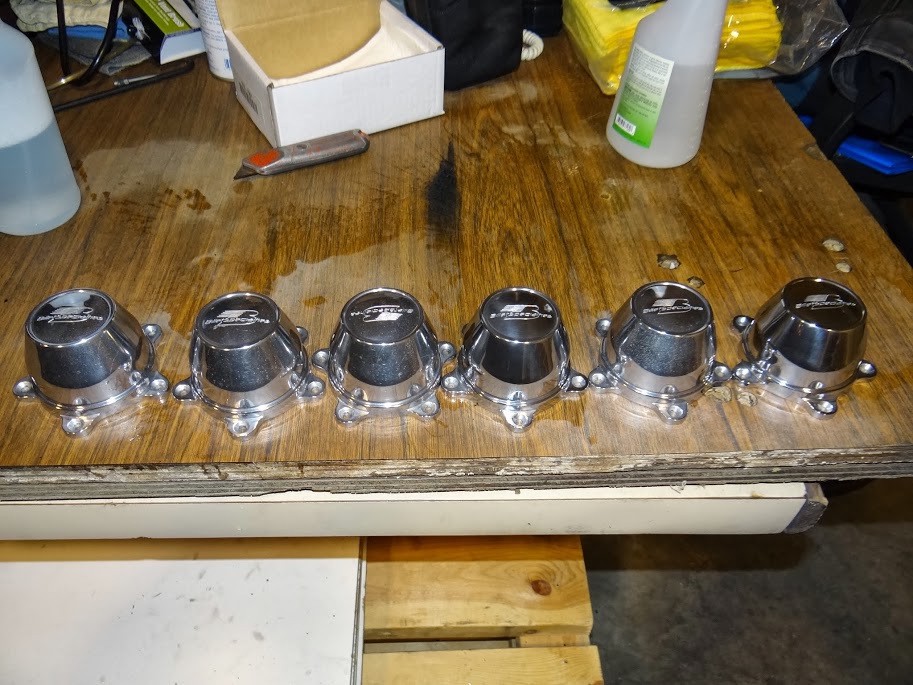
All 6 caps...can you tell which two are brand new?
This morning I went out to see if the sealer was dry, and it was...so I set about applying the Slick Finish. Before the Slick finish, the surfaces were kind of tacky...well not tacky but your finger still stuck to it just a bit as you drug it across. The Slick Finish goes on pretty easy and you just apply it and polish it back off working in small areas as you go along. It turns that somewhat sticky surface into a smooth as glass almost Chrome like finish. It is unbelievable... It also lets you polish smooth the top layer of the sealer if there were any areas where you got the sealer a bit too thick. Those areas showed up after the first coat of slick finish is applied and polished out and you just go back over them with a bit more Slick Finish and a clean microfiber and it polishes the surface out super smooth. This is the step that really finishes off this process nice and I believe it HAS to make the surfaces of the wheels MUCH easier to maintain nice looking. The highly polished areas of the wheels feel just like a chrome surface now.
After I was certain the outsides of all of the wheels were as polished as I could get them I flipped them over and applied the slick finish to the insides of the hoops as well. Probably over kill and unnecessary but remember my goal is to get these wheels as maintenance free as I could get them and that includes keeping the insides of the hoops as nice looking as they can be kept as well.
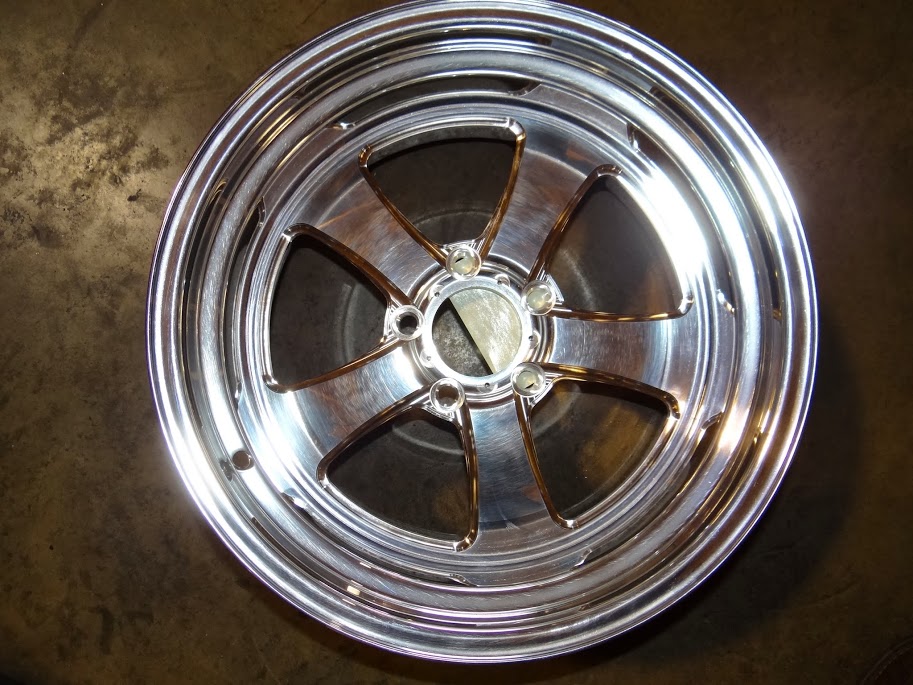
Here is a close up of a used wheel done...Sorry, it's taken with my phone but again, it'll have to do for now.
The camera makes it looks more scratched than it is...to the eye they look pretty dern good.
Here is a new wheel all done...
As you can see it looks great. I wouldn't hesitate to put this treatment on any brand new aluminum wheel...in fact, I'd recommend that you do apply it to your new wheels as soon as you can. The product does nothing to the shine of a billet wheel except protect it and keep it great looking much easier.
I did the insides and outsides of (2) 17x8s and (4) 17x9.5s and this is what I've got left of the kit.
Plenty of Bio Cleaner left over which they say you can also use to clean the wheels with now to maintain them, probably enough Metal Sealer to do the outsides of the wheels one more time, the Slick finish it's hard to see but there is still lots of it left also, I barely used any out of the bottle and never even opened the Brite Shine Metal polish.
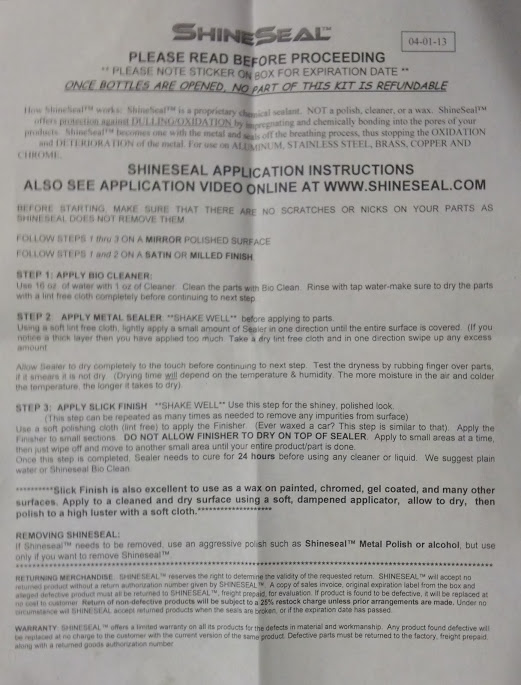
And here's the instructions that came with the kit.
Later on after I've driven with the wheels and got them dirty a few times I'll revisit and update with how they have held up. I think it's gonna be good though, it HAS to be better than maintaining just the bare billet aluminum.Lance
1985 Monte Carlo SS Street Car
02-11-2014 #80
Registered User
- Join Date
- Oct 2006
- Location
- Chicago
- Posts
- 289
Looks good. Your experience pretty much mirrors mine. You used a lot more of the sealer than I did... I applied too much to one wheel and it was hell to remove, so I went way lighter on the rest. The fumes coming off during the sealer process are potent, to say the least. Hopefully I put on enough, lol... the final slickfinish product is what sold me.
Mother's billet polish will take a lot of those small scratches in the used wheels out, but you have to use microfiber towels and keep rotating to new parts of the towel as they turn black. It's one hell of a project. Mine were looking like yours, and I wanted to match to the new backs. By the time I was done, they looked nearly identical, and I had no fingerprints left to be identified by.Luke
'63 Chevy II wagon - project

 Reply With Quote


