

Results 201 to 220 of 565
Thread: 69 GTO Build
-
06-27-2014 #201

 Registered User
- Join Date
- Aug 2012
- Location
- San Diego
- Posts
- 71

Rebel,
Welcome to our mostly 69 Goat thread. Keep in mind, I had the PMD center caps manufactured on my own. But, to answer your question, the fit and finish is awesome. (I highly recommend Chrome lips, my last project had polished aluminum lips, which are a bitch to keep shiny). You do have the option to color match the centers to your car too... but, everything has a price. I hear you about agonizing over wheel size, and design style. I've been researching during my whole project, and luckily came across these bandit's in a Hotrod magazine, I think??? Lead time was about 10 weeks. Anyway, I'll have tires mounted next week. But, even then, the car is not fully loaded yet, so it won't be sitting quite right for a couple months. (No windows or interior yet)
Have a great weekend!
-
06-27-2014 #202
New to Pro-Touring
- Join Date
- Feb 2012
- Posts
- 10
That's some interesting information on the chrome lips and you've really got me thinking hard about the bandits. Was the chrome lip custom or do they offer that? What about the center caps, if i went with bandits, I'd have to have the PMD centers, where did you get them made? I'm curious about your tire combo and I'm looking for a little advice, since you had the wheel rite measuring device. How wide and tall do you think you can go in the front? I was looking at a 10" wide tire (255x45x18) on an 8 (or 8.5) inch rim . height would be 27" What back spacing would you/ are you using? I have a 1 1/2" drop using the SC&C AFX suspension. I want the front and backs to be as deep as possible, but in the rear, it's not in the budget to mini tub. Out back I'm looking at 285v40x19. These would be 28" tall with 11.25" wide tire. It looks like they would fit based on my measurements, but again, I want a deep lip so I'm concerned about the exact back spacing. I was planning 9.5" rims in the back to keep a crown on the tread for a better ride than on a 10" rim since this will be a driver not an autocross car. Any advice you could provide would be appreciated. Thanks
06-29-2014 #203 Registered User
- Join Date
- Mar 2012
- Location
- Canterbury, CT
- Posts
- 262
Hello Rebel6. welcome to the "mostly" 69 GTO thread. I'm the spoiler here since I post progress updates and pics on my '71 Olds cutlass/442 pro touring build. I'm just not organized enough to start a build thread of my own and my progress is very hit and miss, although I am trying to turn that around with Mike and Erics help.
Fortunately, I used to own a '67 Goat, and the guys tolerate my presence while sharing their projects' progress and offering recommendations for my project since we all have 68-72 GM a-body models. It's a great thread and Eric and Mike have exceptional skills (Just look at the pics! ) and will do their best to help anyone who needs it. Me? Kind of a newbie for this complicated of a project but I have the tools and the patience.... things I didn't have 10 years ago. And my daughters are grown and out of the house, leaving a bit more free time.
Good luck with your project. Please Post pics and progress updates when you can. I (we) find it really helps to motivate me (us)when I see other enthusiasts are out there getting stuff done with their projects.
Speaking of motivation, my detached garage's lighting was pitiful... 18 year old flourescents just were'nt going to cut it for the complicated mods I am doing so an upgrade was due before I start plasma cutting into the frame. I will post the results of several hours of work in another post in the hopes someone else will find the info useful.

Gus
Connecticut
1971 Cutlass 442 pt tribute project WIP
1971 Cutlass supreme convertible. RIP
1995 Mazda MX5 Miata autocross and track day ride
06-29-2014 #204
Registered User
- Join Date
- Mar 2012
- Location
- Canterbury, CT
- Posts
- 262
Hey guys, finally got the light's mostly done. Only the end bay needs more but it's used mainly for parking the tractor or the beat up 'vert. Why does it ALWAYS take 4 times longer than I expect?? Attached some after pics. Should have taken some before pics... the improvement is dramatic. If I make a mistake now, can only blame myself since I can really see what I'm doing now. Sorry about the one pic that's tilted 90 degrees. Not sure why that happened but can't seem to post it right side up Originally Posted by '71cutlasluvr


Looking at the ABC performance frame narrowing kit instructions, I was reminded this is NOT just a "put the frame on some jackstands and start cutting" deal. Tony has very specific setup instructions, including welding on bracing and the fabrication of adjustable levelers so the frame is properly supported on all critical points, so now that the lights are done, I'll be fabricating leveler's (found I had purchased all needed bolts and washers, and had cut up an old angle iron bed frame to use for the levelers! ) and welding on bracing before the plasma cutting starts. I'll post pics of my progress. But I'm fairly sure this part of the progress won't get too far during my vacation.. I may start the mintubs since the heat and humidity is coming back tomorrow and the a/c in the attached garage sure takes some suffering out of the equation.
I'll post what I've done as I do it. Hope you guys are getting some stuff done this weekend. Mike, you're in sunny CA so hopefully you don't get the heat and humidity Eric and I get here in new england. But of course, you guys are younger than me so you can take the heat...
Oldest daughter and husband coming over this afternoon for a swim and to show us the wedding pictures that just arrived so gotta get out there and start welding.
Have a great day guys!
Gus
Connecticut
1971 Cutlass 442 pt tribute project WIP
1971 Cutlass supreme convertible. RIP
1995 Mazda MX5 Miata autocross and track day ride
06-30-2014 #205
Registered User
- Join Date
- Aug 2012
- Location
- San Diego
- Posts
- 71
Gus,
I hope you had a good weekend. I didn't get much done, due to the little man keeping me awake at night. Anyway, I owe you some responses... One, your shop lighting looks fantastic. It looks like you installed a piece of the sun. While us Californian's might have great weather, everyone else seems to have nice large shops, and/or outside work areas. Which makes me jealous.
Two, I'm not concerned with your tall spindles and Corvette mounting points. I know GlobalWest has a few different upper A arm options. As for the brakes, I'm pretty sure Most Big Brake brake kits on the market are modeled after Corvette rotors. So, mounting calipers to your mounting points should be easy, I'm 100% confident they have Corvette mounting options.
Lastly, the Black powder coating on the rotors is standard from Willwood. (I wish I was smart enough to claim that as my idea, but I can't... ha, ha)
Have a great week!
Mike
06-30-2014 #206
Registered User
- Join Date
- Aug 2012
- Location
- San Diego
- Posts
- 71
Rebel6, Originally Posted by Rebel 6
Some good questions... The chrome lips are an option on their two piece and three piece wheels. The center caps are easy... ask MHT/USMag, for their polished center caps, then get them bored to fit the Lucite centers. (I had a guy in my machine shop put them on our 4" lathe) Polish the centers, and epoxy in the PMD pieces. Done.
The Wheelrite tool is fantastic, and I recommend you get it, for your own sanity and measuring. My car will be lowered close to 4", so please take my measurements with a grain of salt. My fronts are 245/35-19's (25.8" tall), my rears are 285/30-20's (26.8" tall). My front measurements are irrelevant to you, because my Willwood spindles are wider than stock. You really need to measure them yourself. In my opinion, I think I could fit 255's. But, my caster is -5 degrees, which limits what I can do.
As for the rear, I went with 5.75" backspacing. Be carefull with the height, stock tires are 26.5", when you start pushing the diameter, you might have to start trimming the inner corner of the tub. I suggest searching lowered Chevelles and GTO's to see what others have done. Which is what I did. For example, check out Jim Wanger's latest design... http://forum.grrrr8.net/showthread.php?t=14399 The fronts are 25.8" tall, and the rears are 28".
Post some pics, when you can...
Mike
06-30-2014 #207 Registered User
- Join Date
- Jun 2012
- Location
- N. Shore, Ma
- Posts
- 337
Firewall patches
Busy making patches to the firewall and testing out my new bead roller, having fun with it so far but would love to stick a motor on it someday for better control.
Crappy rubber sanding disc backer blew up on me today and shot across the garage putting a dent in the new rear quarter!
Gus I am running the same brakes that Mike is using, 14" and 13" Wilwood's.
Your earlier question about how to get the undercarriage so clean, after it was media blasted I could still see some rust on the surface so I sprayed Eastwoods After Blast on it. Then I used everything from an 80 grit flap disc on a 4 1/2" grinder on the high spots of the welds, (be really careful not to take off good metal with this, it will burn through and you will have more holes than when you started) to then a Die Grinder with 2" Roloc discs ranging from 36 grit up to scotchbrite, then my DA Sander with 80 grit, and then after sanding all the corners by hand I used a 4 1/2" grinder quick strip disc (like a big scotchbrite wheel) to really clean it. Then smaller scotchbrite wheels on drills. Don't keep track of the hours either, I don't want to know how many hours I spent doing it! I have the same problem where things take at least 4 times as long as you expect them to.
Oh and don't use a regular hard grinder wheel if you are trying to clean up you welds on the sheet metal, no matter how hard you try you WILL either grind too far though or not notice that you have been grinding on a spot that you were unaware of.
Once I have all the welding finished I will be spraying everything with an epoxy primer, then on the underside of the floor a truck bed liner, on the top side of the floor LizardSkin Ceramic Insulation.Eric
Building 1969 GTO - Roadster Shop chassis, LQ9 w LS3 heads and rebuild parts from TSP, Bowler prepped Magnum T56 6 spd, 3 Link Strange 9" w Speedway Floater Hubs, Wilwood 14" F - 13" R brakes, 275.18 - 345.19
https://www.pro-touring.com/threads/94970-69-GTO-Build
07-02-2014 #208
Registered User
- Join Date
- Aug 2012
- Location
- San Diego
- Posts
- 71
Eric, Stunning work! Should I ever do another GTO project, I will be picking your brain on metal work. The only cool thing I did was the valance panel... not sure if you guys noticed, but the license plate boss is not there... I made that entire middle section with one piece of metal. A couple creative bends and a beater bag. (The side markers are flush mounted too)
On other news, I got my tires mounted. Unfortunately, I didn't anticipate the tire crown on the outside edge. For some stupid reason, I modeled squared off edges, formed to the section width of the tire. So, the bad news is I could've easily fit 10.5" wheels in the rear. The good news is, 295's will fit no problem for my next tire order... have yet to fit up the fronts. But, if it's the same story, I can go with 255's, instead of my current 245's. Oh well.
07-02-2014 #209
Registered User
- Join Date
- Mar 2012
- Location
- Canterbury, CT
- Posts
- 262
Good info. Thanks Mike. From all the info you and Eric have passed on to me, I think I'll be calling Eric at GW as my first resource as I move forward with project 442 konekilr. Thinking of changing the name of the project... won't be used for autocross as much as a road car and maybe a track day here and there since I have the Miata. Something ELSE to think about!! Originally Posted by Fastmonty
Well got the youngest daughter moved in yesterday... miserable, hot and humid, but did get some angle iron cut up for the vertical support for leveling before I start the frame mods. Frame is stripped of body and suspension, raised on jack stands in prep for welding the levelers on. Hope to do so this afternoon. Not much to see but attached pic anyway.
btw: Yes, ABC did include the coil over shock mount components with the mini tub frame mod kit. Discovered when I finally opened everything in the box. Everything looks nicely made and the instructions are very good, but slow and steady will be the rule with plenty of time to allow the frame to cool as I go.
Thanks again Mike. btw: Nice of you to stay up with the little guy so the Mrs. can sleep... I'm sure she appreciates it. Mine did!
You have a good week also.
gus
Gus
Connecticut
1971 Cutlass 442 pt tribute project WIP
1971 Cutlass supreme convertible. RIP
1995 Mazda MX5 Miata autocross and track day ride
07-03-2014 #210
Registered User
- Join Date
- Aug 2012
- Location
- San Diego
- Posts
- 71
Guys... some exciting news yesterday. Two things. One, I finally got the engine to fire. For those of you installing a HEI distributor, with a Painless Performance Wiring Harness, the Pontiac column ignition switch is NOT compatible! You have to change it to a GM switch. Gus... I think you're ok with an Olds switch. My understanding is that only Pontiac switches have a built in ballast/resistor, which kills power to the distributor while cranking. Completely lame. I was pulling my hair out for days... but, it now sounds freakin awesome!!!
The other good news is... well... see for yourself... I still have room to lower another 1 or 1.5" inches! Which is awesome! Hope to start on the interior this weekend... windows, door hardware, carpet, etc...
Talk soon, Mike
07-03-2014 #211
Registered User
- Join Date
- Mar 2012
- Location
- Canterbury, CT
- Posts
- 262
Originally Posted by ekmxryda
Hi Eric,
Just previewed this post and realized how long it is. Sheesh. Sorry guys, I get typing and things pop into my head that I think about and would like an answer to,.. before I know it, it's in the post. Please forgive the wordiness.
So sorry to see the dent in your quarter panel. That's a heart breaker. Why couldn't it have hit an old rusty sheet metal panel you were going to replace anyway?? Oh well, ad it to the "to do" list, above and beyond the "honey do" list from your mrs.
The bead roller is cool. We DO love our specialty tools, don't we? But obviously, you have the skill to use it. If it ain't preformed, I'd be lost but once you know what you're doing, it's a valuable skill worthy of putting the time in to learn. Like Mike and his stellar paint job, you guys have the time and the guts to try. And that's very very
Thanks for the heads up on the the Wilwoods. I'm seeing that setup more and more lately compared to Baer and the other popular big brake kits. I'd like to know your's a Mike's thought process that brought you to the Wilwoods (besides the cool coating the helps prevent oxidation as Mike was kind enough to point out), but no rush.. just curious and that part of my project is quite a ways away for now. I am considering using the silicone brake fluid since far too many times, a brake line leak absolutely destroyed the eastwood chassis black in a matter of days on my convertible. The only drawback I have read about is that the silicone does not transfer pedal force and strongly as standard brake fluid.. so perhaps a brake assist system like hydroboost would overcome that short coming? Are you and Mike running manual brakes? With the big calipers I would guess that is doable. Would silicone fluid be efficient enough to run with manual brakes and the big brakes kits you guys have?? Your thoughts when you have time... as I mentioned, no rush.
Re: under body finish. Man you really go to the nth degree, don't you??!! You have incredible patience to put so many hours into something that few will see let alone appreciate, but that's the level you have chosen to maintain and I applaud you for sticking with it. Mere mortals like me probably won't go that far but my goal is to get down to clean metal before using the after blast (neat product, by the way.. didn't know it existed. Saw a vid on how it works... amazing stuff!) So I will follow your formula and hope to achieve the same results. Thanks for the detailed response. As always much appreciated. Your previous thread said you were going to use a truck bedliner for the underside, and lizard skin for the inside. Great idea. I was going to use LS on top and bottom, but the bedliner is far more durable (I would guess anyway) so you really have a winning combo there. Something else to put in my book of "tips from Eric and Mike"!
That's some serious metal cutting your doing there my friend. Are you using the mini cutoff wheel for all of those nice clean cuts? I have a 4" grinder that I use for cutting but that may be a bit to big for quarter panel replacement and a small cutoff wheel may be what I will be needing for that type of precision cuts. I have a plasma cutter and also a guide wheel roller that allows for smoother, straighter cuts, especially with a straight edge, which I'll be using on the frame notching, but as I'm sure anyone who has ever used a plasma cutter will tell you, it is NOT forgiving. If it see metal, it GONE! But it sure is a time saver. I won't be doing much cutting on the floor pan or firewall like you, but I may have to make some mods if I go with my 4l80e. I'll worry about that when i get closer to completing the frame and body mods.
Running a bit behind on my welding chores. Youngest daughter needs me to pickup and install her washer and dryer that her grandmother (my mom) bought her tomorrow. So much for going full out balls to the walls on the project kone kilr, eh? Well, as we all know, family comes first.
You staying cool in this miserable HHH weather Eric?? (for you who live in more temperate locales, like CA, HHH stand for Hazy, Hot and HUMID!) My vaca is going so quickly, and although I did the lights and other stuff, I need to get the nuts and washers welded onto the angle iron then weld those to the frame. Then I'll move the welder (it's in the newer garage) to the old garage where the frame is and weld them to the frame. I must wire up another welding outlet since the plasma cutter needs both 130 psi of compressed air plus 240 vac and I only have the one outlet for the compressor, so MORE wiring!
final note. How long ago did you coat your floor?? did you ucoat it? (I'm guessing that's what you used) I used gray with the flakes but didn't have enough clear so those areas look bad after 9 years. And there are some areas that the coating is flaking and peeling off. Probably cause the cement had just been poured a month and earlier didn't didn't have time to cure properly. It's tolerable for now but I really wish I went with the darker color like you. Would hide many of the oil stains that won't come out now, even with power washing. Not sure what else I can do but I guess it's better than a bare cement floor, eh?
As always, thank for your input and I pray to the car guy gods that any more errant sanding discs will not hit your body panels.
Gus
Connecticut
1971 Cutlass 442 pt tribute project WIP
1971 Cutlass supreme convertible. RIP
1995 Mazda MX5 Miata autocross and track day ride
07-03-2014 #212
Registered User
- Join Date
- Mar 2012
- Location
- Canterbury, CT
- Posts
- 262
DUDE! That is soooooo AWESOME! What a thrill to hear the engine to start up for the first time. Right? I remember it well! Man what a hair puller. Ignition switch ballast resister? Sheesh. But glad you found it. All part of car crafting I guess. Thanks for the Olds heads up. I plan on using painless also and that is Definitely good to know. Originally Posted by Fastmonty

And those WHEELS!! I wish they made an Olds 442 themed wheel (They don't, I checked the website with the link you left earlier in the thread). That look is just KILLER! Hey Mike, how about a quick little vid so we can see and hear your pride and joy run? Do you have a youtube account? If not, make one and make a vid for us (if you're getting enough sleep of course)
We feel your joy my friend. Enjoy the moment. Betcha can't wait to get her on the road now, eh? Hope the interior goes quickly for you.
Kudo's! Keep the updates coming!
Gus
Gus
Connecticut
1971 Cutlass 442 pt tribute project WIP
1971 Cutlass supreme convertible. RIP
1995 Mazda MX5 Miata autocross and track day ride
07-03-2014 #213
Registered User
- Join Date
- Aug 2012
- Location
- San Diego
- Posts
- 71
Gus,
You're absolutely right, hearing it fire and rumble almost made me cry. As well as looking at the stance... a very emotional day, ha ha...
Baer vs. Wilwood? It's a tough decision. Frankly, I don't remember why I went with Wilwood. I seem to recall they had a better price point? Your question about Silicone brake fluid... don't use it. It's for show cars, that don't get driven hard. It has a low boiling point, and the last thing you want coming off of one of those tight radius off ramps in New England, is your foot to hit the floor cuz your brake fluid is too hot.
A video? Ha! If I find the time, I will...
Eric and I are definitely running power brakes. (I'll be shocked if Eric corrects me) I don't know about Eric, but I'm running Hydraboost. Come to think of it, I've never posted engine pics, have I? Well, here it is... it's the original 400, bored .040" over, Edelbrock RPM intake, Mild Cam, DUI HEI, Speed Demon 750, Doug's Headers, 2.5" Magnaflow Exhaust with X Pipe, dual Carter fuel pumps (one electric, one mechanical), HyrdoBoost with CPP Master, BeCool Radiator, with dual fans, trunk mounted battery, ohhh, and a full MARCH belt kit with A/C. This was an A/C car, but I installed a smoothie panel and went with a Vintage Air R134 system, which is mounted under the dash. Those are the original valve covers, which I'm getting sick of looking at. Rev II of this project, probably five years from now, will be a Butler 461 Stroker.
Pardon the rats nest... haven't completed the wire looms yet. Almost there!!!
07-04-2014 #214
Registered User
- Join Date
- Mar 2012
- Location
- Canterbury, CT
- Posts
- 262
Hey Mike, Originally Posted by Fastmonty
Awwww, no vid? No worries. Use the time to work on getting that Goat on the road. And getting some sleep?
Ok, I give up. No silicone brake fluid for my baby... If I were a perfect brake line fabricator, I'd be ok with that, but I'm not, and the krinkled mess on my 'verts frame just under the master cylinder and around various fitting connections confirms that! Gross!
So, hydroboost eh? I would have thought using a big brake kit would allow manual brake use? But I DO want serious braking, so thanks for the input. The time to do all that plumbing is before the body is on, so will do. May need to pick your brain on the HB install, but it seems to be a popular upgrade and well worth the cost and installation effort.
Thanks for the engine pics and specs. She sure looks shiny! Nice job! A nice compliment to that stellar paint job! Dougs headers? How was the fitment? I have a set of headers of the vert but they were punctured by the drivers side a-arm during the crash last year (it will be a year tomorrow since I swerved to avoid a deer 10pm at night and hit a telephone pole, totaling my beloved '71 cutlass vert) I posted pics somewhere else on the forum I think if you're curious about it. But here's a pic of the header damage. I thought I'd try my tig skills on a repair but not sure how it would come out since they are coated. Perhaps a set of doug's may be in order. My engine is a 468 cu in ('060 455) and I believe I may get a bump in hp/tq if I run a 3" exhaust but will need somewhat larger primary headers to do so. Perhaps that would be the way to go, although my is a torque engine, not a high revving chebby bb, so perhaps staying with the smaller primary headers may be the way to go since she runs really well as is. I have a qj, torker intake, edelbrock heads, hei, etc, much like your setup. a pypes x exhaust kit from summit and flowmaster 50 series keeps the drone manageable with the th350, but the od of the th2004r should make it better. The bedliner undercoating and lizard skin on the interior metal should help too. Dynamat or a cheaper equivalent will probably be done also... But I digress... sorry.
I really like the March serpentine setup. Good choice. Did it make the hydroboost install easier or create problems??
Neat that you kept the a/c. Mine was an ac car also but I decided to delete it. If it's warmer than 85 and more than 60% humidity, I wimp out and stay by pool anyway. Comes with getting older.
Also neat that you did the smoothie panel. I was considering the one from ABC but thought it might add a lot of weight. Since you did add one to your build, was the panel light enough so it wasn't a concern? Where did you get yours?
Thanks again for you input and excellent advice Mike. As always, much appreciated.
Well, I finally welded up the angle iron frame supports/levels. Funny how my mig welding skills go to hell after a mere 8 months of non-use. But the grapes got smaller as I worked through the job. Good practice for the important stuff. attached a few pics for anyone else considering the ABC kit. Quite a lot to do before the actual mods take place, but it's all important to prevent twisting and misalignment during the cutting and welding process.
Well the Mrs. has made me lunch, which means, as usual, I have spent waaay too much time on email and forums and half the day is gone, so sandwich then out to move my mig welder to the detached garage in the rain so I can weld the levelers on.
Happy 4th to you Mike, Eric and everyone else! Enjoy the holiday.
Gus
Connecticut
1971 Cutlass 442 pt tribute project WIP
1971 Cutlass supreme convertible. RIP
1995 Mazda MX5 Miata autocross and track day ride
07-06-2014 #215
Registered User
- Join Date
- Mar 2012
- Location
- Canterbury, CT
- Posts
- 262
Less words, more pics! Finally, eh guys?
Made some serious progress Friday, thanks to the rain and cooler temps (and really bright lights ). Vertical supports/adjusters tacked on as well as one wheel arch frame brace. It really killed me to grind off the nice eastwood chassis black, especially when I saw the primer, reminding me I had taken the time to primer the whole thing after I blasted it. Oh well, it's only paint, right? Hope to do more later today... yesterday was shot installing my younger daughters washer/dryer in her new rental house in N. Providence.
Enjoy the holiday weekend.
Gus
Connecticut
1971 Cutlass 442 pt tribute project WIP
1971 Cutlass supreme convertible. RIP
1995 Mazda MX5 Miata autocross and track day ride
07-06-2014 #216
Registered User
- Join Date
- Jun 2012
- Location
- N. Shore, Ma
- Posts
- 337
Firewall 2.0
Hey Gus, nice job on the levelers! Yeah 4 1/2" cutoff wheel on the grinder, Air Body Saw and the 3" Air cutoff tool for most of my body cuts.
They say the trick to the epoxy floor paint is the prep (like anything else) I let the floor cure for a year after it was poured, then etched it with diluted Muriatic acid, I think this really helped, no peeling after 7 years. The only problem with having a nice floor is that sometimes it holds you back from using it like a garage floor!
It has been so hot with the almost 100 percent relative humidity last week, the welding jacket, hat and gloves really helped me loose a few pounds of water weight! Cant really have a fan on you while welding.
I am going with manual brakes 7/8 Wilwood MC, (and it is what the Roadster Shop does) I am hoping to get better pedal feedback with that setup, big tires and big brakes during track time pushing the limits of the car I really don't want to be locking up and flat spotting the tires. Mike it will be nice to get your feedback on your Hydroboost / Wilwood setup when you get on the road.
Nice job getting the motor fired up! I love the Butler 461 Stroker in the future thoughts!
Finished welding the firewall (for now) gotta close up around steering column and I want to figure out a bolt down ECU door so I can mount it under the dash. Then to work out the mounting for future Vintage Air system as well (hint for a couple picts Mike)
Need to weld trans tunnel still.
Hope everyone had a nice 4th of July!
Eric
Building 1969 GTO - Roadster Shop chassis, LQ9 w LS3 heads and rebuild parts from TSP, Bowler prepped Magnum T56 6 spd, 3 Link Strange 9" w Speedway Floater Hubs, Wilwood 14" F - 13" R brakes, 275.18 - 345.19
https://www.pro-touring.com/threads/94970-69-GTO-Build
07-06-2014 #217
Registered User
- Join Date
- Mar 2012
- Location
- Canterbury, CT
- Posts
- 262
Hey Eric,
Thanks for the kudo's on the levelers. They seem kinda flimsy for the work that is to be done, but they are only supports intended for leveling and I would also guess to get the frame high enough to reach the underside cuts. Tony and his son have done several of these before making his kit available to the public so I intend to follow his instructions to the letter which will hopefully ensure good results. Hope to get all the bracing done today.
Great timing.. I was just working my way through your thread and saw you responded to my post. I'm up to page 4.. quite a bit of history you have with your Goat. Glad you shared.
Seeing how much you have accomplished in that time frame really helps to motivate me and get me out to the garage to keep it going, even if it's only a bit at a time.
I see how you started the smoothie panel and what a nice job it does on getting rid of the dents and holes. Some guys weld and use filler to get the same effect but the extra ridgigity
it adds to the cowl and firewall makes sense, so I think I will go that route.
I do, in fact, have the wilwood 7/8" MC on my vert' and was going to use it for konekilr. I too would like to get Mike's input on the hydro Boost. Good point about flatting the tires on the track. I hear that setup makes for a some easy wheel lockups since there's no ABS and it may be difficult for a less experienced driver like myself to keep from ruining a set of big, expensive tires. Looking forward to your report Mike!
Yup, floor only cured for a month.. I did use muriatic acid, but I guess the curing time is critical. Oh well, had no choice at the time. Wanted it done before bringing in the blast cabinet, workbench and such. Live and learn, but it's better than a bare floor.
Hey, that's one way to lose weight! Yeah, a fan kinda screws up the weld, especially if you use the argon gas coverage like I do. Man it was miserable here in NE last week but yesterday and today are warm and dry. Perfect welding weather. Vacation almost over.. back to the grind tomorrow. I think the HHH is coming back mon-tues so lets enjoy it while we can.
Off to the garage for more welding. Enjoy what's left of the weekend Eric.
Gus
Gus
Connecticut
1971 Cutlass 442 pt tribute project WIP
1971 Cutlass supreme convertible. RIP
1995 Mazda MX5 Miata autocross and track day ride
07-07-2014 #218
Registered User
- Join Date
- Aug 2012
- Location
- San Diego
- Posts
- 71
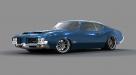
Gentlemen,
I attached another motivational picture. Enjoy. Looks like some great work was accomplished last weekend by Eric and Gus. Great job... Manual brakes for Eric... So, I'm eating my words, eh? I drove a manual brake NASCAR, it was the scariest braking experience I've ever had. They probably weren't warmed up properly. Obviously I'm going for more reliability and safety, than track performance. Of course, I'm just as anxious to get you guys some feedback on the Hydroboost too...
Eric, the Vintage Air system I got is for a Chevelle, and I had to do some significant modifications, which I'm sure you're ok with. I ran all of the hoses under the fender and through the existing fan duct hole. You'll also need to mount some studs on the inside of the firewall to mount the unit. I chose to weld bolts through the fire wall, shown here as well... there are two.
Gus, I got the smoothie panel from ... http://www.abcperformance.net/firewa...%20panels.html I liked it because it also had 1/8" diameter holes pre-drilled along the perimeter, for Cleco fasteners. It wasn't that heavy, maybe 16 guage?
So, now I need some help... I'm installing the side windows, and spent most of the weekend cleaning the old ones. Two of them have wear scratches from years of use... any idea how I can remove those scratches? I assume there's some way to sand them down?
Thanks guys... Mike
07-07-2014 #219
Registered User
- Join Date
- Mar 2012
- Location
- Canterbury, CT
- Posts
- 262
Hi Mike,
Great Pics! She looks killer... I STILL can't get over how fantastic your garage paint job came out! I appreciate the motivation!!
and thanks for the input on the smoothie panel. Looks like thats the way to go for me too. And we look forward to your hydroboost review! I'm all for it if I can modulate it. As I get older, I may need that extra Ooomph. But I thought the idea of the "Big Brake" kits was to get all the stopping power needed with a manual pedal....
  I look forward to getting your seat-of-the-pants impressions.
This is a rare occasion that I may be able to offer some help here rather than asking questions and posting pics, sooooo, I'll jump in and hope this helps...
Regarding your glass situation Mike, I'm in the same boat as the two rear quarter windows on my hardtop have sanding scratches from a previous paint job.
I actually bought a kit from eastwood years ago but haven't used it yet so can't say if it works or not but this kit should be able to handle some deep scratches. I have similar scratches on my front windows but they are hardly noticeable so if your's aren't gouge too deeply, perhaps this will work for you.
http://www.eastwood.com/glass-polish...hes-5771.html#
I hope it works for you. It would sure make me happy if I was finally able to contribute something here besides questions and pictures! If you go for it, please let us know if it works for you. Kinda pricey at $70 but cheaper than new glass I would imagine.
Here's a few more pics of my progress yesterday. Back to work today though... I actually got a sun burn on my left arm from all the welding I did. Mrs. Noticed it. doesn't hurt but should have worn my half jacket.... was a bit warm... not too bright on my part... lots more welding to do so will start wearing the jacket...
Still need to wire up an extra outlet so I can run both the plasma cutter and compressor together so I can trip the overhanging angle iron. Cut off wheel works but I bought the stupid thing so I might as well use it... plus, it's fun to blast metal away and make sparks!
Have a great week Mike. btw: Still hoping for a vid of your beast rumbling..
Gus
Connecticut
1971 Cutlass 442 pt tribute project WIP
1971 Cutlass supreme convertible. RIP
1995 Mazda MX5 Miata autocross and track day ride
07-07-2014 #220
Registered User
- Join Date
- Mar 2012
- Location
- Canterbury, CT
- Posts
- 262
Mike, I read some reviews on this product and they are mixed. Perhaps my recommendation was premature. Read all the reviews before you buy... good luck on your glass repair. Originally Posted by '71cutlasluvr
Gus
Gus
Connecticut
1971 Cutlass 442 pt tribute project WIP
1971 Cutlass supreme convertible. RIP
1995 Mazda MX5 Miata autocross and track day ride
Tags for this Thread

 Reply With Quote


