

Results 41 to 60 of 84
Thread: Project Obsession
-
02-18-2013 #41
 Registered User
- Join Date
- May 2009
- Location
- Minnesota
- Posts
- 615
Great numbers on the engine. The HP Holley set up will be very nice. I hope to get one next year. Your at the point where the build starts to get fun. I remember being there, even though I'm not much past it. Brings up memories. LOL
-
02-23-2013 #42
 Registered User
- Join Date
- Oct 2012
- Location
- British Columbia
- Posts
- 614

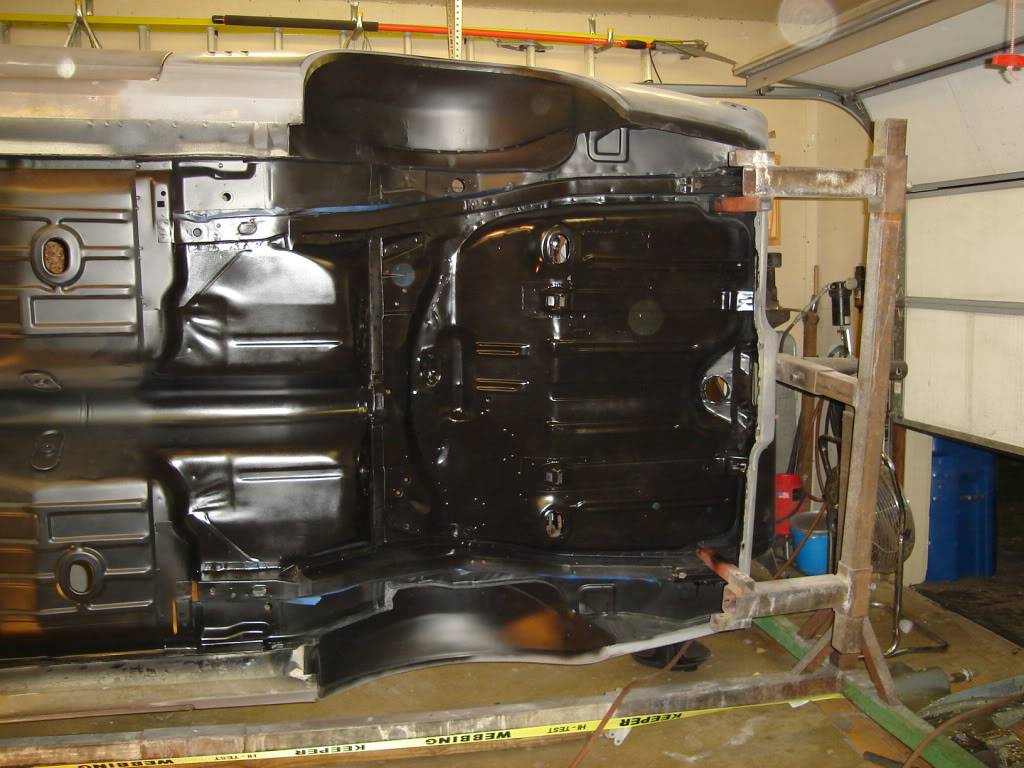
Wow I had no idea how much work it was going to be to clean the undercoat off the bottom of my '67. I'm using these to chip off the undercoat and a heat gun when needed to get the hard spots clean. It's actually chipping off easy but it as a big chunk of area to cover with these.
I've also found some damage under the undercoat in my floor as it looks like the car may have at one time drove over something and damaged the bottom.
Overall the floor is not bad but the driver side is not looking great. I'll have to decide if Im going to put some time into fixing them or just cut them out and replace the drivers side.
Here are some new parts for the mini-tub that I picked up from a local supplier who has a good amount of goodies in stock and giving me some decent pricing.
Hoping tomorrow to get the car flipped around and I'll be starting the other half of the bottom. Living the dream my friends, living the dream Todd
Todd
'14 ZL1, 6 speed and 6.2L of Super Charged Awesome!
'67 Camaro SS in process. A long, slow, expensive trip...
How hard can it be...
Project Obsession
https://www.pro-touring.com/showthre...ject-Obsession
02-24-2013 #43 Registered User
- Join Date
- Dec 2005
- Location
- North of Toronto
- Posts
- 194
I 100% agree with your statement bellow. Its an addiction just like drugs. Nice to see another Canadian build. Keep up the good work.
The definition is "the domination of one's thoughts or feelings by a persistent idea, image, desire, etc." and since starting to use this site and think about what I am going to do with this build it is on my mind 24/7 and keeps me awake at night thinking how I can proceed and what I should do next.Documented 302 Z-28 car updated restoration underway.
02-24-2013 #44 Registered User
- Join Date
- Nov 2010
- Posts
- 1,387

Wow nice. I love the firewall. I want to send my camaro to you know lol!! But good luck with the rest and great numbers on the engine. should be fun to drive todd
68 Camaro RS twin turbo
https://www.pro-touring.com/threads/...d-Intent-V-2-0
1993 Toyota Supra 6768 Built Single Turbo
Slow Lifted Jeep No TURBO :(
Randal F
03-25-2013 #45
Registered User
- Join Date
- Oct 2012
- Location
- British Columbia
- Posts
- 614
Undercoat gone and getting ready for Sandblasting
FINALLY I'm done scraping off undercoat. I've found a guy to do the sandblasting for me but he is twice the money I've been quoted and is booked weeks in advance. The Camaro will be going to him in April with big factor being when I finally got him on the phone (he was always in the shop when I called) he took the time to answer my questions and he even had the right answers. I did my homework and did some reading on here before I started calling people and even went to a couple shops to see their operations. Sadly most of the guys I talked to were clearly not very knowledgable on sandblasting older cars and their bad/messy/filthy looking shops just eliminated them from my list. I only have one '67 Camaro and I'm not about to let just anyone blast away at it.
On to the updates;
Ive stripped all the glass and interior out of the car, when I got down to the bones I found the dash was rusted and had been covered up so I wanted to replace it. My local jobber has a guy who is into and knowledgable on old cars. He has given me some great advice and showed me that I have some options when it comes to getting some replacement parts. Not to start a battle with anyone, but from what I see there are some options when it comes to buying replacement panels. My guy, Thanks Rick, showed me that C2C gives you the option on USA made or off shore. I've picked up some US made stuff and the metal is thick and it fits very well, I'm a happy camper and its well worth the extra couple bucks to me.
http://c2cfabrication.com/gm/chevrolet/camaro/
Thought I would share a little on how I took the dash out of the car. Please feel free to send me any suggestions you have as I will be taking on my quarter panels and some floor work in the future. Hope this helps someone with taking on their own project as it really isn't hard stuff if you just take your time.
Here is the damaged dash that has been patched and bondo over the rust by a earlier owner
First I found the "dimples" along the dash where it was spot welded at the factory
Then I used a small sharp drill bit to put a small pilot hole in the centre* (*that's how we spell center in Canada)
Then I used a stepped drill bit to drill through the pilot hole while using a screw driver to apply light pressure up on the metal until you feel the metal pop loose
Here is a short video I shot so please excuse the shaking and the out of range shots. What I was trying to show was how the multi stepped drill bits work for drilling out spot welds. When I use this bit it goes in the small pilot hole I've already drilled and I ususlly use my other hand to hold the screw driver to lightly pry up on the weld so when the stepped bit makes a big enough hole the metal pops up. Really nice and simple and makes just enough of a hole to take out the spot weld.
http://youtu.be/5INrhOp0K-k
I got sorta lucky with the rust doing most of the work along the front of the dash so I just used some tin snips to remove the little bit of metal along the front of the dash.
The upper cowl metal was in relatively good shape so will just do a light grind along the upper cowl and a little metal repair and I should be good to go and install my new dash upper.
Here is the old upper dash out of the car and it was super easy to do. I will post some more updates when I install the new upper dash.
Todd
'14 ZL1, 6 speed and 6.2L of Super Charged Awesome!
'67 Camaro SS in process. A long, slow, expensive trip...
How hard can it be...
Project Obsession
https://www.pro-touring.com/showthre...ject-Obsession
03-27-2013 #46
Registered User
- Join Date
- Oct 2012
- Location
- British Columbia
- Posts
- 614
Also, a great picture comparing the pilot holes and using the stepped drill bit to drill through the spot welds.
Sorry for the flipped on its side image but seems to be an iPad only issue for me
Todd
'14 ZL1, 6 speed and 6.2L of Super Charged Awesome!
'67 Camaro SS in process. A long, slow, expensive trip...
How hard can it be...
Project Obsession
https://www.pro-touring.com/showthre...ject-Obsession
04-13-2013 #47
Registered User
- Join Date
- Oct 2012
- Location
- British Columbia
- Posts
- 614
Not a lot to report as I continue to get the car down to just the sheet metal and planning out my next steps. Hopefuly the shell will be going for sand blasting in the next couple weekends. The good news is the guys over at TCI have sent me some more goodies.
These headers are killer and I'm really happy with all my TCI products;
And, check out this rear suspension set-up;
That's it for now and hoping to post some more pics soon with some welding done.Todd
'14 ZL1, 6 speed and 6.2L of Super Charged Awesome!
'67 Camaro SS in process. A long, slow, expensive trip...
How hard can it be...
Project Obsession
https://www.pro-touring.com/showthre...ject-Obsession
04-13-2013 #48
Registered User
- Join Date
- Nov 2010
- Posts
- 1,387
Engine looks good... but why did u go with the Stealth Ram MPI fuel injection system over a carb??
68 Camaro RS twin turbo
https://www.pro-touring.com/threads/...d-Intent-V-2-0
1993 Toyota Supra 6768 Built Single Turbo
Slow Lifted Jeep No TURBO :(
Randal F
04-13-2013 #49
Registered User
- Join Date
- Oct 2012
- Location
- British Columbia
- Posts
- 614
I've run carbs on every car I've built and even had two on a polished tunnel ram on my last Camaro. I'm wanting to use this car all the time so FI just makes sense. Its more user friendly with weather changes and on cool damp days which we see lots of here. The tune ability is much better and I can program it to work in the parameters I feel necessary. Not to Mention the better mileage and smooth idle and it allows me to do something different then I've done before. Originally Posted by rfalker1

Did I mention it looks Bad Ass?Todd
'14 ZL1, 6 speed and 6.2L of Super Charged Awesome!
'67 Camaro SS in process. A long, slow, expensive trip...
How hard can it be...
Project Obsession
https://www.pro-touring.com/showthre...ject-Obsession
04-14-2013 #50
Registered User
- Join Date
- Nov 2010
- Posts
- 1,387
^^^ yes I understand that. I might go efi or something in a year or two or 3!! Hopefully the price will drop and I can get a system that improves my power and still works with my vortex heads. I have seen a couple of crazy setups! But yours looks good! Keep up the work todd!!
68 Camaro RS twin turbo
https://www.pro-touring.com/threads/...d-Intent-V-2-0
1993 Toyota Supra 6768 Built Single Turbo
Slow Lifted Jeep No TURBO :(
Randal F
07-16-2013 #51
Registered User
- Join Date
- Oct 2012
- Location
- British Columbia
- Posts
- 614
It's been a while since I've done some updates so I will try and get caught up although doing these updates from my iPad has become a bit more of a challenge than using my PC. The pictures are not as easily formatted and may appear a bit more wonky than before but I will do my best.
So to start I tore out the dash because it was a giant mess that someone had covered in bondo before. They must have thought that because it was under the windshield that it doesn't matter. Well, I'm very picky so it does matter so I took it all back to good metal and started again.
And after it was removed
The new metal goes in and is looking better already
Todd
'14 ZL1, 6 speed and 6.2L of Super Charged Awesome!
'67 Camaro SS in process. A long, slow, expensive trip...
How hard can it be...
Project Obsession
https://www.pro-touring.com/showthre...ject-Obsession
09-09-2013 #52 Registered User
- Join Date
- Sep 2013
- Location
- Massachusetts
- Posts
- 16
Awesome build! I am in the process of putting a TCI subframe in my 68 Nova. I'm curious to know what you are planning to use for your steering column. I have found out the hard way that the stock length will not work with the TCI subframe. This is not highlighted in the TCI instructions and i'm curruntly waiting on a response from Sal at TCI on this. I ended up having to take 3" off the 32" column i originally started with. I can get into more detail on this if your interested.
09-09-2013 #53
Registered User
- Join Date
- Oct 2012
- Location
- British Columbia
- Posts
- 614
Thanks for the information and the compliment. I just picked up an Ididit column to go with the TCI frame. I'm behind on my updates and I need to go through the whole thing and reduce the size of the pictures as I've hit my limit. Unfortunately I'm also battling some health issues and its really slowed me down as I was planning on having the car back on its wheels by now.
The good news is I'm not in a rush for the car so it will get done but just a bit later than I'd hoped. I willmtry and get some pictures up this weekend as I have in-laws coming to visit so that's my time to escape to my garage and get some work done. I've got the whole front end done, engine and trans assembled and mounted in the frame and I'm half done one side of my mini-tub so it's getting done, just slowly. I will also get some pics of the column and part numbers, it was what TCI recommended so I'm not expecting any issues.Todd
'14 ZL1, 6 speed and 6.2L of Super Charged Awesome!
'67 Camaro SS in process. A long, slow, expensive trip...
How hard can it be...
Project Obsession
https://www.pro-touring.com/showthre...ject-Obsession
09-10-2013 #54 Registered User
- Join Date
- Feb 2012
- Posts
- 45
rotiserie
whos rotiserie is that /what company make s it please Originally Posted by Todd in Vancouver
09-10-2013 #55
Registered User
- Join Date
- Sep 2013
- Location
- Massachusetts
- Posts
- 16
what length column did you get?
09-11-2013 #56
Registered User
- Join Date
- Oct 2012
- Location
- British Columbia
- Posts
- 614
Javelin66
The rotisserie is a Auto Twerler Plus and I got it from here;
http://www.kmscarparts.com/index.php...roducts_id=883
I picked mine up for $1,100 but I've seen them as low as $999. I'm really happy with mine and I can't imagine doing an in depth project without one. But as I've stated I'm getting older and not as healthy as I use to be so I've got to find some ways to make this easier on myself.
Novapilot
I will have to look at the paperwork in my office on Friday. I went with the one TCI has listed on their website for the TCI clip but got it from Summit as TCI was out of stock. Also, I ordered my headers from TCI as well and go figure they fit perfect. PM me if you still want the actual part number and I will answer the PM when I'm catching up on paperwork Friday. Also, will try and spend some time catching up on this thread and loading pictures/resizing them. I'm halfway through the mini-tub project.Todd
'14 ZL1, 6 speed and 6.2L of Super Charged Awesome!
'67 Camaro SS in process. A long, slow, expensive trip...
How hard can it be...
Project Obsession
https://www.pro-touring.com/showthre...ject-Obsession
09-17-2013 #57 Registered User
- Join Date
- May 2005
- Location
- Socal, Ca
- Posts
- 913
Todd,
Your build looks good. I have a question about installing the tci front sub. I thought you had to grind/cut the two tabs that are sticking out of the body where the pads get bolted too. In the pics you posted, I see that you still have them in the stock location. Do you need to cut grind those tabs flat? I hope that makes sense...
10-30-2013 #58
Registered User
- Join Date
- Feb 2011
- Location
- Vancouver BC
- Posts
- 12
Hi Todd, great looking build! From another car crazed local. We too are building a 67!!
Aaron Wilson
www.eyekandykustoms.com
04-18-2014 #59
Registered User
- Join Date
- Oct 2012
- Location
- British Columbia
- Posts
- 614
It's been a while since I've done some updates so here we go on what I've been working on.
With the old dash metal removed I installed the new metal,
But the new dash didn't come with tabs to weld to the A-pillars. So, I made some and welded them in because I do not want any squeaks or vibration noises,
After the dash I started on the Mini-Tubbing. On the first side I used a cutting wheel and a grinder on the first side but after getting it done I went and purchased a plasma cutter for the second side and it went so much faster. I asked a few people and even here on Pro-Tour and there were mixed opinions on what was better. In my opinion the plasma cutter does a nice clean job quickly and frankly at this point in my life I'll spend a few bucks on new tolls if it makes my life and the job easier.
here you can see where I had marked out the pattern for cutting.
Todd
'14 ZL1, 6 speed and 6.2L of Super Charged Awesome!
'67 Camaro SS in process. A long, slow, expensive trip...
How hard can it be...
Project Obsession
https://www.pro-touring.com/showthre...ject-Obsession
04-18-2014 #60
Registered User
- Join Date
- Oct 2012
- Location
- British Columbia
- Posts
- 614
With the installing of the mini-tubs on my '67 I needed to narrow the frame. The kit I used came with filler pieces but I ended up building a few parts myself so I could make it reinforce the way I wanted. Again with the plasma cutter I was able to pick up some plate steel and fabricate what I wanted.
Here is the filler kit that came with the mini-tub kit;
Here I marked out the part I wanted to cut out;
then the cutting starts;
Here are the filler pieces;
Here is the long filler piece and it required a little curve at the end to close in the frame. Amazing what a good hammer and an old drive shaft can do to make the exact curve I needed.
then the part that I cut out with the plasma cutter and welding the frame up and cleaning the welds.
Todd
'14 ZL1, 6 speed and 6.2L of Super Charged Awesome!
'67 Camaro SS in process. A long, slow, expensive trip...
How hard can it be...
Project Obsession
https://www.pro-touring.com/showthre...ject-Obsession

 Reply With Quote


