
Results 21 to 40 of 114
-
06-26-2012 #21

 Registered User
- Join Date
- Mar 2009
- Location
- overseas
- Posts
- 3,433

NICE project! already love it! can't wait to see more!

Kevin S. (overseas in Germany)
1963 Chevrolet Impala 2d ht Coupe
www.CruznArt.com
CRUZN - Automotive Artworks
-
07-02-2012 #22 Registered User
- Join Date
- Jun 2012
- Location
- Upstate SC
- Posts
- 95
 Originally Posted by Chad-1stGen
 Originally Posted by CHRIZ28
Originally Posted by AutoX_a_Truck?
Originally Posted by 85coupe50
Originally Posted by CruizinKev
Originally Posted by CHRIZ28
Originally Posted by AutoX_a_Truck?
Originally Posted by 85coupe50
Originally Posted by CruizinKev
Thanks dudes!! I was worried you guys wouldn't like me wanting to keep that much original stying since that's not not what most PT builds are going for. If you've seen George Poteet's '57 Black Widow tribute, that's the style I'm shooting for. I had run across some shots of my dream wheels awhile back- 18x8 and 18x10 billet "steelies", but didn't know what they were going on. My Street Rodder mag came this week with the '57 on the cover, so now I know what the wheels ended up on! If I run "steelies", this will be how they'll look.
Here's a slideshow of the build pics.
http://woodyshotrodz.com/George%20Poteet/#

07-19-2012 #23
Registered User
- Join Date
- Jun 2012
- Location
- Upstate SC
- Posts
- 95
I worked on the speedo graphics last night so the guy that's redoing the tach and speedo faces could have something to go by. It's basicly the same lens as an original 160 KMH speedo except calibrated for MPH.
07-19-2012 #24 Registered User
- Join Date
- May 2008
- Location
- Dillsboro IN
- Posts
- 250
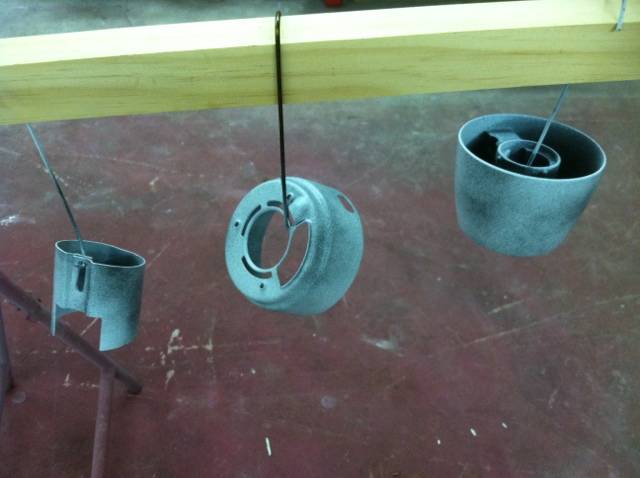
A personal friend of mine that works at Clay Cook Ent (www.ccookenterprises.com) cut those wheel centers for Woodys and Eric Vaughn (www.ericvaugnmachine.com) welded them in the hoops. They (C. Cook) have been talking about cutting some 5 lug versions of that wheel. Let me know if you would like to get in touch with them (him).
Very cool truck by the way!
07-20-2012 #25
Registered User
- Join Date
- Jun 2012
- Location
- Upstate SC
- Posts
- 95
Thanks Copo-Rat! Those are definitely my favorite of all the original-style-but-bigger wheels I've ever seen. Every detail was copied, even down to the rivet heads on the backside! I'm not sure what wheels I'll go with yet; I'm leaning towards a set of three piece forged wheels for less weight. I imagine that those stock style 18's are fairly heavy.
They are extremely nice wheels though!

11-11-2012 #26
Registered User
- Join Date
- Jun 2012
- Location
- Upstate SC
- Posts
- 95
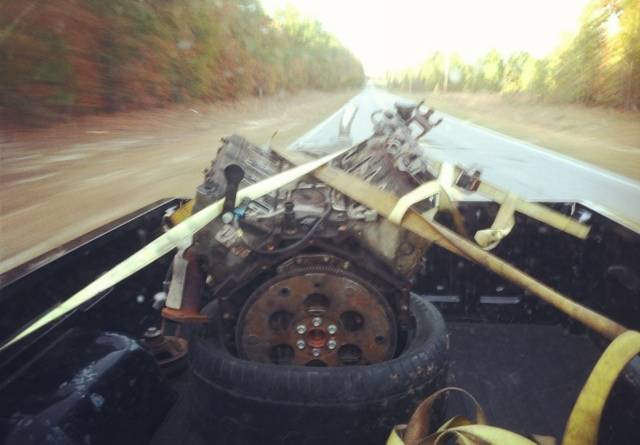
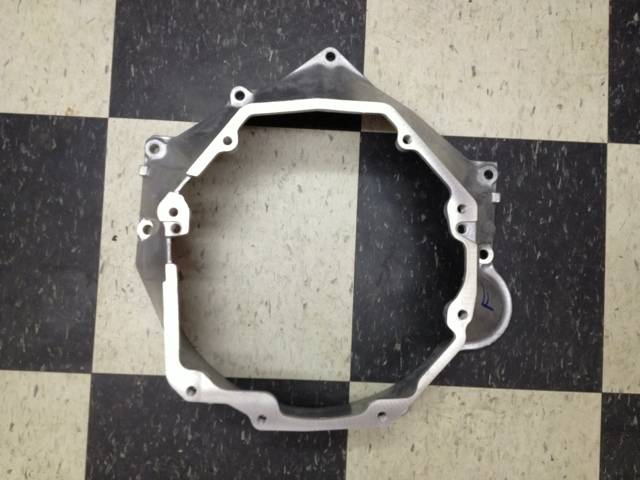
Quick update. I picked up a 5.3 for mock up duties so as soon as I get a bellhousing I'll be able make my engine/trans mounts. I also need to get the oil pan I'll be using to make sure it fits. I want to notch the crossmember 1-2 inches to let the engine drop as low as possible for a lower CG, but I've got to leave room for the steering rack. Also, the frame rails are going to be in the way of the headers if dropped too low. Once the motor/trans are mounted I can finish the frame bracing around the trans and check for driveshaft clearance on the back set of braces.
The 5.3 was dirt cheap but I had to drive to the middle of nowhere (literally!) to pick it up. All the roads were dirt other than the main highway and the little town had a gas station and a grocery store, and that was about it.
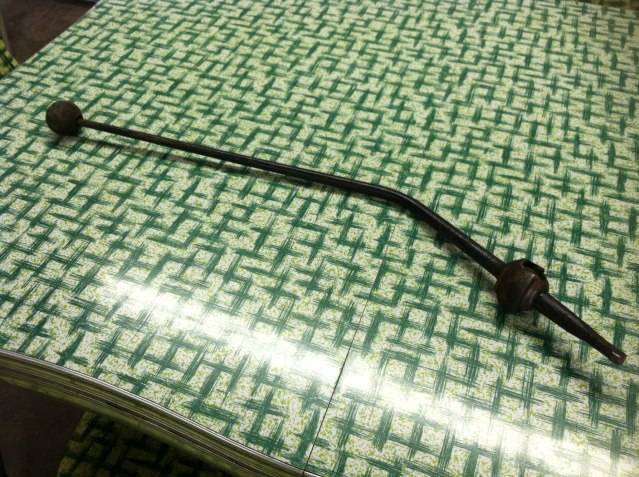
Keeping with the original/factory styling theme, I picked up an original forged shift lever from a 4 speed truck to graft onto the T56 shifter. I'll have an original shifter ball engraved with the T56 shift pattern.
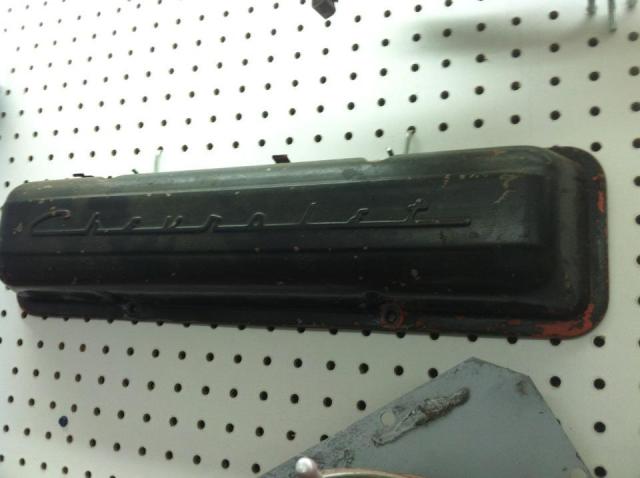
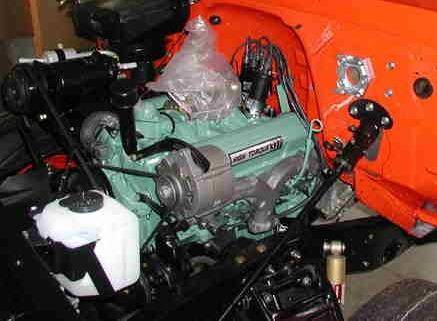
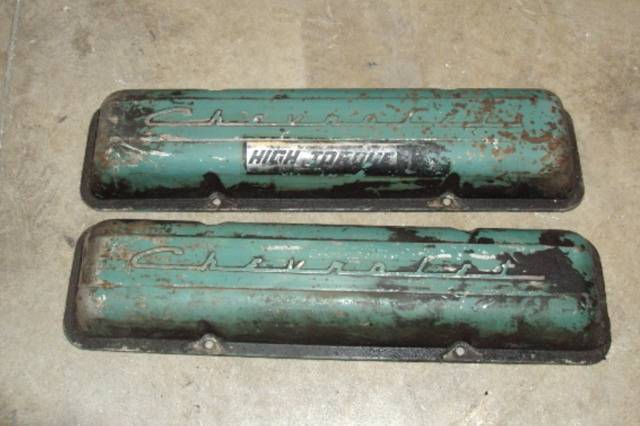
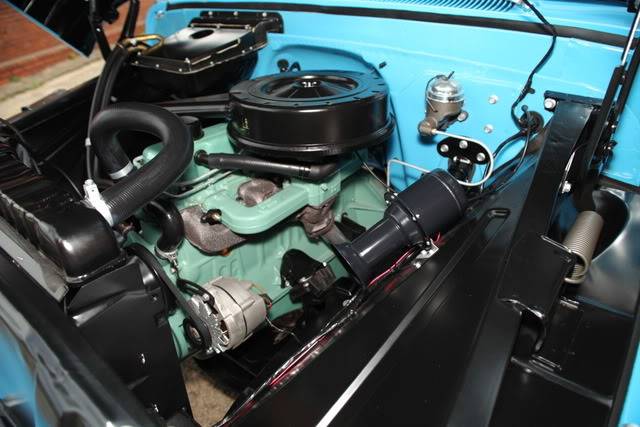
I also picked up a 283 Chevrolet script cover. I'll make a steel flange to match the LS heads and graft the Chevy script area onto a fabricated steel valve cover. I'll hide the coil packs behind the dash to help it look more like an original engine. The whole motor will be painted/detailed/decal'd like an original truck 327.
I stripped, primed, and wetsanded steering column parts after test fitting the parts. I painted the column in low gloss black as the factory did.

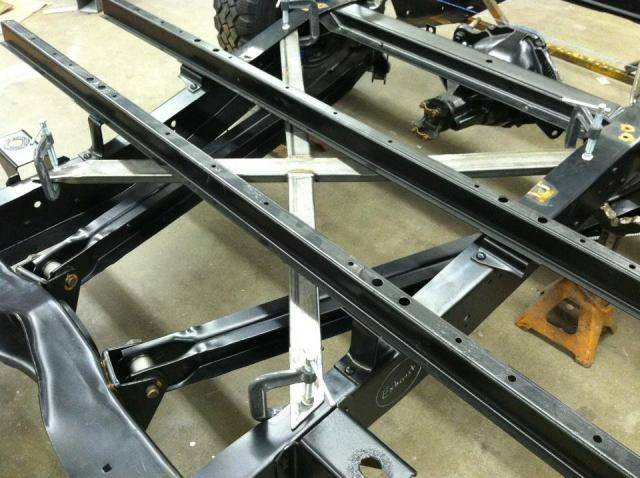
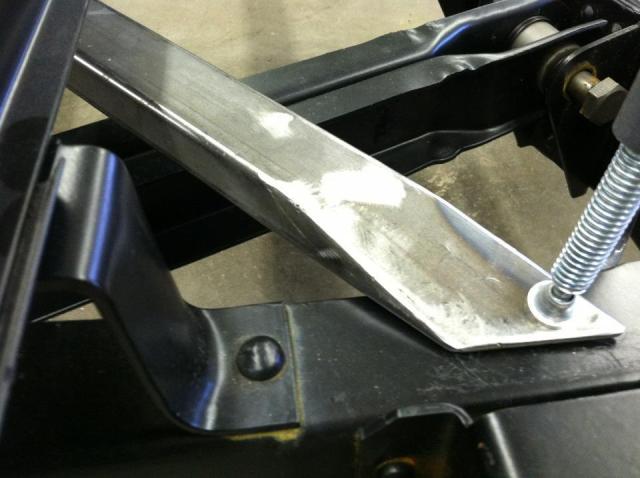
I forgot to show where I started the rear frame bracing on my last updates, so here it is. It's 1x2 14g rectangle tube. It's slightly bent to clear the bed floor braces.

02-15-2013 #27
Registered User
- Join Date
- Jun 2012
- Location
- Upstate SC
- Posts
- 95
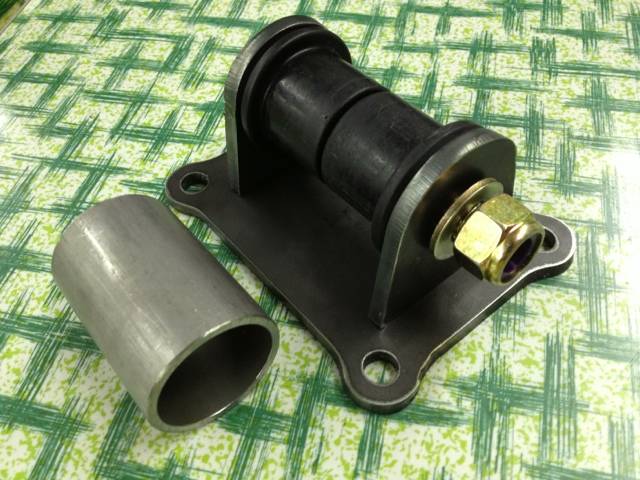
Been awhile since I last posted. Bought a new Tremec bellhousing, engine mount kit, an F-Body oil pan/pickup, and Energy Suspension urethane body mount kit mock up the engine in the frame to check for clearance issues. I have the cab back on the frame and the 5.3/T56 stuck in temporarily just to get an initial idea of how it fits. I'll be able to save the stock floor by notching the front crossmember and dropping the engine/trans lower- better for the center of gravity too.
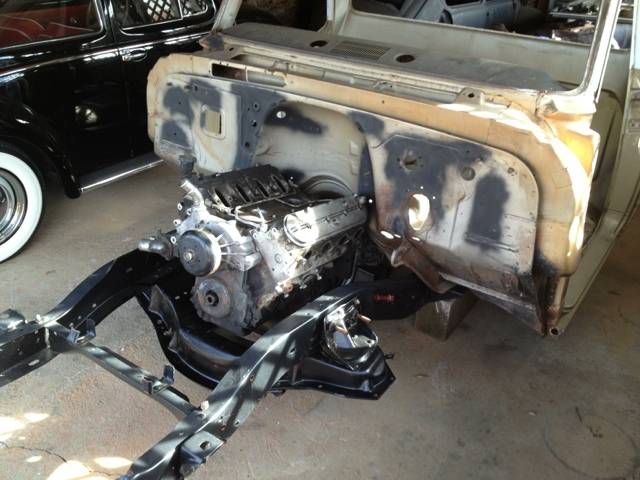
There's plenty of room for the Webers in the factory firewall notch.

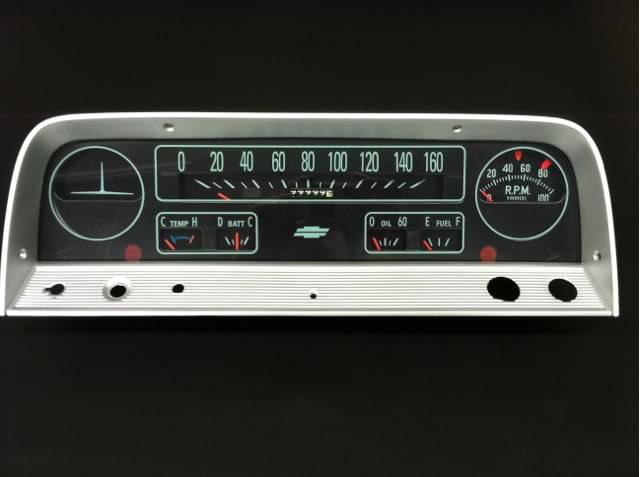
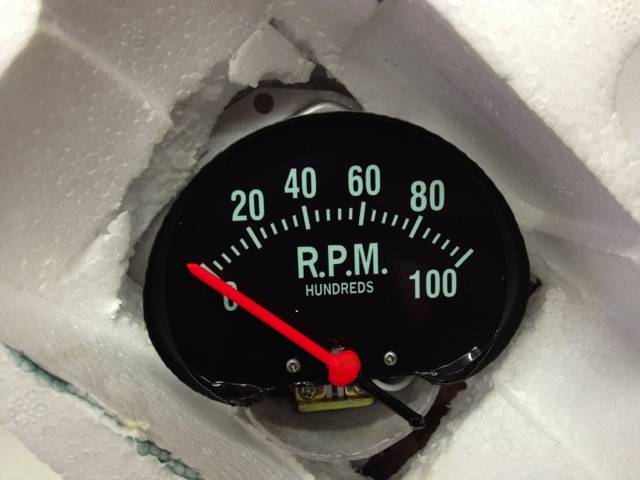
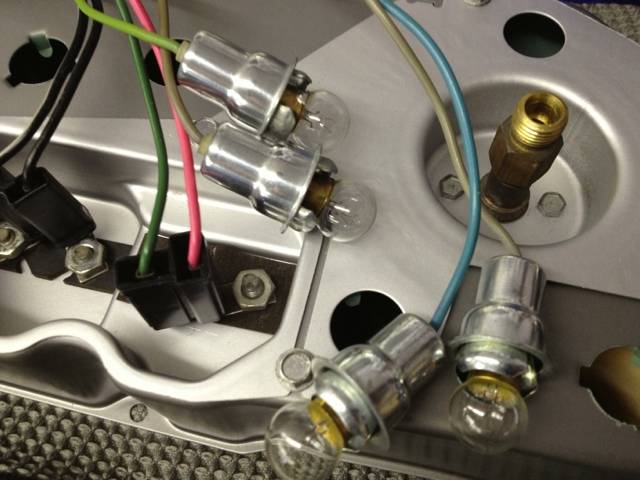
My gauge guy finished the factory looking 10K tach so I rebuilt and detailed a cluster for it. He's working on a 160 mph lens to finish it. The air gauge will be for the air bag tank and is from a C60/C80 with air brakes.
Here's a link to the full rebuild details.
http://67-72chevytrucks.com/vboard/s....php?p=5806390


Last edited by theastronaut; 02-15-2013 at 05:26 PM. Reason: Add pic
02-15-2013 #28
Registered User
- Join Date
- Jun 2012
- Location
- Upstate SC
- Posts
- 95
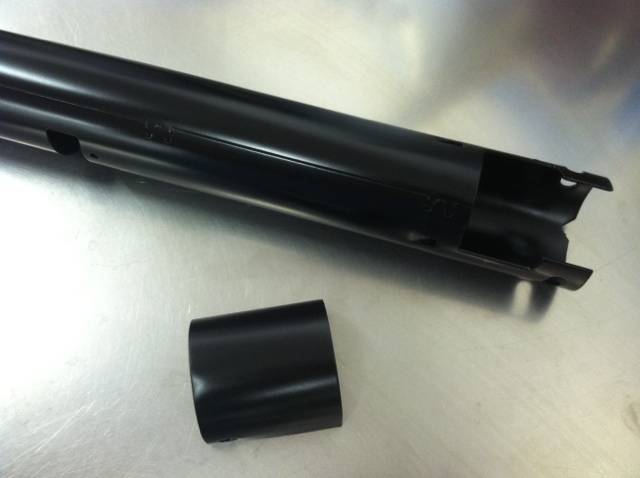
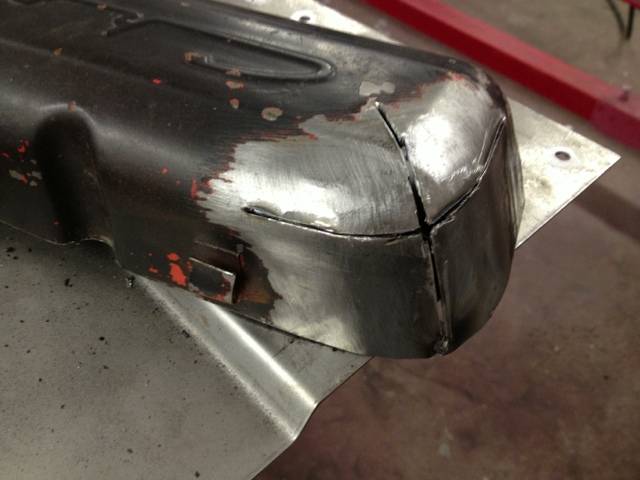
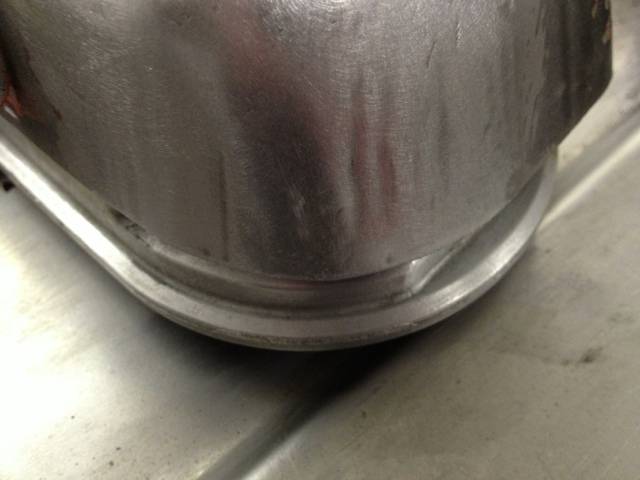
I also started building a pair of 283/truck 327 style valve covers to fit the LS heads. I cut sbc flange off, then cut reliefs so I could reshape the ends into the rounded LS shape. They'll be shortened about an inch from the height they are now. I'll have a local shop CNC a pair of flanges and drill/tap the LS head for the perimeter bolt pattern. The coil packs will be hidden under the dash and wires will come out from behind the engine.

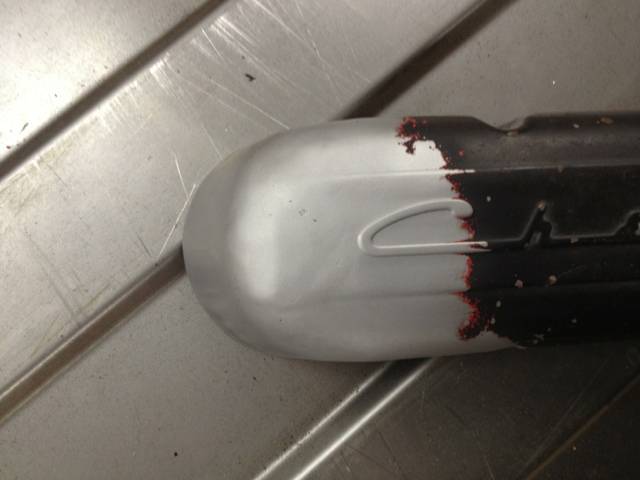
They'll be painted the same color green as original '66 truck 327's were and use factory decals. The destroked LS2 will be 329 CI, close enough.
02-15-2013 #29
Registered User
- Join Date
- Jun 2012
- Location
- Upstate SC
- Posts
- 95
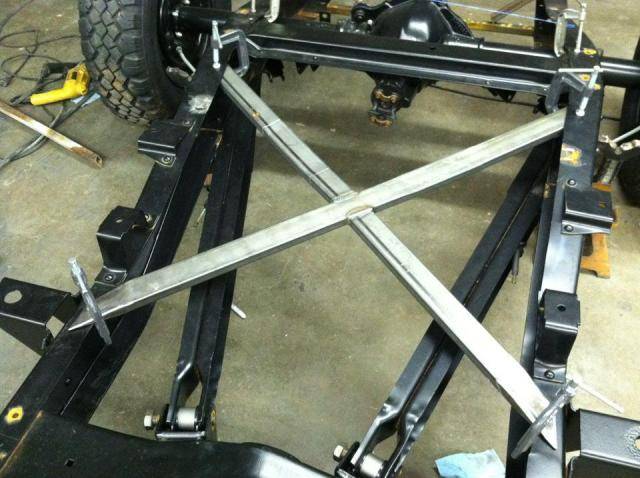
Next on the list is to level the frame, swap to the F-Body oil pan, finalize the engine placement, then start the crossmember raise. I'm going to notch the frame rails and move the crossmember up somewhere around 1.75" for better ground clearance at the lower control arm cross shafts, and also to get the lower A-arms closer to level at ride height. That will also make sure I don't have any scrub line issues if a tire or air bag blows out. I'll need the crossmember in the final position so I can make the engine mounts.
MalibuKasey from 67-72chevytrucks.com and I have been planning out building our own tubular A-arms that fix the lack of (much needed!) castor and camber adjustment that stock arms, and also move the wheel forward 1" to center the wheel in the fenderwell while we're at it. I'm also going to look into taller C20 upper ball joints that will increase camber gain through the suspension travel, and possibly drop the upper A-arm cross bar mount for even more camber gain if its needed. I haven't found anyone that sells lower cross shafts with bushings and outer steel sleeves that I can weld my tubes to though. I'll have a machine shop make them if I can't find any.
I'll build a jig out of tubing to lock in the relocated balljoint location and angles, something like these.
02-15-2013 #30 Registered User
- Join Date
- Dec 2005
- Location
- Birmingham, AL
- Posts
- 3,356
I like the idea behind making the engine look stock. There is a thread here somewhere with an LS motor dressed up like an old Buick Nailhead.
Stephen
02-15-2013 #31
Registered User
- Join Date
- Jun 2012
- Location
- Upstate SC
- Posts
- 95
I plan on keeping it a long time and this way it won't have outdated aftermarket parts all over it in 20 years. I found a LS pic thread that had a few engines that were pretty well disguised as older/stock looking engines. The Holley C10 shop truck has a very neat looking LS engine too. Originally Posted by srh3trinity
04-19-2013 #32
Registered User
- Join Date
- Sep 2012
- Posts
- 19
Any updates on the truck?
04-19-2013 #33
Registered User
- Join Date
- Jun 2012
- Location
- Upstate SC
- Posts
- 95
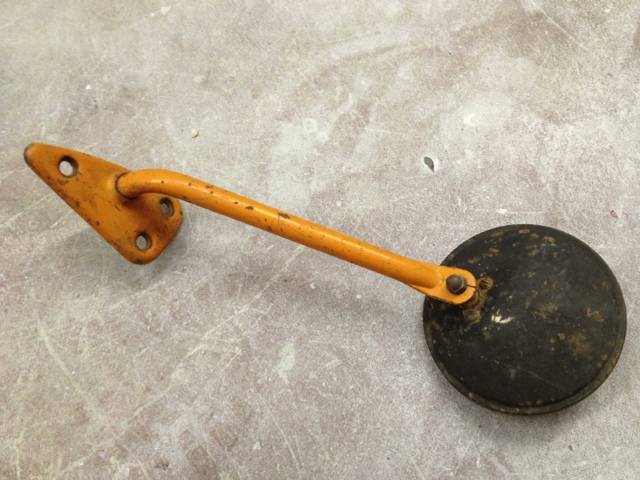
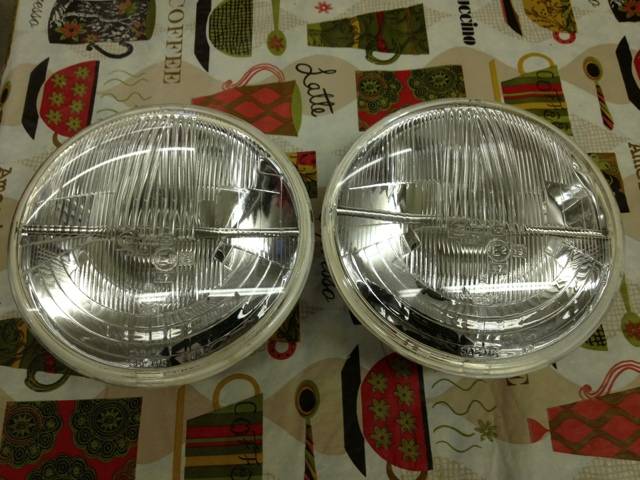
I haven't worked on the truck itself- we have three big restoration projects going on at work so I'm tied up with those. At night I'm helping a local guy restore his '41 Willys gasser that he built in the early '60s, trying to get it done before he's inducted into the East Coast Drag Times Hall of Fame. I did find a few hard to find parts for it like original outside mirror arms, NOS sail panel trim, and a nice pair of vintage Cibie Z-Beam H4 headlights. Originally Posted by 4WardInv
Another thing I wanted to do was see exactly how much weight will be lost by swapping to tubular A-arms, rack and pinion, and lighter spindles/brakes. I weighed each of the stock components so I would have a baseline. I'm going to section the stock crossmember either 1.75 or 2" for more ground clearance at the lower A-arms, so that will drop some weight as well. I also took measurements from the original A-arms so I'll have a baseline for the new arms.
- Spindle/Rotor assembly- 55 pounds each / 110 pounds pair.
- Caliper.- 10 pounds, 3.7 oz each / 20 pounds 7.70 oz pair.
- Brake pads- 3 pounds, 10 oz set.
- Stock coil springs- 11 pounds, 2.3 oz each / 22 pounds, 3.6 oz pair.
- Upper A Arm- 9 pounds, 10.1 oz each / 19 pounds, 4.2 oz pair.
- Lower A Arm- 25 pounds, 7.2 oz each / 50 pounds, 14.4 pounds pair.
- Outer tie rod ends + adjuster sleeves- 2 pounds, 6.1 oz each / 4 pounds 12.2 oz pair.
- Steering box, cross link, inner tie rods, pitman arm, idler arm, adapter bracket- 48 pounds.
Total weight- 279 pounds, 4.1 oz.
The sway bar was an additional 14 pounds, 11.5 oz.
04-26-2013 #34
Registered User
- Join Date
- Sep 2012
- Posts
- 19
Project Goldilocks '66 Chevy C10 Resto-Mod/Mild Pro-Touring Build
Sounds like there's a lot of weight to save there, good to know since I'm planning a similar build!
04-26-2013 #35
Registered User
- Join Date
- Jun 2012
- Location
- Upstate SC
- Posts
- 95
Yeah it was all very heavy. I'm hoping to lose around 300 pounds off the front wheels by swapping the suspension and steering, using an aluminum LS2 block, and setting the engine/trans as far back as possible. Will be moving the battery to the back as well. No A/C, just heat. Originally Posted by 4WardInv
04-26-2013 #36
Registered User
- Join Date
- Jun 2012
- Location
- Upstate SC
- Posts
- 95
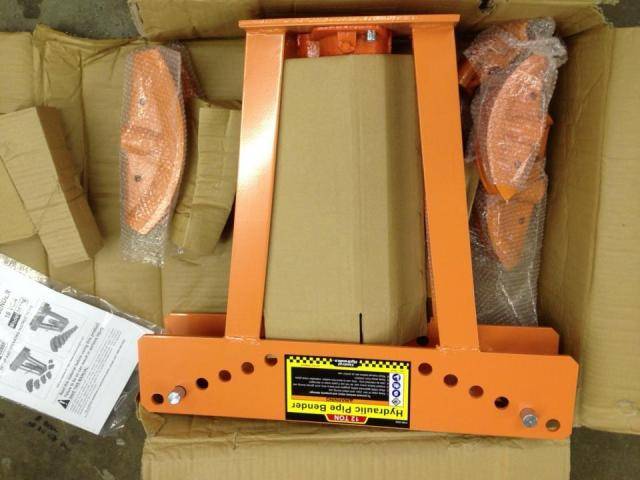
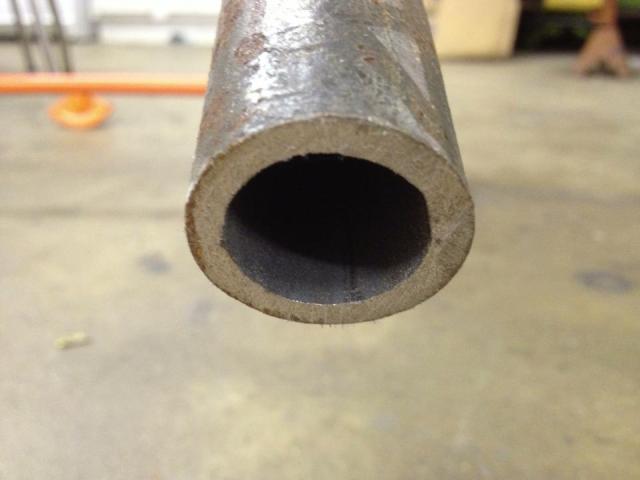
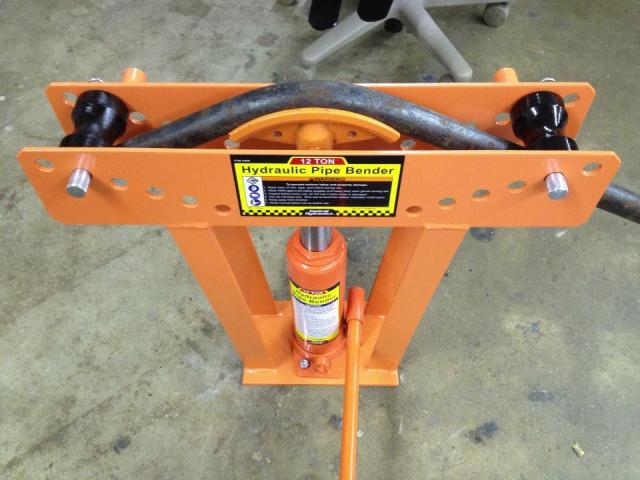
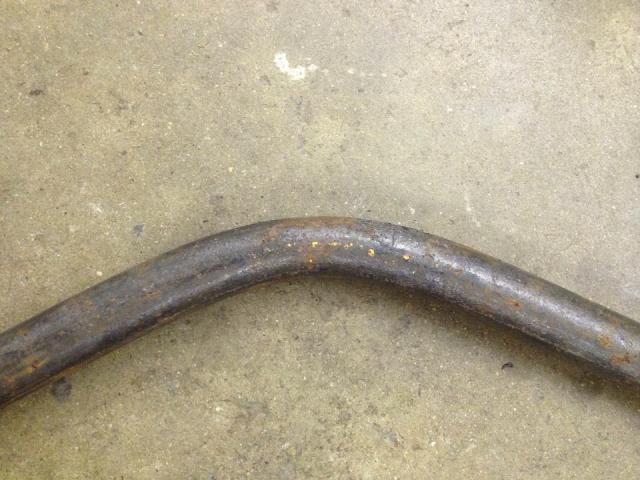
Picked up a HF pipe/tubing bender tonight and tried it out with some scrap 1 5/16" OD 3/16" wall tube. Bent it like butter! This will work great for fabbing the A-arms. I'll dig out my measurements from the stock arms and make a couple jigs for the upper/lower arms. I'll be moving the spindle stub forward 1" to center the wheel in the fender opening, and tipping the top of the spindle back for more castor. I'll incorporate a bag mount plate a little lower than needed so I can add 1/4" or 1/8" aluminum plates to adjust the bag height/spring rate while keeping the same ride height.
04-27-2013 #37 Registered User
- Join Date
- Oct 2004
- Posts
- 419
Wow. Impressive fab/welding/finishing skills.
Glad to see you went with the factory gauge cluster. A zillion Autometers look cool but you loose a certain feel when you remove the factory stuff.
04-27-2013 #38
Registered User
- Join Date
- Jun 2012
- Location
- Upstate SC
- Posts
- 95
Project Goldilocks '66 Chevy C10 Resto-Mod/Mild Pro-Touring Build
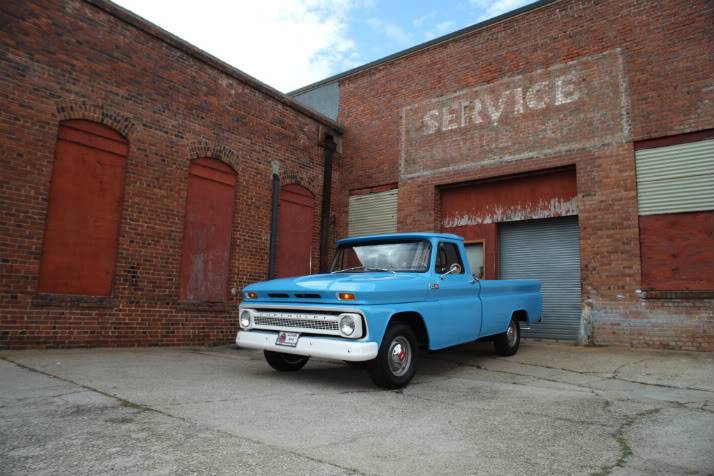
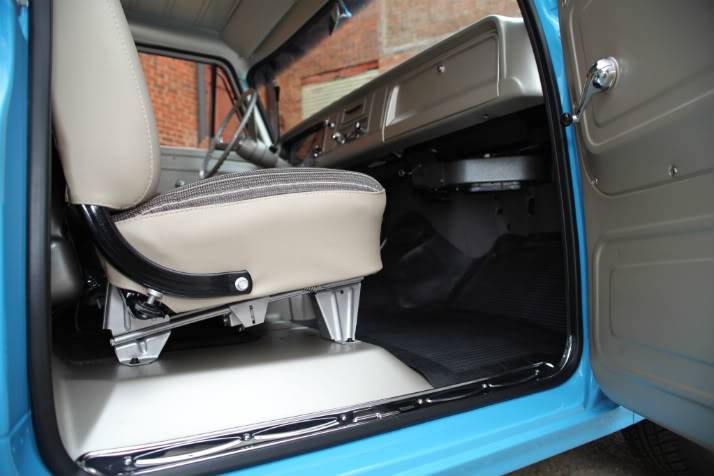
Thanks alocker! I want something that doesn't look dated in 10-15 years and keeping the factory-look parts should accomplish that. I restored a '65 C10 to 95% factory correct standards and loved all of the original styling so I didn't want blatant aftermarket parts thrown all over my own truck.
Few shots of the '65.


04-27-2013 #39 Registered User
- Join Date
- Dec 2010
- Location
- Charlestown NH
- Posts
- 352
you are really talented with fit and finish on the metal work!, all your radius' on your weld grinds are perfect and your valve covers had no distortion. looks great!!. if you need a steel flange for them i have access at my work to a Mitsu cnc Laser, i would just need a dxf file of the valve cover gasket or something and cut it out.
Project is amazing! great work my friendhttps://www.pro-touring.com/showthre...-Touring-Truck
DMP Fabrication LLC
Follow me on Instagram for welding and truck progress! - Americangraffiti
04-27-2013 #40
Registered User
- Join Date
- Dec 2005
- Location
- Birmingham, AL
- Posts
- 3,356
That blue truck is cool. I like the interior color against the blue.
Stephen

 Reply With Quote


