Results 101 to 120 of 183
-
07-02-2015 #101
 Registered User
- Join Date
- May 2014
- Location
- DFW
- Posts
- 6

It's hard to say. I originally built the motor using cheap aluminum heads about 3 years ago and had it tuned on a engine dyno and was not happy with the power(375hp). It set in my garage for 2 years then I heard about Kaase's P38 heads and how much power they would make with the sbf. So after talking with them I purchased their heads and a can of their choice to get me close to 600hp with my stroker. I also had to take a part the motor and have my probe Pistons notched for the heads. I probably have about 6k to 7k into it in just parts as I built it. Once I get used to this amount of power or need to rebuild the short block I'll move the p38 heads over to a 408 stroker. With that in mind I have a coyote in my 2012 mustang that with simple bolt on's I'm 430hp 416tq at the wheels and get 19 highway mpg. So I can see the hard choice you have.
-
07-28-2015 #102
Registered User
- Join Date
- Oct 2011
- Location
- Columbus, GA
- Posts
- 111
Oh man, the 408 would be a blast! I'd still love to build one but the Coyote is so appealing.
Danny,1967 Mustang Coupe - I think I've built more tools\jigs than worked on the car???
Build Thread: Project OCD
07-28-2015 #103
Registered User
- Join Date
- Oct 2011
- Location
- Columbus, GA
- Posts
- 111
Made some time on the lathe to turn the control arm bushings.
Straightened and squared the tabs on the cradle first, before taking the measurements for the bushings.
Acetal cuts like butter with a sharp tool edge. Keep it cool with some air and turn away :-) I love this stuff!
Almost done, have to chamfer the edges and cut some grease grooves.
Danny,1967 Mustang Coupe - I think I've built more tools\jigs than worked on the car???
Build Thread: Project OCD
02-18-2016 #104
Registered User
- Join Date
- Oct 2011
- Location
- Columbus, GA
- Posts
- 111
Finally back at it after a few months of being busy away from my shop. Got the underside and interior of the car sanded, primed, seam sealed and sprayed the underside with a few coats of Upol Raptor. Checked a couple of local body shops to try and farm out the rest of my quarter panel body work because it is a big PITA - no luck...apparently not many shops swing hammers or sling body solder anymore :-( So, I bought a few body work tools (stud gun, body hammers, shrinking wheel and body solder) and started going down that path myself...got tired of that at some point because as I said, what a PITA. Shifted my attention to getting all my IRS parts powder coated, purchased and in the car finally. Plan now is to get a rolling chassis finished and then start back on the body work. This also gives me some time to see what Ford is going to do with the A52XS crate engine; it's supposed to release this Spring :-)
1967 Mustang Coupe - I think I've built more tools\jigs than worked on the car???
Build Thread: Project OCD
06-13-2016 #105
Registered User
- Join Date
- Oct 2011
- Location
- Columbus, GA
- Posts
- 111
Spent some time lately fabricating more things :-)
Lower steering column bracket to hold the Flaming River column, powder coated with black mini-tex (from Columbia Coatings)
Sandblasted the brake/clutch pedals, powder coated and installed Scott Drakes rebuild kit (awesome kit with roller bearings and new shaft).
Sub frame connectors, fit snug against the floor pan (epoxy primed and awaiting a coat of Raptor).
...and now the best part the Gen2 Coyote, Quicktime bell-housing, Superior Kevlar clutch and TKO 600. Special thanks to Modern Driveline, Bruce and Paul were a great help :-)
Danny,1967 Mustang Coupe - I think I've built more tools\jigs than worked on the car???
Build Thread: Project OCD
06-15-2016 #106
 -Moderator/Sponsor-
- Join Date
- Apr 2001
- Location
- The City of Fountains
- Posts
- 15,975
Danny,
Nice work. You may want to look into doing a DIY electronic steering convention.
Andrew1970 GTO Version 3.0
1967 Cougar build
GM High-Tech Performance feature
My YouTube Channel Please Subscribe!
Instagram @projectgattago
Dr. EFI
I deliver what EFI promises.
Remote Holley EFI tuning.
Please get in touch if I can be of service.
"You were the gun, your voice was the trigger, your bravery was the barrel, your eyes were the bullets." ~ Her
06-17-2016 #107
Registered User
- Join Date
- Feb 2011
- Location
- Indpls, IN
- Posts
- 613
How was the Stud welder to use? And where did you get it?
06-26-2016 #108
Registered User
- Join Date
- Jun 2016
- Posts
- 1
This has to be one of the best mustang builds I have seen and a guy doing it all on his own in his shop. Wow, you have my respect. I have a 69 Convertible that just ate its 8'' for lunch and I am wanting to do this swap. I am wanting to build this very similar to your setup but possibly use the front spring perches as my attachment point. Other than wanting to mount the cage solid to your chassis the way you did what other reasons did you not set the diff up to use the front spring perches as your attachment point?
07-07-2016 #109
Registered User
- Join Date
- Oct 2011
- Location
- Columbus, GA
- Posts
- 111
 Originally Posted by andrewb70

Thanks Andrew. Nice work to you as well! Love to see people building stuff, from molding your own steering wheel center cap to fabricating your own parts, again nice work!
I had looked into a couple of electronic steering units including a used OEM Mustang unit; they all seem a little pricey. For now I am going to try the traditional hydraulic route. I have a 2010 Mustang pump that I'll be using with the rack supplied with the TCI front suspension kit. I believe it is a late model Mustang/Thunderbird rack. Hopefully with the proper hose, fittings, routing, a large Canton reservoir and a cooler it will perform. Does anyone out there have experience with the TCI rack with a late model Mustang pump?
Danny,1967 Mustang Coupe - I think I've built more tools\jigs than worked on the car???
Build Thread: Project OCD
07-07-2016 #110
Registered User
- Join Date
- Oct 2011
- Location
- Columbus, GA
- Posts
- 111
Originally Posted by Jetfixr320
The stud welder works awesome! Out of all the pins I've welded, not one of them has failed to weld to the body. I will say however, a handful of the pins were a little harder to get off and eventually just have to grind whatever is left of the pin head. I bought it from National Tool Wharehouse; they had the best price at the time. It is a H&S Autoshot uni-spotter 4550 kit.
Danny,1967 Mustang Coupe - I think I've built more tools\jigs than worked on the car???
Build Thread: Project OCD
07-07-2016 #111
Registered User
- Join Date
- Oct 2011
- Location
- Columbus, GA
- Posts
- 111
Thanks backinblck! Sorry to hear about your 8" but on the bright side, tearing stuff up creates opportunity for upgrades :-) Originally Posted by backinblck
The more I think about a response to your question the more interesting it becomes. I definitely like the idea of using the front spring perches! At the time I was shoehorning this thing in I briefly thought about using the perches but for some reason had my mind set on the bracket approach. I think I was trying to keep the tubing of the cradle mount points as short as possible for strength and tie the rear frame rails together. It also allowed me to very easily position the whole IRS exactly where I wanted it, tack the brackets in place then pull it out and finish welding it.
Using this approach you could cut the 90 degree radius section out of the front cradle tubing and extend it outward and forward to meet the front leaf spring perches (to maintain the factory wheelbase). By extending the tube straight outward you would be able to mount the cradle higher up in the chassis; this is due to the rear frame rail radius's upward and your tube wouldn't have to lay over the frame rail but sit somewhat behind it (from a level plane perspective). Then extend it forward to meet the spring perches/torque boxes. You could use some tubing of like dimensions to extend it all, not sure if you weld but I would recommend TIG welding the cradle/tubing to ensure proper penetration/weld strength.
Danny,1967 Mustang Coupe - I think I've built more tools\jigs than worked on the car???
Build Thread: Project OCD
07-26-2016 #112
Registered User
- Join Date
- Oct 2011
- Location
- Columbus, GA
- Posts
- 111
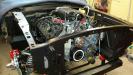
Got the engine/trans shoehorned in the car and quickly realized the grumblings, of past posts in reference to Coyote engines with a TCI front suspension, are no joke! Yes, it is true the engine fits in the engine bay just nothing else around it does! Ill end my rant short and state that with those shortcomings I still do like the TCI front suspension and components and in their defense the Coyote is an awkwardly large small block. Anyway, as youll see in the pictures a number of modifications had to be made; the largest of which came with a decision that brake pedals and a master cylinder are not overrated and you really do need them ;-)
The engine deceivingly tucked nicely into the engine bay
The cross member is TCIs SBF version which was purchased prior to them making their Modular unit (that basically means Ive been working on this car for way too long). It was already welded in so obviously they couldnt just swap it out. I simply cut the section out where the oil pan was first contacting the cross member and flipped it over and starting welding it in. After it was done I reinstalled the engine and it is still not quite enough. I need to take about another 1/2" off the backside of the cross member now :-(
Welding in some cross sections to fill in the gaps left by flipping the cut section over.
Oil pan clearance over the steering rack is good.
OEM/stock shorty clearance is good too
With the Gen2 Coyote the Charge Motion Control Valves have these vacuum actuators in the very back of the engine and stick out a good bit. I ended up trimming about a ¼ of sheetmetal off the lip where the cowl meets the firewall and ended up having just enough room.
The transmission tunnel and FW didnt fare so well. I had to cut most of the section around the trans out. It will be somewhere between 1 ½ 2 Ill end up raising it. On the plus side I guess it will ultimately shorten my shifter length :-)
And now the fun of it all. The original plan was to reuse the recently rebuilt factory brake/clutch pedal assembly and use Wilwoods tandem master cylinder and proportioning valve kit (part #261-13271-BK). Well thats a negative! That tandem master cylinder is 8.15 long and from the picture below I have at most 6 of space to play with. Initially I looked for a smaller/shorter tandem master with no luck and then looked at some offset bellcrank mechanisms to relocate the 8 long master. In my frustration I decided to build my own setup using Wilwoods swing mount pedals and three of their remote reservoir master cylinders (front brake, rear brake and clutch).
Cut out the master cylinder section of the firewall, bent some metal on the brake and welded it in. Still have to grind the welds down - grinding sucks by the way!!!
1" square tube and 1" x 2" rectangular steel tube
Danny,1967 Mustang Coupe - I think I've built more tools\jigs than worked on the car???
Build Thread: Project OCD
07-28-2016 #113
Registered User
- Join Date
- Oct 2011
- Location
- Columbus, GA
- Posts
- 111
Oh yeah, forgot to mention that the new Gen2s have a huge oil cooler assembly that has to be removed in order to get the engine/trans into the car! As you can see in the picture (bottom left corner) the cooler sticks out considerably and youll end up crushing the oil filter on the TCI sway bar mount and potentially damaging the cooler if its not removed. The good news is that it does actually fit once the engine is in place and ends up being quite accessible oil changes should be a breeze.
Danny,1967 Mustang Coupe - I think I've built more tools\jigs than worked on the car???
Build Thread: Project OCD
09-23-2016 #114
Registered User
- Join Date
- Sep 2016
- Location
- Kingman AZ
- Posts
- 38
Just reading your post looks great. Good to see a fellow tool junky in action. I have a 67 FB. I picked up a Cobra IRS a few years ago and have the intention of installing it . I've looked a DVS brackets I don't see the value. If there is any more technical information you can share on you IRS build it would be welcome.
Thanks Ray
09-25-2016 #115
Registered User
- Join Date
- Oct 2011
- Location
- Columbus, GA
- Posts
- 111
Thanks Ray! The IRS route was something I've always wanted to do in an old Mustang. It has been quite the effort but hopefully will be worth it in the long run. There is quite a bit of info throughout this build thread on the IRS; let me know if there is anything specific I might be able to help with. I especially like the approach mentioned by backinblck (several posts back) of using the front spring perches - very interesting! I plan to take some video of the rear suspension once I get the car on the road - might be a little while though. I'm looking to capture the control arm and shock movement under a hard launch, acceleration, cornering and general road conditions.
Danny,1967 Mustang Coupe - I think I've built more tools\jigs than worked on the car???
Build Thread: Project OCD
09-26-2016 #116 Registered User
- Join Date
- Aug 2002
- Location
- Sweden
- Posts
- 902

OMG!
Great thread! I love the DIY!
Really nice sheet metal work!
09-26-2016 #117
Registered User
- Join Date
- Sep 2016
- Location
- Kingman AZ
- Posts
- 38
Danny thanks for the reply. I noticed all the information available throughout this post. As usual I have too many projects going at one time but I look forward to getting back on my FB. If anyone out there has an opinion on what front suspension works best with the IRS unit I'm looking for information.
Thanks Ray
09-26-2016 #118
Registered User
- Join Date
- Oct 2011
- Location
- Columbus, GA
- Posts
- 111
Anders, Thank you! And thanks for posting on my thread as it gave me a link to yours, in short WOW! The innovation and fabrication work is incredible! Your car is amazing and your rotisserie is very cool :-) Originally Posted by Ripper
Danny,1967 Mustang Coupe - I think I've built more tools\jigs than worked on the car???
Build Thread: Project OCD
10-15-2016 #119 Registered User
- Join Date
- Aug 2012
- Location
- Pennsylvania
- Posts
- 254
Good to see things are coming together nicely for you!
10-15-2016 #120
Registered User
- Join Date
- Aug 2002
- Location
- Sweden
- Posts
- 902
Originally Posted by modmotor46
Thank you for the kind words Danny.
We seem to share the same passion for creating stuff.
Tags for this Thread

 Reply With Quote