Enter your username:
Do you want to login or register?
  • Forgot your password?

    Login / Register


    Page 9 of 9 FirstFirst ... 4 5 6 7 8 9
    Results 161 to 174 of 174
    1. #161
      Join Date
      Aug 2011
      Location
      Burleson, TX
      Posts
      130
      Country Flag: United States

      Some progress made-ECM, TCM and Harness are in

      Got the Transmission Dip Stick mounting bracket cut off and welded in its new location to secure it to the head. Rattle canned it black and reinstalled.

      Click image for larger version. 

Name:	20181030_085408.jpg 
Views:	702 
Size:	221.9 KB 
ID:	157915


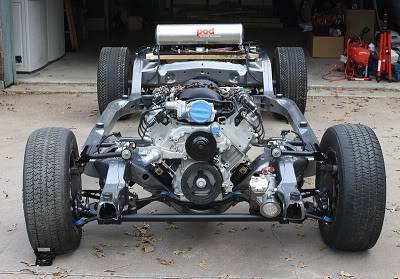
      I have also connected the engine wiring harness including adding some heat shield on wires and cables near headers, installed headers for real and started some of the other wiring needed to get the engine running. I will have a temporary panel set up with the ECU, TCU, switches and possibly some of the relays installed on it since the body is still off. Final wiring will have proper weather pack connectors, heat shrink and the like. If all goes well I am aiming for mid November start up.

      Click image for larger version. 

Name:	20181030_073830.jpg 
Views:	687 
Size:	165.8 KB 
ID:	157916

      Click image for larger version. 

Name:	20181026_213100.jpg 
Views:	696 
Size:	149.2 KB 
ID:	157917

      Click image for larger version. 

Name:	20181030_085341.jpg 
Views:	671 
Size:	193.6 KB 
ID:	157918


    2. #162
      Join Date
      Aug 2011
      Location
      Burleson, TX
      Posts
      130
      Country Flag: United States

      Finished prep work then got her running. Videos

      Made a temporary fire wall/dash, wired up the ignition, fans and fuel pump, put in an ample supply of various fluids and some fuel then lite her off.


    3. #163
      Join Date
      Oct 2007
      Posts
      1,853
      Awesome ken ! Could I ask you for a huge favor? Could you please get a photo of the coil wires on one or both sides? Specifically the colors to the large connector and to the front cylinder?

      You see I bought the same motor the coil bracket on the stock vale covers make it impossible to mess up they only go on one way. I put after market value covers on and I fear I may have mixed up the coins banks. I am right about at the same spot ready to fire it up and I am paranoid that I messed this up
      From a place you will not see comes a sound you will not hear....

      67 Camaro In progress

      https://www.pro-touring.com/showthre...-Tap-67-camaro

    4. #164
      Join Date
      Aug 2011
      Location
      Burleson, TX
      Posts
      130
      Country Flag: United States
      Quote Originally Posted by XLexusTech View Post
      Awesome ken ! Could I ask you for a huge favor? Could you please get a photo of the coil wires on one or both sides? Specifically the colors to the large connector and to the front cylinder?

      You see I bought the same motor the coil bracket on the stock vale covers make it impossible to mess up they only go on one way. I put after market value covers on and I fear I may have mixed up the coins banks. I am right about at the same spot ready to fire it up and I am paranoid that I messed this up
      XLexusTech is this what you are looking for?

      Driver Side Big Connector looks like Dark Grey, Dark Green, Brown and Pink in the front and Green, Red and Black in the back.
      Name:  Driver Side.jpg
Views: 586
Size:  115.3 KB

      Driver Side #1 Cylinder front looks like Pink, maybe a Dark Purple, Brown and Black.
      Name:  DS #1 Front Cylinder.jpg
Views: 579
Size:  120.4 KB

      Passenger Side Big Connector looks like Brown, Blue, Purple and Orange in the front and Green, Red and Black in back.
      Name:  Passenger Side.jpg
Views: 576
Size:  85.8 KB

      Passenger Side #2 Cylinder front looks like Orange, Red, Brown and Black.
      Name:  PS #2 Front Cylinder.jpg
Views: 589
Size:  124.8 KB

    5. #165
      Join Date
      Oct 2007
      Posts
      1,853
      Yes sir thank you !
      From a place you will not see comes a sound you will not hear....

      67 Camaro In progress

      https://www.pro-touring.com/showthre...-Tap-67-camaro

    6. #166
      Join Date
      Aug 2011
      Location
      Burleson, TX
      Posts
      130
      Country Flag: United States
      Quote Originally Posted by XLexusTech View Post
      Yes sir thank you !
      You're welcome! Glad to help.

    7. #167
      Join Date
      Jul 2006
      Location
      Chesapeake, VA
      Posts
      605
      Very detailed, I like what you're doing. Thanks for sharing.
      Cars are meant to be driven.

      John B

    8. #168
      Join Date
      Aug 2011
      Location
      Burleson, TX
      Posts
      130
      Country Flag: United States
      Quote Originally Posted by jaybee View Post
      Very detailed, I like what you're doing. Thanks for sharing.
      Thank you John. It is truly my pleasure as I have gained a wealth of knowledge from this and similar forums so I will not hesitate to help a fellow hot-rodder/motor-head.

    9. #169
      Join Date
      Aug 2011
      Location
      Burleson, TX
      Posts
      130
      Country Flag: United States

      Finally starting on the body

      Main floor plan issue is the passenger front where it appears the heater core went out and no one ever addressed getting all the coolant cleaned up and so the floor rusted out pretty bad here.

      Starting to fit the pan:
      Name:  20190505_195335.jpg
Views: 412
Size:  170.1 KB

      Just about ready to start welding:
      Name:  20190510_190808.jpg
Views: 402
Size:  153.8 KB

    10. #170
      Join Date
      Aug 2011
      Location
      Burleson, TX
      Posts
      130
      Country Flag: United States

      Winter is over

      Winter is over. Time to get back at it. Heat cycle the engine and continue cleaning off the undercoating on the body.


      Got most of the undercoating off the cabin area

      Name:  under cabin.jpg
Views: 264
Size:  133.1 KB

      But still have the trunk area left

      Name:  under trunk.jpg
Views: 266
Size:  87.0 KB

    11. #171
      Join Date
      Feb 2013
      Posts
      799
      Country Flag: United States
      Ken, we have nearly identical frames and I just got mine back from the sandblaster. Aside from the rear lower trailing arms, did you add gussets anywhere else?

    12. #172
      Join Date
      Oct 2015
      Posts
      362
      Country Flag: United States
      Car is looking great. Love all the powder coating and chassis mods. Only one mod I question is when you set back the engine mounts you tapped the frame instead of through bolting. The reason they are through bolted as the frame is not of sufficient thickness to tap threaded holes. I understand why you did it, just throwing it out there. I hope at a minimum you used fine thread.
      My half a$$ed build thread.https://www.pro-touring.com/threads/...elle-6-0-4L60E

      Tighten it till it strips & back it off a quarter turn.

    13. #173
      Join Date
      Aug 2011
      Location
      Burleson, TX
      Posts
      130
      Country Flag: United States
      Quote Originally Posted by JustJohn View Post
      Ken, we have nearly identical frames and I just got mine back from the sandblaster. Aside from the rear lower trailing arms, did you add gussets anywhere else?
      No John I did not. However, I wish I had done a bar between the rails or some other tie-ins because this thing flexes something terrible when I jack up one corner at a time.

    14. #174
      Join Date
      Aug 2011
      Location
      Burleson, TX
      Posts
      130
      Country Flag: United States
      Quote Originally Posted by Alwhite00 View Post
      Car is looking great. Love all the powder coating and chassis mods. Only one mod I question is when you set back the engine mounts you tapped the frame instead of through bolting. The reason they are through bolted as the frame is not of sufficient thickness to tap threaded holes. I understand why you did it, just throwing it out there. I hope at a minimum you used fine thread.
      Alwhite00 - I would have never relied on the tapped hole only. I would have drilled that out and used bolt and nut fasteners as per the original. However, I eventually bought different adapter plates so I could move back to the original engine mount holes. so my transmission tunnel modification would be minimal. I hate body work!

    Page 9 of 9 FirstFirst ... 4 5 6 7 8 9


    Tags for this Thread


    Advertise on Pro-Touring.com