

Results 101 to 120 of 644
-
10-27-2011 #101

 Registered User
- Join Date
- Jun 2011
- Location
- St. George, Utah
- Posts
- 1,629

It's from a local rich guy that has donated a bunch of money to the school. The same guy donated a bunch of $ to build a cancer institute at a hospital in Salt Lake City. Cool thing was that in order to receive the money one of his requirements was I had to write him a letter to tell him more about myself and situation and what I planned on doing with my degree.
It's too bad our school doesn't have the cash flow like Wyotech to advertise nationally. I'll bet we'd get a lot more students if they knew about it. $2400 IS a great deal compared to other schools. Our school also runs the Utah top rated programs for auto repair, diesel repair, and collision repair. I'm not in touch with the mechanics side much but I know our collision repair students took both 1st and 2nd place at the national collegiate Skills USA competition earlier this year.
-
10-27-2011 #102
Registered User
- Join Date
- Jun 2011
- Location
- St. George, Utah
- Posts
- 1,629
Thanks Joe, coming from you I really appreciate that!
John- I've done pretty much everything to cars in the past except for body work & panel fabrication and anything that requires a welder. Although I'm paying for it, the education I'm getting are priceless and I count it as a blessing.
10-27-2011 #103
Registered User
- Join Date
- Jun 2011
- Location
- St. George, Utah
- Posts
- 1,629
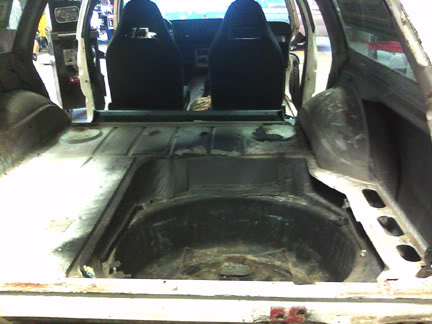
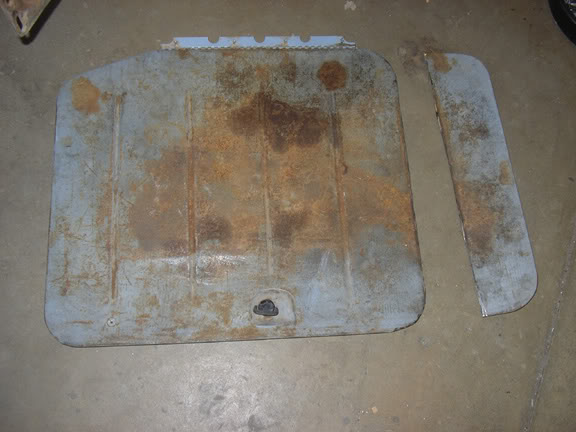
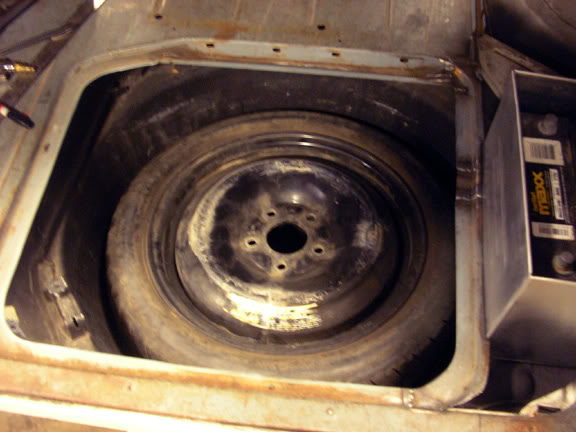
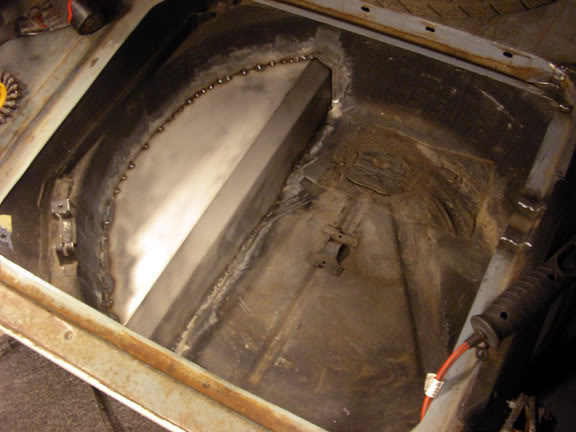
Next item to get in place before I can start building the roll bar is the battery. It needed to move to the rear to clean up the engine bay and help a little with the weight bias. I want to keep as much room available in the back so I can still use it to haul stuff around, so tucking it was in order. Here's a couple shots of what I have to work with.
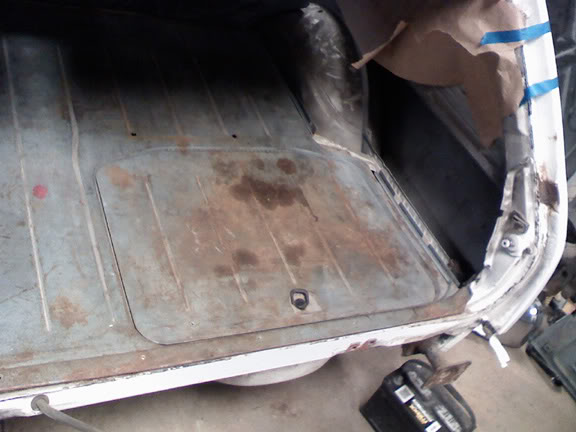
The whole blue rear floor unscrews and comes out to reveal another floor underneath on this car. Underneath the right side of the blue sheet metal is a support to help hold the upper floor up. The frame rail is directly below that.
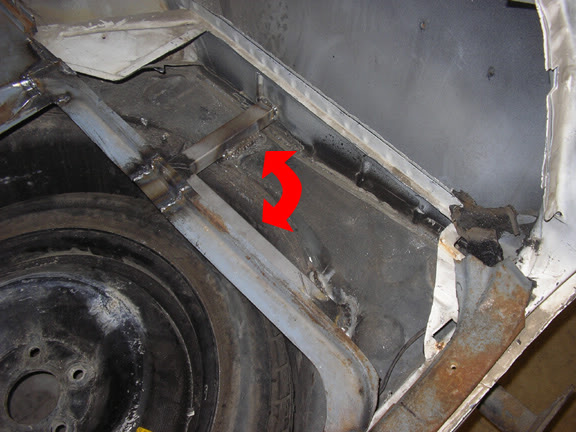
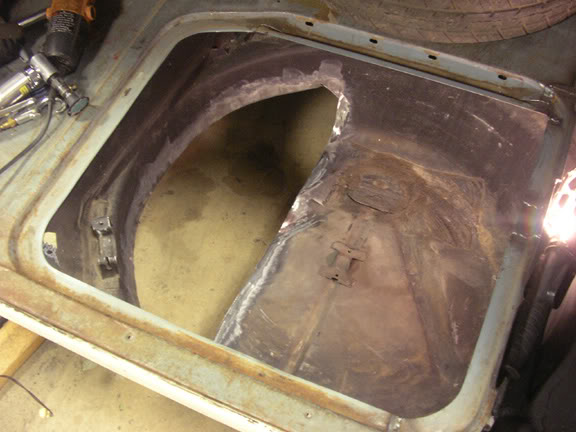
After looking at a couple different options I decided that positioned right above the frame rail on the right would be best. That means moving some things around and removing the support.
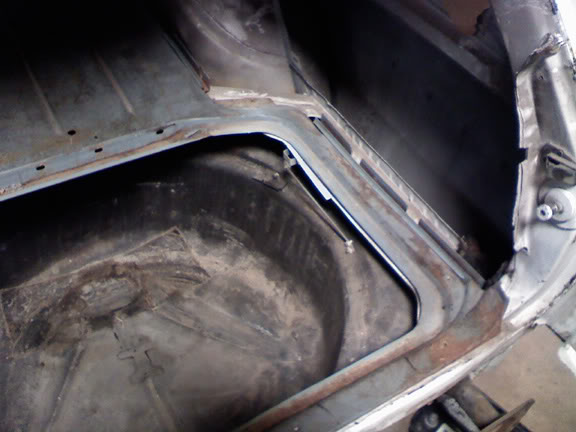
I cut and relocated the right side floor edge that supports the spare tire door. The arrow shows where it used to be attached. Where it used to be it was shorter because of the angle at the top (see above photo) so it took a spacer welded in the middle to make it the new correct length. I also had to cut out the support metal underneath.
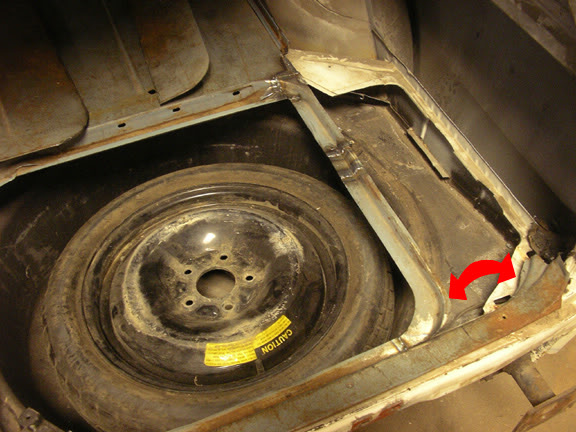
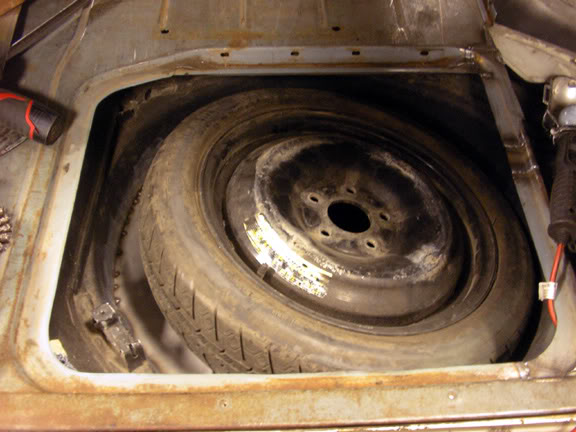
Notice also the space saver spare, I got it free from a guy I know that owns a couple Corvettes. Its a 155-70-17, lighter and skinnier than a full size, perfect for clearing the bigger F-body brakes, and is the same height as a 275-40-17.
Next I cut the door and reshaped it to fit in the recess.
The lower floor is contoured to fit the frame so if I set the battery in as it is it was raked down towards the front. To make a flat support for the batt to sit on I grabbed some scrap 1" square tube, cut it at a 45 deg angle and welded up an L shape.
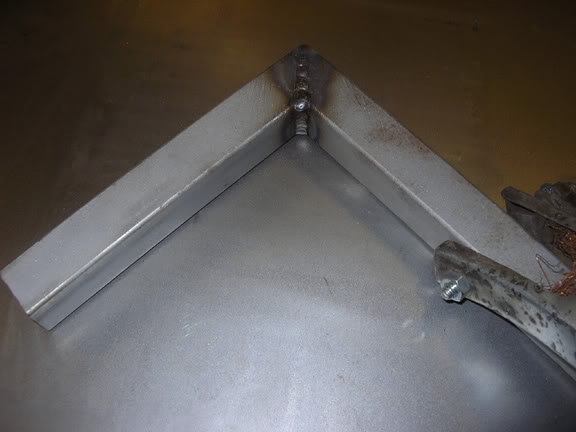
I then welded it into the car on top of the inner floor...
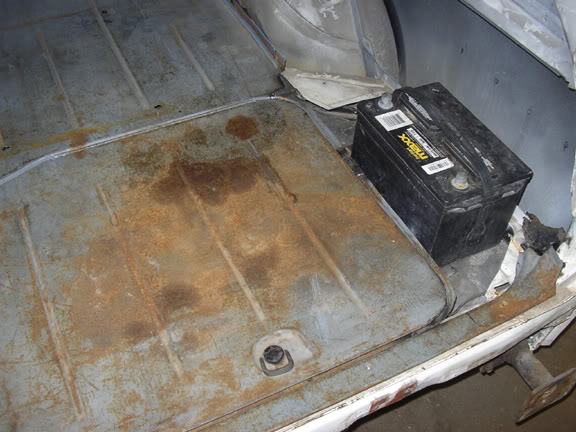
... and here's the end result. The battery is sunk into the floor about 3" and it has a strong support to bolt the box to. Tomorrow I start making a battery box from .063 aluminum. Cost of the materials is about 6 bucks compared to paying $80+ for one already made.
10-27-2011 #104
 Registered User
- Join Date
- Dec 2006
- Location
- SF Bay Area
- Posts
- 456
It's a RANCHERO! Originally Posted by SRD art

Man, Ford had the idea first and we just can't get any respect!chunger
'68 Ranchero 500
'70 Cougar XR-7 Convertible
'98 Mustang GT Convertible
10-27-2011 #105
Registered User
- Join Date
- Jun 2011
- Location
- St. George, Utah
- Posts
- 1,629
Oh dang, sorry dude, it was a long time ago. Either way I thought it was way funny and a great idea. PS Although I'm GM through and through I dig pre '71 Rancheros, Torinos, and Falcons too. My dad had a 68 Torino wagon when I was 15. I hoped to inherit it but it got wrecked. I did a rendering last year of what I wanted to do to it...

10-27-2011 #106
Registered User
- Join Date
- Dec 2006
- Location
- SF Bay Area
- Posts
- 456
Ben,
It's alright - haha! All is forgiven, even us Ford guys dig your project! I do like your rendering, same kinda idea of where I'm going with the Ranchero. But, ya know, there is a wagon just like that on my local CL...chunger
'68 Ranchero 500
'70 Cougar XR-7 Convertible
'98 Mustang GT Convertible
10-28-2011 #107
Registered User
- Join Date
- Apr 2011
- Posts
- 1
This is a very cool project! It makes me miss my 78 Malibu wagon with its IROC wheels and spray can flame job. I had a blast autocrossing that car and I was impressed at how well it responded to little things like poly bushings and cut down truck springs.
10-29-2011 #108
Registered User
- Join Date
- Jun 2011
- Location
- St. George, Utah
- Posts
- 1,629
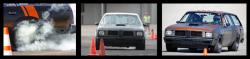
Thanks Static. Good to hear of another long back tearing up the cones. I plan on poly bushings as well as a whole bunch of other suspension goodies. Those are on the schedule for around January. More to come...
10-29-2011 #109
Registered User
- Join Date
- Jun 2011
- Location
- St. George, Utah
- Posts
- 1,629
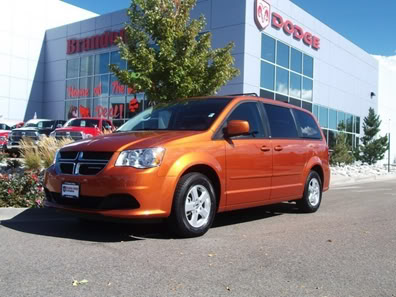
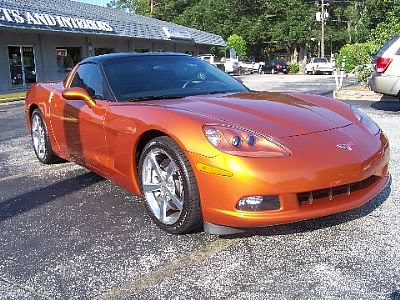
I was on date night with my wife last night and as we were getting into the car a guy pulled in next to us in an orange 2011 Caravan. I liked the shade a lot, similar to Vette Atomic orange. I've looked at lots of orange paint colors and I think I've narrowed it to one of these two paint codes. I'm not sure if the Vette is a 3 stage or not, I'd imagine the Caravan is two. Whichever fits the budget better wins this bout.
11-01-2011 #110
Registered User
- Join Date
- Jun 2011
- Location
- St. George, Utah
- Posts
- 1,629
Now on with the box and the well, sort of sounds like a Disney movie, lol!
Here's a shot of the pattern I used for my battery box. It will be cut and folded from .063 aluminum. I wanted a nice smooth look so the sides will fold around and meet in the middle of the back, having only one vertical weld rather than one at each corner. I've also provided flanges on the top and bottom of each side. The top will be folded completely over and create a smooth perimeter top while providing extra strength. On the bottom the flanges will mate to the floor of the box...
Still working on the box lid but you can see the box put together on the right of the next two shots. Jumping on to the tire well...
11-01-2011 #111
Registered User
- Join Date
- Jun 2011
- Location
- St. George, Utah
- Posts
- 1,629
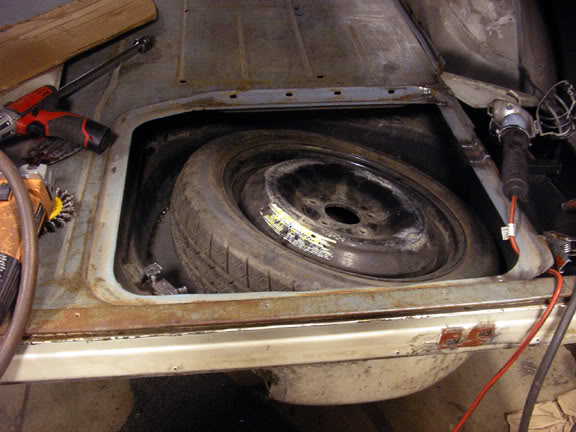
Currently I run a single 3" exhaust that exits behind the passenger rear tire. I want to keep the single 3" but wanted to do something different- have it appear to be duals as folks will expect a performance car to have and exit somewhere else. In keeping with the overall design of the car I decided to run dual rectangle tips and have them exit below the center of the rear bumper. Only problem is that my gas tank and spare well are right in front of the bumper and there's no room to plumb exhaust. As you can see the spare tire takes up the whole well so some more mods are in order to create a passage way for the pipe to run through. See the beginnings of the battery box on the right...
So I marked out an area to remove, trimmed it out and prepped for welding.
Using the sheet metal brake I bent up a piece of 18ga steel, here tacked in place, to create a "shelf" for the spare to rest on.
Now the tire rests at an angle and although I removed a large chunk of the well I actually created better space management. Under the tire I now have storage room for a small tool kit, tow rope and jumper cables and the lid closes with room to spare. I also have created a large open area to run the exhaust pipe.
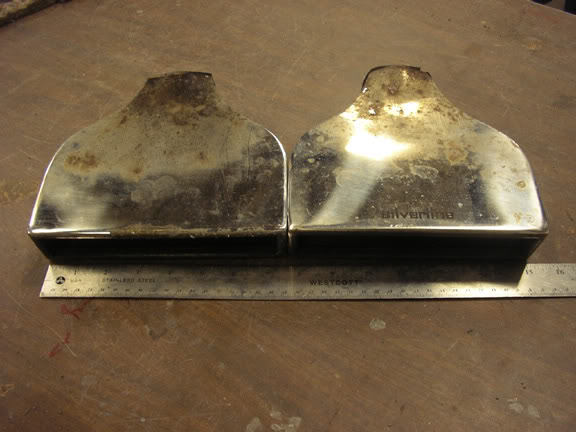
I recently picked up a pair of Flowmasters and tips from a friend that's changing the exhaust on his 91 Corvette. I'll save the mufflers for my son's Nova build that will start next year and the tips will go on my car. They're each about 7.5" wide and should look great nestled under the rear bumper. My car will be anti-chrome so the tips will be getting a makeover as well.
11-01-2011 #112
Registered User
- Join Date
- Dec 2006
- Location
- SF Bay Area
- Posts
- 456
Neato. Love the innovation!
chunger
'68 Ranchero 500
'70 Cougar XR-7 Convertible
'98 Mustang GT Convertible
11-02-2011 #113 Registered User
- Join Date
- Dec 2008
- Location
- Detroit
- Posts
- 2,585
Nice progress there Ben! I want to do a battery relocation on my Cutlass too.
Big dreams, small pockets....
Chris--
'72 Cutlass S LSA/T56 Magnum
Bowler Performance, Rushforth Wheels, ATS, Holley EFI, KORE3, Ridetech
Project Motor City Madness
11-02-2011 #114 Registered User
- Join Date
- Apr 2005
- Location
- Cartersville, GA
- Posts
- 1,300
I love the idea for the exhaust, Ben! Nice execution, too, keeping the spare tire!
Joe Hinds
11-02-2011 #115 Registered User
- Join Date
- Feb 2009
- Location
- N.J.
- Posts
- 674
Great fab work Ben.
Progress is coming along, keep it up.- Paul
70 Camaro RS Project Build
https://www.pro-touring.com/showthre...-Project-70-RS
90 Mustang GT Project Build
https://www.pro-touring.com/threads/...ang-Gt-Project
My Garage Project
http://garagejournal.com/forum/showthread.php?t=189511
11-03-2011 #116 Registered User
- Join Date
- Oct 2011
- Location
- Katy, Tx
- Posts
- 309
Great school. Those are some great fab skills... Keep the updates coming.
11-03-2011 #117 Registered User
- Join Date
- Oct 2011
- Location
- Peru, IN
- Posts
- 118
Watching with interest... Keep up the good work!
Building a GN to carve corners and travel long distances. *inprogress* Ridetech Coil-Over Tru-Turn Suspension, custom paint by child's tricycle handle, Baer Brakes, 6152turbo, 2800stall, Lonnie Diers Transmission, factory installed T-Top water leak, Casper custom harness, hanging on for dear life vacuum line setup, homebrew ported heads, Translator2, AEM TruBoost control, Good looks by GM, oil and gas by fossils, slightly understanding wife mod, Praise Jesus it runs installation, and Baer Brakes for the 'whoa.' R.I.P. Powermaster 1987-2004.
11-09-2011 #118
Registered User
- Join Date
- Jun 2011
- Location
- St. George, Utah
- Posts
- 1,629
Thanks everyone. I feel more confident with my abilities with every task I jump into. In the past I've built motors, rebuilt TH350s, changed/upgraded suspensions, done some minor interior upgrades etc, but I've never had the training or facilities to do fab work. As I've told friends and family as they ask how school's going I just say I was born for this. Every day I spend between 5 and 6 hours working on the car and class projects and when the professor closes the shop I get disappointed, I just wanna go for another 6 hours. It's like this isn't work, it's fun!
11-09-2011 #119
Registered User
- Join Date
- Jun 2011
- Location
- St. George, Utah
- Posts
- 1,629
Some new updates from the last coupla days.
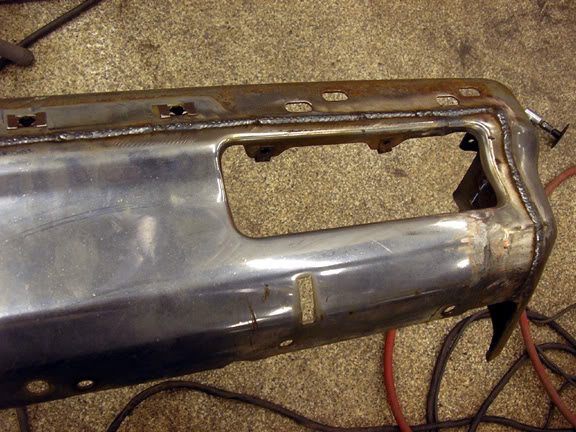
First off I got the front bumper finished up. I sectioned it 1" on the pass side as well as sectioned the turn signal opening from the donor bumper. I then cut out the area on my bumper, tacked in the donor piece and welded it all up.
I learned something new as I did this. Monday my professor and I were talking about weld "prettiness" and where I need to be at with my welding to be at a level where a decent shop will be impressed and hire me. I asked about mig welding and which was a better weld - a nice continuous bead or "stacking pennies"? We discussed the possibility that stacking pennies, although it looks great, wouldn't heat the metal enough to get decent penetration on thicker metal. So to run a test to answer my question I welded the passenger half with short continuous stitch weld beads. I used the paint shop side 120V MIG with the heat cranked all the way. If the stitches were too long or too slow it would blow a hole, so after finding a decent speed I got pretty nice welds. On the driver side I stacked pennies.
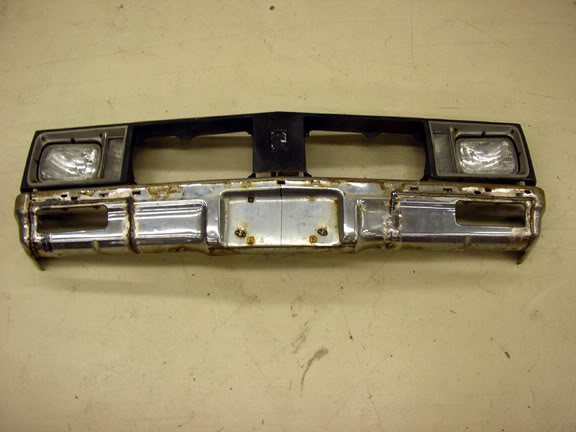
When I flipped it over I found that with that smaller welder on a thick bumper it had trouble penetrating very well either way, but to my surprise the stacking pennies actually got better penetration overall. It also had a smaller heat zone around the weld and looked a ton better . Too bad it's all going to get ground flat anyway, lol!
11-09-2011 #120
Registered User
- Join Date
- Jun 2011
- Location
- St. George, Utah
- Posts
- 1,629
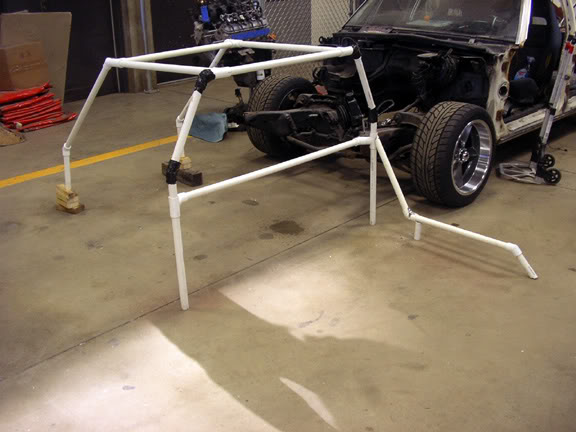
Everything I've been doing so far in the rear of the car was to get everything situated so I can install a roll cage. After researching kits I found nothing fit the wagon the way I wanted. So I checked into just getting just a main hoop and building off that. I got a price from Jegs, I think it was like $45, very reasonable. What wasn't reasonable was the $99 shipping shaft, er, charge. So I decided to just build the whole thing from scratch. Because I've never done anything even remotely close to this I decided to do a mock up first before bending steel. Using PVC pipe, a few homemade brackets and some duct tape I got one put together.
Please note that my cage won't be "legal" for any serious racing venues, it's main design purpose was to add stiffness and safety without sacrificing comfort and streetability at all. Some features will be- A snug overall fit contoured to the interior. There is recessed main hoop cross bar behind the front seats so I have plenty of seat adjustability. I will also be building a camera stand off this bar. I have fairly long legs so I sat in the back seat with the mock up in the car just to make sure there was plenty of "get in" room and clearance for knees. The rearward bars make up the "cage" portion, similar to a 10 point cage turned backwards. I did this mostly because I didn't want to cut up the dash for front bars and that's probably overkill anyway. I also want to keep the versatility of the wagon's back storage area so the diagonal brace will be above the rear seat area. The rear bars will hit right after the rear wheel wells. I want to keep the stock lower half of the front door panels so I had to make the front bar fairly low to clear the armrest mold. The front bars are more for chassis stiffness than anything and are similar to a tiger cage.
With doing the PVC mockup I was able to test fit and try different options before bending and possibly wasting metal tubing. It's rough and pretty ugly, but when it was in the car it fit great and placement looked decent as I envisioned the real bar in there. The interior will be black with a splash of orange and silver accents. I plan on painting the cage silver too.
Tags for this Thread

 Reply With Quote


