

Results 61 to 80 of 644
-
09-27-2011 #61

 Registered User
- Join Date
- Jun 2011
- Location
- St. George, Utah
- Posts
- 1,629

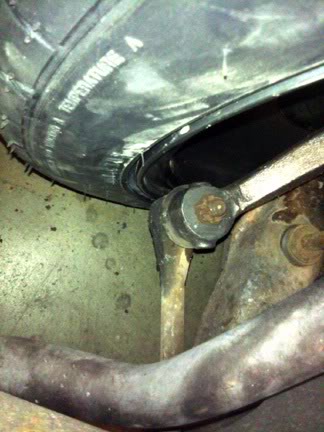
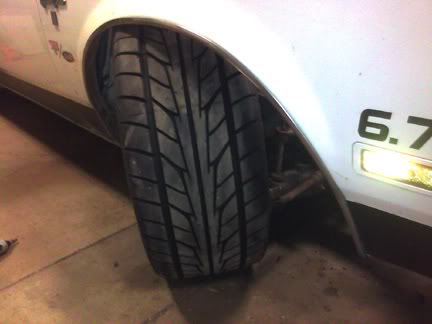
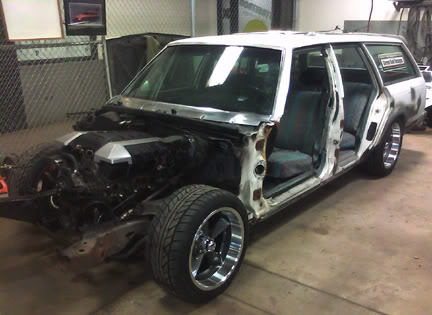
So to answer the question, yes you can run a 9.5" wheel and 255's up front on a g-body. BUT there are some issues that need to be addressed. This 9.5" wheel has 5.5" back spacing, that's pretty deep, and obviously that makes 4" width from the rotor outward. As you see them I have a 3/4" spacer behind them. This is a definite necessity, notice how close the rim is to the tie rod. It doesn't contact the wheel but it would probably knock off clip on weights.
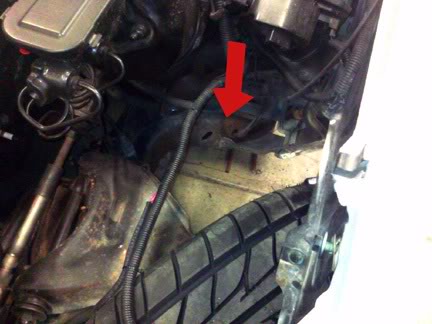
Another problem area is that the tires would hit the rear side of the plastic inner fender wells in the area where the arrow is and would not allow them to turn all the way. Simply removing and/or modifying them will give the necessary clearance.
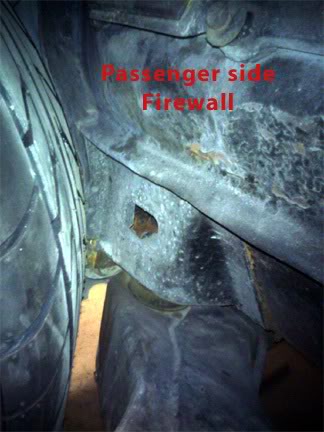
Here's the passenger side with the inner fender well removed and the wheels at full lock.
-
09-27-2011 #62
Registered User
- Join Date
- Jun 2011
- Location
- St. George, Utah
- Posts
- 1,629
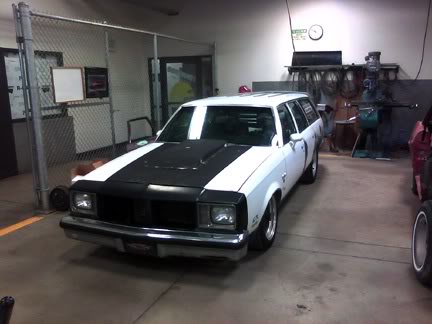
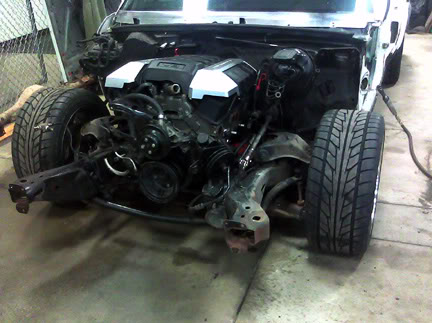
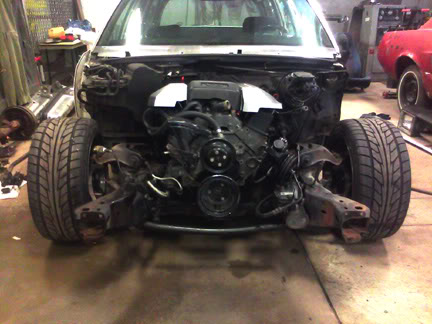
Here are a few more reference photos. Notice also with the 3/4" spacer and the wide wheels the front track is now wider than the rear, even with the 275-40s back there. Tony used 1" spacers on his car to kick the rear wheels outward.

Since I'm narrowing the 9" rear anyway, I'll simply make it 1" wider than the factory wagon rear on each side. This should give the whole car a bit more of a wide stance. Overall I think the wheels look great and will work out fine even with the car being lowered 3". I plan on painting the centers that are now grey to black to better match the car.
09-27-2011 #63
Registered User
- Join Date
- Jun 2011
- Location
- St. George, Utah
- Posts
- 1,629
What a difference!
09-28-2011 #64
Pro-Touring Veteran
- Join Date
- Nov 2006
- Location
- Washington, MO
- Posts
- 2,363
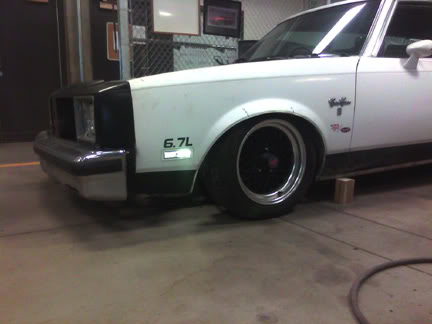
Ben I love the new wheel setup.... but it does look like the fronts stick out more... maybe it's just an illusion, don't know. I'd have to see some other pictures...but if you can pull it off that would be cool. It certainly is tight up there.. doesn't leave much room for travel. I though of going 9.5 on the front of my Monte too, but decided against it after tucking in the rear wheels to match the front.
09-28-2011 #65
Registered User
- Join Date
- Jun 2011
- Location
- St. George, Utah
- Posts
- 1,629
Thanks for your wagon photos by the way, they were a great reference when I was deciding what route to go. One thing I noticed while looking the new set up over is that the body curves inward from rear to front. I.E. if you measured the width of the front compared to the tail end there may be 2-3" difference. With the fenders curving inward it puts a greater emphasis on making the front tires look like they're sticking out. I really think when I get the back wheels pushed out wider it'll look better. Originally Posted by Tony_SS

I'm getting more of a road racer look/ vibe with this set up rather than the everything tucked under sleek and trim pro-touring look I originally was after, does that make sense at all? It's opposite of the look I've always had so honestly it's really taking some adjusting to get used to it. Either way wider meats means a little better handling correct? Perhaps later on when I can afford it I'd like to widen the rear wheels to 11.5"s and run a 315-30 out back. At that point I think I want to make 275-40s fit up front. I kick myself now, I tore the car apart today and realized I never tried a 275 test fit up front. I will do it later on though.
09-28-2011 #66
Registered User
- Join Date
- Jun 2011
- Location
- St. George, Utah
- Posts
- 1,629
One extreme ride height photo. Just for kicks I put the old "skinnier" rims on and let the car down. This is with 2" spindles and 2 3/4 coils cut off the springs. There was about 2.5" of clearance under the front cross member. That wood block is 5.5" tall. Wish I could drive this low all the time, but definitely not here in Utah, the land of lousy roads.
09-28-2011 #67
Registered User
- Join Date
- Jun 2011
- Location
- St. George, Utah
- Posts
- 1,629
Now back to the proposed ride height with the 17's bolted on. I figured this was a good reference point, maybe Powerade will sponsor me now, lol!
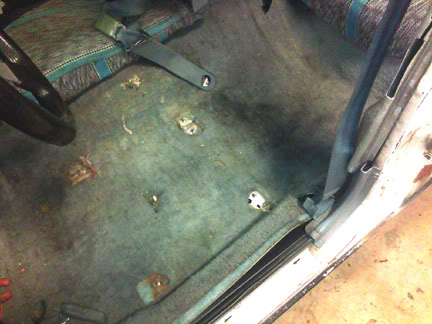
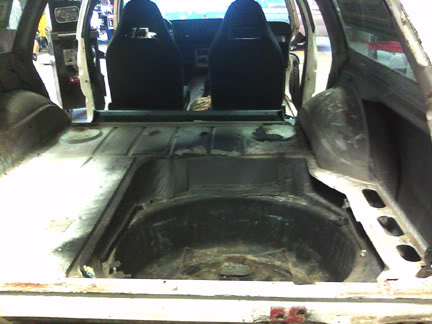
I spent today's spare lab time tearing the car down to get it ready to come off the frame. Just a few shots of the aftermath so far. How about those great seat covers!
Nice granny blue carpet, Eeeeew! The new interior will match the theme of the car, mostly black with silver and orange accents. The factory carpet had a pretty thick layer of a flexible plastic backing, something I've never seen before. Much to my surprise the jute pad underneath looked almost brand new. I suspect the plastic backing saved it from dirt and grime and all the milk bottles spilled in the back.
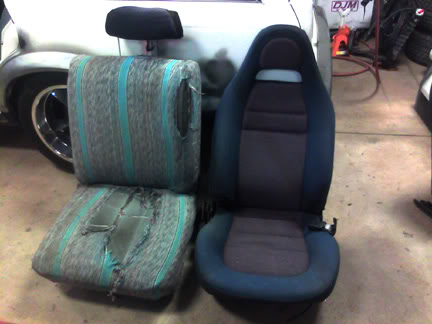
Here's Grandpa's Oldsmobile driver's side portion of the split bench next to the Mazda seat. Looking forward to getting them in, I'll be building the mounts after the car is the rest of the way torn down. The Mazda seats will make a huge difference in keeping my backside planted in hard cornering. Woohoo!
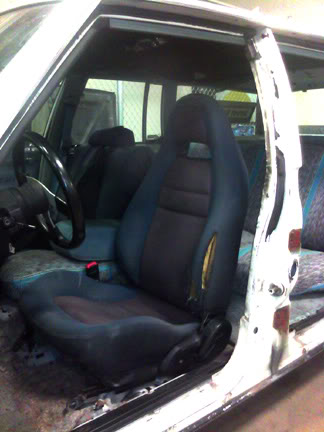
Finally a quick mock up of the driver's seat in place. I need to build custom mounts to raise them up about 3", more to come later on these...
09-29-2011 #68 Registered User
- Join Date
- Apr 2005
- Location
- Cartersville, GA
- Posts
- 1,300
Was that a 60/40 split bench? if you need a set of G-body bucket brackets, I could probably snag you a set cheap. It would be a lot easier to adapt them to your Mazda seats than to build new ones.
Joe Hinds
09-29-2011 #69
Registered User
- Join Date
- Jun 2011
- Location
- St. George, Utah
- Posts
- 1,629
Finished pulling doors and interior today.
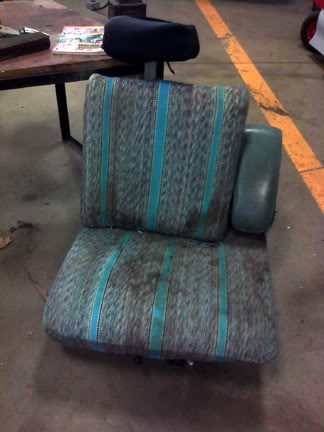
Last ugly seat photo, I'm really glad to see these things hit the dumpster. On this passenger side I pulled out the foam which was in great shape so that I can fab a small jump seat that will fit in between the buckets so that I can still fit my wife and 4 kids in the car with me. When not in use the back will fold down and do double duty as an arm rest. I also pulled off the factory arm rest to save for another project.
09-29-2011 #70
Registered User
- Join Date
- Jun 2011
- Location
- St. George, Utah
- Posts
- 1,629
Thanks Joe. Luckily because it was a split bench it has 4 "legs" instead of 2 like a normal bench. I pulled them off and will be adapting them to the Mazda seats. Originally Posted by BulldawgMusclecars
09-29-2011 #71
Registered User
- Join Date
- Jun 2011
- Location
- St. George, Utah
- Posts
- 1,629
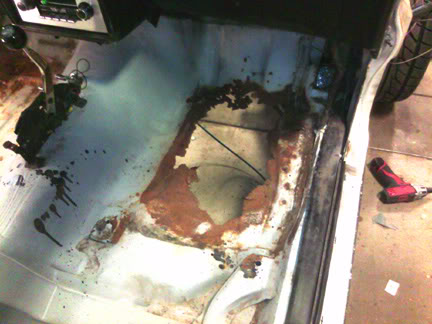
Here's a shot of the passenger side floor. I knew this was there and screwed down a piece of sheet aluminum a couple years ago until I could get to this point to fix it. Funny, the parts car on page one had a large hole in exactly the same spot. My guess is that because this is right above the gynormis factory cat, I'm thinking that the cat got hot enough to cook off the under coating, and the salt they use on the roads here in winter just took it's toll over time. With the school shop tools handy I'll use the bead roller and brake to make another insert out of 16 ga sheet steel and weld it in properly.
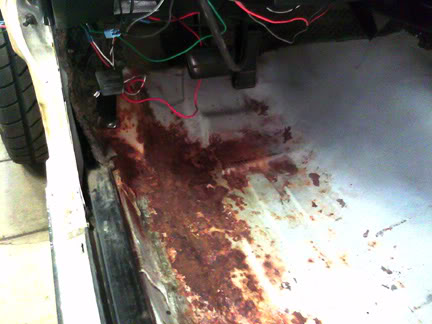
Unfortunately I didn't know this was here. The previous owner had filled the gap above the windshield between the roof and trim with clear silicone, a tell tale sign of a windshield leak. I'll bet that's what caused this. Luckily it hasn't rusted to the point that the floor integrity has been sacrificed so some cleaning with a wire wheel and some Por-15 should take care of it. I'll be pulling the windshield trim to patch up any problems around there.
The rest of the floor pan is luckily in great shape. Interesting how at the factory instead of gluing the jute pad to the floor they just slapped down some double stick squares and laid it down. Quick and simple.

09-29-2011 #72
Registered User
- Join Date
- Jun 2011
- Location
- St. George, Utah
- Posts
- 1,629
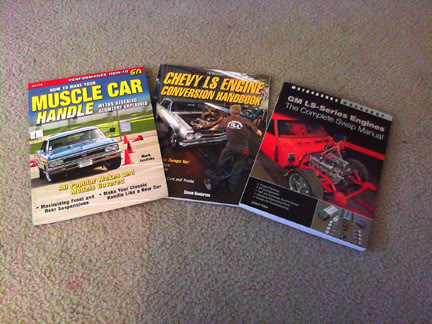
And last for today, new goodies came in. I ordered 2 LS swap books from Joseph Potak and Shawn Henderson and Marcus Savitske's handling book from Amazon. Right around $50, free shipping. I glanced through Marcus' book so far and I like the way he writes. I'm artsie fartsie so when people talk to me like I'm an engineer at Boeing it goes over my head sometimes. From what I can see he spells things out in a way that even I can wrap my head around the concepts. Really looking forward to reading it. PS I see Tony has his Monte's photo in the g-body section! Coool!

10-05-2011 #73
Registered User
- Join Date
- Jun 2011
- Location
- St. George, Utah
- Posts
- 1,629
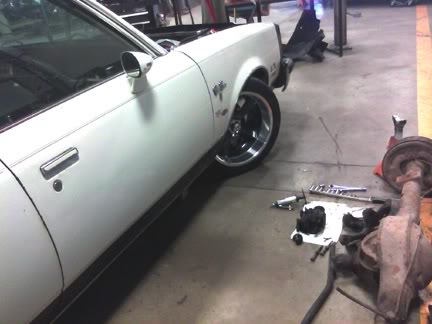
Finally got the motor and trans out.
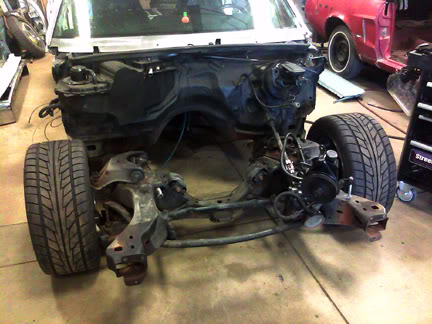
Also finished up stripping the rest of the car. I find it fascinating to see how things were engineered and imagine how they put it together at the factory.
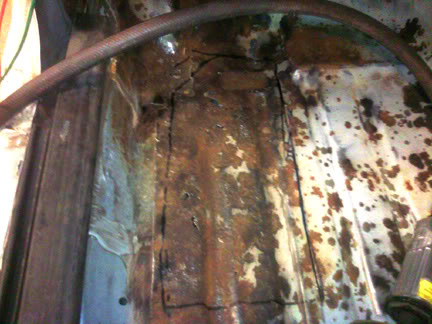
Unfortunately I found this on the rear passenger side wheel well, rotted clear through. I'll be moving them inward slightly so I'll fix the hole when I extend the tubs. Driver's side was fine.
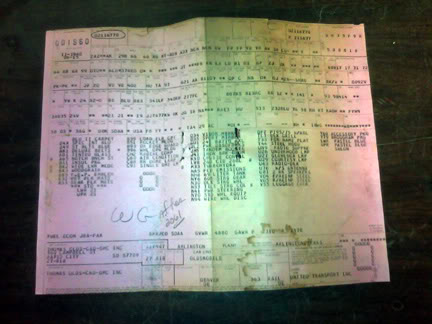
But with the bad comes the good, found this inside the rear seat. Looks like the car was built in Texas and delivered to an Olds dealership in Rapid City, South Dakota. Funny, that's where my wife is from too.
10-05-2011 #74
Registered User
- Join Date
- Jun 2011
- Location
- St. George, Utah
- Posts
- 1,629
I bought a heavy duty wire wheel for my electric grinder and hit the driver's floor. Under the flakes I did find some holes, so I decided to go ahead and replace the area marked out.
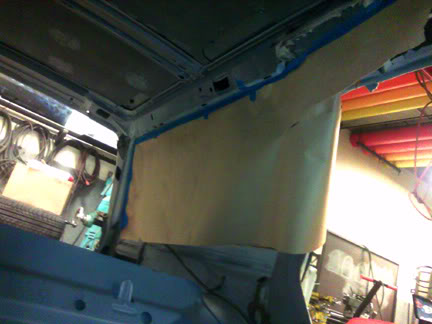
To protect it from any stray sparks I covered up the rear window with some heavy butcher paper doubled over and cut the floor with a die grinder.
Here's the hole left for the passenger side. Yikes!
Once I got the rust cut out I sheared off some 18 ga sheet metal. I got basic dimensions traced on the sheet stock and did a rough cut with beverly sheers.

I used a machine called a Pullmax to duplicate the factory reinforcing ribs, here I am working on the passenger side.
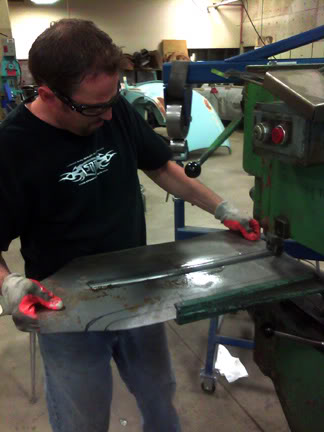
You use an upper female and lower male die, and the machine's up and down action beats the metal into place. I made 3-4 passes raising the lower die each time to get the correct depth imprint.
This is the end result of trimming and using the Pullmax, here's the driver's side tacked in place. Notice how the formed ribs line up with the factory floor ribs. This was as far as I got today, tomorrow I'll finish up the passenger side. More to come...

10-05-2011 #75 Registered User
- Join Date
- Mar 2011
- Location
- Buffalo NY
- Posts
- 259
Thats awesome, great attention to detail when most would have just tacked in a flat pannel and threw some Dynomat over it...great job!
Dave "Big Nasty" B
10-05-2011 #76 Registered User
- Join Date
- Dec 2006
- Location
- SF Bay Area
- Posts
- 456
Wow, love the ribs - nice attention to detail!
chunger
'68 Ranchero 500
'70 Cougar XR-7 Convertible
'98 Mustang GT Convertible
10-06-2011 #77 Registered User
- Join Date
- Jan 2008
- Location
- Charlotte
- Posts
- 1,295
Are there prefabbed minitubs for G-bodies?
2005 LeMans Blue Corvette w/ T56 & Z51 & C6Z06 Brakes, Build Thread: https://www.pro-touring.com/showthread.php?64496
2005 GMC Sierra 2500HD LLY / Allison
2014 Chevy SS LS3 / 4 Door
10-07-2011 #78
Registered User
- Join Date
- Jun 2011
- Location
- St. George, Utah
- Posts
- 1,629
Thanks guys. I may be going a little anal but I wanted it to be close to factory to get a better fit and also the ribs help strengthen the floor.
Not sure about that, I'll be making my own. One of our class assignments is to make a small scale inner wheel tub using the pullmax and power hammer. I can apply what I learn there to making my own full size inner tubs. I'll post photos when I get to it. Originally Posted by bonecrrusher
10-07-2011 #79
Pro-Touring Veteran
- Join Date
- Nov 2006
- Location
- Washington, MO
- Posts
- 2,363
Yea, I'm embarrassed to say that's what I did.... now If I had a classroom like that with all those machines, I would have done what Ben did too. Originally Posted by daveybtv
Great work Ben..keep it up.
10-07-2011 #80 Registered User
- Join Date
- Dec 2008
- Location
- Detroit
- Posts
- 2,585
You'll definitely go far with all things your learning/practicing in school. Looks good, love the wheels....
Big dreams, small pockets....
Chris--
'72 Cutlass S LSA/T56 Magnum
Bowler Performance, Rushforth Wheels, ATS, Holley EFI, KORE3, Ridetech
Project Motor City Madness
Tags for this Thread


 Reply With Quote


