Results 21 to 40 of 644
-
06-15-2011 #21

 Registered User
- Join Date
- Aug 2010
- Location
- nebraska
- Posts
- 86
subscribed....and I'll probably be hollering at you for a rendering on my Volare' wagon.....this sure makes me think I need a g-body wagon too....like a lemans wagon or something equally as unique.....
1994 Caprice Station Wagon
-
06-15-2011 #22 Registered User
- Join Date
- Jun 2011
- Location
- St. George, Utah
- Posts
- 1,629

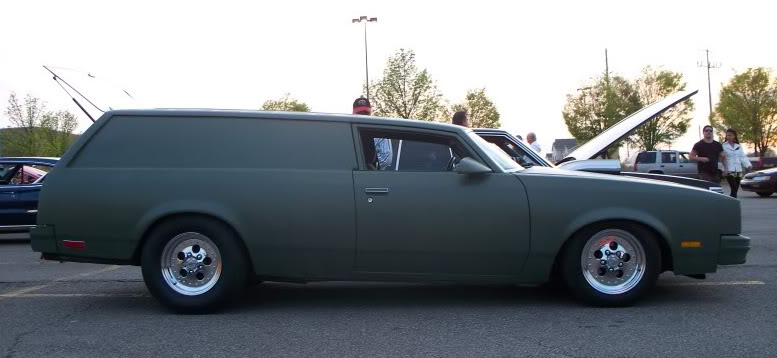
I've seen all versions of the g-body wagon surfing the web. Prolly my favorite so far was a white Regal wagon with a stout T3.8. That was cool. I think another cool deal would be to build a Malibu with a Monte SS nose.
Just let me know when you wanna get that rendering done, A Volare wagon would be pretty wicked tricked out as a g-machine. Just for reference, here's one I'm currently working on with a local rod shop, one of 3 views. Pretty killer ride with lots of goodies inside.
06-15-2011 #23
Registered User
- Join Date
- Dec 2008
- Location
- Lehigh Valley Pa
- Posts
- 1,269
Have you seen this one? Originally Posted by SRD art

Have you seen this one?1996 Federal Cadillac hearse
1988 Eureka Chevy hearse
06-16-2011 #24
Registered User
- Join Date
- Jun 2011
- Location
- St. George, Utah
- Posts
- 1,629
When it lookd like this...
06-16-2011 #25 Registered User
- Join Date
- Aug 2004
- Location
- Rustburg, Virginia
- Posts
- 3,436
Looking good...so how did your door handle project turn out?
1970 RS/SS350 139K on the clock:
89 TPI motor w/ 1pc rear seal coupled to a Viper T56 via Mcleod's modular bellhousing w/ hydraulic T/O bearing from the Viper, 12 bolt rear w/ 3.73 gearing, SC&C upper control arms, factory lowers with Delalums, C5 brakes at all four corners, Front Wheels 17x8's with Sumi 255/40/17 and Rear Wheels 17x9's with Sumi 275/40/17.
Brief description of the work done so far can be found here: http://www.nastyz28.com/forum/showthread.php?t=112454
06-16-2011 #26
Registered User
- Join Date
- Jun 2011
- Location
- St. George, Utah
- Posts
- 1,629
I got the holes for the old lock cylinder patched up and ran out of days at school. The handles are test fit but not permanent yet, I'll get back on those come August when school starts up again.
The goal as crazy as it is, is to have the car done by March or April of next year. I'm in the process of mapping out my game plan so when school hits I have parts and a task list ready to go. Finishing the door handles is near the top of that list.
06-16-2011 #27
Registered User
- Join Date
- Jun 2011
- Location
- St. George, Utah
- Posts
- 1,629
Some new parts came in...
When I first lowered the car I simply cut the springs. This works for a good visual reference and it helped handling because of the slightly better spring rate and lower CG, but really it's a terrible way to lower a car. After a time the springs settled and sagged and dropped almost another inch from where it started. I like a slight rake but right now it's about 1 1/2" difference front to rear and I'd rather have it closer to 1/2". As low as it is now it sits on the snubbers and it's got my suspension geometry all goofed up. Bumpsteer on hard turns like turning into a parking space is out of control.
To remedy the issue 2" drop spindles are in order. I did some research on g-body forums and found that folks had great success with both DJM and Bell Tech, and not so much with some of the cheaper off name brands. The DJMs were a better deal so keeping the budget tight I ordered them from Summit Racing. DJM doesn't list a part # for G-body cars but we share front suspension with 1st gen S-10's, part # DS2031-2, $149.95 + shipping. I'll be getting 1" lowered springs soon too, I'll post info on that when I get them. The goal is 5.5" of clearance at the frame just behind the front wheel, 6" of clearance just in front of the rear wheel. I currently have 4.5" / 6".
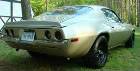
G-bodies were built to be an economy mid size car with a goal of halfway decent gas mileage amongst other cars in their class. Several things were engineered into them to keep them "light" including some cars having aluminum rear drums, light weight (i.e. crappy, like my worn out original) steering boxes, etc. If I have my facts right the smallish 10.5" front brakes were also intended to save weight. As a result braking is definitely not that of a sports car. There are many brake upgrades available out there but again keeping the cost down means being creative. I saw a trend on g-body forums to put on either 2nd gen Camaro or 90's Caprice spindles, milling down the g-body rotors to become a hub, and using LTI late model Camaro drop off rotors and calipers. Problem with this is it creates geometry problems because of the taller spindles and tends to increase bumpsteer. To compensate you have to purchase high dollar aftermarket offset upper control arms. After doing research on S10 forums I found that a lot of those guys have come up with a better idea- keep the G-body spindles- maintaining stock geometry, have the g-body rotors milled to a hub, and with a simple bracket and some slight mods to the spindle you can mount 98+ LS1 Camaro calipers and 12" rotors. You can even re-use the factory g-body brake hoses with the F-body banjo fittings. Simple as that. There are a few different companies that make the caliper adapter brackets, but I found an engineer/machinist on one S10 forum that water jetted a bunch of sets for forum friends. Several folks said they worked great so I bought a set from him for less than half the price of buying them from these companies. I also scored a good pair of rotors free from a friend in our local muscle car club who upgraded to slotted and drilled rotors on his T/A.
06-20-2011 #28
Registered User
- Join Date
- Jun 2011
- Location
- St. George, Utah
- Posts
- 1,629
More parts and art...
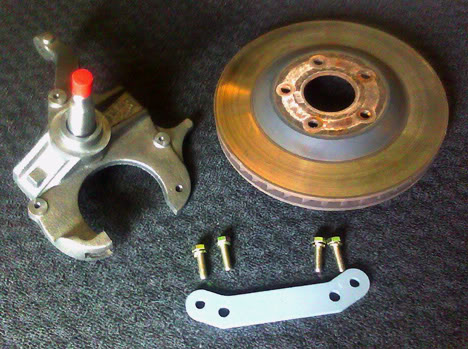
For the car's interior I definitely want to get rid of the bench seat. During hard cornering it doesn't give much support, the cover is pretty banged up, and it doesn't match the rest of the build at all. I considered getting some seats from Summit Racing, they have the Summit brand seat for $149 and the lower line Procar for $156, but I was concerned that the lower end seats may not be fantastic quality and I wanted something unique. With having worked last year as an apprentice in an upholstery shop I decided to find a used seat I like and customize the covers.
I'd love to keep my car all GM, but as I went through the local wrecking yards it's difficult to find a GM with a real performance type seat. Seems a lot of the seats are made to compensate for big Americans and my somewhat smallish 5'-10" and 160 lb size didn't fit snug in anything. Then I stumbled upon a '98 Mazda MX3 in the import section. After sitting in the seat I knew these were the ones. They fit me like a glove, have great supports to keep me planted while cornering and I like the hole under the headrest so I can run a 5-point harness through for seat belts.
The driver's side foam is beat up just a little but that's very easy to fix. Other than that they're in decent shape and a great base to start with. Not bad for $50 for the pair. The plan is I will remove the covers, take all the seams apart, using the old panels as a pattern cut out the new material and then have my old boss sew it all together. He offered to let me run the machine but I want perfect lines and curves so I'd rather the guy with 25+ years experience do the sewing. When he's done I'll assemble them back together and build custom mounts to bolt them into my floor pan. Doing a lot of the work myself I should be able to have the front and back seats done for about the same cost or less than the pair of Summit seats.
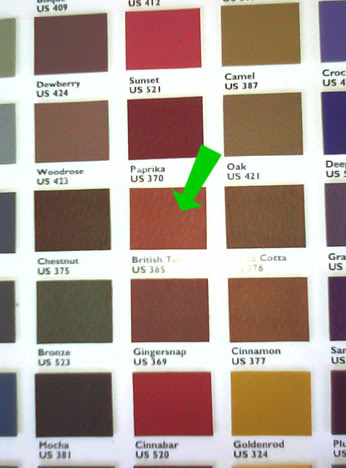
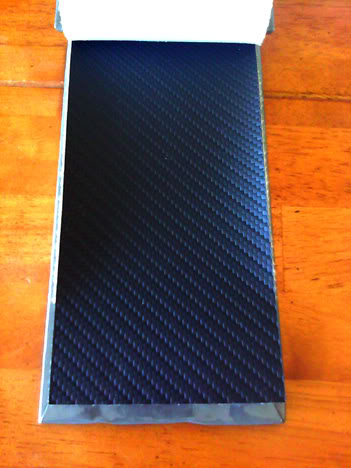
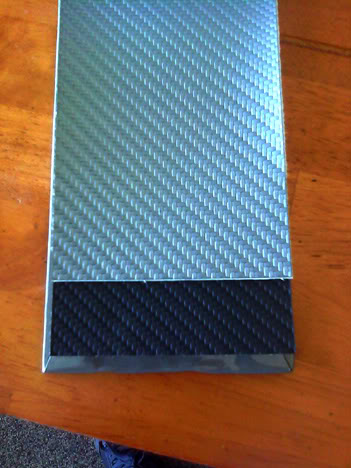
Here are the materials I'm considering. I took a paint chip book with GM 2008 Avalanche orange over to the upholstery shop and we found that his British Tan was a fairly close match. I also looked at some black vinyl with the same grain as the tan, as well as some "carbon fiber" pattern vinyl. These are all high quality products and will last for years to come.
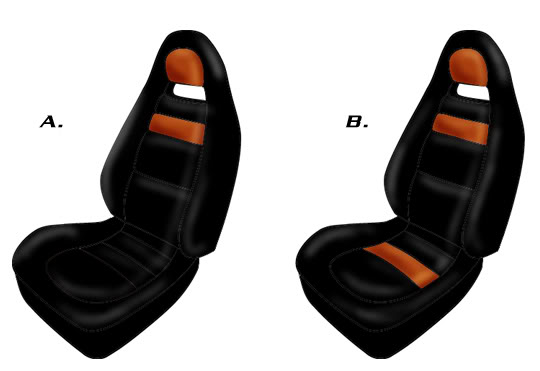
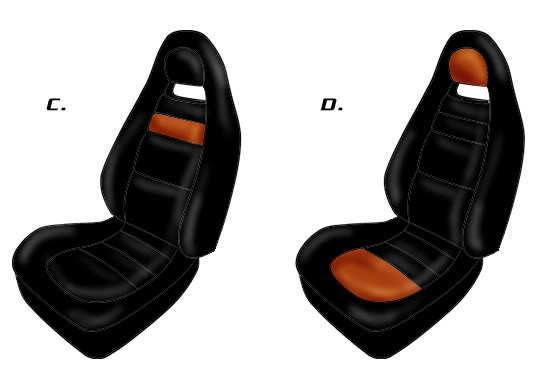
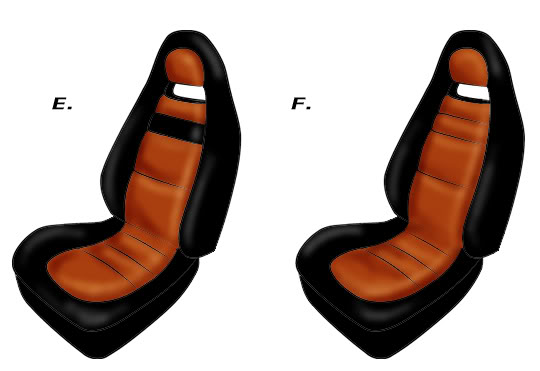
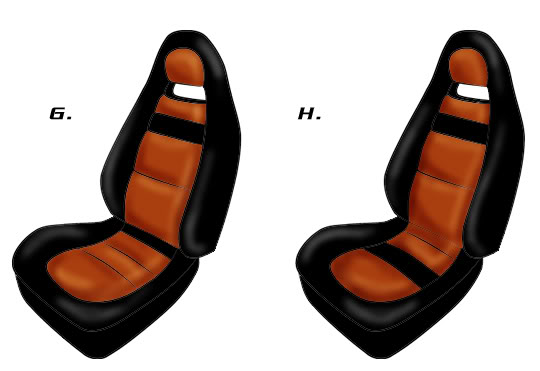
Here are some design ideas I was toying with. So far I think I'm liking A, B, E, & F the best.
I like A & B because they're mostly black and have a bit more aggressive look. The outer perimeter will be smooth vinyl and the center black area will be carbon fiber pattern.
C & D- a couple more mostly black variations.
E & F I like because they would really brighten up the interior. I need to do a paint spray out card first before deciding on these, if the tan didn't actually match the orange very well it would be a big mess. If that were the case having just a small accent strip like A would be a better choice.
Another variation of mostly tan center.
Finally a different color combo. With the car being black and orange I will be using brushed aluminum and silver as my accent color. In this variation I'd use smooth on the perimeter and both silver and black carbon vinyl on the inserts. After seeing this one I decided I'd rather stick with the tan to tie it into the exterior a little more.

Feel free to let me know what you all think.
06-20-2011 #29 Registered User
- Join Date
- Jul 2008
- Location
- ohio
- Posts
- 1,135
looks good i like e or f also
keep the wheels a spinning and the Beavers a grinning (burt reynolds-smokey and the bandit)
06-21-2011 #30 Registered User
- Join Date
- Dec 2006
- Location
- SF Bay Area
- Posts
- 456
I think I'd go with E or F too. If one of your goals is to call attention to your skills, it's better to go with a choice that wouldn't be mistaken for an off the shelf solution.
Nice build!chunger
'68 Ranchero 500
'70 Cougar XR-7 Convertible
'98 Mustang GT Convertible
06-21-2011 #31
Registered User
- Join Date
- Dec 2008
- Location
- Lehigh Valley Pa
- Posts
- 1,269
I like B.
1996 Federal Cadillac hearse
1988 Eureka Chevy hearse
06-21-2011 #32
Pro-Touring Veteran
- Join Date
- Nov 2006
- Location
- Washington, MO
- Posts
- 2,363
I like B or H.
Also, I did the same thing, I went with LS1 stoppers on a g-body spindle but used a 3" drop spring from OPG and a Stage I kit from Marcus.. very happy with that setup. I am running tubular lowers which can accomoadate a coil over in the future if I ever go that route..
Do you have any plans for the rear disc's? I'm running the 7.5 rear and need to find some options and mine is lowered back there about 3" too. I'd like to run a parking brake there as well... let me know your thoughts or plans if you have any!
06-21-2011 #33
Registered User
- Join Date
- Jun 2011
- Location
- St. George, Utah
- Posts
- 1,629
Speedway Motors has several options for rear discs. They're into "metric chassis" (g-body) circle track racing so their prices are such that a racer who brakes parts all the time can afford to buy new ones. I.E they're mostly less expensive than speed parts vendors for the same parts, sort of like the Costco of speed parts. I haven't had much success with their tech department though, every time I've called them they treated me like I'm an idiot when I tell them I'm putting their parts in a street car. :( If you know what you want and don't have questions they're a great resource.
Ultimately I want to run an LS motor. Eventually it will be turbo'd. My dream is to go and be competitive in the Holley LS fest. I can't afford that now but I can sink a few bucks into the rear suspension. Part of my classes is narrowing rear ends so I will be getting a 9" Ford. There's lots of trucks in the wrecking yards here. Several are 70's Ford trucks so landing a 31 spline with a locker for cheap is a pretty good possibility. I'm planning to grab one to narrow, get a control arm bracket kit from Speedway, and do a weld on disc kit. They have one style kit I like for $150- $200 depending on the rotor hat backspacing I choose. It comes with weld on brackets, hats, and rotors. The kit uses G-body front calipers which I will happen to have a spare set of. They charge about $60 more if you want calipers and pads. The rotor is 11.75" and will match the front rotors pretty well. No provisions for e-brake so I will plumb in a manual hydraulic unit. They do have other kits with built in e brakes though, both the Caddy/ Trans Am spring style (which everyone says are junk) and the small drum inside the rotor style. Again I hate to admit it but cheap is good for me and my student budget so the kit I picked works well in my case.
S10s also run the 7.5 rear. Try a google search for S10 /LS1 F-body Rear brake swap for another inexpensive large brake swap route. I've seen those guys use those more and more. I've also seen several wrecked S10s in the yards with factory rear discs. Mostly what I see are 4x4's, not sure if there's goofy offsets to deal with or not. The Extreme S10 is a 2 wheel drive that came with rear discs, but they're prolly rare in wrecking yards. I'd imagine you can find out more about using factory S10 rear discs on those S10 forums. Hope this was helpful.
07-16-2011 #34
Registered User
- Join Date
- Jun 2011
- Location
- St. George, Utah
- Posts
- 1,629
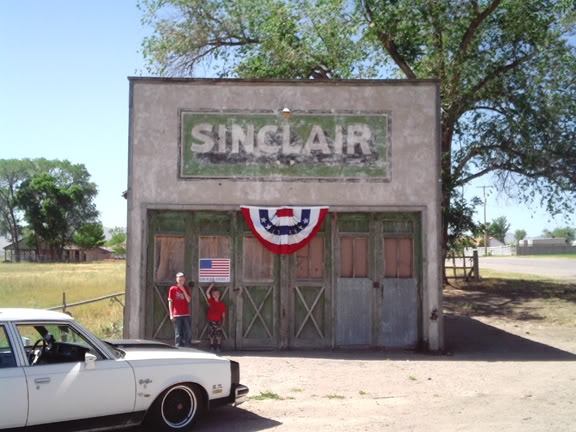
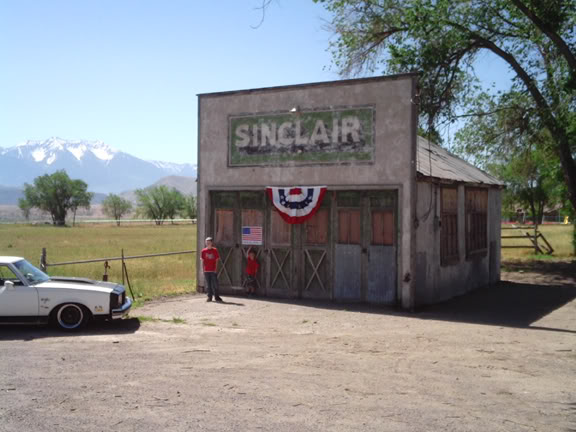
A couple new pics...
Took my 2 boys up to the mountains camping a couple weeks ago. We drove through a few small towns on the way and I came across this little gem, an old Sinclair gas station. Pretty cool find- I love old gas stations and diners. We also had a great time camping.
07-16-2011 #35
Registered User
- Join Date
- Jun 2011
- Location
- St. George, Utah
- Posts
- 1,629
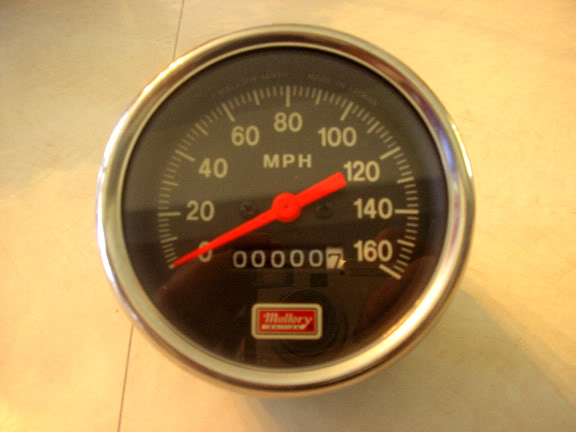
160 Speedo!
My goal is to be able to eventually get the car into the 140mph club. I've been wanting to upgrade my 85 speedo to something more accurate to the car's abilities and I recently scored this from Ebay, just under $17 dollars including shipping, new and never used! You guys remember Mallory selling gauges back in the 80s and 90s?
It's old and had a little surface rust on the back side, but it's perfect and brand new inside. I will be incorporating it into the factory gauge layout to make it look factory stock.
07-16-2011 #36
Registered User
- Join Date
- Aug 2010
- Location
- nebraska
- Posts
- 86
I live this car/build. On a budget and do it yourself, learning as you go.....you inspire me.
1994 Caprice Station Wagon
07-16-2011 #37
Registered User
- Join Date
- Jun 2011
- Location
- St. George, Utah
- Posts
- 1,629
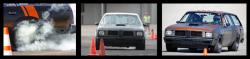
More Track Videos!
I went to the local track's open track day this past Wednesday to try out the new rear sway bar and get one last set of runs in before I tear into the suspension and change things around.
Unfortunately I had two problems with the car, the alternator quit charging on the way to the track and for some reason the right front caliper was grabbing harder than the left. You'll see in both videos how that caused the right front wheel to lock up and slide under hard braking. Got kinda scary at one point on the road course. I have a flat spot on the right front tire now, kinda sucks but at least I planned on upgrading to 17s in the near future.
After the 406 broke a valve spring I yanked it and slipped the factory 305 back in so I could keep the car drivable while I build the 406. I put in a mild Crane 266 cam (.440 lift) and all the intake and exhaust accessories from the 406. Here's a shot of the engine as it is now.
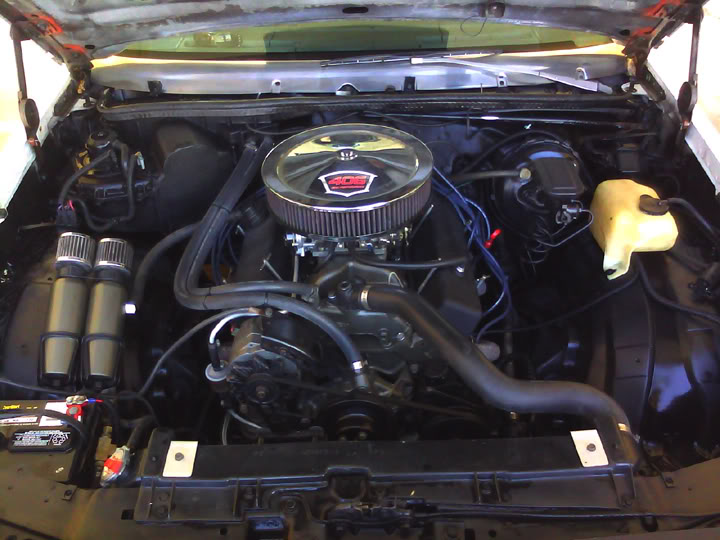
The motor runs great and lays down 21 mpg with a TH350 (no overdrive) but my guess is that the stock 140 hp is prolly only up to 170-180. Backed by factory 2.41 gears you can see it's lengthy acceleration on the track and I am so looking forward to the torquey TPI 406 I'm putting together! The cones on the course are to keep the newbies and stock handling cars from going too fast. Kinda lame but it keeps everyone safe.
Roadcourse 2
Because the alternator went south I decided to head over to the autocross course where the lines are usually short rather than having to keep asking for jump starts in the road course line. I got in line and the officials decided to take about 10 minutes to discuss something while we all waited in line. I kept the motor running and the electric fan and such were running the battery down. Finally after they started racing us again and I was on deck the battery was low enough that the fan quit working and the car started to heat up. It was at 240 degrees when it was my turn so knowing this would probably be my only run I went all out. Because I wasn't familiar with the course and I was stressed about the run I saw the cones in the background of the first hard turn and got disorientated. Completely blew the run but it was fun. I spent the rest of the evening fiddling with the alternator and found a wire in the harness that came loose from the connection. Got it repaired and headed home.
Autocross 2
Despite the problems, I had a good time and felt a definite improvement in stability with the sway bar outback.
07-16-2011 #38
Registered User
- Join Date
- Jun 2011
- Location
- St. George, Utah
- Posts
- 1,629
Thanks Chad!
07-16-2011 #39 Registered User
- Join Date
- Aug 2007
- Location
- Tennessee
- Posts
- 499
The wagon is looking good SRD, I just picked up a 83 Malibu wagon this week. Im looking forward to seeing more of your progress.
07-18-2011 #40
Registered User
- Join Date
- Jun 2011
- Location
- St. George, Utah
- Posts
- 1,629
You've got a great line up there already, a cool wagon will fit nicely. Make sure you start a build thread!
Tags for this Thread

 Reply With Quote