Results 1 to 20 of 29
-
04-29-2011 #1

 Registered User
- Join Date
- Feb 2002
- Location
- Santee, CA
- Posts
- 387

Push Button Start (Advanced Keys)
I know there are a number of threads on the topic of push button starts. I thought I would post some information on the system that I used on my 1969 Camaro.
I drive a 2006 Infinity to work every day and wanted something that worked similar. I really like the Infiniti switch so wanted a solution that would allow me to use the same button. I also didn't want one of these systems that requires you to push and hold the button to turn over the starter (wanted tach sensing)
This is what I used:
- AK-PSB03 Push Button Start from Advanced Keys ($170)
- CMD-X Remote Accessory Controller from Dakota Digital ($200)
- Infiniti Start Button from local Infiniti Dealer(~$50)
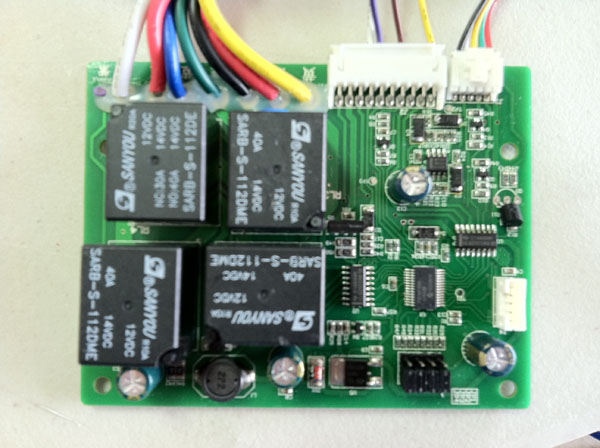
- Relay module using 3 Radio Shack 275-241 Micro Relays (~$20)
I had already decided to go with the CMD-X module since I shaved my door handles and needed some way to open the doors. I decided to use button 1 to arm/disarm the ignition and buttons 3 & 4 to pop open the doors (only button 1 & 2 are operational when the ignition is on). Note that Advanced Keys also has an RFID solution for about another $100 that could be used instead of the CMD-X
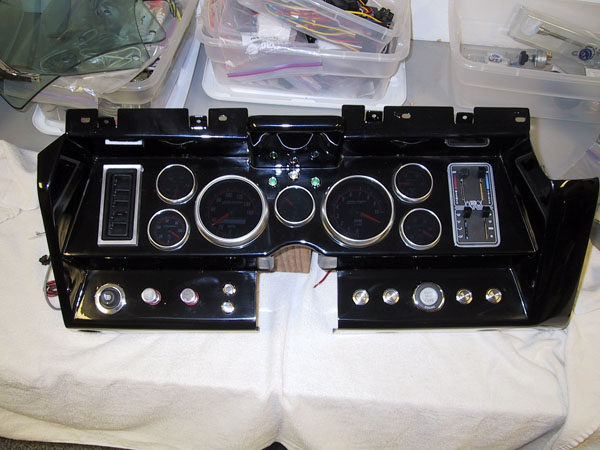
Here's a picture of what the inside of the Push Button Start Module looks like:
and here's the Lexus button that ships with it:
I didn't care for the Lexus button and instead wanted to use an Infiniti Button. I built a small relay module to control the indicator lights based on the IGN and ACC circuits:
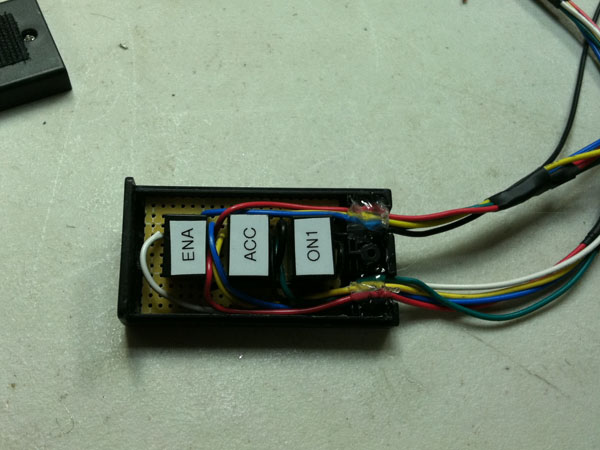
When I push Button 1 on the remote, the ignition switch is enabled and lights up. Pressing the button once will switch to Accessory mode and a second time will turn the ignition on. If you push the button while pressing the brake (doesn't matter if Off, Acc, or Ign), it switchs to Ign On and enables the starter. The unit has a tach sensor so you only have to momentarily press the button to start the car.
To help with testing, I installed a small micro switch in the back of the PSB module wired to JP1 to be able to take it out of tach sensing mode.
I uploaded a video of a mock-up test to YouTube.
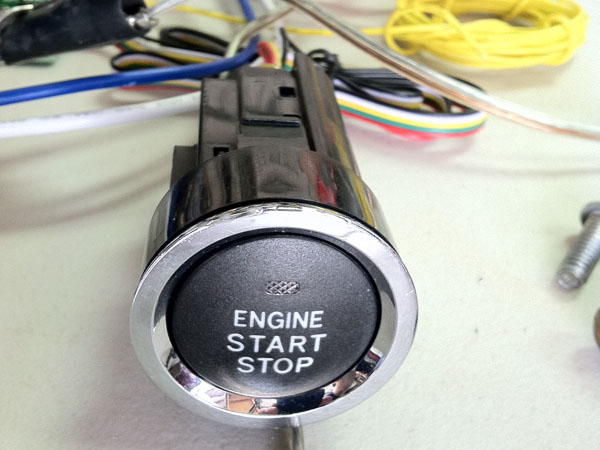
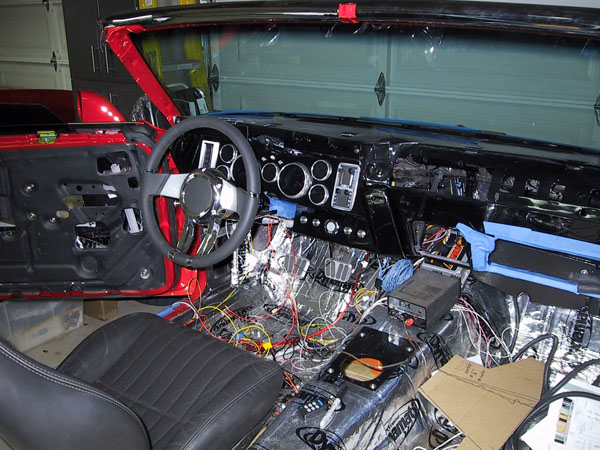
The Infiniti switch was a pain to install (odd shaped hole), but the end result came out pretty nice:
If anyone needs pinouts or wiring diagrams, just let me know. ---Eric
-
04-29-2011 #2 Registered User
- Join Date
- Jun 2009
- Posts
- 651
Very cool
Dan W
1968 Plymouth Road Runner
1962 Dodge Dart 440
05-01-2011 #3
Registered User
- Join Date
- Mar 2008
- Posts
- 21
Very nice. I'm using an ISIS harness and realize it'll do the basic push button, but following as I'm not sure how "factory" it will operate (LEDs, tach sensing, etc.)
This looks dead on. Great job and definitely what I am after.
05-13-2011 #4
Registered User
- Join Date
- Sep 2005
- Location
- Woodstock, Ga
- Posts
- 695
Very nice write up.
Robert
05-13-2011 #5 Registered User
- Join Date
- Dec 2009
- Posts
- 1,607
Very nice Eric. What happens if you forget to push the remote disable when you exit the car? Can anyone just hop in and start it up?
Ron in SoCal
69 Camaro in progress
http://www.lateral-g.net/forums/showthread.php4?t=31246
Used to be known as flash911
06-23-2011 #6
Registered User
- Join Date
- Feb 2002
- Location
- Santee, CA
- Posts
- 387
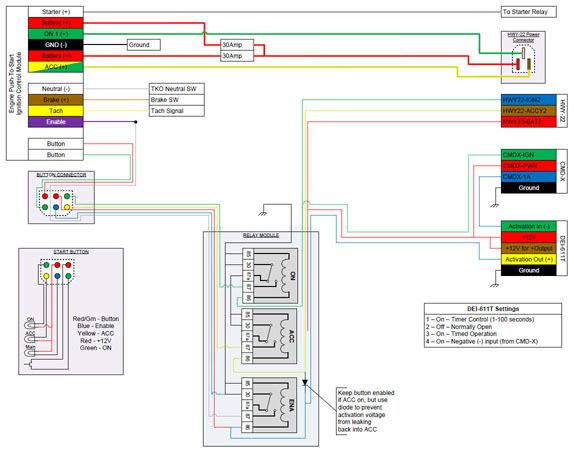
Modified circuit for timed enable
Sorry for the delayed response...work got crazy, then they sent me to Taiwan for a few weeks. Couldn't wait to get back to the project though. Originally Posted by Ron.in.SoCal

Yeah, if you forget to push the button on the remote, then the car is still "enabled". I was originally willing to accept this, but it's been eating at me and I finally decided to do something about it.
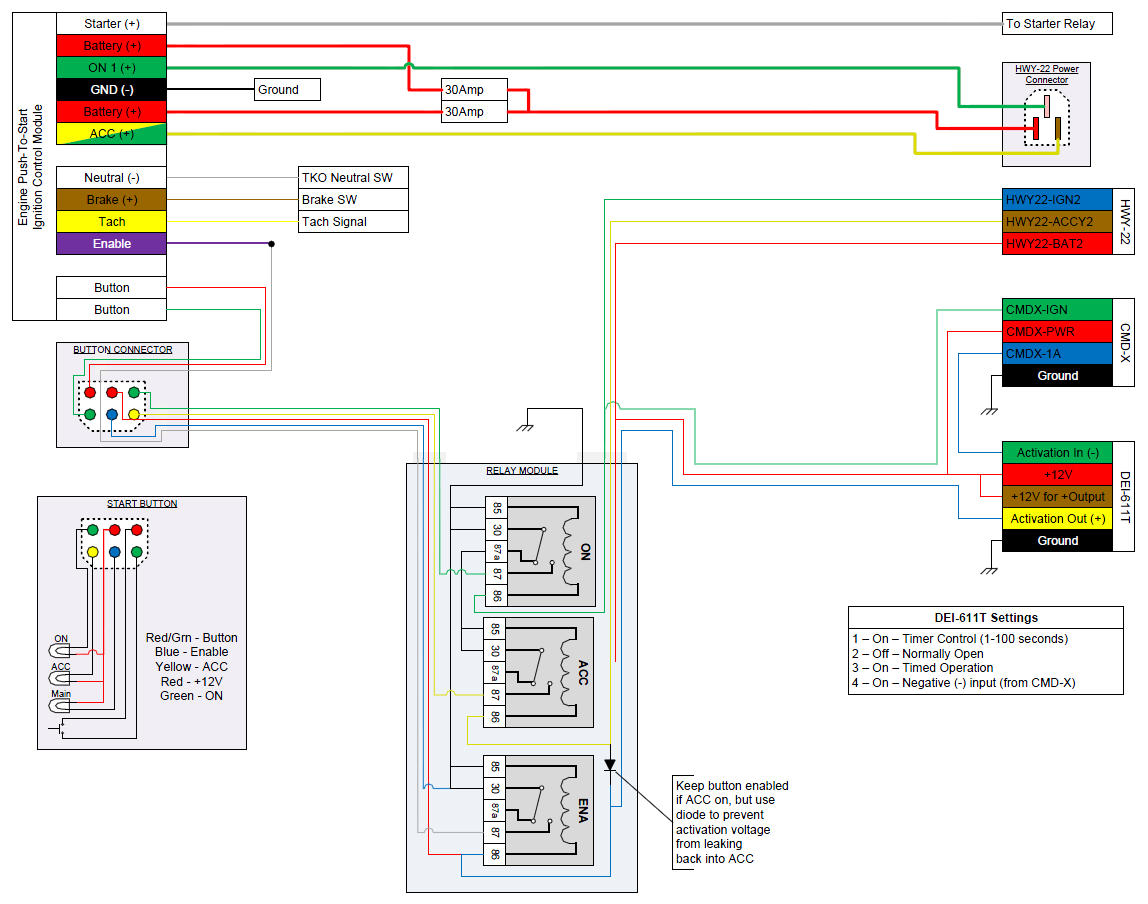
I recently purchased a DEI-611T timer module on eBay for around $20 (w/shipping). Instead of using the CMD-X to activate the push button module, I changed my setup to instead have the CMD-X activate the 611T timer module. The timer module then provides a timed "enable" signal to the PSB module. I also changed the relay module so that the enable from the 611T would be a +12v instead of ground (like the CMD-X). I then wired in a diode so that enable would be kept active by the ACC circuit.
This is the way it works now:
- Push the enable button on the remote and the push button lights up for 0-100 seconds (I have mine set to around 30 seconds via the adjustment on the 611T)
- If the button is not pushed again, it will turn off after the 30 seconds
- If the button is pushed within the 30 seconds, it will switch ACC to on. ACC will stay on indefinitely or until the button is pushed again
- Another push will turn on the ON (ignition) circuit and light up the ON light (ACC turns off). This will also stay on indefinitely or until the button is pushed again.
- Pushing the button a third time will turn off ACC and ON. If this is done within the 30 seconds, the button will still be enabled and can be pushed again, if not, then the button will go dark and the system will be disabled.
Kind of hard to explain, but I plan on updating the Youtube video with a walk through this weekend.
The DEI-611T needs to be setup as follows:
SW1 On Timer Control (1-100 seconds)
SW2 Off Normally Open
SW3 On Timed Operation
SW4 On Negative (-) input (from CMD-X)
Here's a schematic of the setup (Click for a larger link). If anyone needs a better copy, I can send them a visio or PDF copy.
06-25-2011 #7 Registered User
- Join Date
- Dec 2010
- Location
- Gaston, SC
- Posts
- 105
that looks awesome. What is the diameter of the lexus button? Is it close to the diameter of the original key? I wouldn't mind installing this in my 64 chevelle.
Milan
1964 Chevelle SS
06-25-2011 #8 Registered User
- Join Date
- May 2002
- Location
- Northern California
- Posts
- 10,716
nice work, can you post the part number for the Lexus start button.
MrQuick ΜΟΛ'ΩΝ ΛΑΒ'Ε
06-25-2011 #9
Registered User
- Join Date
- Dec 2009
- Posts
- 1,607
Bravo eSenior! I like that much better...
Ron in SoCal
69 Camaro in progress
http://www.lateral-g.net/forums/showthread.php4?t=31246
Used to be known as flash911
06-25-2011 #10 Registered User
- Join Date
- Mar 2008
- Location
- Ramona, Ca. San Diego area
- Posts
- 1,307
show off!!

His car is so bad ass. a ton of attention to detail.67 Camaro convertible (Jinx)
06-26-2011 #11
Registered User
- Join Date
- Feb 2002
- Location
- Santee, CA
- Posts
- 387
The button is 40mm. Probably a lot bigger then your 64 Chevelle key. By the way, if you are mounting the button in sheet metal, do NOT purchase the bit from Advanced Keys. Might be ok for plastic, but won't go through sheet metal. Originally Posted by mplecha
Not sure since the Lexus button came with the kit from Advanced Keys. But it's the same button listed here on eBay: Originally Posted by MrQuick
http://cgi.ebay.com/ebaymotors/ws/eB...m=360339322036
Thanks....but it wouldn't be "bad ass" if it weren't for my painter doing such great work! Originally Posted by 67 ls1 vert

10-30-2011 #12
Registered User
- Join Date
- Oct 2011
- Posts
- 1
Is there a way to reconfigure lights on the button?
What i want is:
When the system is armed: no light or backlight.
When the system is unarmed: backlight on and solid yellow light.
When the ignition is in pos1 (acc) or pos2 (on): backlight on and green blinking light.
When the engine running: backlight on and solid red light.
Is there a way to make this work?Last edited by kentivar; 10-30-2011 at 10:27 PM. Reason: Typo
11-22-2011 #13
Registered User
- Join Date
- Feb 2002
- Location
- Santee, CA
- Posts
- 387
If you use the Lexus button, out of the box, the lights work like this: Originally Posted by kentivar
Off - No Lights
Ready (Activated) - Amber LED
ACC (1st Push) - Greed LED
ON (2nd Push) - Flashing Green
Brake Pressed (Ready to start) - Flashing Amber
Start (Brake & Push Button) - Text Lights up
I wanted something different so I used the Enable, Accessory, and Ignition signals to control how the LEDs light up. Could do something similar, or contact Brian on the advanced Keys site. Just post your question in their forum. Usually takes a day or 2 to get a response. Good luck!
11-23-2011 #14 Full Blown G-Machiner
- Join Date
- Sep 2010
- Location
- alpine ca
- Posts
- 657
i know who to call when i need help wiring, wait till your phones go out than who ya gonna call hahaha happy gobble gobble day
john1972 NOVA SPEED TECH TORQUE ARM AND FRONT ARMS , RUSHFORTH NIGHT TRAINS, DRIVERZ INC
BUILD LINK
https://www.pro-touring.com/showthre...t-(GREY-MATTER)
12-13-2011 #15
Registered User
- Join Date
- Oct 2006
- Location
- Las Vegas, NV
- Posts
- 226
Hey Eric, great write up. Nice work but looks way to technical for me.
However, on a different note, where did you get your vent controls? I like those and looking to get something like that myself.
12-14-2011 #16 Registered User
- Join Date
- May 2011
- Location
- central Pa, USA
- Posts
- 189
Excellent system/writeup, one question though, you said buttons 3/4 (doors) only work when the car is off, what if you want to get in or out while its running?
Tom
trailers are for boats and broke stuff.
12-26-2011 #17
Registered User
- Join Date
- Feb 2002
- Location
- Santee, CA
- Posts
- 387
Sorry for the delay in response (things got busy). Originally Posted by Carbo
The vents are Vintage Air 49058-VUQ. They are a plastic vent with an aluminum bezel and are 2" x 4.25". Hope that helps!
Yes, something I need to be aware of, but not something I am overly concerned about, especially since it is a convertible and doubtful the top will ever be up. This is a safety feature built into the CMD-X to prevent things like doors from popping open while driving down the road because you're sitting on the remote. Originally Posted by grenade inspector
If this is a concern, you can always leave the ignition wire disconnected from the CMD-X, but then you would need to worry about functions happening while driving down the road. A better approach would be to run the ignition line to the CMD-X via a relay with the Neutral safety switch. This way buttons 3-6 are only inoperable when the ignition is on and the car is not in neutral.
01-10-2013 #18
Registered User
- Join Date
- May 2007
- Posts
- 228
I know that I am ressurecting this thread, but I had a quick question; I am getting the parts together to do this, and while I think Ihave found the right switch (won't know for sure till it comes) from my local Infiniti dealer, the parts guy told me that the plug was not available; only as a part of the whole harness. How did you get the plug, or did you at all? I'd really like to get this to be as factory as possible, and the right plug is a large part of that.
I have another question that I think that you might be able to help with, since it seems like you have a prety good head for wiring (quite a bit better than mine). I am using ISIS, and was wondering; if I use their transister board to convert the positive signal to a ground (which is what ISIS uses), would I be able to bypass the whole relay board if I converted the signal? I'm planning on using the same Advanced Keys kit as you used.
01-10-2013 #19
Registered User
- Join Date
- Jan 2012
- Location
- AMITYVILLE, N.Y.
- Posts
- 56
I purchased the whole kit from advanced keys and it comes with fob and push button start button, harness. Looks to be identicle to my Audi S5 botton. Make sure you buy the whole saw bit from advanced. Its the correct size which is I believe to be metric. I will be firing up the LS motor soon. Watch for my thread on the 68. I will post interior pics in about two weeks.
01-10-2013 #20
Registered User
- Join Date
- Feb 2002
- Location
- Santee, CA
- Posts
- 387
I also searched for the right plug and wasn't able to find one (other than buying the entire harness). I had a few extra cables laying around from some computer parts and I found that the header connectors (like what attaches the computer case to your motherboard) fit perfect. I used what I had (3 separate connectors), but a 10 pin connector (similar to an internal USB connector, but without the blocked pin) might work, however it won't snap into the button like the factory harness. Originally Posted by rossmacd
What I did was take the computer connectors and about 6" of wire and put a 6-pin connector at the end. I then plugged the small connectors into the button and hot glued everything in place. I ended up with a button without a 6" cable with a connector at the end so that I could easily install or remove the button.
I'm not familiar with the transistor board, but if it can convert a +12v signal to a ground signal, that should work perfect. Since the lights in the button are LED's and the common side is the positive side of the LED's, you have to control the lights by switching ground. Originally Posted by rossmacd
This is the schematic for the switch that I found in the Infiniti Service manual:
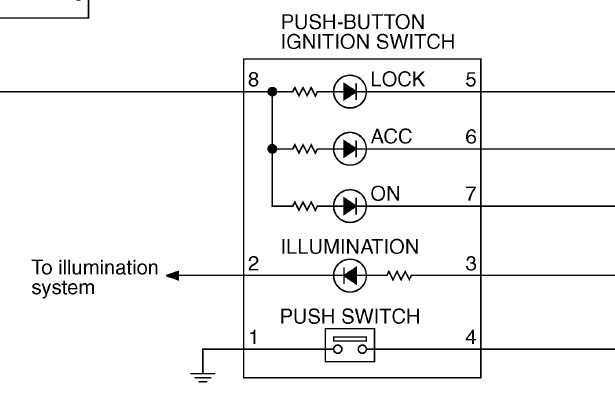
Using a 12v power supply and a lot of trial and error, I figured out the pinout for the switch as follows (as viewed from the back):

I can't recall off the top of my head which +12V signal is for the LED's and which is for the illumination (I wired them together), but it would be pretty easy to figure it out. The illumination might not be an LED (don't recall) and if necessary, you may be able to control it directly with a +12V signal. I tied my enable circuit to the button illumination so the entire button lit up when the system was enabled. I also used the ACC and On (IGN) lights, but didn't use the lock light.
Good luck, and let me know if you have any other questions. If you want to talk directly, just PM me and I'll give you my cell number. ---Eric
Tags for this Thread

 Reply With Quote