

Results 201 to 220 of 709
-
11-14-2012 #201

 Registered User
- Join Date
- Nov 2009
- Location
- the dirty mitten
- Posts
- 1,212

Thanks so much! I also have spent so much time on this website reading all the way thru a lot of build threads. I really like to find them when they are super long that way you get to see years worth of updates. Also very cool to hear about more AWD projects, you should let everyone see what you are working on.
Doing research on transfer cases, New Venture named them in a specific way. NV just means New Venture, the manufacturer's name. The first digit is the number of selectable speeds. A typical 4x4 has a 2 speed so they are usually labeled with a 2. The 147 is a non-shiftable unit which is better in this case because there is less weight, rotating parts and things to go wrong. It is still the same physical size however.
The second digit is the one that refers to the cases strength/torque handling abilities. The higher the number, the stronger the case. In the 90's trucks, a 231 case was VERY common to be had in just about everything. In this case, the 4 denotes a slightly stronger case. I however was never able to get an actual power/strength ability. If you want to hear a Hp/Tq number, I do not know that. If you find out, I would be interested to know but as of rite now I cannot say. I do know that the Jeep Grand Cherokee is not a light vehicle and the 247 transfer case is not a common failure point on regularly off roaded jeeps with v8's and big tires. All that being said, I would tip toe over the 500hp/tq range with much apprehension and probably reinforce the floor to protect you incase the case does blow.
The last digit if I remember correctly refers to either the type of clutch or slip assembly in the case. I do not know much about that one.
As far as I know, there is no NV -5- transfer case. I believe that you are left with either a 3 or a 4.
All that being said, I do not think that I will be running the 147 case in my car. It is rather large for one. The other reason is that it is built to run a drivers side front differential. Mine is on the passenger side. You can flip SOME transfer cases very easily just by mounting it differently. This is not one of them. These newer transfer cases have oil pick up's on the inside. You would have to figure out a way to do that. I do not believe that there is a 'kit' for doing that. Instead, I have the transfer case from a Cadillac STS-4, same car that my front diff came from. It is more compact, weighs a little less I think and just about the same in adaptability. By that, I mean that it is not just going to bolt up anyway so it does not much matter what case I choose, i will have the same issues with any one. For strength, I do not know. All I know on that one is that the STS weighs quite a lot and I have read about those car's making 400hp+ and no mention's of an exploding transfer case.
Cliff notes: the NV147 case appears to be relatively strong with not many know failures. If it will fit in your application, run it and see what happens! Hope that helpsSteve
1968 Dodge Charger All Wheel Drive project Red Bull<script type="text/javascript" src="safari-extension://com.ebay.safari.myebaymanager-QYHMMGCMJR/5cce6da5/background/helpers/prefilterHelper.js"></script><script type="text/javascript" src="safari-extension://com.ebay.safari.myebaymanager-QYHMMGCMJR/85dc54c0/background/helpers/prefilterHelper.js"></script><script type="text/javascript" src="safari-extension://com.ebay.safari.myebaymanager-QYHMMGCMJR/85dc54c0/background/helpers/prefilterHelper.js"></script>
-
11-15-2012 #202
Registered User
- Join Date
- Nov 2012
- Location
- SF Bay Area
- Posts
- 8
Thanks for the info. Yea I was wondering if you had a torque rating for that tcase. No worries, they are in pretty heavy vehicals for sure and I've never heard of one failing in a cherokee. The 247 comes behind the 5.2L V8 and as you said it is pretty heavy. I think it will do well for me. I'll start a thread once I finish my cutlass and start on my 57 stepside awd project. Keep up the good work, I'll be following closely.
11-15-2012 #203
Registered User
- Join Date
- Dec 2009
- Posts
- 261

Not sure how much parity there is across the case types, but the nv146 (last digit means clutch as opposed to viscous) is rated to 2200ft/lbs at the input.
11-15-2012 #204
Registered User
- Join Date
- Nov 2009
- Location
- the dirty mitten
- Posts
- 1,212
Wow, thats cool, thanks a lot for that info. My 1st gear is 2.66:1, so I guess I can make 800ft/lb rite!
Steve
1968 Dodge Charger All Wheel Drive project Red Bull<script type="text/javascript" src="safari-extension://com.ebay.safari.myebaymanager-QYHMMGCMJR/5cce6da5/background/helpers/prefilterHelper.js"></script><script type="text/javascript" src="safari-extension://com.ebay.safari.myebaymanager-QYHMMGCMJR/85dc54c0/background/helpers/prefilterHelper.js"></script><script type="text/javascript" src="safari-extension://com.ebay.safari.myebaymanager-QYHMMGCMJR/85dc54c0/background/helpers/prefilterHelper.js"></script>
11-16-2012 #205 Registered User
- Join Date
- Nov 2012
- Location
- Mendoza, Argentina
- Posts
- 4

Amazing work! really admirable quality of the work! I learned a lot reading this post!
11-22-2012 #206
Registered User
- Join Date
- Nov 2012
- Location
- SF Bay Area
- Posts
- 8
Sweet, thanks for the info ace! Gonna start my search for a tcase at a decent price.
11-22-2012 #207
Registered User
- Join Date
- Oct 2009
- Location
- Garland, Tx
- Posts
- 533
Wow, another first time thread sighting. Awesome project!
Eric.
'66 El Camino build thread
https://www.pro-touring.com/showthre...roject-CaMEANo
My car show pic blog
http://igotocarshows.blogspot.com/
11-22-2012 #208
Registered User
- Join Date
- Nov 2009
- Location
- the dirty mitten
- Posts
- 1,212
Thanks guys. I am hoping to get some more work done to it soon.
57 Chevy, I just started talking to George at RS gear about their AWD T-56. Seems like they use a custom output shaft and adapter along with a corvette trans adapter. I think you also have to use a forward shifter. The T case has to be a 27 spline also.
Sigh.....that I am stuck at work tonight......Steve
1968 Dodge Charger All Wheel Drive project Red Bull<script type="text/javascript" src="safari-extension://com.ebay.safari.myebaymanager-QYHMMGCMJR/5cce6da5/background/helpers/prefilterHelper.js"></script><script type="text/javascript" src="safari-extension://com.ebay.safari.myebaymanager-QYHMMGCMJR/85dc54c0/background/helpers/prefilterHelper.js"></script><script type="text/javascript" src="safari-extension://com.ebay.safari.myebaymanager-QYHMMGCMJR/85dc54c0/background/helpers/prefilterHelper.js"></script>
11-22-2012 #209
Registered User
- Join Date
- Nov 2012
- Location
- SF Bay Area
- Posts
- 8
Damn Dak you're doing all the hard work for me! Thanks a bunch man, I really appriciate all the info. That sucks that you gotta work today. Can't wait for your next update. Happy Thanks giving to everyone here!
12-03-2012 #210
Registered User
- Join Date
- Nov 2009
- Location
- the dirty mitten
- Posts
- 1,212
57 Chevy, I have been doing a lot of research lately for the transmission. I need to get it ready to go in very soon. Rockland has the setup if that is what you want to do. I have decided to save some $ and do it all myself. I will have to take the trans apart and install a front shift. I will also have to remove the main shaft and have it cut down and resplined for the transfer case. You will need a c5 corvette transmission extension housing and also a tail shaft to mount your transfer case to. I am then going to have the 2nd tail shaft cut down and welded to a plate that will bolt to the corvette housing. The shaft will have to be the correct length so that all works together nicely.
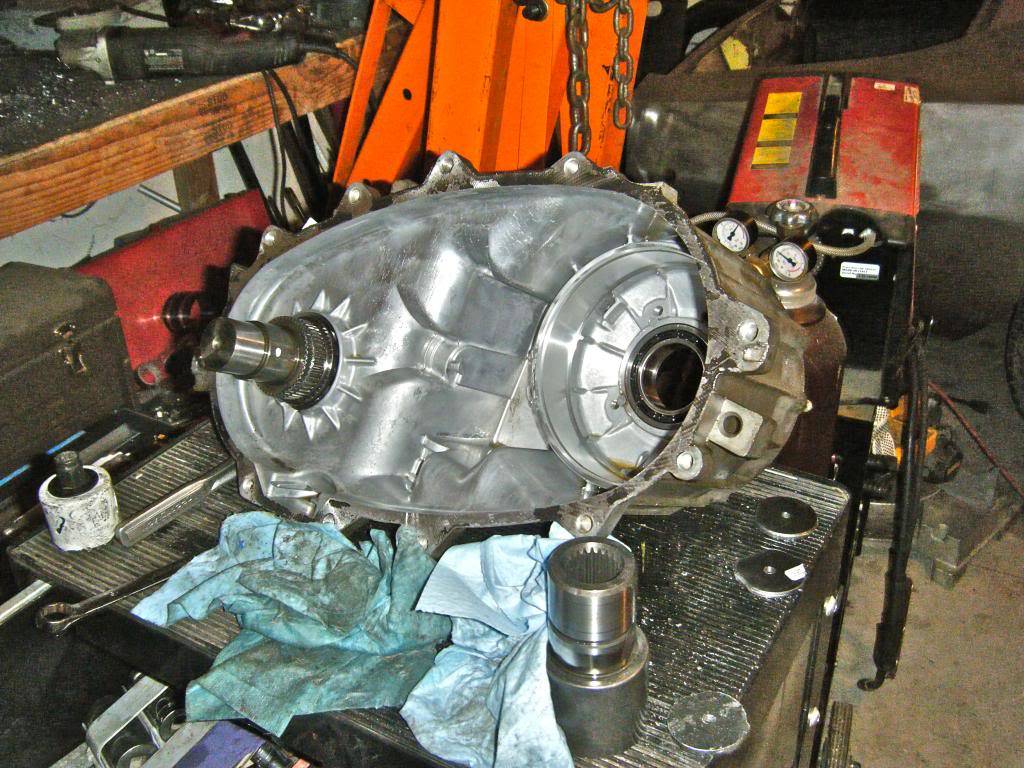
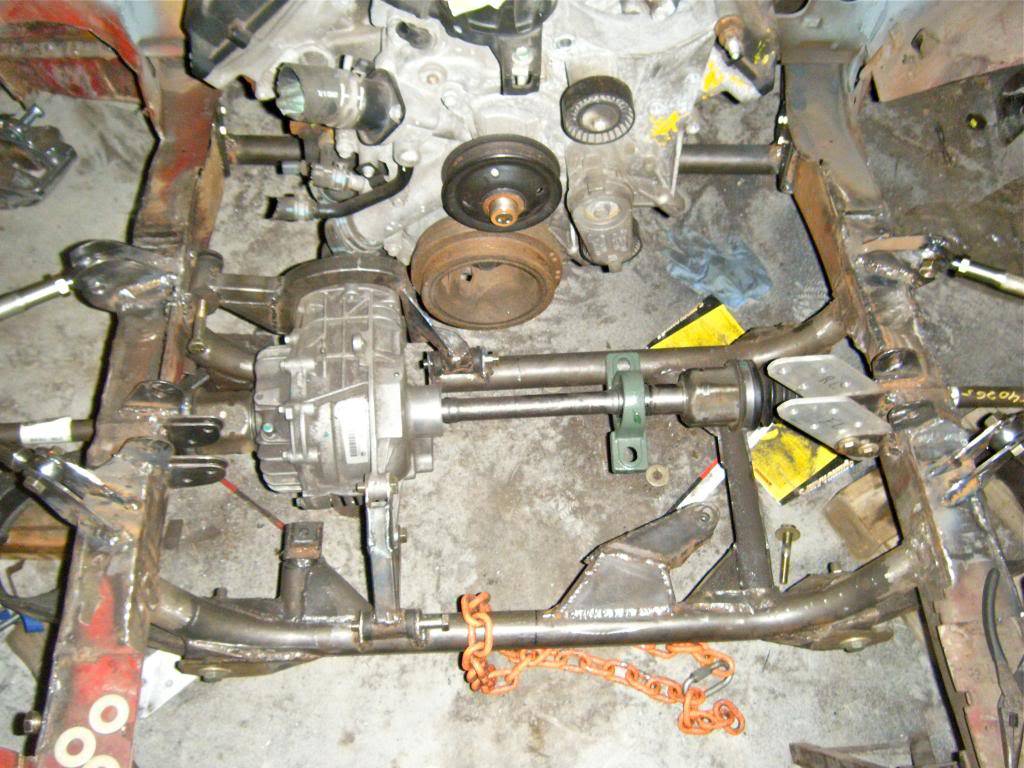
With that in mind, I needed to start to tear down my transfer case. I have decided to use the 147 I have. It is larger but I think it will work out better. This is a drivers side transfer case but after opening it up it does not look like it will be difficult to make it a passenger side one. Just the oil pickup, fill and drain plugs and the vent. I also wanted to get the input shaft out so I can take that to a machine shop once I get the t56 apart. Unfortunately this transfer case only has a 1 inch chain, I do not know yet if I can upgrade to something a little wider and stronger. I will deal with that later tho.
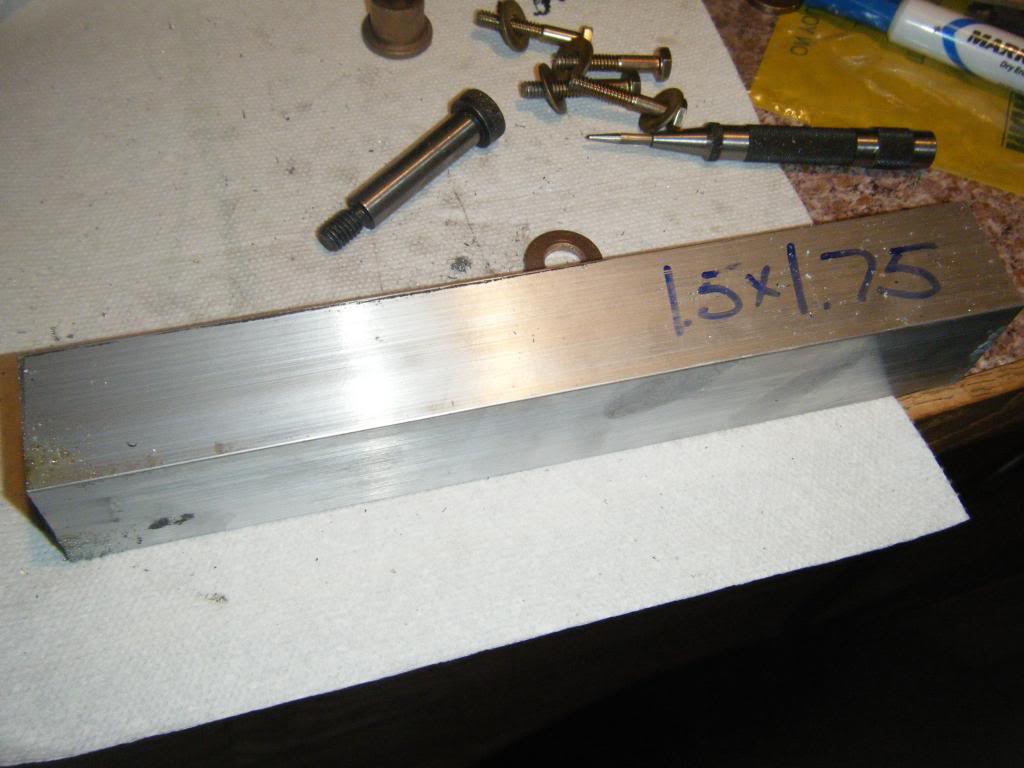
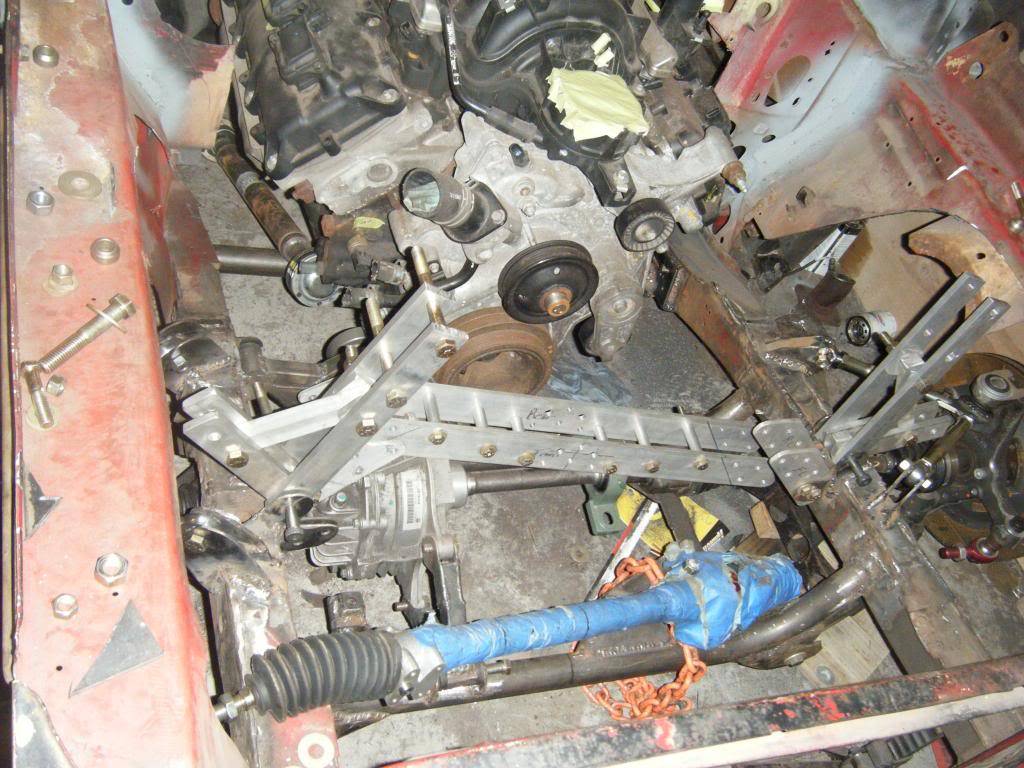
I also decided that I wanted to change my upper control arms to something that was more easily adjustable. I thought about this for months, trying to figure out something that i liked. I was trying to find a setup that used a bolt in ball joint flange but never was able to. Then I decided that I would just get a round threaded one and weld some plate into the inside of it, so that is what I did. There are 3 3/16 plates welded to each one.
I had big plans for the work I did over the weekend. I wanted to quickly install these new arms then work on finish welding in the front sub frame to the chassis. Well that did not go as planned. I got 1/2 x 5/8 rod ends for these new arms and they did not offer enough misalignment to fit in the brackets I already had made. I looked into 5/8 rod ends with high misaligment spacers but also did not want to go that route. I ended up deciding that I just had to for the 3rd time, change my upper control arm brackets. This time, I think I finally got what I want. The bad thing is that this took me all day and it ended up being the only thing I got done. I also spent a few straight hours with the grinder going and could barely see in the garage when that was done.
So the frame rails had to get naked again. You will also see the 30mm pillow block I got for the center shaft in another picture, I wanted to build its mount this weekend but didn't get to that either
Finally tho after all that work I basically was back to where I started with my new upper arms all connected. I even did a preemptive alignment to it, currently 1 degree of camber and 6 of caster. Also I hope you enjoy these pictures. My internet is HORRIBLE and took me 2 hours to load these up today!!
 Steve
Steve
1968 Dodge Charger All Wheel Drive project Red Bull<script type="text/javascript" src="safari-extension://com.ebay.safari.myebaymanager-QYHMMGCMJR/5cce6da5/background/helpers/prefilterHelper.js"></script><script type="text/javascript" src="safari-extension://com.ebay.safari.myebaymanager-QYHMMGCMJR/85dc54c0/background/helpers/prefilterHelper.js"></script><script type="text/javascript" src="safari-extension://com.ebay.safari.myebaymanager-QYHMMGCMJR/85dc54c0/background/helpers/prefilterHelper.js"></script>
12-19-2012 #211
Registered User
- Join Date
- Nov 2009
- Location
- the dirty mitten
- Posts
- 1,212
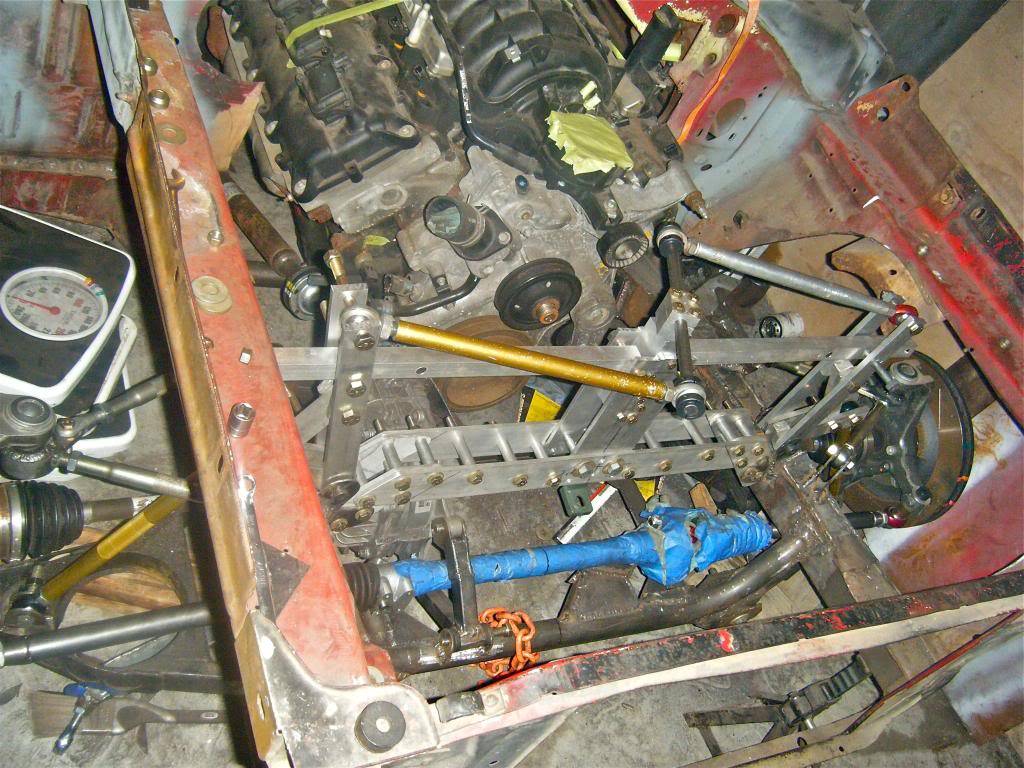
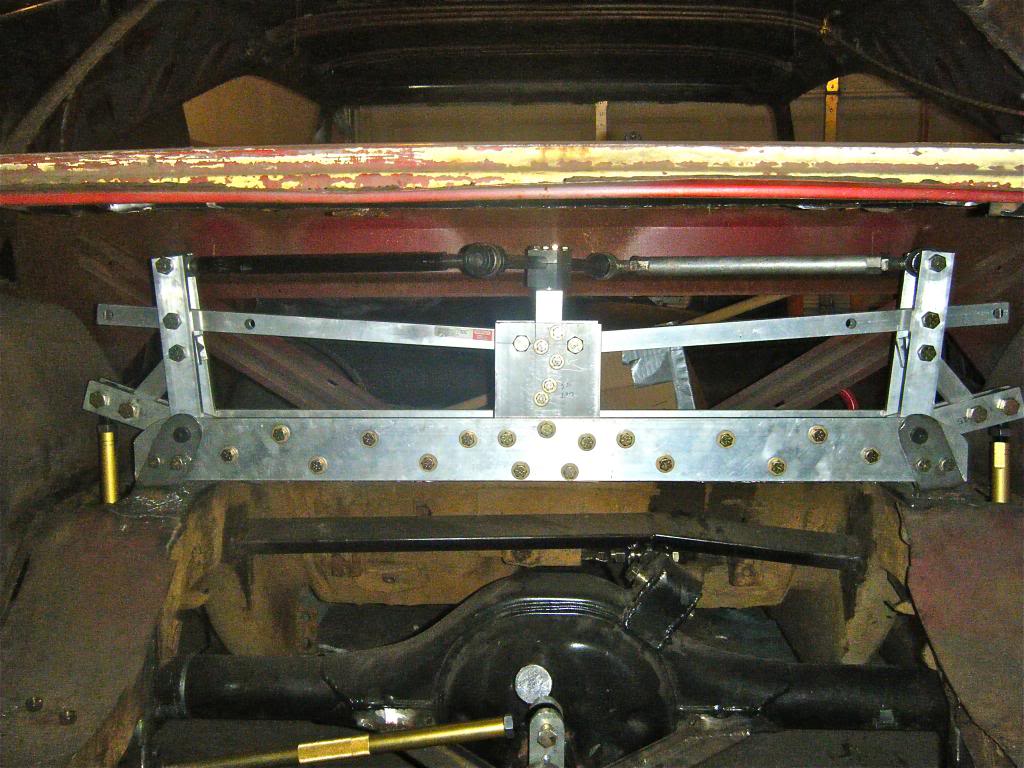
Another few days of work was done, again never seems like enough progress. I have been working on my sway bar setup. The conventional stuff seems to take up way too much room, weigh too much and well, I just do not like it. Adds to chassis flex if nothing else. So in keeping with my reinventing the wheel habits, here is the sway bar setup I will be running
I started with this
made it look like that

and put it there
I had to remake the one arm of my rocker however. They had to be longer for the new sway bar mount. Their height now should allow more than enough clearance for the coilovers to go in there
Longer arms were made for the front as well then that is as far as I have gotten. More to come in the next few days
The center bar that is the actual sway bar here is 5/8 inch 4340 bar. I know that it will be crazy rigid as it is now. I will have the center parts of the bar milled down to a specific vertical thickness at some point in the future. It will then be heat treated to keep a spring property to itSteve
1968 Dodge Charger All Wheel Drive project Red Bull<script type="text/javascript" src="safari-extension://com.ebay.safari.myebaymanager-QYHMMGCMJR/5cce6da5/background/helpers/prefilterHelper.js"></script><script type="text/javascript" src="safari-extension://com.ebay.safari.myebaymanager-QYHMMGCMJR/85dc54c0/background/helpers/prefilterHelper.js"></script><script type="text/javascript" src="safari-extension://com.ebay.safari.myebaymanager-QYHMMGCMJR/85dc54c0/background/helpers/prefilterHelper.js"></script>
12-24-2012 #212
Registered User
- Join Date
- Nov 2009
- Location
- the dirty mitten
- Posts
- 1,212
I did this while tapping my 2nd of 25 holes in that thick aluminum. Snapped my only 1/4x20 tap which kind of ruined my night. I read around online about how to remove it and finally came across this method. Everything else seemed very time consuming with either breaking the tap by smashing it to trying to drill it out with a bit that had to be of a much higher quality. Well I just welded a bit of material to the broken end of the tap then set a 3/8 hex nut over that, welded them together and the tap simply and easily turned out. Thankfully I had the tap in aluminum so no concern about welding to that. If it were in steel, it is still possible you just have to be more careful. Maybe even drill a hole the size of your tap into a penny (copper) so no weld gets onto that.
I also wanted to say that I got these Irwin taps from Home Depot. They have a straight shank just in front of the cutting teeth that make them go straight into the material. Much better than all the other taps I have that are just beveled on the ends. These will not thread all the way to the bottom of a hole because of that but they are so much easier to use!
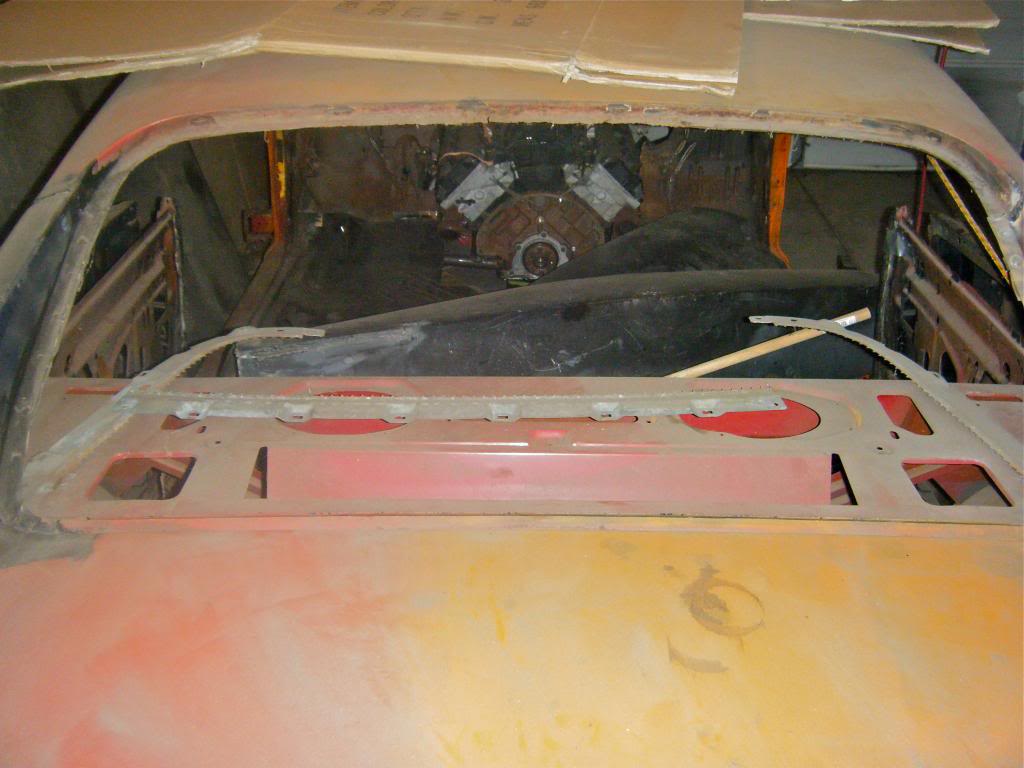
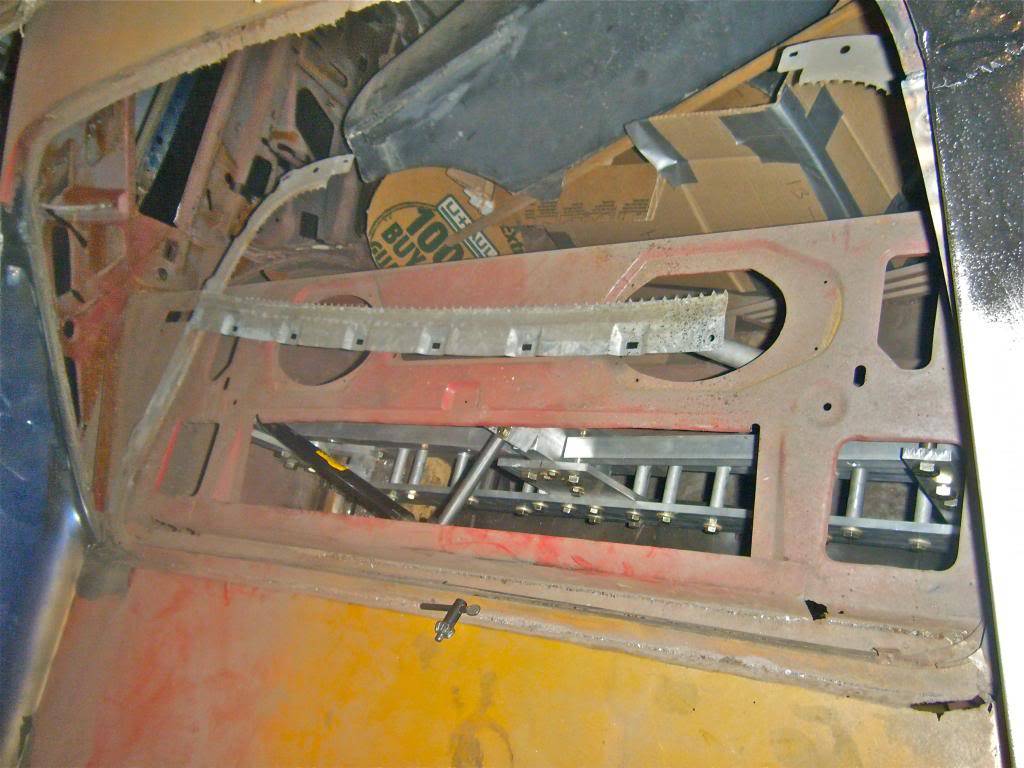
This is my rear package tray, most of it will be removed. You will see why in a little bit.
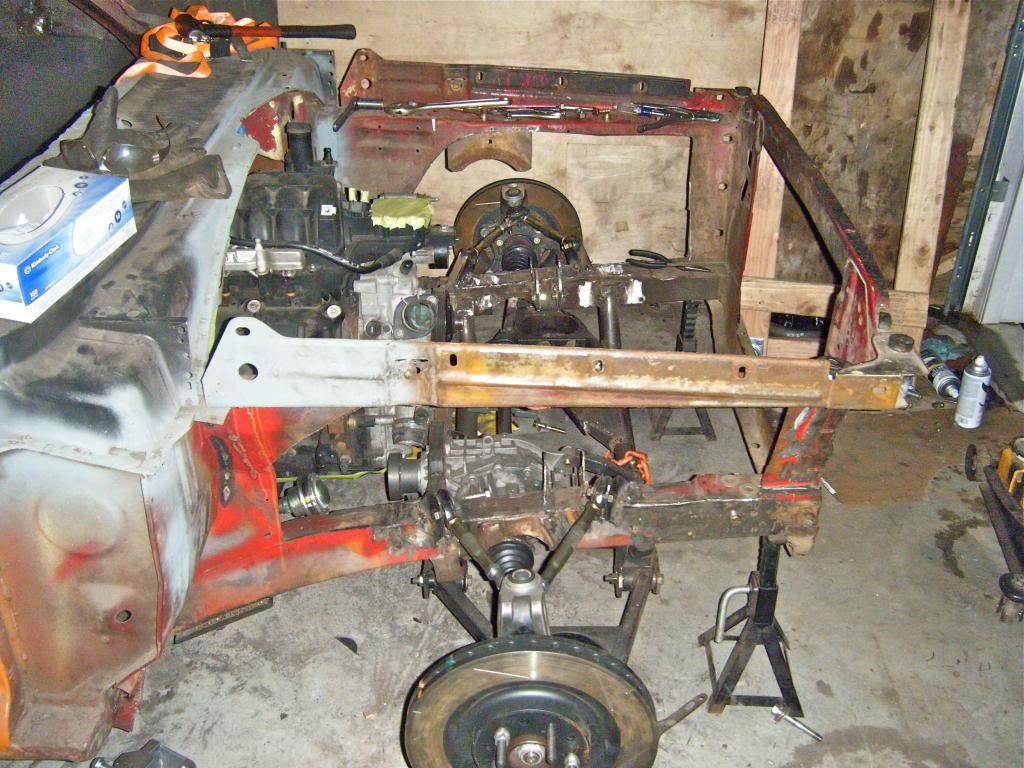
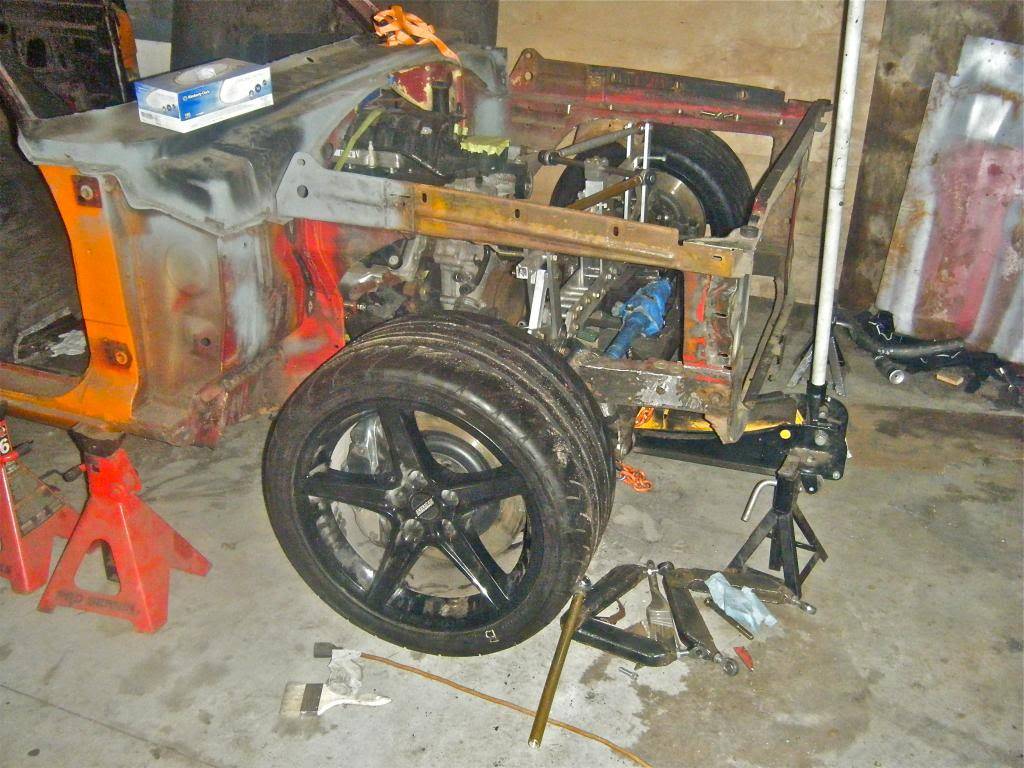
Here, you will see something quite amazing. It is a completed front suspension. It has taken me a very long time to get to this point but finally. I still have some more welding and bracketry to do but everything is here minus a pair of Ride Tech triple adjustable coilovers
I finished up the rear suspension as well. There used to be a large piece of sheet metal in this area. I am not really sure what it is for, maybe ease of assembly? Does not matter now since i had to cut it out to make room for the sway bar assembly
Here is why that package tray gets to go away. I am going to replace it with a large piece of plexiglass so that you can see what I built thru the back window
Finally I had to set the car back down on all 4 wheels just to do it.
I am currently working on the transmission and transfer case situation. Hope to have that wrapped up some time relatively soonSteve
1968 Dodge Charger All Wheel Drive project Red Bull<script type="text/javascript" src="safari-extension://com.ebay.safari.myebaymanager-QYHMMGCMJR/5cce6da5/background/helpers/prefilterHelper.js"></script><script type="text/javascript" src="safari-extension://com.ebay.safari.myebaymanager-QYHMMGCMJR/85dc54c0/background/helpers/prefilterHelper.js"></script><script type="text/javascript" src="safari-extension://com.ebay.safari.myebaymanager-QYHMMGCMJR/85dc54c0/background/helpers/prefilterHelper.js"></script>
12-24-2012 #213
Registered User
- Join Date
- Jul 2012
- Posts
- 96
constantly gets more intimidating, buy the way have you thought about the shifter location? just wondering because of how far back the motor is
Brandon
2003 f250 powerstroke 2/4 drop daily driver
1979 f250 crew cab on superduty axles
1947 dodge 5 window coupe
12-24-2012 #214
Registered User
- Join Date
- Nov 2009
- Location
- the dirty mitten
- Posts
- 1,212
Actually I am looking into shifters rite now. I will be using a forward shifter for this since I have a corvette tail shaft that will replace the Viper tail shaft. I also need to pick up a 27 spline t 56 main shaft. I think I will have to angle the shifter forward a little to get it closer to the steering wheel. Even in that forward spot, it will be a bit far back for me
Steve
1968 Dodge Charger All Wheel Drive project Red Bull<script type="text/javascript" src="safari-extension://com.ebay.safari.myebaymanager-QYHMMGCMJR/5cce6da5/background/helpers/prefilterHelper.js"></script><script type="text/javascript" src="safari-extension://com.ebay.safari.myebaymanager-QYHMMGCMJR/85dc54c0/background/helpers/prefilterHelper.js"></script><script type="text/javascript" src="safari-extension://com.ebay.safari.myebaymanager-QYHMMGCMJR/85dc54c0/background/helpers/prefilterHelper.js"></script>
12-24-2012 #215
Registered User
- Join Date
- Jul 2012
- Posts
- 96
i dont know if this would work or not but it just popped in my head, if you took a stock shifter and made a mount up where it is comfortable for you with a pivot point so that it is fixed in the center and then just send an arm back to the stock shifter so that it moves back and forth, side to side like a normal shifter, kind of uses the linkage effect of the old toploaders
Brandon
2003 f250 powerstroke 2/4 drop daily driver
1979 f250 crew cab on superduty axles
1947 dodge 5 window coupe
12-25-2012 #216
Registered User
- Join Date
- Nov 2009
- Location
- the dirty mitten
- Posts
- 1,212
Thanks, that is a good suggestion. That is for sure a possibility and I have done some research on it before. I have a few pictures of a setup like that somewhere, just not sure where. Basically you just need a ball and socket joint with a shift lever on it. Use the stock shifter in the stock location and put a hole in the top. Use 2 flat pieces of metal to tie then 2 together and put some bronze bushings in the holes with shoulder bolts. I may still have to build it depending on how I feel about the placement. I cannot use to stock shifter location tho since I will be using a corvette tail shaft which I need to adapt to the transfer case. I have to run the front shifter no question and go from there
Steve
1968 Dodge Charger All Wheel Drive project Red Bull<script type="text/javascript" src="safari-extension://com.ebay.safari.myebaymanager-QYHMMGCMJR/5cce6da5/background/helpers/prefilterHelper.js"></script><script type="text/javascript" src="safari-extension://com.ebay.safari.myebaymanager-QYHMMGCMJR/85dc54c0/background/helpers/prefilterHelper.js"></script><script type="text/javascript" src="safari-extension://com.ebay.safari.myebaymanager-QYHMMGCMJR/85dc54c0/background/helpers/prefilterHelper.js"></script>
12-25-2012 #217
Registered User
- Join Date
- Aug 2007
- Location
- Albemarle, NC
- Posts
- 1,149
theres a company that advertises in grassroots motorsports that already makes it....
have no idea of their name. its in the back....Michael Crawford
1970 plymouth Duster back under construction:
https://www.pro-touring.com/showthre...uring-makeover
1987 GMC S15 https://www.pro-touring.com/showthre...ct-drivabeater
01-01-2013 #218 Registered User
- Join Date
- Dec 2004
- Location
- Beaufort , NC
- Posts
- 1,849
Mustangs Plus......But with your skills making one should be no prob!
1968 F100 sb full vic chassis swap
1965 Mustang coupe 347 5 spd cheap touring SOLD
2003 Porsche 996 Outlaw LS2 swap SOLD
1992 Lexus SC400 daily SOLD
1966 Porsche 912 Outlaw SOLD
1968 Ford F-100 sb SOLD
01-04-2013 #219
Registered User
- Join Date
- Nov 2009
- Location
- the dirty mitten
- Posts
- 1,212
That is pretty cool and I may have to build one based on shifter location. I would use shoulder bolts vs those regular grade 8 fasteners. Those will give some slop in the linkages and also wear them down
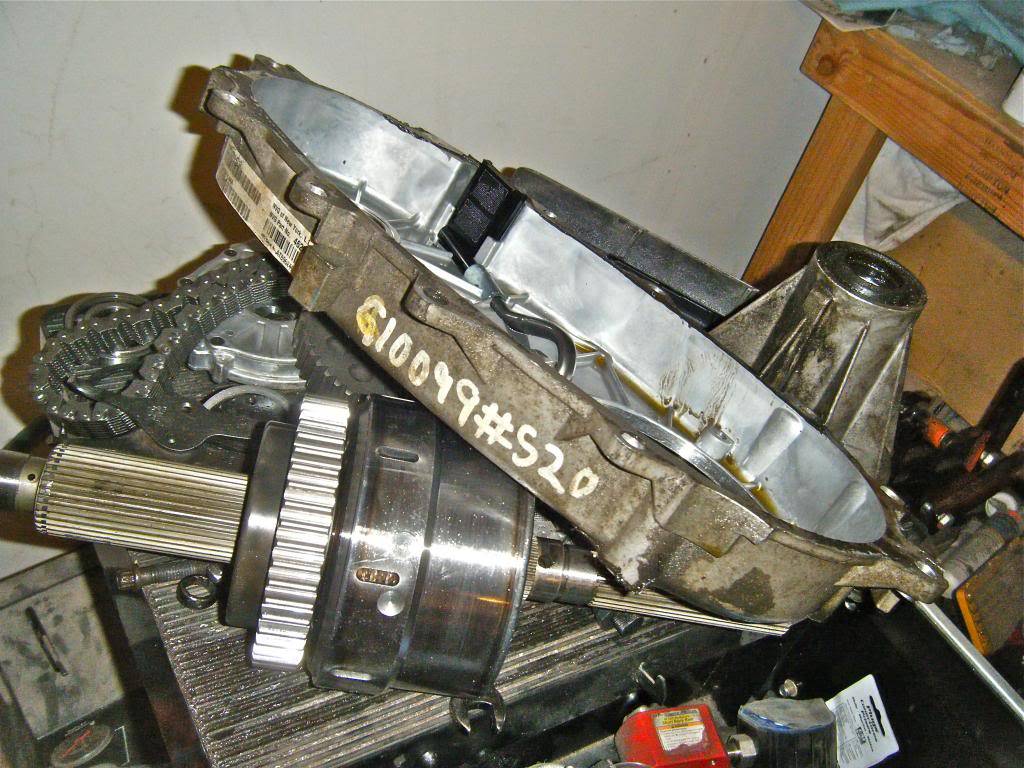
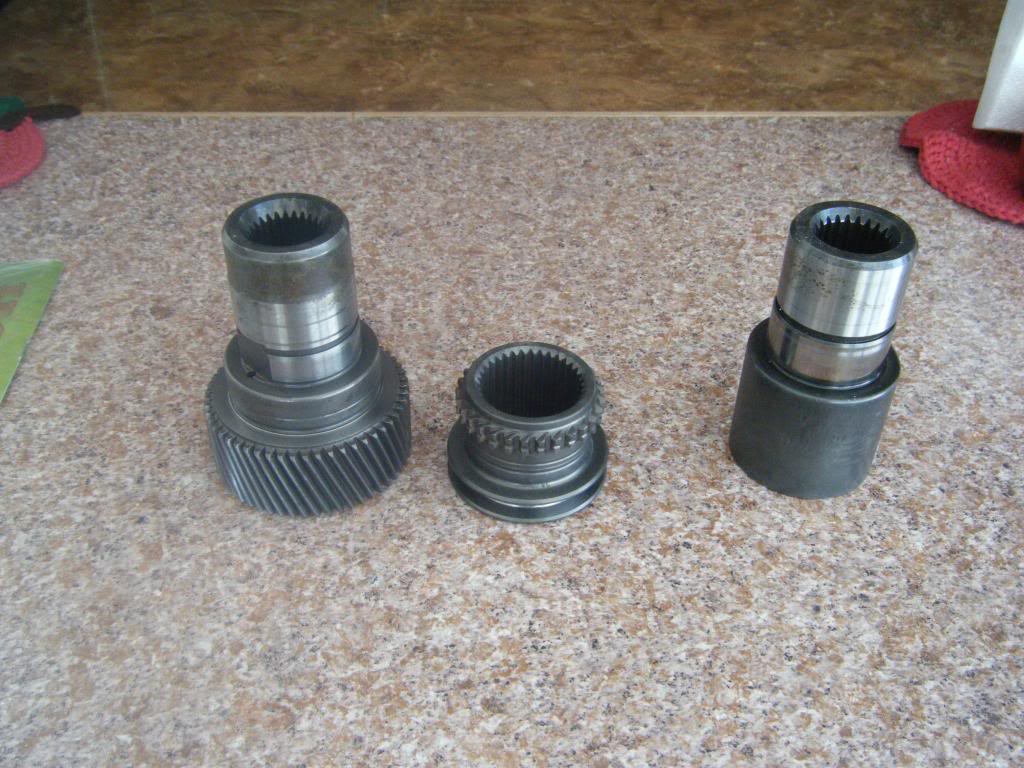
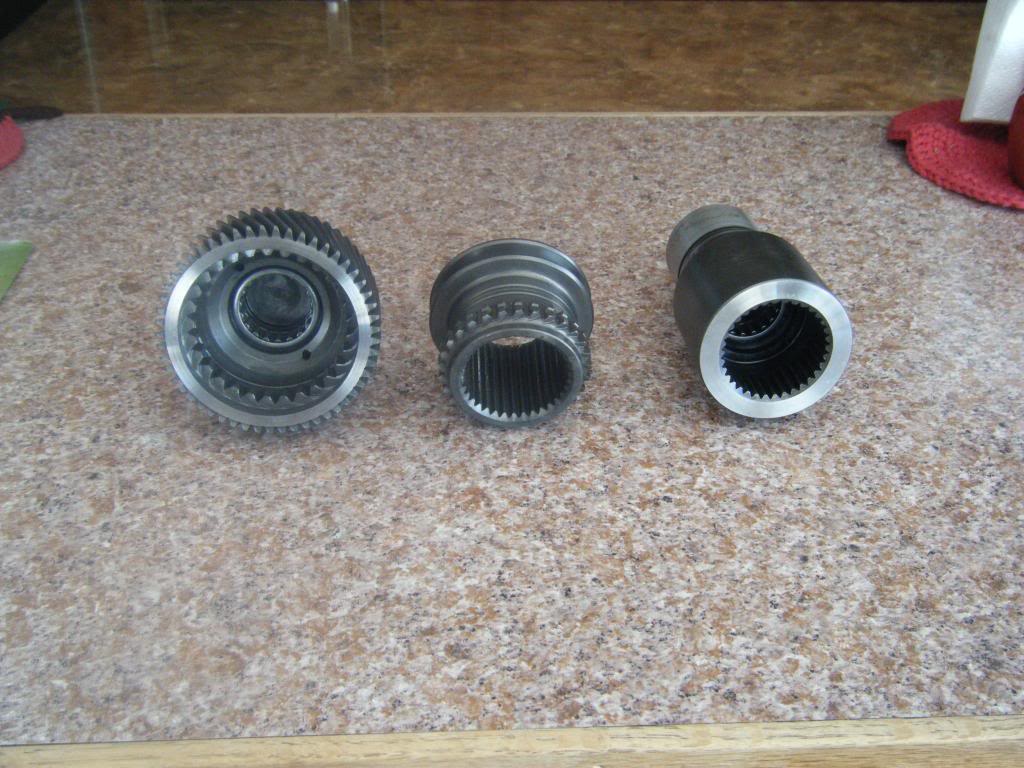
I got some good news today! I have to run 27 splines for the input/output on the trans and transfer case. There is no 30 spline input transfer case that I am aware of. There is a 32 and I can get a 32 spline output for the T 56 but did not want to have to deal with swapping the 32 into my T 56, the 27 is a direct swap. It will be weaker than my stock Viper 30 but we will just have to see how it goes. Now on to the next issue, my 147 transfer case came from a Jeep with all use 23 spline outputs. Chevy used the 4 series case and 27 spline outputs but never used a 1 speed case. I have been looking at pictures of the different Chevy inputs to see if anything would work. After that I just had to take a gamble that New Venture (the transfer case manufacturer) would not want to make different parts and sizes for every case. I hoped that all 4 series would be the same input. The good news is that I was about 98% correct in my thinking. I bought this input off Ebay from a Chevy 243 transfer case. It is 27 spline input and comes with the locking hub that would be used it put the case into neutral, if mine had a shifter which it does not. I like that since it will save weight. I checked it out in my 147 housing, the hub fits nicely into the front bearing. The hub fits onto my T case shaft. All I have to do now is figure out a way to lock the hub in position so that it will always be engaged on the input shaft. I am thinking either a shaft collar or a lock ring but the lock ring would mean that I would also need to have the t case shaft machined with a groove for the lock ring to sit in. This weekend I will be reassembling the transfer case just to be sure that everything will go back together without issue.
So here is what I just got. The new input shaft is on the left, hub in the middle. The stock 147 input is on the right. You can see here that my only other issue is that the groove for the input's lock ring is in a different location. I will have to have that machined so the ring can be placed.
 Steve
Steve
1968 Dodge Charger All Wheel Drive project Red Bull<script type="text/javascript" src="safari-extension://com.ebay.safari.myebaymanager-QYHMMGCMJR/5cce6da5/background/helpers/prefilterHelper.js"></script><script type="text/javascript" src="safari-extension://com.ebay.safari.myebaymanager-QYHMMGCMJR/85dc54c0/background/helpers/prefilterHelper.js"></script><script type="text/javascript" src="safari-extension://com.ebay.safari.myebaymanager-QYHMMGCMJR/85dc54c0/background/helpers/prefilterHelper.js"></script>
01-05-2013 #220
Registered User
- Join Date
- Apr 2007
- Posts
- 193
I'm interested in that front STS diff/axle for another project. Quick Google suggest that is 3.23 ratio and that is the sole option? Or is that R&P from another more common application? I assume it's an open diff? Originally Posted by Motorcitydak


 Reply With Quote


