Results 41 to 60 of 709
-
08-18-2011 #41

 Registered User
- Join Date
- Nov 2009
- Location
- the dirty mitten
- Posts
- 1,212

Haha, no Will you are not allowed to vote since you have insider information.
If you have to build your own control arms, I have the 7 degree ball joint reamer and just ordered the 10 degree. You can use em when you come back. It would be nice to be able to bolt control arms on but its just easier to get exactly what you want if you build it yourself. Also I spaced my ends out a little just because of the extra load they will see with both braking and acceleration going thru the front wheels. The ends are 10.5 inches apart.Steve
1968 Dodge Charger All Wheel Drive project Red Bull<script type="text/javascript" src="safari-extension://com.ebay.safari.myebaymanager-QYHMMGCMJR/5cce6da5/background/helpers/prefilterHelper.js"></script><script type="text/javascript" src="safari-extension://com.ebay.safari.myebaymanager-QYHMMGCMJR/85dc54c0/background/helpers/prefilterHelper.js"></script><script type="text/javascript" src="safari-extension://com.ebay.safari.myebaymanager-QYHMMGCMJR/85dc54c0/background/helpers/prefilterHelper.js"></script>
-
08-18-2011 #42 Registered User
- Join Date
- Jul 2009
- Location
- Grand Rapids, MI
- Posts
- 1,559
Thanks Steve. I can probably use that for my rear lowers since the rear lower BJ is in the spindle. I agree, it's nice being able to build it exactly as you need it. I also like that you are using spacers on the outsides of the front ends. I am considering something similar for my rear uppers in order to have some caster adjustment, just in case it needs to be dialed in...
Did you're new toy get shipped? Pretty exciting stuff man.
Oh, I almost just asked a question that gave it away... Not cool!
08-24-2011 #43
Registered User
- Join Date
- Nov 2009
- Location
- the dirty mitten
- Posts
- 1,212
I had another night in the garage last night. Again I spent a good 8-9 hours in there with not what I feel is a ton of results to show but anyways, here is what I was up to
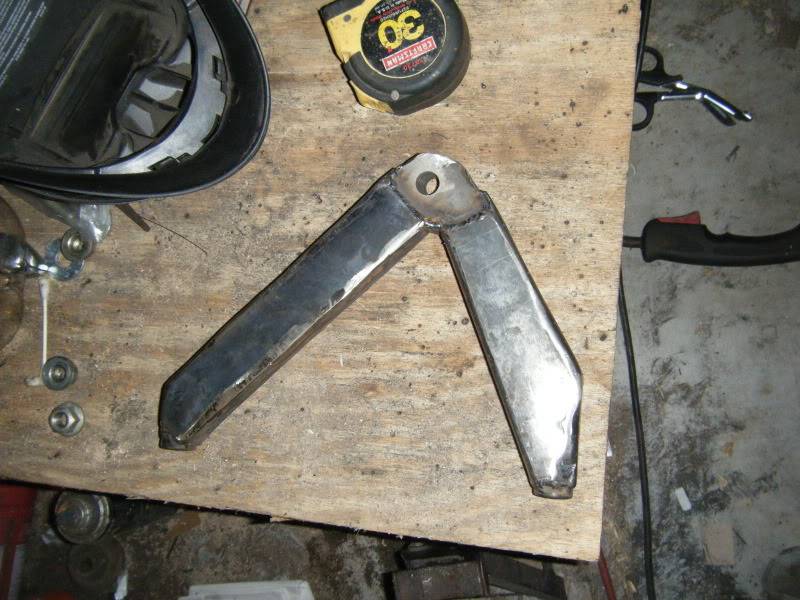
I built the ball joint side of the UCA's with 2 pieces of 1/4 plate and a piece of 3/8 in between em to give me a decent thickness and used my brand new 10 degree ball joint reamer which worked awesome. I also put the rod ends back in their place and started throwing 1/8 plate at em

First piece in, I wanted to have one part bent and one straight to keep the rod end straight and also let the horizontal pieces of the control arm wider to better cope with the stress
Then after another hour or two I had the passenger side arm boxed up and I sanded down to welds to make em pretty
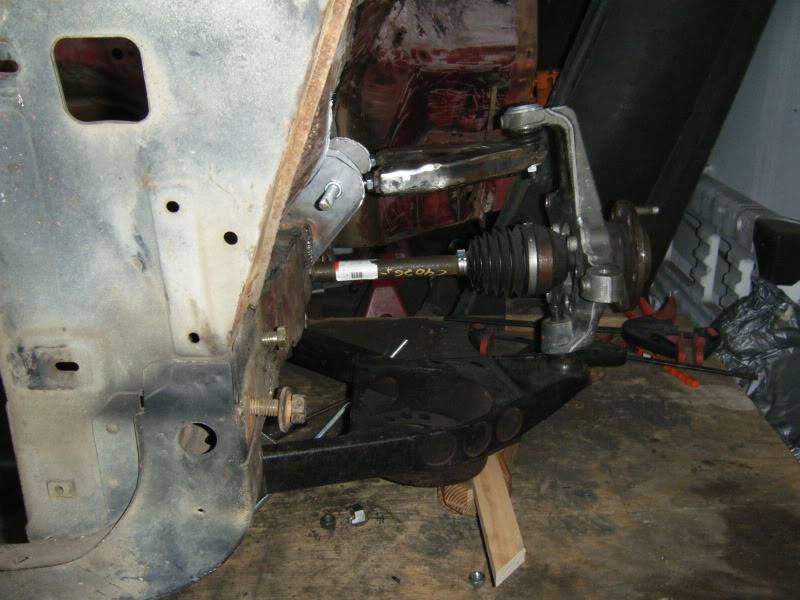
Then I put it back on, it was so nice to finally be able to cycle the suspension and steering

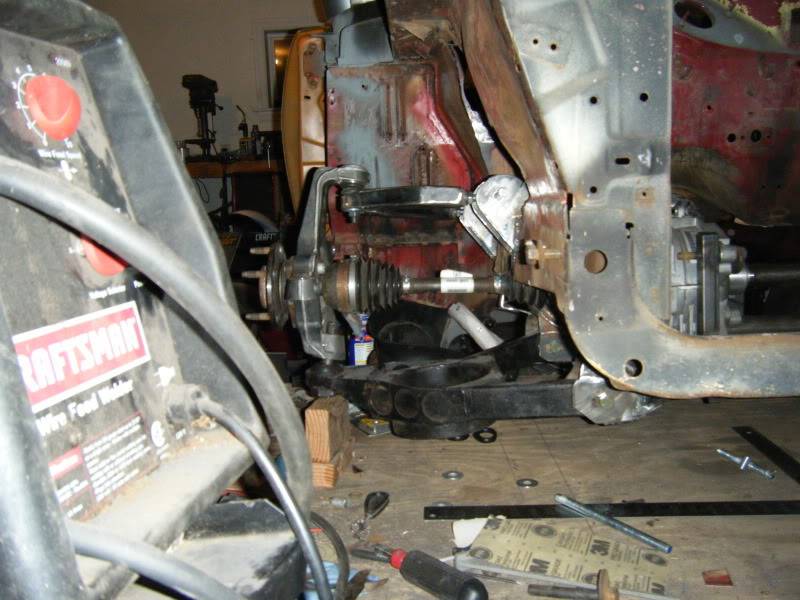
Using the same technique I built one for the drives side too
Thats all for now folks. I think now I have to get working on my pushrod suspension and also figure out my steering.Steve
1968 Dodge Charger All Wheel Drive project Red Bull<script type="text/javascript" src="safari-extension://com.ebay.safari.myebaymanager-QYHMMGCMJR/5cce6da5/background/helpers/prefilterHelper.js"></script><script type="text/javascript" src="safari-extension://com.ebay.safari.myebaymanager-QYHMMGCMJR/85dc54c0/background/helpers/prefilterHelper.js"></script><script type="text/javascript" src="safari-extension://com.ebay.safari.myebaymanager-QYHMMGCMJR/85dc54c0/background/helpers/prefilterHelper.js"></script>
08-24-2011 #44 Registered User
- Join Date
- Mar 2008
- Location
- Dripping Springs, TEXAS
- Posts
- 356
I have to Sub to this one.. Very Different..
08-24-2011 #45 Registered User
- Join Date
- Jul 2008
- Location
- ohio
- Posts
- 1,135
pretty neat things your doing here cant wait to see this thing in action
keep the wheels a spinning and the Beavers a grinning (burt reynolds-smokey and the bandit)
08-24-2011 #46
Registered User
- Join Date
- Dec 2010
- Posts
- 709
You're doing awesome work--keep the freaky ideas flowing!
08-25-2011 #47 Registered User
- Join Date
- Apr 2009
- Location
- san diego
- Posts
- 5,102
Thats some good looking geometry! HAHAHA.
My build thread: https://www.pro-touring.com/showthre...ing&highlight=
The mustang build thread: https://www.pro-touring.com/showthre...el)&highlight=
08-25-2011 #48 Registered User
- Join Date
- Dec 2007
- Location
- Lombard, IL
- Posts
- 545
Awesome build!
If there was an award for "Most Craftsman Tools" in a build thread, you would win it!
Are you doing all that welding with the #20569 110 volt welder?Dan
1971 Chevelle Maliboo Convertible 496/4L80E
1956 210 2 door Sedan 8-71 blown 468/T400
08-25-2011 #49
Registered User
- Join Date
- Nov 2009
- Location
- the dirty mitten
- Posts
- 1,212
Dunno if thats the part number for the welder, Ive had it for I think 7 years but yeah its a 110 volt. It does awesome work on 1/8 stuff that Im using. It would be nice to have something better but I really do not see a need since all I weld is 1/8 plate and under
Yeah bryce, I think the geometry is pretty good for me doing it all with a blind fold onSteve
1968 Dodge Charger All Wheel Drive project Red Bull<script type="text/javascript" src="safari-extension://com.ebay.safari.myebaymanager-QYHMMGCMJR/5cce6da5/background/helpers/prefilterHelper.js"></script><script type="text/javascript" src="safari-extension://com.ebay.safari.myebaymanager-QYHMMGCMJR/85dc54c0/background/helpers/prefilterHelper.js"></script><script type="text/javascript" src="safari-extension://com.ebay.safari.myebaymanager-QYHMMGCMJR/85dc54c0/background/helpers/prefilterHelper.js"></script>
08-25-2011 #50
Registered User
- Join Date
- Aug 2008
- Posts
- 41
Awesome work. Some day I would love to do an AWD PT car. Do the gear ratios match in the front and rear diffs?
08-25-2011 #51 Registered User
- Join Date
- Aug 2011
- Location
- Clearwater/FL
- Posts
- 512
This has already been done!!! Cooter made the general 4x4 in an episode!! LOL
AWESOME BUILD!!!! 85 monte, drift project- small block t5 and 8.8
88 Blazer sbc
05 300c
09-22-2011 #52
Registered User
- Join Date
- Nov 2009
- Location
- the dirty mitten
- Posts
- 1,212
 Originally Posted by Kennedy

Thanks guys!
I do not have the diff for the rear yet but it will match the front which is 3.23
Lol, well I guess since its already been done Ill just scrap this and move on to my next idea Originally Posted by SS PUNISHER
 Steve
Steve
1968 Dodge Charger All Wheel Drive project Red Bull<script type="text/javascript" src="safari-extension://com.ebay.safari.myebaymanager-QYHMMGCMJR/5cce6da5/background/helpers/prefilterHelper.js"></script><script type="text/javascript" src="safari-extension://com.ebay.safari.myebaymanager-QYHMMGCMJR/85dc54c0/background/helpers/prefilterHelper.js"></script><script type="text/javascript" src="safari-extension://com.ebay.safari.myebaymanager-QYHMMGCMJR/85dc54c0/background/helpers/prefilterHelper.js"></script>
09-22-2011 #53
Registered User
- Join Date
- Nov 2009
- Location
- the dirty mitten
- Posts
- 1,212
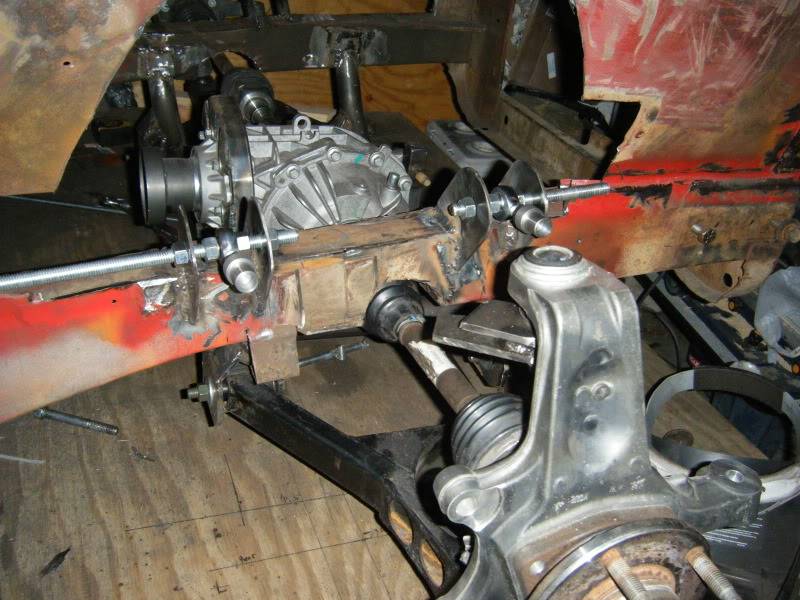
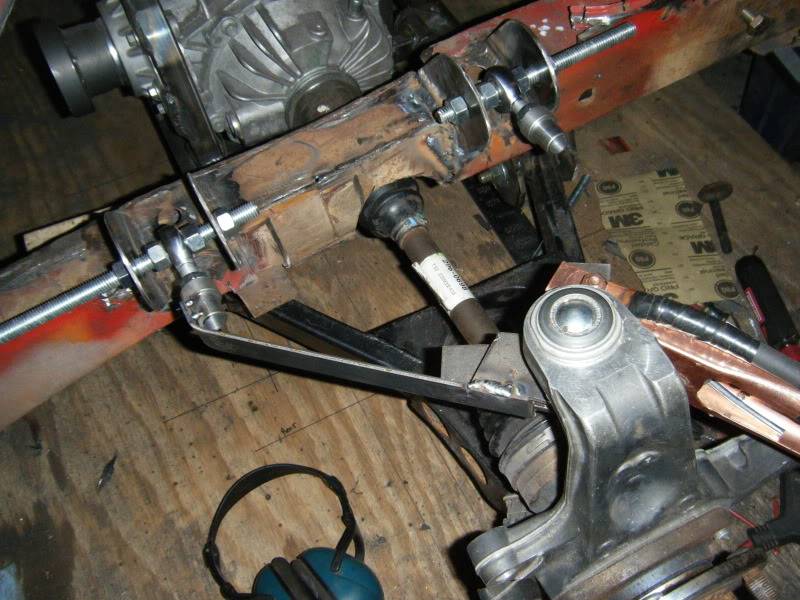
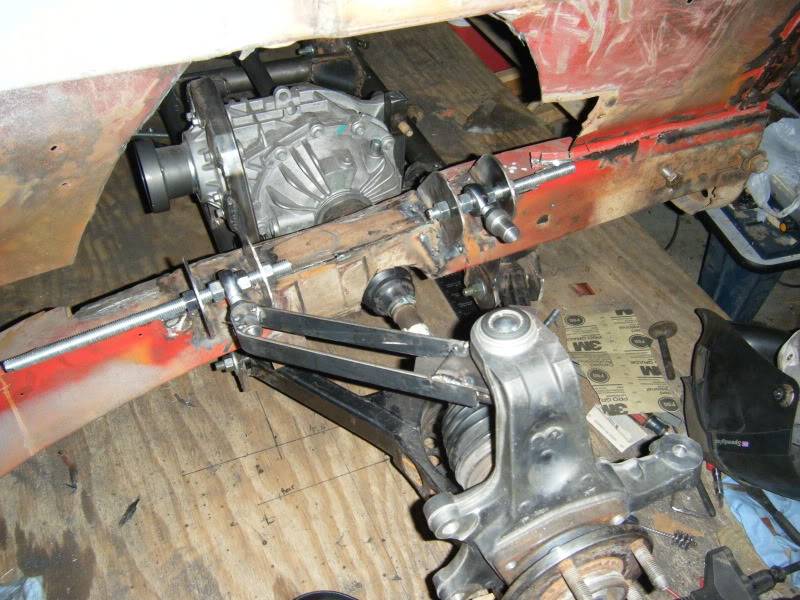
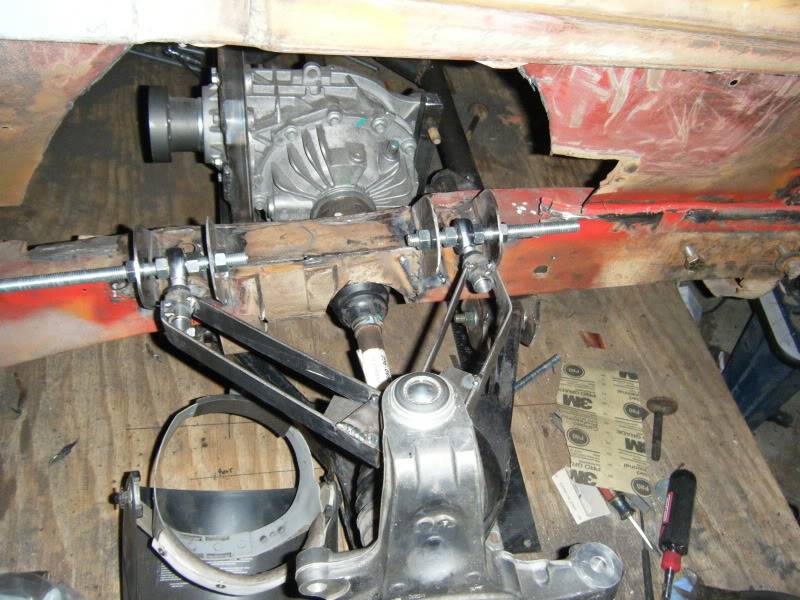
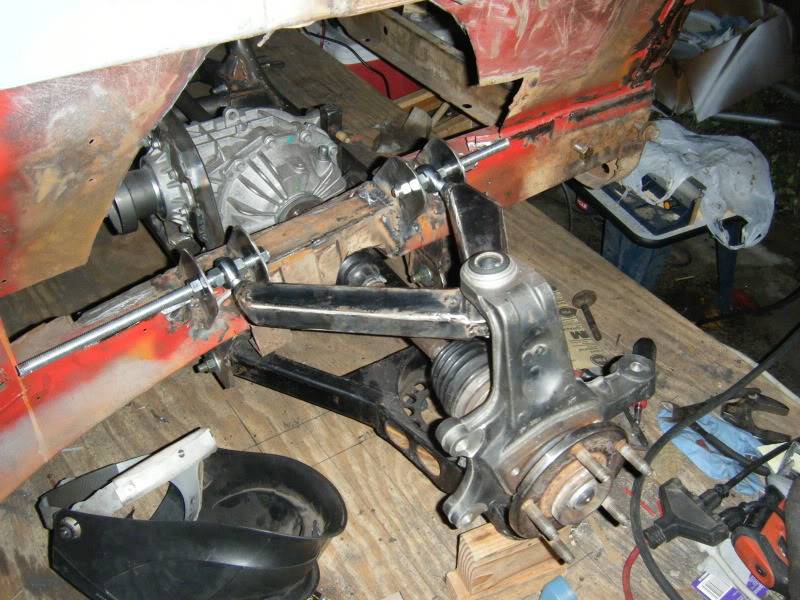
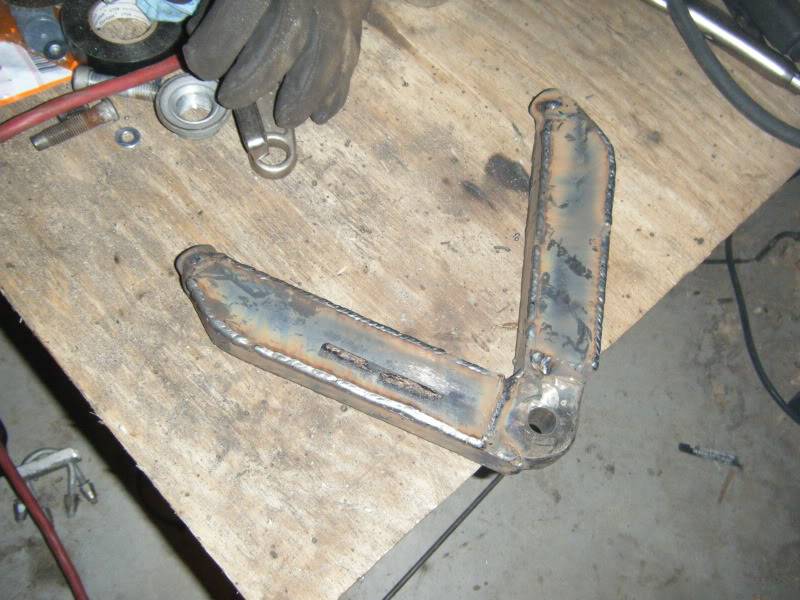
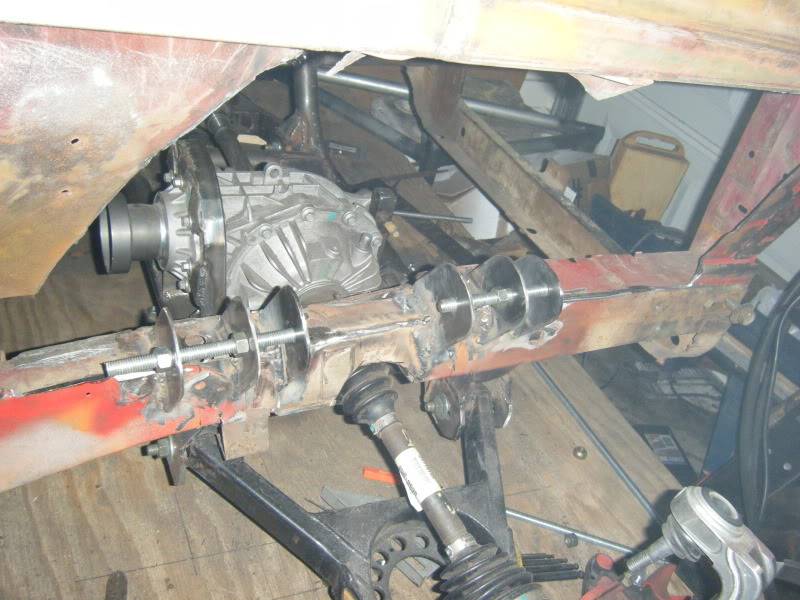
Well I have some good and bad news. First, the good news. I am currently working on version 2.0 of my UCA's and mounts. I had 2 problems with the old UCA's. They were set back from the knuckle and that meant that the rim hit the arm while steering to about 25 degrees which is really not enough and it would be really hard to make a tight turn. The easy way to fix that would be to run narrower rims but there is no way I would do that. The other problem is that the arm was in the way of any possibility I had of getting a coilover to the lower control arm. I fixed both of those problems by building a new arm. It is not done yet because I wanted to build the sides then check that it fit how I wanted. Ill wrap it up and make the drivers side as well next week. Here is a shot of the new control arm. Obviously I still need to make a new bracket to put of the frame. I just did this to place the rod ends and start the arm
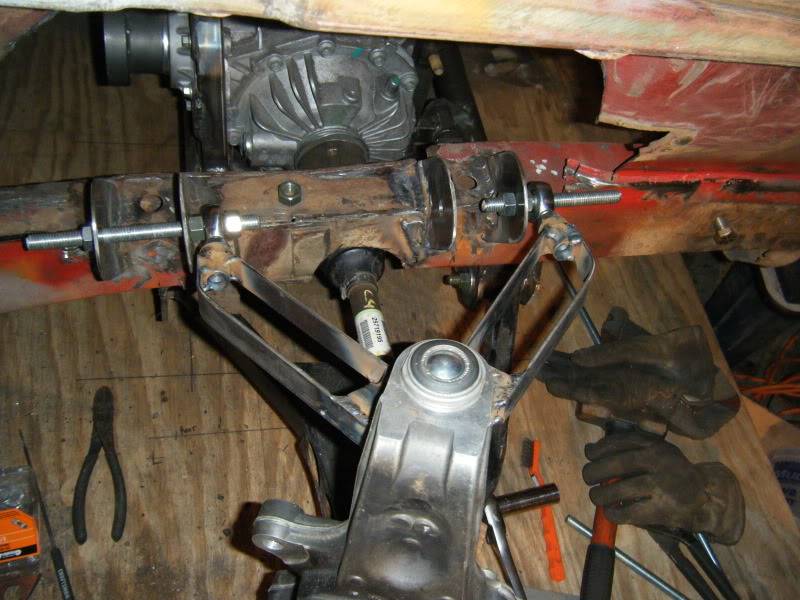
And the result!
the old result
Also after wrestling with the wheel/tire, I was curious just how much it all weighs, 18x10 rim and 315 30 tire is 57 pounds all together. I was pretty surprised by that, wished it was a lot lower. I weighed the tire and that alone is 29.5lbs
Now the bad news. I have to make a Dr's appointment because I somehow got a stupid little spark in my left eye even tho I had safety glasses on. This isn't the first time this has happened but usually Im able to get crap out myself with a wet q tip. This will be the 2nd time Ive had to have a Dr take it out.
The other bad news is that I cannot get a consistent measurement on this car to save my life. Measuring the front frame rails from anything on the passenger area of the car says that the one side is around 1/2 inch longer than the other. I even used the corner of the rockers to the edge of the frame rails and it is off. Im not sure if I should be concerned by this. I know old cars are not perfect but I expected way better. Im now measuring off the old mounting plate for the leaf springs and just measuring forward to get something I can rely on a little moreSteve
1968 Dodge Charger All Wheel Drive project Red Bull<script type="text/javascript" src="safari-extension://com.ebay.safari.myebaymanager-QYHMMGCMJR/5cce6da5/background/helpers/prefilterHelper.js"></script><script type="text/javascript" src="safari-extension://com.ebay.safari.myebaymanager-QYHMMGCMJR/85dc54c0/background/helpers/prefilterHelper.js"></script><script type="text/javascript" src="safari-extension://com.ebay.safari.myebaymanager-QYHMMGCMJR/85dc54c0/background/helpers/prefilterHelper.js"></script>
09-22-2011 #54
Registered User
- Join Date
- Jul 2009
- Location
- Grand Rapids, MI
- Posts
- 1,559
Nice work on getting the extra room you needed. I am no help on the measurements, but you can always cut it up and start fresh...
09-22-2011 #55
Registered User
- Join Date
- Jan 2010
- Location
- Elk River, MN
- Posts
- 676
Next time try one of those strong pen magnets if you get steel in your eye, it's worked for me 3 or 4 times, heals nice too Originally Posted by Motorcitydak

-mattMatt Peterson 84 Monte Carlo - Sold :( | 99 Corvette Racecar | 2001 Z06 Daily Driver
https://www.pro-touring.com/showthre...ng-Bertha-Back
http://ls1tech.com/forums/conversions-hybrids/1499192-84-monte-5-3-build.html
https://www.pro-touring.com/threads/...rvette-Racecar
09-22-2011 #56
Registered User
- Join Date
- Nov 2009
- Location
- the dirty mitten
- Posts
- 1,212
Yeah the extra room will make a nice amount of space for a certain coil over Originally Posted by wellis77
I just heard about that, its a good idea. I think Ill try to pick one up and see what happens. Im still going to go to the Dr for this one just because its been in there for so long. Last time the Dr showed my pics of guys that did that and waited so long that the piece rusted in their eye so if this one is rusting they mite have to take some tissue out as well and maybe give me some anti biotic eye drops. Originally Posted by monteboy84
So what do you guys use for eye protection? I used those clear safety glasses for maybe a year with no other problems but after this I think I should upgrade. I have a face shield but I can barely see thru that one after all the sparks it has caught. I noticed that the glasses didn't catch anything and stayed clear like the sparks were not able to melt the plastic and stick in the way they did on the shield. I saw the bionic face shield that sears has and i liked the looks of it just unsure how it will perform
Also I finally remembered to subscribe to my own thread so if anyone asks anything it won't take me a month to see it and reply anymoreSteve
1968 Dodge Charger All Wheel Drive project Red Bull<script type="text/javascript" src="safari-extension://com.ebay.safari.myebaymanager-QYHMMGCMJR/5cce6da5/background/helpers/prefilterHelper.js"></script><script type="text/javascript" src="safari-extension://com.ebay.safari.myebaymanager-QYHMMGCMJR/85dc54c0/background/helpers/prefilterHelper.js"></script><script type="text/javascript" src="safari-extension://com.ebay.safari.myebaymanager-QYHMMGCMJR/85dc54c0/background/helpers/prefilterHelper.js"></script>
09-22-2011 #57 Registered User
- Join Date
- Nov 2009
- Location
- illinois
- Posts
- 146
you don't have to buy the hole unit everytime the face lense gets beyond being able to see through it. you can buy the lense by itself. its alot cheaper and less painful tha going to the doctor
09-24-2011 #58
Registered User
- Join Date
- Aug 2011
- Posts
- 23
cool build
09-25-2011 #59
Registered User
- Join Date
- Dec 2009
- Posts
- 261

I've had luck with the older style ones that look like goggles:
http://www.adhesive.com/accessory_de...P__safety.html
you want ones with the hardened lenses,those were just the first I could find.
09-28-2011 #60
Registered User
- Join Date
- Nov 2009
- Location
- the dirty mitten
- Posts
- 1,212
After a fun moment at the eye Dr, my eye is healing well now and it feels fine. I got a pair of goggles just like those for the work I did tonight, I just did not really like them against my face the whole time. That being said, my eyes are free of metal this time so they did their job but i think im still going to get a new shield.
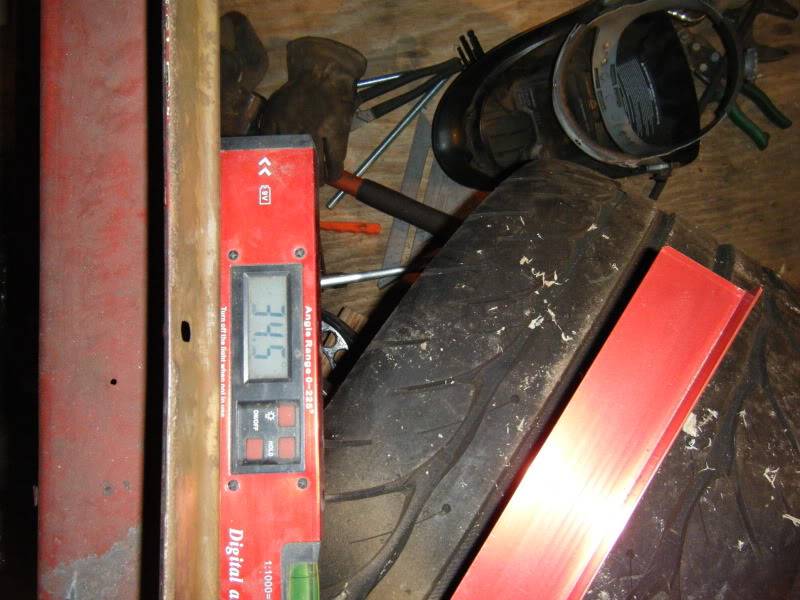
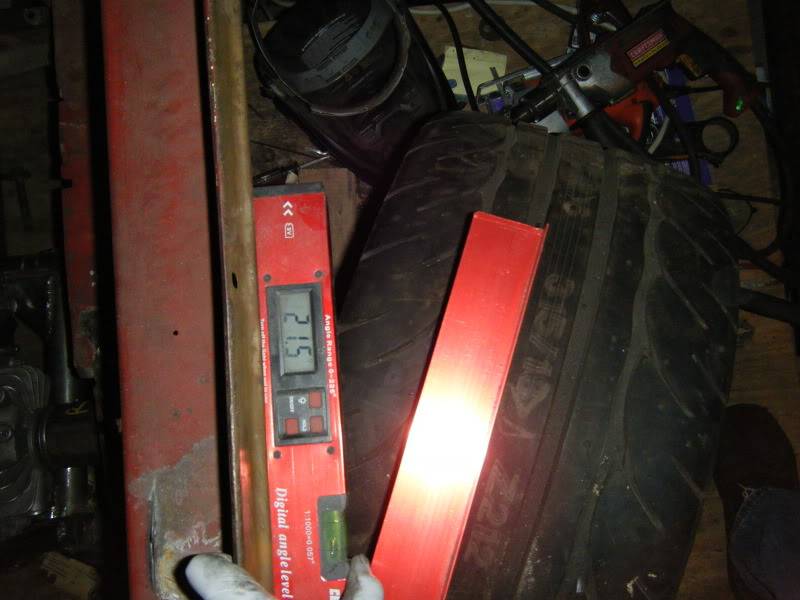
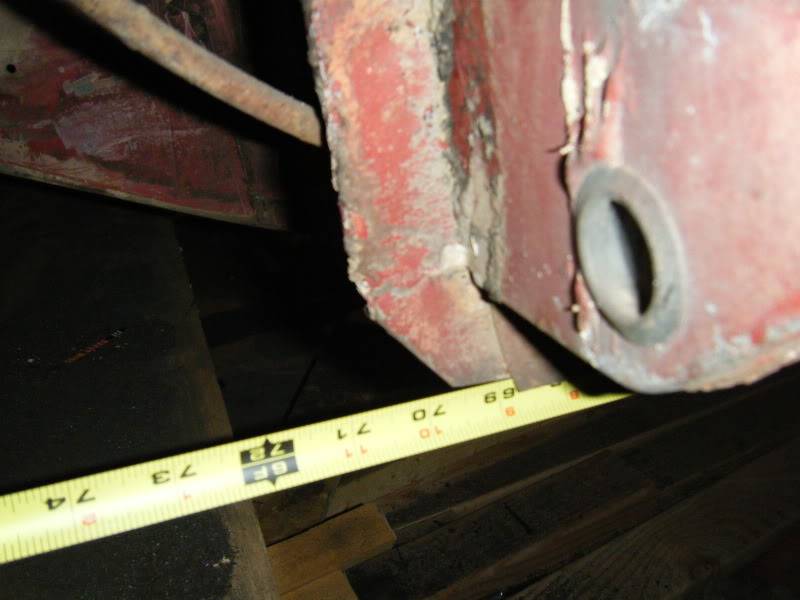
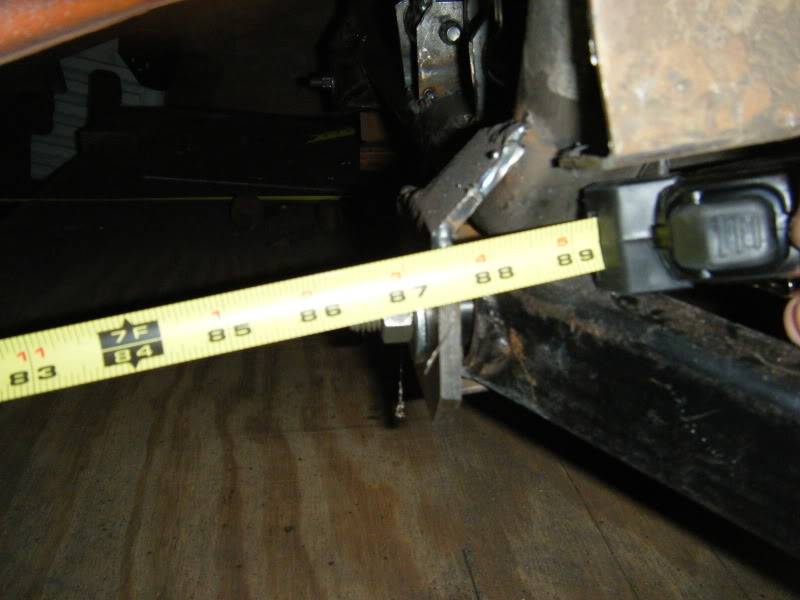
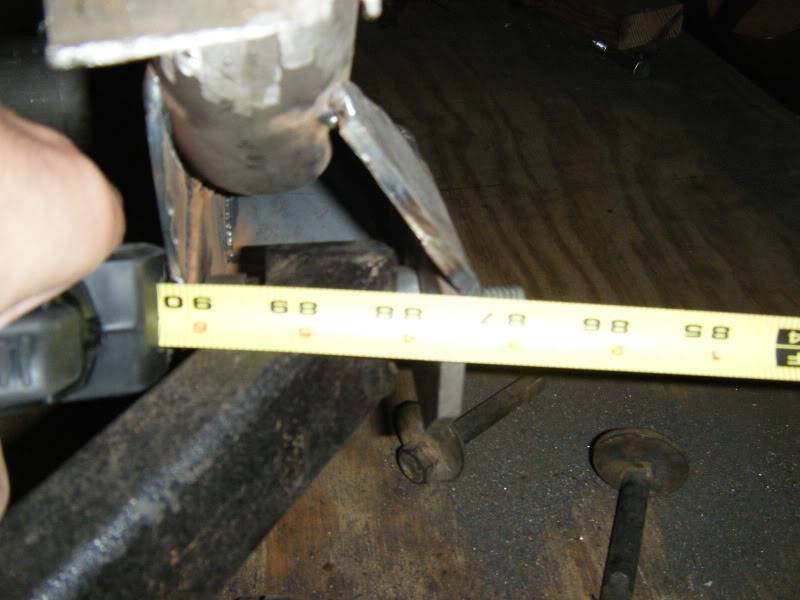
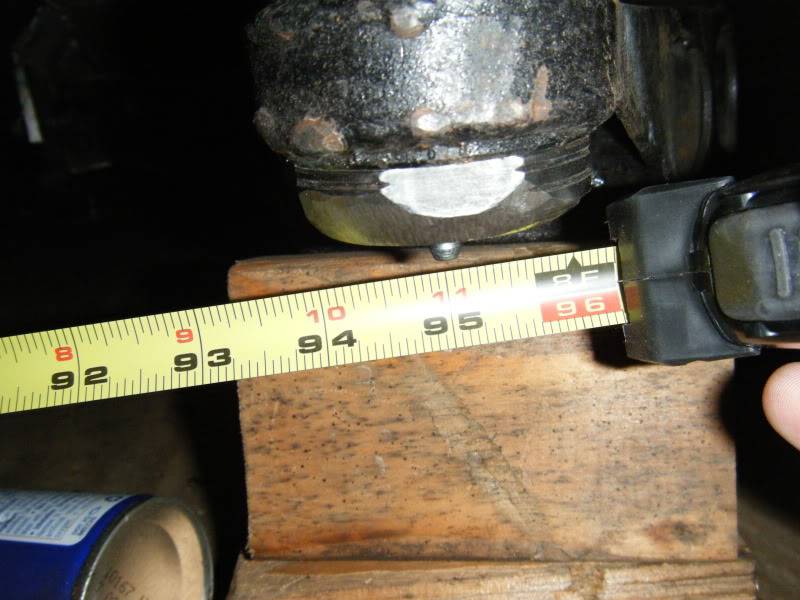
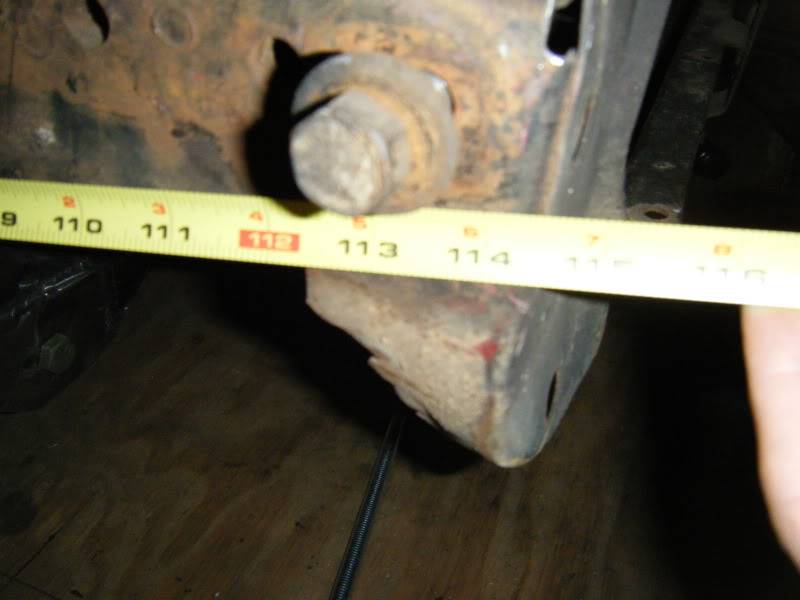
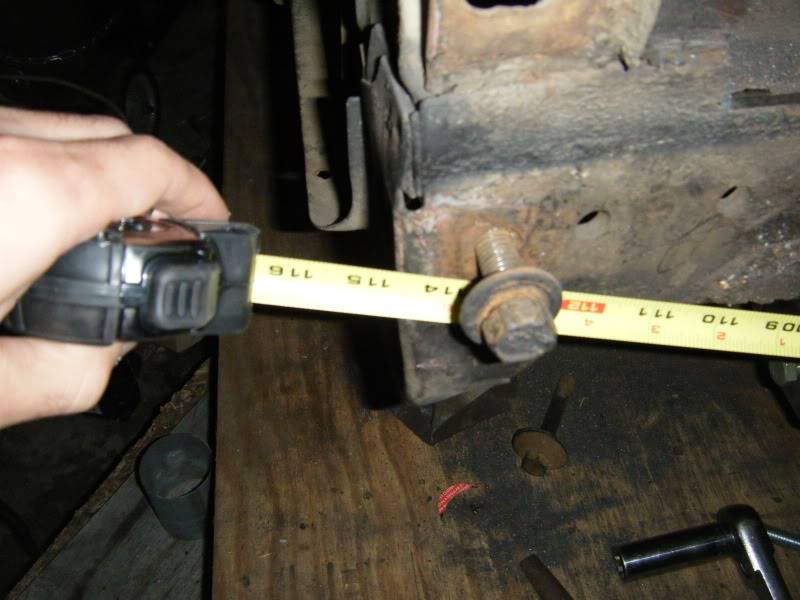
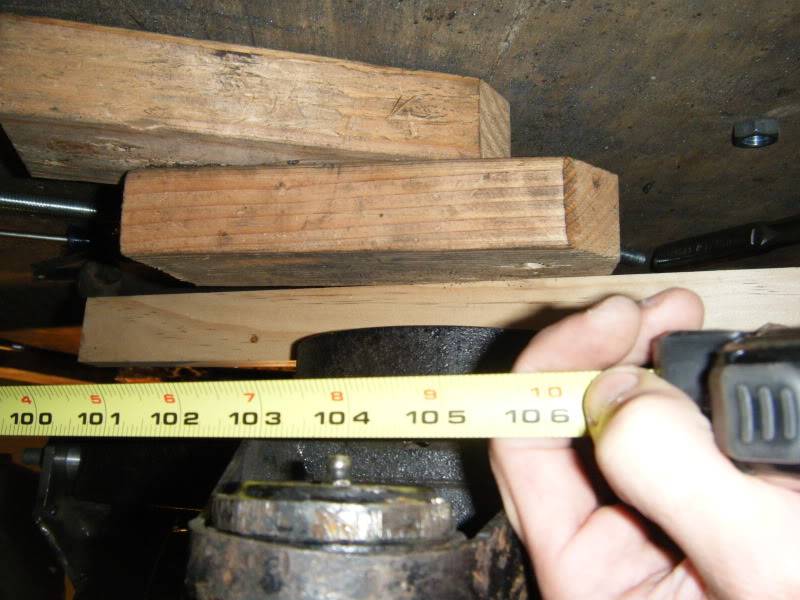
I got some more work done tonight. I got a few measuring tapes with little magnets in the end of the tape and stuck those to the front side of the rear leaf spring mount. I measured forward from there and realized that the rockers were what was throwing me off, they are different lengths. I measured to my control arm mounts, ball joints and the front of the frame. Thankfully all that stuff is perfect.
This is where I measured off of

This is the front of the passenger side rocker
and the drivers side, this is what threw me off so bad. I should also point out that I was not using this exact point to measure off of, rather the corner of the rocker itself that you can see in the middle left side of the passenger side picture. I just assumed that that part of the car would be square, its not
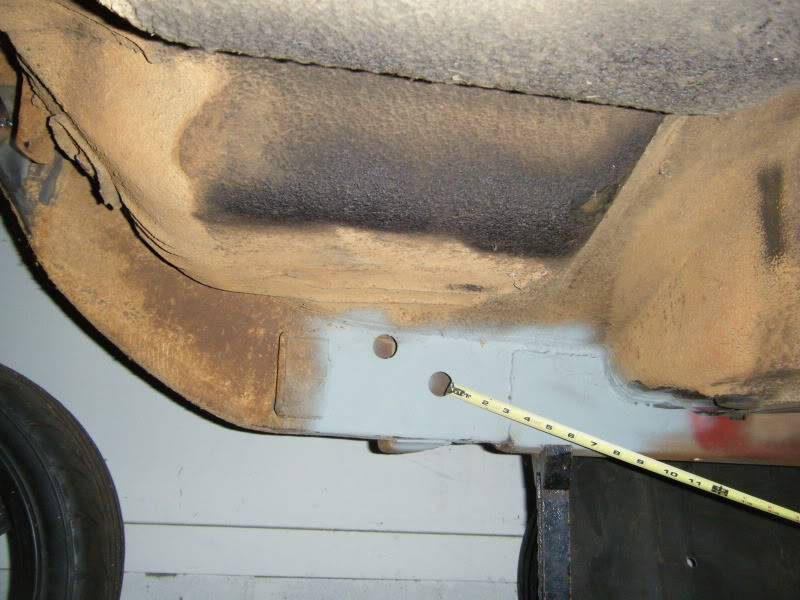
After seeing that, I checked my rear LCA brackets
Passenger side
and drivers side
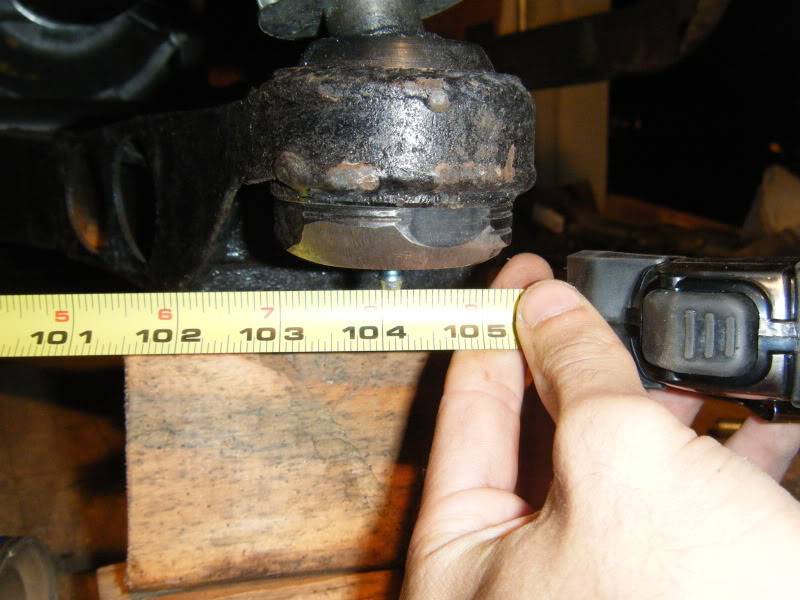
Next up was to confirm placement of the lower ball joints
passenger side
and drivers

Also checked to the front of the frame rails
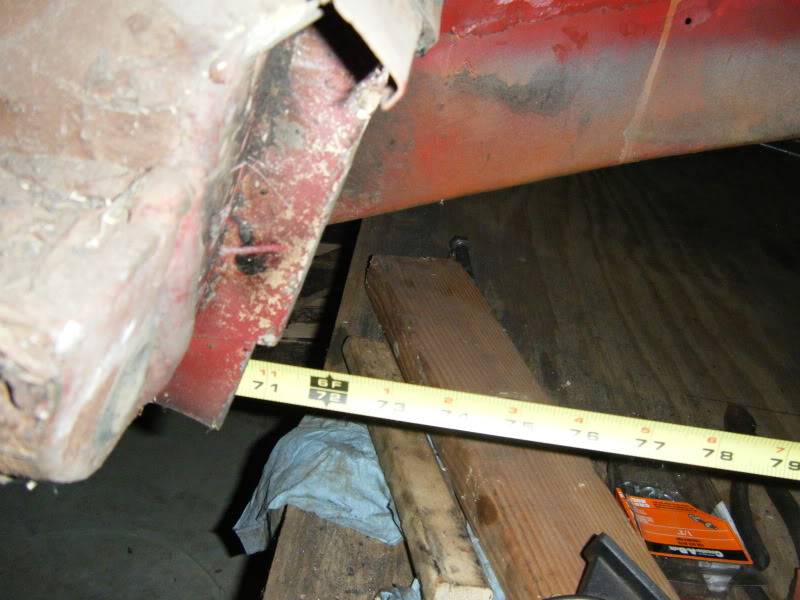
After those came back good I was still worried maybe it wasn't square under the car so I compared across the car using these holes in the rear frame
To the ball joints
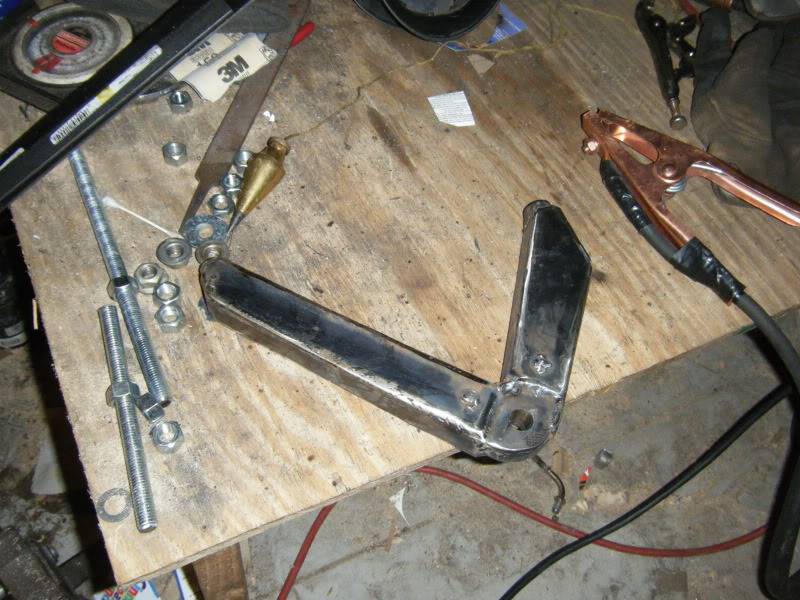
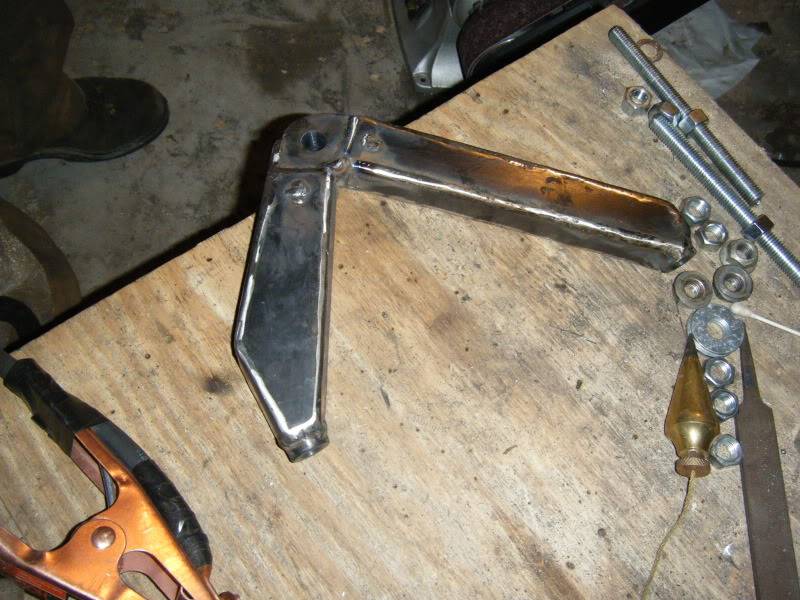
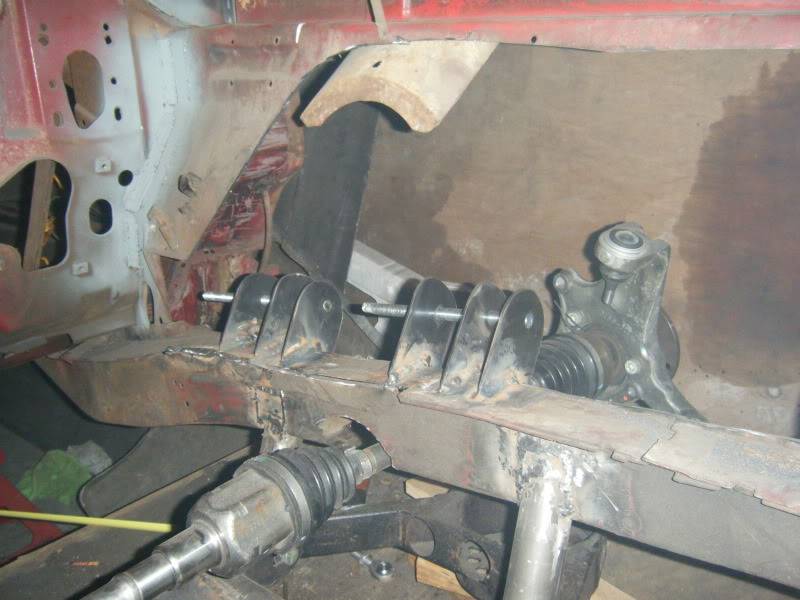
I also checked to the rear LCA bracket, that one was great too. Relieved, I starting making some progress. I cut out some more of the inner fender since I won't be needing that anyways then I got to work building the drivers side UCA and the new brackets to hold my new mounting locations. I got the 4 new brackets in place and I also just got some 1/2 cone rod end spacers. They measure just under a half inch so I did not space my brackets nearly as far as I did last time. They are more compact now so hopefully they will not be in the way of anything. I also was able to box in one of the upper control arms but I ran out of time and 4 1/2 cut off wheels so that will have to wait until next time
The semi complete upper arm

and the finished one. I think Im going to leave the welds alone this time and not other sanding them, it doesn't improve strength anyways
and the new brackets. I was not able to cut out the now un-needed rear brackets yet because Im out of cut off wheels but they will be removed
 Steve
Steve
1968 Dodge Charger All Wheel Drive project Red Bull<script type="text/javascript" src="safari-extension://com.ebay.safari.myebaymanager-QYHMMGCMJR/5cce6da5/background/helpers/prefilterHelper.js"></script><script type="text/javascript" src="safari-extension://com.ebay.safari.myebaymanager-QYHMMGCMJR/85dc54c0/background/helpers/prefilterHelper.js"></script><script type="text/javascript" src="safari-extension://com.ebay.safari.myebaymanager-QYHMMGCMJR/85dc54c0/background/helpers/prefilterHelper.js"></script>

 Reply With Quote