

Results 81 to 100 of 106
-
04-14-2013 #81

 Registered User
- Join Date
- Aug 2004
- Location
- Austin, Tx
- Posts
- 495

Thanx guys! It was a pretty exciting step for me, after all the time it's taken to get to this point!
Hopefully the assembly this week will go smoothly...
Bryan (a.k.a. Carbuff)
70 Camaro RS Hunk'o'Metal - Previous Project
71 Firebird Project T.O.W. - New Project
-
04-21-2013 #82
Registered User
- Join Date
- Aug 2004
- Location
- Austin, Tx
- Posts
- 495
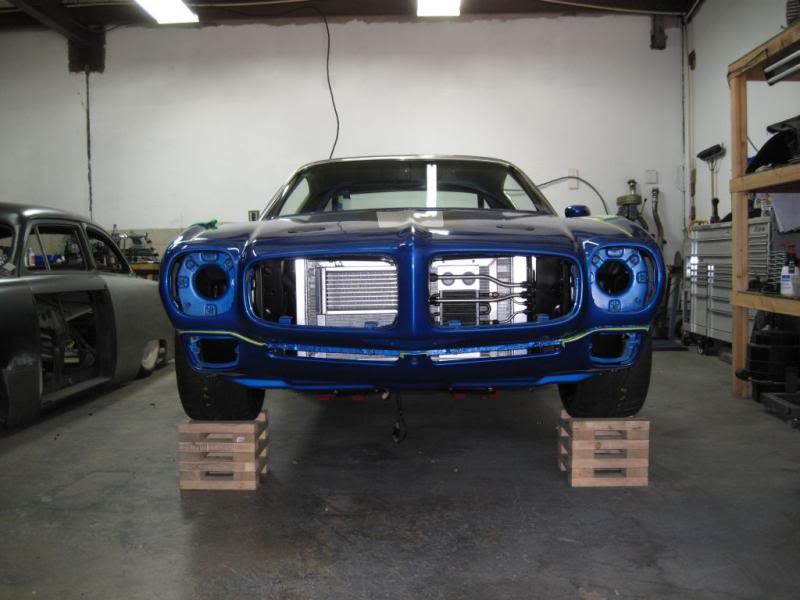
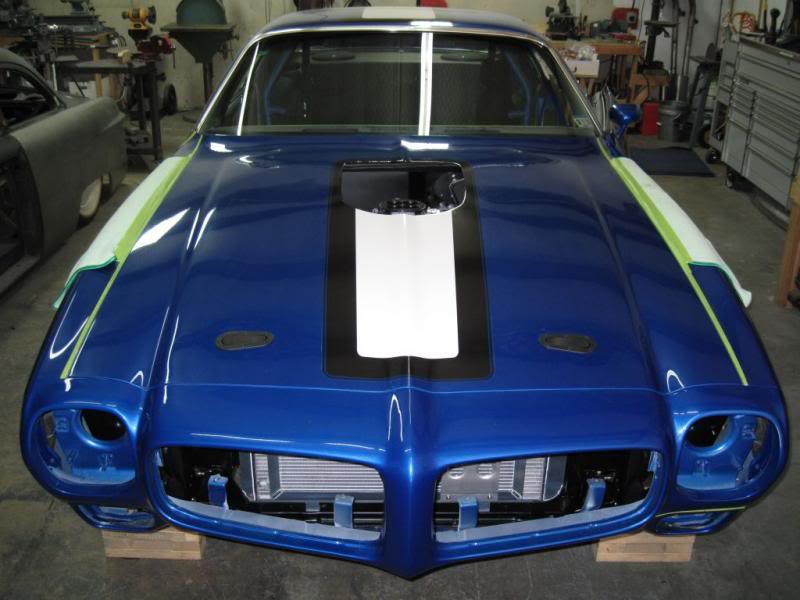
More progress this week!
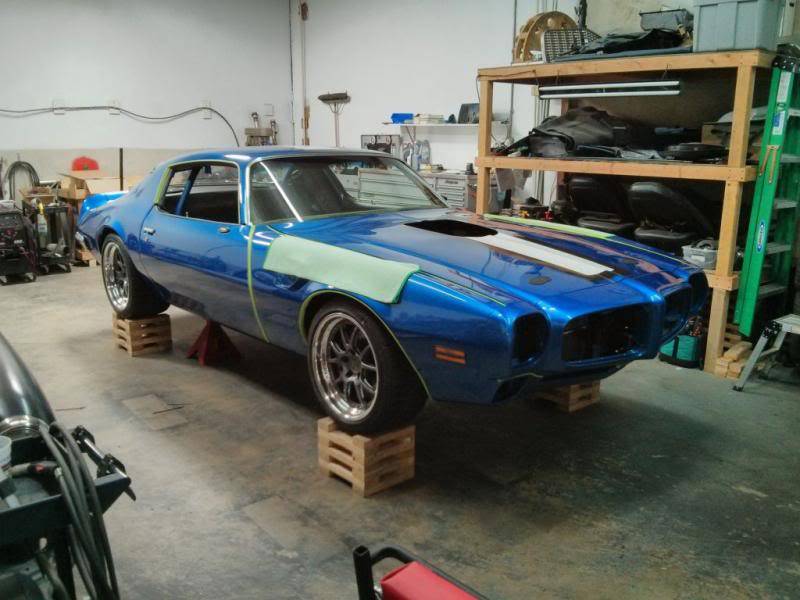
Eric has been busy assembling the front of the car, and it's amazing how much different the project looks and feels with the front sheetmetal on again! It's as if I can 'feel' the end of the project in sight now! As seems to be the case for all of these assemblies, there has been a lot of adjusting and tweaking to get to this point, but the gaps are looking great around the front, especially considering these parts were just painted and assembled without any actual bodywork on them...
He also replaced the RB hood pins with the Aerocatch units. I love these, and I'll be a lot more comfortable driving down the road and not watching the pins wiggle their way out of the RB units. We had to mount these sideways due to the inner structure of the VFN hood, but I think they look just fine this way.
I'm trying to determine which of the available drop-shaker bases will be the closest to working for me. Strangely, I'm having trouble find some simple dimensions for the couple that are available. Eric and I have discussed it, and we may just have to buy one and cut it as needed. I need to get something on the way...
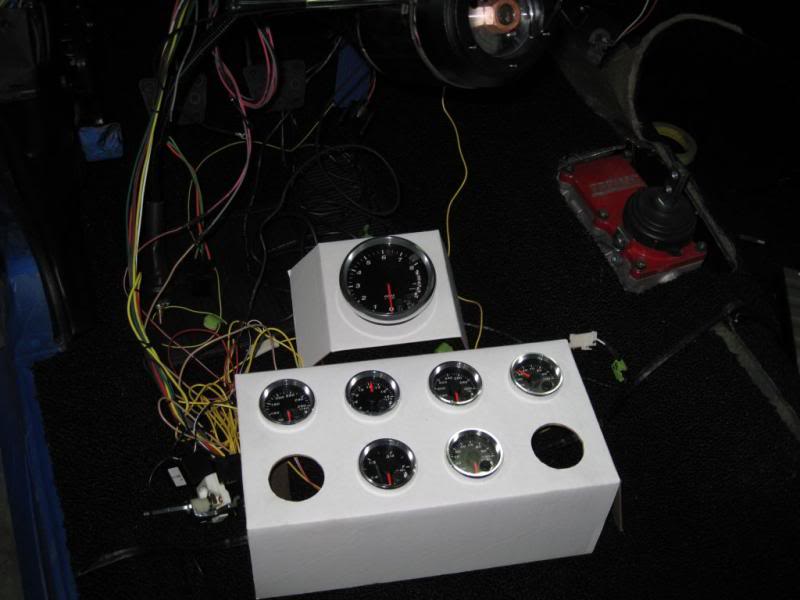
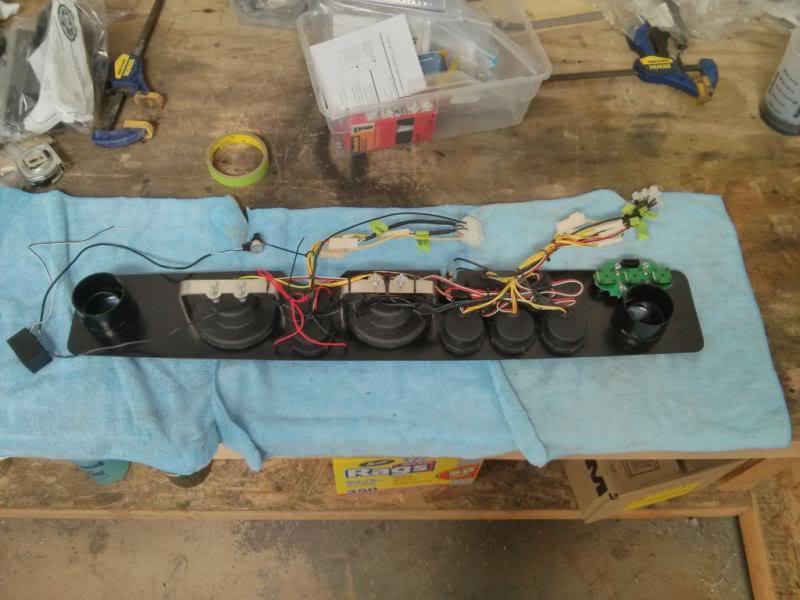
As for me, I continue on the seemingly endless saga of wiring this car. I'm really sick and tired of laying in the car on my back and side trying to cleanly route wires. Hopefully I'm finally done under the dash. We stuck the VA evaporator setup in for the last time this week, and I made the used a pair of 15-pin Painless Wiring disconnect connectors for my gauge panel. I had the panel powder coated this week, and I was able to stick the Speedhut gauges in it too.
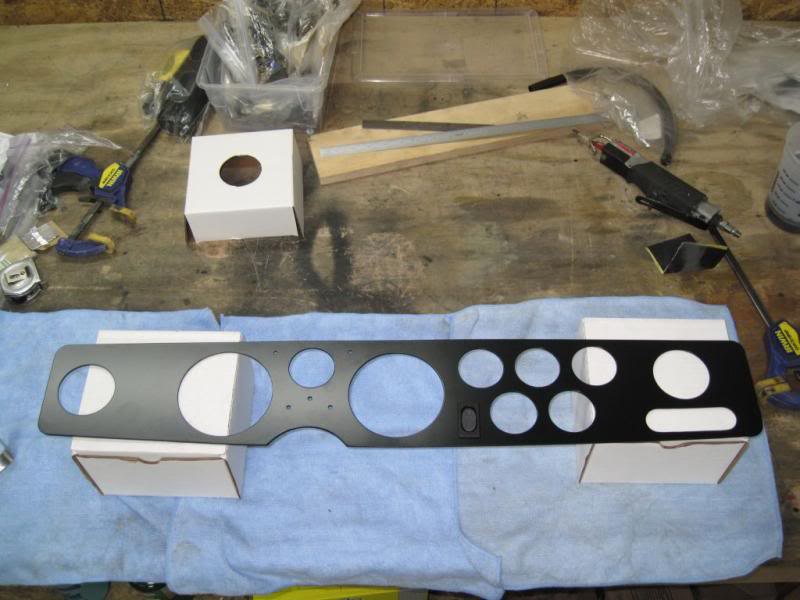
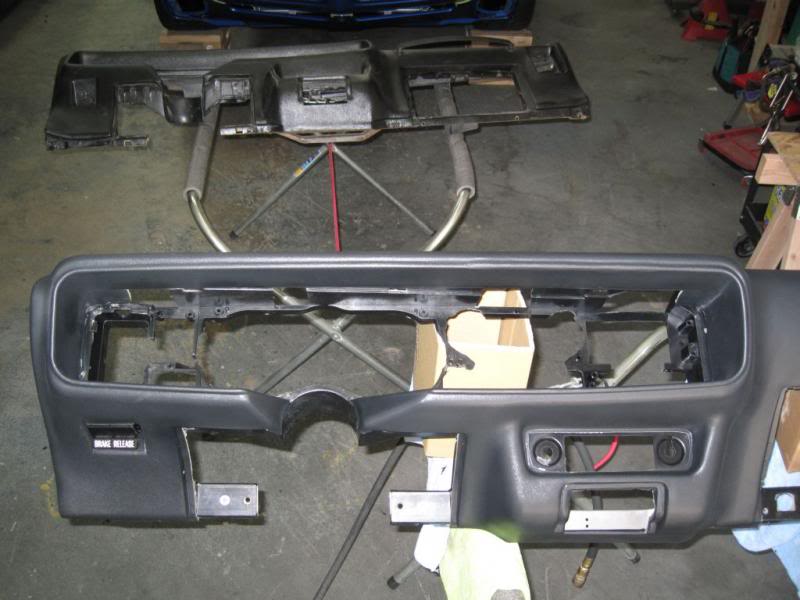
Then I had to take the painful step of cutting up a brand new reproduction Firebird dash. I bought this piece 2 years ago, and it's been sitting in wait for this day. The Firebird dash has a lot of plastic structure behind the gauges where the heater control, dash vents, etc were mounted originally. With my gauge layout, all of that stuff was going to be in the way. Out came the air saw and the drum sander, and I started cutting. I tried to leave as much as I could, and I still have vertical support across the opening.
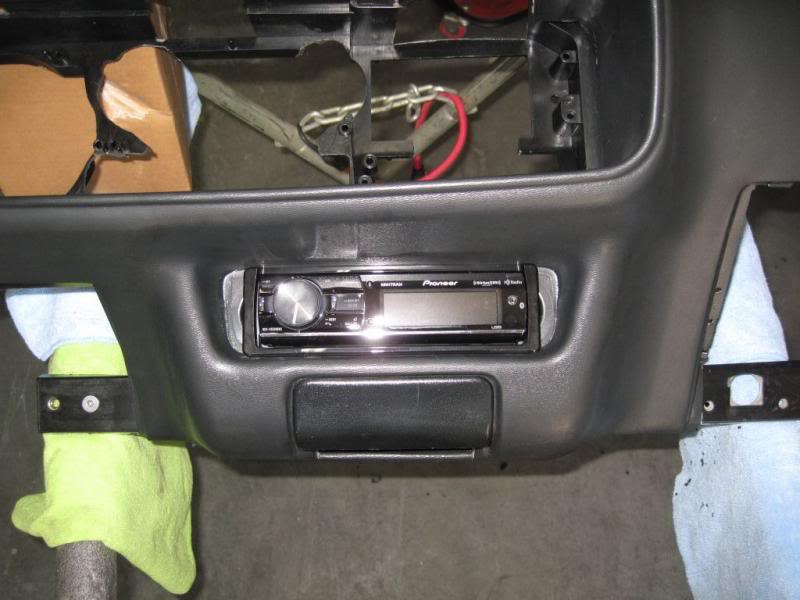
Then the perhaps even more painful step of cutting the radio opening for the head unit. The Firebird dash has the radio opening cast into the ABS plastic, so again with the air saw and drum sander. It's a tight fit height wise, but it's in there...
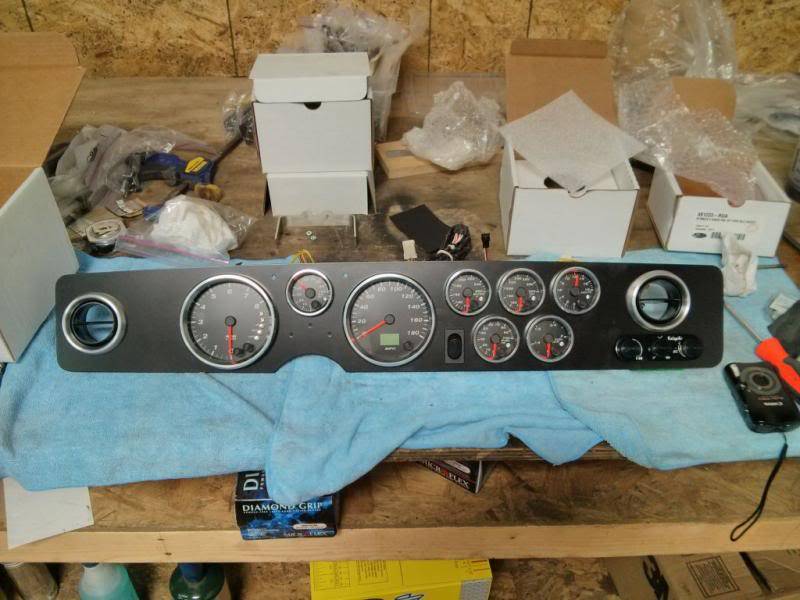
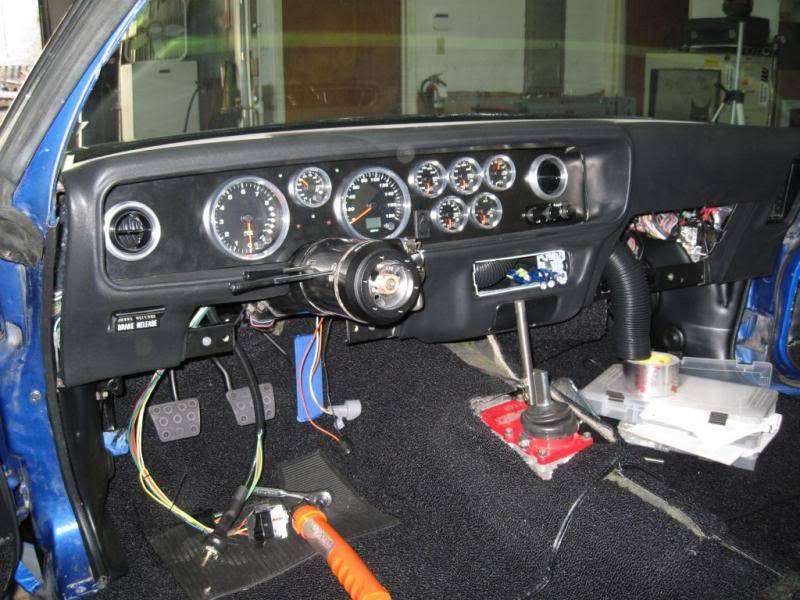
After all of the cutting, I put the dash and gauge panel in the car to check all of the fitment. It looks GREAT in my opinion. I sadly had to take it back out since we still have a little under-dash work to do on the AC ductwork, but I was glad to at least see it in place.
Then I started wiring up the gauges and lights. I'm almost done, but needed some small gauge wire to wire the turn signal, brake, high-beam, and warning lights. I picked that up this afternoon, so on my next trip to the shop I will wrap all of that up. The dash should be in place next week.
I picked up all of the bulbs for the rear of the car and installed those too. Thankfully, everything worked.
There are a few other odds and ends to be taken care of this week too... Eric is going to heat and bend the shifter stick once we have the console in place, it's a little too close to the dash as it sits now. I already mentioned the shaker, and the stereo amplifier needs to be mounted. We are going to switch the circuit breaker from a 120A unit to a 150A unit. We tripped it once starting the car last weekend, so on a hot day it may pull too much current. I also need to contact Fesler about a set of hood struts. The ones I have don't hold the VFN hood up, so I need to get another set...
Requisite pictures below...
Here was my temporary gauge setup when we fired the engine last weekend.
The blank panel after powder coating:
Panel assembled, without the LEDs:
Dash pad after cutting the gauge area:
Stereo installed (I may do something to cover up the knob depression areas):
Dash and gauges in the car (you can see how close the shifter handle is, and that's without the knob):
And working on the wiring:
 Bryan (a.k.a. Carbuff)
70 Camaro RS Hunk'o'Metal - Previous Project
71 Firebird Project T.O.W. - New Project
04-21-2013 #83 Registered User
- Join Date
- Feb 2005
- Location
- Sydney, Australia
- Posts
- 1,798

Very nice, I had to work carefully not to run into problems with that dash structure as well....and I wan't trying to fit that many gauges at once. Nice work!
Car looks terrific!Regards,
Leigh
Sydney, Australia
1971 Firebird 455
https://www.pro-touring.com/showthre...Project/page27
04-25-2013 #84
Registered User
- Join Date
- Aug 2004
- Posts
- 175
Looking Good!
04-25-2013 #85
Registered User
- Join Date
- Mar 2009
- Location
- Houston, TX
- Posts
- 1,192
Car looks great. Love those Forgeline wheels.
Tu Ho
Firebird V2-LS swap
04-25-2013 #86
Registered User
- Join Date
- Jun 2010
- Location
- Painted post NY
- Posts
- 115
Very nice build! I need to mount my tweeters in the kick panels like you did!
I too had to trim my dash to fit my year one bezel... I was glad I had an extra dash laying around(junk) to experiment and mark the holes.
Again, nice build!Leon Reed
1978 Trans Am
LS1/4L60E
my build..updated 11-21-13 https://www.pro-touring.com/showthre...8-TA-LS1-build
04-25-2013 #87
Registered User
- Join Date
- Sep 2009
- Posts
- 645
Car is looking amazing! Great job on the build.
Greg
04-26-2013 #88
Registered User
- Join Date
- Aug 2004
- Location
- Austin, Tx
- Posts
- 495
Thanx guys!
I don't have any pictures yet, but Eric mounted the gauge bezel edge trim that the top lip attaches too this week. That small piece of chrome trim along the edge really makes it all stand out! Can't wait to get it finished up and on the road...Bryan (a.k.a. Carbuff)
70 Camaro RS Hunk'o'Metal - Previous Project
71 Firebird Project T.O.W. - New Project
04-27-2013 #89
Registered User
- Join Date
- Aug 2010
- Posts
- 16
I have thoroughly enjoyed reading up on your build Bryan. I am really looking forward to installing my Dynamat and Dynaliner after reading your posts on all the fun you've had. I love several of the choices you made on your project and look forward to more updates. I am currently looking at the same brake system as you chose for your car and have plans to do a Ricks gas tank when I get my fuel injection setup picked out. I love the wheel choice and the JRS suspension components. Great project and the color combo I have always loved.
Keep up the posts and like many here I love the pictures.
04-29-2013 #90
Registered User
- Join Date
- Aug 2004
- Location
- Austin, Tx
- Posts
- 495
Thanx for the props! We are getting closer now... Eric pulled together a list of odds and ends that we need to work out, and while it feels like a long list, it feels good to see the end is near!
More details and pictures soon...
Bryan (a.k.a. Carbuff)
70 Camaro RS Hunk'o'Metal - Previous Project
71 Firebird Project T.O.W. - New Project
05-14-2013 #91
Registered User
- Join Date
- Aug 2004
- Location
- Austin, Tx
- Posts
- 495
I'm a bit behind on this thread, but we're making progress. I won't bore you with all of the frustrations that we've run into lately, but just know that it's getting closer to a first drive! If I didn't have plans all weekend, it would probably happen then. As it is, it will be next week.
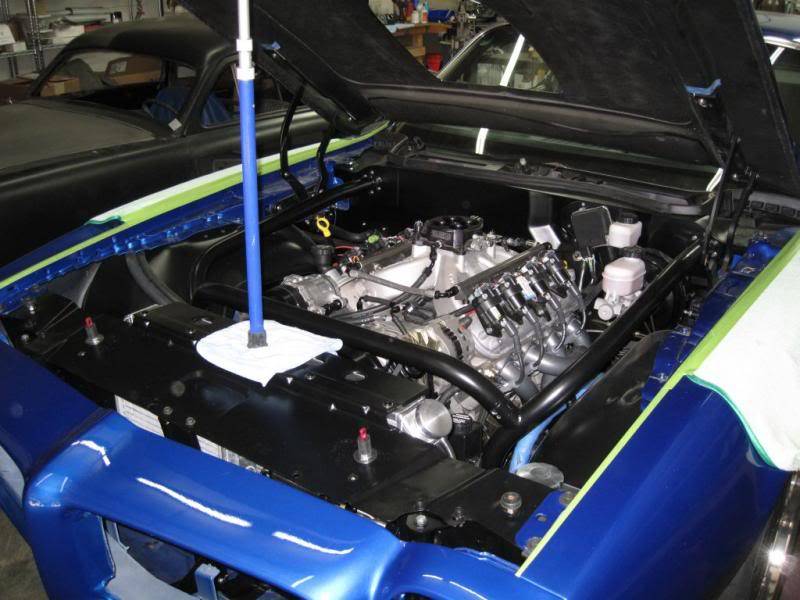
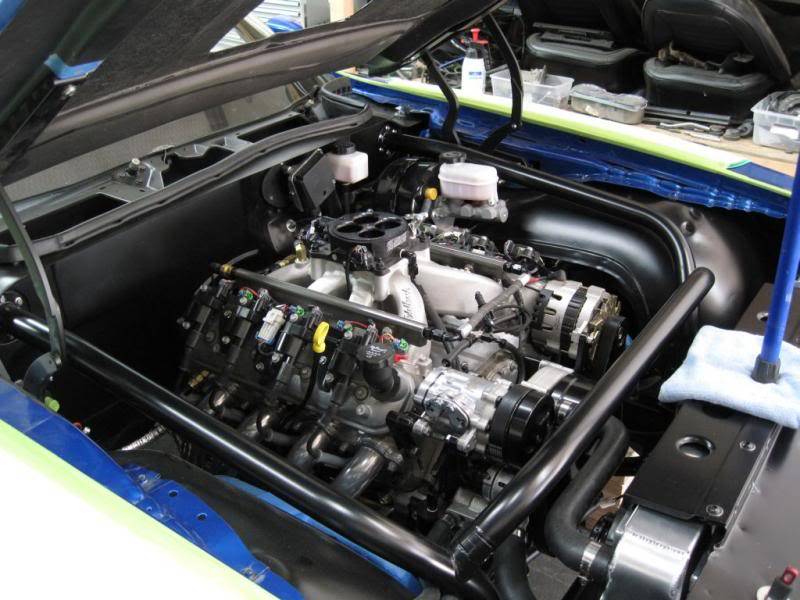
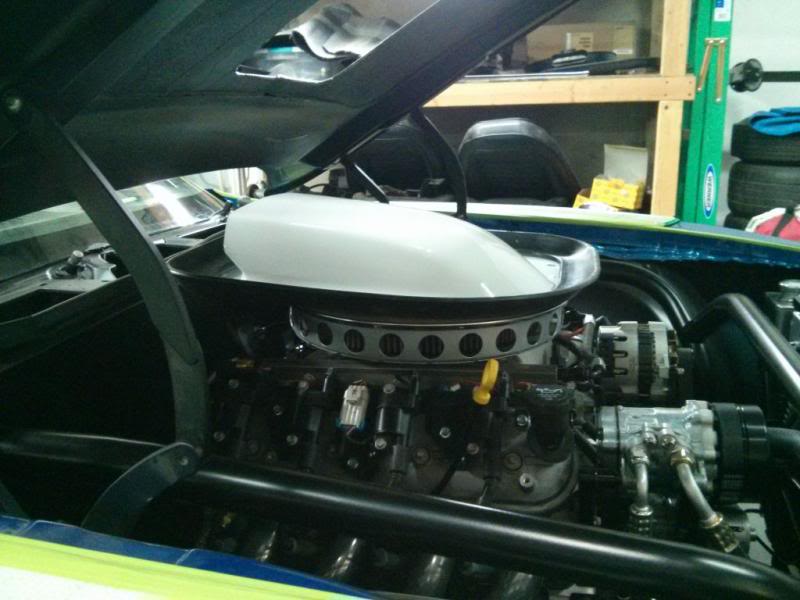
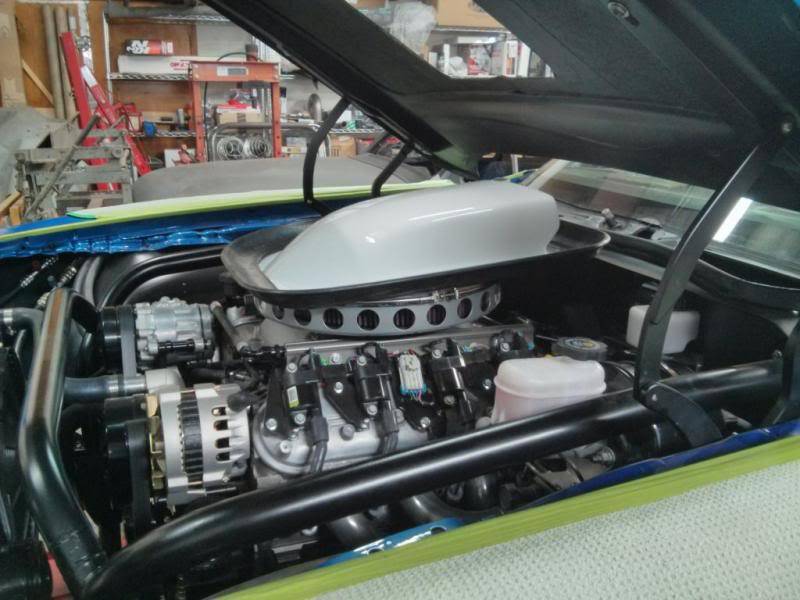
In the mean time, here was what we got done tonight. Installed the shaker tonight. It took a little more clearancing by Eric on the Lokar throttle cable adjuster, but she's in there now!

I reinstalled the dash and stereo tonight. I also cut the original glove box to clear the VA evaporator and ECU, and we're going to bond a new ABS back to it so that I have have a glove box. I'm losing about 1" of depth.
That is going to turn into the most expensive shaker ever by the time I'm done! I've purchased a new throttle body to lower it, I've purchased 3 shakers to find one that we could 'start' with, and Eric has hours into modifying it to work. We think it's going to be pretty good now that we're at this point, but we won't know for sure until we are able to chassis dyno the car and see what effect the shaker has...Bryan (a.k.a. Carbuff)
70 Camaro RS Hunk'o'Metal - Previous Project
71 Firebird Project T.O.W. - New Project
05-15-2013 #92
 -Moderator/Sponsor-
- Join Date
- Apr 2001
- Location
- The City of Fountains
- Posts
- 15,977
Bryan,
I'll take the bet on who has the most expensive shaker...LOL....I spent a small fortune on mine. Call me crazy, but isn't it the point of the shaker to insulate the cold air intake from the hot air under the hood? With all those holes around the perimeter of the base, how is that going to work? I can also tell you that the single plane intake will cost you 40 lb/ft of torque. The build looks great.
Andrew1970 GTO Version 3.0
1967 Cougar build
GM High-Tech Performance feature
My YouTube Channel Please Subscribe!
Instagram @projectgattago
Dr. EFI
I deliver what EFI promises.
Remote Holley EFI tuning.
Please get in touch if I can be of service.
"You were the gun, your voice was the trigger, your bravery was the barrel, your eyes were the bullets." ~ Her
05-15-2013 #93 Registered User
- Join Date
- Jun 2007
- Location
- St. Pete FL
- Posts
- 934
"Call me crazy, but isn't it the point of the shaker to insulate the cold air intake from the hot air under the hood? With all those holes around the perimeter of the base, how is that going to work?"
agreed
"I can also tell you that the single plane intake will cost you 40 lb/ft of torque."
agreed but you gain 50 points of cool factor
As Andrew also said, the build does look great Bryan!
Since I am in the same boat, what TB & shaker / air cleaner base did you end up using?HELP!!!
1973 TA 4 spd #'s match red/white = STOLEN
https://www.pro-touring.com/threads/...55#post1106255
05-15-2013 #94
Registered User
- Join Date
- Aug 2004
- Location
- Austin, Tx
- Posts
- 495
Ha! That's a bet I would prefer not to win, but I'm thinking we'd be pretty close. I recall the work you did on your's. On mine, I've purchased 3 different shakers, a new throttle body, and a lot of 'Eric-hours' to make this ultimately work. And I'm still not sure how well it's going to work yet, see below... Originally Posted by andrewb70

Not crazy at all. Trust me, I struggled with that decision. It's a long story, but the shorter version is that without those holes, I'm not going to get much air into the intake, period. The shaker base has about 2.5" of depth, and I'm using a 2.5" tall filter. On top of the filter is an aluminum lid. When you assemble those, then sit the shaker itself on top, there is literally about 3/8" of opening around the edge of the lid for the air flow to get from the shaker to the filter. I did some math, and the actual 'area' calculated is pretty low. Originally Posted by andrewb70
So then I thought I would try one of the K&N X-Stream lids. I've read mixed views about how they can hurt absolute horsepower. But if you don't have any air flowing into the engine, that's going to hurt even worse. So I figured that turbulent air was better than no air. Unfortunately, the lid hits both the shaker and the shaker base, so it wouldn't work at all. :(
Eric and I decided to open up the holes around the shaker base to allow at least some air to get in there. Yes, it's engine compartment air, but I need some air. I've come to the conclusion that I will likely remove the shaker and base and install a generic base/filter for any event where I actually care about making power and running cooler (ie: a track day). I will also chassis dyno the different setups and see what kind of power I'm losing.
There just wasn't a better way to do it... I can't go any lower on the base drop. As it is, the inside of the filter touches the base in a lot of area, so the flow is highly restricted. There are a couple of guys who make flat filters that install into the shaker, but I don't like those solutions either for various reasons. Thus, I chose this compromise.
I'm also painfully aware of this. I'm giving up a lot because I wanted a functional shaker on this car!!! See below: Originally Posted by andrewb70
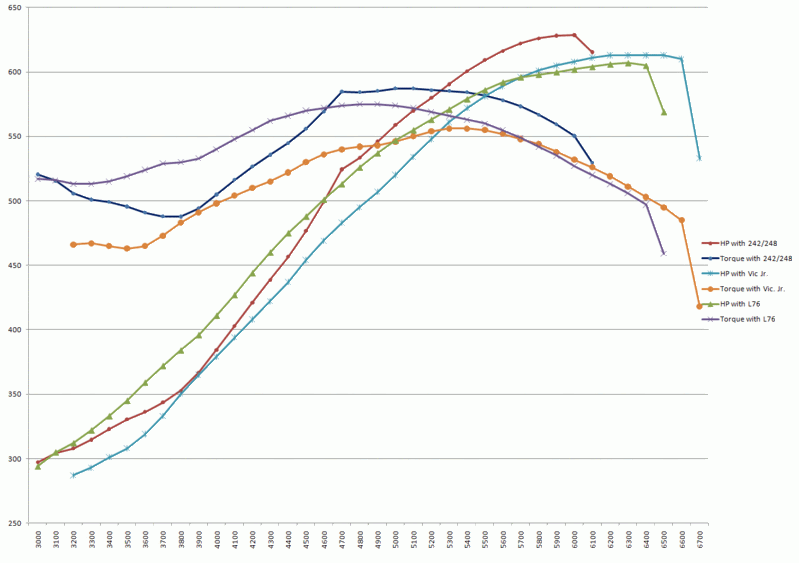
The orange torque line is my current setup. If I decide to go back to an LS-style intake, at least I know what awaits me. ;)Bryan (a.k.a. Carbuff)
70 Camaro RS Hunk'o'Metal - Previous Project
71 Firebird Project T.O.W. - New Project
05-15-2013 #95
Registered User
- Join Date
- Aug 2004
- Location
- Austin, Tx
- Posts
- 495
Well, I've tried several, and none worked without modifying something. There are several factors which affected this for me: Originally Posted by cdoggy81
- My engine sits about 3/4" further back than stock
- The top of the throttle body is way higher than stock
- The angle of the engine vs. the stock Pontiac setup
Those are some main ones. The combination of the Victor Jr, the LS setup in general, and the throttle body cause the shaker to see too high. I could step down to the GMPP intake, which is about 3/8" - 1/2" shorter, and that would help a lot. I purchased a replacement Accel throttle body which is 1/4" shorter than the one I had, and in my case, that little bit helped a lot.
Ultimately, we started with the 2.5" version of the PTFB shaker base. It drops about 2" and then has about a 2.5" side height. This ultimately drops the shaker about 3/4" from stock height. Then, due to the angle of the engine (apparently the stock Pontiac intake where the carb sits is angled to compensate for this), Eric ground the angle of the lip that sits on the TB to compensate. That worked great! Finally, Eric cut out the bottom of the shaker from the side, made a new circle from aluminum, slid the side about 3/4" forward, and welded it all back together. So the filter is closer to the side in the back than it is in the front, another reason we opted for drilling the holes.
So my combination of JRS subframe, Trans-Dapt mount plates, LS engine, Victor Jr. intake, Accel throttle body, PTFB 2.5" shaker base, and lots of modifying to the base made it all fit. And I'm still struggling to get enough air into the engine! Bryan (a.k.a. Carbuff)
70 Camaro RS Hunk'o'Metal - Previous Project
71 Firebird Project T.O.W. - New Project
05-15-2013 #96
-Moderator/Sponsor-
- Join Date
- Apr 2001
- Location
- The City of Fountains
- Posts
- 15,977
Why didn't you do something similar to what I did or that was on the Year One Bandit cars?


*Edit* Looking at your pictures it doesn't look like in a TA there is nearly as much height as there is in my GTO...
Andrew1970 GTO Version 3.0
1967 Cougar build
GM High-Tech Performance feature
My YouTube Channel Please Subscribe!
Instagram @projectgattago
Dr. EFI
I deliver what EFI promises.
Remote Holley EFI tuning.
Please get in touch if I can be of service.
"You were the gun, your voice was the trigger, your bravery was the barrel, your eyes were the bullets." ~ Her
05-15-2013 #97
Registered User
- Join Date
- Jun 2007
- Location
- St. Pete FL
- Posts
- 934
Thanks for the info Bryan. Originally I was going with:
PTFB drop base
Vic JR
Edelbrock TB
Now I may need to look at the GMPP intake (depending on price) & an Accel TB....
What TB did you have before the Accel?
If you go to a GMPP LMK about that Vic Jr :}HELP!!!
1973 TA 4 spd #'s match red/white = STOLEN
https://www.pro-touring.com/threads/...55#post1106255
05-16-2013 #98
Registered User
- Join Date
- Aug 2004
- Location
- Austin, Tx
- Posts
- 495
Andrew, this was one of the places where I've known what I wanted all along, and just haven't been willing to sacrifice form for function... I wanted the 4-barrel 'look', and I wanted a functional shaker. I knew it was going to be tough, but it's just what I want. Originally Posted by andrewb70
But you also hit on a key point: I don't have the height you have! I don't know the exact difference, but the LS-style intake wouldn't be that much shorter than the setup I have not. My shaker base is about 1/2" above my fuel rails, so I couldn't make it much lower even if I changed intakes. So I might be able to build a setup similar to yours, but it would literally have to be 1/2 as tall. I certainly couldn't run a 3" or larger pipe out of it. :(
If I were to try and build something like what you have, then literally my filter would be right on top of the TB. I don't know how well that would work either.
What size is that filter? I'm guessing approximately 14" x 12"? If what we've got really is a horrible power robber, then I might consider building something different.Bryan (a.k.a. Carbuff)
70 Camaro RS Hunk'o'Metal - Previous Project
71 Firebird Project T.O.W. - New Project
05-16-2013 #99
Registered User
- Join Date
- Aug 2004
- Location
- Austin, Tx
- Posts
- 495
It's tough to know what combination will work, since every setup is different. My suggestions are to, if possible, take some measurements off of a car based on the firewall. We measured how far forward the center of the original carb was, and how much lower it was relative to the edge of the firewall. That point stayed consistent after the swap, so we at least knew where we were starting from. We were about 1/2 - 3/4" closer to the firewall, and about an inch taller. Without putting it all together though, it's hard to know what you have... Originally Posted by cdoggy81
I had a throttle body which I had owned for about 15 years, and the company is long gone. It looks like a FAST, but it's not the same. The Accel is about 1 5/8" tall if I recall correctly. It was actually recommended by another member here. It doesn't match the picture on their website at all, it's a much nicer piece in person. Between that 1/4" saving, grinding down the lip which sits on the TB about 3/16", we managed to get where we needed to be. The GMPP would have made it easier, but like I said in reply to Andrew, I'm almost touching the coils and the fuel rail, so I realistically cannot go much lower. I might get 3/8" more if we pushed it, but after that it's modifying fuel rails (I already have the 1.5" tall injectors instead of the normal 2.5" tall ones) and relocating coils. Stuff I don't really want to do...Bryan (a.k.a. Carbuff)
70 Camaro RS Hunk'o'Metal - Previous Project
71 Firebird Project T.O.W. - New Project
05-17-2013 #100
-Moderator/Sponsor-
- Join Date
- Apr 2001
- Location
- The City of Fountains
- Posts
- 15,977
I hear you on all accounts. Hopefully your setup will work well, and this discussion will be mute. LOL Originally Posted by carbuff
I don't know the exact dimensions of the filter but it is huge. The application is for a Dodge Ram 3500 series pickup with the cummins diesel. I just went into the parts store and got the biggest filter I could find. One of these days I will get a little CAN bus scanner and monitor AITs, just for giggles. I can tell you that it makes quite a bit of noise when under WOT. Also, when it rains you can see the water droplets on the hood getting sucked in, even under a light tap of the throttle. Although, I have minor issues with drivability if the MAF gets wet...small price to pay.
I know that when I had the shaker with the BBC, my AITs were 5-10 degrees above ambient.
Andrew1970 GTO Version 3.0
1967 Cougar build
GM High-Tech Performance feature
My YouTube Channel Please Subscribe!
Instagram @projectgattago
Dr. EFI
I deliver what EFI promises.
Remote Holley EFI tuning.
Please get in touch if I can be of service.
"You were the gun, your voice was the trigger, your bravery was the barrel, your eyes were the bullets." ~ Her

 Reply With Quote


