

Results 41 to 60 of 129
Thread: and so it begins
-
08-11-2009 #41

 Registered User
- Join Date
- Dec 2006
- Location
- Out of the Burbs of Detroit to SoCal, then onto my ancestral homeland, the woods of Cascadia
- Posts
- 1,753

Please tell me the copper brake lines seen in post #24 wuill be replaced w/ steel
Greg Fast
(yes, the last name is spelled correctly)
1970 Camaro RS Clone
1984 el Camino
1973 MGB vintage E/Prod race car
(Soon to be an SCCA H/Prod limited prep)
-
08-11-2009 #42
Registered User
- Join Date
- Aug 2004
- Location
- Dunwoody, GA
- Posts
- 4,984
They aren't copper actually. That's the coating on the steel. The shop that did my bubble flares and my SS flares had that stuff. I thought it was copper too. It's supposedly some new steel that's much easier to bend and the coating is much better. It is much easier to bend. Not copper easy to bend though
Trey
"The early bird may get the worm, but the second mouse gets the cheese."
~ Jon Hammond
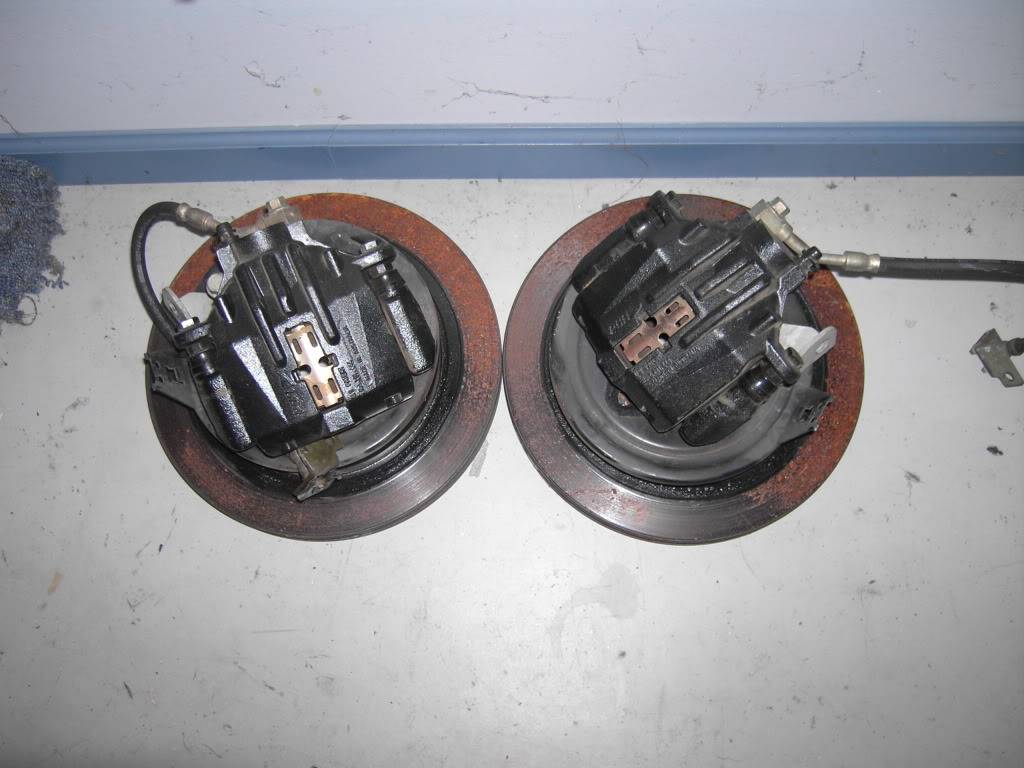
1979 WS6 Trans Am stock LT1/T56 drive train out of my Formula. BMW M-parallel rims. C5/C6 brakes
build thread https://www.pro-touring.com/showthre...ghlight=begins
08-11-2009 #43
Registered User
- Join Date
- Aug 2004
- Location
- Dunwoody, GA
- Posts
- 4,984
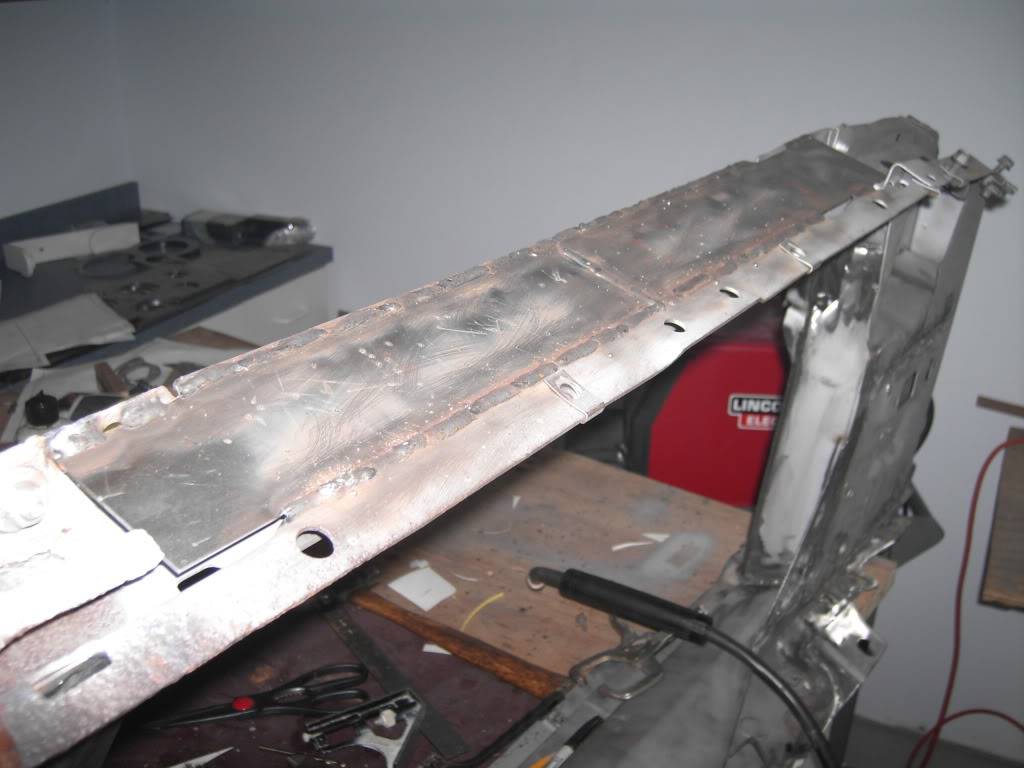
I lied. I do have pictures of the bottom of the core support boxed in. I just don't have pictures of the welds ground down. I got the idea to box in the core support and not just repair it from people like XV Motorsports and the project SN65.
I boxed it in using two pieces of steel instead of one for ease and because I'm running low on 16ga steel and don't want to be wasteful or buy more, lol.
 Trey
Trey
"The early bird may get the worm, but the second mouse gets the cheese."
~ Jon Hammond
1979 WS6 Trans Am stock LT1/T56 drive train out of my Formula. BMW M-parallel rims. C5/C6 brakes
build thread https://www.pro-touring.com/showthre...ghlight=begins
08-11-2009 #44 Registered User
- Join Date
- Mar 2007
- Location
- Florida
- Posts
- 2,391
Thats the way I'm considering doing the bottom of my core support. I'm hoping to use that area as an attachment point for a splitter.
08-11-2009 #45
Registered User
- Join Date
- Dec 2006
- Location
- Out of the Burbs of Detroit to SoCal, then onto my ancestral homeland, the woods of Cascadia
- Posts
- 1,753
 Originally Posted by WS6

Maybe Kunifer, commonly used in the UK? An alloy of copper, nickel, and iron (Ku--> Cu--> Copper; Ni---> Nickle; fer--> Ferrous--> Iron)Greg Fast
(yes, the last name is spelled correctly)
1970 Camaro RS Clone
1984 el Camino
1973 MGB vintage E/Prod race car
(Soon to be an SCCA H/Prod limited prep)
08-12-2009 #46
Registered User
- Join Date
- Aug 2004
- Location
- Dunwoody, GA
- Posts
- 4,984
No idea honestly Greg. I had never heard of there being a new steel for brake lines until the shop grabbed it. It was definitely easier to deal with than the steel I did use for the one section I had made out of SS but screwed up.
Trey
"The early bird may get the worm, but the second mouse gets the cheese."
~ Jon Hammond
1979 WS6 Trans Am stock LT1/T56 drive train out of my Formula. BMW M-parallel rims. C5/C6 brakes
build thread https://www.pro-touring.com/showthre...ghlight=begins
08-12-2009 #47
Registered User
- Join Date
- Feb 2008
- Location
- Detroit
- Posts
- 206
Looking really good Trey. Thanks for sharing the info on your rad saddle. I have to fix mine (the lower channel was grafted off my original saddle onto the one I picked up). Unfortunately, I didn't weld (those many years ago) and the guy I had do it, brazed them in. The welds are crappy and it still has that flimsy feel to it.
I think I might adopt some of your ideas for trying to strengthen it up.
Cheers,
~Brian.
08-13-2009 #48
Registered User
- Join Date
- Jul 2006
- Location
- Hackettstown, NJ
- Posts
- 1,026
well done on the rad support. I would add a 'Z bend' or coil to the brake lines though to provide for frame flex. the lines by snap or break if too much strain is acted upon the lines. Even with mine being grafted to the body of the car, it still flexes a little. the 'G-braces' help that issue.
nice mounth of the prop valve. looks like a familiar placement.
08-13-2009 #49
Registered User
- Join Date
- Aug 2004
- Location
- Dunwoody, GA
- Posts
- 4,984
That's a good idea. I did not even take that into consideration. The front lines are not secured down really at all so they should be fine. The rear line though goes straight down and is secured almost right away. I'll see what I can do with them. Originally Posted by Takid455
Did you put your prop valve there too? LOL I had no idea. How is your car coming along? Love the things you are doing as well.
Oh yeah, I mocked up the core support today with the fenders and all. I'll have to put a wedge under the bolt at the saddle that I rebuilt. After all that checking I still put it in wrong enough that it will screw up the alignment. Oh well, I can make it work with a wedge and other than that, everything lines up just fine. Hopefully I will have another update this weekend. Core support is done besides painting.Trey
"The early bird may get the worm, but the second mouse gets the cheese."
~ Jon Hammond
1979 WS6 Trans Am stock LT1/T56 drive train out of my Formula. BMW M-parallel rims. C5/C6 brakes
build thread https://www.pro-touring.com/showthre...ghlight=begins
09-07-2009 #50
Registered User
- Join Date
- Aug 2004
- Location
- Dunwoody, GA
- Posts
- 4,984
man has it been a long time since I updated. I've been working on the car steadily but haven't had time to sit down and upload pics and write this stuff out. Here's what I have to up load.
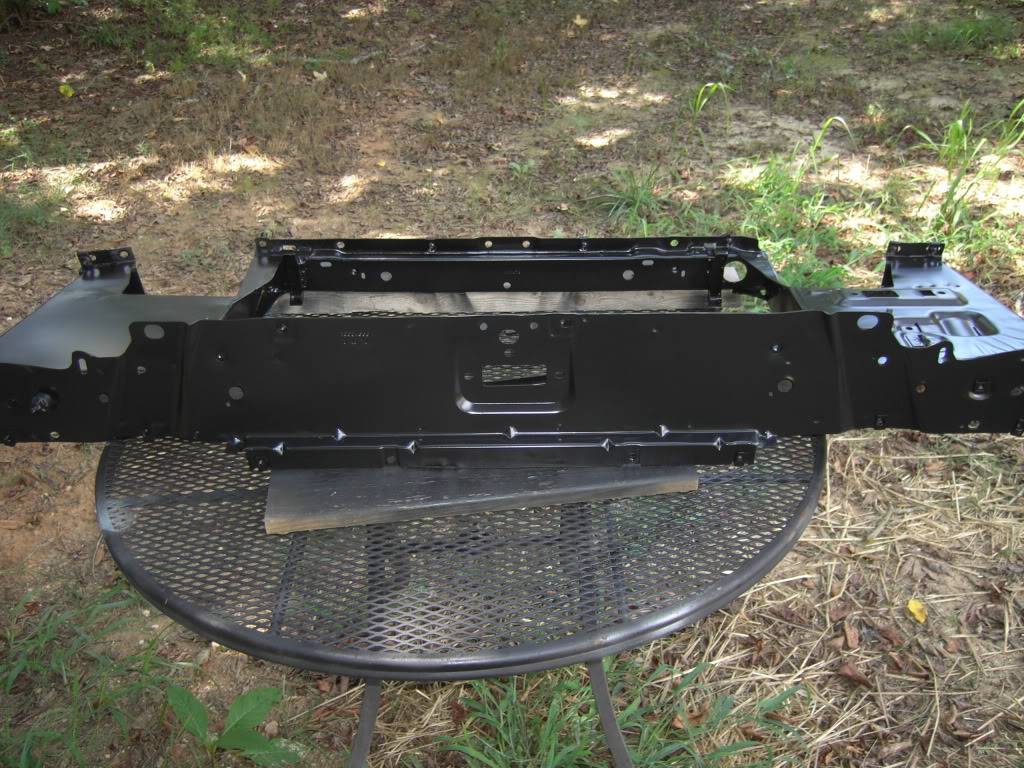
I'm done with the core support and it's all nicely painted. I used Krylon semi-gloss black. this stuff dries in 10 minutes and looks great I think.

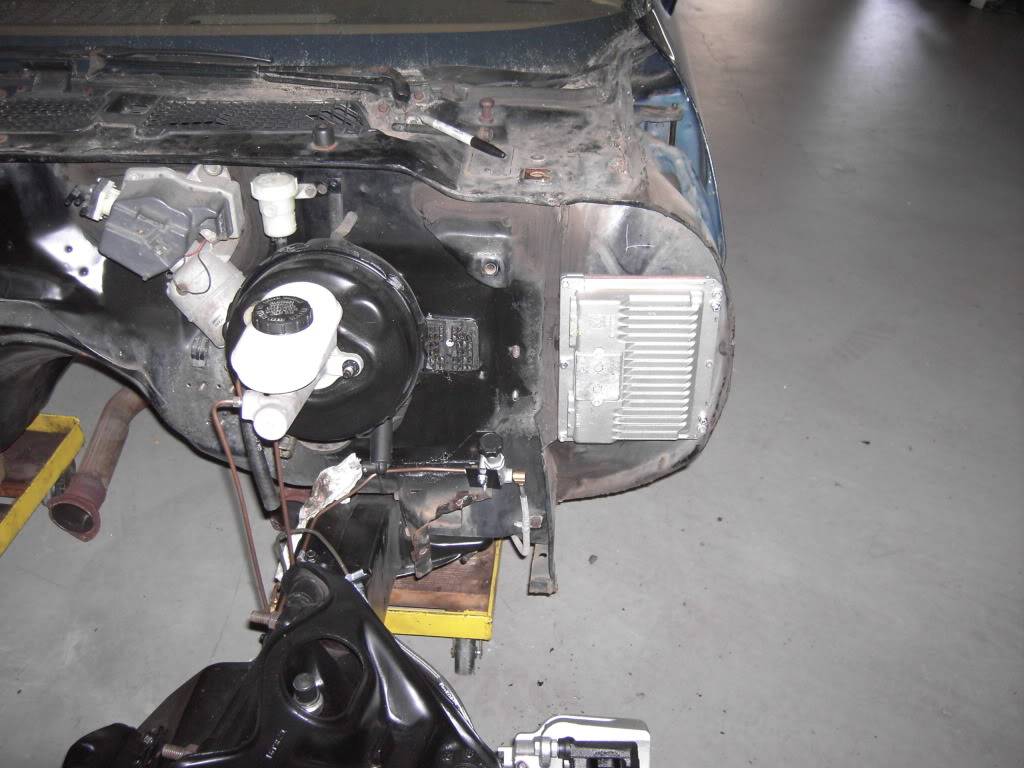
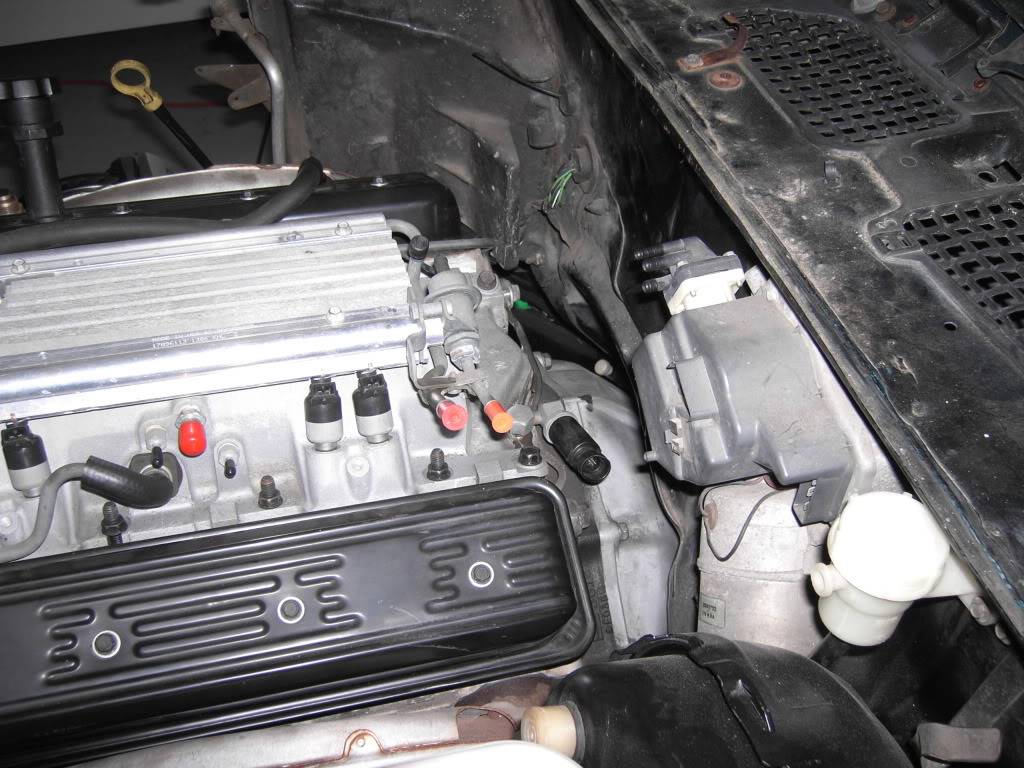
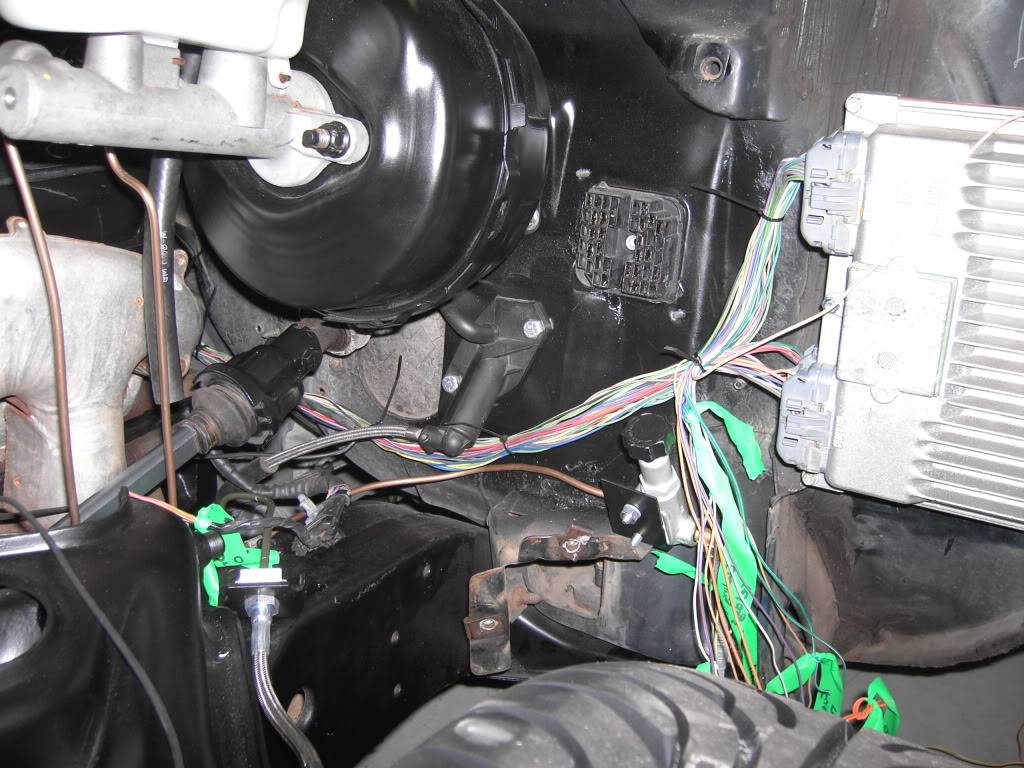
I've mounted the computer to the firewall. It's not the nicest way but I didn't feel like making a bracket. This will work just fine. I'm going to have to leave the power antenna in a box or sell it though. The car was optioned from the factory with a power antenna which went in the driver's front fender. I'd rather have my ECM on the firewall under where the antenna comes though. I have a severe aversion to putting the ECM at the front of the engine bay and these cars are great at wasting space. So basically unless I mounted it inside or got serious about fabbing something up, the only place to put it is on the firewall right there. This place works out great as I can hide the wiring harness as much as possible which is something I routinely do.
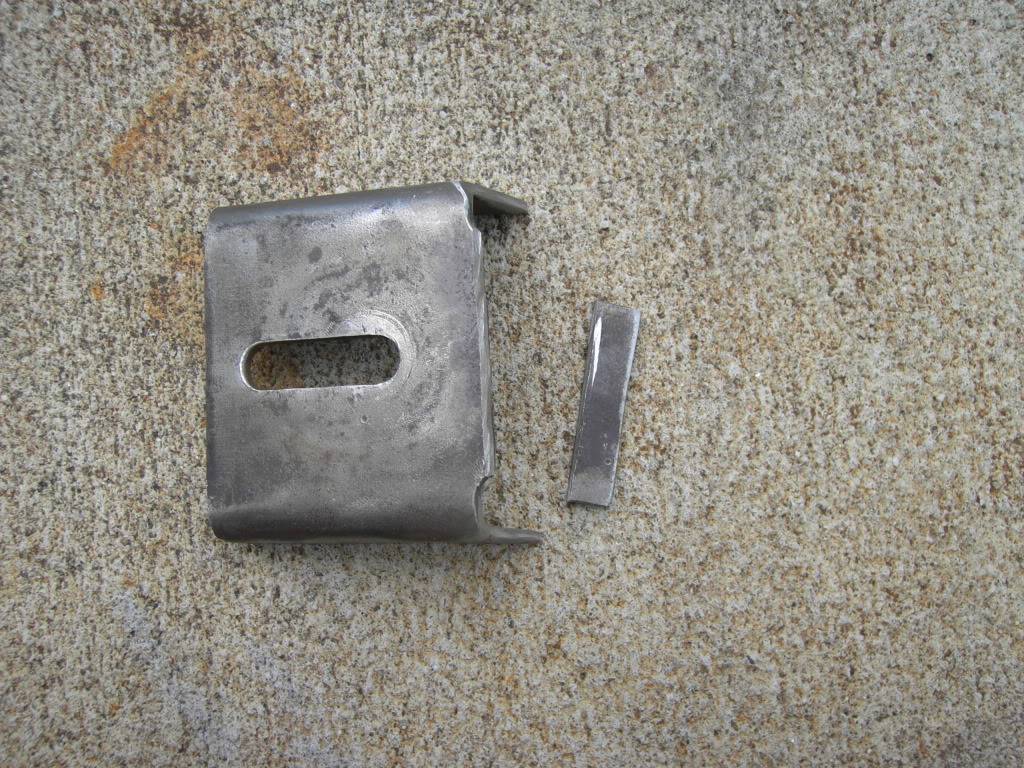
These next pictures show how to get the transmission cross member to work with the T56. You'll need to modify the mount by cutting the metal away because the mount will not sit inside the bracket which has been flipped upside down and rewelded to the cross member itself. You'll also need to cut away that little tab off the bracket so it will fit tightly against the oddly shaped cross member. The pictures are fairly self explanatory. I set the bracket on the cross member before welding it in such a manner as to give me about 5* down in the back on the trans. I did this so I could shim the trans up and adjust the pinion angle instead of trying to weld it in the exact spot. I also didn't take any close ups of the welding I did on the cross member. I was taxing the hell out of my 110 mig. High heat sloooooow feed. Got good penetration but it's ugly. Worst part is, the neighbor had just bought a 220 mig a few weeks earlier and didn't tell me. He needed it to weld the long arm suspension brackets onto his Jeep. Doh!
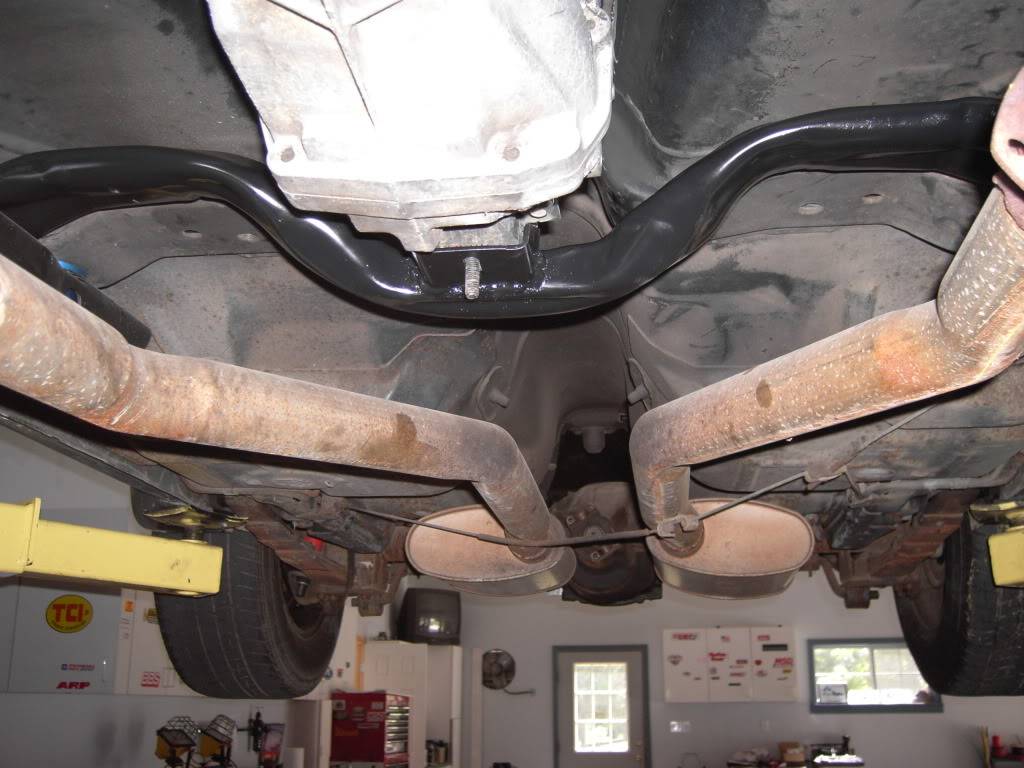
and the cross member in place and painted. New holes were drilled in the subframe for the bolts and access. What a messy hard job. 16 holes, two of which where hole saw drilled, all drilled upside down. I was so sore when I got done. Good bits and cutting oil are a must. Just put the oil onto a cloth and wipe it onto the bit after a little drilling. This will cool the bit and help it cut as well as not sling oil everywhere or have it drain back into the drill
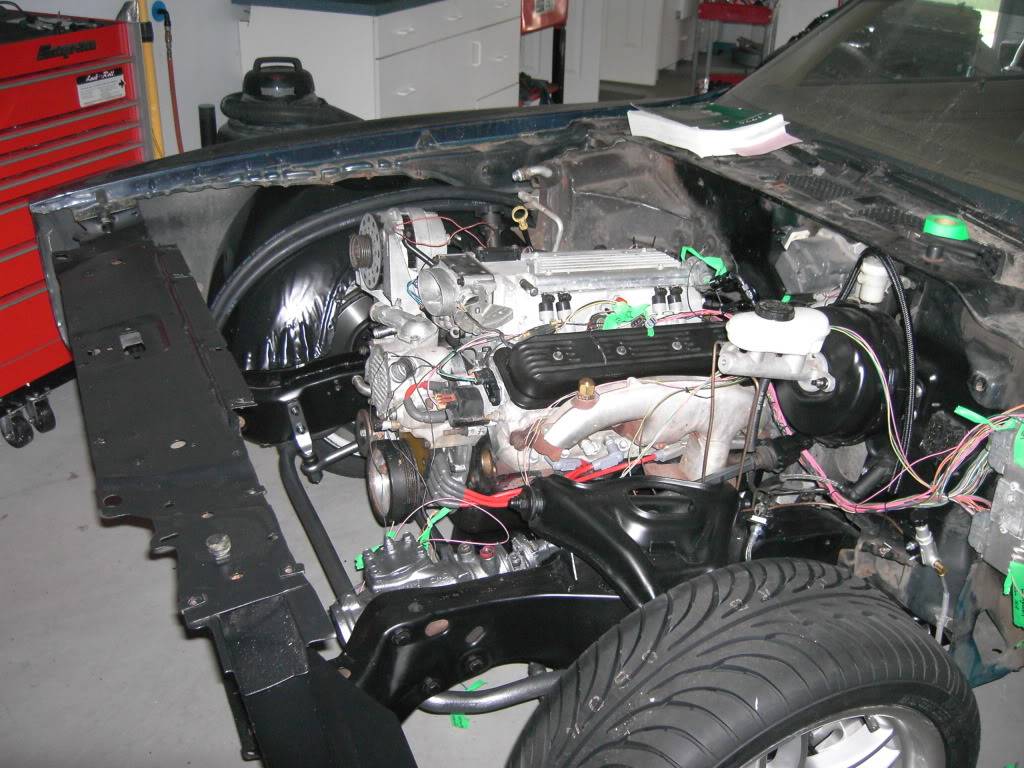
This is just a couple of pictures to show how close or really how far away from the firewall the engine sits. I really think I will move the engine back when I build the turbo system. We will see. Again, that's years from now.
Remember way back when I mocked the engine up I showed how close the upper control arm was to the accessory bracket? I introduced Mr Bracket to Ms Carbide bit :O
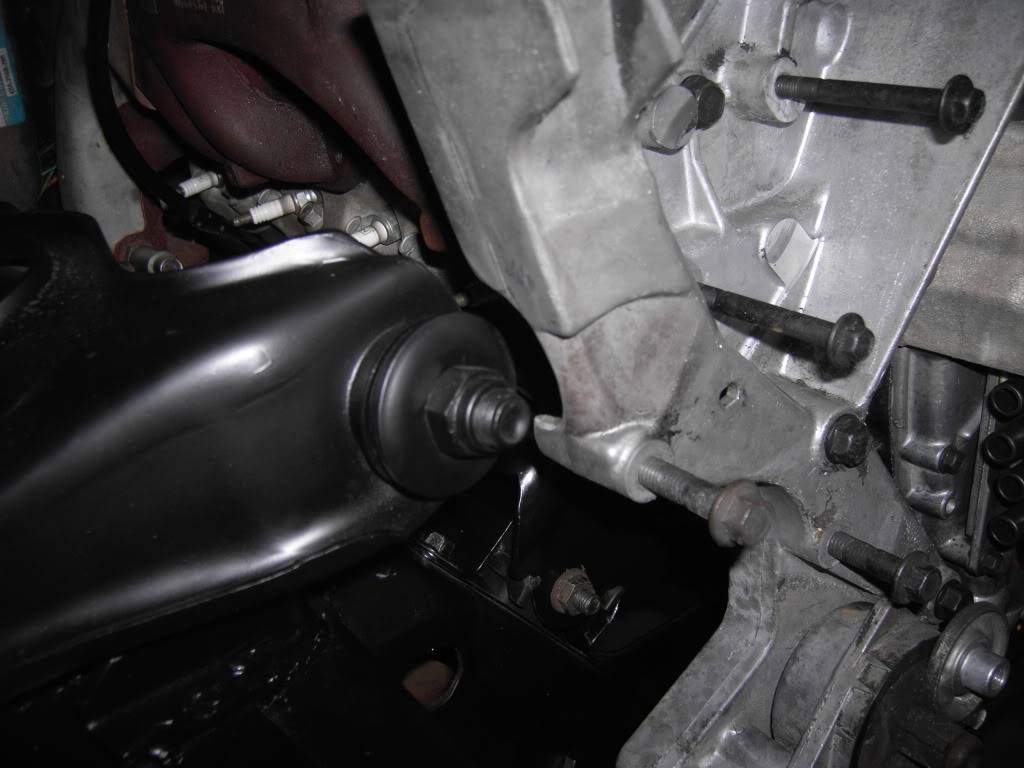
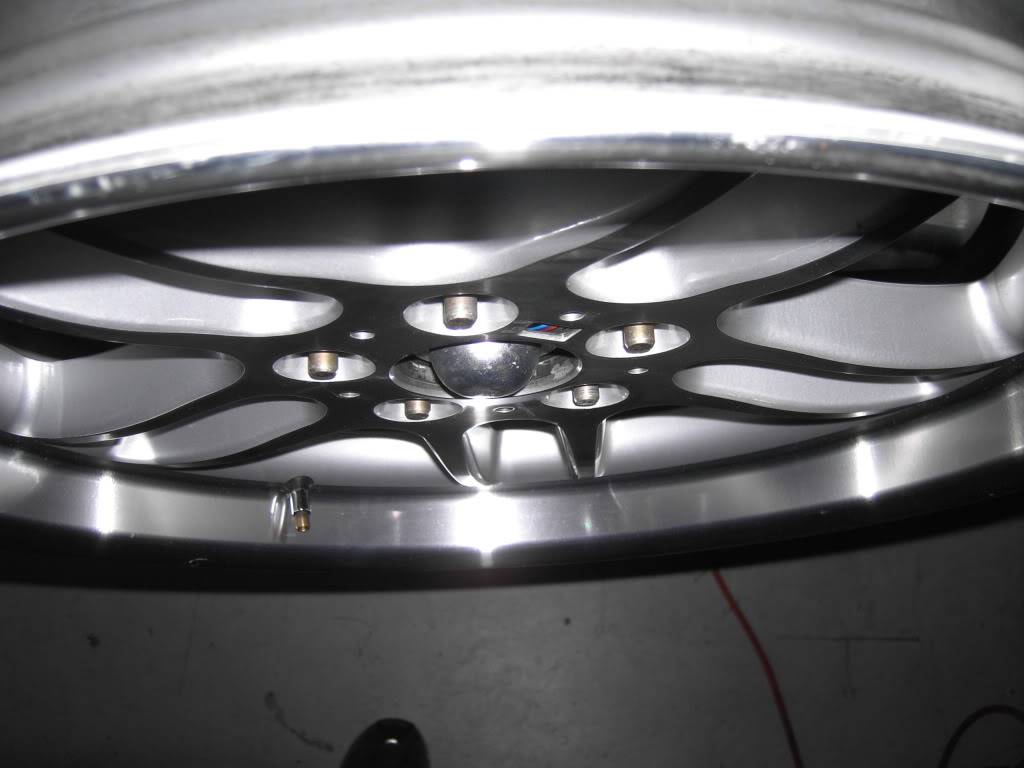
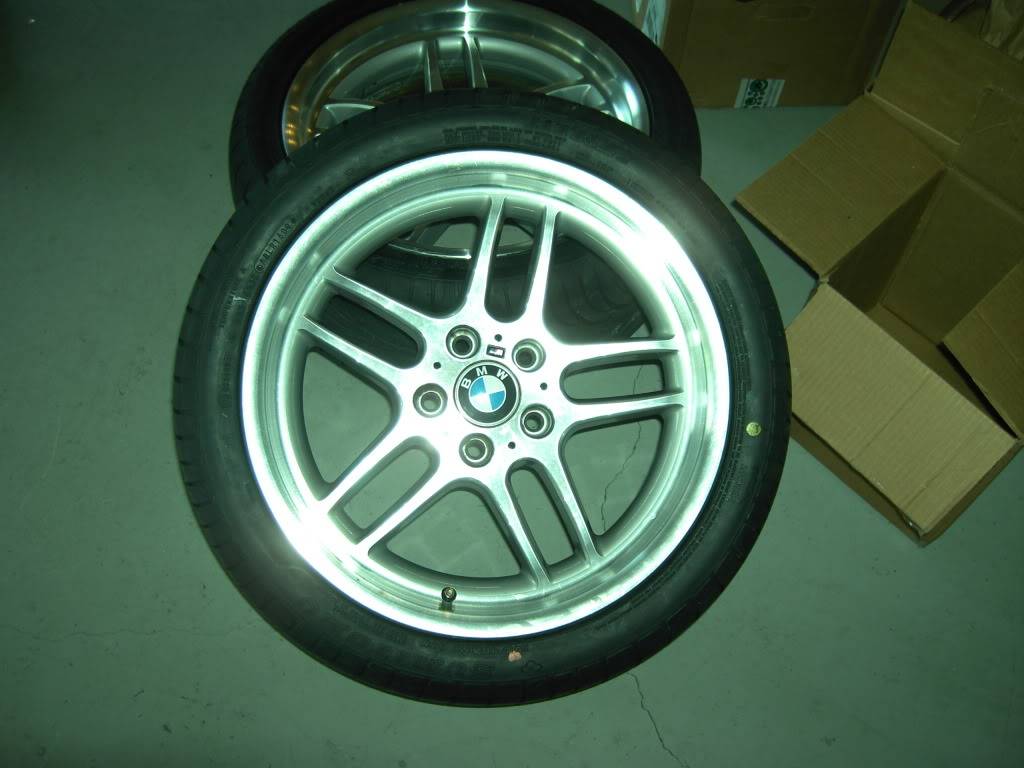
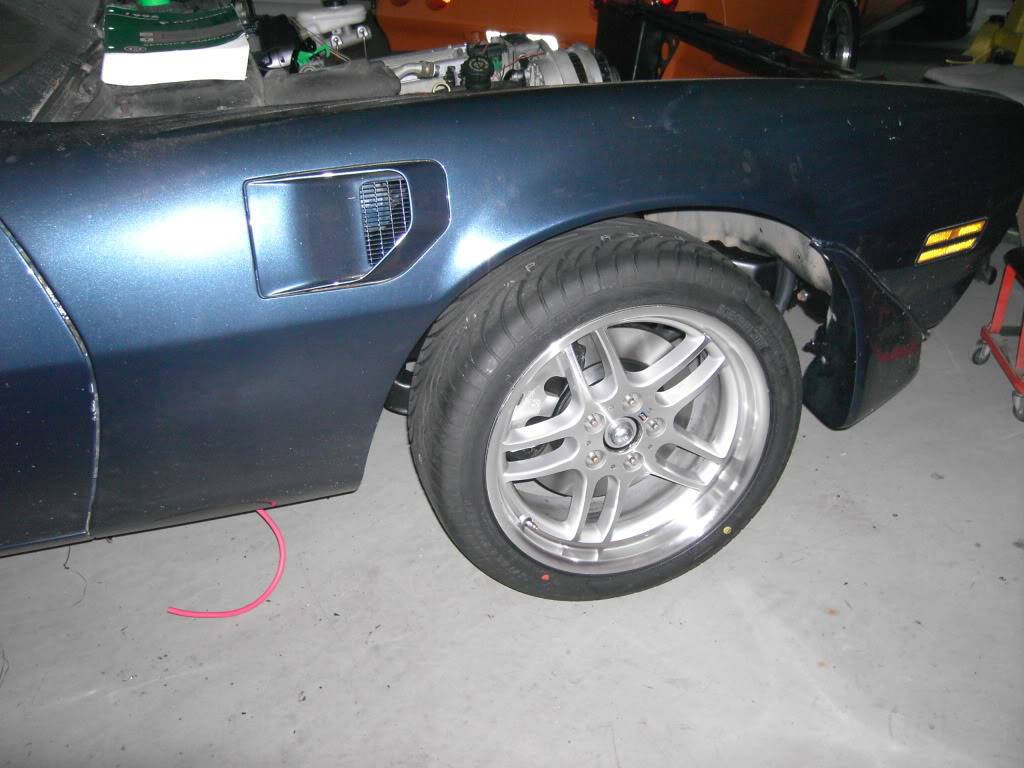
Photo of the rims mocked up on the car. I really dig these rims. I'll eventually switch the fronts out to another pair of rears so that I have 9.5 inches of rim on each corner.
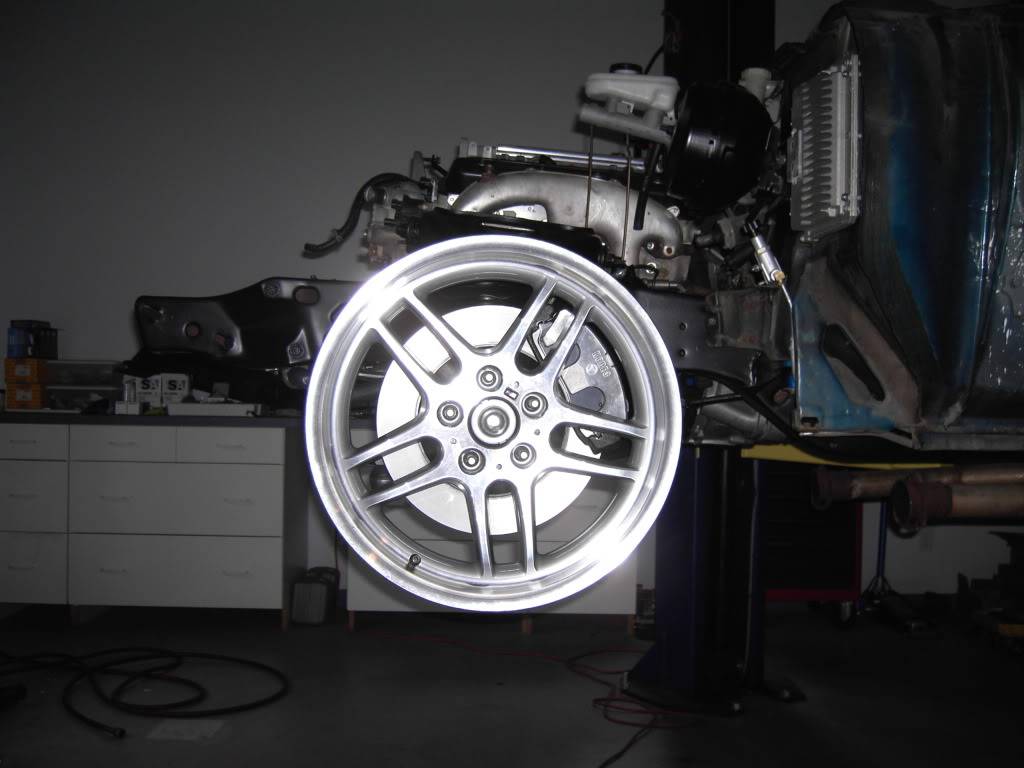
This picture shows why I need to move my rims out 1/2". I just have no idea if I can. I'll have to see once I put the fenders back on where everything sits. With 1/2" spacers, my back spacing will be right about 4-5/16". Not sure if this will work on an 8in wide rim. I've got my fingers crossed that it does. I want my center caps on there.
 Trey
Trey
"The early bird may get the worm, but the second mouse gets the cheese."
~ Jon Hammond
1979 WS6 Trans Am stock LT1/T56 drive train out of my Formula. BMW M-parallel rims. C5/C6 brakes
build thread https://www.pro-touring.com/showthre...ghlight=begins
09-07-2009 #51
Registered User
- Join Date
- Aug 2004
- Location
- Dunwoody, GA
- Posts
- 4,984
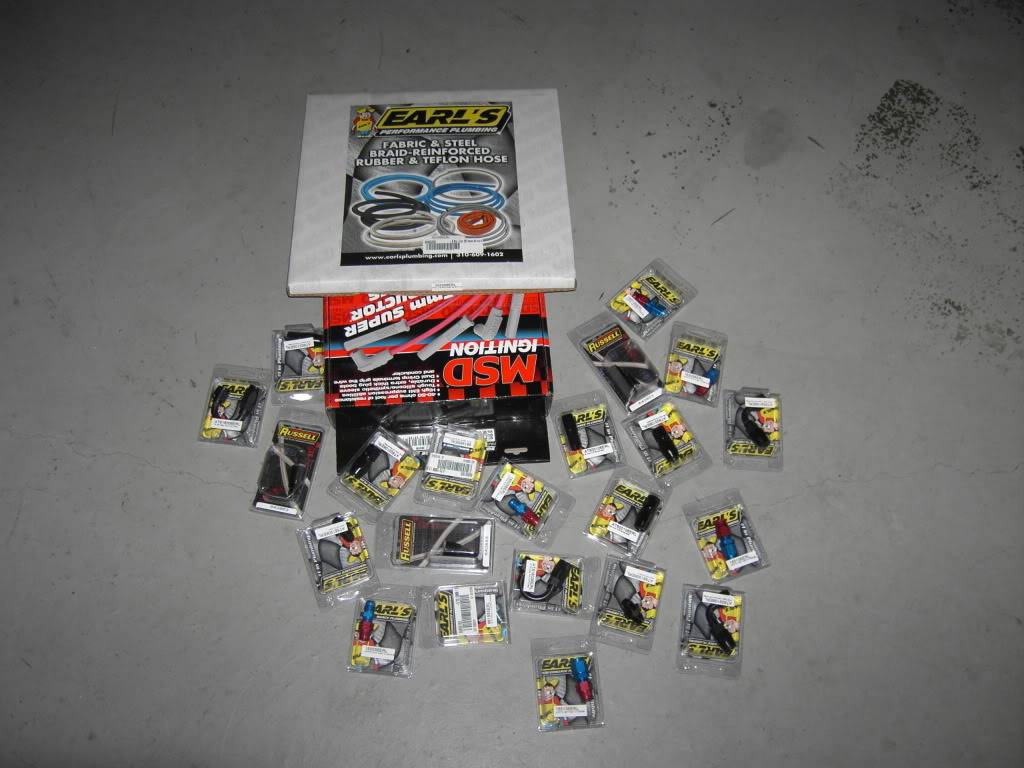
More goodies. First up are the fuel system components. I'm on a budget and not doing things as well as I could or would if this was a customer's car but you'll find that fuel and wiring I will not skimp on, period. Those are my cut to fit LT1 wires with 90* opti boots. I put those on today but the pics are at the shop still. Maybe next weekend I can show them off.
Tires. Sumitomo HTRZ II in 245/40/18. These tires get good reviews for the most part. I need them to fit and look correct as well as allow me to go down the road. At $107 each, they fit my bill just fine. In all seriousness, I would keep an eye on Sumitomo. They have come a long way from when they started. I expect and hope that in a few years they are at the top of the list for good tires on a budget. I'm talking on par with Kuhmo Ecsta MX's and Firestone Firehawk Wide Ovals. I'd run the Wide Ovals if I could afford them. That or BFG KDW 2's? I think it's the 2's that have that wicked tread pattern as well as grip.
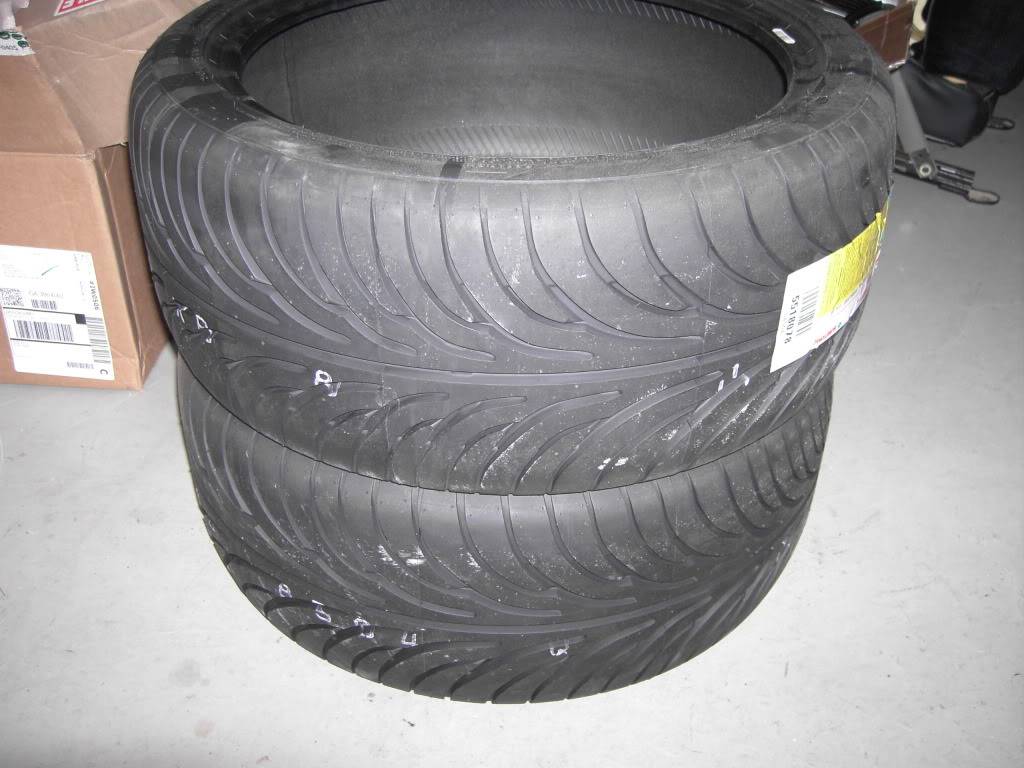
Here they are mounted. They fit the rim perfectly IMO. I highly recommend everyone check out Tire Rack's specs section on any tires you are thinking of buying. I did that with these tires and it saved me. I wanted to run 255/40s on the front. The rim and the car can handle that. However, the 255/40s would have been a tad taller than the 275/40s I wanted to run in the rear. It would have looked dumb. These 245/40s are slightly shorter overall than the rears will be. Like I said, they fit perfectly IMO.
 Trey
Trey
"The early bird may get the worm, but the second mouse gets the cheese."
~ Jon Hammond
1979 WS6 Trans Am stock LT1/T56 drive train out of my Formula. BMW M-parallel rims. C5/C6 brakes
build thread https://www.pro-touring.com/showthre...ghlight=begins
09-07-2009 #52
Registered User
- Join Date
- Aug 2004
- Location
- Dunwoody, GA
- Posts
- 4,984
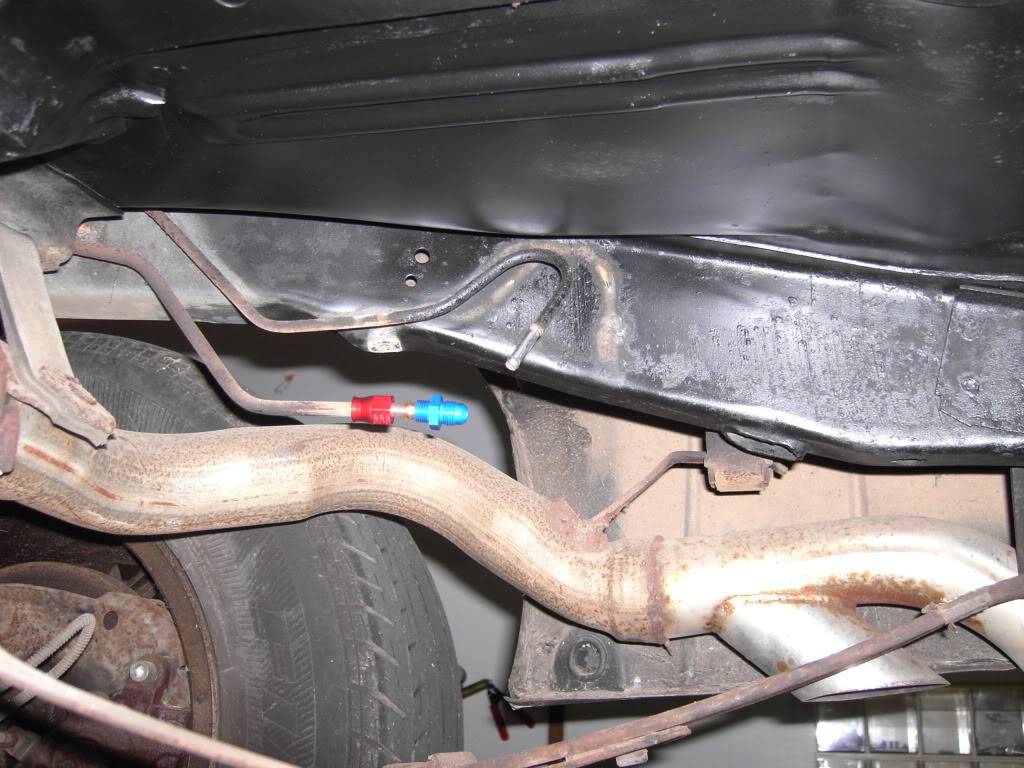
OK on with the fuel system. I'm actually using the vent line that ran to the charcoal canister as the return line. The vent line is 5/16" and the factory original return line is only 1/4". I'm just using the line and not the port on the tank for fuel return so I should be fine.
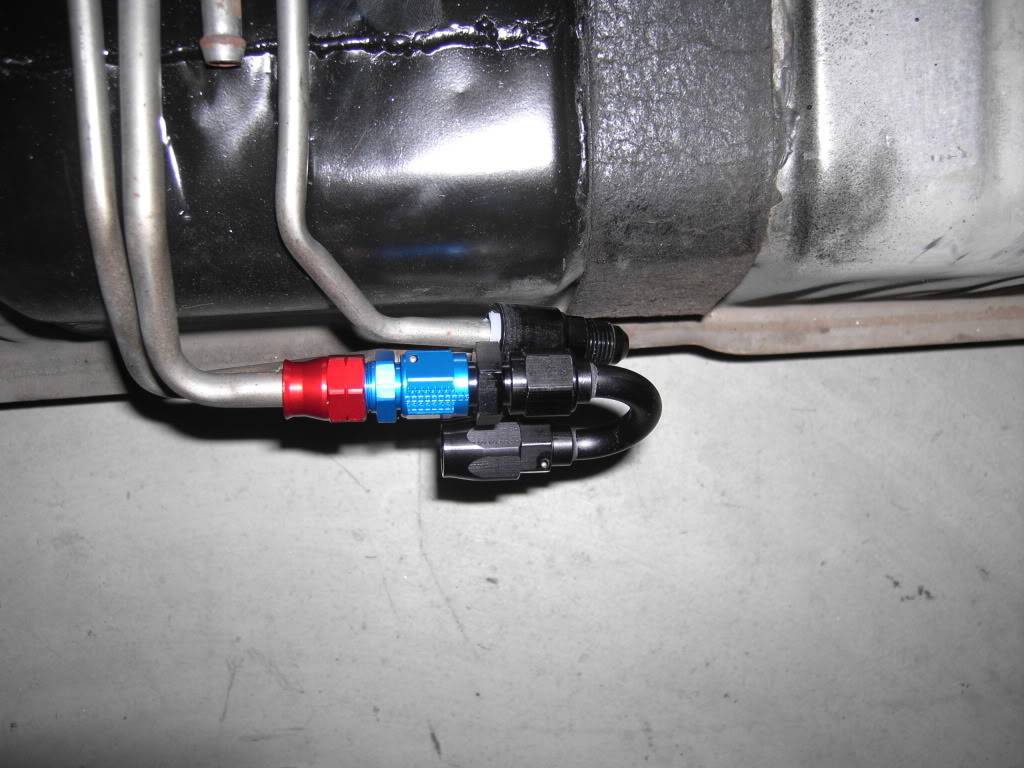
Here's what the fittings on the end of the fuel pump connects will look like. I didn't think I would get a good shot with the tank in the car so here it is while sitting on the floor. Everything clears and will work out just fine.
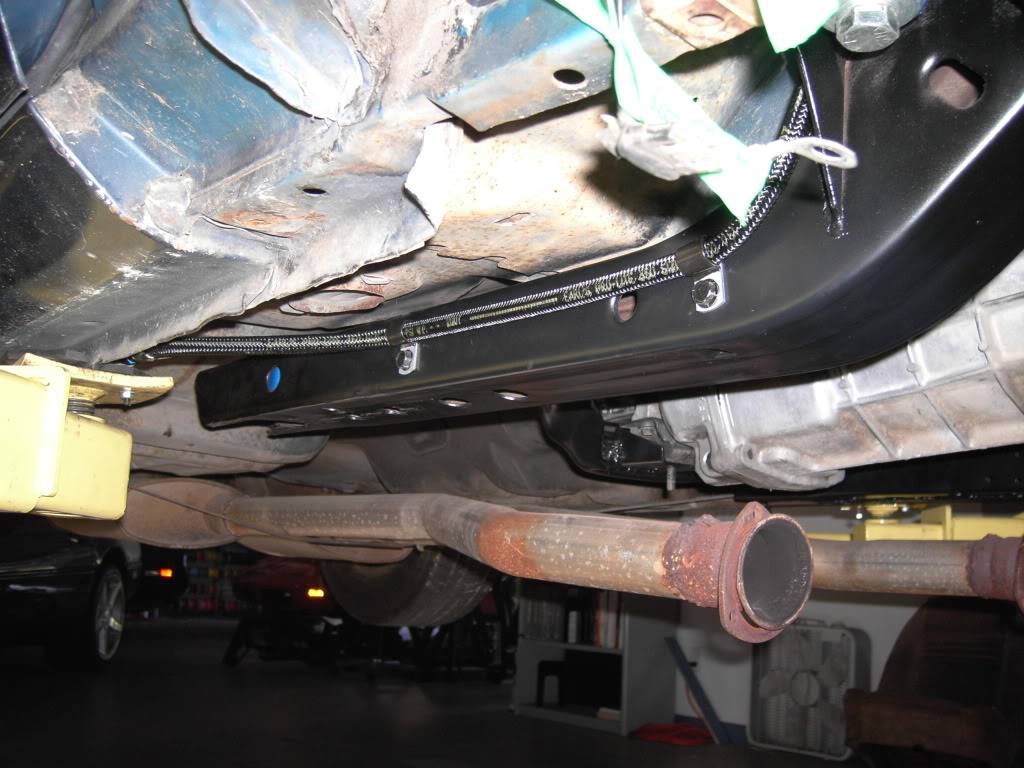
I used the factory hard lines as much as possible when hooking everything up. I don't like running soft lines down the car even earl's Pro-lite 350 which I love and am using. These cars don't have a frame rail to follow or even a direct shot so I decided to adapt to the hard lines.
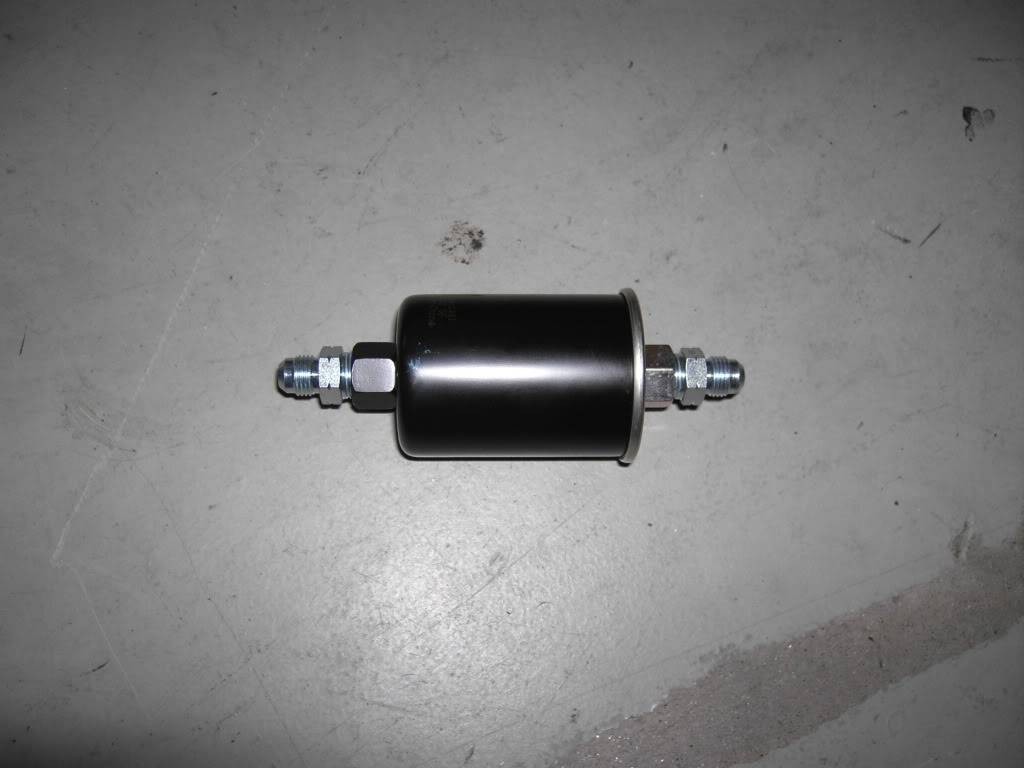
Here's a great idea that was mentioned to me by Doug F. Use a Corvette TPI fuel filter and just get the fittings to adapt to the 6AN hose. The LT1 and TPI cars ran with the same fuel pressure so the filter will work just fine. The flow rates between the engines isn't that great of a difference either. Besides, as Doug mentioned, the filter will support a lot to horse power too which requires lots of fuel flow. So here's my $6 fuel filter that can be easily bought at any parts store. The fittings are from Earl's
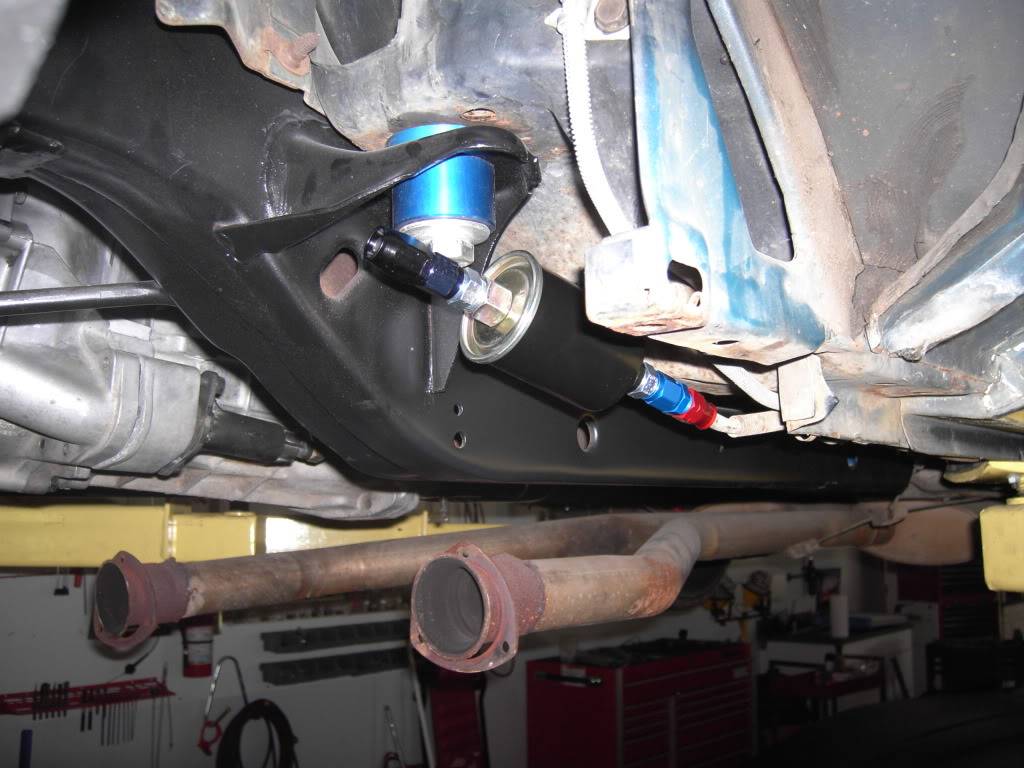
I'm mounting it right under the number 2 subframe mount. It will be hidden but easily accessible here.
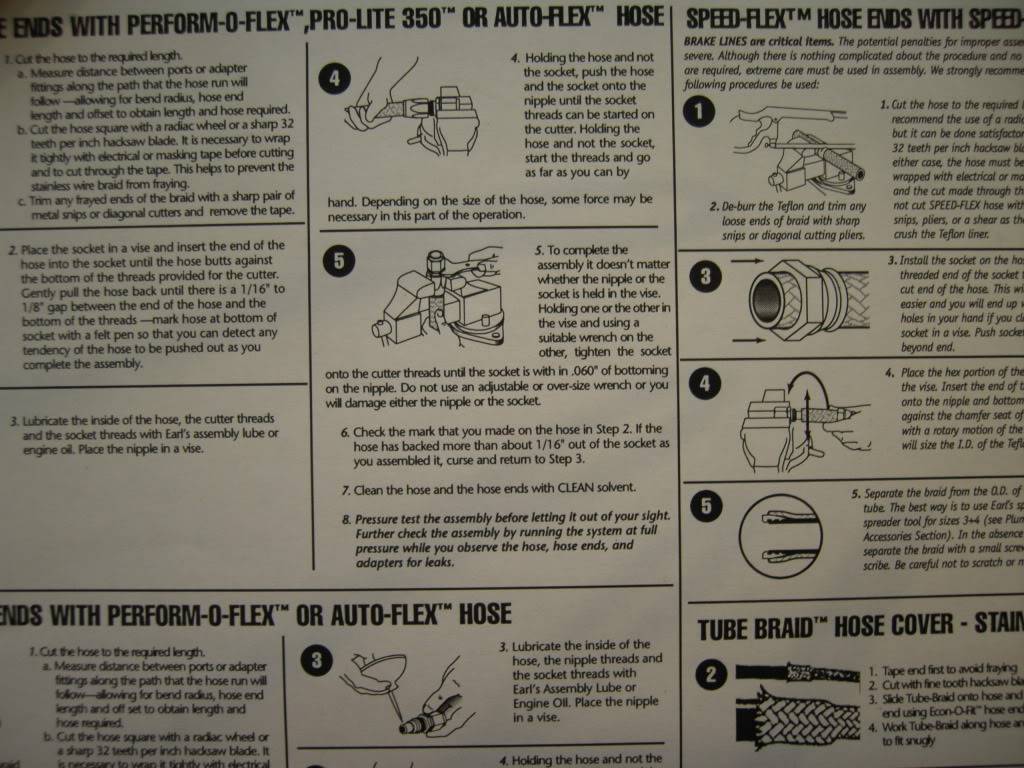
Now for some comedic relief. This is why you should always read directions. The PC police have not won their stupid little war. People with senses of humor still exist. read step number 6 carefully. I laughed
Here's how the driver's fuel line will reach the engine from the hard line. That plastic loop that's right below the wiper motor I believe originally held the wiring harness. I thought it would be better for it to hold the fuel line.
And connected to the fuel rail now.
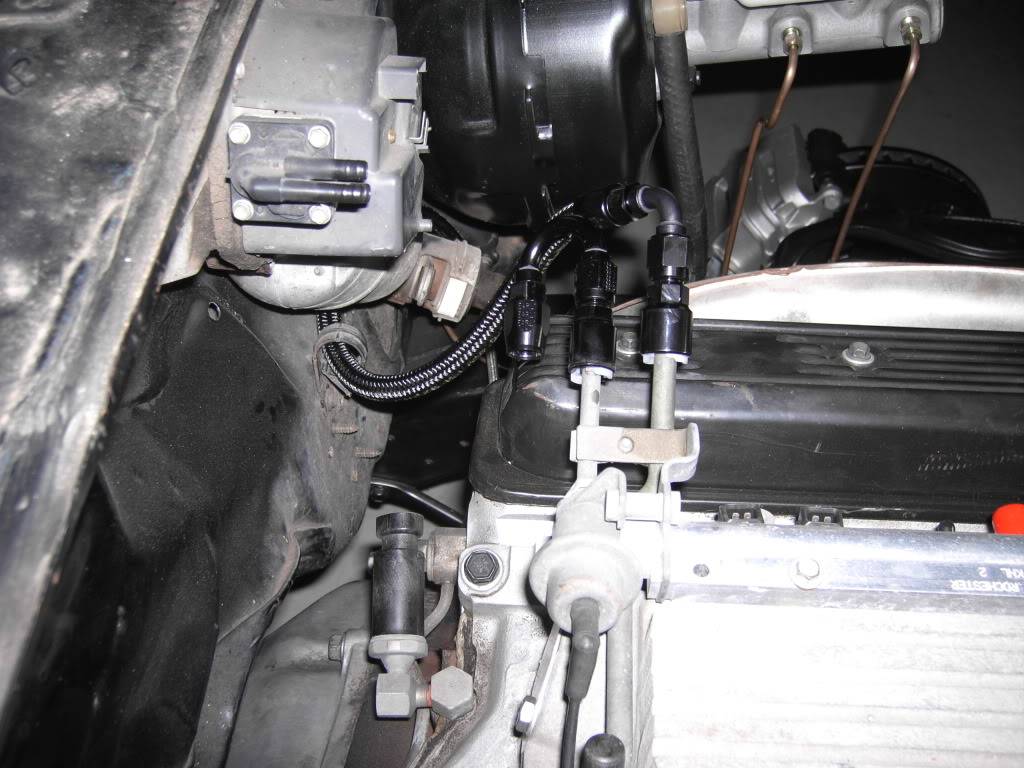
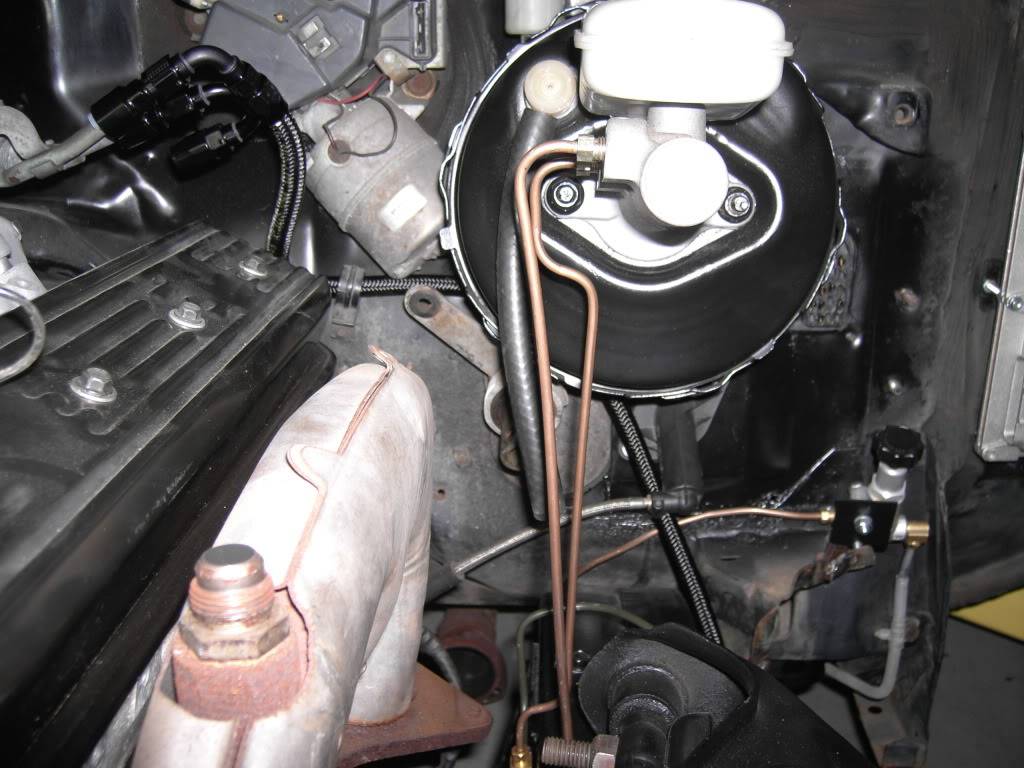
As you can see, I'm running the return line down the passenger side. This is how the factory did it with the 403. I'm not sure but I believe all the late 2nd gens were this way regardless of engine choice or fuel pump location. Feed on the driver's side and return down the passenger side.
 Trey
Trey
"The early bird may get the worm, but the second mouse gets the cheese."
~ Jon Hammond
1979 WS6 Trans Am stock LT1/T56 drive train out of my Formula. BMW M-parallel rims. C5/C6 brakes
build thread https://www.pro-touring.com/showthre...ghlight=begins
09-07-2009 #53
Registered User
- Join Date
- Aug 2004
- Location
- Dunwoody, GA
- Posts
- 4,984
I liked the plastic loop on the driver's side so much that I added one to the passenger side. It was almost necessary as the exhaust manifold sits further back and closer to the firewall on the passenger side and I certainly don't want the return hose to get melted or rupture.
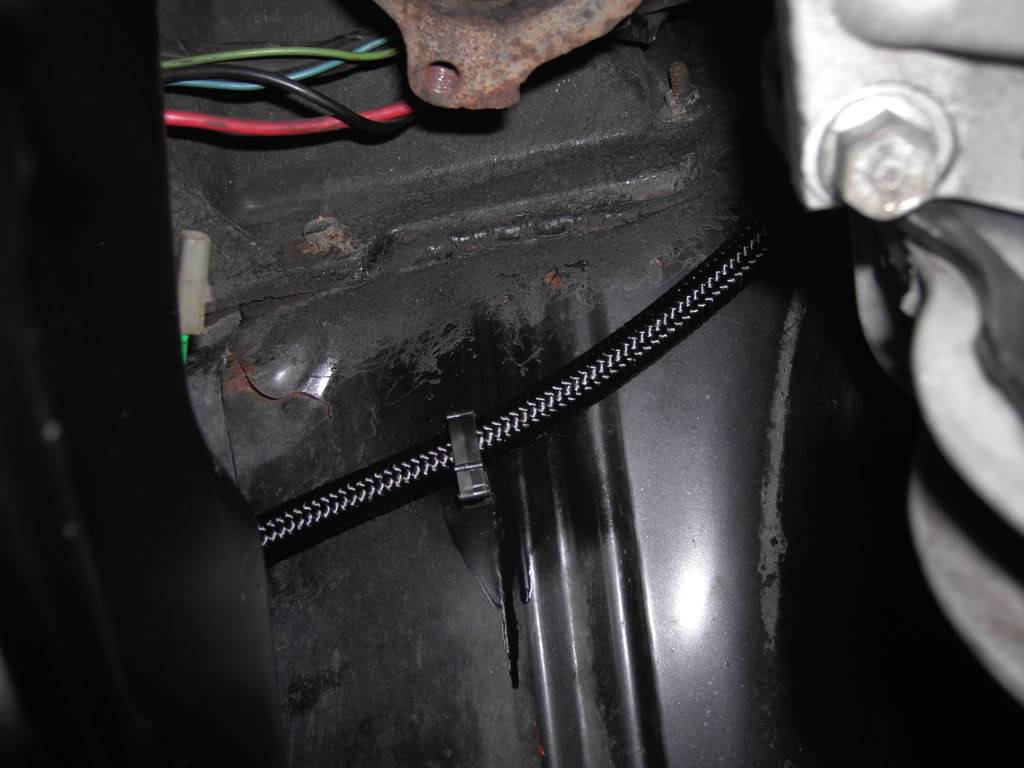
And here it is clamped to the side of the frame rail on the passenger side. I used some generic conduit clamps. Not he prettiest but they work great and I had them. There's enough flew between the connection at the frame rail to the hard line to not be an issue.
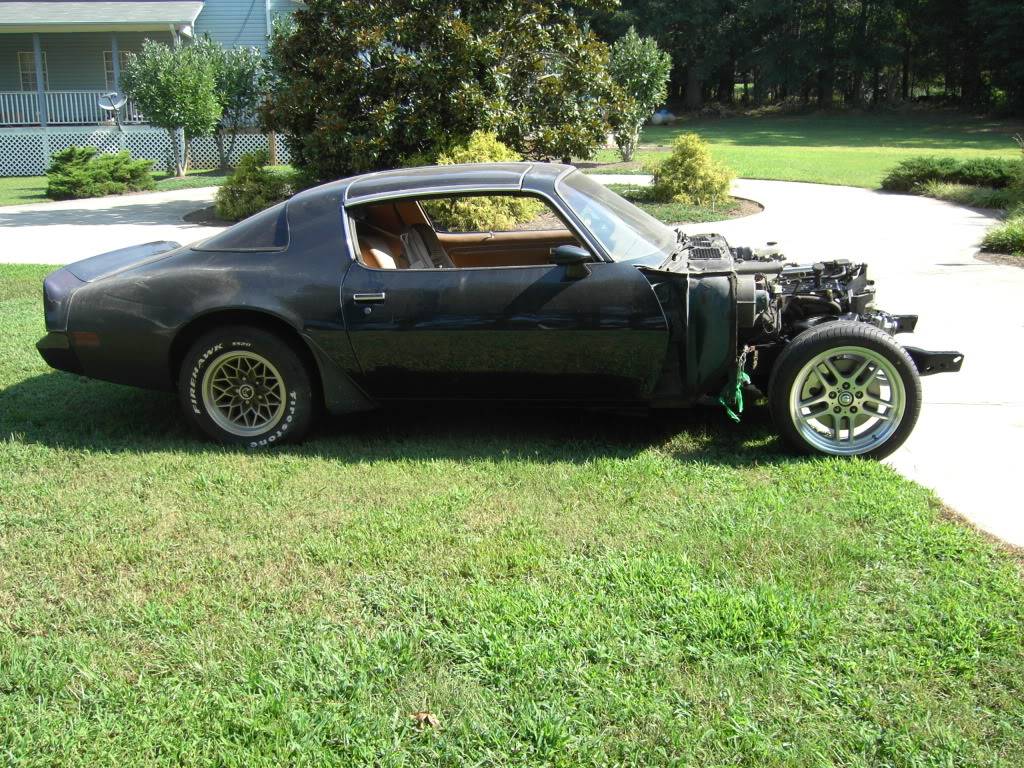
Voila! gratuitous outside shots of the engine and trans sitting in the car with the car on all four wheels again. I'm further along than this like I said. I'm well into the wiring for the engine and that's very time consuming for me to do since I'm so anal about it. I'll update again when I can. Thanks for looking.
 Trey
Trey
"The early bird may get the worm, but the second mouse gets the cheese."
~ Jon Hammond
1979 WS6 Trans Am stock LT1/T56 drive train out of my Formula. BMW M-parallel rims. C5/C6 brakes
build thread https://www.pro-touring.com/showthre...ghlight=begins
09-07-2009 #54
Registered User
- Join Date
- Dec 2004
- Location
- North Jersey
- Posts
- 983
Awesome job Trey, I'm impressed!!! Can't wait to see the next updates!
Steve Ragusa - North Jersey
2006 Infiniti G35x
Former Build - 1988 Monte Carlo SS - ZZ4-cammed TPI 355, F-body serpentine conversion, World-Class 5-speed, Eibachs/Bilsteins, Howe tall LBJs, 34mm hollow front swaybar, 3/4" straight rear bar, 17" Coys C55s, 12" front discs, and more. Sold on 2/28/11.
09-25-2009 #55
Registered User
- Join Date
- Aug 2004
- Location
- Dunwoody, GA
- Posts
- 4,984
ok so I thought I'd spend my Friday trying to get this caught up instead of doing homework. Sounds good to me!
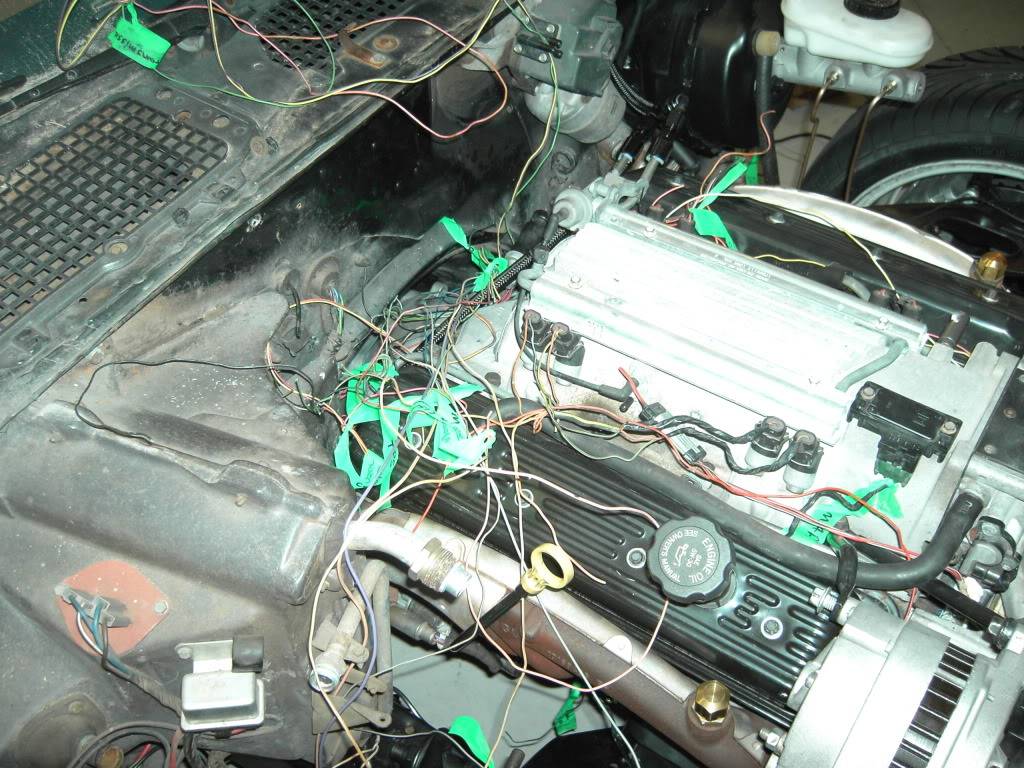
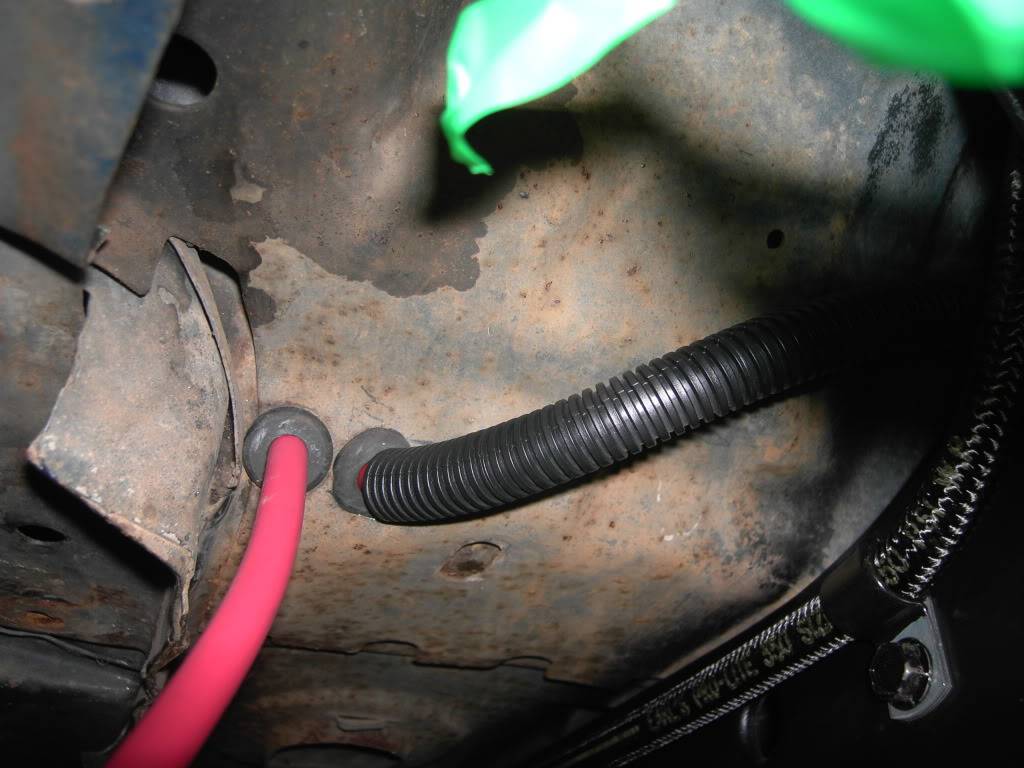
Anyway, here are some random wiring pictures. I decided to modify the factory harness which means everything on the passenger side has to be lengthened due to the fact that the PCM now sits on the other side of the car from where it did in my 96. I think this is the last time I modify a harness to work. From now on, I'll build them from scratch. I have all the tools, connectors, and pins needed. Oh and I have a few miles of wire in all sorts of colors. This has taken me much longer than I thought it would but it takes time to make it look right and build it for the car and not just for the engine. I still need to get the fuse panel inside the car mounted and wired as well as get the MAF, IAT, and fans wired up. I need the driver's inner fender on for that though. So it may be a little while yet unfortunately. I've also only just begun on the battery relocation too.
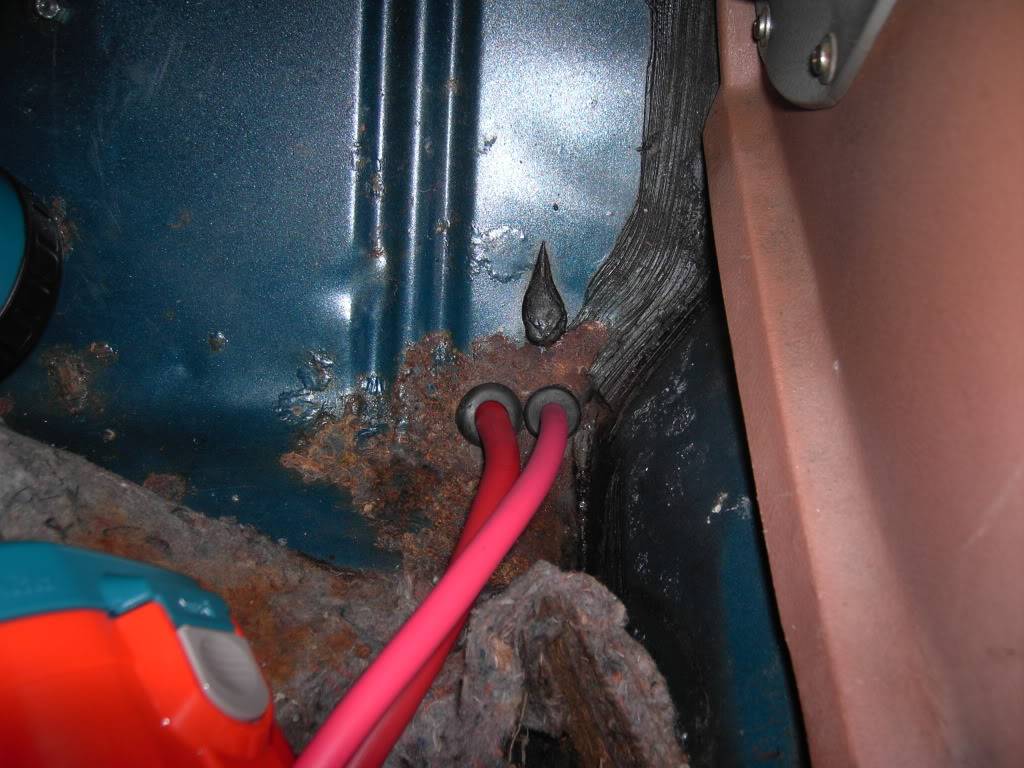
For relocating the battery, I'm running a 2ga and 6ga wire from the rear. The 2ga is for the starter only and the 6ga is to power the car and recharge the battery. The 6ga is overkill but I'd rather go big than small. I'm also going overboard on circuit breakers and fuses too I bet. Again, better safe than sorry. I'm running the wires through the car instead of under. I see no reason to go under the car. The battery is in the trunk, the wires are better protected inside the car, and if you've ever seen the bottom side of a 2nd gen, you know there is no straight forward path to take from front to back. So inside the car it goes. Unfortunately, I'm finding more and more rust than I thought the car had. The car is plenty solid still but I think this one will be the track car. I'll build something else for cruising and looking pretty. I've got this mean itch to build a Ventura slammed to the ground and looking a lot like Notorious by Rad Rides. Anyway, pictures of big wires
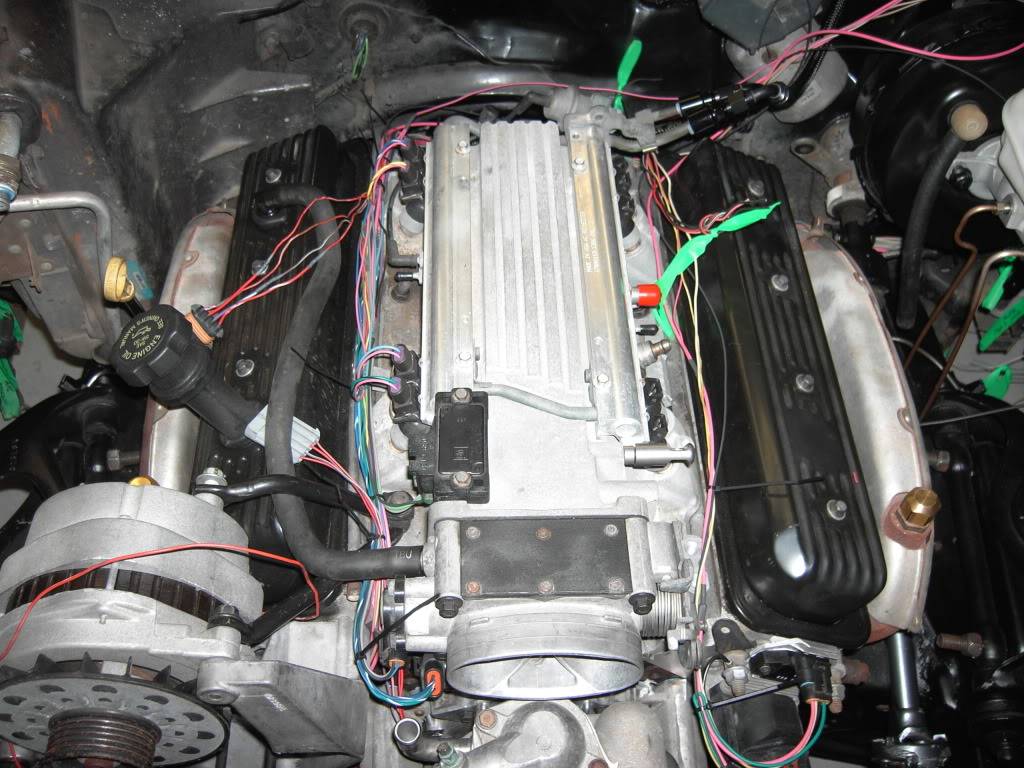
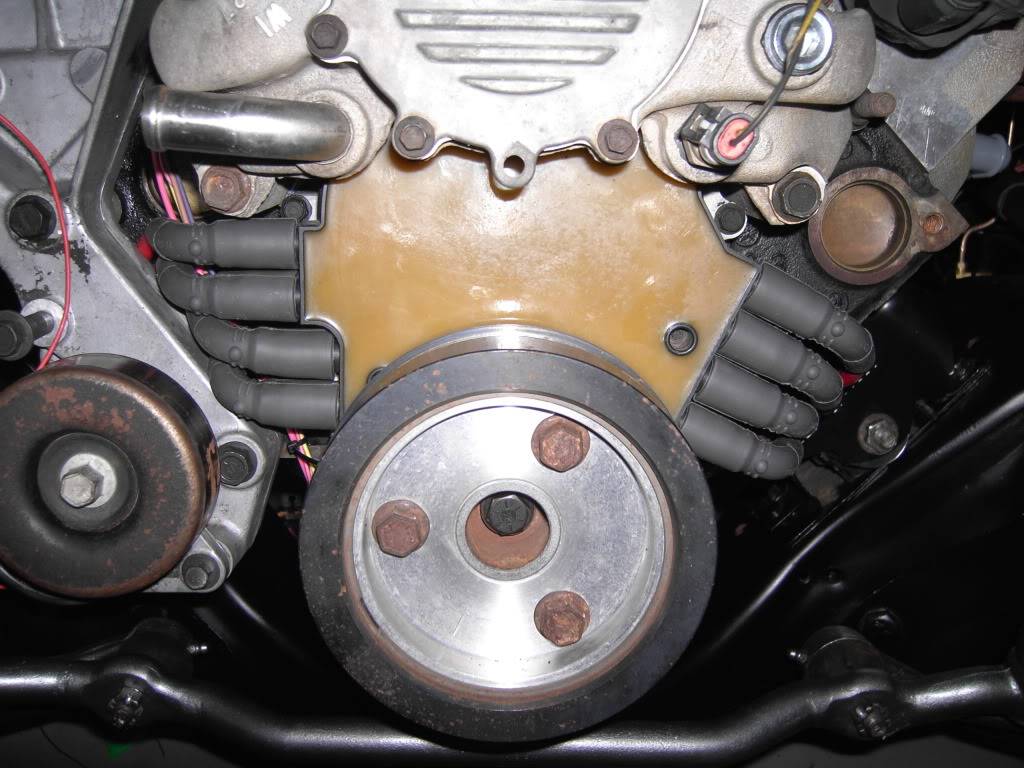
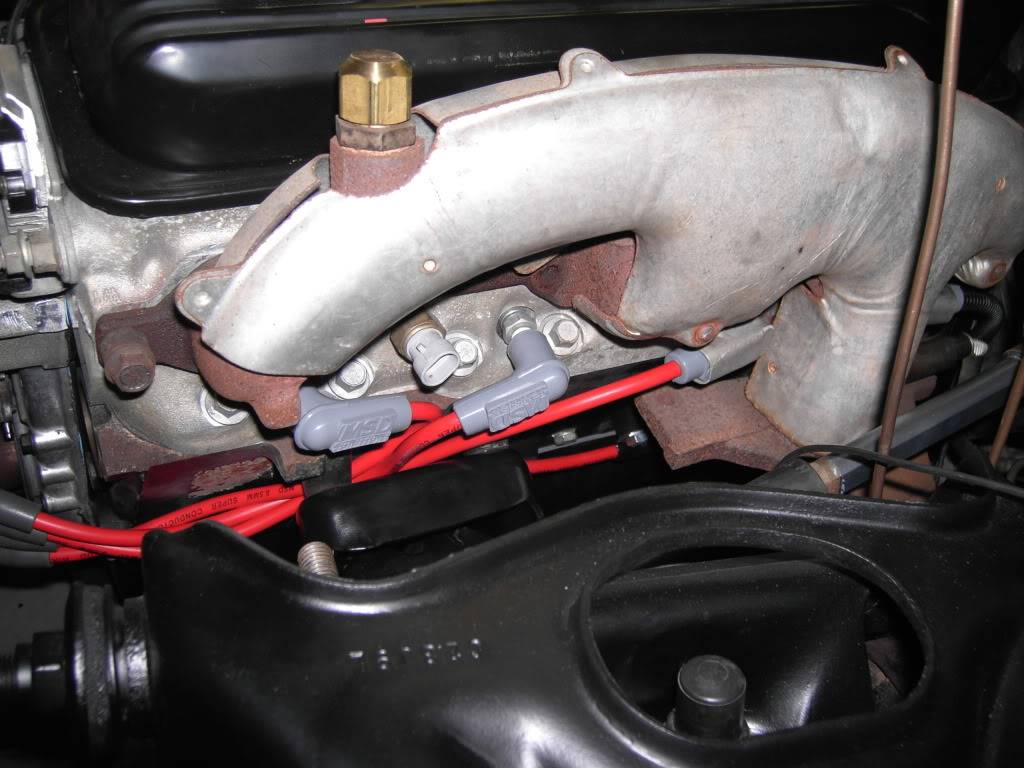
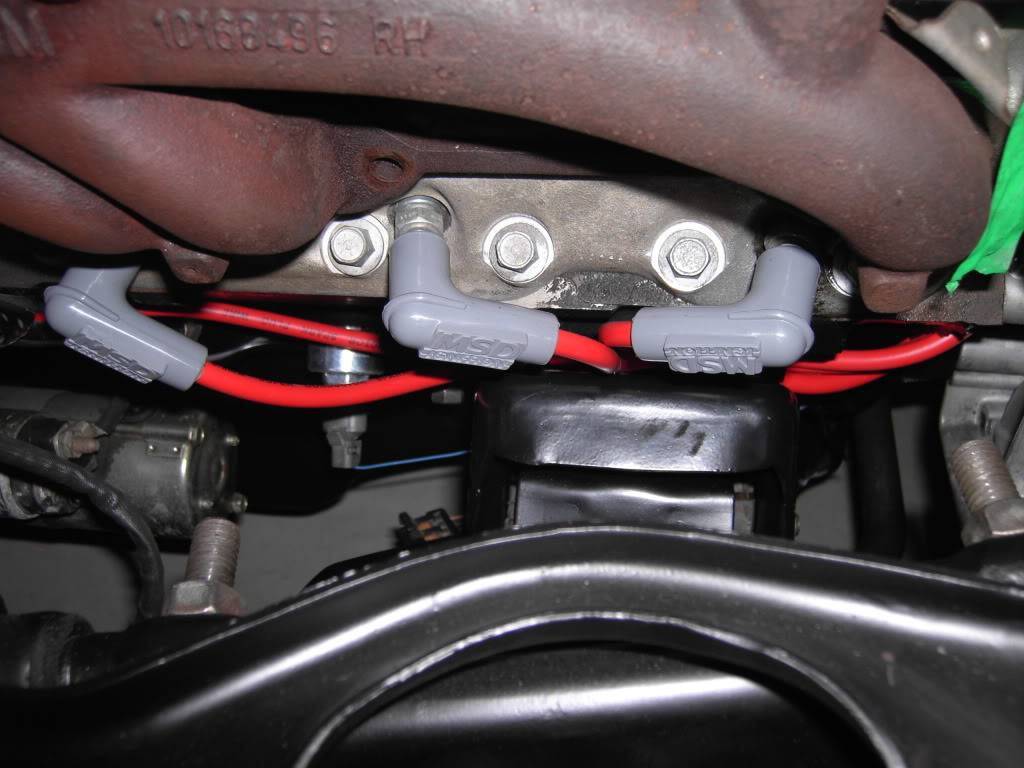
I've got my MSD wires on now too. I order the cut to length ones with 90* opti boots. I wanted to run my wires in such a manner that they don't get burnt or hang all over the place. I also wanted to go behind the accessory bracket on the passenger side instead of in front. So here's what my plug wires look like. The 90* opti boots are tight on the passenger side but they fit if you're careful with the bottom two.
Almost forgot a warning. If you are poor like me and run manifolds on your LT1, you must put the factory heat shields over the 5,7, and 8 plug boots. They will get damaged from heat rather quickly if you don't. You can see the two on my driver's side. I need to go get another off the LT1 I have in storage for the number 8 plug. They fit nice and tightly over the MSD boots.
What's this?! Front clip parts back on the car? Why, yes it is. I can't put the driver's side stuff on yet because I have a hole I need to drill first. I can't drill the hole just yet either because not all of the wires are ran yet. Soon though I hope.
Please no kissing the screen with this picture. LOL whatever! So as the car comes together more and more, I am really really liking the rims. I need to wait to the whole weight of the car is on the suspension before I make changes but it looks as if I can move the front wheels out 1/2". If I can get 3/4" which I think is highly doubtful, that would allow me to run adapters and that would be just swell. Like the swell in my pants as I look at this picture
 Trey
Trey
"The early bird may get the worm, but the second mouse gets the cheese."
~ Jon Hammond
1979 WS6 Trans Am stock LT1/T56 drive train out of my Formula. BMW M-parallel rims. C5/C6 brakes
build thread https://www.pro-touring.com/showthre...ghlight=begins
09-25-2009 #56
Registered User
- Join Date
- Aug 2004
- Location
- Dunwoody, GA
- Posts
- 4,984
Here's a teaser shop of what's to come. Just as soon as Ed Miller gets around to getting me a bracket set with cables and hoses, I'll be good to go here too.
He's a busy man I know. I'm patient too.
I know the update was short but oh well. I'm getting up at 5 tomorrow morning so I can get into the shop and make some headway. I'll try to get another update done soon too. I have more pictures of the almost completed wiring harness. It'll be a while yet before I wrap it but the wires are ran and you can see how that's been done. Til thenTrey
"The early bird may get the worm, but the second mouse gets the cheese."
~ Jon Hammond
1979 WS6 Trans Am stock LT1/T56 drive train out of my Formula. BMW M-parallel rims. C5/C6 brakes
build thread https://www.pro-touring.com/showthre...ghlight=begins
09-25-2009 #57 Registered User
- Join Date
- Dec 2005
- Location
- Birmingham, AL
- Posts
- 3,356
The car is shaping up nicely. The BMW wheels look a lot like the split 5 spoke Fikse wheel. Nice to know that the backspacing is close.
Stephen
09-25-2009 #58
Registered User
- Join Date
- Mar 2008
- Location
- Wichita, KS
- Posts
- 375
wow, those rims.......fap fap fap. i sure wish i knew about the 90* opti boots. thats awesome! keep it up!
67 GTO, LS2, T56
WILWOOD, FORGELINE, RIDETECH
09-30-2009 #59 Registered User
- Join Date
- Feb 2009
- Location
- Long island, New York
- Posts
- 668
whats the bolt pattern on those rims?? would they fit on a 69 camaro 5x4.75? because i seen a set of those in a special interest paper here where i live and they would look sweet on my car in black thanks-dom
Dom Buffa
69 Camaro- 2JZ /Garrett 67MM, Ls1 13" Front disc conversion, 18" ROH 3 piece Modenas
10-01-2009 #60
Registered User
- Join Date
- Aug 2004
- Location
- Dunwoody, GA
- Posts
- 4,984
they are 5x120mm. They will fit on a 4.75in pattern but it's not 100%. That's part of the reason I am hoping to get adapters in there and not just spacers.
Trey
"The early bird may get the worm, but the second mouse gets the cheese."
~ Jon Hammond
1979 WS6 Trans Am stock LT1/T56 drive train out of my Formula. BMW M-parallel rims. C5/C6 brakes
build thread https://www.pro-touring.com/showthre...ghlight=begins

 Reply With Quote


