Results 21 to 40 of 129
Thread: and so it begins
-
07-11-2009 #21

 Registered User
- Join Date
- Nov 2008
- Location
- iceland
- Posts
- 1,859

Awesome project

Bjarni B
My Chevelle project The Awakening
http://www.1971chevelle.net/

http://www.kvartmila.is/smf/index.php?topic=27028.0
CHEVY POWER RULES!
-
07-11-2009 #22 Registered User
- Join Date
- Jun 2007
- Location
- St. Pete FL
- Posts
- 934

Trey, great work so far!
What were you thinking for rear brakes? Your 79 TA should already have rear disc. You want to go to something bigger I assume? Best bang for the buck, go with the LS1 rear set then. $39 adapter plate & a $75 trip to the local junk yard & you are set
What size rims/tires? You may want to check out the Eagle Alloy or Boss rims. You can find them all day on the net for $150 to $200. Here are examples of the more popular TT II copies:

HELP!!!
1973 TA 4 spd #'s match red/white = STOLEN
https://www.pro-touring.com/threads/...55#post1106255
07-12-2009 #23
Registered User
- Join Date
- Aug 2004
- Location
- Dunwoody, GA
- Posts
- 4,984
I was looking at the C5 rear brakes so I could run the internal parking brake. Is this what you're referring to or are you talking about the LS1 Fbody rear brakes? I do have rear discs now and they suck. I almost wish I had rear drums to start with because my brake problems most likely wouldn't exist and the solution to the problem by upgrading could have possibly been put off until I had more money. Oh well, 13's front 12's rear sound good to me!
For rims I was thinking of the YO 17 cast snowflakes but am not sure they will fit. I'll have to make a trip up there with the template off Kore3's website to verify they fit. My next option was to find some BMW M Parallel rims. I'd go for the machined finish http://www.lakeshorewheelandtire.com...taggered.shtml
I'm looking for ideas and used rims as well. My problem with the BMW rims is the metric bolt pattern and 18" tires. 18" tires cost more obviously. The metric bolt pattern is close. Actually, it is very close to the stock GM pattern. That's not good enough for me. I want exact which means adapters and more $$$. I think they look great though and have found take off sets with tires for $1000 or less. I missed them though as it was a search on CL and they were not recent ads. I don't want anything polished or chromed if buying new. If used, spray paint will change the finish in a heartbeat
Thanks everyone.Trey
"The early bird may get the worm, but the second mouse gets the cheese."
~ Jon Hammond
1979 WS6 Trans Am stock LT1/T56 drive train out of my Formula. BMW M-parallel rims. C5/C6 brakes
build thread https://www.pro-touring.com/showthre...ghlight=begins
08-03-2009 #24
Registered User
- Join Date
- Aug 2004
- Location
- Dunwoody, GA
- Posts
- 4,984
Finally another update. I was tied up working on an L98 vette that was giving me hell. It's done now though so on with my car.
Got another new item in for the car.
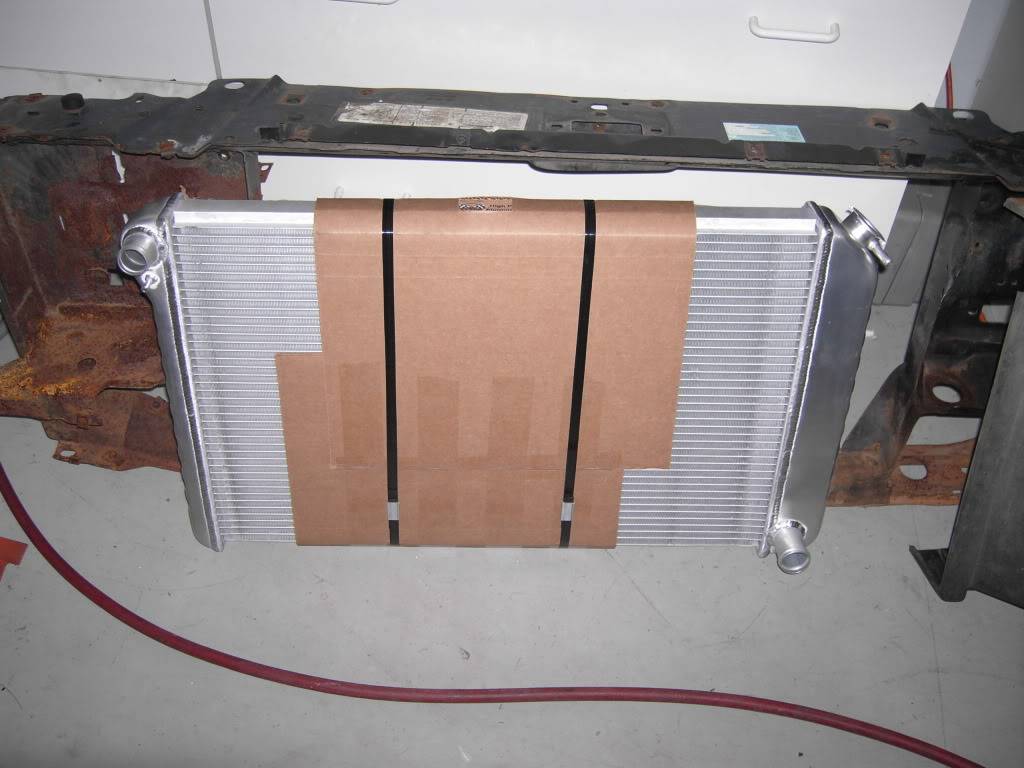
This is a DeWitt's radiator. You're probably saying Dewhat who? DeWitt's makes the best radiators for Corvettes, period. Their Direct Fit line of radiators work fantastically and they even offer correct date coded and all radiators for people wanting restoration radiators. Anyway, since I love their product and I happen to be a dealer for them, I thought I'd check with them to see if they had something close to my stock HD radiator. Turns out that GM used that particular size of radiator in a couple of different vehicles of the era. They didn't just have one that was close, they had an exact one. All that was necessary was for them to put straight outlets on the radiator instead of the bent ones that would normally be on a C3(in this case) Corvette. While they were at it, I had them size the upper hose for the modern LTx/LSx engines(1-5/16" versus 1-1/2" of yester-year) and add the steam port which you see below the upper inlet. The radiator admittedly isn't cheap compared to the low end ones you can get from Summit but it's right in line with anyone looking to use the higher end Be Cools, Griffins, or Ron Davis radiators. I'll be using my stock 96 radiator fans to pull air through the radiator. I won't have any cooling issues. Oh, I did have them put the drain **** in the Corvette location instead of factory TA location. It's now located on the bottom under the outlet port. I'll have to drill a hole in the core support to make it work but that's no problem. I always hated that the radiator would drain right onto the steering box and spray everywhere.
Next up, brakes! I'm reusing my factory 96 master cylinder. The lines I have bent up myself since I am using a t block for the front and an adjustable proportioning value for the rear. I had some stainless line left over from another project so I used it for the front crossover tube. The rest are steel. Because the MC has ports on the inboard side, I had to bend the lines to clear the steering shaft. It's not the prettiest job I've ever done but I'm more interested in function and not spending more on steel tubing.
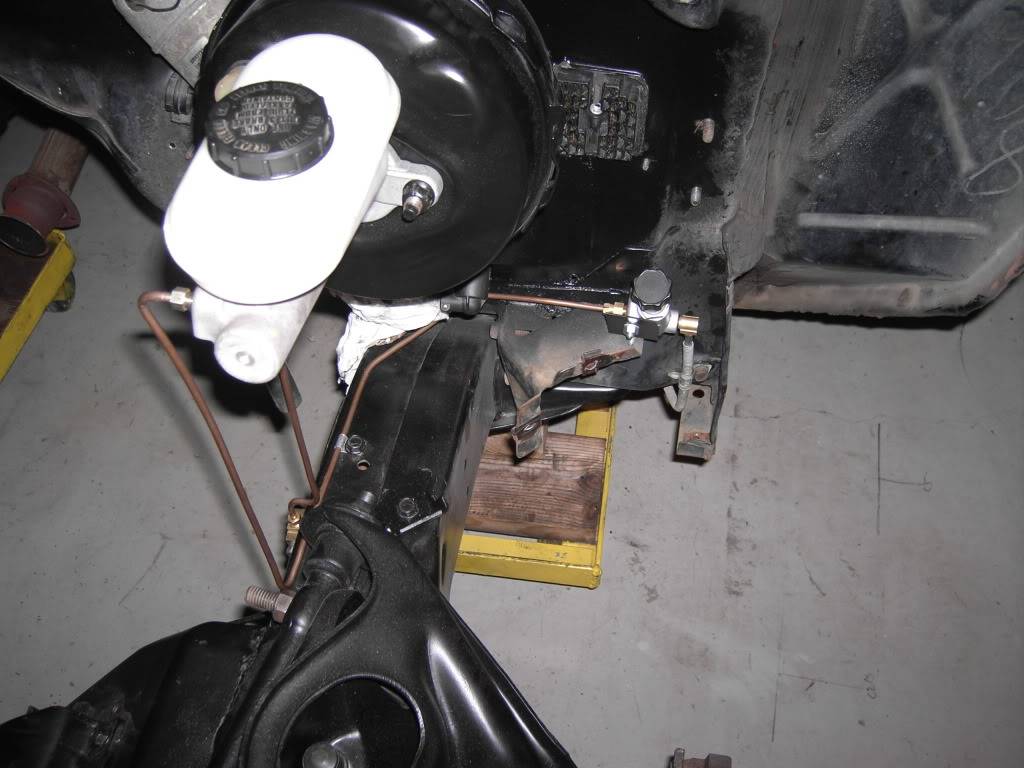
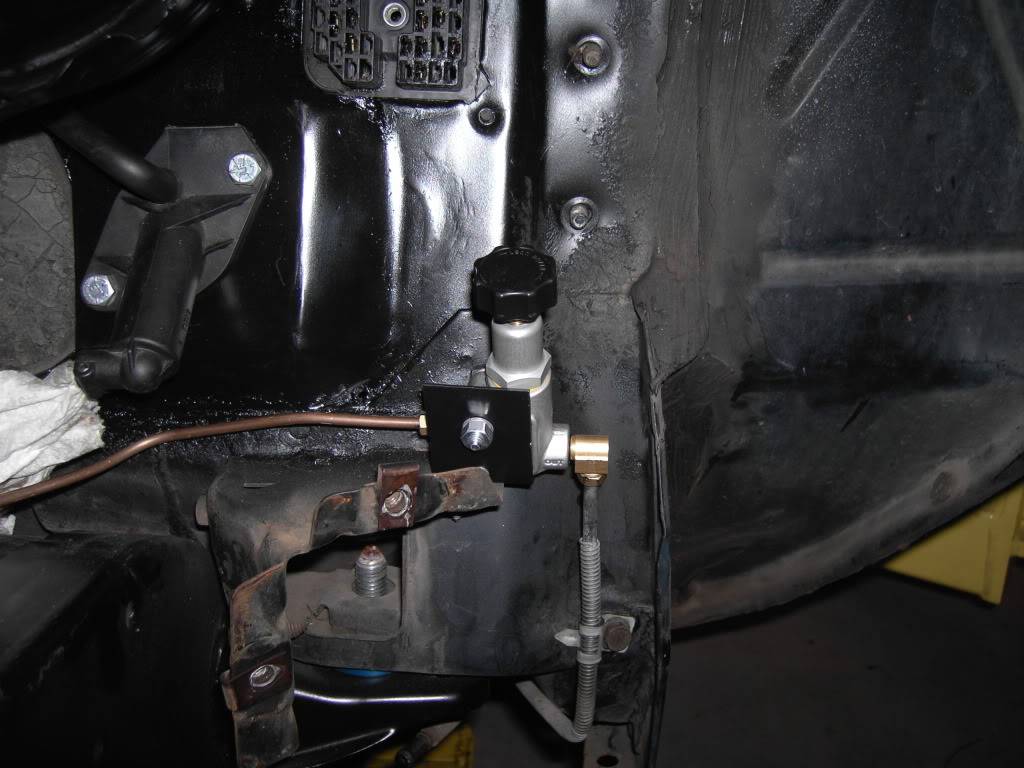
If you'll notice, I've tucked the prop valve behind the inner fender. That's the inner fender mount right below the valve. I HATE seeing prop valves under the hood of cars. Hide the thing already. On a street car you'll more than likely get it adjusted and never touch it again. Besides, putting it where I did allowed me to only shorten and bend the factory line to the rear brakes. I just needed to buy a different tube nut to fit the prop valve. Saving money where ever I can.
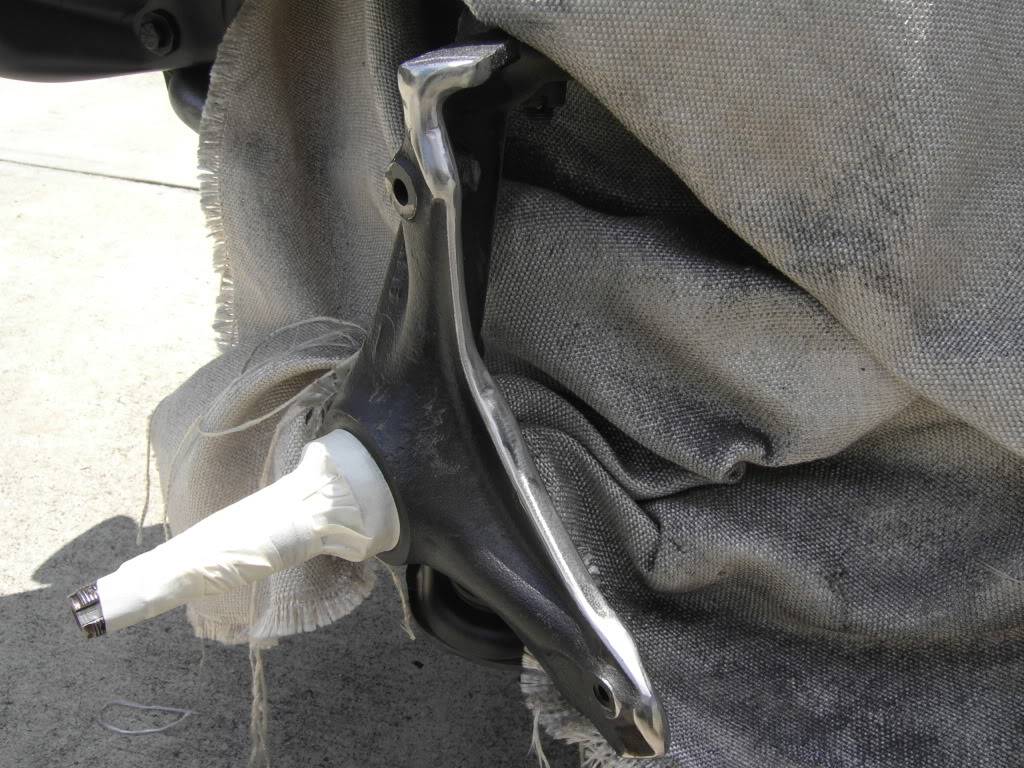
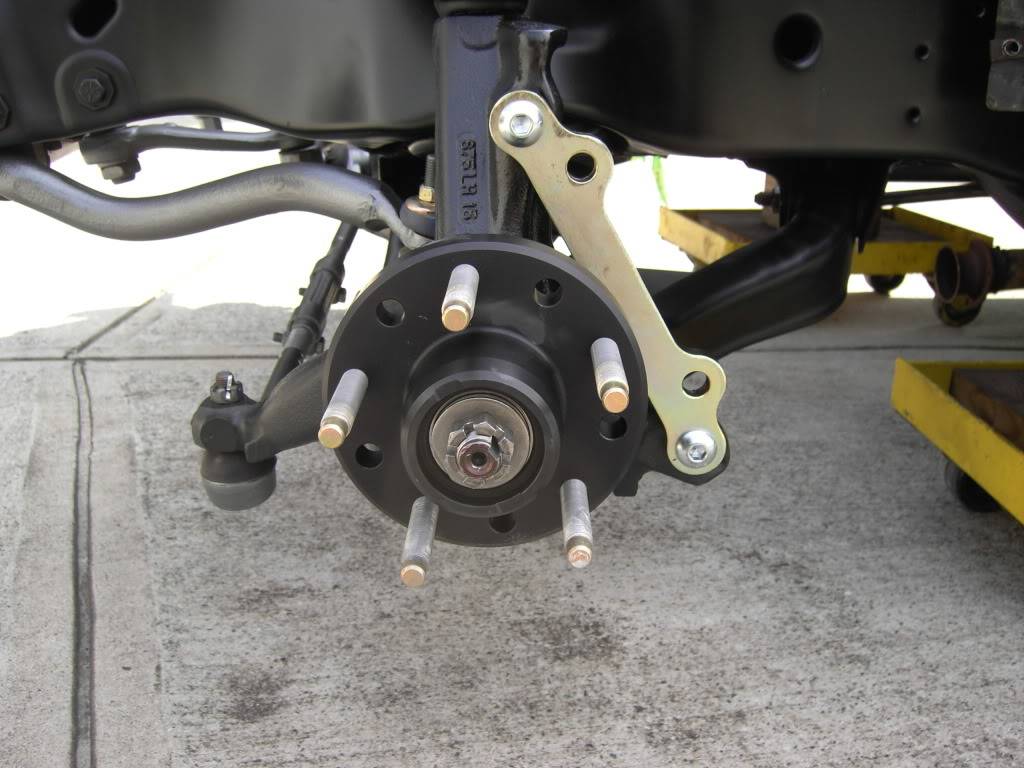
Onto the spindle modifications needed in order to run 13in brakes on the front. I read the directions supplied by Kore 3 carefully before beginning. I would suggest getting online and looking at the directions in PDF form. The picture for where to cut is much bigger and clearer. Triple and quadruple check your lines before your cuts. Think about how you are going to make your cuts as well. You do not want to mess this up. Here's the lines I drew to guide me on my cuts. I just used a silver sharpie. As you can see in the one picture, I drew over my lines with a black sharpie so as to not get confused over which line I wanted to follow
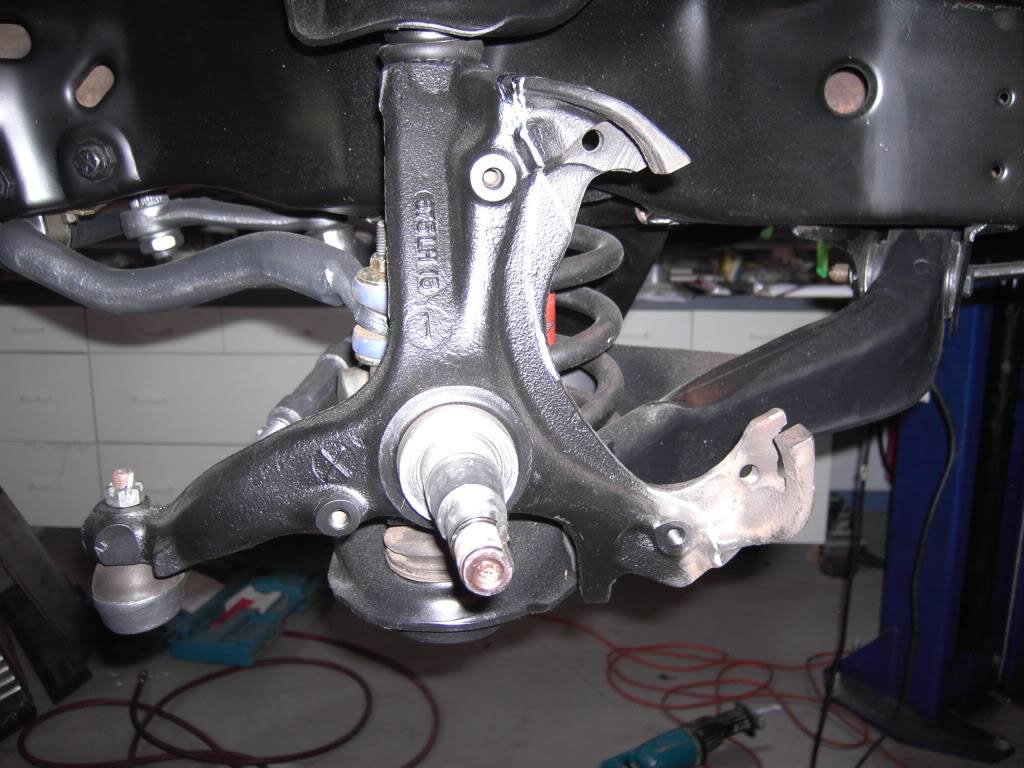
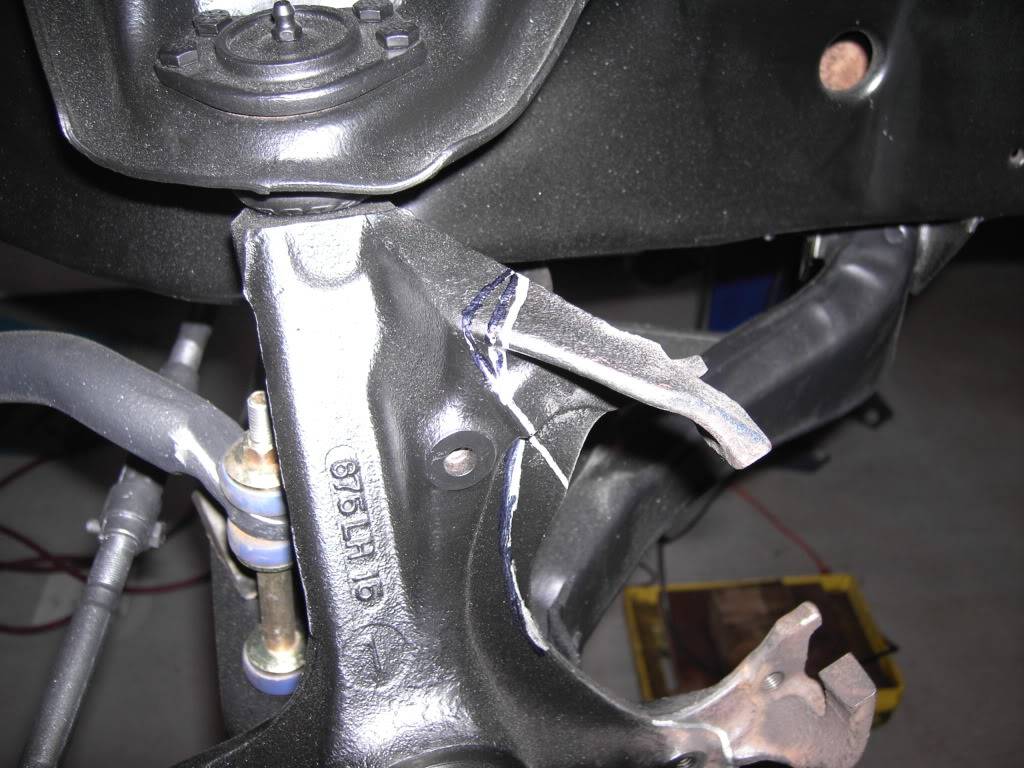
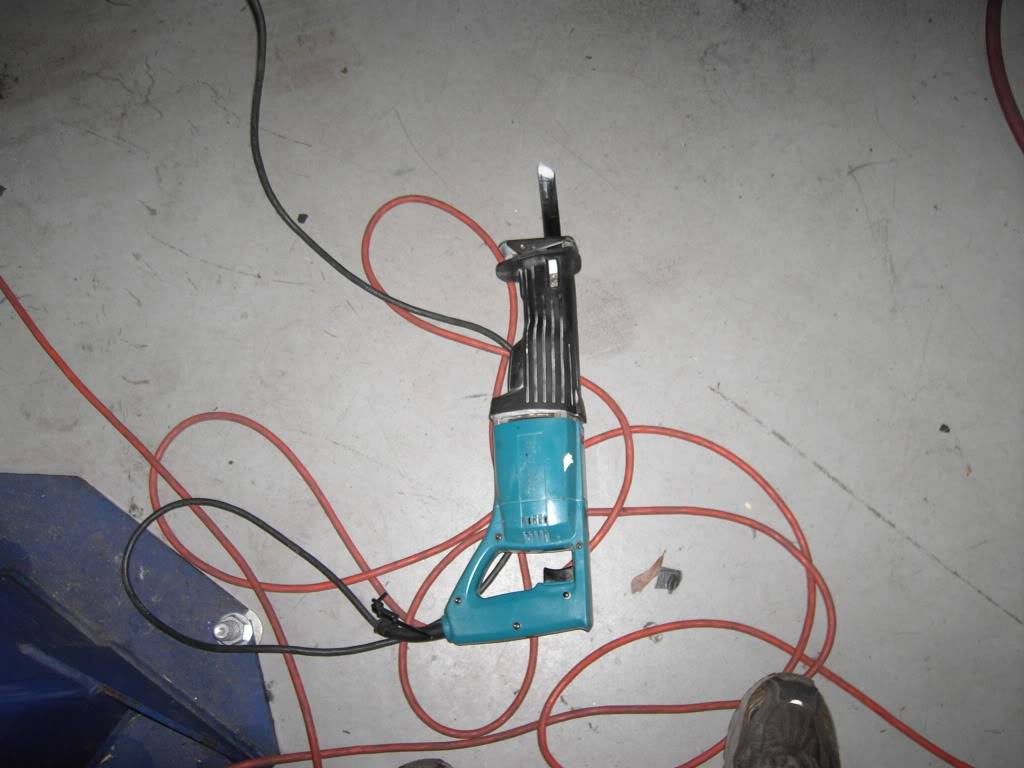
Here are my initial cuts. My weapon of choice was the Makita sawzall. It worked great and only took one blade for both sides. WEAR A DUST MASK THOUGH! I did not think it would create a lot of dust. Shavings and bits of metal, yes. Dust, no. I cut the first spindle without a mask. I was sneezing and blowing my nose for two days.
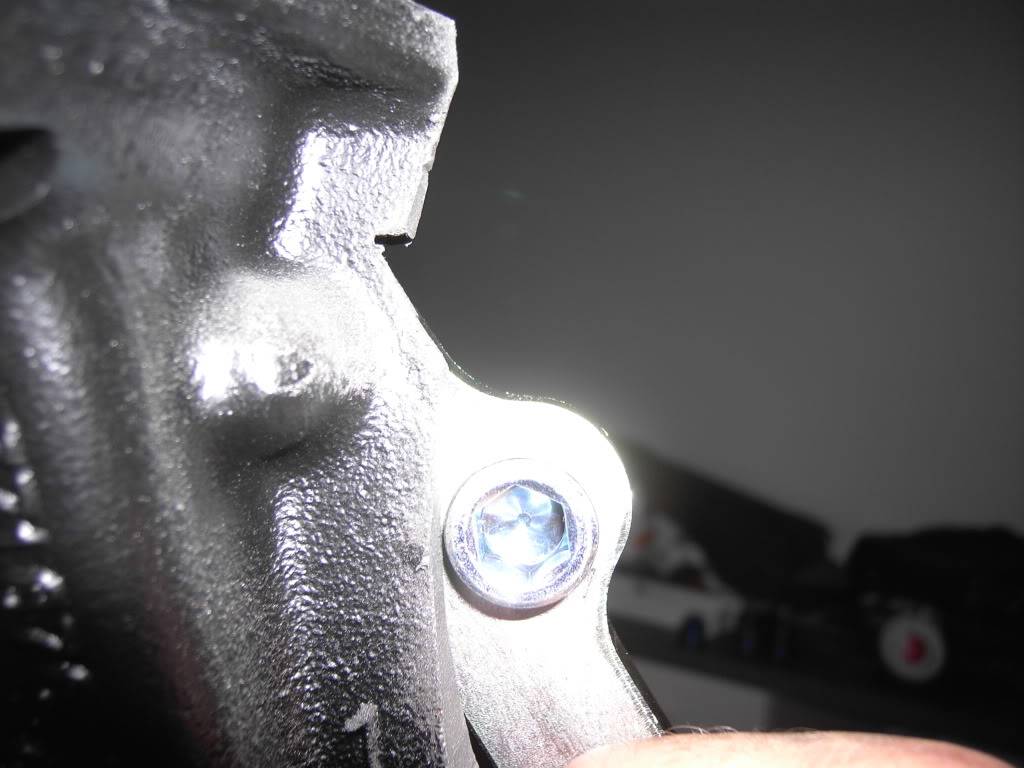
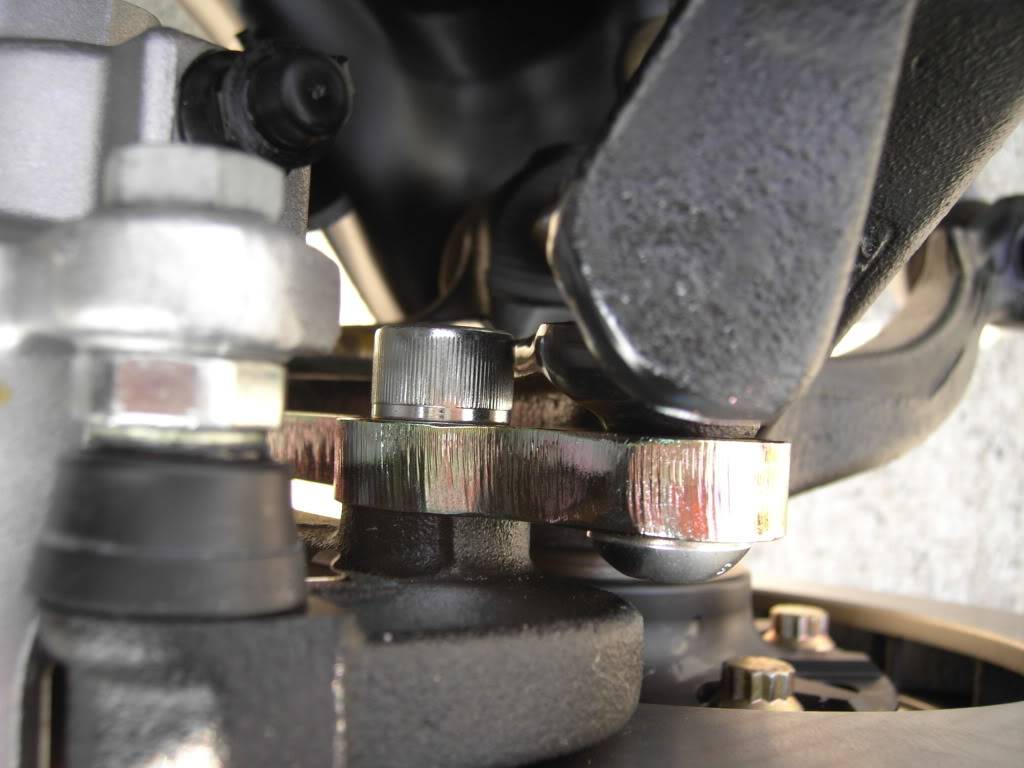
This picture shows why you have to change the curve in the spindle. That's the bolt that will hold the C6 calipers to the mounting bracket.
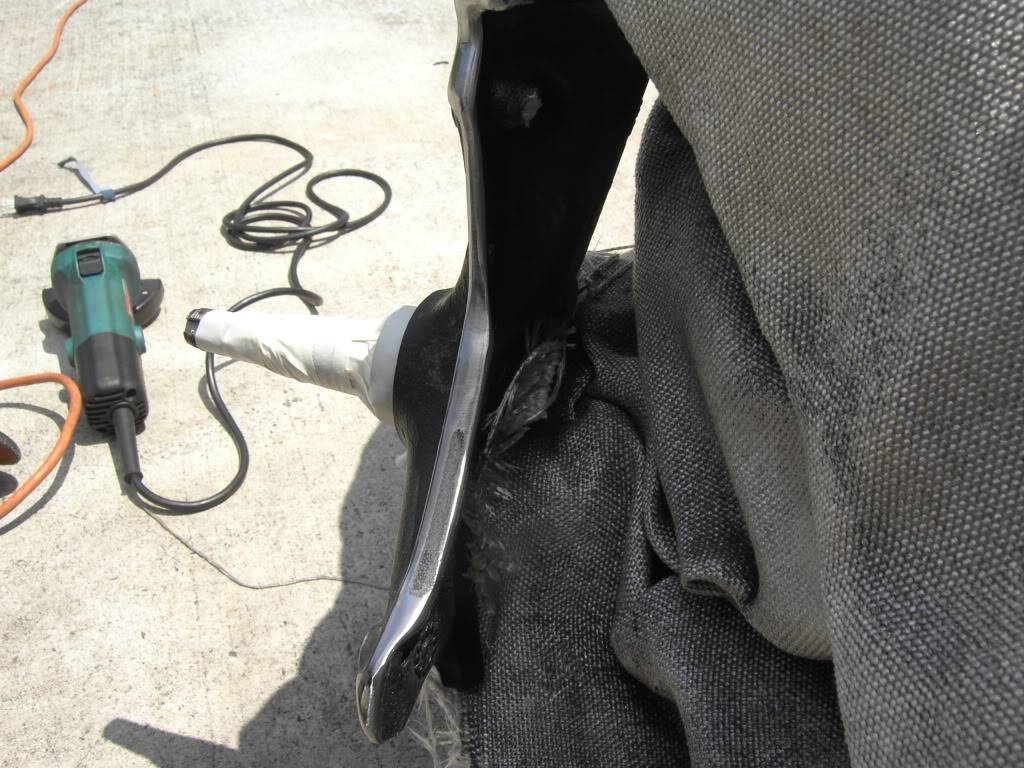
I used a grinding disk to rough in the cuts and finished everything off with a flap wheel. Notice how I contoured and smoothed everything. This prevents any stress points that could be starting points for cracks. It also makes everything nice looking. The directions are great and tell you to do this and for the same reasons.
 Trey
Trey
"The early bird may get the worm, but the second mouse gets the cheese."
~ Jon Hammond
1979 WS6 Trans Am stock LT1/T56 drive train out of my Formula. BMW M-parallel rims. C5/C6 brakes
build thread https://www.pro-touring.com/showthre...ghlight=begins
08-03-2009 #25 Registered User
- Join Date
- Nov 2006
- Location
- Ma.
- Posts
- 5,567
Looking good .
Wayne
Car FINALLY home !!!!!! lol
Project FNQUIK https://www.pro-touring.com/showthre...ghlight=FNQUIK
08-03-2009 #26
Registered User
- Join Date
- Jun 2007
- Location
- St. Pete FL
- Posts
- 934
Good stuff buddy, keep it up
HELP!!!
1973 TA 4 spd #'s match red/white = STOLEN
https://www.pro-touring.com/threads/...55#post1106255
08-03-2009 #27
Registered User
- Join Date
- Aug 2004
- Location
- Dunwoody, GA
- Posts
- 4,984
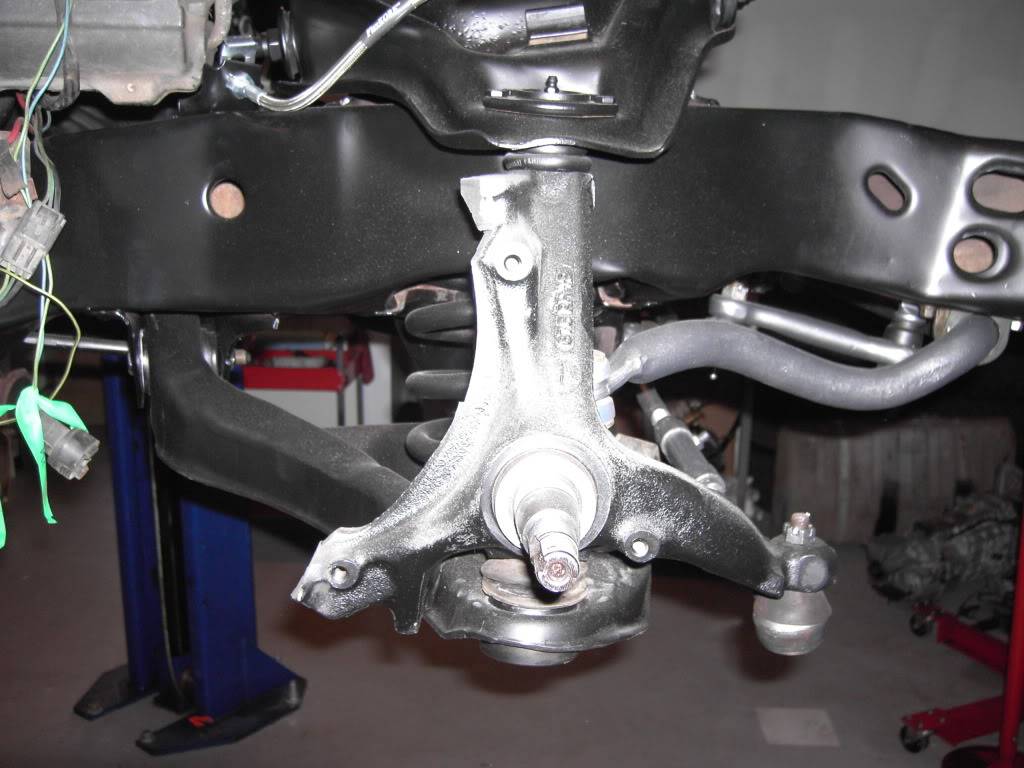
In this picture, I have already painted the bare metal parts of the spindle and have drilled and tapped the caliper mounting brackets. You must take your time with the drilling and tapping. Neither one is very difficult but both are very easy to screw up. Cast iron is very rough and will dull a drill bit if you spin it too fast. So use a good bit and go slow. Also. use cutting oil not motor oil. Use oil for both drilling and tapping. Get a second set of eyes to watch and mach sure you stay level and perpendicular to the bosses so you don't mess up. You can not go too slow with the tapping of the threads. After you have tapped the threads, use a countersink bit to debur and slightly counter sink the holes. This will allow the bolts to start easier. You may also notice the paint is now gone from the bosses. I used a flat file to remove the paint and any burs left over. Make sure you keep the file flat though.
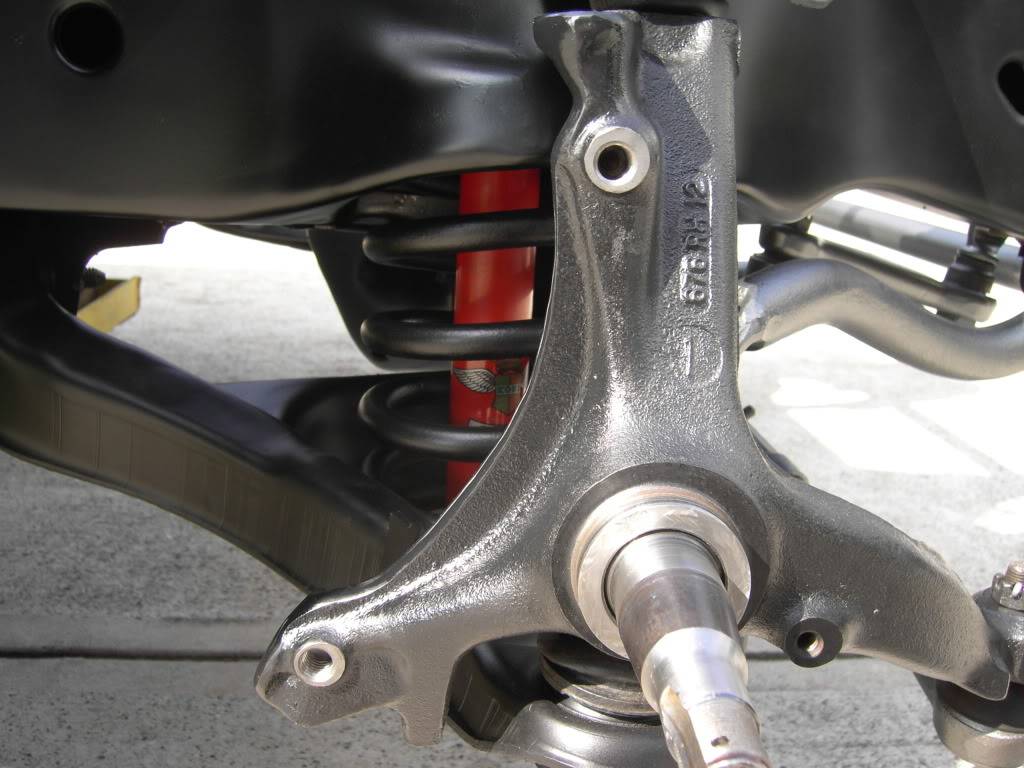
I did a dry test fit of the hub and bearings as well as the rotor and calipers. I selected the 1/2 screw in studs instead of the M12 press fit ones. Be sure to lubricate the studs before putting them in. You can just snug them up. They won't back out as you try to put lug nuts on. They will work the same way studs do on cylinder heads.
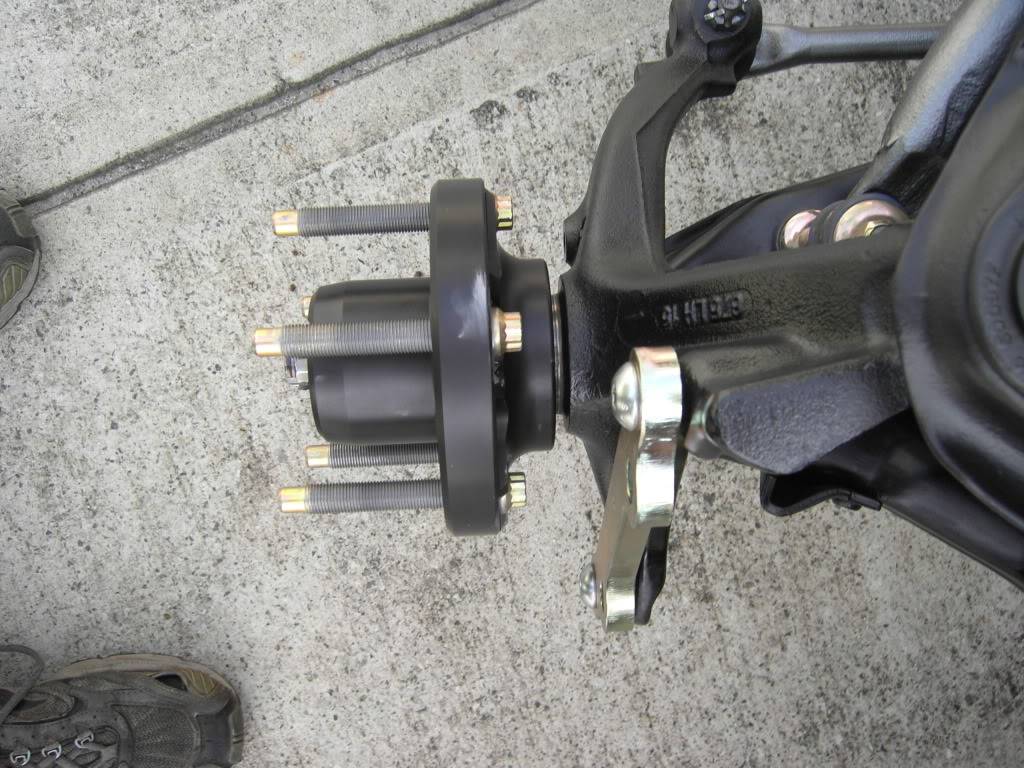
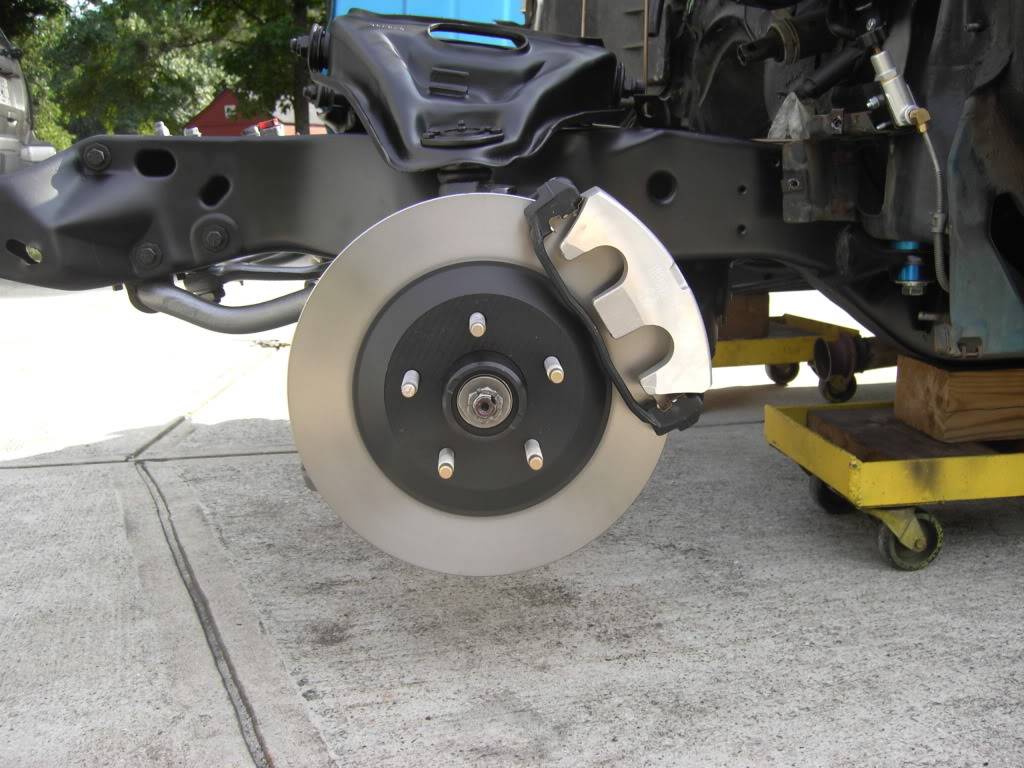
Here's the clearance around the caliper mounting bolt that I showed earlier.
Well that's it for tonight. It's late and I'm a slow typist so I'll be back tomorrow. I'm working on the core support now. It's really messed up. I'll have pictures tomorrow.Trey
"The early bird may get the worm, but the second mouse gets the cheese."
~ Jon Hammond
1979 WS6 Trans Am stock LT1/T56 drive train out of my Formula. BMW M-parallel rims. C5/C6 brakes
build thread https://www.pro-touring.com/showthre...ghlight=begins
08-03-2009 #28 Registered User
- Join Date
- Jul 2005
- Location
- Eastern Virginia
- Posts
- 3,960
Awesome work. Keep us posted.
Scot
86 Monte SS

08-03-2009 #29
Registered User
- Join Date
- Nov 2006
- Location
- Ma.
- Posts
- 5,567
Nice Work, it looks good.
Wayne
Car FINALLY home !!!!!! lol
Project FNQUIK https://www.pro-touring.com/showthre...ghlight=FNQUIK
08-05-2009 #30
Registered User
- Join Date
- Dec 2004
- Location
- North Jersey
- Posts
- 983
Looking great, nice work!!
Steve Ragusa - North Jersey
2006 Infiniti G35x
Former Build - 1988 Monte Carlo SS - ZZ4-cammed TPI 355, F-body serpentine conversion, World-Class 5-speed, Eibachs/Bilsteins, Howe tall LBJs, 34mm hollow front swaybar, 3/4" straight rear bar, 17" Coys C55s, 12" front discs, and more. Sold on 2/28/11.
08-05-2009 #31 Registered User
- Join Date
- Aug 2004
- Location
- Amsterdam,The Netherlands
- Posts
- 881

Looking sharp Trey!!

Cliff
1968 Firebird
Project Cheyenne Pro Performance
08-07-2009 #32
Registered User
- Join Date
- Aug 2004
- Location
- Dunwoody, GA
- Posts
- 4,984
Ok so I didn't update a few days ago like I said I would. Life got in the way. Oh well.
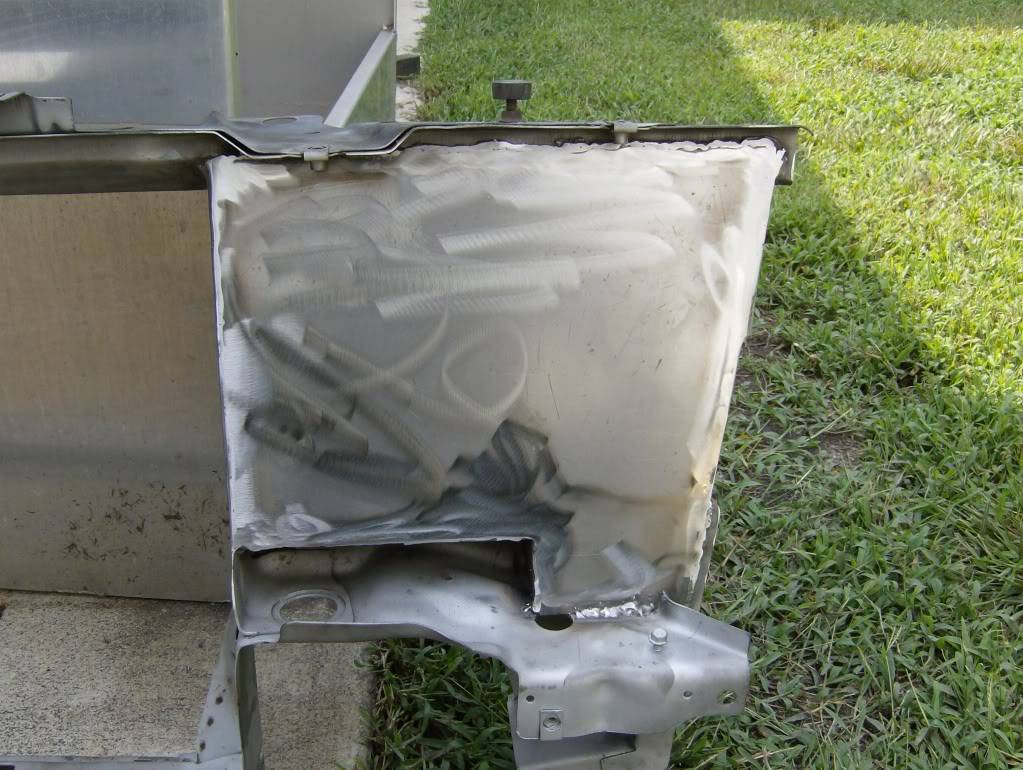
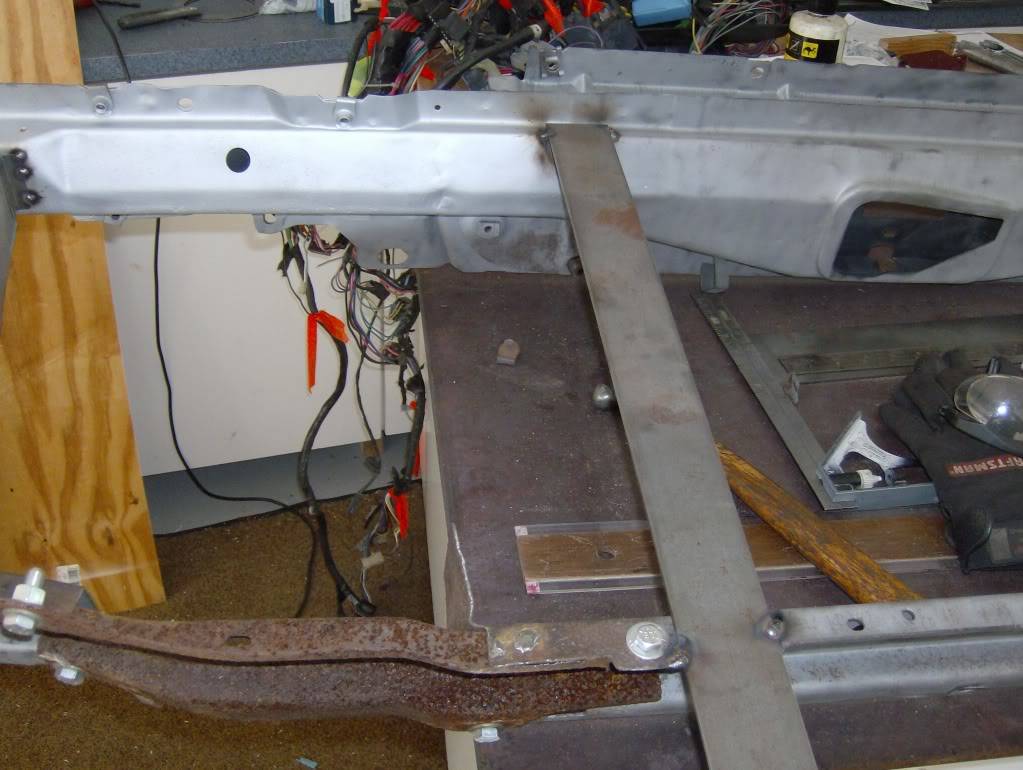
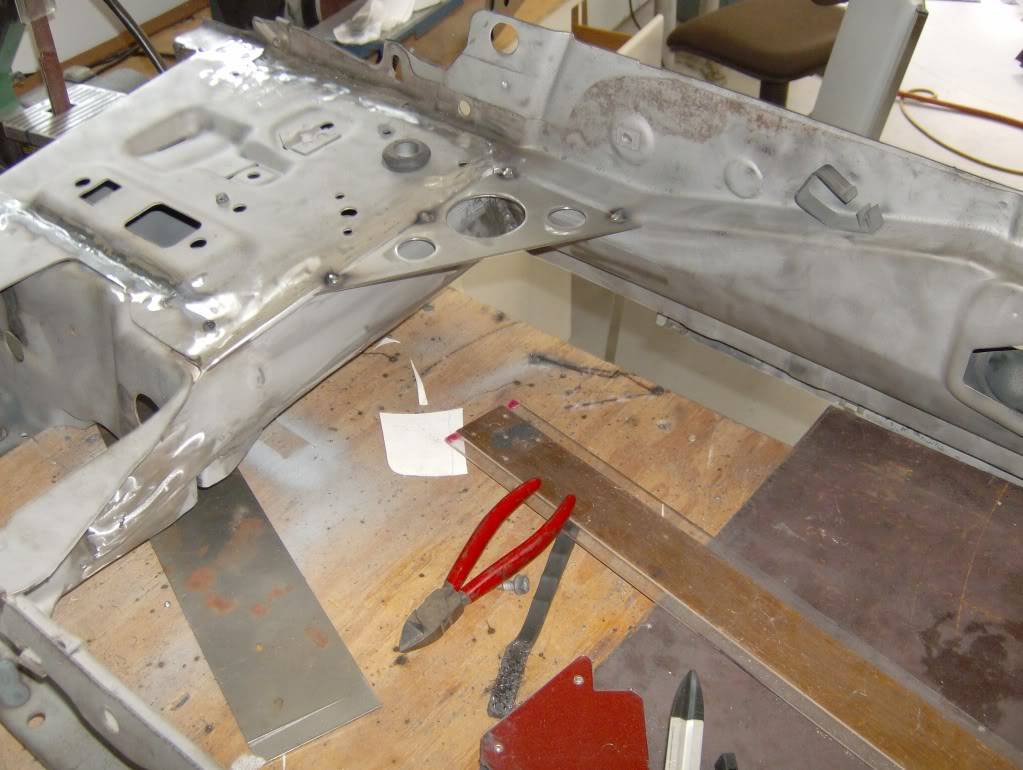
The last major work that needs to be done is fixing the core support. Everything else is easy to me. The core support for my car was in bad shape. Exhibit 1 is the passenger side ie non battery side of the core support all nicely sand blasted.
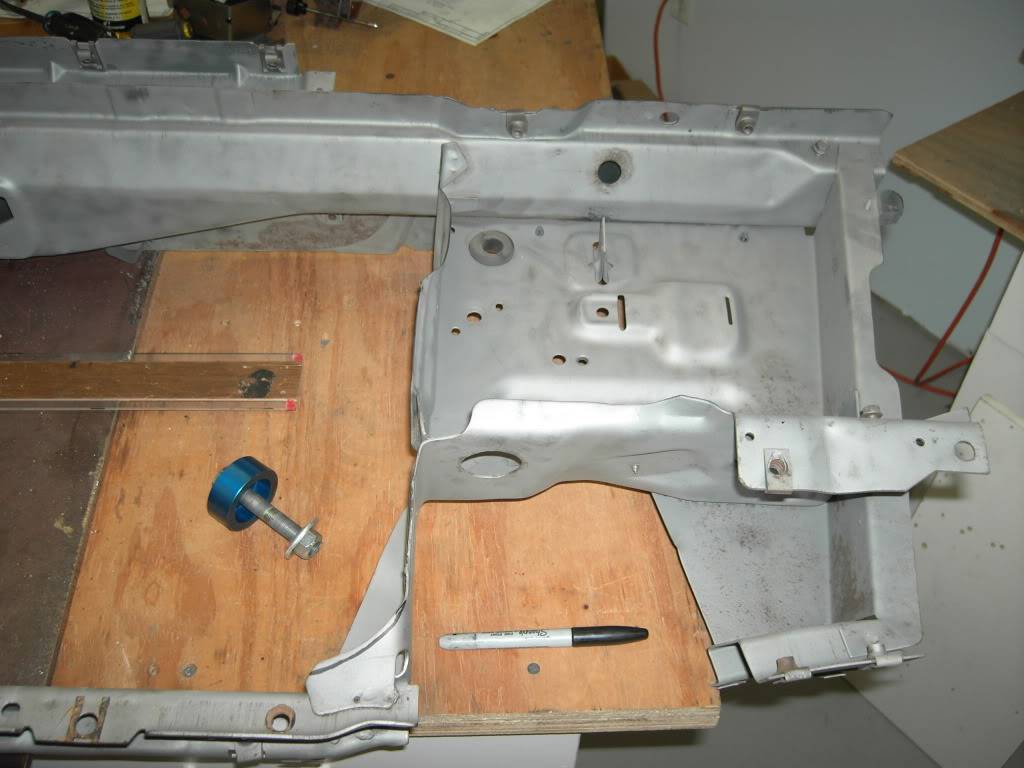
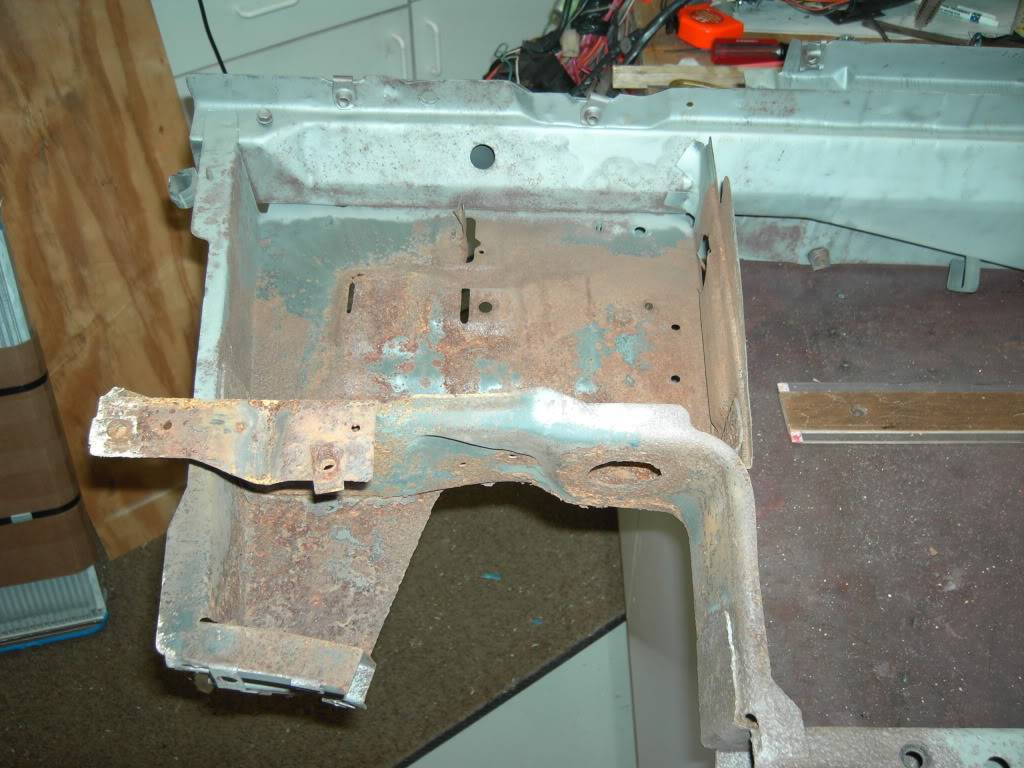
Exhibit 2 is the driver's side which did have the battery. This side is trashed. I didn't both sand blasting it as I will be cutting it out entirely and rebuilding it.
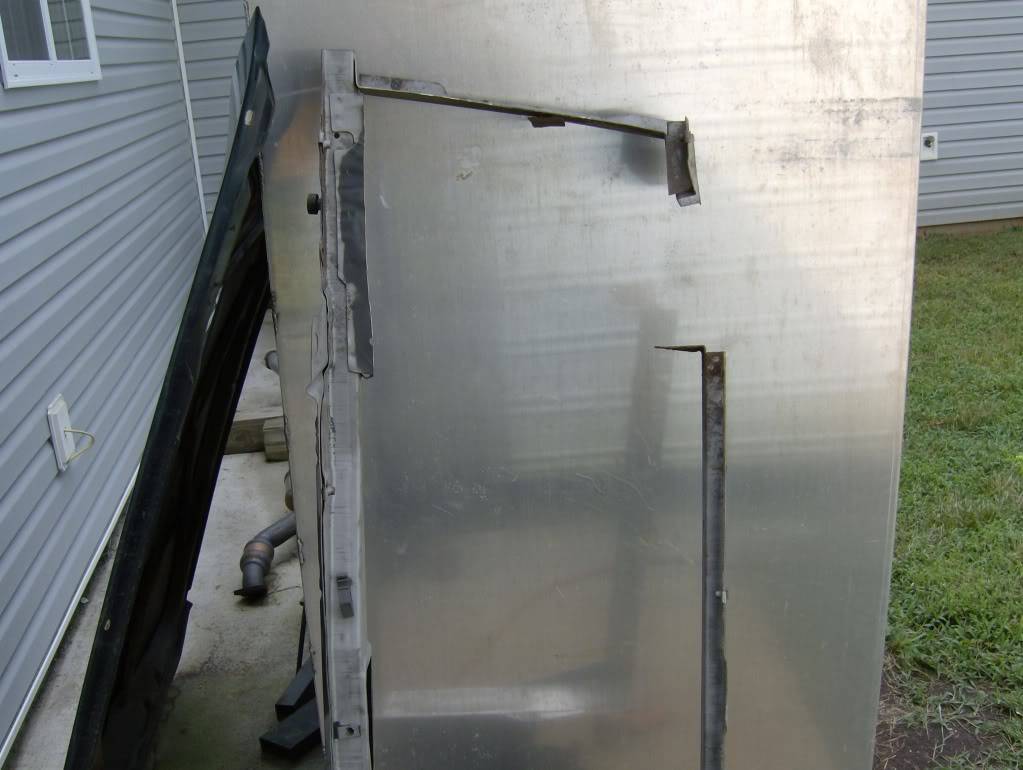
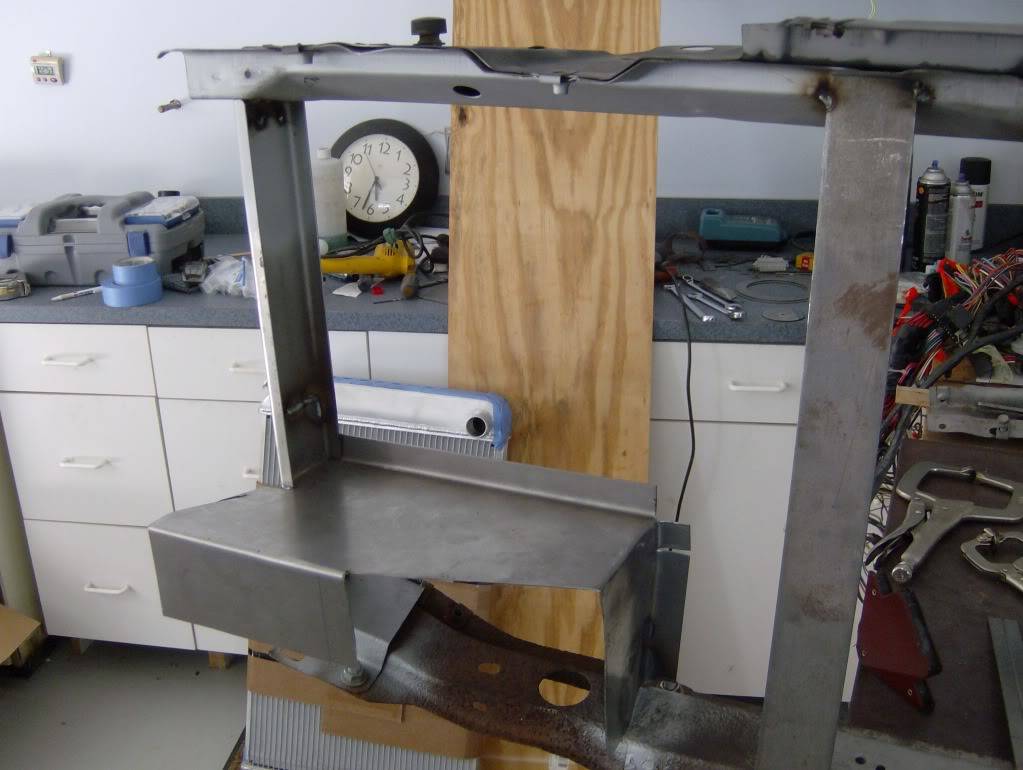
I decided that I was going to modify the core support in an effort to strengthen it which in turn strengthens the front end of the car. So I started on the good side. My thoughts were that since I am teaching myself as I go, if I can't make this side work, I won't be able to rebuild the other side. Step one was removing the inside wall.
I am using 16ga steel again and it is thicker than the core support metal. The inside wall also was not straight which would cause problems with my plans. Since the car does not have AC right now and will not for quite some time, the bends in the wall that were there to accommodate the AC lines won't be missed.
This picture shows the new inside wall tacked in place as well as two more walls.
It should be obvious what I am doing at this point, but in case it is not, this picture will make it clear.
 Trey
Trey
"The early bird may get the worm, but the second mouse gets the cheese."
~ Jon Hammond
1979 WS6 Trans Am stock LT1/T56 drive train out of my Formula. BMW M-parallel rims. C5/C6 brakes
build thread https://www.pro-touring.com/showthre...ghlight=begins
08-07-2009 #33
Registered User
- Join Date
- Aug 2004
- Location
- Dunwoody, GA
- Posts
- 4,984
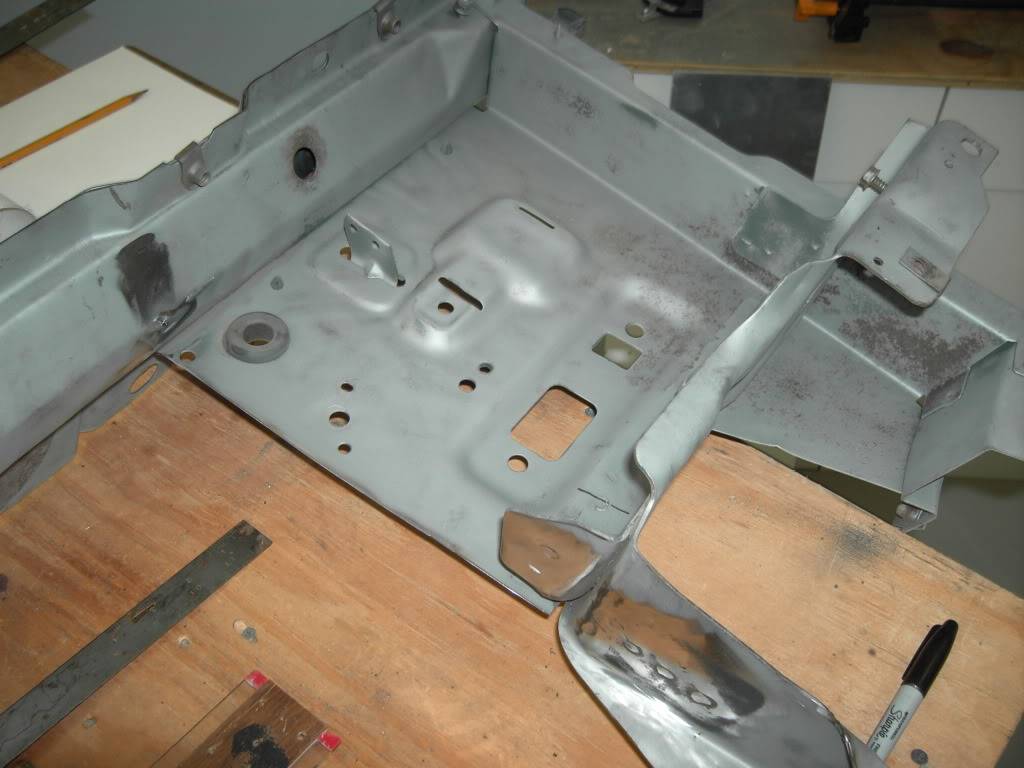
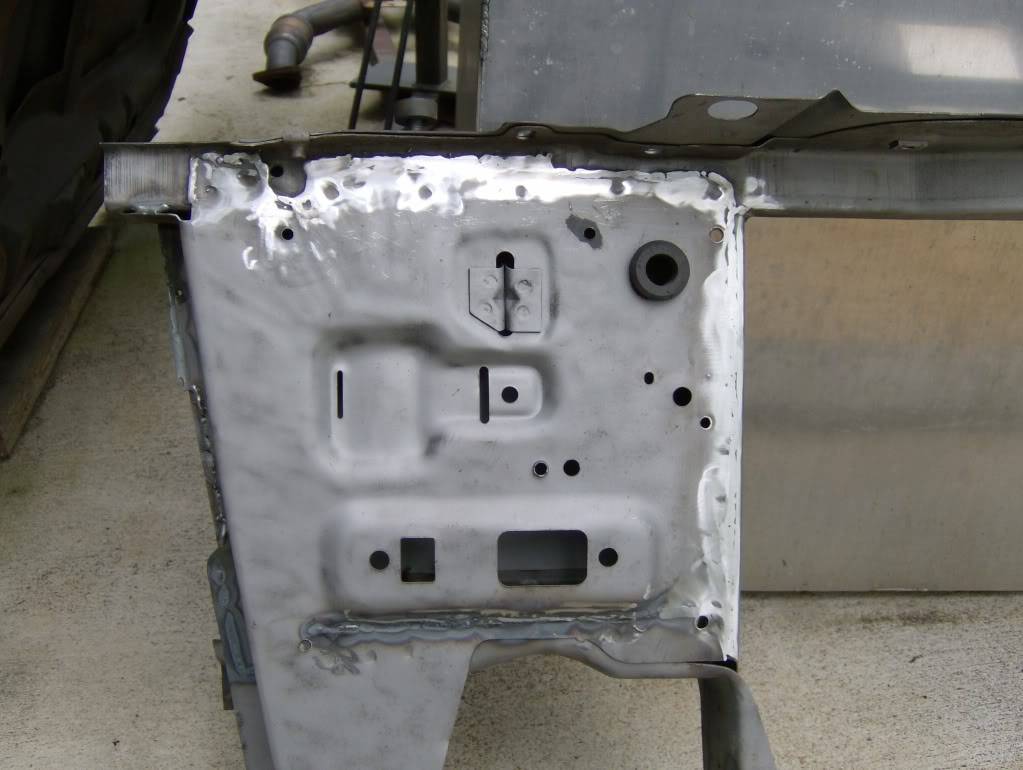
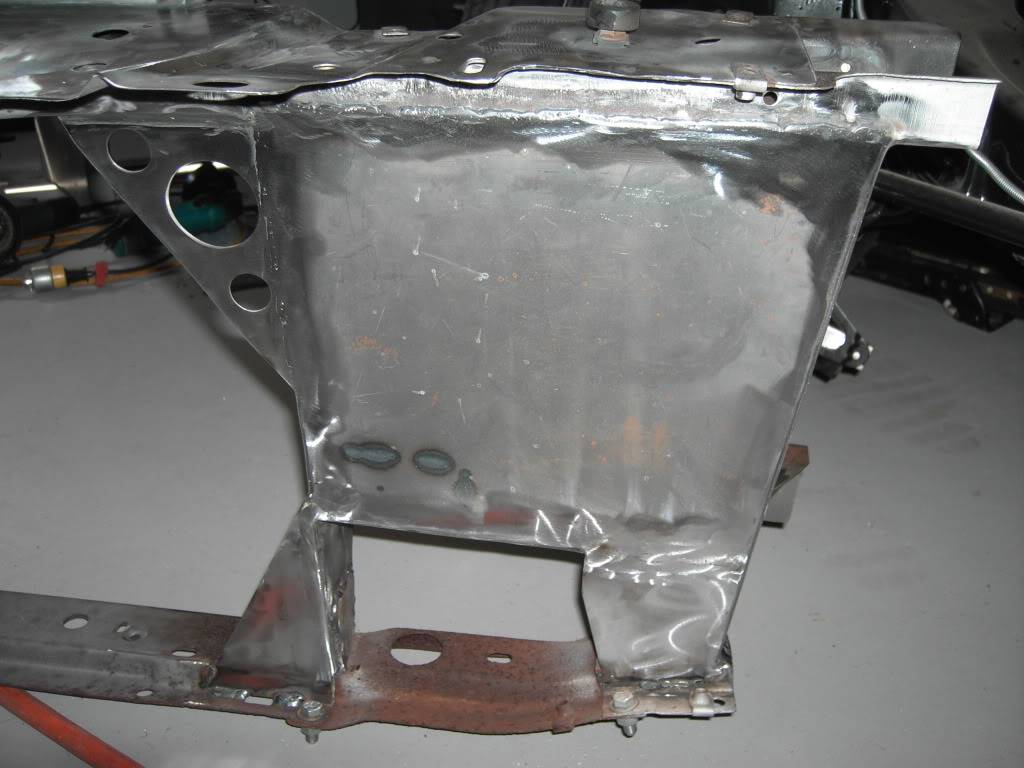
Here's what the completed passenger side looks like after being fully welded and ground down.
I even welded the front side which is original sheet metal but only tack welded in place.
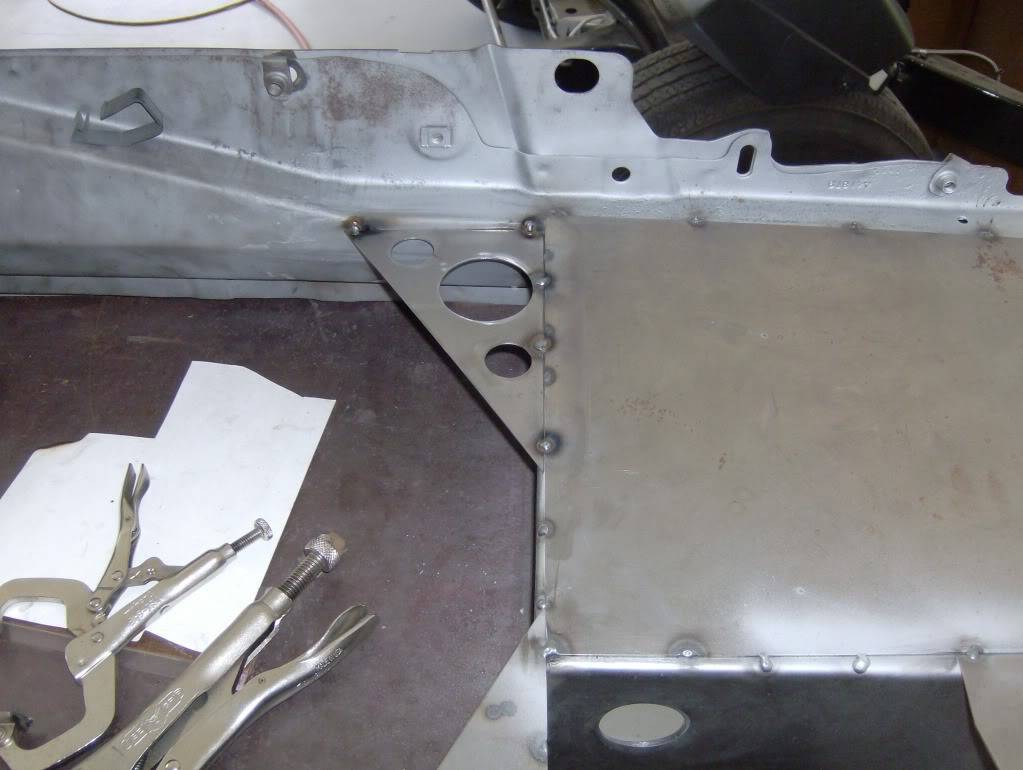
Feeling confident about my abilities which are getting better and better especially my welding, I cut out the driver's side of the core support
Hind sight being 20-20, I should have point some bracing in there to keep the core support's original shape and dimensions. I took measurements before I cut so I could get things correct but braces would have been smarter.
I added braces for support after the fact but also because I decided I needed to get ride of the outside wall which I had hoped to keep. This picture shows not only the reason I ended up cutting the outside wall away but also the tabs that I welded in as locators and welding points for the new wall.
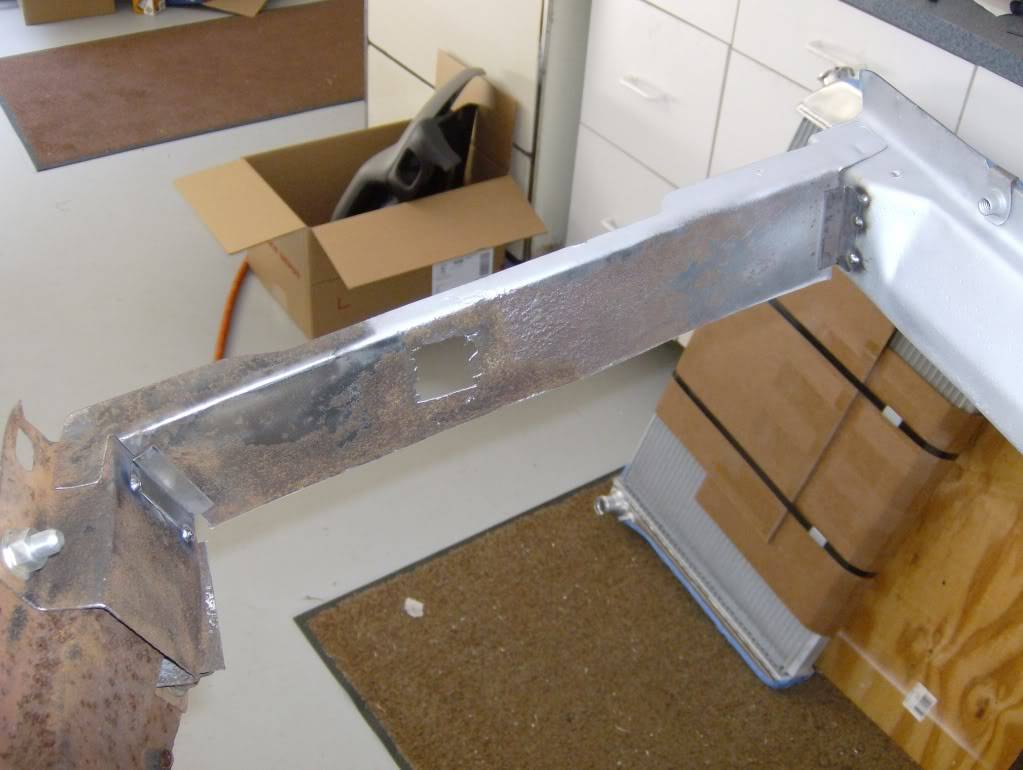
Here's the other brace put in for temporary support.
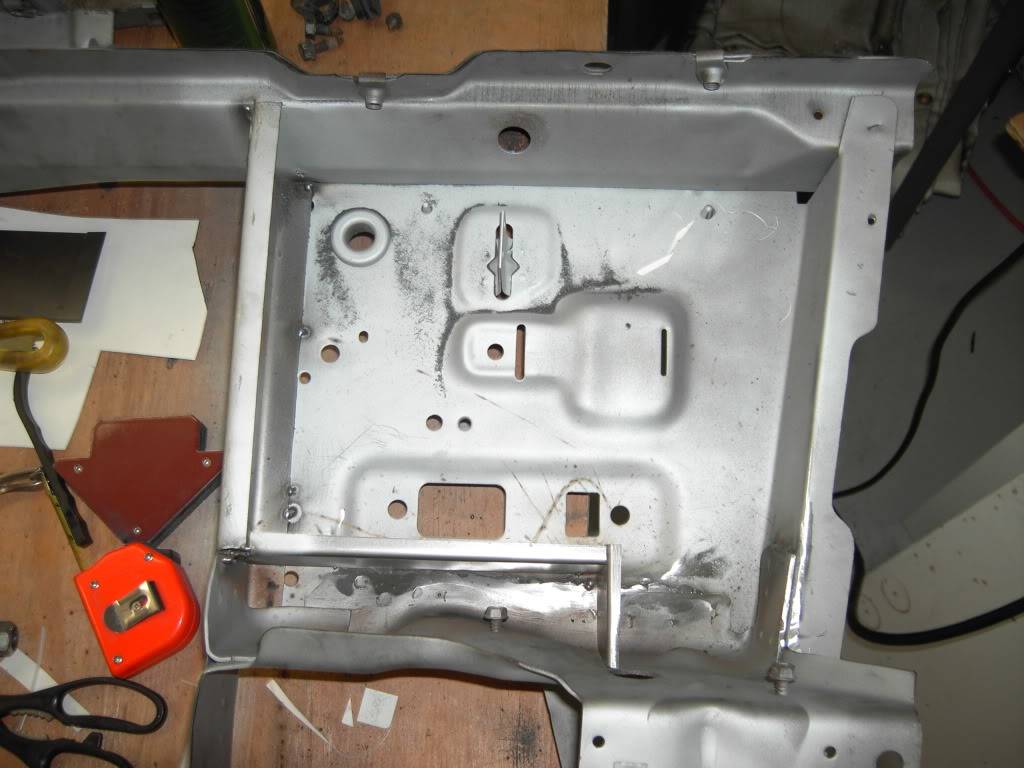
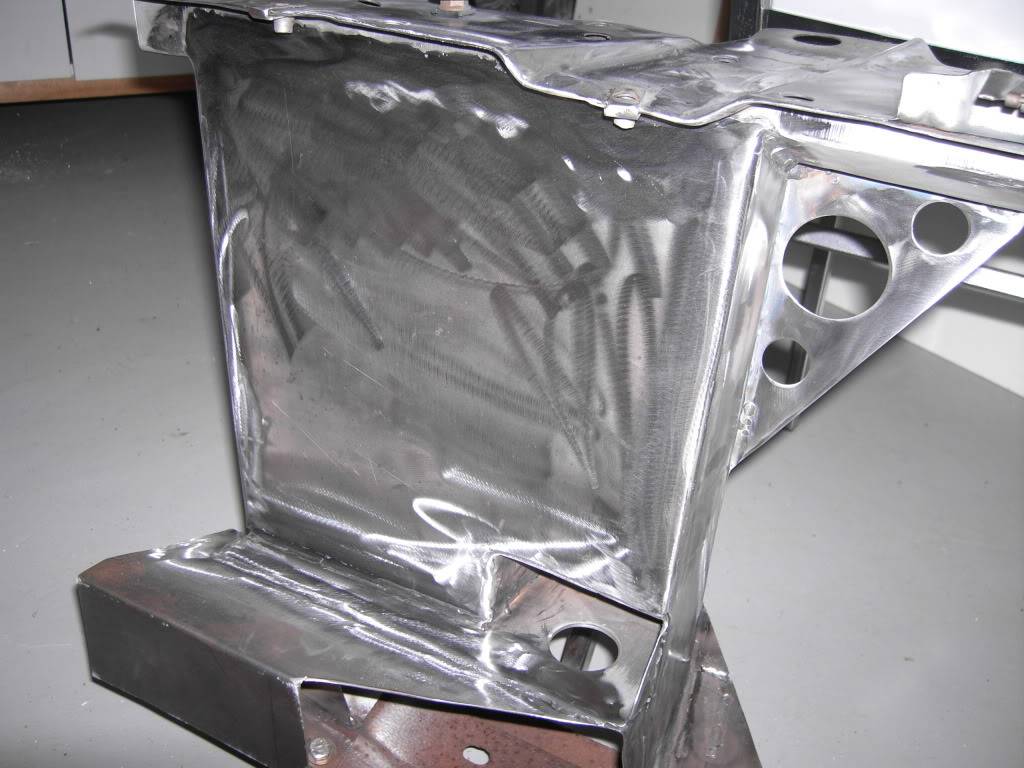
The first steps I decided were to build that new outside wall and to put the main support back in. The main support is what sits on the subframe and has the bolts and mounts go through it. The outside wall was a cinched. The main support took me hours to do. I tripled checked everything as best I could to make sure it was level and in the correct location. In the end, it's close, lol. It should work though. If not, guess I'll source one from somewhere.
After that, I started flying with the other pieces. I even forgot to take pictures I was moving so fast. So here's what the driver's side looks like almost completed. Everything is just tacked into place of course.
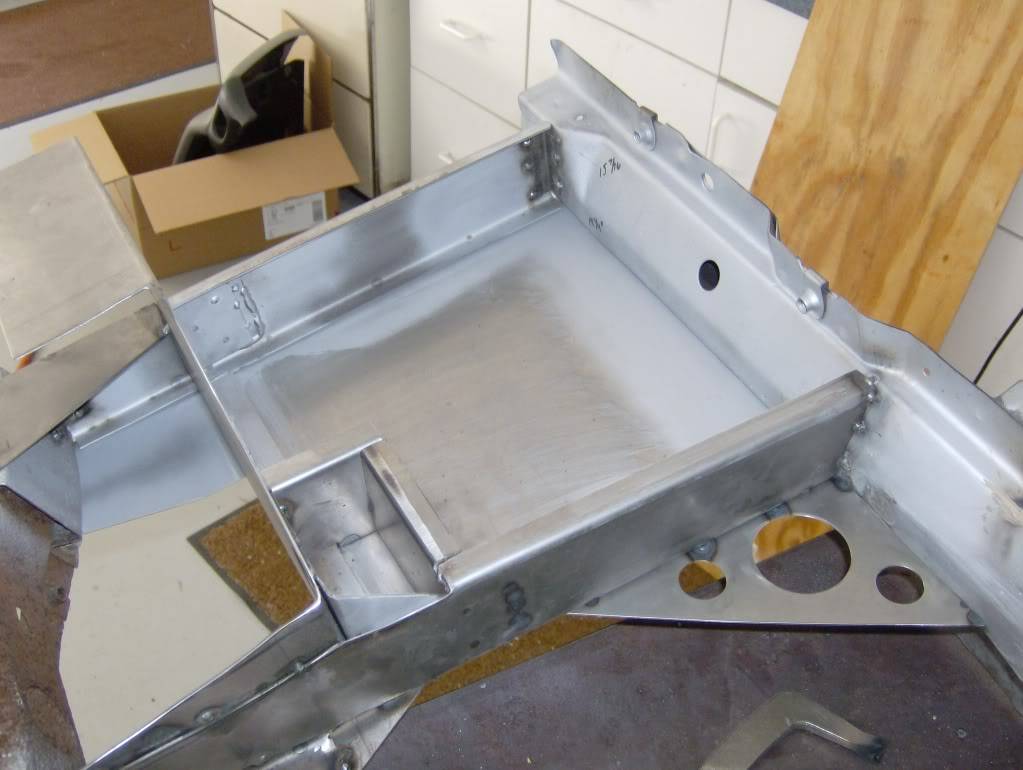
I have to give props to Inverter for giving me the idea to drill holes in these diagonals. He's doing it to a lot of the piece in his truck build up and I think it looks good. In my case it also allows air to pass through to the radiator. These diagonals should help strengthen the radiator opening area of the core support
I added one to the passenger side too.
And that's it for now. I have a lot of welding and grinding left to do. I'll have more pictures soon though as I've made more progress since these pictures where taken.
ThanksTrey
"The early bird may get the worm, but the second mouse gets the cheese."
~ Jon Hammond
1979 WS6 Trans Am stock LT1/T56 drive train out of my Formula. BMW M-parallel rims. C5/C6 brakes
build thread https://www.pro-touring.com/showthre...ghlight=begins
08-07-2009 #34
Registered User
- Join Date
- Aug 2004
- Location
- Dunwoody, GA
- Posts
- 4,984
Forgot to add that I am not a fabricator. I am just going at it with this and teaching myself as I go. I'm using my mind and planning ahead on how I want everything to lay out. I'm totally open to suggestions if you see something wrong or that I could have done differently. I didn't do any sort of analysis on the core support and the changes I've made. I can't imagine it is not going to be stronger and help brace the front end of this car though.
Trey
"The early bird may get the worm, but the second mouse gets the cheese."
~ Jon Hammond
1979 WS6 Trans Am stock LT1/T56 drive train out of my Formula. BMW M-parallel rims. C5/C6 brakes
build thread https://www.pro-touring.com/showthre...ghlight=begins
08-07-2009 #35
Registered User
- Join Date
- Nov 2006
- Location
- Ma.
- Posts
- 5,567
Nice work it looks good..
Wayne
Car FINALLY home !!!!!! lol
Project FNQUIK https://www.pro-touring.com/showthre...ghlight=FNQUIK
08-07-2009 #36 Registered User
- Join Date
- Mar 2007
- Location
- Florida
- Posts
- 2,391
Looking good! It does look like it should be stiffer using thicker sheetmetal, being boxed, and having the the extra braces added. I like the boxing idea combined with the solid mounts to reduce twisting of the whole front. Are you adding metal where the body mounts are? I'm going to be switching to solid mounts from polys and prepping a different core support for my 70 and thought I'd beef up the area where the mounts are to help stiffen everything up.
08-07-2009 #37 Registered User
- Join Date
- Jun 2005
- Location
- Greenwood, SC
- Posts
- 2,314
whoa, dude....you're doing fantastic work! I'm envious of your skills and bravery. Absolutely sick!
08-08-2009 #38 Pro-Touring Veteran
- Join Date
- Jun 2002
- Location
- Long Island, NY
- Posts
- 11,320
It's coming along nicely, Trey! Keep up the good work.
08-08-2009 #39
Registered User
- Join Date
- Aug 2004
- Location
- Dunwoody, GA
- Posts
- 4,984
Thanks guys. I appreciate the positive feedback.
John, I didn't add extra metal around the actual mounts. I did weld up the metal parts on the passenger side that were stock. I believe the boxing will help make the whole platform area with the holes stiffer. I'm also welding all the way around the support instead of relying on the factory pinch welds. I figure, why not since it is out.
In all honesty, I'm sure I could have just put gussets instead of an entire panel and gotten the same results. The solid sheets look better and work. I'll worry about weight one day later. In a few years when I go to build the turbo system, I hope to be able to tig aluminum and I'll make up and whole new support then. I'll have intercooler piping to worry about as well as AC lines and the different coolers. This is all just to hold me over til then.Trey
"The early bird may get the worm, but the second mouse gets the cheese."
~ Jon Hammond
1979 WS6 Trans Am stock LT1/T56 drive train out of my Formula. BMW M-parallel rims. C5/C6 brakes
build thread https://www.pro-touring.com/showthre...ghlight=begins
08-11-2009 #40
Registered User
- Join Date
- Aug 2004
- Location
- Dunwoody, GA
- Posts
- 4,984
not much of an update but I did have some pictures to show of the core support 95% completed.
I've got the driver's side panel welds ground down and looking pretty. All that's left for this part of the build is boxing in the lower portion under the radiator itself which is done but I don't have a picture for it yet. Also, I have to make two brackets to hold the lower rubber radiator isolators that were normally held by the fan shroud that's no longer being used and the upper radiator cover that will some how hold the twin electric fans off my Formula.
The biggest news to me is da rims
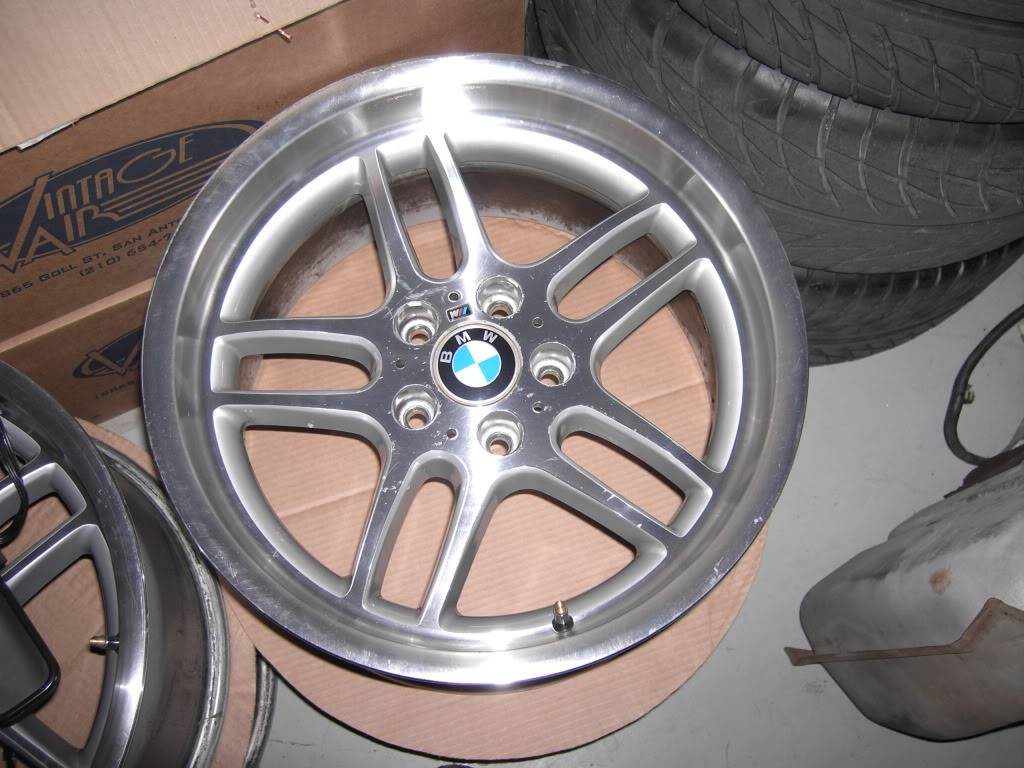
That's right. I got my hands on a set of staggered OEM M-parallel rims. Why would I want these you ask? Well here's some info on them. They are 18x8 and 8x9.5 front and rear. Front back spacing is 4-13/16" while rear is 6" This is pretty close to what is needed for these cars so a thick adapter is not needed. the fronts weigh 24-3/4 pounds and the backs weigh 26-1/4 pounds. Not bad for factory forged aluminum rims. Oh and I picked the set up for $600. There's some minor curb rash on the one and nicks in the clear coating but a set of 18" rims for $600. That rocks in my book. Oh and the fronts clear my Kore 3 C5/6 hybrid brake setup. I may paint these eventually but they are just getting bolted on for now.Trey
"The early bird may get the worm, but the second mouse gets the cheese."
~ Jon Hammond
1979 WS6 Trans Am stock LT1/T56 drive train out of my Formula. BMW M-parallel rims. C5/C6 brakes
build thread https://www.pro-touring.com/showthre...ghlight=begins

 Reply With Quote