

Results 21 to 40 of 248
Thread: Our F85 Power Tour Project
-
05-25-2008 #21

 Registered User
- Join Date
- May 2001
- Location
- Mesa, Az.
- Posts
- 1,433
 The rears are 20x8.5 w/ 5" BS on a 275 35 20 I'm also running a .300" spacer to clear the inner body mounts.
 Originally Posted by TurboLark
The rear is narrowed 1.5" over all.
The fronts are 19x8 w/ 6" BS 245 35 19.
-
05-26-2008 #22
Registered User
- Join Date
- Aug 2007
- Posts
- 151
Kool build

05-26-2008 #23 Registered User
- Join Date
- Jun 2007
- Location
- Dayton Ohio
- Posts
- 1,283
nice man
GTO Project https://www.pro-touring.com/showthre...-The-Great-One
Colorado Project https://www.pro-touring.com/showthre...cab-CodeRedZQ8
Check Out My YouTube Channel http://www.youtube.com/c/geedsgarage
05-30-2008 #24
Registered User
- Join Date
- May 2001
- Location
- Mesa, Az.
- Posts
- 1,433
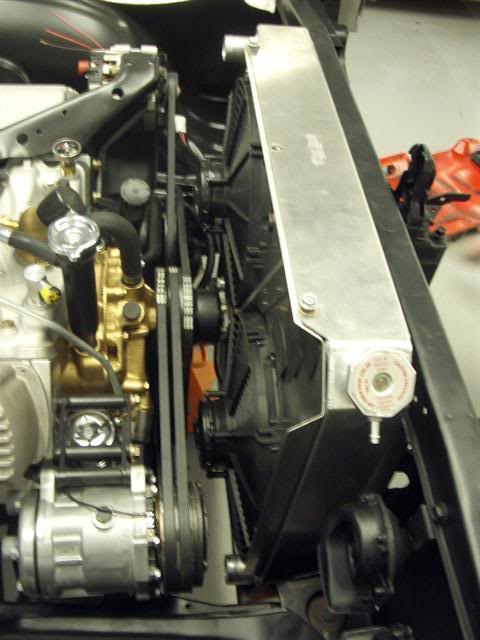
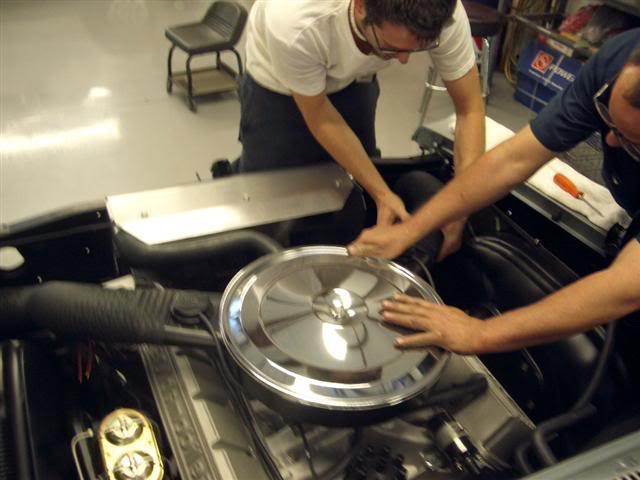
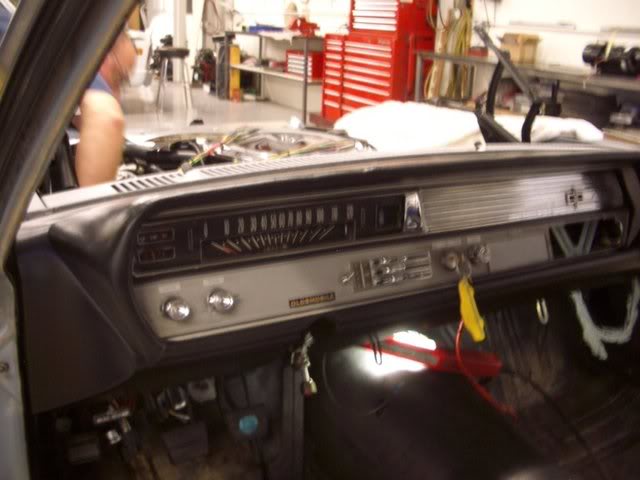
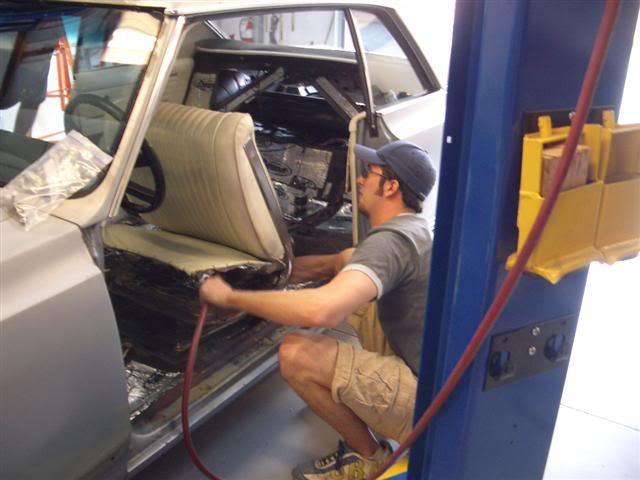
Well we are moving along. Front wheels should be here very soon but we took it out to have the carpet installed last Sunday. Below are a few updated pics.
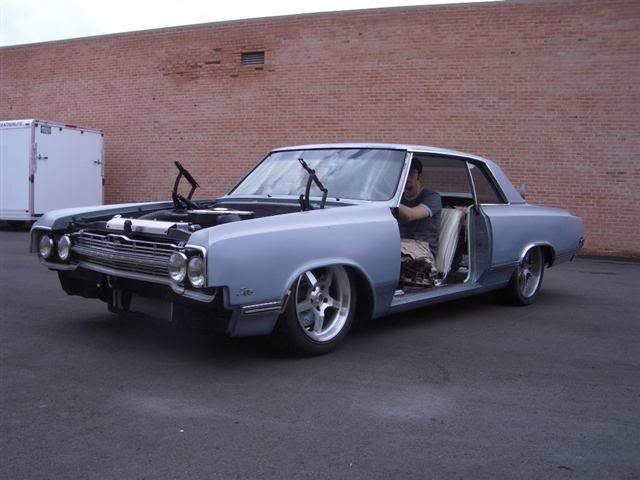
I took it out for a drive down the side street like this and had a police officer not turned before I got to the intersection I'm pretty sure he would have stopped me. "No officer, I don't know why you stopped me.." Haha

06-27-2008 #25
Starting The Transformation
- Join Date
- Aug 2004
- Location
- Alta Loma,SoCal
- Posts
- 396
Thanks for the info. How was the steering/rubbing up front when you took it for the test drive? Originally Posted by PhillipM
1965 Buick Skylark
06-27-2008 #26
New to Pro-Touring
- Join Date
- Jun 2008
- Location
- Fort Worth
- Posts
- 6
Great looking car and choices of combos. Man I would have been nervous under the body doing the uncoating!
06-27-2008 #27 Registered User
- Join Date
- Aug 2004
- Location
- Mesa, Az
- Posts
- 196
Jack Stands
Thanks, the Cutlass has turned out pretty well. Need to do a couple minor changes after the power tour, like front seats! When I was 16 and had a 64 Cutlass they seemed just fine. Alot different now when you're over 50. The fork lift scared me more than the jack stands! I had one of our Z/28s on those stands for almost 10 years.
06-27-2008 #28 Registered User
- Join Date
- Mar 2005
- Location
- Miamisburg, Oh
- Posts
- 2,393
I've missed this thread previously but damn this is a cool build. sits low, the rims are great on the F-85's body lines too,....Olds 455 power and a T56. that is just awesome! <2 thumbs up>
06-27-2008 #29 Registered User
- Join Date
- Feb 2006
- Location
- SoCal
- Posts
- 1,622
Super Nice! That should be real fun on the power tour!
John'66 Chevy II - The "NEW" '69 Camaro!
***Under Construction***
Build Update Link:
https://www.pro-touring.com/forum/sh...ad.php?t=17108
06-27-2008 #30
Registered User
- Join Date
- May 2001
- Location
- Mesa, Az.
- Posts
- 1,433
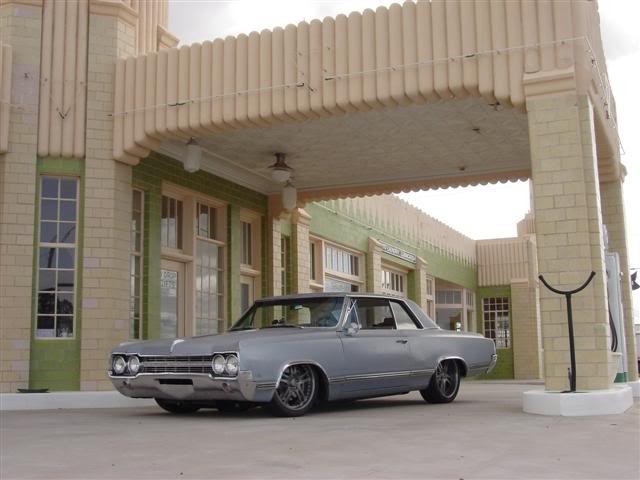
With our new 6" back spacing on the front wheels they only rub at full lock. And that is with a pretty low ride height. If the bottom of the fender is at the top of the wheel then they don't rub at all. Here are some updated photos. The last one is us in Cresco, IA on our way to the Featherlite trailor facility. We went over a few bumbs and had a shockwave come apart. The problem was in a way an accident on our part so nobody be affraid that you Shockwave will just "fall apart". In the action of it coming apart we lost the "O" rings in it so we had to drove it to the next stop adding air every 30 seconds or so. We met up with air ride and they helped us rebuild it right there. Scarry but hey, you gotta do what you gotta do on tour sometimes. Charley Lillard has some photos of use pulling the suspension apart at the show.. If your reading this Charley send them on over! Originally Posted by TurboLark


06-27-2008 #31 Registered User
- Join Date
- Dec 2006
- Location
- oshawa ontario
- Posts
- 1,607

very cool......always loved that body style!
Nascar 69 Chevelle project, 1999 Hutch Pagan Nascar chassis, 69 Chevelle body,700hp, Penske's, slicks, roadrace track day https://www.pro-touring.com/showthre...le-Cup-project
89 Iroc 406 Fitech 5 spd
01 chevy 2500HD 4x4 8.1 Allison
31 Scarab 2 x 454
06-28-2008 #32
Starting The Transformation
- Join Date
- Aug 2004
- Posts
- 210
A very nice ride. And I ought to know....I rode in it. I got to watch it go together, as my car is being built out of that shop (70 GTO). So I spend a bit of time there.
06-28-2008 #33
Registered User
- Join Date
- Aug 2004
- Location
- Rowlett Tx.
- Posts
- 201
I followed this post & loved the choices made.
After thinking about the build, I wondered what were your specs on the drivetrain (motor, cam, carb, rear gearing) & how were the mpg's for the tour?
I would bet there's a bunch of guys out there that are curious how much of an impact a T-56 can make in an older muscle-car on the road.
Also..... What exactly went wrong on the SW install that caused the failure (if you don't mind airing the dirty-laundry)?
06-28-2008 #34
Registered User
- Join Date
- May 2001
- Location
- Mesa, Az.
- Posts
- 1,433
The motor is a mid 70's Olds 455, bored 40 over with a mild stage 1 cam. The carb is a quadrajet and we are running a 4.11 gear. We averaged 18 mpg with a high of 21 and a low of 15. The real key to getting the mpg's up with the carb is to not run too low of an rpm at cruise. We ran about 2k rpm at our cruising speed of 70, and it worked out pretty well. I'm sure with some more tweaking it could have done better but we were pretty happy.
As for the SW failure, the coupler at the top of the shock was removed and was found to not have loctite on it. air ride has already checked their production line and have found that all of them had loctite.. so it sounds like a fluke deal. We took the rest apart and made sure that there was loctite on them. We are not sure if someone on our side took it off or if it came from the factory like that but either way we are safe now.
06-28-2008 #35
Registered User
- Join Date
- Aug 2004
- Location
- Rowlett Tx.
- Posts
- 201
18mpg average isn't too shabby for a 455 in some 60's era muscle. I always figured it would be best to keep rpm's around the normal city cruise speed (city subdivisions that is) so around 40mph & 2Krpm. That 2Krpm on the hwy sounds right.....
Thanks for the follow-up on the shockwave. I've read where many people assume the red 'goo' on the fitting threads is sealant. I've also seen that it's anti-galling compound & that you're still supposed to wrap the threads in sealant. Did ART clarify that for you?
06-29-2008 #36 Registered User
- Join Date
- Jan 2007
- Location
- Georgia
- Posts
- 308
could we see some pics of the interior back together?
Alex McCarty
1955 Chevrolet 210 "JOE BEN", 425hp 355 smallblock, saginaw 4 speed
1966 Chevelle: Talldeck 427 bigblock, turbo 400, 12 bolt
06-30-2008 #37
Registered User
- Join Date
- May 2001
- Location
- Mesa, Az.
- Posts
- 1,433
The red stuff that you see on the airline fittings is just to protect the threads.. you still need to add a thread sealant. Originally Posted by ScotI
The red stuff on the coupler that goes ontop of the shock to make the shock longer is loctite and needs to be there.
55chevyman- Funny as it may be I have a bunch of photos of the car but none of the interior. I will see if I can't snap a few in the next day or so.
06-30-2008 #38
Registered User
- Join Date
- Jan 2007
- Location
- Georgia
- Posts
- 308
Thanks Phillip!
Alex McCarty
1955 Chevrolet 210 "JOE BEN", 425hp 355 smallblock, saginaw 4 speed
1966 Chevelle: Talldeck 427 bigblock, turbo 400, 12 bolt
07-04-2008 #39 Registered User
- Join Date
- Sep 2006
- Location
- Chicago
- Posts
- 355
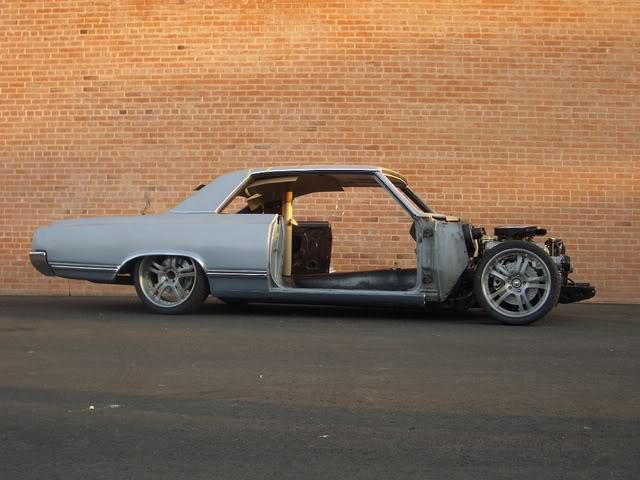
I'm in love wit the rims any chance of a side shot so I can do a little chop? Great work by the way.
Tony L
07-05-2008 #40
Registered User
- Join Date
- May 2001
- Location
- Mesa, Az.
- Posts
- 1,433
Should do.. Originally Posted by 70 Chevelle

 Reply With Quote


