

Results 81 to 100 of 763
Thread: 1970 GTO Version 2.0
-
03-31-2008 #81

 -Moderator/Sponsor-
- Join Date
- Apr 2001
- Location
- The City of Fountains
- Posts
- 15,975

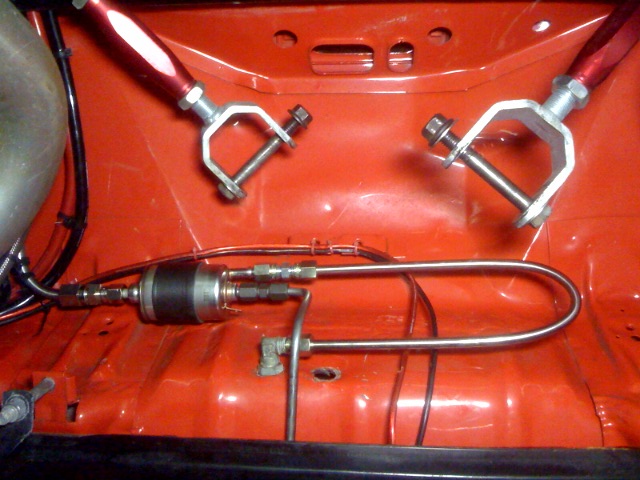
It seems that just when you think something will only take a short time, the bottom falls out. I got the fittings this morning and got under the car. It's a good thing the rear end was out, because I am not sure if I could have done this with the rear end installed. That also makes me worried that it might be hard to get to the filter for maintenance, but I will cross that bridge when the time comes.
So here is the final installation. It was a little challenging because I didn't have quite enough room. There were some existing lines that I wanted to reuse and this is the best layout that I could come up with.
Andrew1970 GTO Version 3.0
1967 Cougar build
GM High-Tech Performance feature
My YouTube Channel Please Subscribe!
Instagram @projectgattago
Dr. EFI
I deliver what EFI promises.
Remote Holley EFI tuning.
Please get in touch if I can be of service.
"You were the gun, your voice was the trigger, your bravery was the barrel, your eyes were the bullets." ~ Her
-
03-31-2008 #82
 Registered User
- Join Date
- Jul 2007
- Location
- So Cal
- Posts
- 263
Andrew,
Looks good. Your posts are really usefull for some of us knobs like me. If you could and when the time comes snap a picture of the spring adjuster install? I have never used those and I think I would like the idea of being able to adjust ride height a little in the rear.
Thanks,
Tom
-
03-31-2008 #83
-Moderator/Sponsor-
- Join Date
- Apr 2001
- Location
- The City of Fountains
- Posts
- 15,975
Thanks Tom. My goal with this thread was to proide as much technical information as possible for people that are doing something similar. Originally Posted by tom_a
I was actually messing around with the spring adjusters today and I have mixed feelings so far. As always "bolt on" parts, don't. The stock spring perch has a very wide filet and the spacer that is supposed to slip over it, doesn't have enough clearance to sit flush. I may just leave it. I don't think a small gap will make any difference. I will take some pictures tomorrow.
Andrew1970 GTO Version 3.0
1967 Cougar build
GM High-Tech Performance feature
My YouTube Channel Please Subscribe!
Instagram @projectgattago
Dr. EFI
I deliver what EFI promises.
Remote Holley EFI tuning.
Please get in touch if I can be of service.
"You were the gun, your voice was the trigger, your bravery was the barrel, your eyes were the bullets." ~ Her
-
03-31-2008 #84
-Moderator/Sponsor-
- Join Date
- Apr 2001
- Location
- The City of Fountains
- Posts
- 15,975
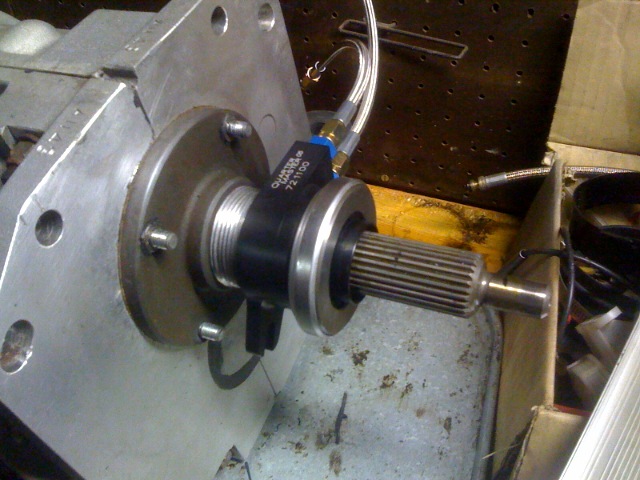
I also got the got the Quarter Master "street" hydraulic bearing today. Remember how I said in a previous post that the clutch fingers are 3.25" away from the face of the bellhousing? We this is where that dimension is critical. The bearing has to be shimmed so that it is .100"-.150" from the clutch fingers. The shims go between the bearing retainer and the bearing and move it closer to the clutch fingers. I have mine set with a .090" gap. Tighter than what is recommended, but I am comfortable with it. The gap is needed because as the clutch wears, the spring fingers will move back towards the bearing. If there is no gap, the spring fingers will start to press against the bearing and there is the potential for clutch slippage due to decreased spring pressure.
Andrew1970 GTO Version 3.0
1967 Cougar build
GM High-Tech Performance feature
My YouTube Channel Please Subscribe!
Instagram @projectgattago
Dr. EFI
I deliver what EFI promises.
Remote Holley EFI tuning.
Please get in touch if I can be of service.
"You were the gun, your voice was the trigger, your bravery was the barrel, your eyes were the bullets." ~ Her
-
04-01-2008 #85
 Registered User
- Join Date
- Jun 2006
- Location
- NW burbs IL
- Posts
- 1,732
Andrew the underside of your car looks very clean, like it never had rust. Where did you find that car?
On the clutch I found out the hard way years ago. I setup a hays clutch to factory specs ( which has you measure pedal play, mind you all parts were new ) and after one day at the drags it was ruined. I only had 200 miles on it. Dohh!!Matt
Current project: " Chain Reaction "
A.K.A. " BIG " by wife, biatch in garage.
1969 RS Camaro L92 T56 Quadra-link, CW sub, Ford 9" a progressive build.
Ex track car: 1995 Camaro LS1 T56
-
04-01-2008 #86
-Moderator/Sponsor-
- Join Date
- Apr 2001
- Location
- The City of Fountains
- Posts
- 15,975
I've owned the car since I was 15. When we started on the body it was decided that a new shell would save money in the long run. So this shell was off an Arizona car with original quarters and solid floor. The only part that was replaced was a small section of the trunk floor that was rusted due to some foam in the trunk. It held the moisture and resulted in a hole. Originally Posted by Bow Tie 67
Most people pay very little attention to properly setting up a driveline. Bellhousing alignment, bearing clearance, driveshaft angles are all very important and very hard to diagnose once the car is done.
AndrewLast edited by andrewb70; 04-01-2008 at 02:13 PM.
1970 GTO Version 3.0
1967 Cougar build
GM High-Tech Performance feature
My YouTube Channel Please Subscribe!
Instagram @projectgattago
Dr. EFI
I deliver what EFI promises.
Remote Holley EFI tuning.
Please get in touch if I can be of service.
"You were the gun, your voice was the trigger, your bravery was the barrel, your eyes were the bullets." ~ Her
-
04-01-2008 #87
-Moderator/Sponsor-
- Join Date
- Apr 2001
- Location
- The City of Fountains
- Posts
- 15,975
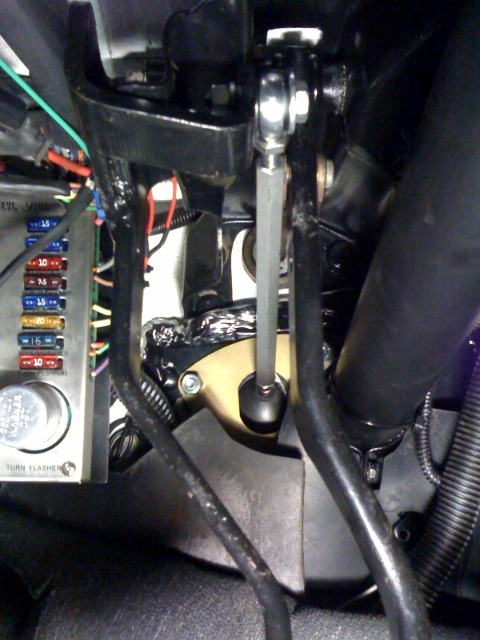
So tonight I tackled the installation of the Keisler clutch master kit. Overall I am pretty pleased with this setup. I had to clearance a small section of the mounting plate to clear the steering column, however that is no fault of the product. As I recall, my steering column is a hair over to the left. I did that so the steering shaft would clear the headers. The notch is minor as you can see in the picture:

The rod from the MC to the pedal makes a straight shot and fits well. I did have to remove the little bracket that held my backup light switch, so I will have to figure out something else for that.
Once everything was installed I wanted to test how far my throw out bearing would move with the full travel of the clutch pedal. This is important because moving the bearing past a certain point will cause it to leak and possibly get damaged. So I connected a long hard line to the MC and ran it to the outside of the car. Connected my Quarter Master release bearing, and bled the system.
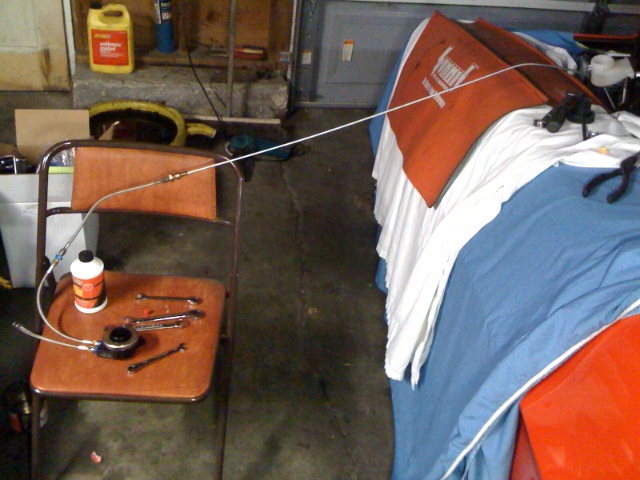
It turned out that the bearing moved about .610" with the full stroke of the clutch pedal. This is perfect considering that the max travel on this bearing is about .650". The next step will be to see how well the bearing releases the clutch. Tomorrow I will bolt everything together and mock it up outside the car. This seems like a lot of work, but it sure beats taking everything apart after the fact.
AndrewLast edited by andrewb70; 06-06-2017 at 06:24 AM.
1970 GTO Version 3.0
1967 Cougar build
GM High-Tech Performance feature
My YouTube Channel Please Subscribe!
Instagram @projectgattago
Dr. EFI
I deliver what EFI promises.
Remote Holley EFI tuning.
Please get in touch if I can be of service.
"You were the gun, your voice was the trigger, your bravery was the barrel, your eyes were the bullets." ~ Her
-
04-01-2008 #88
 Registered User
- Join Date
- Sep 2004
- Location
- Santa Barbara, Ca
- Posts
- 1,135
Originally Posted by andrewb70
Andrew,
You are absolutely right about this one. People see the LSx builds on the internet and assume that they are everywhere. As you know, this is not the case. The last show I had my car in last year had at least 400 cars, and I think my car was the only one with an LSx motor. You are seeing quite a few in magazines these days, because that is the hot trend in higher-end cars (for a reason). Thses cars do not reflect the average hotrod or musclecar out on the road or in the shows today.
Fact is that an LSx motor has a lot more going for it than a 60's or 70's Pontiac motor, whether some people want to agree with it or not. Good choice, Andrew, and I look forward to seeing this car done again.
AndyLast edited by andrewb70; 06-06-2017 at 06:25 AM.
-
04-02-2008 #89
Registered User
- Join Date
- Feb 2006
- Posts
- 478
Ouch.
-
04-02-2008 #90
 Registered User
- Join Date
- Feb 2006
- Location
- Southern California
- Posts
- 660
Andy I agree with you. Im amazed that there are very few LSx cars at the shows. I was expecting more, but find that there isnt a big showing for the swaps. Im glad to see this post and great job Andrew. This is great info and I look forward to reading more. Keep up the great work. Originally Posted by streetk14
Ron
"If at first you don't succeed Skydiving is not for you"1970 Z28
Scott Mock C6 Subframe, Ridetech RJoint 4 link
LSX454
Anvil Auto - through the build
-
04-02-2008 #91
-Moderator/Sponsor-
- Join Date
- Apr 2001
- Location
- The City of Fountains
- Posts
- 15,975
Someone pinch you? Originally Posted by gearbanger
Thanks for the compliments and words of encouragement guys. Today I wanted to finalize the clutch hydraulics and confirm that everything will work. So I bled the clutch. I know that there are numerous methods out there, as well as all kinds of tools. My favorite solo bleeding method is still the "clear bottle with a tube" method.

Remember that bleeding hydraulics is not about pressure. There is no need to pump the pedal as hard and fast as you can. The goal is to displace air and replace it with fluid. Gently moving fluid through the system does just that, without aerating the fluid.
Once the hydraulics were free of air I was able to press on the clutch pedal to see what was happening at the bearing. The nice thing about doing this outside of the car is that I am able to look through the clutch fork hole and see exactly what is happening inside the bellhousing. I discovered that the fittings on the side of the throw out bearing were touching the clutch pressure plate. The LS7 clutch spring fingers sit a good ways down when the pressure place is bolted to the flywheel. So the solution was to press the bearing off the piston and put some shims behind it. This way there is more space between the body of the bearing and the face of the bearing. Hard to imagine what I am talking about.
Here is the bearing at rest, with the shims already installed.

Here is the bearing fully extended and the clutch released.

The pedal is firmer than I expected, but the release is super smooth. So much better than the mechanical bearing with the z-bar. I would recommend this mod to anyone, regardless of engine choice.
AndrewLast edited by andrewb70; 04-05-2008 at 09:21 AM.
1970 GTO Version 3.0
1967 Cougar build
GM High-Tech Performance feature
My YouTube Channel Please Subscribe!
Instagram @projectgattago
Dr. EFI
I deliver what EFI promises.
Remote Holley EFI tuning.
Please get in touch if I can be of service.
"You were the gun, your voice was the trigger, your bravery was the barrel, your eyes were the bullets." ~ Her
-
04-05-2008 #92
Registered User
- Join Date
- Jun 2006
- Location
- NW burbs IL
- Posts
- 1,732
Great write up, I am surprised that the whole assy moves. Which would explain why the guide pin is needed and the fact why shims may, and in your case, were needed. If I'm not mistaken a factory setup only has the piston move, while the main hydraulic housing is stationary. Great pics.
The second pic may be better described as full extension. Lol, now I see what you meant, ( full clutch release ) my mind was in a hydraulic mode, not full clutch system mode. Matt
Matt
Current project: " Chain Reaction "
A.K.A. " BIG " by wife, biatch in garage.
1969 RS Camaro L92 T56 Quadra-link, CW sub, Ford 9" a progressive build.
Ex track car: 1995 Camaro LS1 T56
-
04-05-2008 #93
-Moderator/Sponsor-
- Join Date
- Apr 2001
- Location
- The City of Fountains
- Posts
- 15,975
I changed to wording to make it more clear. Thanks for pointing that out. Originally Posted by Bow Tie 67
The design of that bearing is fairly common. I don't know that Quarter Master was the first to make it like that, but they have been making it for a long time. The design lends itself well to tight applications. By centering and supporting the release bearing on the transmission bearing retainer it can be made very compact. Room was not an issue in my case, but some clutches are very tall. Some engines also have a lot more flywheel offset (distance between the crank flange and the bellhousing mating surface) and push the clutch further back. If the bearing was designed to have a base that did not move, with fittings going into it, the collapsed height would be taller.
I may change the MC. I looked on the Wilwood website and it looks like this same style MC is available in a smaller (.700") bore. This will reduce bearing travel and make the pedal lighter. There is plenty of travel at the bearing now to release the clutch and a lighter pedal will be nicer.
Andrew1970 GTO Version 3.0
1967 Cougar build
GM High-Tech Performance feature
My YouTube Channel Please Subscribe!
Instagram @projectgattago
Dr. EFI
I deliver what EFI promises.
Remote Holley EFI tuning.
Please get in touch if I can be of service.
"You were the gun, your voice was the trigger, your bravery was the barrel, your eyes were the bullets." ~ Her
-
04-05-2008 #94
 -Moderator-
- Join Date
- Mar 2002
- Location
- Redwood City, CA
- Posts
- 1,895,413,640
Looking real good Andrew. I really like that clutch setup. It's giving me good idea's for when I finally decide to go with a manual trans.
Allen Ortega
Meanstreets Performance Fabrication
---------------------------------------
Vegetarians are the reason for global warming
-
04-05-2008 #95
 Registered User
- Join Date
- Aug 2004
- Location
- CHICAGO SUBURBS
- Posts
- 761
You'd want a larger bore to make it easier, been there done that, already. The pedal travel might need to be limited then, to not over-travel the bearing.
-
04-05-2008 #96
-Moderator/Sponsor-
- Join Date
- Apr 2001
- Location
- The City of Fountains
- Posts
- 15,975
Using a smaller bore MC will decrease pedal effort and reduce bearing travel. The smaller the bore the less volume of fluid is pushed per stroke, but pressure at the bearing will be increased. Originally Posted by HILROD
Andrew1970 GTO Version 3.0
1967 Cougar build
GM High-Tech Performance feature
My YouTube Channel Please Subscribe!
Instagram @projectgattago
Dr. EFI
I deliver what EFI promises.
Remote Holley EFI tuning.
Please get in touch if I can be of service.
"You were the gun, your voice was the trigger, your bravery was the barrel, your eyes were the bullets." ~ Her
04-05-2008 #97 -Moderator-
- Join Date
- Jul 2001
- Location
- Detroit, Michigan
- Posts
- 6,854
Fun stuff.
OK lets get back to the fuel system. Now...where did you get your regulator from, how much and what type of fuel tank are you running? Sumped? Do you have a pump installed in the tank or are you running an external pump?
Looks great Andrew. I finally made it out to the garage today and started my window installation. I hope to beworking on the fuel system sometime in June and I'll probably come back to this thread time and time again for technical help.1968 Pro-Touring Camaro LS1
Project: Next Year
- Start date; June '01
- Completion; Sometime next year or the year after.....
04-05-2008 #98
-Moderator/Sponsor-
- Join Date
- Apr 2001
- Location
- The City of Fountains
- Posts
- 15,975
Tony,
I got the regulator/filter from RockAuto.com. It is an AC Delco. Just look up 2000 Corvette. It was about 40 bucks. My fuel tank started life as a new, stock replacement tank. It was modified by Rock Valley to have an internal pump installed along with a sump.
Andrew1970 GTO Version 3.0
1967 Cougar build
GM High-Tech Performance feature
My YouTube Channel Please Subscribe!
Instagram @projectgattago
Dr. EFI
I deliver what EFI promises.
Remote Holley EFI tuning.
Please get in touch if I can be of service.
"You were the gun, your voice was the trigger, your bravery was the barrel, your eyes were the bullets." ~ Her
04-06-2008 #99
-Moderator-
- Join Date
- Jul 2001
- Location
- Detroit, Michigan
- Posts
- 6,854
Is the sump needed for a street car? Do they put a baffle in the tank as well to go around the pump? That is what I plan on doing, sending my tank out to Rock Valley. That's a great price for the regulator/filter. Street & Performance wants a kidney for one of their's.
1968 Pro-Touring Camaro LS1
Project: Next Year
- Start date; June '01
- Completion; Sometime next year or the year after.....
04-06-2008 #100
-Moderator/Sponsor-
- Join Date
- Apr 2001
- Location
- The City of Fountains
- Posts
- 15,975
The sump was needed under the fuel pump insert because the A-body tansk are very shallow. The baffle is part of the insert and keep fuel from sloshing away from the pump "sock." Originally Posted by trapin
I think the Street and Performance filter kit includes some lines and fittings, hence the higher price. I like to do my own thing so I went to the local hydraulic hose company and they had everything I needed.
Andrew1970 GTO Version 3.0
1967 Cougar build
GM High-Tech Performance feature
My YouTube Channel Please Subscribe!
Instagram @projectgattago
Dr. EFI
I deliver what EFI promises.
Remote Holley EFI tuning.
Please get in touch if I can be of service.
"You were the gun, your voice was the trigger, your bravery was the barrel, your eyes were the bullets." ~ Her

 Reply With Quote


