
Results 41 to 60 of 763
Thread: 1970 GTO Version 2.0
-
03-16-2008 #41

 Registered User
- Join Date
- Sep 2006
- Location
- Greensburg, PA
- Posts
- 118
Andrew,
I've used the S&P engine mount plates (they look very close to the edelbrock mounts you show) before & they mounted the engine in the exact place that was occupied by a big block. Your trans should be in the same place & your driveshaft/shifter should not be affected by the new engine.
Those headers are pretty damn sweet.
Good luck.Tod
1990 Chevrolet 454SS - Hot Rod Power Tour 2007 Long Hauler & 2002 partial
1966 Pontiac GTO Hdtp TriPower/4spd
2002 Honda VTX1800C
Visit my website: http://www.akvalley.net/~ss
buying parts I can't afford...with money I don't have...to impress people I don't like anyway.
-
03-17-2008 #42
 -Moderator/Sponsor-
- Join Date
- Apr 2001
- Location
- The City of Fountains
- Posts
- 15,975

Anyone have a water cooled credit card handy? :/
Andrew1970 GTO Version 3.0
1967 Cougar build
GM High-Tech Performance feature
My YouTube Channel Please Subscribe!
Instagram @projectgattago
Dr. EFI
I deliver what EFI promises.
Remote Holley EFI tuning.
Please get in touch if I can be of service.
"You were the gun, your voice was the trigger, your bravery was the barrel, your eyes were the bullets." ~ Her
-
03-17-2008 #43
Registered User
- Join Date
- Aug 2004
- Location
- Dunwoody, GA
- Posts
- 4,984
Those mounts will put the engine back further than the SBC/BBC would have been. 1/4 - 1/2" it appears.
I like the direction you are heading so far. I think a carb intake would be a good way to go so you could retain the shaker. That would also keep it clean so you didn't have to worry about plumbing an air intake.Trey
"The early bird may get the worm, but the second mouse gets the cheese."
~ Jon Hammond
1979 WS6 Trans Am stock LT1/T56 drive train out of my Formula. BMW M-parallel rims. C5/C6 brakes
build thread https://www.pro-touring.com/showthre...ghlight=begins
-
03-18-2008 #44
 Registered User
- Join Date
- Mar 2008
- Posts
- 3
Actually just about all the other mounting plates out there move the engine forward for A/C compressor, and it still isn't enough to fit the compressor. We set the engine closer to the OEM location so things like tranmission shifter linkage and driveshafts will bolt right in. The biggest advantage to setting the engine back in the OEM location (our plates actually put the engine about 3/8" forward) is for better weight balance, move the engine forward and you give away a ton of vehicle balance. Here is a picture of an LS2 in a 1968 Chevelle. Originally Posted by WS6
-
03-18-2008 #45
-Moderator/Sponsor-
- Join Date
- Apr 2001
- Location
- The City of Fountains
- Posts
- 15,975
Parts are slowly starting to trickle in. I got the proper cam gear to use with the LS7 cam. I also got a take off C6 water pump.
For the sake of my sanity, I removed the lifter valley cover just to double check that this engine does not have Displacement on Demand. It does not.
Andrew1970 GTO Version 3.0
1967 Cougar build
GM High-Tech Performance feature
My YouTube Channel Please Subscribe!
Instagram @projectgattago
Dr. EFI
I deliver what EFI promises.
Remote Holley EFI tuning.
Please get in touch if I can be of service.
"You were the gun, your voice was the trigger, your bravery was the barrel, your eyes were the bullets." ~ Her
-
03-19-2008 #46
-Moderator/Sponsor-
- Join Date
- Apr 2001
- Location
- The City of Fountains
- Posts
- 15,975
Received the Keisler aluminum bellhousing today. Nice piece.

Andrew1970 GTO Version 3.0
1967 Cougar build
GM High-Tech Performance feature
My YouTube Channel Please Subscribe!
Instagram @projectgattago
Dr. EFI
I deliver what EFI promises.
Remote Holley EFI tuning.
Please get in touch if I can be of service.
"You were the gun, your voice was the trigger, your bravery was the barrel, your eyes were the bullets." ~ Her
-
03-19-2008 #47
 Registered User
- Join Date
- May 2007
- Location
- Houston, Tx
- Posts
- 2,200
looks nice!
Colin Russ
-
03-20-2008 #48
-Moderator/Sponsor-
- Join Date
- Apr 2001
- Location
- The City of Fountains
- Posts
- 15,975
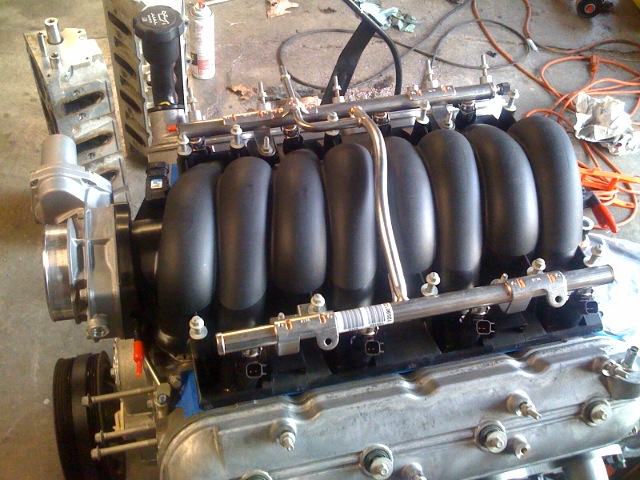
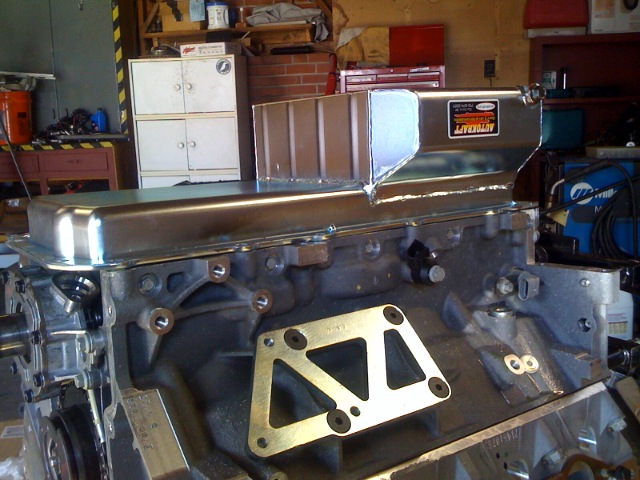
Lots of goodies showed up today including the L76 intake manifold kit:
Andrew1970 GTO Version 3.0
1967 Cougar build
GM High-Tech Performance feature
My YouTube Channel Please Subscribe!
Instagram @projectgattago
Dr. EFI
I deliver what EFI promises.
Remote Holley EFI tuning.
Please get in touch if I can be of service.
"You were the gun, your voice was the trigger, your bravery was the barrel, your eyes were the bullets." ~ Her
-
03-21-2008 #49
-Moderator/Sponsor-
- Join Date
- Apr 2001
- Location
- The City of Fountains
- Posts
- 15,975
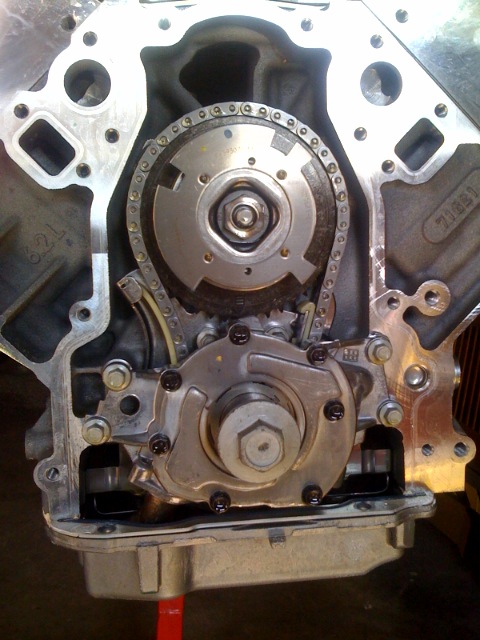
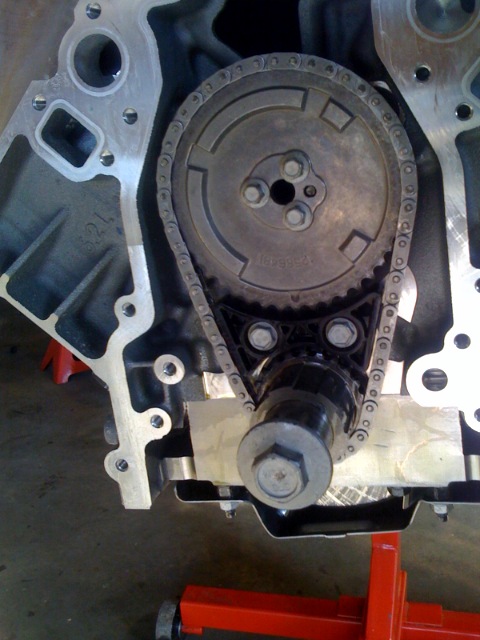
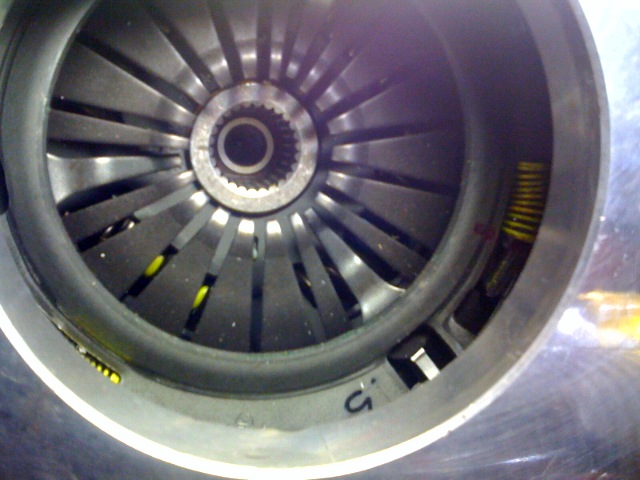
Today I took off the truck balancer and the front cover. This is what the VVT system looks like:
The VVT cam use a single bolt to attach the cam gear and VVT mechanism:
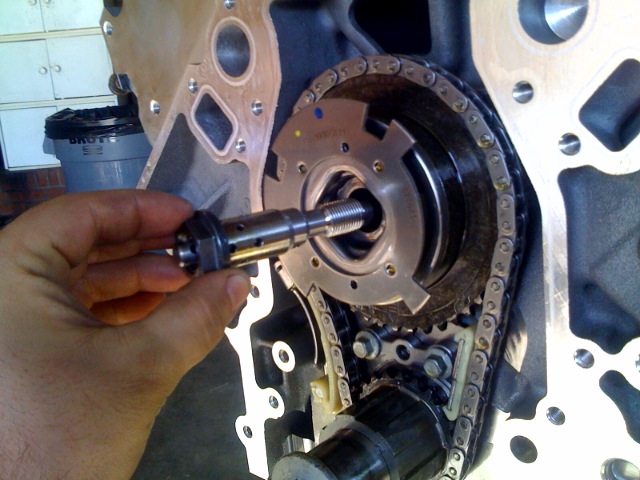
The LS7 cam uses the typical 3 bolt style cam gear. You just have to make sure to get the correct gear with the right pattern of bumps for the cam sensor. I got mine as a handy little kit from Lingenfelter.
Once the cam was installed I bolted on an LS2 from cover along with a C6 water pump and balancer. With the exception of the hollow stem valves, and of course the LS7 cam, this is pretty much an LS3 now.
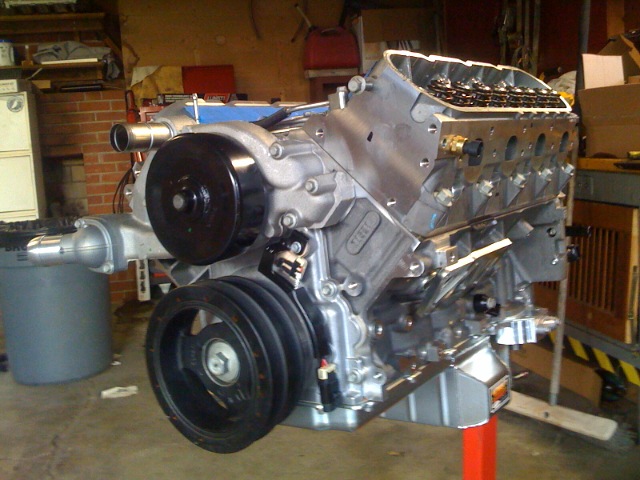
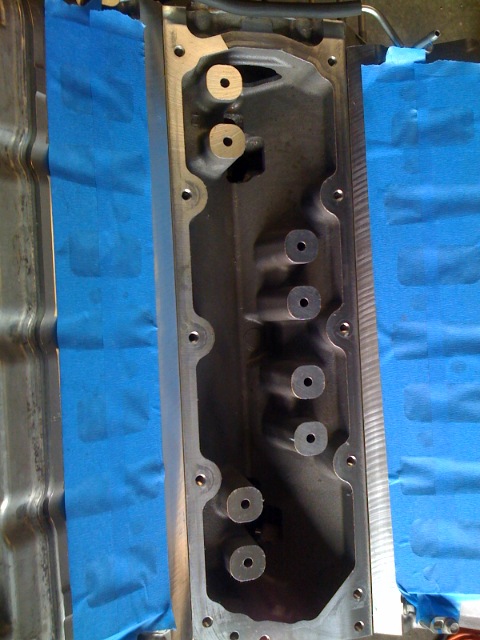
I also installed the AutoKraft oilpan. I really wanted to use an OEM style cast pan, but no one seems to agree what pan will work best. So I went with something that is proven to fit and retains the oil filter in the stock location.
Tomorrow I will be installing some Patriot Gold dual springs and doing some minor detailing.
Andrew1970 GTO Version 3.0
1967 Cougar build
GM High-Tech Performance feature
My YouTube Channel Please Subscribe!
Instagram @projectgattago
Dr. EFI
I deliver what EFI promises.
Remote Holley EFI tuning.
Please get in touch if I can be of service.
"You were the gun, your voice was the trigger, your bravery was the barrel, your eyes were the bullets." ~ Her
-
03-21-2008 #50
Registered User
- Join Date
- Apr 2006
- Posts
- 1,027
looks awesome andrew!! cant wait for a ride

-
03-22-2008 #51
Registered User
- Join Date
- May 2007
- Location
- Houston, Tx
- Posts
- 2,200
wow looks awsome! glad your making such solid progress!
Colin Russ
-
03-22-2008 #52
 Registered User
- Join Date
- May 2005
- Location
- IL
- Posts
- 586
Andrew, I know it's a little late now but the F-body pan fits with alittle rounding of the corners at he bottom of the pan by the crossmember. We put on in a 70 elcamino worked great. On your L92 heads did you do any work to them. To make them work even better you need to clean up the exhaust side posts and if you deck the heads you can get some really good power out of them. Glad to see you back on the car.
Rick
-
03-23-2008 #53
-Moderator/Sponsor-
- Join Date
- Apr 2001
- Location
- The City of Fountains
- Posts
- 15,975
I have read other people using F-body pans, but I am not sure it would work in my case. It is critical in my case that the bellhousing location stay in exactly the same place as it was with the big block. I am not planning on changing anything rear of the engine. I think the f-body pan does fit, but the engine needs to be pushed further back, and that is not an option for me. Originally Posted by BadRS69
I just have 4 more springs to install and I can button it up.
Andrew1970 GTO Version 3.0
1967 Cougar build
GM High-Tech Performance feature
My YouTube Channel Please Subscribe!
Instagram @projectgattago
Dr. EFI
I deliver what EFI promises.
Remote Holley EFI tuning.
Please get in touch if I can be of service.
"You were the gun, your voice was the trigger, your bravery was the barrel, your eyes were the bullets." ~ Her
-
03-23-2008 #54
 Registered User
- Join Date
- Sep 2001
- Location
- Accord, NY
- Posts
- 2,295
Looking forward to your journey part II! Originally Posted by andrewb70
Is that L92 a takeout? I'll be following in your footsteps.
Thanks, Andrew.69 Camaro convertible, 410, M22, 8-pt cage therapy program. SOLD.
68 camaro - SOLD
67 Bel Air - New street project with perfect floors, frame and trunk!
-
03-23-2008 #55
-Moderator/Sponsor-
- Join Date
- Apr 2001
- Location
- The City of Fountains
- Posts
- 15,975
The L92 is new, purchased as a GM reject. It was on a railcar that derailed and the intakes were damaged. Originally Posted by Rick Dorion
More progress over the weekend. I finished installing the Patriot Gold dual springs and hardened pushrods. I am pretty sure I went overkill on the springs, but I figure if I don't like this LS7 cam, I can just stab another one in it without having to worry about the springs.
Next I wanted to check the alignment of the Keisler bellhousing. I took the engine off the stand and placed the bellhousing against the block. Tick, tick, tick, tick...it was rocking back and forth. No good. I inspected it and it looks like someone dropped the bellhousing after it was machined. It put a slight dent on the corner and didn't allow the bellhousing to sit flat against the block. Little work with the file and it was good to go. This is a perfect example of why parts should be mocked up before installing them in the car. I may not have noticed this if I was on my back, under the car, trying to install it.
Next I wanted to check the alignment. I first measured the flatness. Very impressive, at .001".
Next I wanted to check the runout. I installed the dial indicator so it would ride on the inside of the bearing retainer register. This is what centers the transmission in the bellhousing. I set the indicator to zero.
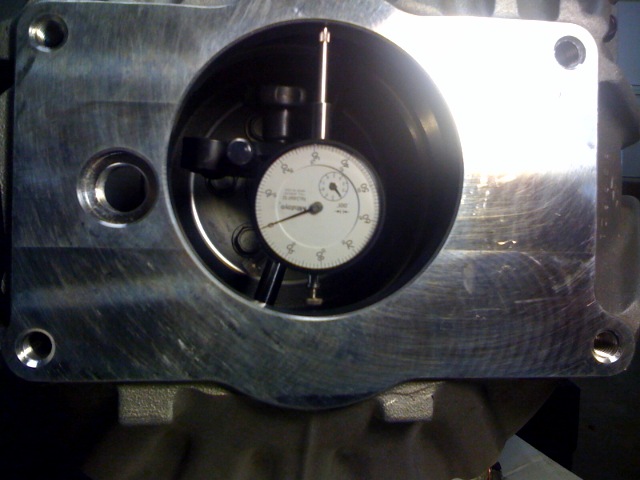
Rotated the engine 90 degrees. Still zero. Good.
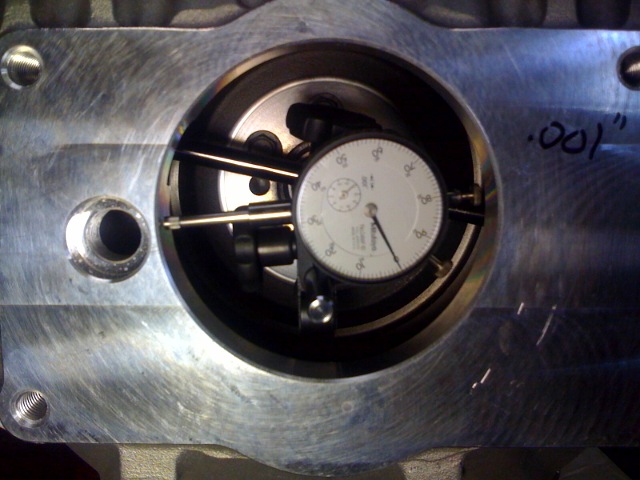
Rotated another 90 degrees. .005". Not bad.
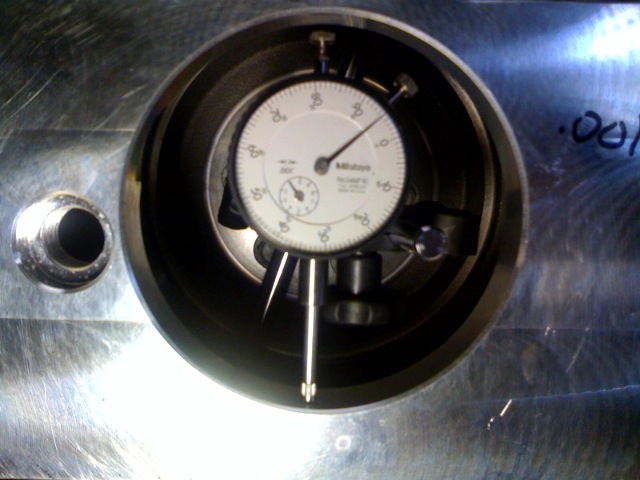
Rotated another 90 degrees. .004". Great.
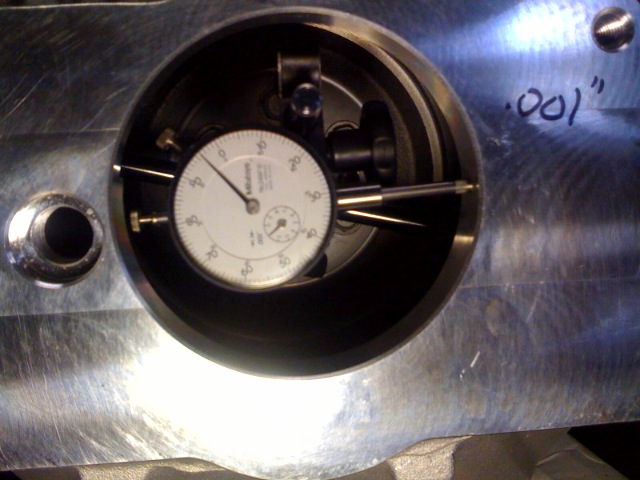
So the most the needle moved was .005". Divide that by 2 and you get total runout of .0025". Well under the recommended .005". Other than the minor issue with the bellhousing, I am pretty impressed.
Next it was time to see how the input shaft engages the pilot bearing. I am using a stock LS7 pilot bearing. I am happy with the engagement.

Then I wanted to install the clutch so that I can take some measurements for getting the right hydraulic throw out bearing. Everyone should have a nice clutch alignment took. This one is from Quarter Master and is way better than a plastic one.
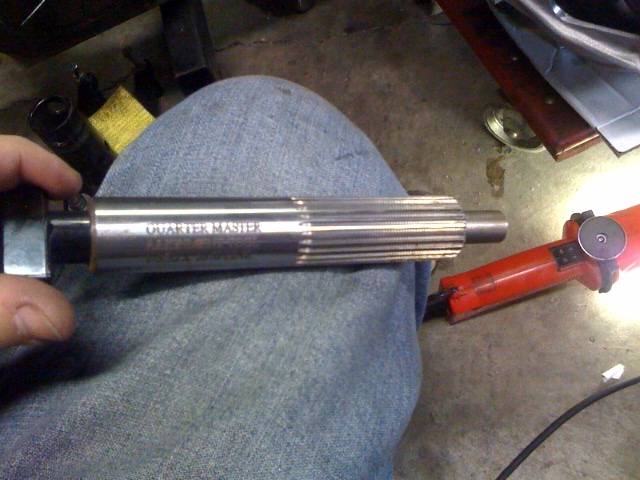
There you have it, clutch and bellshousing installed. I am using a stock LS7 clutch on an LS2 flywheel. Heavy, but it will drive great. The distance from the clutch fingers to the outside of the bellhousing was 3.25". I will elaborate on why that's important later.
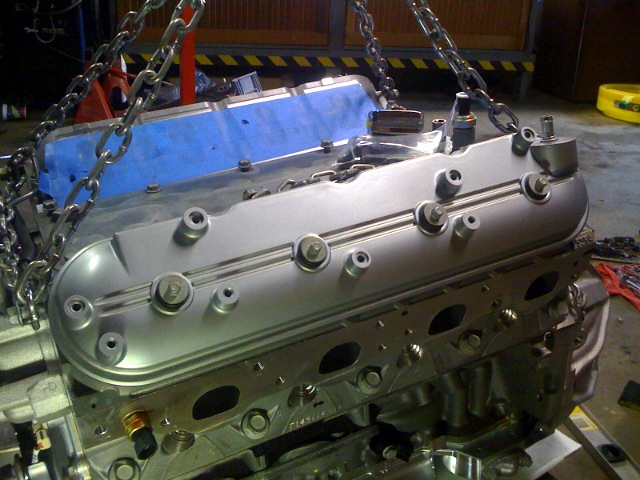
I used some high temp "cast aluminum" paint to add a little detail to the valve covers.
Time to start working on the car and get it ready for the engine. I want to redo some of the wiring as well as some of the fuel lines in the engine compartment.
Andrew1970 GTO Version 3.0
1967 Cougar build
GM High-Tech Performance feature
My YouTube Channel Please Subscribe!
Instagram @projectgattago
Dr. EFI
I deliver what EFI promises.
Remote Holley EFI tuning.
Please get in touch if I can be of service.
"You were the gun, your voice was the trigger, your bravery was the barrel, your eyes were the bullets." ~ Her
-
03-23-2008 #56
Registered User
- Join Date
- Sep 2004
- Location
- Chicago - western burbs
- Posts
- 680
Good progress Andrew...almost looks like it will be ready for Year One.
-
03-23-2008 #57
-Moderator/Sponsor-
- Join Date
- Apr 2001
- Location
- The City of Fountains
- Posts
- 15,975
Thanks Rubes. I really wasn't planning on going to Year One, but I just might. Originally Posted by Rubes
Andrew1970 GTO Version 3.0
1967 Cougar build
GM High-Tech Performance feature
My YouTube Channel Please Subscribe!
Instagram @projectgattago
Dr. EFI
I deliver what EFI promises.
Remote Holley EFI tuning.
Please get in touch if I can be of service.
"You were the gun, your voice was the trigger, your bravery was the barrel, your eyes were the bullets." ~ Her
-
03-23-2008 #58
Registered User
- Join Date
- Apr 2006
- Posts
- 1,027
you need to go to year one. looks awesome,
-
03-23-2008 #59
Registered User
- Join Date
- May 2005
- Location
- IL
- Posts
- 586
Andrew the ls1 we put in the elcamino was with a 4 spd using all the stock componets. Everything is in the stock GM location. I made new frame mounts and used the stock f-body mounts. I was supprised it fit so good, but you already have an awsome pan so no big deal. Keep the pictures coming.
Rick
03-24-2008 #60 Registered User
- Join Date
- Sep 2007
- Location
- Hampton Bays NY
- Posts
- 338
Lookin good! Can't wait to check it out in person.


 Reply With Quote


