

Results 341 to 360 of 681
Thread: Project FNQUIK
-
10-25-2015 #341

 Registered User
- Join Date
- Aug 2009
- Location
- Chandler, Az (from west NE)
- Posts
- 240

Great going on the engine install, Wayne. Since you're getting a heater installed, putting even a sheet of plastic up on the ceiling will help keep the hot air closer to the floor and help your heat loss until you can put in some insulation up there. Thanks for all the pics. Makes me feel guilty for not working on mine.
Ric
2002 s10, DD and AutoX.
1966 Malibu owned since 1971. Drag car converting to track toy!
-
10-26-2015 #342 Registered User
- Join Date
- Nov 2006
- Location
- Ma.
- Posts
- 5,569
I have some 6 mil poly I may put up to keep the heat in.
Wayne
Car FINALLY home !!!!!! lol
Project FNQUIK https://www.pro-touring.com/showthre...ghlight=FNQUIK
10-27-2015 #343 Registered User
- Join Date
- Aug 2001
- Location
- Connecticut
- Posts
- 1,570
Great job with the car and posting so much great info. It will be a great resource for a lot of other builders.
1968 Camaro RS/SS, LS7 with Katech mods, T56 Magnum, C6Z06 Brakes
1968 Camaro RS Convertible LS3/480hp/4L70E
1962 Corvette 327-340hp stock
1963 Corvette Split Window Coupe
1967 Corvette L79 convertible
2006 Corvette Z06
2011 Corvette GS convertible

10-27-2015 #344
Registered User
- Join Date
- Nov 2006
- Location
- Ma.
- Posts
- 5,569
Thanks. I hope I can help, everyone here has always been good to me with help on all my questions.
Wayne
Car FINALLY home !!!!!! lol
Project FNQUIK https://www.pro-touring.com/showthre...ghlight=FNQUIK
10-28-2015 #345 Registered User
- Join Date
- May 2008
- Location
- Austin, Tx.
- Posts
- 1,539
Great progress Wayne! The upgrade from the SBC to the LSA is gonna be sweet! You're getting closer and closer... Keep up the great work! Interior and paint won't be far behind!
Ray
FEW FRILLS, just BIG CHILLS!!!
1972 VW Bug (427LS/T56 Magnum/9"-3.70 gears)
18"x10-1/2" (315/30/18) Front, 18x12" (335/30/18) Rear
https://www.pro-touring.com/showthre...-Lady-Bug-quot
10-31-2015 #346 Registered User
- Join Date
- Mar 2008
- Location
- Chicago
- Posts
- 200
Good job Wayne. Car is going to be ridiculous! It's hard to stay motivated on these huge projects. I know. Lol!!
Dante'
10-31-2015 #347
Registered User
- Join Date
- Nov 2006
- Location
- Ma.
- Posts
- 5,569
Thanks guys.
Today I was working on the wiring for the Big MAXX garage heater. I really need to clean this place up! At work I always told my guys make it safe!!! Today I'm hanging from the trusses and standing on the pump from my 80 gal compressor to get the wires run. I kept looking over my shoulder for the safetyman, but the wires are run just need to tie it in to the heater and run the thermostat and it will be ready for the plumbers to run the gas pipe Monday. They ran the vent out the wall Friday and said they would finish Monday, They must have known I wanted it done then because they brought my about a quarter bushel of clams and little necks. So I did the only thing I could I made a clam boil for me the wife and my daughters family. Brownie points for me ;)Wayne
Car FINALLY home !!!!!! lol
Project FNQUIK https://www.pro-touring.com/showthre...ghlight=FNQUIK
11-01-2015 #348
Registered User
- Join Date
- Aug 2015
- Location
- Madrid Iowa
- Posts
- 116
I plan on putting a furnace in my shop, but for this year I'm using a propane heater. I can't stand the thought of being stuck in the house all winter long.
11-06-2015 #349
Registered User
- Join Date
- Nov 2006
- Location
- Ma.
- Posts
- 5,569
We've been working on the car a few hours a day we installed the RS doors to figure if it would interfere with the intercooler reservoir. I'm going to put it right behind the passenger headlight in the same place Travis (Snappytravis) put his. I had been thinking about putting it there and seeing how nice his is, it was definitely a go.
We made a platform to mount the tank out of aluminum and bolted it in to see how it fit .It will have a piece in the back for a tab to slide into and be bolted 2 or 3 places in the front and be covered with some type of rubber to prevent chafing the tank.
Here's a quick shot of the platform test fit.

We removed the factory balancer and are replacing it with an ATI super dampener. If you guys want a Harmonic dampener check out ATI blems on E Bay,for all types of engines you just need to be patient. Instead of the $465 I got one for $269 for my LSA, it doesn't come with the super charger pulley blem or not. If I had to find the blem on it to save my life the wife could sell the car because I would never find it........ The bolt came right out with my impact wrench.
The problem was getting t he balancer off. We tried with a 3 jaw puller we had, no dice, then I went for an AutoZone loaner, wrong one back again, Then we got another one from AutoZone and it finally got it to move. About 3/16 of an inch, we had to go back to the first puller to finish taking it off, but the loaner was the only thing to get it to break loose.

And finally in place ready to be put on.

We also tried the Front accessory drive on for fit. I don't have the A/C compressor yet so that test will have to wait. The throttle body is a ported one from V Max in Florida.

And something else that will help the build continue.
HEAT!
No more frost bite on this old bootie!

 Wayne
Wayne
Car FINALLY home !!!!!! lol
Project FNQUIK https://www.pro-touring.com/showthre...ghlight=FNQUIK
11-11-2015 #350
Registered User
- Join Date
- Nov 2006
- Location
- Ma.
- Posts
- 5,569
Yesterday we tried to mount the intercooler pump but it didn't work out too well, the hose that goes to the heat exchanger was going to interfere with the radiator so we're moving the bracket.
We installed the Hamburger remote oil filter mount on the frame right behind the radiator. I will be running the -12 oil lines to the filter then to the oil cooler in radiator and back after I make my order for my hose and fitting, soon I hope.

The next thing to try and stuff in there is the trans cooler in the white box in the bottom of the picture.
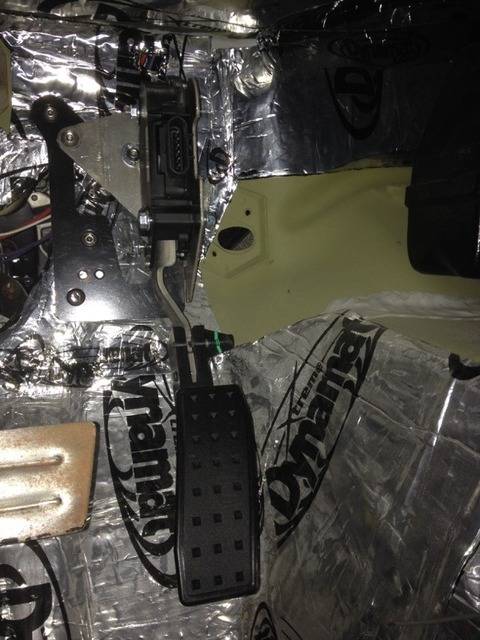
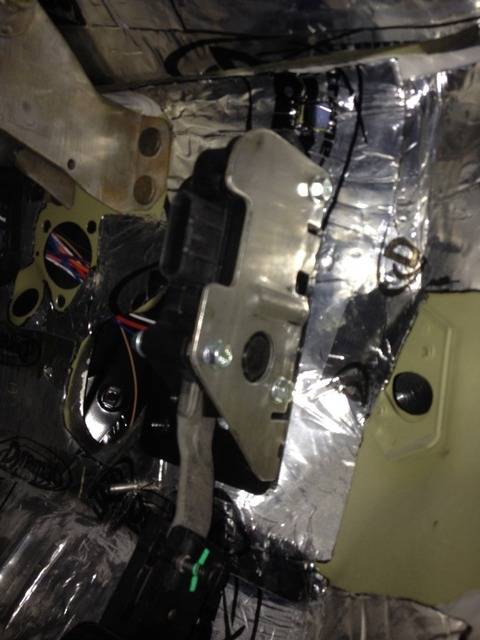
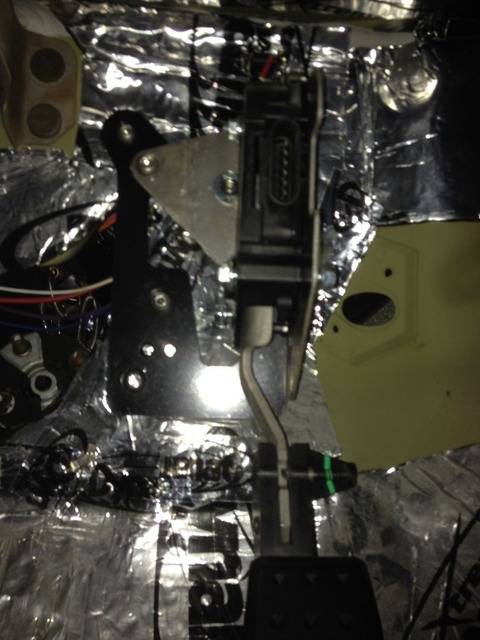
Last week I installed the DBW pedal using the GM factory bracket that came with the controller and the DSE mount. It looks good.
Thanks icemanrd19 for the pictures.
 Wayne
Wayne
Car FINALLY home !!!!!! lol
Project FNQUIK https://www.pro-touring.com/showthre...ghlight=FNQUIK
11-11-2015 #351
Registered User
- Join Date
- Sep 2013
- Location
- sw Kansas
- Posts
- 1,650
Glad you have heat!
11-11-2015 #352
Registered User
- Join Date
- Nov 2006
- Location
- Ma.
- Posts
- 5,569
As the kids used to say it's the bomb.
Wayne
Car FINALLY home !!!!!! lol
Project FNQUIK https://www.pro-touring.com/showthre...ghlight=FNQUIK
11-21-2015 #353
Registered User
- Join Date
- Nov 2006
- Location
- Ma.
- Posts
- 5,569
Not much progress this week, we had to move the remote oil filter because of my mistake. The fitting for the oil cooler stuck out further than I remembered and the mount had no room for the fitting. we made a bracket to mount it on the front bar Mike installed to replace the smaller front cross member on the sub frame, then made a bracket for the intercooler pump. I have no welder so everything has to go to Spaceman's house to be welded.There's more room than appears to be.
(Heavy little sucker)

The remote oil filter from here
To here.


Brackets will be cleaned up and either painted or powder coated.
I picked up some air tools for the garage to make this easier.
A MATCO TOOLS MT4880 .75HP STRAIGHT DIE GRINDER .

A MATCO TOOLS (MT2883) .50 HP Variable-Speed Right Angle Die Grinder .
A MATCO SE430K Silver Eagle Mini DA Sander Kit

All used from E Bay but in great shape.
I also got my spacers for the BMW rear wheels.


I only needed spacers in the rear. I'll use these while I'm working on the car and sell them later when I'm done.Wayne
Car FINALLY home !!!!!! lol
Project FNQUIK https://www.pro-touring.com/showthre...ghlight=FNQUIK
11-21-2015 #354
Registered User
- Join Date
- Feb 2011
- Location
- dallas, tx
- Posts
- 1,730
where do you plan on mounting the ecu and fuse panel? I was thinking of putting my fuse panel to the right side of the pedal mount.
11-21-2015 #355
Registered User
- Join Date
- Nov 2006
- Location
- Ma.
- Posts
- 5,569
That's one of the areas I think of too. I want to try to keep the ECU, fuse panel and trans controller in the cabin but I'm running out of room quick. John from IIMUCH fabrication mounted the ECU on the pass inner fender and it looks like a nice place too. But it's all still up in the air.
Wayne
Car FINALLY home !!!!!! lol
Project FNQUIK https://www.pro-touring.com/showthre...ghlight=FNQUIK
11-22-2015 #356
Registered User
- Join Date
- Aug 2015
- Location
- Madrid Iowa
- Posts
- 116
Great use of BMW M-par wheels.. lol I had those on a 528i I owned. The car looks great man.
11-22-2015 #357
Registered User
- Join Date
- Nov 2011
- Location
- Riverton, Wyo,
- Posts
- 330
Project is looking good Wayne, The plumbing, the more you put on the car the trickier it gets.. I bought gates hoses that had 4" straight then a 90 degree with 12" 14" 16" lengths, then cut to fit. It worked out pretty good.
https://images.search.yahoo.com/sear...g&action=click
11-22-2015 #358
Registered User
- Join Date
- Sep 2013
- Location
- sw Kansas
- Posts
- 1,650
4 lbs. in a 2 lb. box is always tough. I've found that I may not have the correct idea until I finish the project and drive it for a while.
 That has to be tough to not have a welder in the shop. Great to have friends!
11-22-2015 #359
Registered User
- Join Date
- Nov 2006
- Location
- Ma.
- Posts
- 5,569
Thanks Travis I have been trying to look at some Camaro builds to try to figure the hoses out. This will help a lot.
wfo guy Its tough, I feel bad some times we make a couple of trips to change small things that's why I bought the air tools so he doesn't have to drag his down here. now it's the trans cooler which I posted a question in the cooling section. Please feel free to check it out .
Wayne
Car FINALLY home !!!!!! lol
Project FNQUIK https://www.pro-touring.com/showthre...ghlight=FNQUIK
11-30-2015 #360 Registered User
- Join Date
- Sep 2013
- Posts
- 289
Wow..........Just went thru the entire thread.........Man.....You have patience.......Great Job!!!
Ken

 Reply With Quote


