
Results 1 to 8 of 8
Thread: My 1975 Trans Am - "PapasTA"
-
02-02-2023 #1
 Registered User
- Join Date
- Oct 2017
- Location
- Eastern Iowa
- Posts
- 10
My 1975 Trans Am - "PapasTA"
I've been lurking here for a couple of years since I got my 75 in April of 2019. As with most projects, the progress seems to come in spurts. I bought the car in Minneapolis from a classic car body shop guy - it was his car for about 10 years before I bought it. He took it off the road in 2012ish and started a full rotisserie restoration in his spare time. All bad sheet metal was replaced, car was prepped and painted black. He didn't do anything to the 400 from a 77 other than replace some gaskets and paint it. It was a bare shell when I got it, but had all of the interior parts in pretty decent shape except for the front seats that needed new foam and covers.
Here she is loaded up for the 5 hour drive home.
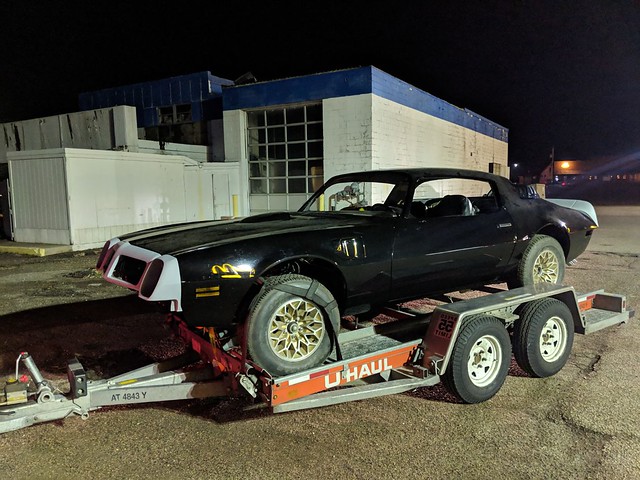
And safely tucked in my garage!
 IMG_20190407_120928 by Rob Armstrong, on Flickr
I was never a fan of the 74/75 front ends and since I would still need to paint the nose I had, I decided to swap out to a 73 nose I picked up. It wasn't in the worst shape and was complete. A little love at the body shop and it bolted up nicely. Still need to tweak the alignment some.
 IMG_20190531_195307 by Rob Armstrong, on Flickr
 IMG_20200502_154704 by Rob Armstrong, on Flickr
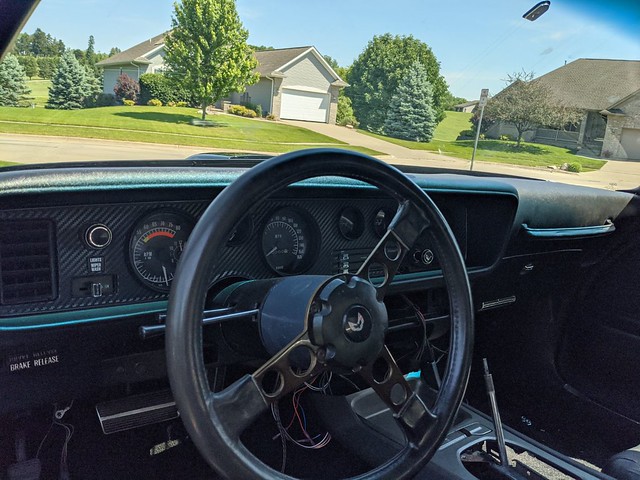
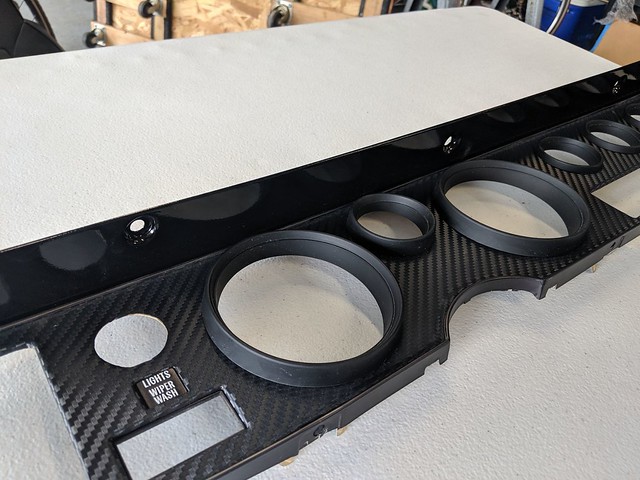
The interior was lined with Lizard Skin and ready for reassembly. I plan on using a 5th gen center console that i picked up for cheap as well. I restored all the plastic using the SEM products and am very happy with how they turned out. Also added a carbon fiber wrap to the dash bezel.
How the interior looked when I got it.
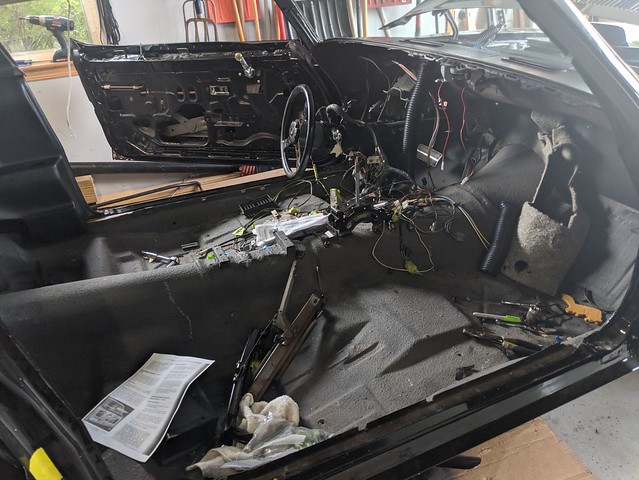 IMG_20190922_162003 by Rob Armstrong, on Flickr
After restoring the plastic and installing the carpet, door panels, etc.
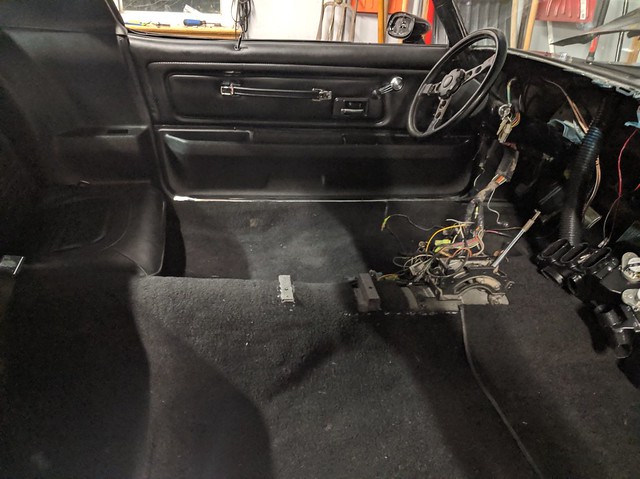 IMG_20190925_212603 by Rob Armstrong, on Flickr
 IMG_20190925_212615 by Rob Armstrong, on Flickr
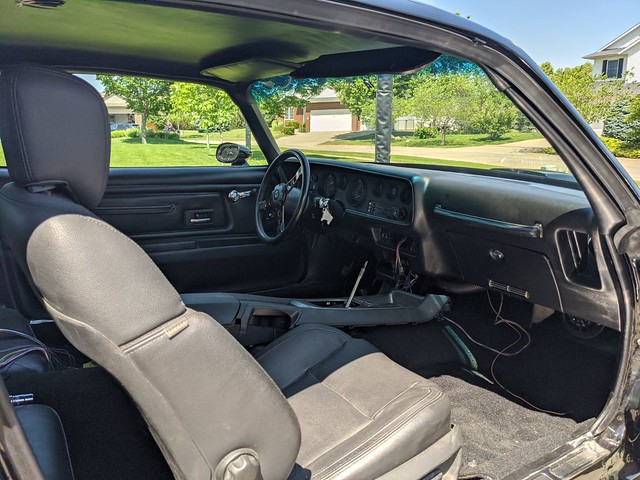
After installing Vintage Air, I put the dash back in, set the console in place and fabbed some brackets for a set of G8 seats.
 IMG_20200607_111111 by Rob Armstrong, on Flickr
 IMG_20200607_111039 by Rob Armstrong, on Flickr
Close up of dash bezel.
 IMG_20190901_134428 by Rob Armstrong, on Flickr
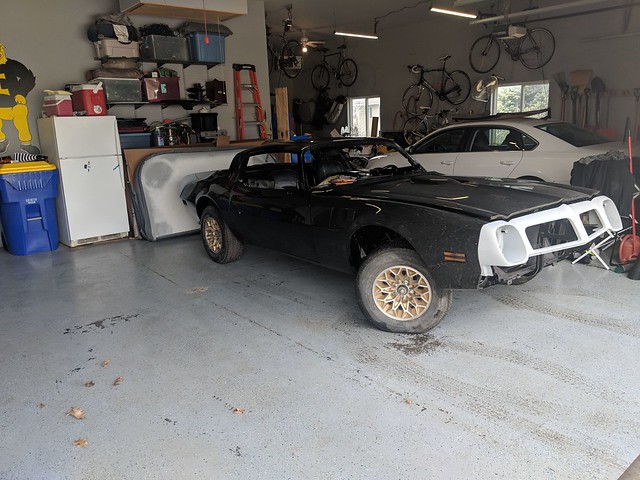
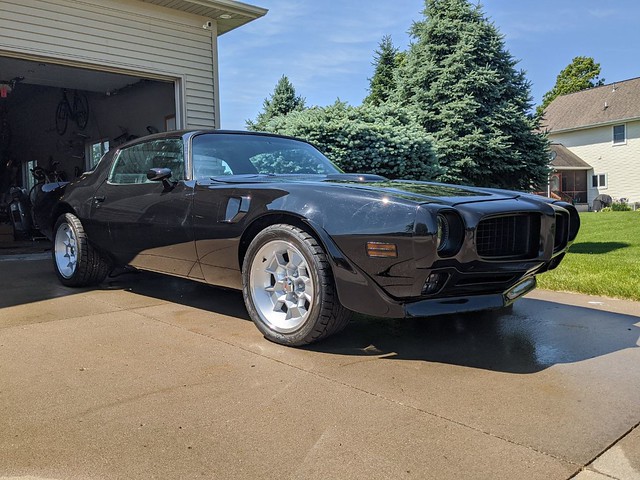
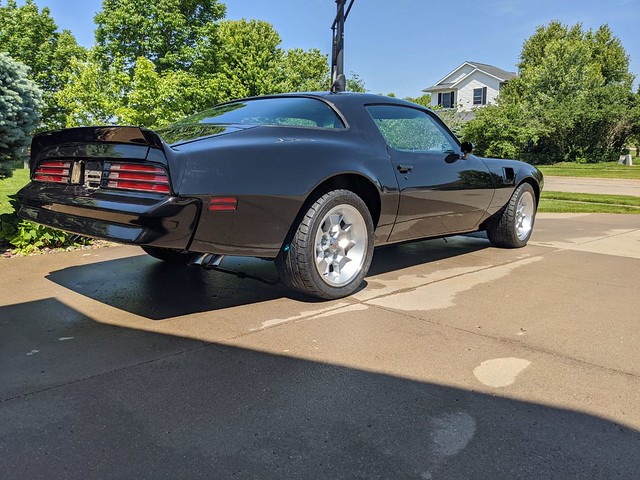
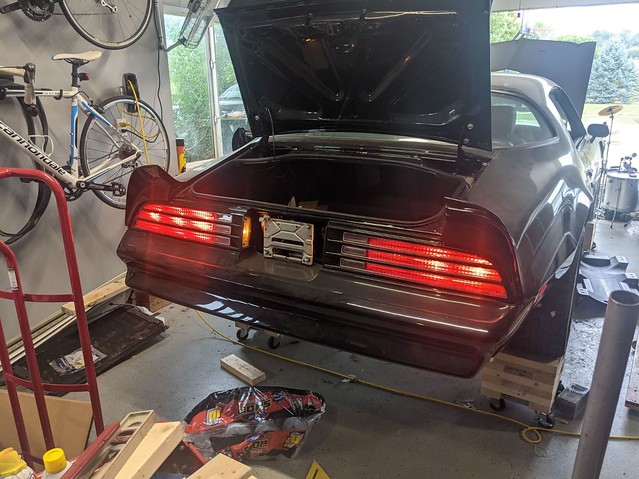
Put the rest of the front end together, added LED halo headlights. I added PTFB GT front springs, 17" Year One Honeycombs and Nitto 275/40 17 tires and she is starting to look pretty good!
 IMG_20200607_105826 by Rob Armstrong, on Flickr
 IMG_20200607_110434 by Rob Armstrong, on Flickr
Most of this was done in the first year or so and it has sat in the garage mostly untouched since then as life got in the way - rehabbed 2 houses for the kids, 2 new grandbabies, work stuff, etc. I started back up on it August of 2021 and got most of the wiring figured out - I messed something up with the new headlights that I still gotta track down, but it was pretty cool seeing it light up for the first time in almost 10 years!
 PXL_20210805_201002359 by Rob Armstrong, on Flickr
It has a posi rear end but not the most desirable gearing, either a 2.41 or 2.56 (can't remember) but I picked up a 3.23 posi rear end, cleaned it up, added rear disc brakes.
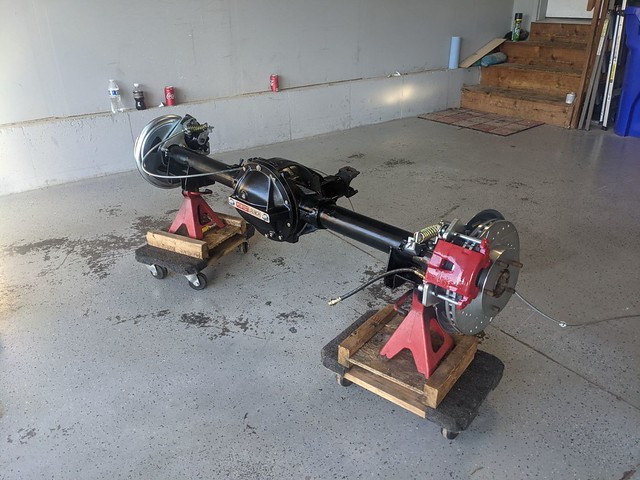 PXL_20210908_233424295 by Rob Armstrong, on Flickr
So there ya go - April of 2019 to August of 2021 summed up in one long post!
Dreaming of the day it's ready to drive!
1975 Trans Am Resto-Mod work in progress
LS1 4L60
-
02-02-2023 #2
Registered User
- Join Date
- Oct 2017
- Location
- Eastern Iowa
- Posts
- 10
In February of 2022 I changed directions with my build. Again.

Picked up a 2004 GTO with only 70K miles and bone stock. Plan is to swap the LS1 and 4L60 into the T/A, along with the seats. My Holley Sniper system was still on backorder from Holley so I was able to cancel that order and ordered the Holley Sniper EFI tank and Holley engine and transmission mounts.
Here is the GTO when I got it home.
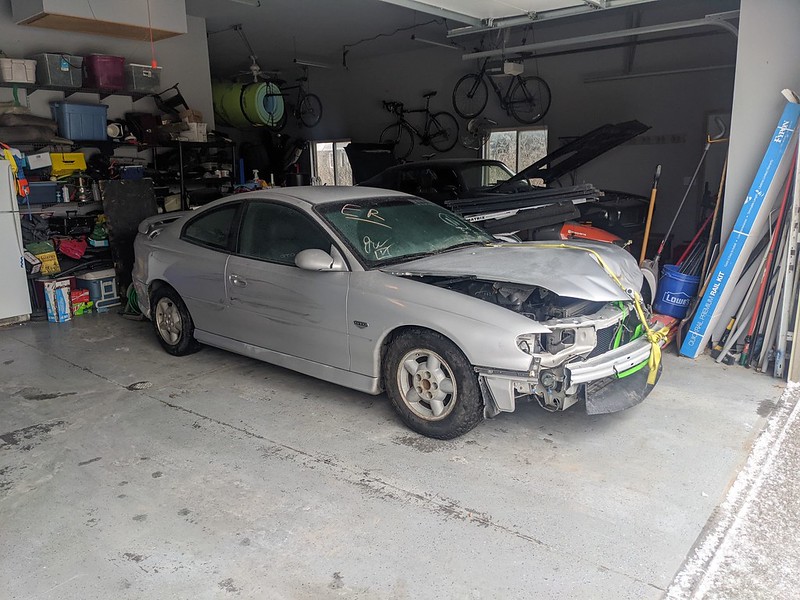 PXL_20220224_142604663 by Rob Armstrong, on Flickr
And here it is mostly picked over! :shock:
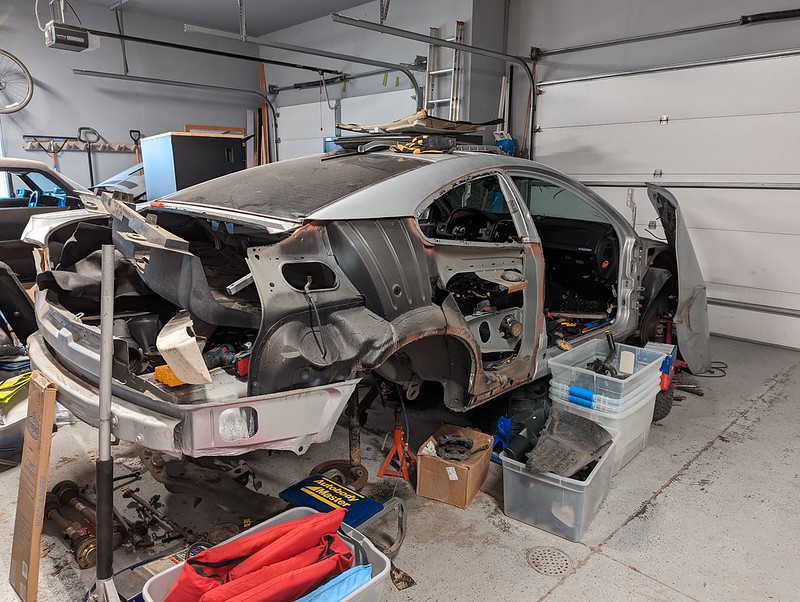 PXL_20220426_175341879 by Rob Armstrong, on Flickr
I did some sketchy **** and pulled the motor and trans out from underneath the GTO using my engine hoist and some jack stands under the back end. I was pretty happy with how easily it came out, but my wife was less than impressed with my creativity. Something about how she would finally get to cash in that big life insurance policy when it fell on me.
Got the chain hooked up to the top of the radiator support to start lifting it. Engine and transmission were supported by a couple of furniture moving dollies.
 PXL_20220617_202110263 by Rob Armstrong, on Flickr
That worked fairly well but I couldn't get the front end high enough so there was some more sketchy **** involving a 2x4 supporting the those thing while I reattached the hoist arm to a lower anchor point.
 PXL_20220617_205033597 by Rob Armstrong, on Flickr
I finally got the body high enough to roll the engine/trans combo out from underneath it!
 PXL_20220617_210010511 by Rob Armstrong, on Flickr
A few days later after I picked a few more parts of the carcass of the GTO, off it went to the scrapyard.
 PXL_20220708_132836099 by Rob Armstrong, on Flickr
It's final resting place it gets crushed. :sad:
 PXL_20220708_132900945 by Rob Armstrong, on Flickr
Safely tucked away under the workbench!
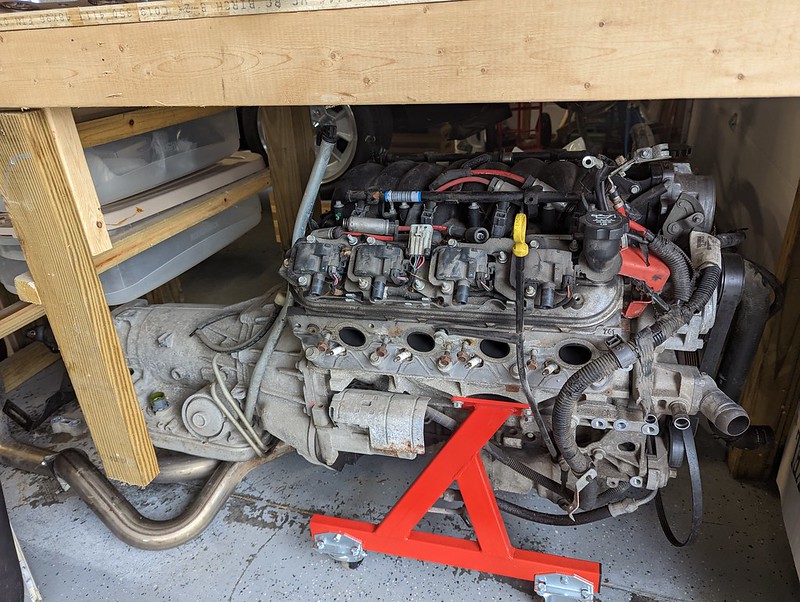 PXL_20220924_141212034 by Rob Armstrong, on Flickr
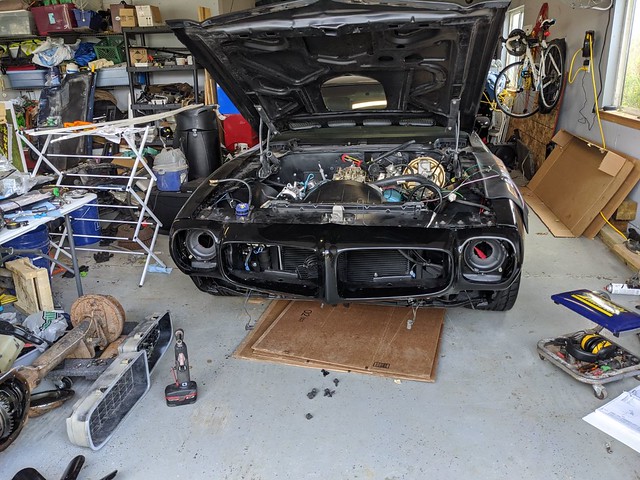
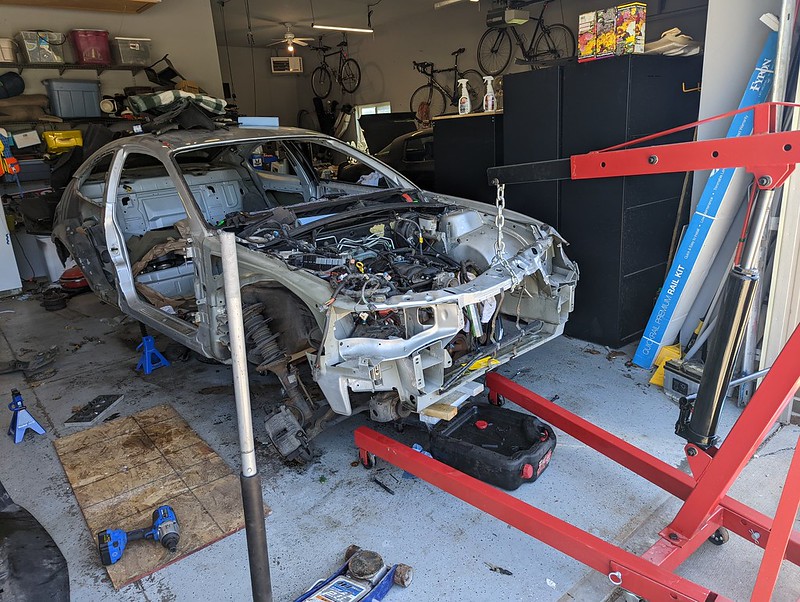
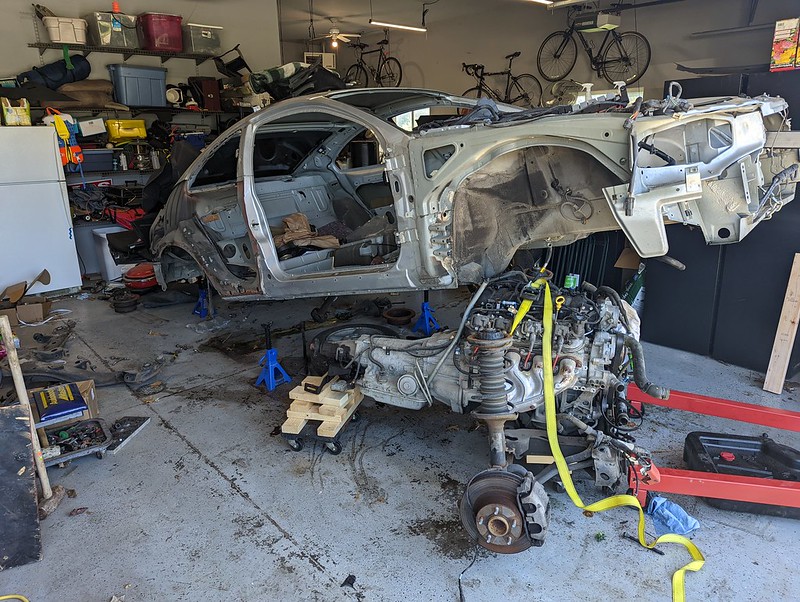
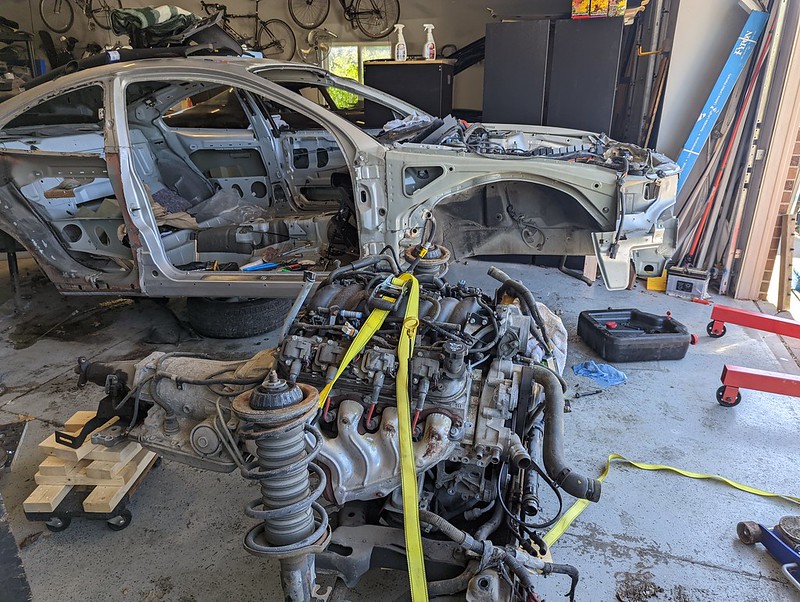
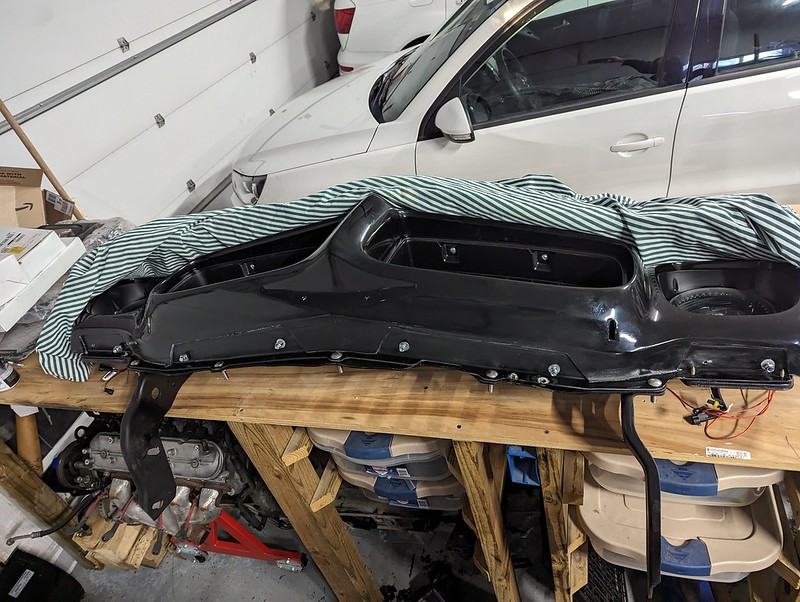
It sat here from June until January as other projects always seemed to get in the way of quality time with the Trans Am. Started working on the swap again in early January by removing the front end of the Trans Am and getting the 400 ready for removal. I got the nose pulled and safely stored away and then removed the radiator support to gain better access to the engine bay. I wasn't too keen on lifting the engine above the radiator support and really didn't want to remove the fenders as the door gaps are perfectly aligned. Might not be the way it's usually done, but made sense to me and didn't take too long to get to this point.
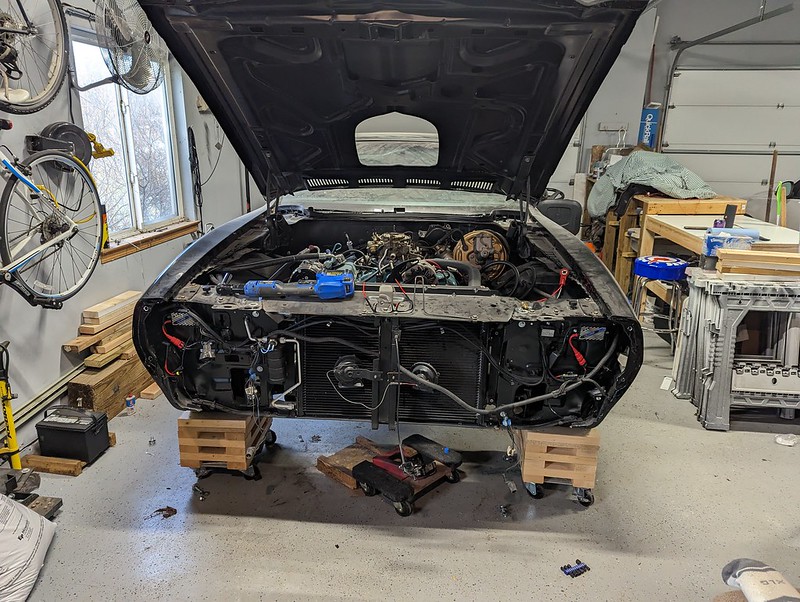 PXL_20230106_221901748 by Rob Armstrong, on Flickr
 PXL_20230106_221933372 by Rob Armstrong, on Flickr
 PXL_20230106_224952759 by Rob Armstrong, on Flickr
While cleaning up the engine to prep for paint, I decided to pull the valve cover and hope I wasn't sad about what I found. I was worried that even though the GTO only had 70K miles on it, maybe the engine wasn't in the best shape. It ran fine with no CEL but I was still a bit worried. I was pretty happy with what I saw!
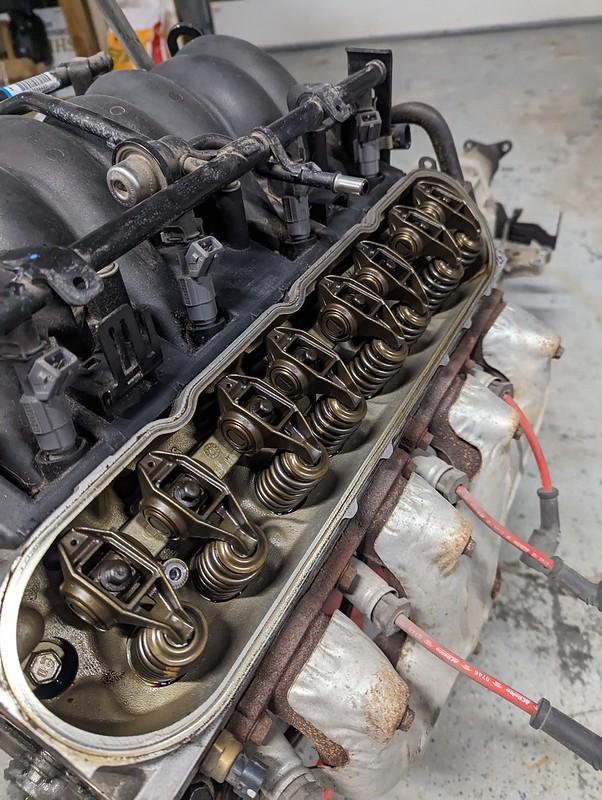 PXL_20230113_205249464 by Rob Armstrong, on Flickr
Pulled off all the accessories and after about an hour of scrubbing with some Purple Power and small brush, it cleaned up pretty nicely!
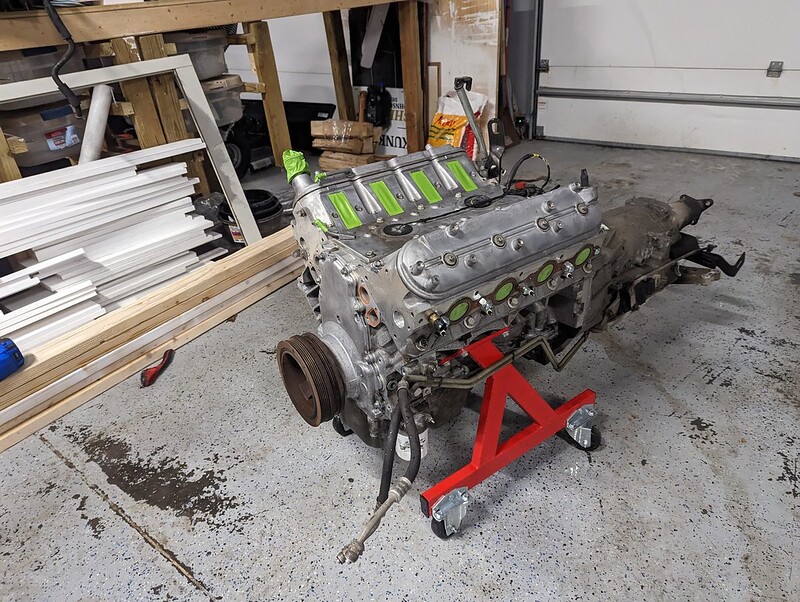 PXL_20230113_231946675 by Rob Armstrong, on Flickr
Next I taped it all up and shot some Dupli-color Engine Enamel Ceramic Primer.
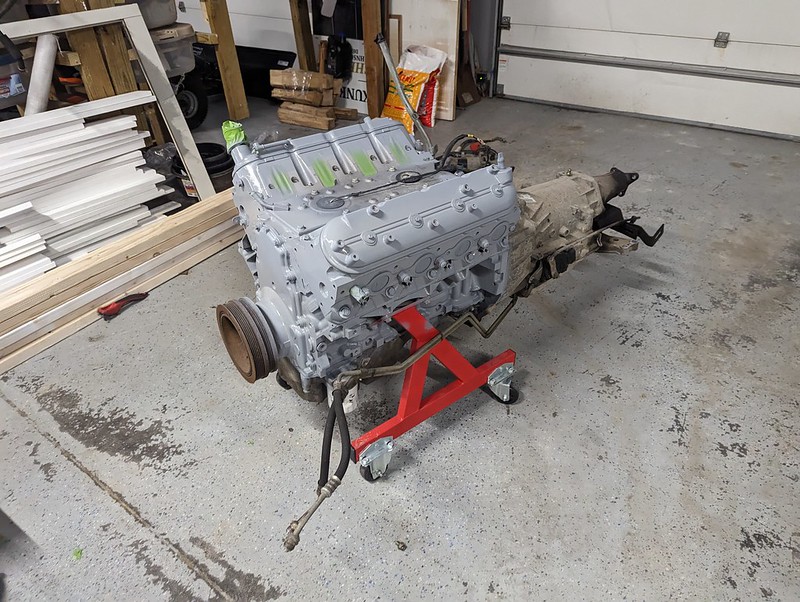 PXL_20230114_175822127 by Rob Armstrong, on Flickr
Once that dried and cured, I sprayed it with Dupli-Color Engine Enamel Ceramic Pontiac Blue DE1610. It went on really nicely and I love how it turned out!
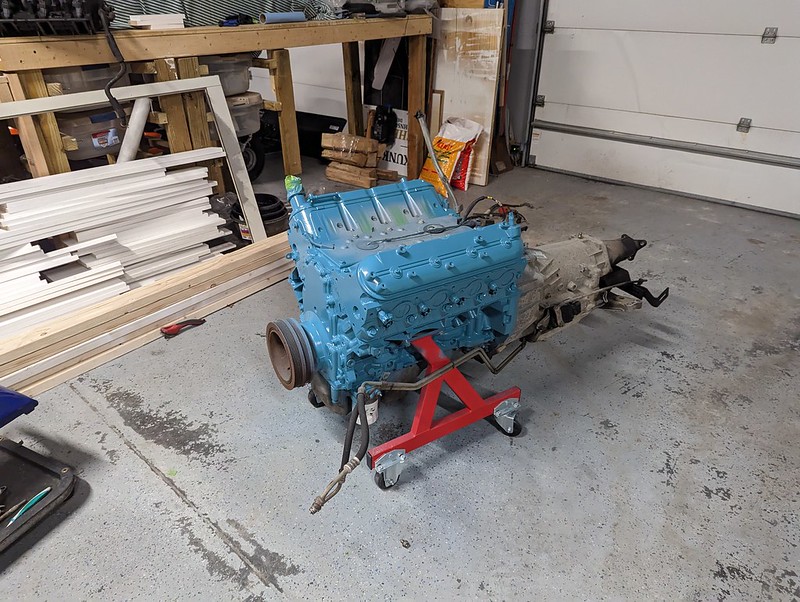 PXL_20230114_230511126 by Rob Armstrong, on Flickr
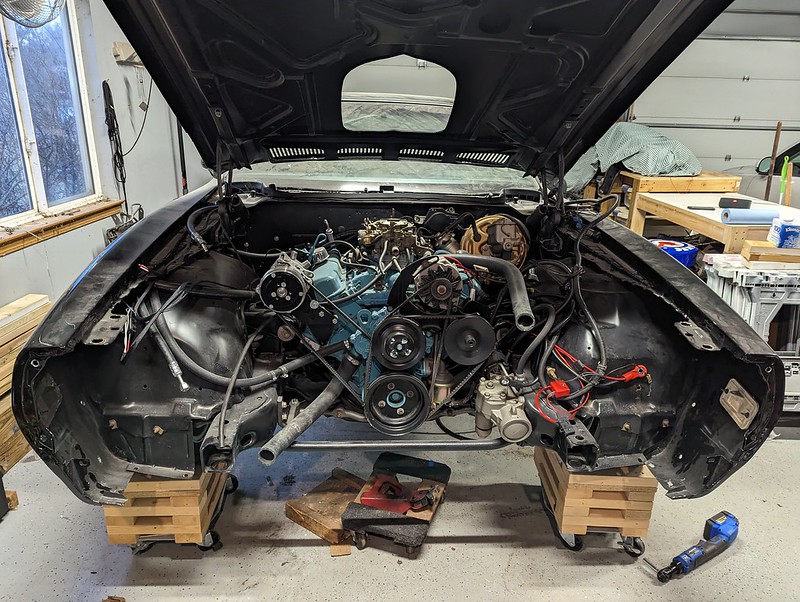
I went with the Holley Mid-Mount accessory system. I didn't use all their parts as it gets pretty pricey and I'll detail in another post what I used and didn't use from Holley. Here is it all cleaned up with the accessories and headers. Also painted the trans as well because it looked pretty ugly not painted!!
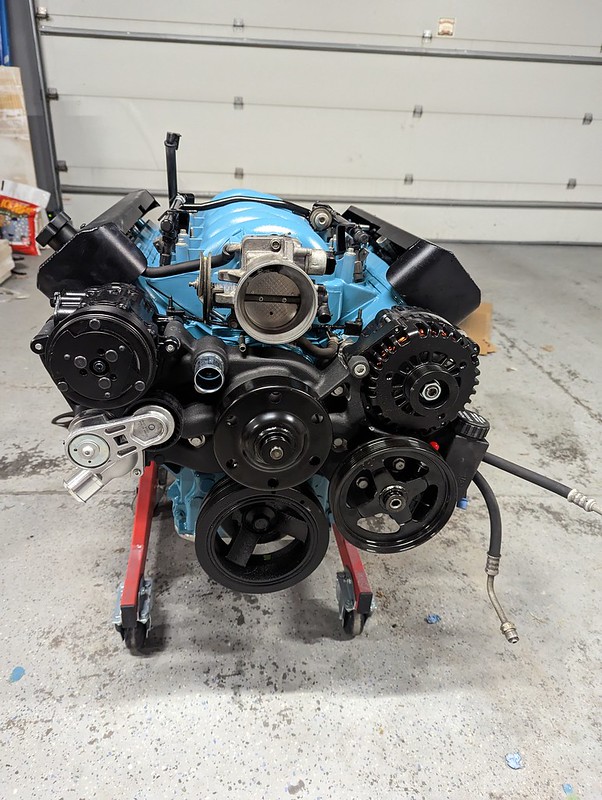 PXL_20230125_230129073 by Rob Armstrong, on Flickr
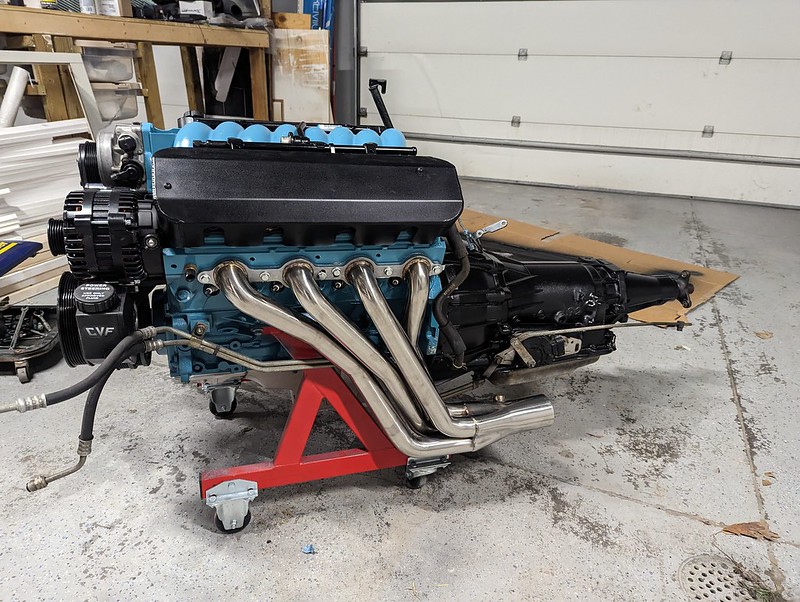 PXL_20230125_230150220 by Rob Armstrong, on Flickr
Dreaming of the day it's ready to drive!
1975 Trans Am Resto-Mod work in progress
LS1 4L60
-
02-02-2023 #3
Registered User
- Join Date
- Oct 2017
- Location
- Eastern Iowa
- Posts
- 10
So I mentioned I did the Holley Mid-Mount accessory drive on my build, but really I did a hybrid system using their manifold, crank pulley, water pump and hardware kit. Their total system in black runs about $2,350. I saved about $655 by sourcing a different alternator and AC compressor, and finding the same tensioner and PS pump pulley cheaper elsewhere. Hope this helps someone else!!
The tensioner in the Holley kit is a Gates 38163. They wanted $132 for it - Amazon had it for $35. Same for the PS pulley. Same part number GM12568997 (as shown on Holley's site) was $22 on eBay from a Chevy dealer in Arizona vs $75 for Holley. The AC Compressor was $428 for the Holley version. It says it is a Sanden manufactured compressor but does not have the Sanden label on it. I found an identical looking one from Karl Kustoms for $190. So far, I'm up to $388 in savings.
For the alternator, I had to get creative and found some videos on Youtube that helped me. Basically the Holley alternator is similar in size to the GM AD244 size alternator but the charging post exits on the side instead o fin the back. Due to the position of the alternator up against the driver's side head, the post has to be out the side, not the back. The video I watched showed how a simple $12 part could fix the issue:
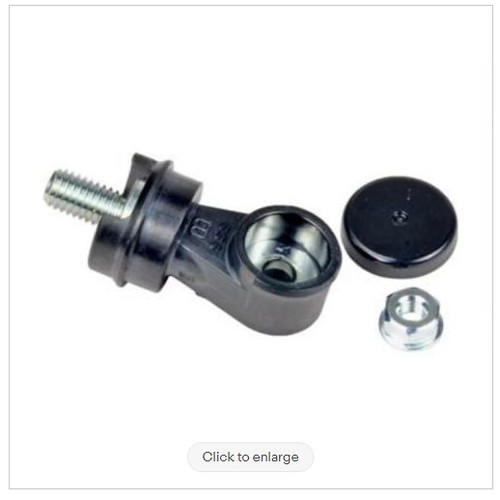 Screenshot 2023-02-02 164731 by Rob Armstrong, on Flickr
I popped the plastic cover off the back of the alternator, trimmed a little of the plastic under the charging post, then trimmed the cover to let it exit on the side and it fit perfectly. Once assembled I cut the excess post off and it's good to go! Looks like it came that like that from the manufacturer!
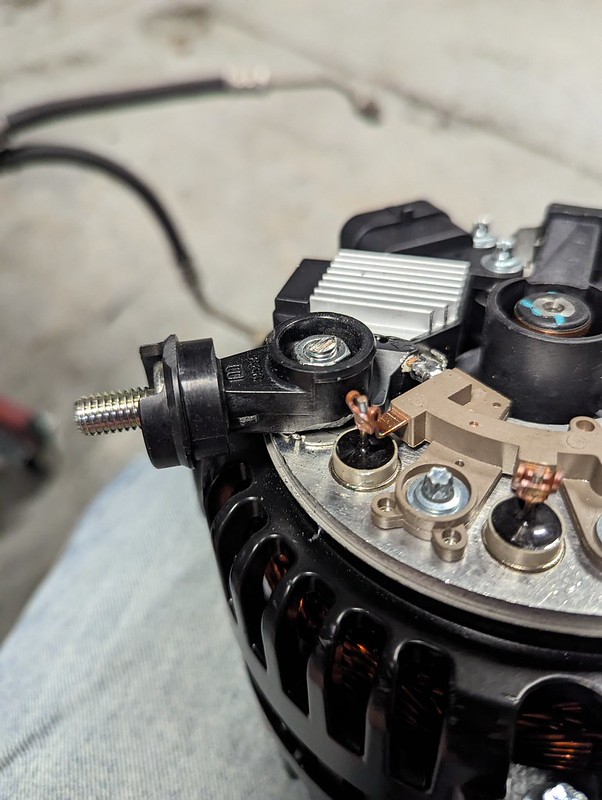 PXL_20230124_231810778 by Rob Armstrong, on Flickr
 PXL_20230124_231842896 by Rob Armstrong, on Flickr
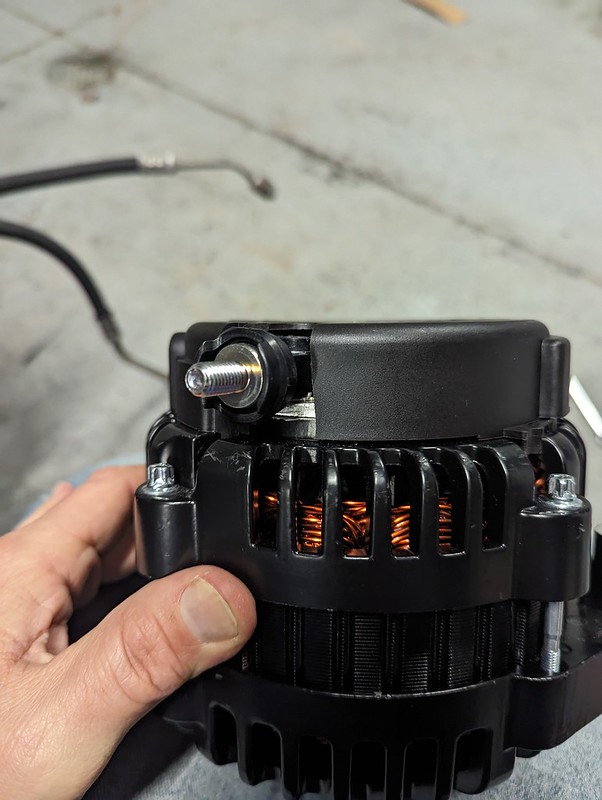 PXL_20230124_231846599 by Rob Armstrong, on Flickr
Dreaming of the day it's ready to drive!
1975 Trans Am Resto-Mod work in progress
LS1 4L60
-
02-06-2023 #4
 Registered User
- Join Date
- Feb 2007
- Location
- Benton, WI
- Posts
- 68

Thanks Pontiac Dreamer for the write-up on the accessory drive. Always great to see where we can save money. The price tag on these accessory drives is a very hard pill to swallow for what they are really. Maybe I am just a cheap-ass?! That savings is better spent elsewhere!
Steve Brink
1979 RS Camaro
1979 Z-28 Camaro
1966 Chevy II SS
1971 Corvette
2021 GMC Sierra Denali
2003 Harley-Davidson Softail
-
02-07-2023 #5
 Registered User
- Join Date
- Mar 2021
- Location
- Indy
- Posts
- 113
Great Post! Good luck with the build> I look forward to seeing the finished car. I love the '73 nose!
-
02-09-2023 #6
Registered User
- Join Date
- Oct 2017
- Location
- Eastern Iowa
- Posts
- 10
Yeah, I really didn't want to drop al the cash for the full set-up and originally was hoping to use the alternator and PS pump from my GTO donor car, but of course the 04 GTO had some weird parts and nothing would fit. I found a couple YouTube videos that walked though it so I figured I'd give it a shot! Originally Posted by brink_79camaro

Dreaming of the day it's ready to drive!
1975 Trans Am Resto-Mod work in progress
LS1 4L60
-
02-09-2023 #7
Registered User
- Join Date
- Oct 2017
- Location
- Eastern Iowa
- Posts
- 10
Hoping to get the engine in place in the next week or so. Lot's of stuff left to do, but hope to be on the road this spring! I've always loved the early front ends but couldn't find a suitable car within my price range, so ended up with this 75 instead! Originally Posted by NCSU68
Dreaming of the day it's ready to drive!
1975 Trans Am Resto-Mod work in progress
LS1 4L60
02-09-2023 #8 Registered User
- Join Date
- Oct 2015
- Posts
- 362
Looking great. Cool alternator mod.
My half a$$ed build thread.https://www.pro-touring.com/threads/...elle-6-0-4L60E
Tighten it till it strips & back it off a quarter turn.

 Reply With Quote


