

Results 1 to 20 of 49
Hybrid View


-
01-27-2021 #1
 Registered User
- Join Date
- Jan 2021
- Location
- Tennessee
- Posts
- 49

PTS-1 69 Camaro (Pro-Tour-Street No.1)
Well, here we go everyone. Home garage 1969 Camaro build on a budget. Been researching for awhile and I see that there's a fixed formula for a Pro-Touring vintage car. I'm following those basic ground rules and addressing handling, stopping, speed, and looks in incremental stages (no deep pockets here). Ultimate goal is a fun driver for the back country roads.
Well here she is. Nothing special. Just an X44 Base with what appears to be a bunch of Taiwanese metal already in place (floors, quarters). First step is to address all the "interesting" things the previous owner(s) have done to this poor car. Then, lets start with the rear suspension. Hoping to learn a lot from you guys. More to follow........
-
01-27-2021 #2 Registered User
- Join Date
- Nov 2008
- Location
- Lawrenceburg, TN
- Posts
- 4,086
whats the end goal of the car? what you install skill level (welder, fabricator) that will help a little on advice
such as a full touring car and we will see you at Goodguys, optima, Drive AutoX a few times a years, a simple 4 link and some adjustable coil overs are a good base for that and from there we can decide the levels........
or a casual tourer, a simple street grip that gives some of the stance, easy install, and the car will ride well and turn well
01-27-2021 #3
Registered User
- Join Date
- Jan 2021
- Location
- Tennessee
- Posts
- 49
 Originally Posted by Rod

End goal right now is a fun street car for the back country roads. I can weld and fabricate with welders/plasma cutter and the necessary tools accounted for.
This is my 3rd car project. Cut my teeth on a hot VW bug and built a V8 S-10 Mini-Truck many moons ago. Those are all gone now and this, and a Trailblazer SS (daily driver), are the only cars in the shop right now.
From all the readings I can definitely see the appeal to progress into a full touring car. Baby steps. LOL!
02-04-2021 #4
Registered User
- Join Date
- Jan 2021
- Location
- Tennessee
- Posts
- 49
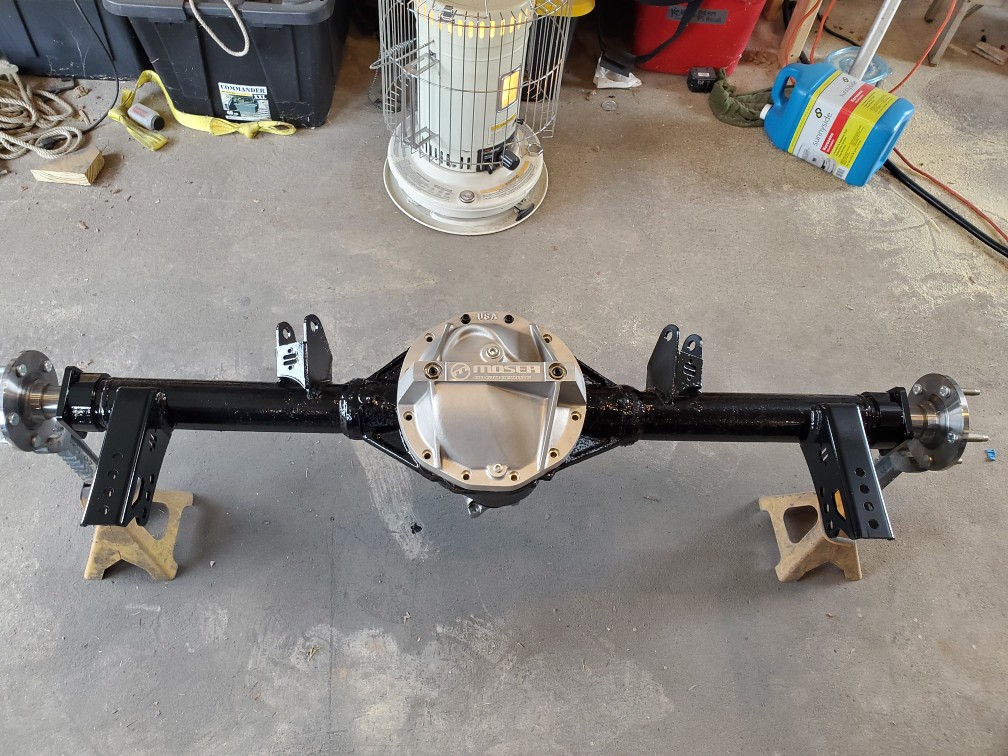
I know I know, there's a bunch of mini-tub pics on here already. But you cant have too much, right? LOL! As for the anemic tiny 10 bolt, It'll definitely get replaced as the power train items are upgraded in time. She can handle what's going to remain up front for now. Enjoy!
02-09-2021 #5
Registered User
- Join Date
- Jan 2021
- Location
- Tennessee
- Posts
- 49
02-09-2021 #6
Registered User
- Join Date
- Jul 2018
- Posts
- 434
I'm curious why you stayed with the spring pad mount for the lower shock and lower link instead of the weld on bracket. I just did mine and the spring pad sure would have been easier
02-09-2021 #7
Registered User
- Join Date
- Jan 2021
- Location
- Tennessee
- Posts
- 49
Hello there. This ridetech kit was specifically designed to work with the original rear axle's leaf spring perches and does not include lower weld-on mounts. Only the top link mounts required welding. On the heavy side but does simplify installation a bunch when using a factory rear end. Originally Posted by Just 1 More
02-10-2021 #8
Registered User
- Join Date
- Jul 2018
- Posts
- 434
I did the same kit, however, I went with the lower weld on brackets. I have the spring perch brackets sitting on a shelf, might try to sell. Originally Posted by Kraftwork69
 Resized_20201218_153203 by F G, on Flickr
 Resized_20201229_191330 by F G, on Flickr
02-10-2021 #9
Registered User
- Join Date
- Jan 2021
- Location
- Tennessee
- Posts
- 49
Honestly that's a much cleaner looking way to do it and if my future upgraded axle doesn't come with them I'll be doing it your way as well. Thanks for the pics!
Just noticed I use the same kerosene heater to knock the chill off so a little work can get done this winter. LOL
02-17-2021 #10
Registered User
- Join Date
- Jan 2021
- Location
- Tennessee
- Posts
- 49
So when you remove this stuff......
..... and you cut out this stuff.......
... all this cool gear can finally be installed. ridetech is an awesome company to work with! :
I could not get Speedtech's Chicane mount to work with the Gulstrand mod. Had to settle with tall upper ball joints. I've read that there's little to no difference between the two in terms of the amount of negative camber gained during cornering.
I know I know...wear gloves but what's the secret again to remove POR-15 from your hands? LOL! I did not like the sharp corners on the front chicane brackets. Looked like stress risers to me so I filled them in with chamfers. Also not a fan of the upper bolt. Searching for a 12 point MS or NAS aircraft bolt designed for shear loads now (will look better too).
And this finishes off the front suspension for now.
02-25-2021 #11
Registered User
- Join Date
- Jul 2018
- Posts
- 434
Beautiful job on those subframe connectors
02-25-2021 #12
Registered User
- Join Date
- Jan 2021
- Location
- Tennessee
- Posts
- 49
Many thanks! I was a bit nervous cutting into the floor. Must've measured and marked for hours. 😂 Wasn't nearly as bad as I thought it was going to be. Originally Posted by Just 1 More
02-25-2021 #13 Registered User
- Join Date
- Nov 2006
- Location
- Ma.
- Posts
- 5,567
I agree nice job! It all looks good. Originally Posted by Just 1 More
Wayne
Car FINALLY home !!!!!! lol
Project FNQUIK https://www.pro-touring.com/showthre...ghlight=FNQUIK
02-25-2021 #14
Registered User
- Join Date
- Jan 2021
- Location
- Tennessee
- Posts
- 49
Thanks Wayne. Fantastic work on your Camaro by the way. Very inspirational! Originally Posted by Motown 454
02-28-2021 #15
Registered User
- Join Date
- Jan 2021
- Location
- Tennessee
- Posts
- 49
Here's some interior work I did earlier before tackling the suspension. I never liked the factory dash cap and word on the block was the aftermarket ones are low quality and don't fit well. Had decided to make my own.
Taped off the dash area and coated it with Pam as the release agent:
After laying down a layer of fleece with a layer of 1/2 oz cloth, trimmed to ensure fitment and left on to cure.
Wooden frame is built to support the contour shape around the gauge cluster area. This is where you can get creative with different shapes. I kept it kinda simple.
After glassing over the frame with lots of filling, sanding and priming.
These are the best I've used to reproduce that plastic/vinyl grain texture/color.
Finished dash cap.
Stainless steel mesh installed over the defog vents.
02-28-2021 #16
Registered User
- Join Date
- Jul 2018
- Posts
- 434
Are you freakin kidding me? That looks awesome. If you're ever near Fort Wayne, please stop by and help do mine. All the free pizza and beer you can handle.. lol
02-28-2021 #17
Registered User
- Join Date
- Jan 2021
- Location
- Tennessee
- Posts
- 49
Will do!!!! LOL! You know I lived in Huntington for three years and spent lots of time in Fort Wayne. I do miss it up there. Originally Posted by Just 1 More
Cheers!
02-28-2021 #18
Registered User
- Join Date
- Jul 2018
- Posts
- 434
I'm actually in Huntington,, 7 miles north of town. Originally Posted by Kraftwork69
02-28-2021 #19
Registered User
- Join Date
- Jan 2021
- Location
- Tennessee
- Posts
- 49
Too cool. Being a car guy the names Hoss Cocklin, Todd DeLay, and Greg Boxel may be familiar to you. Originally Posted by Just 1 More
03-05-2021 #20
Registered User
- Join Date
- Jan 2021
- Location
- Tennessee
- Posts
- 49
Just a few catchup items. My local car Audio shop said this stuff works very well under the headliner. Its nice and thick but lightweight and is layered with acoustic foam, foil material, and that sticky butyl rubber. With no AC and the planned satin black color I'm going to need all the help I can get.
Installing the Quick Ratio 12.7:1 box was a royal pain. I know these old headers have seen better days but they fit OK before. Cant understand after all this time why no one makes a set of headers that fit perfect for these cars. I had to cut and add a new section to go around the new steering gear. No need trying to source new headers anyway when an engine change is a future possibility. Was a fair bit of work just for about 3/8" of clearance but did not want to do the ball peen hammer thing.
Just gotta take it back out now and finish the welds. I know it looks like the cylinder#3 pipe hits the box but it clears by 1/4". Just a funky picture angle.
You ever have those few body panel areas that are just gapped weird and makes you twitch when you look at them? Good old aftermarket sheet metal. Waiting on parts soooo........

 Reply With Quote


