Results 21 to 32 of 32
Thread: 69 Firebird street beast.
-
01-23-2021 #21
 Registered User
- Join Date
- Dec 2020
- Posts
- 37
The quarters were from Dynacorn and the passenger side was poor. Around the tail panel. The fenders are from Goodmark and the passenger side needs massaging. Again. Itís all aftermarket stuff and the quality isnít were it needs to be but because the cars are old and rusty your kind of stuck getting what you can get.
Lots of on and off grinding and welding. Itís sure not going to be no trailer queen or on the floor of SEMA! But as long as I can get the gaps nice and do minimal bodywork that will be my goal. Itís a driver!! Cheers.
-
07-04-2021 #22 Registered User
- Join Date
- Dec 2020
- Posts
- 37
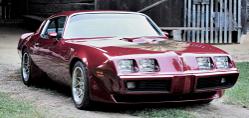
Just a bit of an update. Been awhile since I was able to post. Been a very busy year so no to much has happened but making some progress. My biggest issues has been the 4 link install. Still have a lot more to do but getting there. These are from this weekend. First time on wheels in over 2 years. Bodywork is about 60-70% done. This is the second coating after 180 blocking. The rear pockets for the bumper turned out well. It looks pretty cool with them tucked in to the body. We took the stock spoiler and I didnít like the way it sat on top of the quarters so we cut them down and molded them into the body and trunk. Like the look much better. Still have to work on the front end and get the rid of the rubbers you see behind the light bezels. Have some moulding to do there yet. She still has to be blown apart again and put back on the rotisserie to finish the under body. But seeing it like this gets you motivated for sure.
07-05-2021 #23Thats a lot of metal work right there,
Car looks great, always was a Firebird fan,Steve68- 1968 Camaro SS LSX T56, 12bolt 3:90's, 18" Fikse Profil 13s, Deep Fathom Green paint, Spearcos, just bunch of old junk because another member said so, LOL
70 Nova SS street/drag 454, T400, 3:55, ugly!
01-08-2024 #24 Registered User
- Join Date
- Dec 2020
- Posts
- 37
69 Firebird street beast.
Just an update. I know I havenít posted in a bit but like all projects they get pushed aside when life gets in the way. I have managed to do odds and ends. So I finally got around to finishing the underside of the car, epoxy, under guard and paint. Got the frame painted, the 12 bolt built. Also have the brake lines and fuel lines. Just placed an order with summit for some brake stuff.
01-08-2024 #25 Registered User
- Join Date
- Dec 2020
- Posts
- 37
More pics
01-08-2024 #26 Registered User
- Join Date
- Dec 2020
- Posts
- 37
So for the brake master I went with the C5 corvette. I modified the bracket to the degree that the Detroit speed one uses.
01-08-2024 #27 Registered User
- Join Date
- Dec 2020
- Posts
- 37
Next was tackling the clutch master.
01-08-2024 #28 Registered User
- Join Date
- Dec 2020
- Posts
- 37
Next was running the lines.
01-08-2024 #29 Registered User
- Join Date
- Dec 2020
- Posts
- 37
Put the rear end in. Installed the front hubs with new bearings.
01-08-2024 #30Yum!! Keep feeding
Corlas
68 Firebird https://www.pro-touring.com/threads/...chine-GO-GO-GO
01-09-2024 #31 Registered User
- Join Date
- Mar 2022
- Posts
- 126
Wow, you got deep into that build. Really well done. Wish I had those metal skills.
01-11-2024 #32Car looks great man, keep it up!


 Reply With Quote


