

Results 661 to 680 of 786
Thread: 1970 GTO Version 3.0
-
02-26-2023 #661

 Registered User
- Join Date
- Aug 2004
- Location
- Harriman, Tennessee
- Posts
- 1,290

You really don't mind fuel lines in the interior?
Why do termites eat houses?
Because they have Munchausen Syndrome.
-
02-26-2023 #662
 -Moderator/Sponsor-
- Join Date
- Apr 2001
- Location
- The City of Fountains
- Posts
- 15,977
It is the trunk, not the interior. My Cougar has fuel lines in the trunk as well. I don't see the big deal. Originally Posted by ProTouring442

Andrew1970 GTO Version 3.0
1967 Cougar build
GM High-Tech Performance feature
My YouTube Channel Please Subscribe!
Instagram @projectgattago
Dr. EFI
I deliver what EFI promises.
Remote Holley EFI tuning.
Please get in touch if I can be of service.
"You were the gun, your voice was the trigger, your bravery was the barrel, your eyes were the bullets." ~ Her
02-26-2023 #663 Registered User
- Join Date
- Apr 2003
- Location
- Central Valley, CA
- Posts
- 900
Fuel lines in the interior are all fun until you have a leak, then you have a lingering smell inside the car that takes a while to dissipate... plus the fire hazard, lol!
Many factory cars have fuel tanks and fuel lines in the trunk right behind the back seat partition. First two cars that come to mind are 2004-2006 GTOs and Mercedes R107/C107 SL/SLCs.
That being said, I prefer keeping the tank and all fuel related plumbing outside of the passenger compartment and trunk if at all possible. Sometimes it's a necessity though, like if you're plumbing an surge/expansion tank-- the higher the better for it for drainback reasons, which almost guarantees they have to be mounted inside the trunk.1969 Chevelle
Old setup: Procharged/intercooled/EFI 353 SBC, TKO, ATS/SPC/Global West suspension, C6 brakes & hydroboost.
In progress: LS2, 3.0 Whipple, T56 Magnum, torque arm & watts link, Wilwood Aero6/4 brakes, Mk60 ABS, vaporworx, floater 9" rear, etc.
02-27-2023 #664
Registered User
- Join Date
- Aug 2004
- Location
- Harriman, Tennessee
- Posts
- 1,290
Except there's no firewall between the trunk and the interior of a GM A-body, just some cardboard and a seat. Originally Posted by andrewb70
Can't say how it is on the Cougar.
So long as you're comfortable... you're probably right that it's no big deal... but it would make me nervous. LOLWhy do termites eat houses?
Because they have Munchausen Syndrome.
02-27-2023 #665
-Moderator/Sponsor-
- Join Date
- Apr 2001
- Location
- The City of Fountains
- Posts
- 15,977
You know these cars as well as anyone, and can probably testify to the fact that there is not a lot of room in the area in front of the tank and where the rear end wants to move up and down. Originally Posted by Blown353
I have more than cardboard behind the seat. It is not a solid, metal firewall, but there is stuff there... Originally Posted by ProTouring442
Andrew1970 GTO Version 3.0
1967 Cougar build
GM High-Tech Performance feature
My YouTube Channel Please Subscribe!
Instagram @projectgattago
Dr. EFI
I deliver what EFI promises.
Remote Holley EFI tuning.
Please get in touch if I can be of service.
"You were the gun, your voice was the trigger, your bravery was the barrel, your eyes were the bullets." ~ Her
02-28-2023 #666
Registered User
- Join Date
- Sep 2013
- Location
- sw Kansas
- Posts
- 1,645
The last gen of crown vic had the tank behind the seat. Pretty protected as compared to many possible locations.
02-28-2023 #667
Registered User
- Join Date
- Oct 2015
- Posts
- 63
The fuel tank in my E46 M3 us under the rear seat and lines run out of the top of it.
02-28-2023 #668
-Moderator/Sponsor-
- Join Date
- Apr 2001
- Location
- The City of Fountains
- Posts
- 15,977
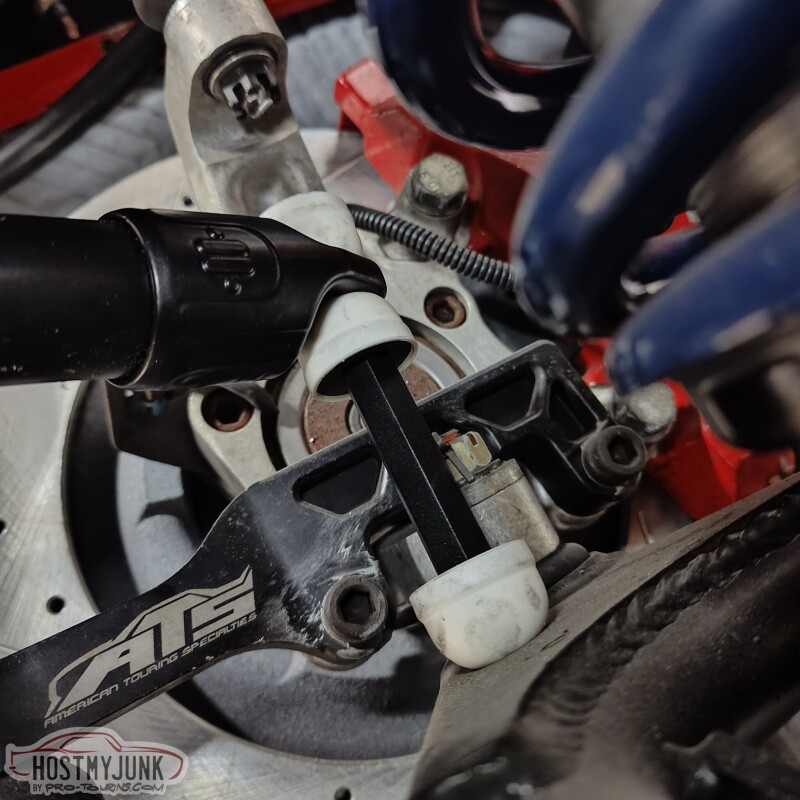
Today I decided to leave the plumbing for a while and tackle one of the last big boxes that I have. As mentioned before, this car now has a complete ridetech suspension, front and rear, and part of that package are front and rear sway bars. This is the front sway bar.
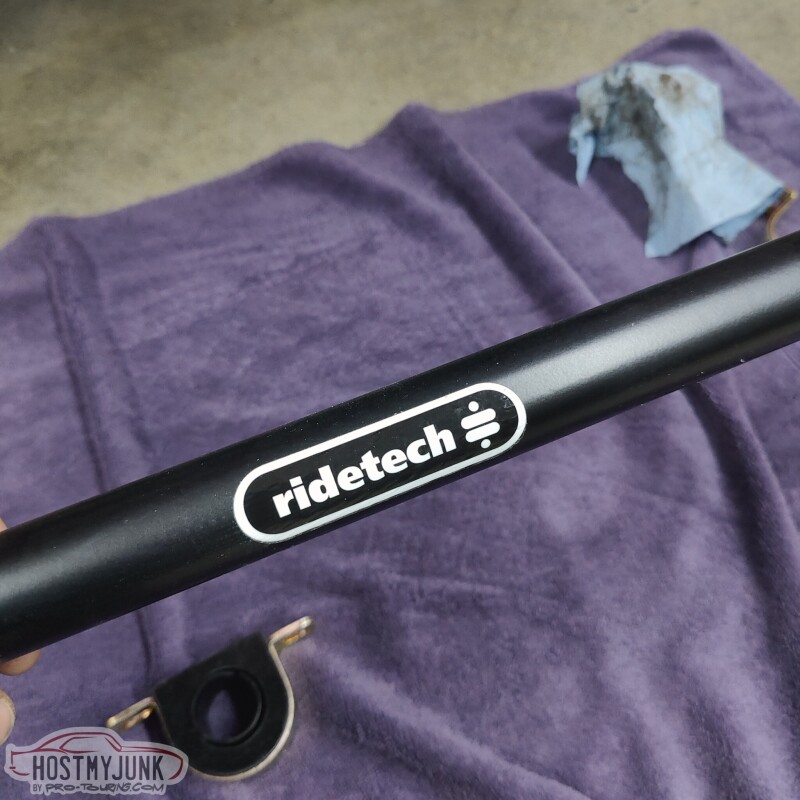
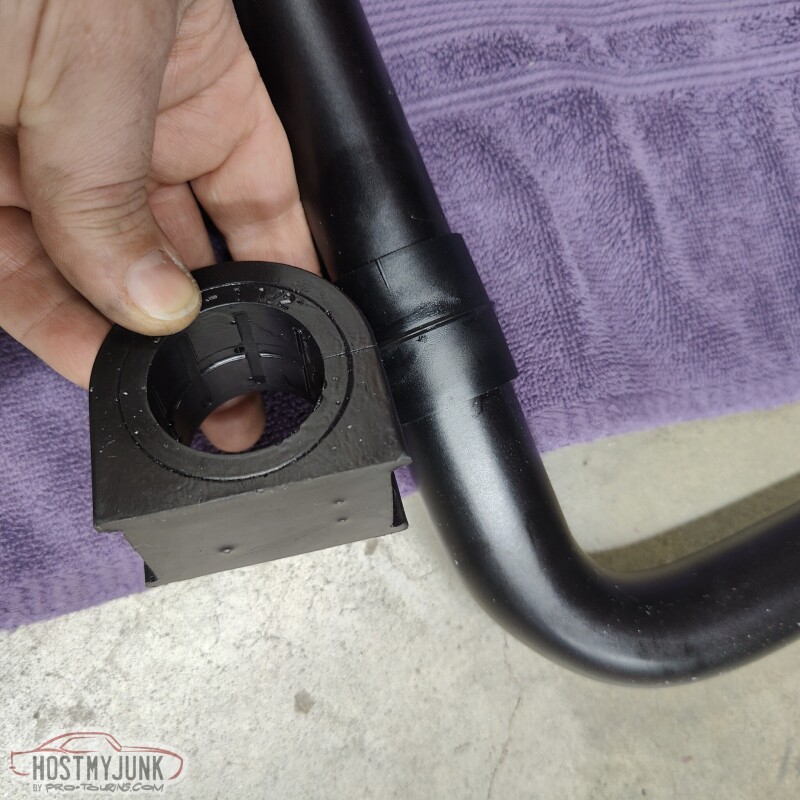
This sway bar kit is very thought out. The bushings are polyurethane, but they also include this slick Delrin bushing, which is supposed to eliminate the need for lube and is supposed to eliminate squeaks, which are so common with polyurethane bushings.
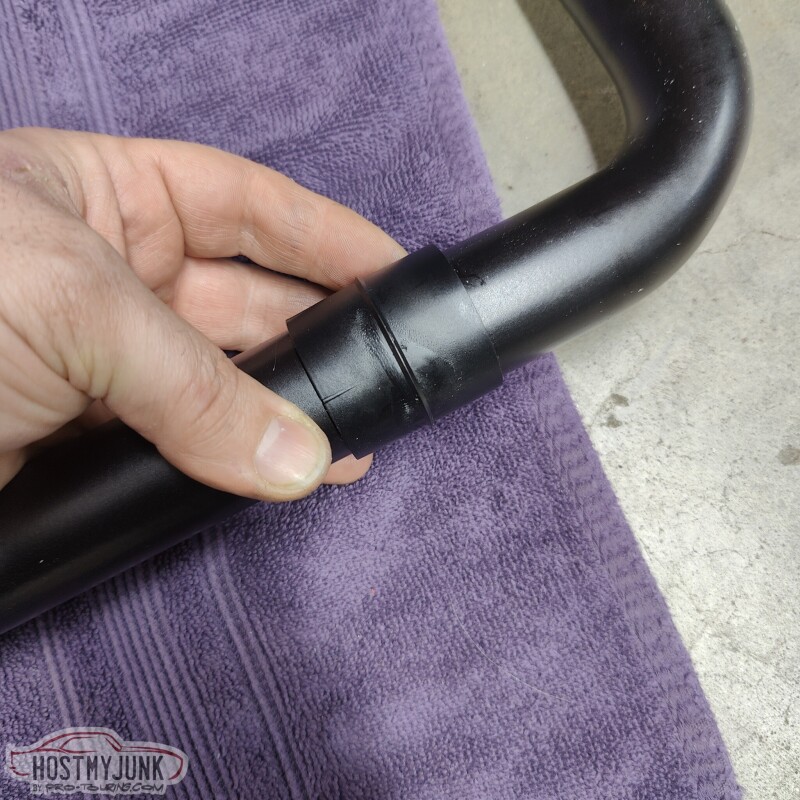
The ridge on the Delrin bushing rides inside a groove in the middle of the bushing, which keeps the bushing from sliding out.
Judging by the weight, the bar is hollow and has there bushing ends welded to both sides.
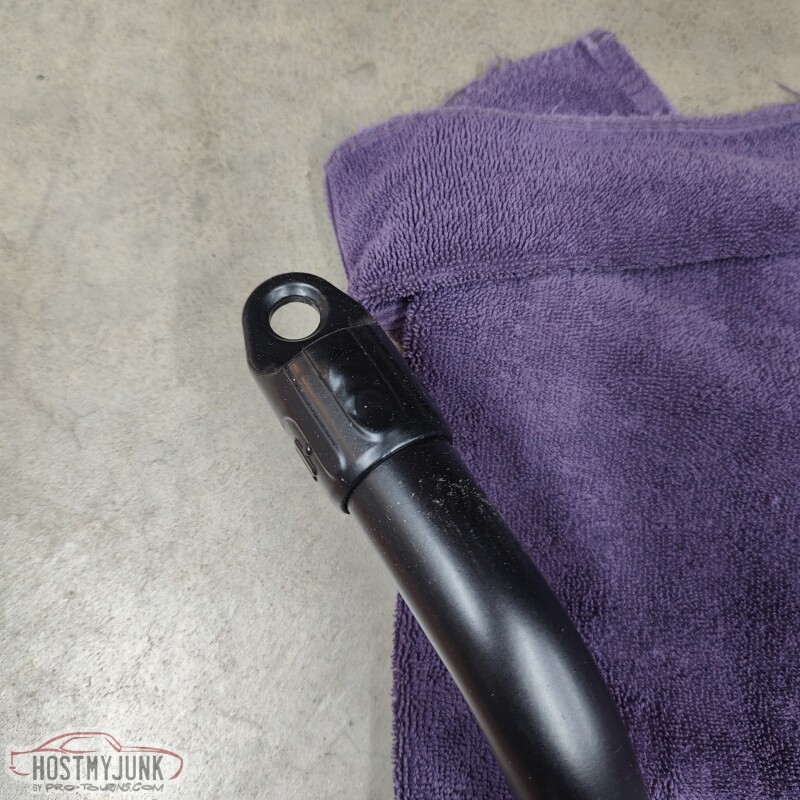
The mounting system includes some plates that move the bar about 1" forward. This is done to clear the pitman arm on the passenger side. My old swaybar used to rub a little bit against the edge of the pitman arm. You can see that now there is a solid inch of clearance.
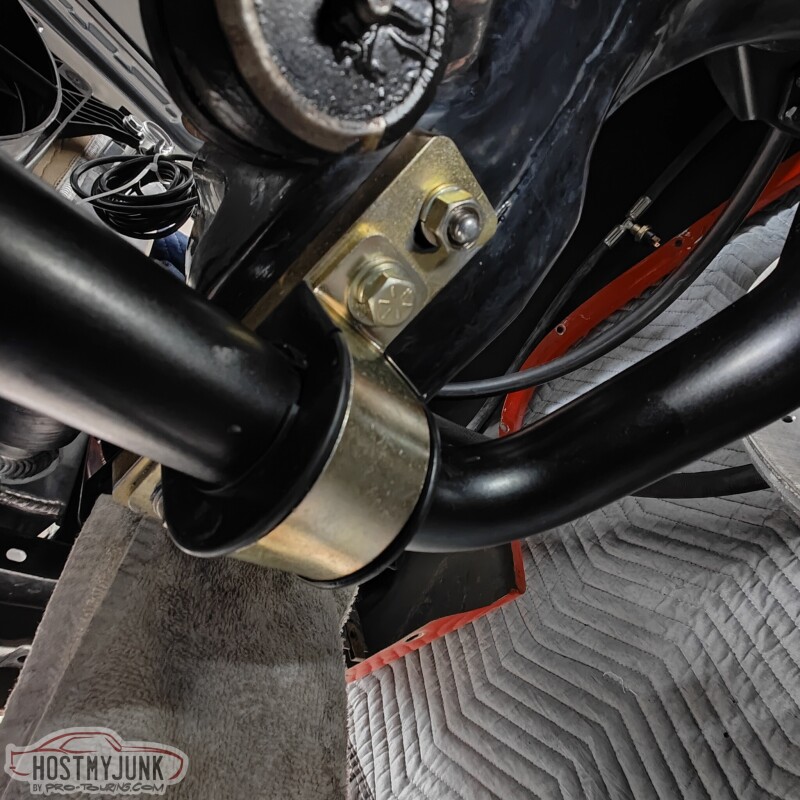
The end links are Moog parts and also did not call for any lube.
Lastly, I also dug out the mating connectors for the bulkhead panel.
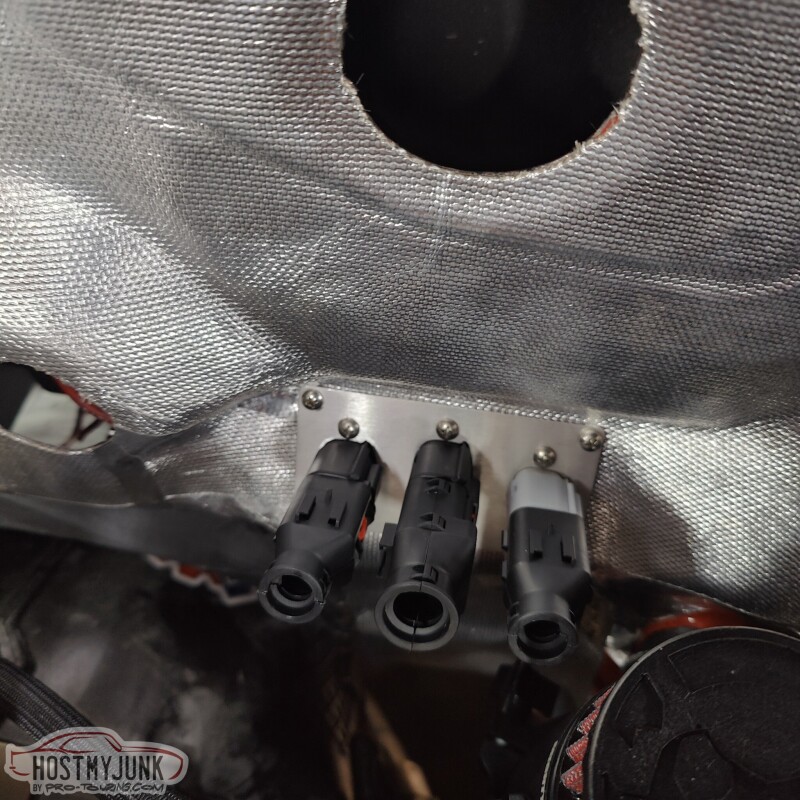
The connectors have the optional "backs" on them, so that I can fully cover the wires. The "backs" also provide addd strain relief, which is very important for all connectors.
Andrew1970 GTO Version 3.0
1967 Cougar build
GM High-Tech Performance feature
My YouTube Channel Please Subscribe!
Instagram @projectgattago
Dr. EFI
I deliver what EFI promises.
Remote Holley EFI tuning.
Please get in touch if I can be of service.
"You were the gun, your voice was the trigger, your bravery was the barrel, your eyes were the bullets." ~ Her
03-01-2023 #669
Registered User
- Join Date
- Sep 2013
- Location
- sw Kansas
- Posts
- 1,645
I meant to ask earlier, what do you gain with the power distribution panel that you purchased? I see that you can record data, but how does that interface with what you are doing?
03-01-2023 #670
-Moderator/Sponsor-
- Join Date
- Apr 2001
- Location
- The City of Fountains
- Posts
- 15,977
The Hardwire PDM is going to replace all the needed fuses and relays for the EFI system and AC. Here are a couple of things that I will be able to do with it. Originally Posted by wfo guy
Scenario 1. Reverse lights. Normally, there is a switch on the transmission or on the shifter that closes a switch, which then turns on the reverse lights. With a PDM that can read Holley CAN messages, I can program the reverse light circuit to turn on when I put the shifter into reverse. This is done without the need for a switch, since the PDM will receive a CAN message that the shifter has been moved to reverse.
Scenario 2. Neutral safety. Again, there is usually a switch on the shifter that closes when the shifter is in P or N. Since the starter solenoid circuit will be powered by the PDM, I can program that output to work only when the shifter is in P or N.
Scenario 3. AC compressor. Normally, the AC system sends a signal to the AC compressor to activate the AC clutch. This circuit will now be controlled by the Dominator and the PDM. The AC request will be an input to the ECU. The ECU will then look at other sensor data, namely, AC pressure, RPM, and TPS, and based on those, it will either turn on or off the AC compressor.
The possibilities are endless.
AndrewLast edited by andrewb70; 03-01-2023 at 07:22 PM.
1970 GTO Version 3.0
1967 Cougar build
GM High-Tech Performance feature
My YouTube Channel Please Subscribe!
Instagram @projectgattago
Dr. EFI
I deliver what EFI promises.
Remote Holley EFI tuning.
Please get in touch if I can be of service.
"You were the gun, your voice was the trigger, your bravery was the barrel, your eyes were the bullets." ~ Her
03-01-2023 #671
Registered User
- Join Date
- Sep 2013
- Location
- sw Kansas
- Posts
- 1,645
^^^
Thank you.
03-07-2023 #672
-Moderator/Sponsor-
- Join Date
- Apr 2001
- Location
- The City of Fountains
- Posts
- 15,977
With spring quickly coming, my tuning business has been picking up steam, which means less time to work on the GTO, but I managed to knock out a couple of tasks.
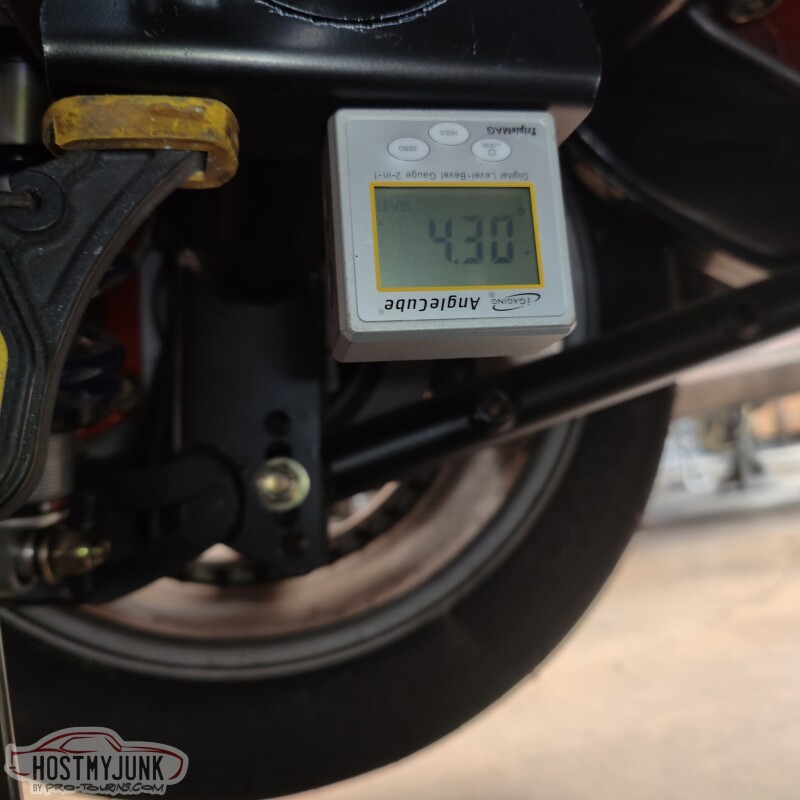
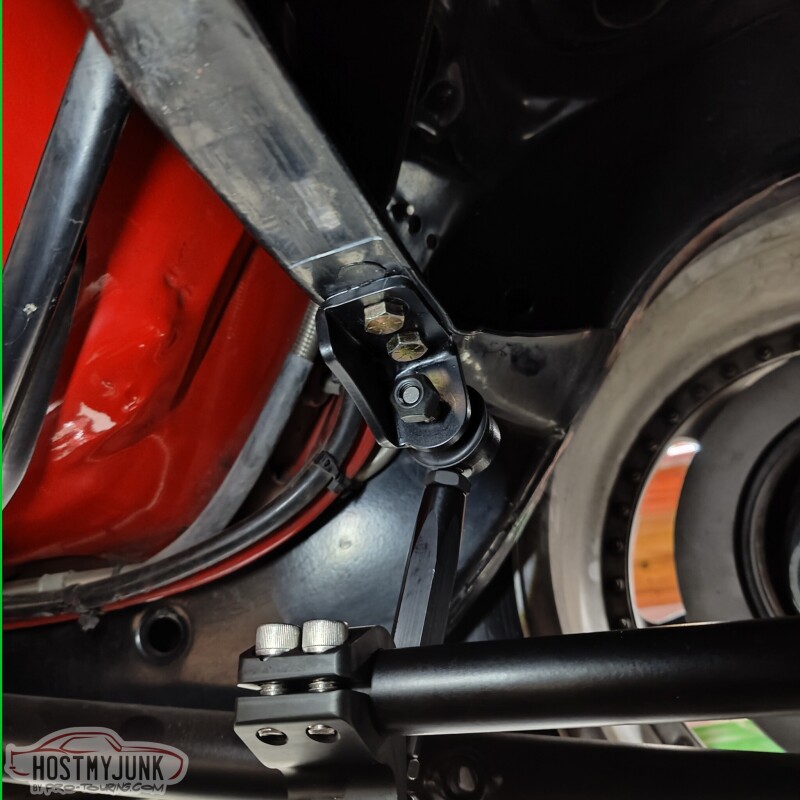
First up is the ridetech rear sway bar. The kit comes with these brackets that would normally be held in place by a U-bolt. This this rear housing has a back brace, the bracket no longer fits around the axle tube. I trimmed the parts that were interfering and used an angle finder to make sure that both brackets were at the same angle. The actual angle is not critical, but having them be the same seemed pretty important.
Next, I drilled some holes in the frame for the end link brackets. This is the driver's wide.
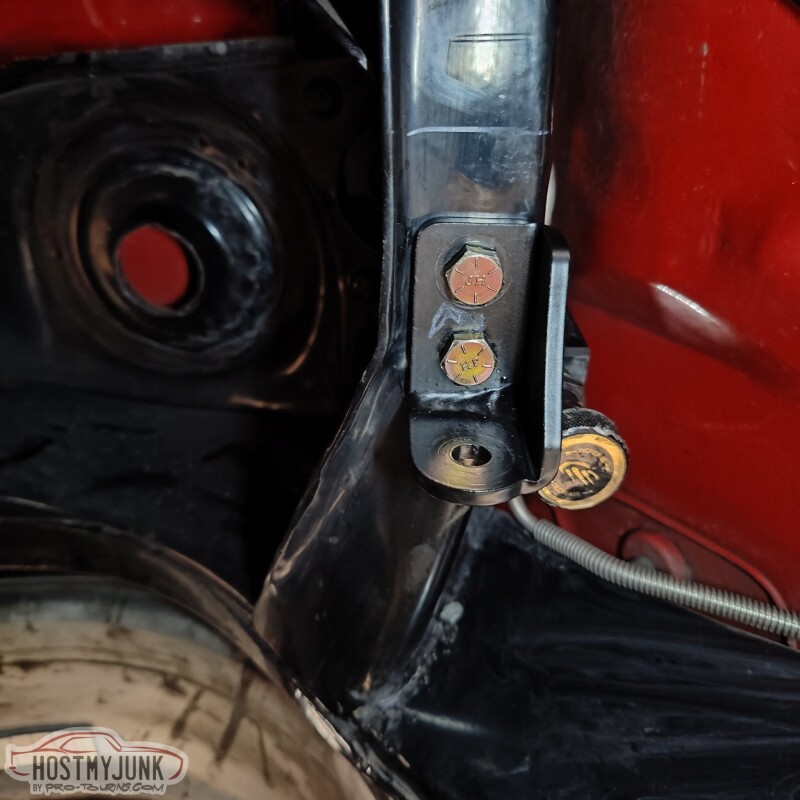
This is the passenger side with the sway bar bracket and the end link installed.
Vic got a new MIG welded and I buggered it in place. The welds are not pretty, but they will be fine.
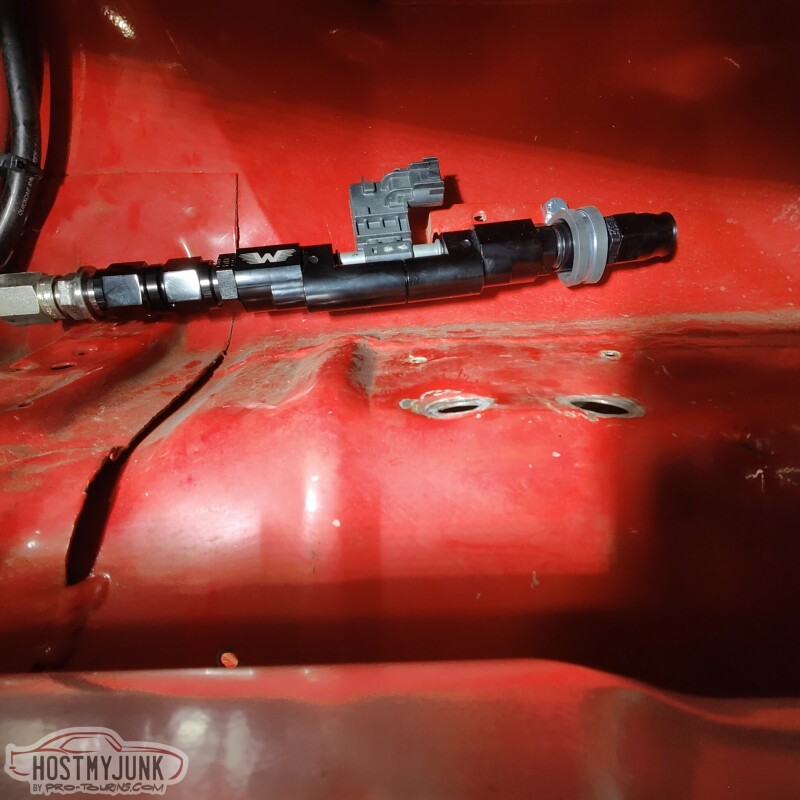
Lastly, fiddled around with the flex fuel sensor holder. I didn't want the sensor to just be hanging by the AN union without any support. I used a large P clamp to support the other side where the fuel line will attach.
Andrew1970 GTO Version 3.0
1967 Cougar build
GM High-Tech Performance feature
My YouTube Channel Please Subscribe!
Instagram @projectgattago
Dr. EFI
I deliver what EFI promises.
Remote Holley EFI tuning.
Please get in touch if I can be of service.
"You were the gun, your voice was the trigger, your bravery was the barrel, your eyes were the bullets." ~ Her
03-09-2023 #673
Registered User
- Join Date
- Apr 2003
- Location
- Central Valley, CA
- Posts
- 900
Andrew, I'd suggest welding gussets to the rear frame crossmember right next to the the swaybar mounts.
I've done a couple of sway bar installs that mount similarly on A-bodies that ended up cracking the crossmember after a couple years of hard use as mounting the bar endlinks to the bottom of the crossmember flexes the lower lip of the crossmember.
For bars that attach the endlink brackets on the lower portion of the crossmember, welding a couple of small gussets from the lower flange to the vertical wall on the inboard side of the endlink mount points stiffens the lower flange in the area where the bar mounts and stops the cracking issue.
The Hellwig rear bar mounts the endlink brackets to the tall vertical face of the rear frame crossmember for that reason, the tall vertical face of the crossmember is a much better attachment point for the cyclic vertical loading applied by the swaybar than the short lower lip of the c-section.
Outline in red of the suggested gusset... do this on the inside of the C-section of course. You just want to give that flange more support where the swaybar endlink brackets mount.
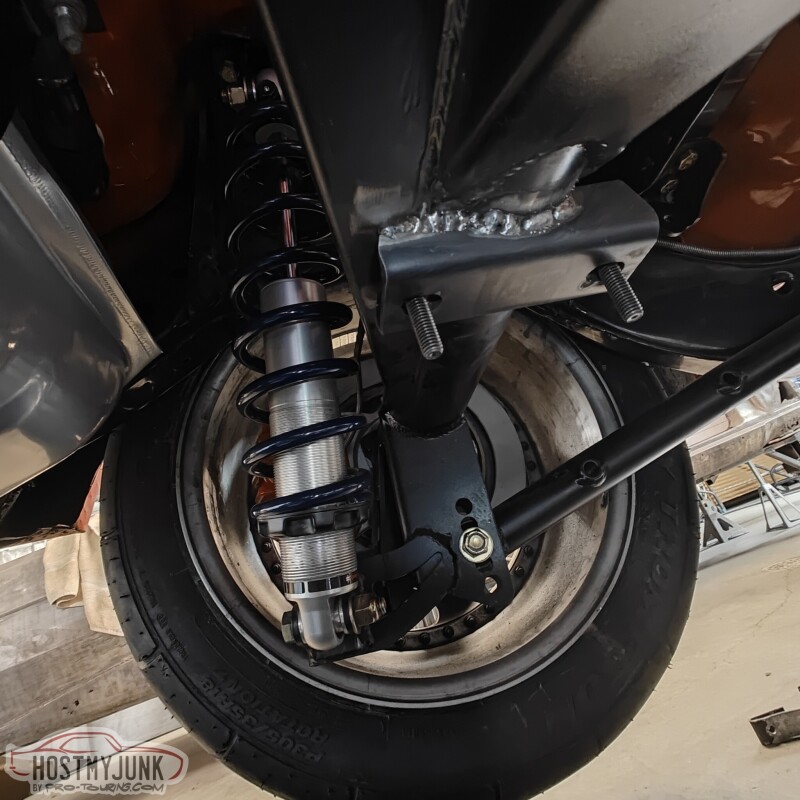
Also, I would strongly suggest adding a tie bar across the frame ears where your coilovers attach. The rear shock upper mounting location on these frames was never meant to support the weight of the vehicle (the weight was meant to be supported by the stock spring seat in the forward corner where it's closer to the frame side rails and crossmember, which is much stronger) and air shocks or bolt in coilover conversions that put all the weight of the car on the shock mounting points will eventually crack the frame since the rear spring/shock brackets aren't supported as well in the shock mounting area. I've repaired several frames that have cracked there over the years, most on El Caminos with air shocks but also a couple Chevelles that had "bolt in" coilover conversions.
Global West has a stout solution that's mostly bolt in... you might want to try and do something similar.
Pics/install of one: https://www.motortrend.com/how-to/he...ck-conversion/
A UMI bolt in rear shock tie-bar is not as good as the GW mounting solution, but better than nothing.
https://www.umiperformance.com/home/...brace-bolt-in/Last edited by andrewb70; 03-10-2023 at 07:17 PM.
1969 Chevelle
Old setup: Procharged/intercooled/EFI 353 SBC, TKO, ATS/SPC/Global West suspension, C6 brakes & hydroboost.
In progress: LS2, 3.0 Whipple, T56 Magnum, torque arm & watts link, Wilwood Aero6/4 brakes, Mk60 ABS, vaporworx, floater 9" rear, etc.
03-09-2023 #674
-Moderator/Sponsor-
- Join Date
- Apr 2001
- Location
- The City of Fountains
- Posts
- 15,977
I take inspiration from all kinds of places. A while back I ran across a build on the Rad Rides website. It was the 1961 Brookwood wagon built for George Poteet:
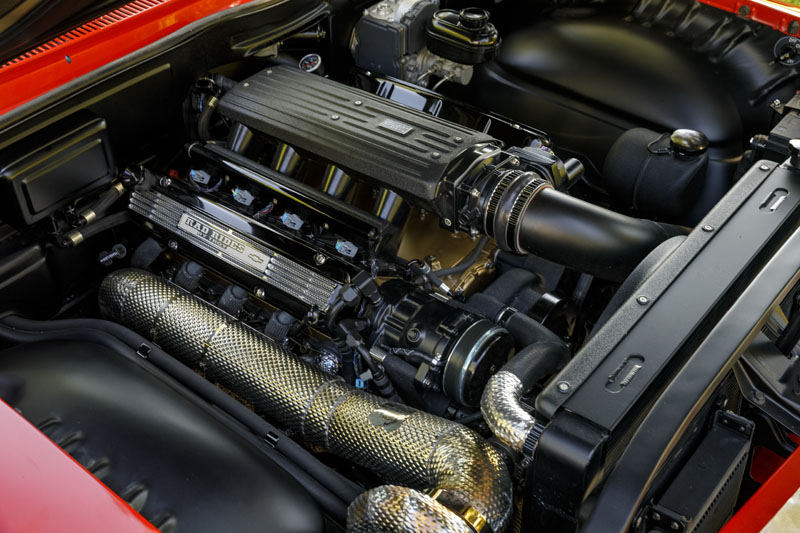
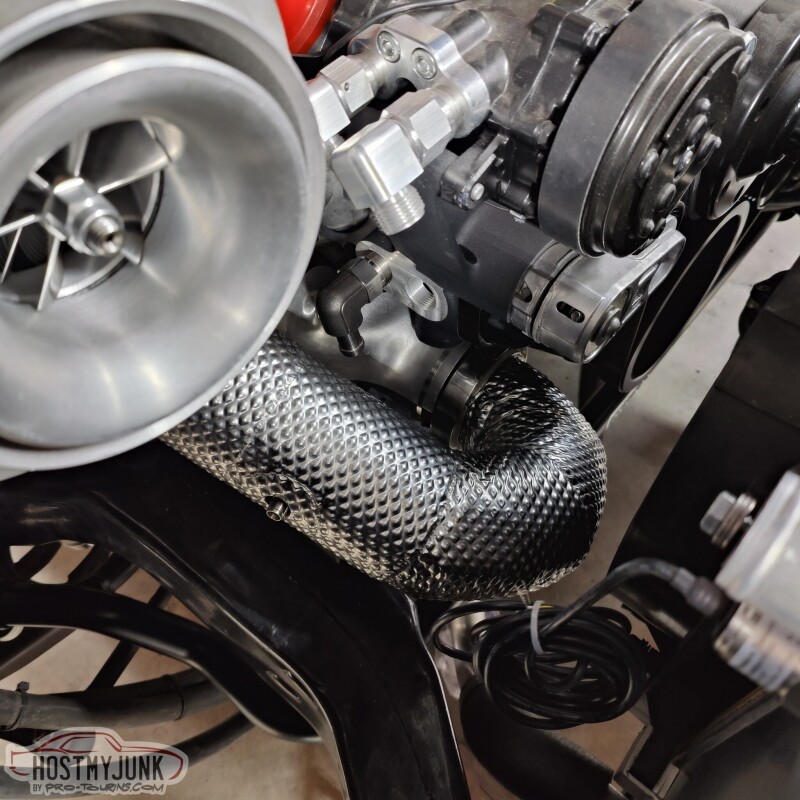
When I was at PRI I went to the booth of the vendor that did the cladding on the downpipe. The company is HeaderShield. I emailed them after the show, sent pictures of my parts, they gave me a quote, I paid it, sent my parts in, and ten weeks later I got them back.
This is the up-pipe that goes from the Holley manifold exit to the turbine inlet.
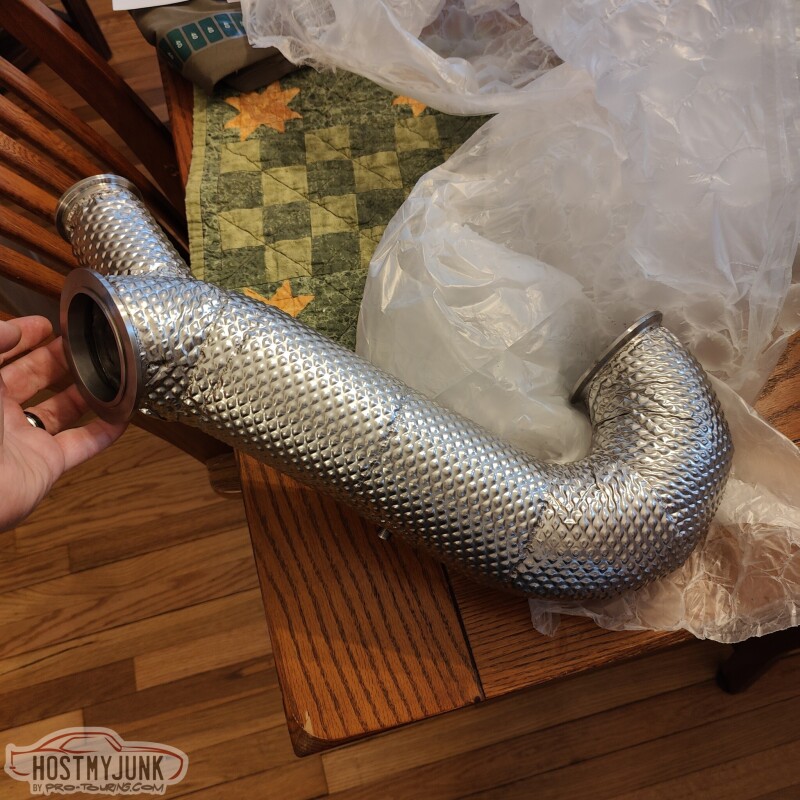
This is the downpipe that feeds the exhaust from the turbine, under the car.
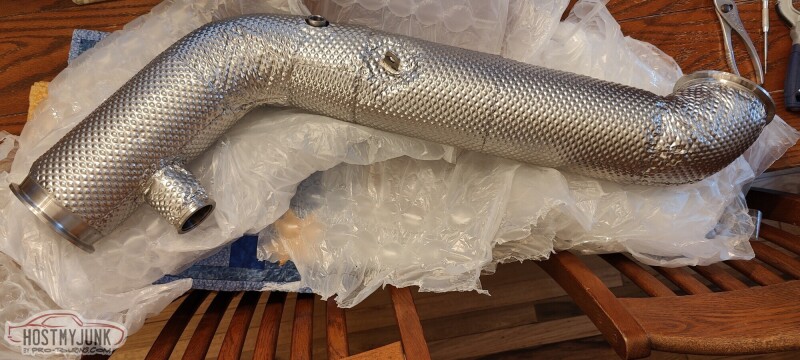
The rest of the exhaust will take off from the downpipe.
Andrew1970 GTO Version 3.0
1967 Cougar build
GM High-Tech Performance feature
My YouTube Channel Please Subscribe!
Instagram @projectgattago
Dr. EFI
I deliver what EFI promises.
Remote Holley EFI tuning.
Please get in touch if I can be of service.
"You were the gun, your voice was the trigger, your bravery was the barrel, your eyes were the bullets." ~ Her
03-09-2023 #675 Registered User
- Join Date
- Nov 2000
- Location
- O-town
- Posts
- 4,284
We did this to the Space Shuttle fuel lines that ran through the aft compartment since the first launch in 81'
Steve68- 1968 Camaro SS LSX T56, 12bolt 3:90's, 18" Fikse Profil 13s, Deep Fathom Green paint, Spearcos, just bunch of old junk because another member said so, LOL
70 Nova SS street/drag 454, T400, 3:55, ugly!
03-10-2023 #676 Registered User
- Join Date
- May 2012
- Location
- Kansas City, Missouri
- Posts
- 666
Those turned out great. Love the look.
03-10-2023 #677
-Moderator/Sponsor-
- Join Date
- Apr 2001
- Location
- The City of Fountains
- Posts
- 15,977
It doesn't surprise me that this technology trickled down from the Aerospace industry. Then it made it into professional motorsports and now down to the consumer level. Much like AN fittings, turbo and super sharpers, and probably a lot more. Originally Posted by Steve68
Thanks Ron! Originally Posted by thumper877
Andrew1970 GTO Version 3.0
1967 Cougar build
GM High-Tech Performance feature
My YouTube Channel Please Subscribe!
Instagram @projectgattago
Dr. EFI
I deliver what EFI promises.
Remote Holley EFI tuning.
Please get in touch if I can be of service.
"You were the gun, your voice was the trigger, your bravery was the barrel, your eyes were the bullets." ~ Her
03-10-2023 #678
Registered User
- Join Date
- Nov 2000
- Location
- O-town
- Posts
- 4,284
[QUOTE=andrewb70;1388203]It doesn't surprise me that this technology trickled down from the Aerospace industry. Then it made it into professional motorsports and now down to the consumer level. Much like AN fittings, turbo and super sharpers, and probably a lot more.
Yes sir, that it did, covers on the turbo pumps too, all the fuel lines were vacuum jacketed, that's the same technology that keeps your drink cold or hot in your Yeti or Artic cups!
Car is looking great!Steve68- 1968 Camaro SS LSX T56, 12bolt 3:90's, 18" Fikse Profil 13s, Deep Fathom Green paint, Spearcos, just bunch of old junk because another member said so, LOL
70 Nova SS street/drag 454, T400, 3:55, ugly!
03-10-2023 #679
-Moderator/Sponsor-
- Join Date
- Apr 2001
- Location
- The City of Fountains
- Posts
- 15,977
I appreciate the comments and suggestions. I too had reservations about the upper coilover mount, but ridetech insisted there would not be a problem. As for the sway bar mount, there is actually a gusset on the frame, right inside the red area that you drew. It is right where the white line is drawn. I drew the line there to avoid drilling holes where the gusset was, for bolt clearance. Originally Posted by Blown353
Andrew
Thanks Steve! Originally Posted by andrewb70
Andrew1970 GTO Version 3.0
1967 Cougar build
GM High-Tech Performance feature
My YouTube Channel Please Subscribe!
Instagram @projectgattago
Dr. EFI
I deliver what EFI promises.
Remote Holley EFI tuning.
Please get in touch if I can be of service.
"You were the gun, your voice was the trigger, your bravery was the barrel, your eyes were the bullets." ~ Her
03-10-2023 #680
-Moderator/Sponsor-
- Join Date
- Apr 2001
- Location
- The City of Fountains
- Posts
- 15,977
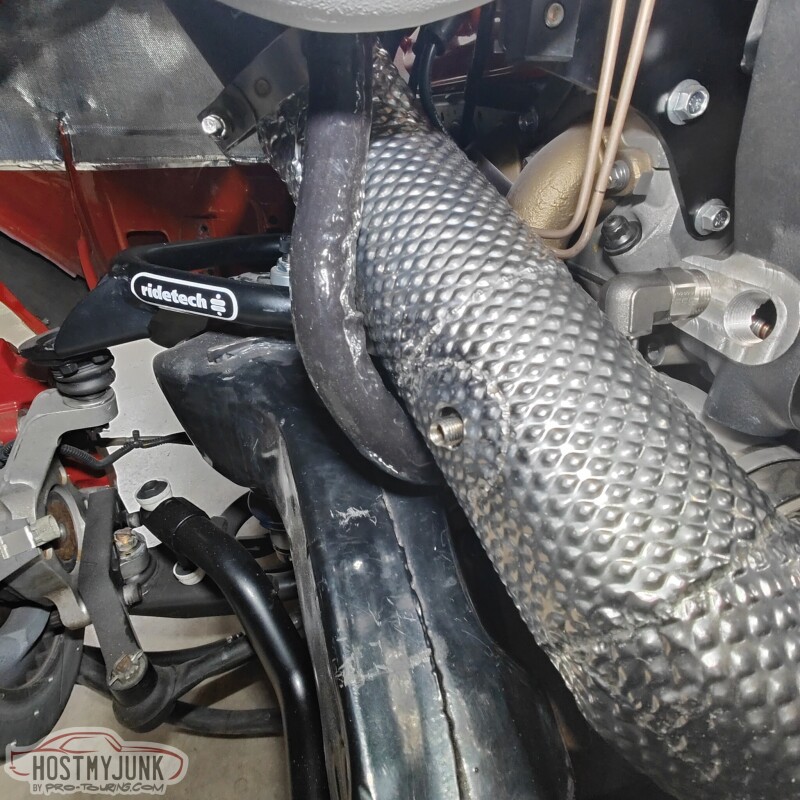
I brought the pipes over to Vic's and installed them, hopefully for good. The downpipe fits great, although it is about 1/8 inch away from the frame. I am hoping the cladding will keep the powder coating on the frame from burning off.
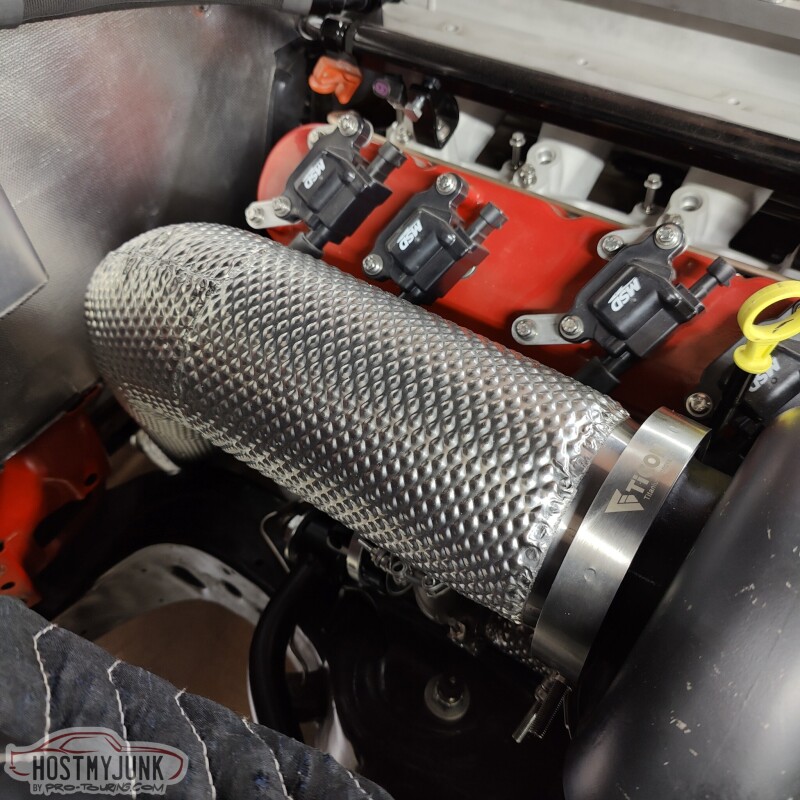
Here is the up-pipe, going from the Hooker exhaust manifold to the turbine inlet. If you look closely, you can see the bung for the EGT probe.
Here is the wastegate plumbing. The wastegate itself will get a little blanket, as will the turbine housing. Both from Funk Motorsports in England.
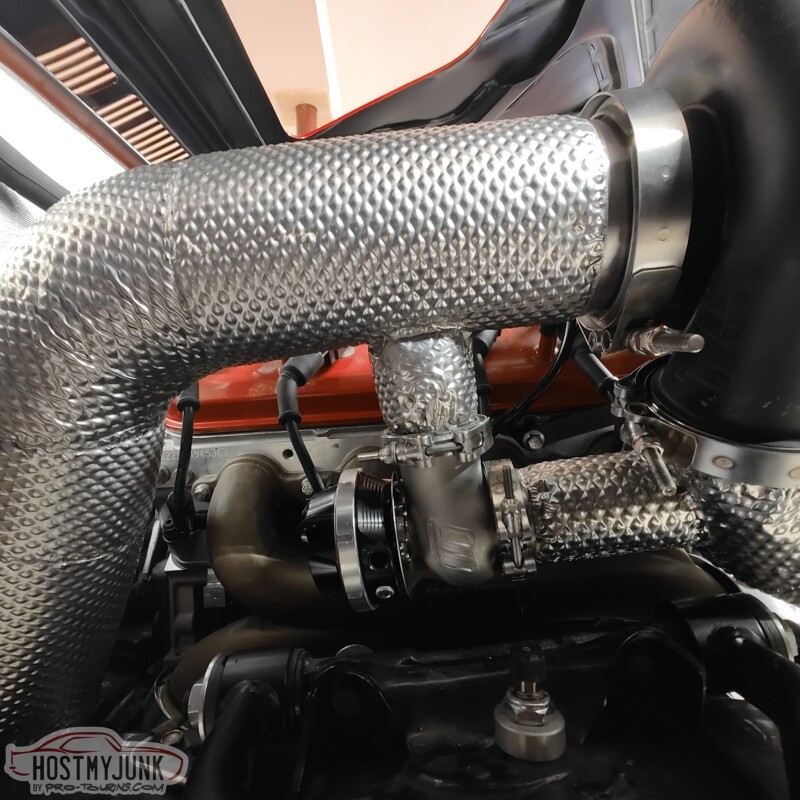
Here you can see the oil drain. Remember, it is stainless steel, but I also added an insulating sleeve over the top. The EGT bung is also clearly visible.
This is just an overall shot of how things are looking.
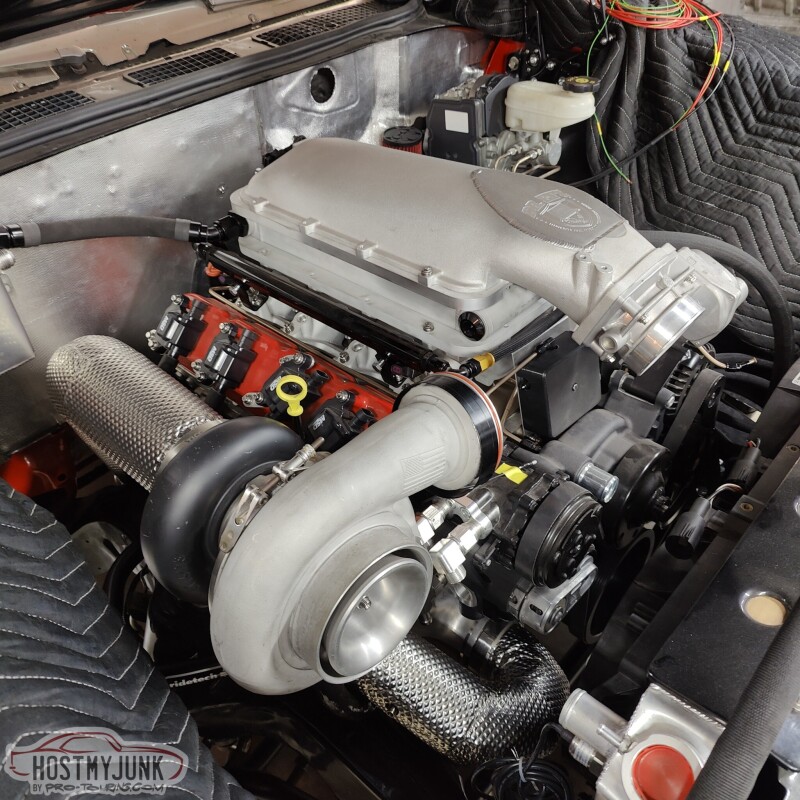
The yellow dipstick handle needs to go...
Andrew1970 GTO Version 3.0
1967 Cougar build
GM High-Tech Performance feature
My YouTube Channel Please Subscribe!
Instagram @projectgattago
Dr. EFI
I deliver what EFI promises.
Remote Holley EFI tuning.
Please get in touch if I can be of service.
"You were the gun, your voice was the trigger, your bravery was the barrel, your eyes were the bullets." ~ Her

 Reply With Quote


